
SHM 600 A1 - Blender SILVERCREST - Free user manual and instructions
Find the device manual for free SHM 600 A1 SILVERCREST in PDF.
| Product type | Handheld portable scanner |
| Brand | SILVERCREST |
| Model | SHM 600 A1 |
| Dimensions (L x H x D) | approx. 25.9 x 3 x 2.8 cm |
| Weight (without accessories) | approx. 146 g |
| Power supply | 2 AA 1.5V batteries (LR6/Mignon) |
| Resolution | 300 dpi (LOW) or 600 dpi (HIGH) |
| Image sensor | Color contrast image sensor, 5138 dots |
| File format | JPEG |
| External memory | Micro SD memory card up to 32 GB |
| Interface | USB 2.0 |
| Auto power-off | 3 minutes |
| Operating temperature | +5 °C to +40 °C |
| Humidity (without condensation) | 5% to 90% |
| Main functions | Color or black/white scanning, text recognition (NimoDoc Lite software), white balance calibration |
| Maintenance and cleaning | Housing: damp cloth and mild detergent; lens: provided cleaning cloth |
| Safety | Do not expose to moisture, use only specified batteries, do not open the device yourself |
| Warranty | 3 years |
| After-sales service (France) | Tel.: 0800 919270, e-mail: kompernass@lidl.fr, IAN 73767 |
Frequently Asked Questions - SHM 600 A1 SILVERCREST
User questions about SHM 600 A1 SILVERCREST
0 question about this device. Answer the ones you know or ask your own.
Ask a new question about this device
Download the instructions for your Blender in PDF format for free! Find your manual SHM 600 A1 - SILVERCREST and take your electronic device back in hand. On this page are published all the documents necessary for the use of your device. SHM 600 A1 by SILVERCREST.
USER MANUAL SHM 600 A1 SILVERCREST
Operating instructions
DE AT CH HANDSCANNER
Bedienungsanleitung
FR
Before reading, unfold the page containing the illustrations and familiarise yourself with all functions of the device.
Information for these
operating instructions .62
Copyright 62
Limited liability 62
Warnings 63
Intended use. 63
Safety. 64
Interaction with batteries . 64
Basic Safety Instructions.. 65
Commissioning . . .66
Safety instructions. 66
Items delivered and
transport inspection 66
Disposal of the packaging 67
Inserting/replacing the
batteries 67
Operating Elements .68
Handling and
operation. 69
Insertion/exchange of the
Micro-SD memory card . . 69
Formattling the Micro SD
memory card 69
Setting Time and Date . . . 70
Setting the Scan Resolution 71
Setting the Scan Mode...71
Scanning 71
Perform calibration. 72
LED Indicators. 73
Viewing the scanned
documents/images. 73
Connection to a computer 73
Installation of the program
mme NimoDoc Lite. 74
Launching the programme
NimoDoc Lite 75
Cleaning. 83
Safety instructions. 83
Cleaning. 83
Troubleshooting . . .84
Malfunction causes and
remedies. 84
Storage/Disposal .86
Storage. 86
Disposal of the appliance. 86
Disposing of the batteries. 86
Appendix. 87
Technical data 87
Minimum PC requirements 88
Notes on the Declaration
of Conformity 88
Warranty 89
Service 90
Importer 90
Introduction
Information for these operating instructions
Congratulations on the purchase of your new appliance. You have clearly decided in favour of a quality product.
These operating instructions are a component of the mobile Hand Scanner SHM 600 A1 (henceforth designated as the appliance) and they supply you with important information for intended use, safety and connection as well as operation of the appliance. The operating instructions must be constantly kept available close to the appliance. They are to be read and applied by everyone occupied with operating and troubleshooting the appliance. Retain these operating instructions and pass them on, with the appliance, to any future owners.
Copyright
This documentation is copyright protected.
All reproductions or duplications, also as extracts, as well as representations of the illustrations, even in an altered state, are only permitted with the written approval of the manufacturer.
Limited liability
All technical information, data and instructions for connection and operation contained in this operating manual correspond to the latest available at the time of printing and, to the best of our knowledge, take into account our previous experience and know-how. No claims can be derived from the details, illustrations and descriptions in these instructions. The manufacturer assumes no responsibility for damage caused by failure to observe the instructions, improper use, incompetent repairs, making unauthorised modifications or for using unapproved replacement parts.
Warnings
In these operating instructions the following warnings are used:

WARNING
A warning at this risk level indicates a possible dangerous situation.
If the dangerous situation is not avoided it could lead to injuries.
The directives in this warning are there to avoid personal injuries.
IMPORTANT
A warning at this risk level indicates possible property damage.
If the situation is not avoided it could lead to property damage.
Follow the instructions in this warning to avoid property damage.
NOTICE
A notice indicates additional information that assists in the handling of the appliance.
Intended use
This appliance is intended solely for non-commercial use in the scanning and digitising of documents and images. This appliance is not intended for any other use or for uses beyond those mentioned. Claims of any kind for damage resulting from unintended use will not be accepted. The user alone bears liability.
Safety
In this chapter you receive important safety information regarding the handling of the appliance. This appliance complies with the statutory safety regulations. Incorrect usage can lead to personal injury and property damage.
Interaction with batteries

WARNING
Danger from improper use! The risk of explosions and leakages exists!
For safe handling of batteries observe the following safety instructions:
Do not throw batteries into a fire.
Do not short circuit batteries.
Do not attempt to recharge batteries.
Regularly check the condition of the batteries. Leaking battery acid can cause permanent damage to the appliance. Special caution should be shown when handling damaged or leaking batteries. Risk of acid burns! Wear protective gloves.
- Store batteries in a place inaccessible to children. If swallowed, seek IMMEDIATE medical attention.
If you do not intend to use the appliance for an extended period, remove the batteries.
Basic Safety Instructions
For safe handling of the appliance observe the following safety information:
Before use, check the appliance for visible external damage. Do not put into operation an appliance that is damaged or has been dropped.
This appliance is not intended for use by individuals (including children) with restricted physical, physiological or intellectual abilities or deficiencies in experience and/or knowledge unless they are supervised by a person responsible for their safety or receive from this person instruction in how the appliance is to be used.
Children should be supervised to ensure that they do not play with the appliance.
Repairs should only be carried out by authorised specialist companies or by the Customer Services department. Incompetent repairs can result in significant risks for the user. In addition, warranty claims become void.
A repair to the appliance during the warranty period may only be carried out by a Customer Service department authorised by the manufacturer, otherwise no additional warranty claims can be considered for subsequent defects.
Defective components may only be replaced with original replacement parts. Only by using original replacement parts can it be guaranteed that the safety requirements are being complied with.
- Do not make any unauthorised modifications or alterations to the appliance.
- Protect the appliance from moisture and liquid penetration. Do not place containers filled with fluids, such as vases, adjacent to the appliance.
Do not use the appliance adjacent to open flames.
GB
Commissioning
Safety instructions

WARNING
Personal injury and property damage may be caused during the commissioning of the appliance!
- Packaging material should not be used as a play thing. There is a risk of suffocation!
Items delivered and transport inspection
The appliance is delivered with the following components as standard:
- Hand Scanner
- 2GB Micro SD memory card including adapter for SD memory card
- 2 x 1.5 V Batteries Type AA / LR6 / Mignon
Programme CD
Storage case - USB Cable
- Cleaning cloth
- Paper for white balance calibration
- Operating Manual
NOTICE
Check the contents to make sure everything is there and for visible damage.
If the contents are not complete or are damaged due to defective packaging or through transportation, contact the service hotline (see chapter Service).
Disposal of the packaging
The packaging protects the appliance from transport damage. The packaging materials are selected from the point of view of their environmental friendliness and disposal technology and are therefore recyclable.

The recirculation of packaging into the material circuit saves on raw material and reduces the amount of waste generated. Dispose of packaging material that is no longer needed as per the regionally established regulations.
NOTICE
If possible, preserve the appliance's original packaging during the warranty period so that, in the event of a warranty claim, you can package the appliance ideally for its return.
Inserting/replacing the batteries
Open the battery compartment cover on the upperside of the appliance by sliding the cover to the right and then lifting it off.
Insert two batteries of type AAA (supplied) into the battery compartment 2.
Close the battery compartment 2 by replacing the cover and sliding it to the left.
Operating Elements (see fold-out side Figure A)
1 Button / :On/Off switch; Start/end scan process
2 Battery compartment
3 Button FORMAT: Format the Micro-SD memory card
4 Insertion slot for Micro SD memory card
USB port
6 Button TIME SET: Setting Time and Date
7 LED ERR: Scanning speed is too high
LED SCAN: Scan is being performed
9 Display
10 Button C/BW: Setting the Scan Mode
11 Taste DPI: Setting the Scan Resolution
Display representations (see fold-out side Figure B)
12 Display SD Card: Photos are being stored on the Micro-SD memory card
13 Display effect: Documents are being scanned in colour or black/white
Counter: Indicates the number of scanned files on the Micro-SD memory card
15 Selected resolution: HIGH: 600 dpi; LOW: 300 dpi
16 Battery indicator: Battery is full; Battery is empty
Handling and operation
In this chapter you receive important information in regard to the handling and operation of the appliance.
Insertion/exchange of the Micro-SD memory card
The appliance requires a Micro SD memory card (supplied) to be able to scan and save documents or pictures.
Switch the appliance off with the button / 1.
Insert the Micro SD memory card with the metal contacts facing upwards into the slot 4 and carefully press the card until it clicks into place.
IMPORTANT
Do not press the Micro-SD memory card into the slot with force. The appliance and the memory card could be damaged.
Formatting the Micro SD memory card
When using a new Micro SD memory card, this must be formatted prior to scanning.
NOTICE
Formatting erases all data saved on the Micro-SD memory card.
Switch the appliance off with the button / 1
Insert the Micro SD memory card with the metal contacts facing upwards into the slot 4 and carefully press the card until it clicks into place.
Switch the appliance on with the button / SCAN 1.
Using a blunt and thin object, such as the end of a paper clip, press the button FORMAT ③. In the display ⑨ appears a F.
Press the button (1) / SCAN 1 to start formatting the Micro-SD memory card. In the display the indicator for the SD card 12 will blink until formatting is complete.
GB
Setting Time and Date
Switch the appliance on with the button / 1.
Using a blunt and thin object, such as the end of a paper clip, press the button TIME SET ⑥. In the display ⑨ appears ! ## for the year, whereby # # stands for a series of digits that will be changed to match the actual time and date.
Press the button C/BW 10 or DPI 11 to select the current year.
Press the button / SCAN to confirm the setting. In the display 9 appears 已 ##.
Repeat the last two action steps to set the month, day, hour and minute.
After setting the minute (#, #), press the button TIME SET ⑥ once again to exit the setting of date and time.
| Display | Setting |
| 1 ## | Year |
| 2 ## | Month |
| 3 ## | Day |
| 4 ## | Hour |
| 5 ## | Minute |
Setting the Scan Resolution
Press the button DPI ① to choose between either the high resolution (HIGH = 600 dpi) or the low resolution (300 dpi = LOW). In the display ⑨ either HIGH or LOW is indicated.
Setting the Scan Mode
Press the button C/BW to choose between either the colour mode (COLOR) or the black / white mode (MONO). In the display 9 either COLOR or MONO is indicated.
Scanning
NOTICE
To scan, please ensure that the appliance is not connected to a computer and the Micro-SD memory card is inserted.
Switch the appliance on with the button / SCAN 1.
Place the document on a flat surface and hold it down firmly with one hand.
Place the appliance on the edge of the paper. Ensure that the scan area between the markings for the scan width (▶), which are marked on the side of the appliance, is maintained.
Hold the appliance pressed flat against the document and press the button / SCAN 1 once. The LED SCAN glows.
Proceed slowly with the appliance over the document whilst keeping your hand steady, so as to achieve the best quality for the scanned document.
Press the button / once again to stop scanning.
NOTICE
To conserve the batteries, the appliance switches off automatically after 3 minutes of not being in use.
GB
Perform calibration
NOTICE
Perform a calibration only if the white balance needs to be reset. A white balance is recommended if it should be that the lightest point in scanned images, which in reality should be white, in fact appears in a shade of grey.
Place the appliance on the paper supplied for white balance calibration then switch the appliance on with the button /SCAN 1.
Press and hold the button C/BW ⑩ and then press the button ①/SCAN ① to switch into calibration mode. In the display ⑨ the indicator for the SD card ⑫ will blink until the internal memory is deleted. Subsequently, the LED SCAN ③ and the LED ERR ⑦ glow.
NOTICE
The documents/pictures extant on the Micro-SD memory card will be retained even after the deletion of the internal memory.
Do not move the appliance until the LED ERR 7 extinguishes. The LED SCAN 3 continues to glow.
Now begin to scan the paper by moving the appliance over the white paper until the LED SCAN 8 extinguishes (push the appliance backwards if necessary).
The calibration process is finished. Switch the appliance off with the button ( ) /SCAN 1.
LED Indicators
LED SCAN ③ lights up green: Scan is being performed.
LED SCAN ⑧ does not light up: Standby mode/Scan complete.
LED ERR ⑦ lights up orange: Scanning speed too high/Scan blurred.
LED ERR ±b does not light up: Faultless scanning speed.
Viewing the scanned documents/images
To transfer your data from the Micro-SD memory card, use either the supplied SD card adapter or connect the appliance directly to a computer with the USB cable.
Connection to a computer
System Requirements
You require a computer with a free USB port and, as the operating system, either Microsoft® Windows® XP SP2, Windows® Vista, Windows® 7 or Mac OS® 10.4 or higher.
Connect the appliance to your computer via the USB cable and switch it on with the / button. Your computer should recognise the appliance as a "Removable Medium".
Click on "Open folder to display files" to view and import the scanned images.
NOTICE
If you have switched the auto start function off and the removable medium does not appear automatically, go to My Computer (PC) and search for the appliance under "Removable Medium".
Installation of the programme NimoDoc Lite
NOTICE
- Please note that the programme NimoDoc Lite only functions with Windows PCs. Mac users will need an alternative software or need to emulate a Windows environment.
The illustrations and descriptions refer to the operating system Microsoft® Windows® 7. The screen display may, depending on the display settings, vary with other operating systems.
Place the supplied software CD into the CD-ROM drive of your computer. The window "Automatic Playback" is displayed.
Click on the "Run NimoDoc.exe" button. The installation starts and the start window is displayed.
NOTICE
If you have switched the auto start function off and the installation process does not start automatically, start the installation process by double-clicking the file "NimoDocLite.exe" in the root directory of the CD.
Click on the button "Install NimoDoc Lite" to install the programme "NimoDoc Lite". The installation wizard will now guide you through the installation process. After successful installation, a display appe
Click on the button "Finish". The launch window is displayed once again.
Click on the button "Exit" to end the installation programme.
Launching the programme NimoDoc Lite
Start the programme by double clicking on the programme icon on the desktop or select the corresponding entry in the Start Menu.
The main window is opened.

- Menu bar
- Quick Launch toolbar
- Search field
- Preview area
5.Workspace
Configuring the work space
Click on "MyNimoDoc" in the work space with the right mouse button. A context menu opens.
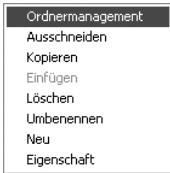
Click on "File Management" with the left mouse button. A new window with the file management will open.
Click on "Add" to select a file from your hard disc or appliance.
After you have selected a file, click on "Save". The selected file will now be displayed in the work space and all documents or images to be processed can be stored in this file.
Importing images from the appliance
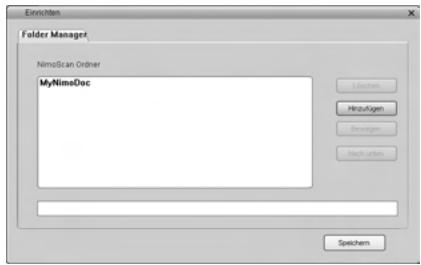
Click in the Quick Launch bar on "Open" to take over images from the appliance into a document file. The window "Open" appears.
Here, select whether you want to import an entire file (folder) or a single file (image) into a document folder. In addition, you can also filter as to which file formats are to searched for.
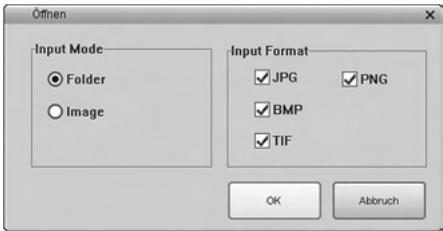
Click on "OK" and then select the folder or individual file that you wish to import. A new document folder with the imported images is created.
Click on the document folder with the right mouse button and, under "resume", assign a descriptive name for the document folder.
NOTICE
The images from your appliance can be found on the newly recognised removable medium in the directory DCIM/100Media.
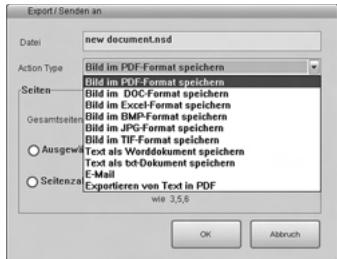
Export images of a document folder
You can export the collected images and documents in a documents folder in various file formats.
First, select the appropriate document file and then click on "Save" in the main screen.
Another window then opens in which you can specify in which file format the document folder is to be issued.
Text Recognition
Click in the Quick Launch bar on "Open" to take over an image from the appliance. The window "Open" appears.
Select the Input Mode "Image" and click on "OK".
Specify the path to your image, mark the image and then click on "Open". The image will now appear in the preview area.
By double clicking on the image the editing interface opens.
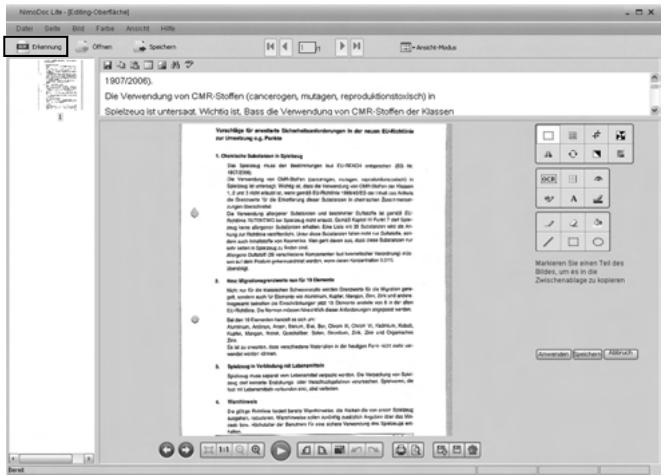
Click on "Recognition". Another window will open in which you can specify which language is to be used in the image.

Select the appropriate language and click on "OK". The editor starts with the recognition of the text.
In the Quick Launch toolbar click on "Save" in the editing interface and select the file format to be exported, e.g. " Save text as a Word document".
Specify a path and file name and click on "Save".
NOTICE
- Ensure that on the scanned image the text runs horizontally, otherwise the text recognition does not work. If this is not the case, rotate the image with the left/right buttons in the lower area of the screen and save it again.
Toolbar
On the right side of the display there is the tool bar, which provides you with various editing tools:
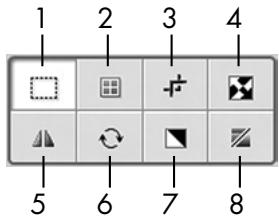
- Marking of image areas
- Adjustment of brightness, contrast, saturation and colour
- Cutting tool
- Convert colours
- Mirror function
- Function for rotating the images
- Black and white saturation
- Create black and white image
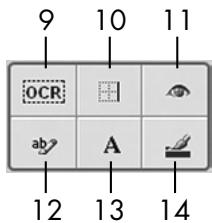
- Text Recognition
- Function for trimming the edges
- Red eye removal
- Insert notes into the image
- Insert text into the image
- Ballpoint pen function
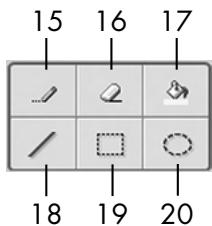
- Pencil function
- Eraser
- Colourise areas
- Draw lines
- Draw rectangles
- Draw circles
Control bar

GB
- Previous image
- Next image
- Display optimal image size
- Display actual image size
- Zoom out
- Zoom in
- Switch to full screen mode
- Rotate image to the left
- Rotate image to the right
- Resize image (pixel data)
- Undo
- Restore
- Print image
- Open print preview
- Save as
- Save
- Delete
Cleaning
Safety instructions
IMPORTANT
Possible damage to the appliance.
Moisture penetration can cause damage to the appliance.
In order to avoid irreparable damage, when you are cleaning the appliance ensure that moisture cannot penetrate inside it.
GB
Cleaning
Clean the housing exclusively with a soft damp cloth and a mild dishwashing liquid.
Clean the surface of the lens scanner with the supplied cleaning cloth.
Troubleshooting
In this chapter you will receive important information for malfunction localization and remedies. Observe the instructions in order to avoid danger and damage.
GB
Malfunction causes and remedies
The following table will help with localizing and remedying minor malfunctions:
| Defect | Possible cause | Solution |
| The appliance will not switch on. | - Batteries are discharged. - Batteries are not inserted correctly. | - Replace the batteries. - Insert the batteries into the battery compartment correctly. |
| The images cannot be saved when scanning. | - The Micro SD memory card is not fitted. - The Micro-SD memory card is full. - The Micro-SD memory card has not been formatted correctly | - Insert the memory card with the metal contacts facing upwards. - Save the data from the memory card onto a computer. - Format the memory card (see section "For-matting the Micro-SD memory card") |
| The computer does not recognise the appliance after the connection is made (it has not detected removable medium). | Connection error. | - Ensure that all cables are connected properly. If necessary, restart the computer. - Try a different USB port. |
| The images are blurry. | The scanner lens is dirty. | - Clean the scanner lens with the cleaning cloth. - Recalibrate the appliance. |
| The LED ERR ⑦ lights up when scanning a document. | The scanning speed is too high. | To cancel, press the button ( )/SCAN ① and try to scan the document again at a slower speed. |
| The LED ERR ⑦ lights up after switching the appliance on. | The calibration data has been reset. | Recalibrate the appliance. |
NOTICE
If you cannot solve the problem with the aforementioned methods please contact Customer Service.
Storage/Disposal
Storage
If you intend to not use the appliance for an extended period, remove the batteries and store it in the supplied storage bag in a dry and dust-free environment.
Disposal of the appliance

Do not dispose of the appliance into normal household waste. This product is subject to the provisions of European Directive 2002/96/EC-WEEE (Waste Electrical and Electronic Equipment).
Dispose of the appliance through an approved disposal centre or at your community waste facility. Observe the currently applicable regulations. In case of doubt, please contact your waste disposal centre.
Disposing of the batteries
Do not dispose of the batteries with household waste. Every consumer is statutorily obliged to dispose of batteries at a collection centre in his/her community/district or a dealer. This obligation is intended to ensure that batteries are disposed of in an environmentally safe fashion. Dispose of batteries only when they are fully discharged.
Appendix Technical data
| Power supply | 2 x 1.5 V Type AA/Mignon/LR6/R6 |
| Image Sensor | Colour contrast image sensor |
| Number of sensors | 5138 Points |
| Resolution | LOW: 300 x 300 dpi HIGH: 600 x 600 dpi |
| Data format | JPEG |
| Automatic switch-off | 3 Minutes |
| External memory | Micro-SD memory card up to 32GB |
| Interface | USB 2.0 |
| Operating temperature | +5 - +40°C |
| Humidity (no condensation) | 5 - 90 % |
| Measurements (W x H x D) | approx. 25.9 x 3 x 2.8 cm |
| Weight (without accessories) | 146 g approx. |
Minimum PC requirements
| Operating system | Windows® XP SP2, Windows® Vista™, Windows® 7 and Mac OS® 10.4 or higher (Insert the appliance directly, driver installation not required) |
| CPU | Pentium III or higher |
| Main memory | Minimum 256 MB |
| Interface | USB-Port 2.0 |
Notes on the Declaration of Conformity
This appliance satisfies the fundamental requirements and other relevant regulations of the EMC Directive 2004/108/EC.
The complete original declaration of conformity can be obtained from the importer.
CE
Warranty
You receive a 3-year warranty for this appliance as of the purchase date. This appliance has been manufactured with care and meticulously examined before delivery.
Please retain your receipt as proof of purchase. In the case of a warranty claim, please make contact by telephone with our service department. Only in this way can a post-free despatch for your goods be assured.
NOTICE
The warranty covers only claims for material and manufacturing defects, not for transport damage, wearing parts or for damage to fragile components, e.g. buttons or batteries.
This appliance is intended for domestic use only, NOT for commercial purposes. If this product has been subjected to improper or inappropriate handling, abuse, or modifications not carried out by one of our authorised sales and service outlets, the warranty will be considered void.
Your statutory rights are not restricted in any way by this warranty. The warranty period will not be extended as a result of repairs made under warranty. This applies also to replaced and repaired parts.
Damages and defects discovered on purchase are to be reported directly after unpacking, at the latest two days after the date of purchase.
On the lapse of the warranty period, all repairs carried out are liable to charges.
Service

Service Great Britain
Tel.: 0871 5000 720 (£ 0.10/Min.)
E-Mail: kompernass@lidl.co.uk
IAN73767
GB
Importer
KOMPERNASS GMBH
BURGSTRASSE 21
44867 BOCHUM, GERMANY
www.kompernass.com
KOMPERNASS GMBH
Burgstraße 21
D-44867 Bochum
www.kompernass.com


- Safety. 64
- Commissioning . . .66
- Operating Elements .68
- Handling and
- operation. 69
- Cleaning. 83
- Troubleshooting . . .84
- Storage/Disposal .86
- Appendix. 87
- Introduction
- Information for these operating instructions
- Copyright
- Limited liability
- Warnings
- WARNING
- A warning at this risk level indicates a possible dangerous situation.
- IMPORTANT
- A warning at this risk level indicates possible property damage.
- NOTICE
- Intended use
- Safety
- Interaction with batteries
- Danger from improper use! The risk of explosions and leakages exists!
- Basic Safety Instructions
- Commissioning
- Safety instructions
- Personal injury and property damage may be caused during the commissioning of the appliance!
- Items delivered and transport inspection
- Disposal of the packaging
- Inserting/replacing the batteries
- Operating Elements (see fold-out side Figure A)
- Display representations (see fold-out side Figure B)
- Handling and operation
- Insertion/exchange of the Micro-SD memory card
- Formatting the Micro SD memory card
- Setting Time and Date
- Setting the Scan Resolution
- Setting the Scan Mode
- Scanning
- Perform calibration
- LED Indicators
- Viewing the scanned documents/images
- Connection to a computer
- System Requirements
- Installation of the programme NimoDoc Lite
- Launching the programme NimoDoc Lite
- Configuring the work space
- Importing images from the appliance
- Export images of a document folder
- Text Recognition
- Toolbar
- Control bar
- Cleaning
- Possible damage to the appliance.
- Troubleshooting
- Malfunction causes and remedies
- Storage/Disposal
- Storage
- Disposal of the appliance
- Disposing of the batteries
- Appendix Technical data
- Notes on the Declaration of Conformity
- Warranty
- Service
- Importer
- KOMPERNASS GMBH
Brand : SILVERCREST
Model : SHM 600 A1
Category : Blender