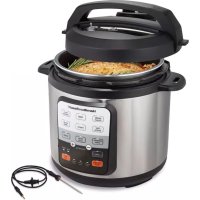
34506 - Pressure Cooker HAMILTON BEACH - Free user manual and instructions
Find the device manual for free 34506 HAMILTON BEACH in PDF.


User questions about 34506 HAMILTON BEACH
0 question about this device. Answer the ones you know or ask your own.
Ask a new question about this device
Download the instructions for your Pressure Cooker in PDF format for free! Find your manual 34506 - HAMILTON BEACH and take your electronic device back in hand. On this page are published all the documents necessary for the use of your device. 34506 by HAMILTON BEACH.
USER MANUAL 34506 HAMILTON BEACH
hamiltonbeach.com For recipes, tips and product information.
When using electrical appliances, basic safety precautions should always be followed to reduce the risk of fire, electric shock, and/or injury to persons, including the following:
- Read all instructions.
- This appliance is not intended for use by persons (including children) with reduced physical, sensory, or mental capabilities, or lack of experience and knowledge, unless they are closely supervised and instructed concerning use of the appliance by a person responsible for their safety.
- Close supervision is necessary when any appliance is used by or near children. Children should be supervised to ensure that they do not play with the appliance.
- Do not touch hot surfaces. Use handles or knobs. Use pot holders when removing hot containers.
- To protect against a risk of electrical shock, do not immerse cord, plug, or base in water or other liquid.
- Unplug from outlet when not in use and before cleaning. Allow to cool before putting on or taking off parts. To unplug, grasp the plug and pull from the outlet. Never pull from the power cord.
- Do not operate any appliance with a damaged supply cord or plug, or after the appliance malfunctions or has been dropped or damaged in any manner. Supply cord replacement and repairs must be conducted by the manufacturer, its service agent, or similarly qualified persons in order to avoid a hazard. Contact Customer Service for information on examination, repair, or adjustment as set forth in the Limited Warranty.
- The use of accessory attachments not recommended by the appliance manufacturer may cause injuries.
- Do not use outdoors.
- Do not let cord hang over edge of table or counter or touch hot surfaces, including the stove.
- Do not place on or near a hot gas or an electric burner, or in a heated oven.
-
Extreme caution must be used when moving an appliance containing hot oil or other hot liquids.
-
Avoid sudden temperature changes, such as adding refrigerated foods into a heated warming pot.
- To disconnect, press keep warm/cancel button, then remove plug from wall outlet. To unplug, grasp the plug and pull from the outlet. Never pull from the power cord.
- Do not use appliance for other than intended use.
- CAUTION: To prevent damage or shock hazard, do not cook in base. Cook only in removable pot.
- Cooking pot and heating element may remain hot until unit is turned off. Allow to cool before touching.
- WARNING! Spilled food can cause serious burns. Keep appliance and cord away from children. Never drape cord over edge of counter, never use outlet below counter, and never use with an extension cord.
- Intended for countertop use only.
- This appliance cooks under pressure. Improper use may result in scalding injury. Make certain unit is properly closed before operating. See "Using Pressure Cook Modes."
- Always check the pressure release devices for clogging before use.
- When in pressure cook mode, do not fill the unit over 2/3 full. When cooking foods that expand during cooking such as rice or dried vegetables, do not fill the unit over 1/2 full. Overfilling may cause a risk of clogging the vent pipe and developing excess pressure. The result of excess pressure is steam being released from the excessive pressure valve. See "Pressure Cooking Modes" chart.
-
Be aware that certain foods, such as applesauce, cranberries, pearl barley, oatmeal or other cereals, split peas, noodles, macaroni, rhubarb, or spaghetti can foam, froth, and sputter, and clog the pressure release device (steam vent). These foods should not be cooked in pressure cook mode.
-
Do not open the pressure cooker until all internal pressure has been released. If the lid is difficult to turn, this indicates that the cooker is still pressurized - do not force it open. Any pressure in the cooker can be hazardous. See "Using Pressure Cook Modes."
- Do not use this pressure cooker for pressure frying with oil.
-
WARNING! Burn Hazard. Steam is hot. Avoid contact with steam. Use care when releasing steam.
-
Do not operate the appliance by means of an external timer or separate remote-control system.
- Do not lift or carry the pressure cooker using lid handle; use both handles provided on base.
- Do not insert the probe into probe hole when unit is in pressure.
- CAUTION: HOT SURFACE. The temperature of accessible surfaces may be high when the appliance is operating.
SAVE THESE INSTRUCTIONS
Other Consumer Safety Information
This appliance is intended for household use only.
This appliance is only intended for the preparation, cooking, and serving of foods. This appliance is not intended for use with any nonfood materials or products.
WARNING Electrical Shock Hazard: This product is provided with a polarized plug (one wide blade) to reduce the risk of electric shock. The plug fits only one way into a polarized outlet. Do not defeat the safety purpose of the plug by modifying the plug in any way or by using an adapter. If the plug does not fit fully into the outlet, reverse the plug. If it still does not fit, have an electrician replace the outlet.
The length of the cord used on this appliance was selected to reduce the hazards of becoming tangled in or tripping over a longer cord. To avoid an electrical circuit overload, do not use another highwattage appliance on the same circuit with this appliance.
Parts and Features
Before first use: Wash Cooking Pot, Lid, Roasting Rack, Rice Measuring Cup, Rice Paddle, and Removable Condensation Collector in hot, soapy water. Rinse and dry.
To order parts, visit: hamiltonbeach.com/parts
| 1 Probe End |
| 2 Probe Hole Stopper |
| 3 Temperature Probe |
| 4 Rice Paddle |
| 5 Rice Measuring Cup |
| 6 Roasting Rack |
| 7 Lid Handle |
| 8 Handles |
| 9 Ease |
| 10 Control Panel/Display |
| 11 Probe Jack |
| 12 Cooking Pot |
| 13 Probe Hole (on Lid) |
| 14 Lid |
| 15 Steam Release Valve |
| 16 Removable Condensation Collector |
| 17 Lid Tab |
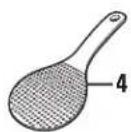
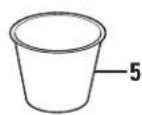
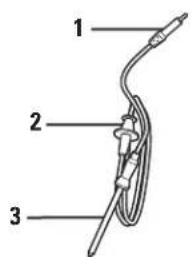
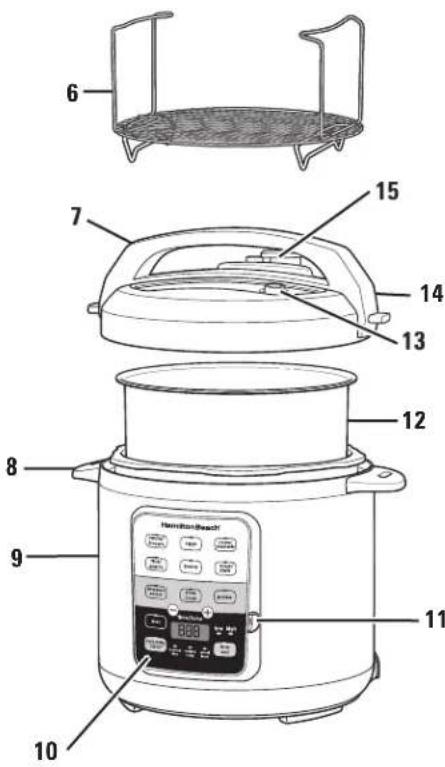
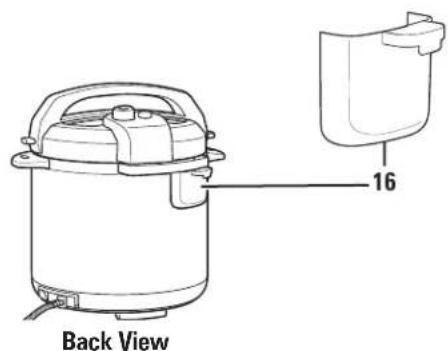
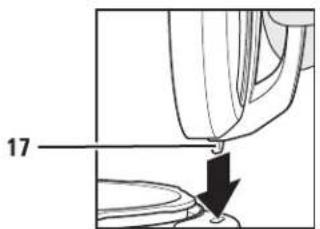
NOTE: To rest Lid, using oven mitt to hold Lid, insert Lid Tab into opening of base handle. *Do not carry Pressure Cooker by Lid Handle, which is only to be used for easy opening and locking Lid.
Parts and Features (cont.)
| 16 | Steam Release Valve Open ( ) and Closed ( )cons |
| 17 | Pressure Safety Indicator/Float Valve |
| 18 | Excessive Pressure Valve |
| 19 | Removable Steam Release Valve Cover and Stem Cap (stem not shown) |
| 20 | Removable Gasket |
| 21 | Probe Hole Cover (on underside of Lid) |
| 22 | + and - Buttons |
| 23 | Clean Button |
| 24 | Keep Warm/Cancel Button |
| 25 | Preset Cook Modes |
| 26 | Programmable Cook Modes |
| 27 | Low or High Slow Cook/Pressure Cook Settings |
| 28 | Delay Start Button |
| 29 | Display Indicator Lights |
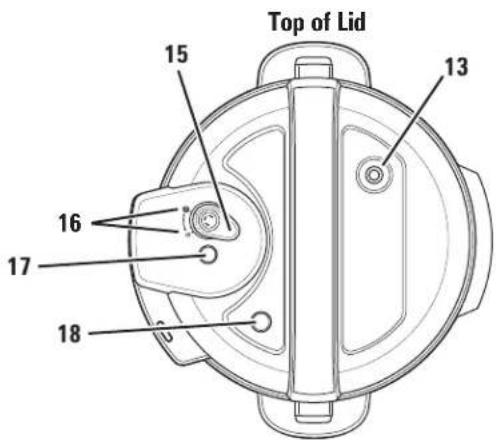
NOTE: Use care when inserting Gasket. Stretching Gasket will allow steam to escape from between Base and Lid.
Always replace worn Gasket with new manufacturer's Gasket. Visit hamiltonbeach.com/parts.
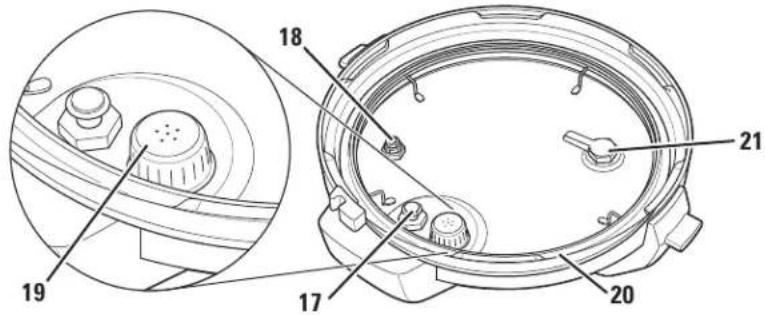
Underside of Lid
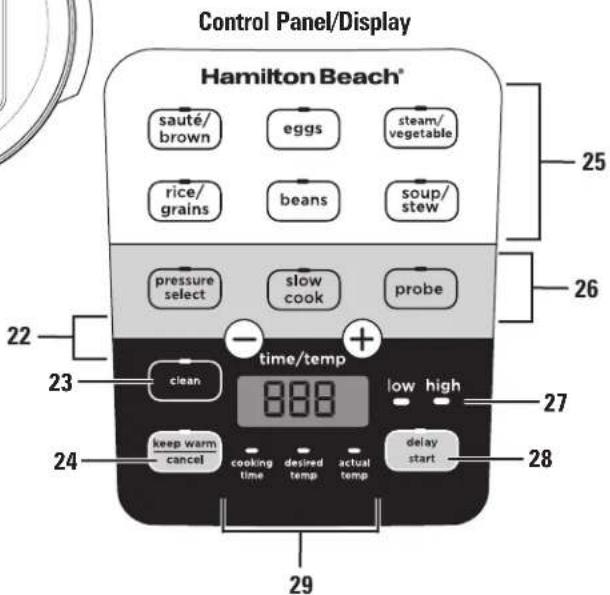
Meet Your Pressure Cooker
A WARNING Burn Hazard. Steam is hot. Avoid contact with steam. Use care when releasing steam.
Cooking with pressure differs greatly from normal cooking methods. A pressure cooker is essentially a cooking pot with a sealed, lockable lid and a valve to control pressure. Once the pot is sealed, steam is captured and pressure builds up, raising cooking temperature and dramatically reducing cooking time. The pressure also forces liquid into food so it stays juicy and tender while deep, rich flavors develop quickly, and the high temperature allows food to brown and caramelize, despite the moist environment.
This Pressure Cooker has a unique Temperature Probe Function. Use Temperature Probe to ensure desired cooking results without having to check your food. When using Temperature Probe, be sure to use a Quick Pressure Release (see below).
Pressure Levels
When choosing pressure levels, remember that pressure is measured in psi (pounds per square inch).
High Pressure - 10 to 13 psi. High pressure is recommended for almost all foods. The higher the pressure, the faster food cooks.
Low Pressure - 6 to 9 psi. Used for delicate foods. Lower pressure cooks food slower when compared to high pressure.
Releasing Pressure Steam
When the cooking cycle is complete, steam must be released before the Lid can be opened. The Lid should open without force. There are two ways to release steam:
Natural release - After cooking time ends, Cooker will switch to keep warm mode. Allow Cooker to cool down naturally until Pressure Safety Indicator/Float Valve drops down and Lid unlocks. This may take 10 to 30 minutes or more, depending on amount of food. During natural release, food is still warm and may continue to cook for the amount of time it takes to release steam.
Quick release - When cooking cycle is complete, using an oven mitt, carefully turn Steam Release Valve to to release steam until Pressure Safe Indicator/Float Valve goes down. Be sure to keep your oven mitt on with your face and arms away from steam when releasing pressure.
Before first use
- Follow assembly instructions (see "How to Assemble"), but pour in 3 cups (711~mL) of water instead of food.
- Insert Probe Hole Cover into Probe Hole from underside of Lid to prevent steam from escaping.
- Place Lid on Cooker by matching arrow icon on Lid with unlock icon on Base. Rotate Lid clockwise to lock. Arrow icon and lock icon should align.
- Plug into outlet.
- Select high pressure setting by pressing pressure select button.
- Adjust time to 2 minutes by pressing + or - buttons; Cooker will automatically start within 10 seconds.
- Display will show "ON" until pressure is reached, and then lid locks
and cooking time will start to count down. When cooking cycle is complete, Cooker will beep 3 times and switch to keep warm mode.
- Either allow pressure to naturally release, or open Steam Release Valve to quickly release.
-
When all pressure is released, Lid will automatically unlock. Rotate Lid counterclockwise to unlock. Remove Lid carefully, allowing excess moisture on Lid to drain back into Cooking Pot.
-
Press keep warm/cancel to stop Cooker. Unplug. NOTE: Countdown for cooking time will not start until pressure has built in the Cooker and Lid is locked. Average time is 10 to 15 minutes, but can be much longer depending on amount of liquid and food in Cooking Pot.
How to Assemble
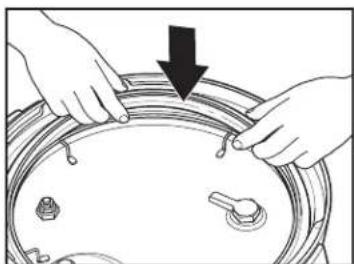
1. Ensure Gasket is properly inserted into Lid. Align Gasket behind metal ring and push Gasket firmly into place.
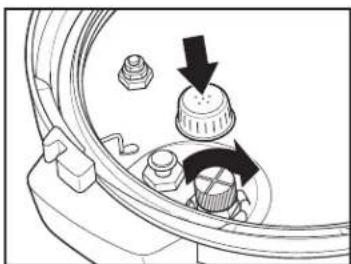
2. On underside of Lid, screw Stem Cap onto Steam Release Valve Stem. Push down Steam Release Valve Cover over Stem Cap. Ensure that Steam Release Valve and Float Valve are clean and free of debris.
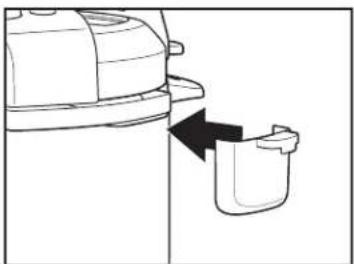
3. Install Condensation Collector at back of Cooker by aligning top of Collector with guides on Cooker and snap into place.

4. Place Cooking Pot into Base, and add a minimum 1 cup liquid to Cooking Pot, then add food.
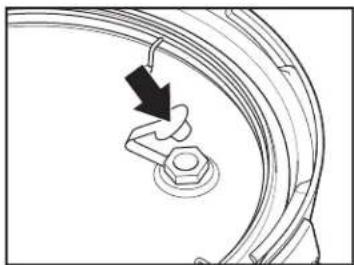
5. Probe Hole Cover or Stopper of Temperature Probe must be secured in place when pressure cooking to prevent steam from escaping. Insert Probe Hole Cover on the underside of Lid up into Probe Hole. NOTE: See page 10 for How to Use Temperature Probe.
6. On top of Lid, place Steam Release Valve on Valve Stem. Leave in open position
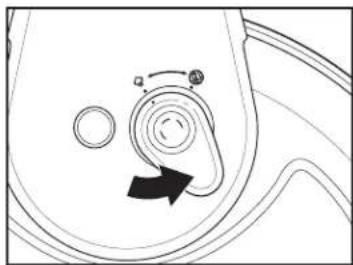
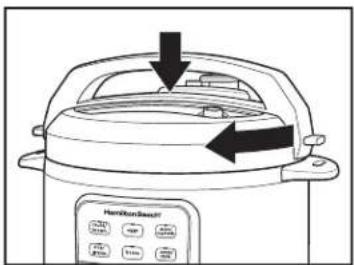
7. Place Lid on Cooker by matching arrow icon on Lid with unlock icon on Base. Rotate Lid clockwise to lock. Arrow icon and lock icon should align.
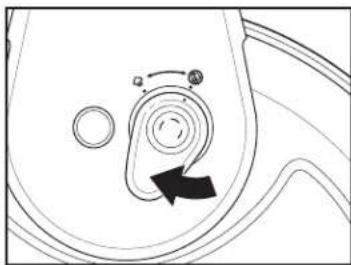
8. Turn Steam Release Valve to closed position (NO NOTE: Do not carry Pressure Cooker by Lid Handle. This Handle is designed for easy opening and locking Lid.
Using Pressure Cooking Modes
A WARNING Burn Hazard. Steam is hot. Avoid contact with steam. Use care when releasing steam.
The Cooker has 6 modes that use pressure and 3 modes that do not use pressure. Refer to the two Cooking Mode charts (Pressure and Non-Pressure) for descriptions, recommendations, default cook times, and pressure levels (if applicable) for each mode. Use Temperature Probe to ensure desired cooking results without checking your food. Probe Hole Cover must be inserted into Probe Hole or Stopper on Temperature Probe on the underside of Lid to prevent steam from escaping while cooking. See pages 10 & 11 for How to Use Temperature Probe, and charts.
-
Once Cooker is assembled (see "How to Assemble"), add food to Cooking Pot.
-
In order to create steam to build pressure, pressure cooking requires liquid in the Cooking Pot. Use a minimum of 1 cup (237 mL) water or other liquid.
-
Do not fill Cooking Pot more than 2/3 full. For foods that expand, such as rice or beans, fill no more than 1/2 full.
-
See Mode in the Pressure Cooking Mode chart. Press a mode to select. Once selected, default pressure level and default cooking time will be displayed.
-
Adjust pressure level and cook time:
-
Pressure level can be changed for any pressure cook mode. Press pressure select button repeatedly to toggle between high and low pressure.
- Adjust cooking time by using the + and - buttons.
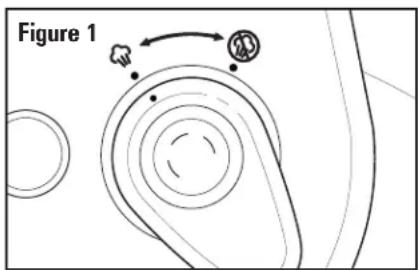
- Steam Release Valve should be in closed (position) (Figure 1).
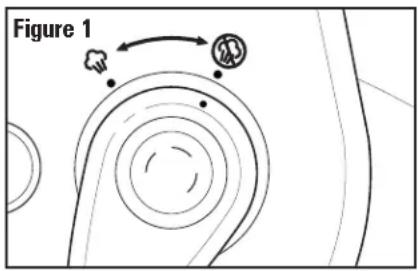
- For manual mode, press pressure select button. Press again to change from low to high. Default cooking time of 35 minutes will be displayed. Adjust cooking time by using the + and - buttons.
- Cooker will start cooking within 10 seconds. Display will show "ON" until pressure is reached, then cooking time will begin to count down. When cooking cycle is complete, Cooker will beep 3 times and automatically switch to keep warm mode.
- Release steam by natural or quick release method. See "Releasing Steam" instructions in "Meet Your Pressure Cooker."
-
Press keep warm/cancel at any time to stop cooking. Display shows "OFF." Always release steam before opening Lid.
-
Unplug.
NOTES:
- When all pressure is released, Lid will automatically unlock. Rotate Lid counterclockwise to unlock. Remove Lid carefully, allowing excess moisture in Lid to drain back into Cooking Pot.
- Be aware that certain foods, such as applesauce, cranberries, pearl barley, oatmeal or other cereals, split peas, noodles, macaroni, rhubarb, or spaghetti can foam, froth, and sputter, and clog the pressure release device (Steam Release Valve). These foods should not be cooked in pressure cook mode.
Pressure Cooking Tips
- Cooking times for pressure cooker recipes can be up to 70% faster than traditional methods. To adapt recipes, start by reducing time by half.
- The amount of liquid needed is much less than traditional cooking methods. To adapt favorite recipes to a pressure cooker, reduce liquid by about half.
- Liquid is required to create steam and build pressure in the Cooker. Always add a minimum of 1 cup (237 mL) water or other liquid.
- Fill Cooking Pot no more than 2/3 full. For foods that expand, such as rice or beans, fill no more than 1/2 full.
- Remember that the countdown for cooking time will not start until pressure has built in the Cooker and Lid is locked. Average time is 10 to 15 minutes, but can be much longer, depending on amount of liquid and food in Cooking Pot.
-
When using pressure cook mode, set Temperature Probe to about 10^(-12^) lower than the recommended temperature settings on the chart. Food will continue to cook while pressure is releasing.
-
When cooking rice, use a 1:1 ratio of rice to water. Rinse rice before cooking.
- Add 1 tablespoon (15 mL) oil to rice or beans to reduce foaming and splattering.
- Beans do not require soaking, but soaking beans for at least 3 hours will yield softer, more consistent results.
- Steam foods by adding at least 1 cup (237 mL) water to bottom of Cooking Pot. Place food on Roasting Rack in Cooking Pot. Press steam/vegetable mode button and follow desired recipe. Frozen vegetables can be steamed from frozen state: add 1 to 2 minutes to the time indicated on package directions.
- For recipe ideas, go to hamiltonbeach.com/recipes.
- For answers to questions about your Pressure Cooker, go to hamiltonbeach.com/frequently-asked-questions.
How to Use Temperature Probe for Pressure Cooking or Slow Cooking
NOTES:
- Do not insert the probe into probe hole when unit is under pressure.
Before every use, make sure the Temperature Probe and stopper are clean and without any dried food particles. - Plug into outlet.
- If needed, place Roasting Rack in Cooking Pot in Base and add food to Roasting Rack. Ensure Temperature Probe cord is not tangled.
- Insert Temperature Probe in center of food and not touching bottom or side of Cooking Pot. For proper Probe placement see Temperature Probe chart on page 11.
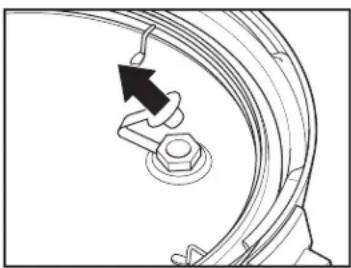
- From the underside of Lid, pull Probe Hole Cover out, as shown in illustration above. Then thread Temperature Probe through Probe Hole on underside of Lid. Feed Probe cord through Hole until Probe Hole Stopper is securely in place to prevent steam from escaping.
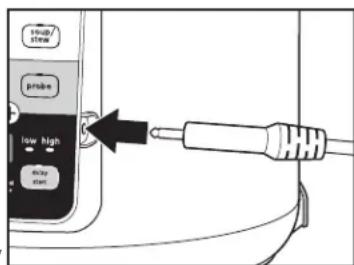
- Insert Probe Jack into side of Control Panel.
Temperature Probe Tips
- Insert Temperature Probe. See Temperature Probe chart on Page 11.
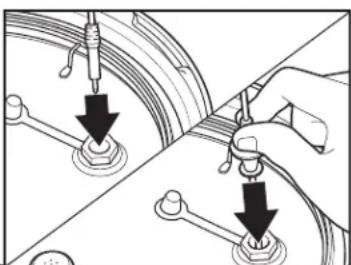
- Press pressure select button to select low or high pressure and then, press Probe Button and press + or - Button to adjust to desired cook temperature.
OR Press Slow Cook Button to select high or low cooking, then, press Probe Button and press ^+ or -Button to adjust to desired cook temperature. See pages 13, 14, and 15 for how to use nonpressure modes, tips and chart.
- For Pressure Cooking Mode, when temperature is reached Pressure Cooker will beep, signaling to release pressure. Beeps will continue until Pressure Cooker is turned off. For Slow Cooking Mode, when cycle is complete, Cooker will beep 3 times and automatically switch to keep warm mode.
NOTES:
- Pressure buildup takes an average of 10 to 15 minutes, but can take 30+ minutes depending on amount of liquid and food in Cooking Pot.
-
Set Temperature Probe to about 10^ (-12^) lower than the recommended doneness temperature on Recommended Settings chart. Temperature may vary depending on size and thickness of meat or poultry. Refer to charts on page 11 and adjust temperature as necessary. Your food will continue to cook while pressure is releasing.
-
Once desired temperature is reached, release pressure immediately. Meat continues to cook while Cooker is pressurized.
- Allow meat to rest for 5 to 10 minutes before carving.
Recommended Settings
Food Slow Cook Pressure Cook
| Beef | 145°F (63°C) 135°F (57°C) |
| Poultry | 165°F (74°C) 155°F (68°C) |
| Shredded Chicken | 180°F (82°C) 170°F (77°C) |
| Eggs | 160°F (71°C) 150°F (66°C) |
| Fish | 145°F (63°C) 135°F (57°C) |
| Pork | 145°F (63°C) 135°F (57°C) |
| Pork Shoulder, shredded | 190°F (88°C) 180°F (82°C) |
NOTE: When using the pressure cook mode, set Temperature Probe to about 10^(-12^) lower than the recommended doneness temperature. Temperature may vary depending on size and thickness of meat or poultry. Refer to charts on this page and adjust temperature as necessary. Food will continue to cook while pressure is releasing. Visit www.foodsafety.gov for more information on safe internal cooking temperatures.
Temperature Probe
Food Placement
Correct Probe Placement
| Steaks, boneless | Insert Probe into thickest part of steak | |
| Beef, pork or lamb roast | Insert Probe into thickest part of roast and away from any bone or cartilage | |
| Chicken breasts | Insert Probe into thickest part of breast and away from any bone or cartilage | |
| Burgers or meatloaf | Insert Probe into center of burger | |
| Fish fillet | Insert Probe into center of thickest part of fillet | |
| Whole Chicken, Turkey breast | Insert Probe into thickest part of breast away from any bones or cartilage |
Pressure Cooking Modes
NOTE: Insert Probe Hole Cover on the underside of Lid up into Probe Hole for all pressure cooking modes.
| DEFAULT SETTINGSPressure Cook Time | PressureCook Time ValveRange DescriPiticianM&decommendations | ||||
| Pressure Level | Cook Time | ||||
| pressure select: Use manu low low 35 min 1 min - 4 hours high 35 min 1 min - 4 hours | pressure level and time | e. Great for u Closed closed | using with combination food recipes. | ||
| soup/stew high 30 min 1 min - 4 hours | min - 4 hours | Closed | Make soup, stews, and broths with delicious depth of flavor. | ||
| eggs high 5 min 1 min - 30 min | Closed | Cook eggs in the shell to your desired doneness. Eggs are steamed, so they peel easily. | |||
| steam/vegetable | low 10 min 0 min - 4 hours | 4 hours | Closed | Steam vegetables or seafood, or reheat food on the Roasting Rack. Use quick release to prevent overcooking. Place at least 1 cup (237 mL) water in Cooking Pot, filling to just under the Roasting Rack. Add food to rack, making sure that water does not touch food. | |
| rice/grains | low | 5 min | 1 min - 4 hours | Closed | Suitable for cooking all types of rice. Best to use natural release. Fill Cooking Pot no more than 1/2 full to allow for rice expansion. |
| beans | 30 min 1 min - 4 hours | Closed | Soaked or unsoaked dry beans can be cooked in less than an hour on this mode. Be sure to cover the beans by at least 1/2 inch of water. Fill Cooking Pot no more than 1/2 full to allow for bean expansion. | ||
Non-Cooking Mode
| clean | high 5 m | n | N/A | Closed | Helps to loosen any stuck on food to make cleaning easier. Add 1/2 cup (118 mL) water and 1/2 cup (118 mL) white vinegar to Cooking Pot and following directions in Care and Cleaning on page 16 under How to use Clean Mode. |
Visit www.foodsafety.gov for more information on safe internal cooking temperatures.
Using Non-Pressure Cooking Modes
Follow directions for assembling Pressure Cooker in "How to Assemble." Press mode button to select. A default time will display. To adjust cooking time, press + or - buttons.
- Saute/brown mode can be used to brown foods or sauté vegetables before pressure cooking, slow cooking, or as a function on its own. Lid should be off while using this mode. Saute/brown time will start to count down when Cooker has reached browning temperature.
- Slow cook mode can be used on low or high heat. To select heat setting, press slow cook button multiple times to toggle through settings. Steam Release Valve should be in open position (Figure 1). Slow cook will automatically start to count down cooking time within 10 seconds. When cycle is complete, Cooker will switch to keep warm for up to a total cooking and warm time of 24 hours.
- Keep warm can be used as a mode for keeping cooked foods at serving temperature. Food must be hot enough to prevent bacterial growth before using keep warm setting. The keep warm setting should only be used after a recipe has been thoroughly cooked. Do not reheat food on keep warm setting. If food has been cooked and then refrigerated, reheat it on slow cook low or high and then switch to keep warm Visit foodsafety.gov for more information. Press button again to cancel all functions, clear time, and return display to "OFF." Use at any time to stop cooking modes.
- Delay start can be used on rice/grains and beans modes. It should only be used with non-perishable foods. Do not use for recipes containing meat, fish, poultry, eggs or milk. Follow USDA food safety guidelines and visit foodsafety.gov for more information. To set a delay start time, select cooking mode and adjust pressure level and cooking time if necessary. Then, press delay start button and adjust to desired delay start time by pressing + or - button. Countdown for delay start will start within 10 seconds. Selected mode will begin when delay countdown is complete.
Slow Cooking Tips
- The Cooking Pot should be at least half full for best results. If only half-filled, check for doneness 1 to 2 hours earlier than recipe time.
- Stirring is not necessary when slow cooking. Removing Lid results in major heat loss and the cooking time may need to be extended. However, if cooking on low, you may want to stir occasionally.
- If cooking soups or stews, leave a 2-inch (5 cm) space between the top of the Cooking Pot and the food so that the recipe can come to a simmer.
-
Many recipes call for cooking all day. If your morning schedule doesn't allow time to prepare a recipe, do it the night before. Place all ingredients in Cooking Pot, cover with Lid, and refrigerate overnight. In the morning, simply place Cooking Pot in Cooker and start cooking.
-
Some foods are not suited for extended cooking in a slow cooker: pasta, seafood, milk, cream or sour cream should be added 2 hours before serving. Evaporated milk or condensed soups are perfect for slow cooking.
- The higher the fat content of meat, the less liquid is needed. If cooking meat with a high fat content, place thick onion slices underneath so meat will not sit on (and cook in) fat.
- Slow cookers allow for very little evaporation. If making your favorite soup, stew, or sauce, reduce liquid called for in original recipe. If too thick, liquid can be added later.
- If cooking a vegetable-type casserole, there will need to be liquid in the recipe to prevent scorching on the sides of Cooking Pot.
- If cooking a recipe with root vegetables, place root vegetables in the bottom of the Cooking Pot.
Non-Pressure Cooking Modes
| Mode | DEFAULT SETTINGSPressureLevel | Cook Time | Pressure Cook Time Valve Range Description and Recommendations | ||
| saute/brown | N/A 30 min | 1 min - 30 min | N/A Use | for browning meats or poultry, or sautéing vegetables. Also use to preheat Cooker to speed up pressure building. Cooker heats to 365°F (185°C) before countdown begins.Lid should be off while using this mode. Cook time will begin countdown when Cooker has reached browning temperature. | |
| slow cook:lowhigh | N/AN/A | 8 hours4 hours | 30 min - 20 hours30 min - 20 hours | Open (Φ)Open (Φ) | True Slow™ cooks like a traditional slow cooker to achieve tender, flavor meals.To select heat setting, press slow cook button multiple times to toggle through settings. Cook time begins countdown within 10 seconds. Once cycle is complete, Cooker will switch to keep warm for up to a total combined cook and warm time of 24 hours. |
| keep warm/cancel | N/A | 4 hours | 10 min - 24 hours | Open (Φ)Keepwarm setting should not be used to cook food, but to keep already cooked food warm. Each program mode automatically switches to keep warm when cycle is complete. Total time is 24 hours, then keep warm shuts off. | |
| delay start | N/A | 6 hours | 10 min - 24 hours | N/A Use | to delay the start time (from 10 minutes to 24 hours) in rice and steam modes only. |
Visit www.foodsafety.gov for more information on safe internal cooking temperatures.
Care and Cleaning
How to use Clean Mode:
Clean Mode is to help loosen any stuck on food to make cleaning easier.
- Add 1/2 cup water and 1/2 cup white vinegar to Cooking Pot in Base.
- Close Probe Hole Cover on underside of Lid.
- Lock Lid in place.
- Turn Steam Release Valve to closed position (No ensure pressure buildup).
- Press Clean Button to start the cleaning process.
- Pressure Cooker will automatically shut off after cleaning is complete. 7. Release steam to open Lid. Unplug and allow to cool.
- Discard vinegar mixture and wash Lid and Cooking Pot in hot, soapy water. Rinse and dry.
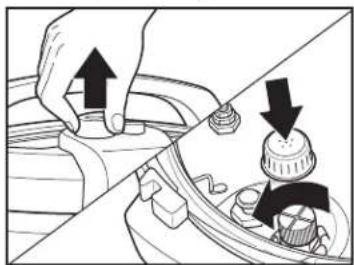
- Pull up Steam Release Valve to remove from Lid. Flip Lid over and pull up Steam Valve Cover from underside of Lid. Unscrew Stem Cap from Steam Release Valve Stem.
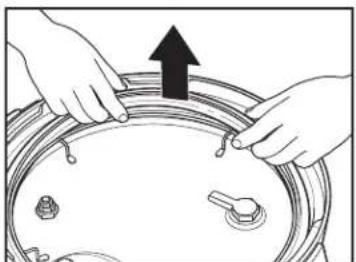
- Unplug. Allow to cool. Remove Gasket from Lid by pulling out from under metal ring.
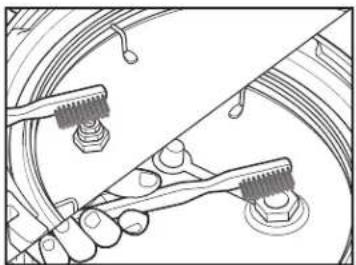
- Hold Lid at an angle, and use a small, soft brush to clear the Probe Hole Cover, Pressure Safety Indicator/Float Valve, and Removable Steam Stem of any debris. Rinse these areas with warm water.
WARNING Electrical Shock Hazard. Disconnect power before cleaning. Do not immerse cord, plug, or base in any liquid.
NOTE: Cooking Pot, Lid Gasket, Roasting Rack, Rice Measuring Cup, Rice Paddle, and Condensation Collector are dishwasher-safe. DO NOT use "SANITIZE" setting when washing in dishwasher. SANITIZE cycle temperatures could damage your product.
-
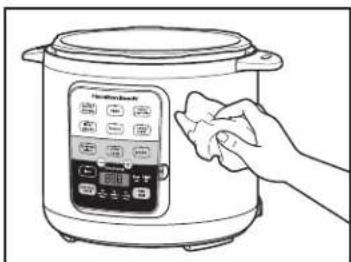
Wipe Base with a soft, damp cloth or sponge. To remove stubborn spots, use a mild, nonabrasive cleanser.
-
Wash Temperature Probe, Steam Release Valve, Steam Release Valve Cover, and Lid with warm, soapy water. Rinse and dry. Ensure that Steam Valve, Steam Valve Stem, and Pressure Safety Indicator/Float Valve are clean and free of debris. Center of Steam Valve Cover must be clear of food before cooking.
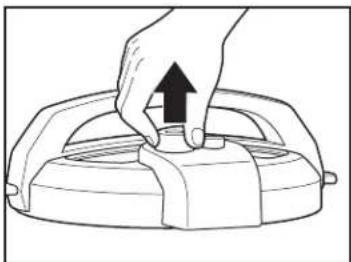
- Replace Steam Release Valve Cover and reinsert Gasket (see Step 1 of "How to Assemble.")
Troubleshooting
Display shows Error Codes 1-9.
- Unit is malfunctioning; visit hamiltonbeach.com.
Display shows ( ) flashing.
- Pressure Cooker Lid is not on Pressure Cooker or Lid isn't on correctly. Place Lid on Cooker by matching arrow icon on Lid with unlock icon on Base. Rotate Lid clockwise to lock. Arrow icon and lock icon should align.
Display shows "ProbE" scrolling across Control Panel Display when in pressure cook or slow cook mode and unit is beeping.
- Temperature Probe is not plugged in. Ensure Temperature Probe is plugged into Probe Jack.
Cooker will not turn on.
- Make sure outlet is functioning properly.
Lid is difficult to close.
-
Make sure Gasket is inserted properly in the underside of Lid.
-
If Cooker has been used to saute/brown or is still warm from previous cooking, there may be a small amount of pressure in Cooker. Move Steam Release Valve to open position (2), close Lid and then move Valve to closed position (3)
Lid will not lock.
-
Gasket is not installed properly.
-
Debris may be blocking Gasket or Valves. Make sure all are clean and free of food.
Pressure Cooker is beeping and "Prob" is on the display.
Probe Jack is not plugged in and probe mode has been selected. Plug Probe Jack into side of Control Panel.
Lid cannot be removed.
- Pressure must be completely released before Lid is unlocked. See "Releasing Steam" instructions in "Meet Your Pressure Cooker."
Cooker takes too long to come to pressure.
- Amount of time to bring to pressure depends on amount of liquid and food in Cooking Pot. Starting temperature of food may also extend time.
Steam is escaping from Cooker during cooking.
- It is normal for some steam to come out of the Float Valve until the Cooker comes to pressure and Lid is locked.
- Lid may not be closed and locked properly.
- Gasket may not be inserted properly or needs to be replaced.
- Valves or Gasket may need to be cleaned to remove debris. See "Care and Cleaning."
Probe Hole Cover or Temperature Probe Stopper may not have been secured in Probe Hole on underside of Lid.
Spattering occurs when steam is released.
- Cooking Pot may be overfilled. Fill no more than 2/3 full, or 1/2 full for foods that expand, such as rice or beans.
- If spattering occurs, wear an oven mitt to protect hand and release pressure in short bursts or allow to natural release.
Food is not done.
- If using Temperature Probe, see Temperature Probe chart on page 11 for proper placement.
- More cooking time is needed. Reset cooking mode and adjust for additional time, or set Cooker to sauté/brown and allow food to simmer longer.
- If low pressure was used, try using high pressure next time.
- Make sure there is enough liquid to create steam and build pressure. A minimum of 1 cup (237 mL) liquid is recommended.
Food is overdone.
- Make sure the proper pressure and cooking time was selected.
- Reduce cooking time or select low pressure.
- If using Temperature Probe, see Temperature Probe chart on page 11 for proper placement.
- Set temperature may vary, depending on size and thickness of meat or poultry. Refer to charts on page 11 and adjust temperature as necessary.
Limited Warranty
This warranty applies to products purchased and used in the U.S. and Canada. This is the only express warranty for this product and is in lieu of any other warranty or condition.
This product is warranted to be free from defects in material and workmanship for a period of five (5) years from the date of original purchase in Canada and one (1) year from the date of original purchase in the U.S. During this period, your exclusive remedy is replacement of this product or any component found to be defective, at our option; however, you are responsible for all costs associated with our returning a product or component under this warranty to you. If the product or component is unavailable, we will replace with a similar one of equal or greater value.
This warranty does not cover glass, filters, wear from normal use, use not in conformity with the printed directions, or damage to the product resulting from accident, alteration, abuse, or misuse. This warranty extends only to the original consumer purchaser or gift recipient. Keep the original sales receipt, as proof of purchase is required to make a warranty claim. This warranty is void if the product is used for other than single-family household use or subjected to any voltage and waveform other than as specified on the rating label (e.g., 120V 60Hz ).
We exclude all claims for special, incidental, and consequential damages caused by breach of express or implied warranty. All liability is limited to the amount of the purchase price. Every implied warranty, including any statutory warranty or condition of merchantability or fitness for a particular purpose, is disclaimed except to the extent prohibited by law, in which case such warranty or condition is limited to the duration of this written warranty. This warranty gives you specific legal rights. You may have other legal rights that vary depending on where you live. Some states or provinces do not allow limitations on implied warranties or special, incidental, or consequential damages, so the foregoing limitations may not apply to you.
To make warranty claim, do not return this appliance to the store. Please write Hamilton Beach Brands, Inc., Customer Service Department, 4421 Waterfront Dr., Glen Allen, VA 23060, or visit hamiltonbeach.com/customer-service in the U.S. or hamiltonbeach.ca/ customer-service in Canada. For faster service, locate the model, type, and series numbers on your appliance.
Notes
PRECAUTIONS IMPORTANTES
- Laundry should be checked before use.
La pantalla parpadea ()L id
Col. Polanco V Seccion,
Miguel Hidalgo
Mixcoac, Benito Juarez,