
40791-IN - Coffee maker HAMILTON BEACH - Free user manual and instructions
Find the device manual for free 40791-IN HAMILTON BEACH in PDF.


| Product Type | Espresso Maker |
| Brand | Hamilton Beach |
| Model | 40791-IN |
| Power Supply | 220-240V~, 50Hz |
| Functions | Brew espresso, steam milk, froth milk |
| Brewing System | Filter holder for ground espresso or ESE pods |
| Milk Frothing | Steam nozzle with frothing capability |
| Controls | Control knob (BREW, STEAM, STANDBY); ON/OFF button |
| Indicators | Green ready light for brew/steam; amber ON light |
| Water Reservoir | Removable, capacity not specified |
| Filter Holder | Two sizes: shallow (1 cup) and deep (2 cups); also accepts ESE pods |
| Included Accessories | Tamping tool, wrench for nozzle tip |
| Cleaning | Hand wash only; not dishwasher safe; steam clean nozzle |
| Safety Features | Automatic shut-off not specified; unplug when not in use |
| Warranty | 2 years limited (India only) |
| User Manual | 16 pages, available for download |
| Customer Support | Phone: 1.800.42.555.43; Website: www.hamiltonbeach.in |
| Intended Use | Household and similar applications |
| Country of Use | India |
Frequently Asked Questions - 40791-IN HAMILTON BEACH
User questions about 40791-IN HAMILTON BEACH
0 question about this device. Answer the ones you know or ask your own.
Ask a new question about this device
Download the instructions for your Coffee maker in PDF format for free! Find your manual 40791-IN - HAMILTON BEACH and take your electronic device back in hand. On this page are published all the documents necessary for the use of your device. 40791-IN by HAMILTON BEACH.
USER MANUAL 40791-IN HAMILTON BEACH
natural_image
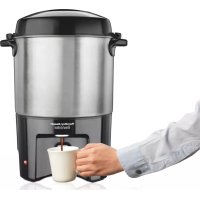
Hamilton Beach self-service milk pump with white cup and saucer (no visible text or symbols)Espresso Maker
Visit www.hamiltonbeach.in for our complete line of products and Use and Care Guides – as well as delicious recipes, tips, and other helpful information!
Questions?
Please call us – our friendly associates are ready to help. 1.800.42.555.43
840231500
7/13
READ BEFORE USE
IMPORTANT SAFEGUARDS
When using electrical appliances, basic safety precautions should always be followed to reduce the risk of fire, electric shock, and/or injury to persons, including the following:
- Read all instructions.
- This appliance is intended to be used in household and similar applications such as: staff kitchen areas in shops, offices, and other working environments; farm houses; by clients in hotels, motels, and other residential type environments; bed and breakfast-type environments.
- Do not touch hot surfaces. Use handles or knobs. Care must be taken, as burns can occur from touching hot parts or from spilled, hot liquid.
- To protect against electric shock, do not place cord, plug, or coffeemaker in water or other liquid.
- This appliance can be used by children aged from 8 years and above and persons with reduced physical, sensory, or mental capabilities or lack of experience and knowledge if they have been given supervision or instruction concerning use of the appliance in a safe way and understand the hazards involved. Children shall not play with the appliance. Cleaning and user maintenance shall not be made by children without supervision.
- Close supervision is necessary when any appliance is used by or near children.
- Unplug from outlet when the coffeemaker is not in use and before cleaning. Allow to cool before putting on or taking off parts and before cleaning the appliance.
- Coffeemaker must be operated on a flat surface away from the edge of counter to prevent accidental tipping.
- Do not operate any appliance with a damaged supply cord, or after the appliance malfunctions or has been damaged in any manner. Supply cord replacement and repairs must be conducted by the manufacturer, its service agent, or similarly qualified persons in order to avoid a hazard.
- The use of accessory attachments not recommended by the appliance manufacturer may cause injuries.
- Do not use outdoors.
- Do not let cord hang over edge of table or counter or touch hot surfaces, including stove.
- Do not place on or near a hot gas or electric burner, or in a heated oven.
- Do not use appliance for other than intended use.
- WARNING To reduce the risk of fire or electric shock, do not remove the bottom cover of the coffeemaker. There are no user-serviceable parts inside. Repair should be done by authorized service personnel only.
SAVE THESE INSTRUCTIONS!
Other Consumer Safety Information
To avoid an electrical circuit overload, do not use another high-wattage appliance on the same circuit with this appliance.
NOTE: For best results, allow the coffeemaker to cool for at least one minute between brewing cycles.
Parts and Features


flowchart
graph TD
    A["Control Knob"] --> B["BREW Knob Position"]
    B --> C["STANDBY Knob Position"]
    C --> D["ON/OFF Button"]
    D --> E["Green Ready Light (for BREW and STEAM)"]
    E --> F["STEAM Knob Position"]
    F --> G["Amber ON Light"]
Before First Use (Priming the Pump)
NOTIcE: Wash all removable parts in warm, soapy water. No parts may be washed in a dishwasher. The water pump must be "primed" before first use to work properly. Operating without water in the reservoir can permanently damage the appliance.
natural_image
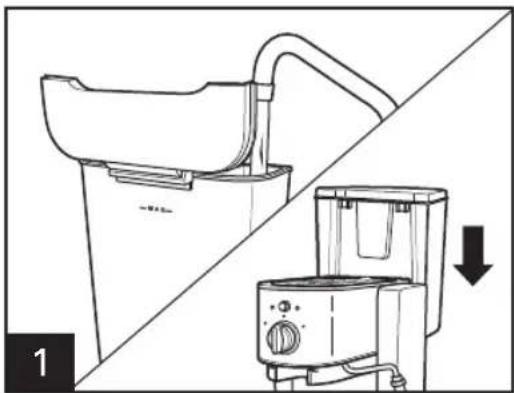
Line drawing of a kitchen appliance with a side panel and a downward arrow indicating a change (no text or symbols)Fill the removable water reservoir to the MAX fill line with cold water and replace securely on the back of unit.

Plug in the unit and press the ON/OFF button to turn unit on. The amber ON light will illuminate.

The ready light will glow green when the water is heated and unit is ready for use. Place an empty container under frothing nozzle in order to catch any drips of water from the steam nozzle.

Turn the control knob to the STEAM setting. Steam will begin to flow from the steam nozzle.

natural_image
Line drawing of a toaster with a cup of coffee being poured into it (no text or symbols)Allow steam to flow for about 2 minutes. NOTE: After the ready light initially glows green, the light may cycle on and off during operation.

Turn the control knob back to the STANDBY position.
Before First Use (cont.)

Place a container under brew head—it should be wide enough to catch water from both spouts. Turn the control knob to BREW and dispense any remaining water from reservoir.

Turn control knob back to the STANDBY position.
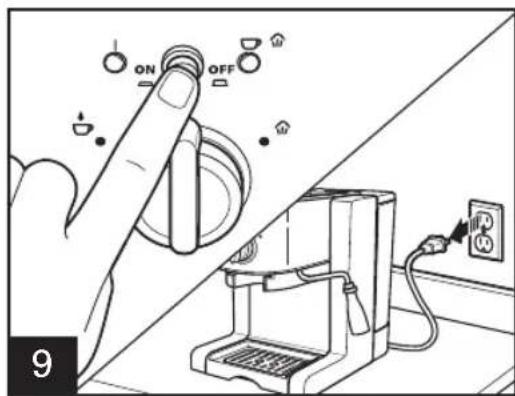
Press ON/OFF button to turn the unit off. The light next to the button will turn off. Unplug the unit.
natural_image
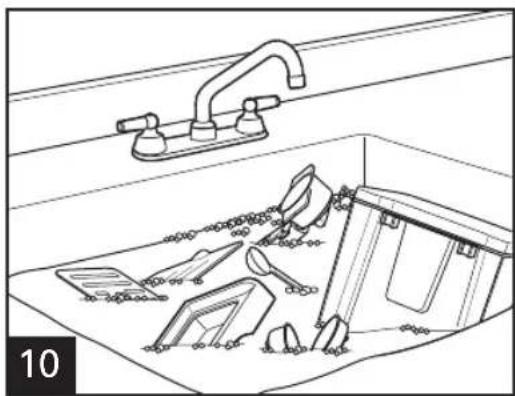
Line drawing of a kitchen sink with fixtures and a faucet (no text or symbols)Wash all parts again with warm, soapy water and dry thoroughly.
WARNING! Shock Hazard. Do not immerse machine, cord, or plug in water or any other liquid. See Cleaning section on page 12 for full instructions.
How to Use
NOTE: Ensure there are no grounds on the rim of the filter holder. This prevents a proper seal from forming and may damage the machine.
natural_image
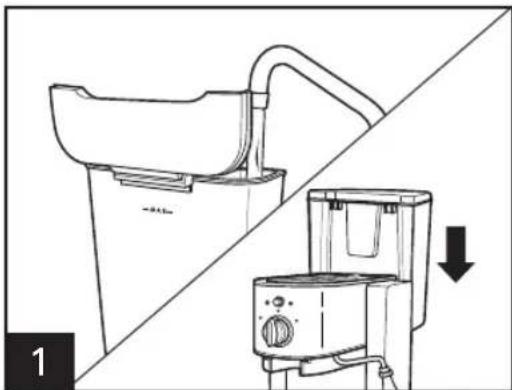
Line drawing of a kitchen appliance with a side panel and a downward arrow indicating a drop (no text or symbols)Fill the removable water reservoir with desired amount of cold water and replace securely on the back of unit.

natural_image
Illustration of a cooking step showing a pot being heated by a hand, with arrows indicating rotation direction (no text or symbols)Align raised dimple on the exterior of espresso/pod filter holder with cutout notch on inside of filter holder. Rotate espresso/pod filter holder 180° to secure in base.

natural_image
Illustration of a food processing step showing mixing and drying steps with a ladle and container (no text or symbols)Place ground espresso holder into filter holder. Add one tablespoon of ground espresso for each cup being made. Use shallow holder for 1 cup and deep holder for 2 cups. Press grounds firmly into holder with tamping tool and ensure no grounds remain on the rim.


natural_image
Illustration of two kitchen utensils with rotating components, showing a step-by-step assembly (no text or symbols)Place pod into filter holder. When using an ESE (Easy Serving Espresso) pod, always use the shallower espresso/pod filter holder. Never put two pods in either filter holder at one time.
How to Use (cont.)

natural_image
Line drawing of a coffee maker with a hand operating the grater (no text or symbols)Holding handle securely, align locking tabs of filter holder with the brew head opening. Insert filter until it slides all the way to the back and cannot be pushed in any further.
natural_image
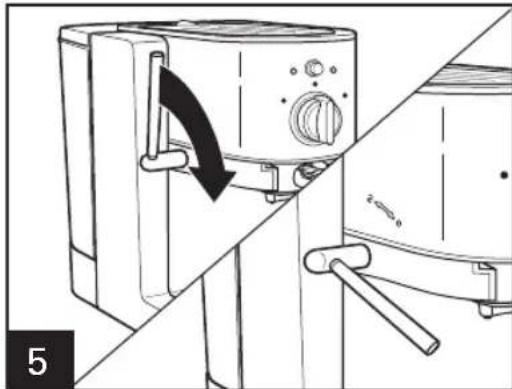
Diagram of a kitchen appliance with a right-handled door and handle, showing a black arrow indicating rotation (no text or symbols present)Pull down on the lever handle to lock the filter holder into place. The lever will be locked when it is slightly below horizontal and cannot be pushed down any further.

Plug in and press the ON/OFF button to turn unit on. The amber ON light will illuminate. The ready light will glow green when the water is heated and unit is ready for use.
natural_image
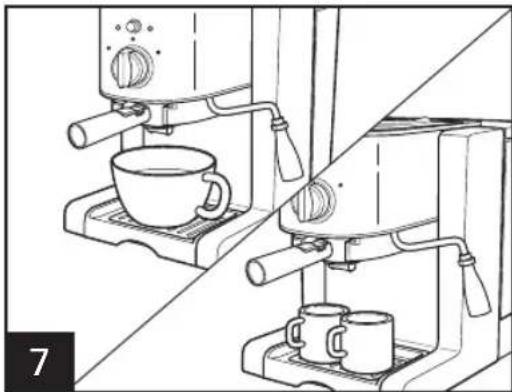
Line drawing of two espresso machines with cups, one on a stand and the other on a machine (no text or symbols)Place one or two cups under brew head spouts. If using one cup, use one wide enough to catch espresso from both spouts.

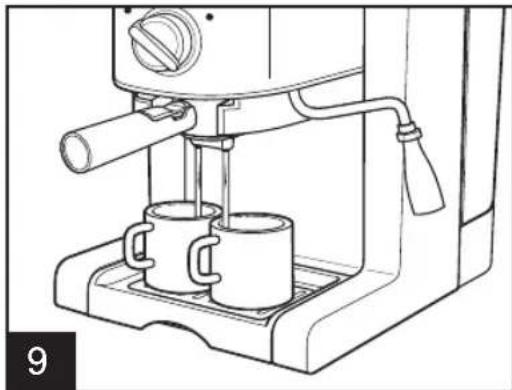
Turn the control knob to BREW 🤒 to begin the flow of espresso.
natural_image
Line drawing of a coffee maker with two mugs and a side arm (no text or symbols)As espresso dispenses, it will gradually look lighter in color. Allow espresso to drip from filter holder for 15–20 seconds before removing cup(s). This will make about 30–45 ml of espresso if using two cups or 60–90 ml if using one cup.
How to Use (cont.)

Turn control knob back to the STANDBY position.
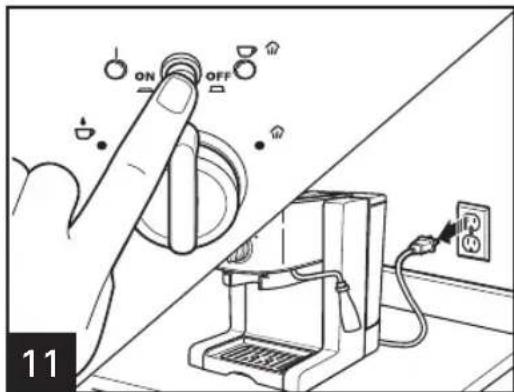
Push ON/OFF button to OFF. Unplug unit from outlet.

natural_image
Line drawing of a coffee machine with a hand operating the cup (no text or symbols)Wait about 1 minute before unlocking the lever and removing filter holder. This will allow any water still flowing through the pump to finish.
NOTES:
- Some water may continue to drip intermittently from brew head. This is normal and a result of product operation.
- This unit has a steam purge in the drip tray that will cycle if there is any water remaining in the heater. Some steam may escape under the drip tray—this is normal.
How to Use (cont.)
natural_image
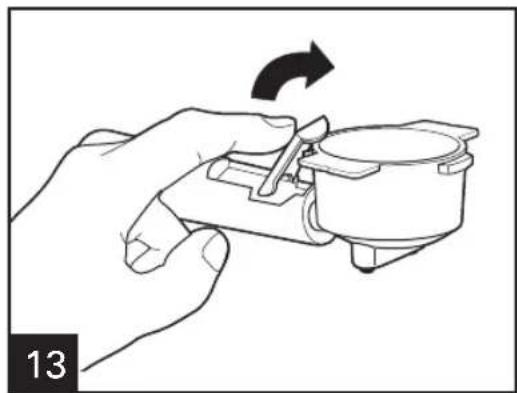
Line drawing of a hand holding a mechanical component with an arrow indicating rotation (no text or symbols)To empty espresso grounds and/or an espresso pod from the filter holder, flip the plastic lever located on the handle of the filter holder and hold the lever open.
cAUTION: The metal parts of the filter holder may be hot.

Keeping thumb on handle lever, dispose of espresso grounds and/or pod filter.

natural_image
Diagram of a cooking pot with an upward arrow indicating a step, no text or symbols presentEnsure filter holder is cool. Align raised dimple on espresso/pod filter holder with cutout notch in filter holder base; then remove.

natural_image
Line drawing of a hand pouring liquid into a faucet with granular base (no text or symbols)Clean filter holder and brew head after each use. See Cleaning instructions on page 12. DO NOT allow grounds to remain in filter holder; this can clog filter holder and cause unit to malfunction.
How to Steam and Froth Milk
WARNING
Burn hazard.
Vapor and water emitted from frothing nozzle are hot.

natural_image
Line drawing of a toilet and toaster with a downward arrow indicating a change (no text or symbols present)Ensure there is water in the removable water reservoir and move the frothing nozzle to the right of the unit.

Plug unit in; press ON/OFF button to begin heating water. The ready light will glow green when the water is heated and unit is ready for use.
natural_image
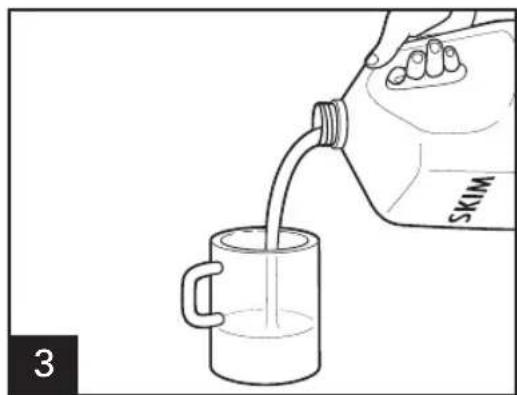
Illustration of a hand pouring liquid from a bag into a mug, labeled 'SKIM' (no text or symbols on the diagram itself)Fill a metal or ceramic cup 1/3 full with cold milk. A stainless steel cup and skim milk are recommended.
natural_image
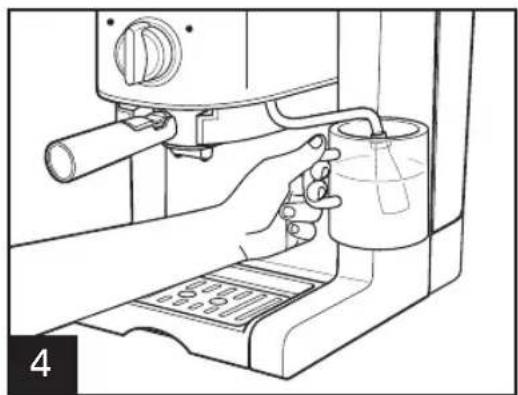
Line drawing of a hand using a coffee maker machine to handle a cup (no text or symbols present)Hold cup underneath frothing nozzle, leaving about 1/4 to 1/2 inch between the nozzle and the bottom of the cup.
How to Steam and Froth Milk (cont.)

Turn the control knob to STEAM 📋. Steam will begin to flow from the nozzle.

natural_image
Line drawing of a hand using a coffee maker to press a cup of liquid (no text or symbols)TO STEAM: Milk is steamed when the cup becomes warm to the touch.
TO FROTH: Making sure there is always milk covering the nozzle, move cup up and down until desired consistency is reached. Froth should be stiff and scoopable with a spoon.
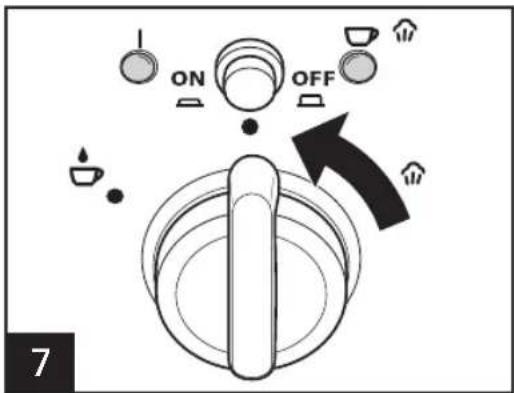
Turn the control knob back to the STANDBY position; then remove cup from underneath frothing nozzle.
NOTE: After each time steaming and to prevent clogging nozzle, hold a cup with water under nozzle and "steam" into the cup to clean.

Push ON/OFF button to OFF. Unplug unit from outlet.
Recipes
| Espresso | Brew one or two cups at a time following directions. Optional: Add sugar to taste. |
| Cappuccino | Mix 1/3 espresso, 1/3 steamed milk, and 1/3 frothed milk. Top with ground nutmeg, ground cinnamon, powdered chocolate, or vanilla to taste. |
| Latte | Mix 1/2 espresso with 1/2 steamed milk. Top with ground nutmeg, ground cinnam- mon, powdered chocolate, or vanilla to taste. |
| Iced espresso, cappuccino, or latte | Mix beverage as described above; then pour over ice. |
| Mocha | Mix 30ml thick chocolate syrup with 1/3 espresso. Fill with frothed or steamed milk. |
Cleaning
WARNING
Electric Shock Hazard.
Disconnect power before wiping exterior of unit or brew head. Do not immerse cord, plug, or base in any liquid.

natural_image
Line drawing of a hand using a grater to press or feed into a coffee cup (no text or symbols present)Make sure unit is turned on and the green ready light illuminated. Turn control knob to STEAM 🔗 position and let steam flow for about 30 seconds into a cup; then turn control knob back to the STANDBY position.

Place a container under brew head wide enough to catch water from both spouts. Turn control knob to BREW and dispense at least one cup of water.

Cleaning (cont.)

Turn control knob back to STANDBY position; then press ON/OFF button to turn unit off. Unplug the unit.

natural_image
Line drawing of hands using a kitchen sink with a spoon and pipe (no text or symbols)Allow unit to cool completely; then remove cover of frothing nozzle and wipe down nozzle with a cloth.
Every other use: Remove nozzle tip with wrench on tamping tool and wash in warm, soapy water.

natural_image
Line drawing of hands operating a kitchen grater with a rack, showing mechanical components and a diagonal line (no text or symbols)Wipe exterior and brew head with warm water and damp cloth carefully.

natural_image
Line drawing of a kitchen sink with fixtures including a faucet, showerhead, and bucket (no text or symbols)Wash all parts with warm, soapy water and dry thoroughly. DO NOT wash any parts in a dishwasher.
Tips for Making Espresso
- For best results, use fresh-ground, dark, espresso roast coffee.
- If espresso preground coffee is used, store the unused portion in an airtight container and keep in a cool, dark area for up to one week.
- The grind of the coffee will affect the taste of the coffee and how the appliance works. If the grind is too coarse, water will flow too fast through the coffee and result in a weaker flavor. If the grind is too fine, the flavor may be too strong or bitter, and the grounds may clog the filter.
- For hotter espresso, preheat the filter holder, the ground espresso filter, and the pod filter by first brewing water into the cups for a few seconds and then emptying the brewed water. CAUTION: The filter holder, ground espresso filter, and pod filter are hot.
- Espresso beans may be ground in a coffee grinder. For best results, use the Hamilton Beach Coffee Grinder on the fine setting. If grinding espresso in a store or using a burr mill, then use a setting that is one to two notches coarser than the espresso setting.
- Grind your espresso so that it looks gritty, like salt or sand. It is too fine if it looks like powder and feels like flour. If the coffee is ground too fine, then the water will not flow through the coffee.
- Espresso pods make it even easier to brew a great cup of espresso and cleanup is as easy as throwing out the used pod. Pods can be purchased at many local coffee houses and specialty housewares stores. A Web search for "coffee pods" will also connect you with many coffee pod suppliers.
• Always use cold water to make coffee. Warm water or other liquids could cause damage to the appliance. - Filtered water will make the best-tasting coffee.
Troubleshooting
Espresso will not flow out.
• Is the water reservoir empty?
• Is the water reservoir properly fitted into position?
• Make sure that the coffee grounds are not overpacked in the filter.
- Is filter holder properly fitted into the espresso maker?
- Clean the filter, filter holder, and brew head.
- Holes in filter holder may be clogged. Clear with a toothpick or straightened paper clip.
Machine is noisy when operating.
• Is the water reservoir empty?
- Is the water reservoir properly fitted into position?
• Is the filter holder properly fitted into position?
Espresso is too weak.
• Always use fresh espresso ground coffee and tamp the ground coffee down firmly.
- The longer the brew time, the weaker the espresso (1 serving = 30 to 45 ml).
- Be sure there is sufficient ground coffee in the filter.
• Coffee grounds are too coarse.
- Try a different brand or roast of coffee.
Espresso is too strong or bitter.
- Too much ground espresso was used.
• Grounds were too fine. - Brew longer before turning control knob back to STANDBY.
• Use the Hamilton Beach Coffee Grinder.
Difficult to froth milk.
• Always use fresh, cold milk (skim milk is recommended).
- Use a cold, stainless steel cup and move the cup slightly up and down while frothing.
- Clean the frothing nozzle.
- Trying to froth too much milk; reduce amount of milk in cup.
Limited Warranty
CUSTOMER NAME:
ADDRESS:
PHONE NUMBER: ____
MODEL NUMBER: ____
DATE OF PURCHASE: BILL NUMBER: ____
NAME OF DEALER:
DEALER'S SIGNATURE:
CUSTOMER'S SIGNATURE: ____
STAMP:
SERIAL NUMBER:
(PLACE SERIAL NUMBER STICKER HERE)
EXPIRY DATE:
SHOULD ANY DEFECT IN MATERIAL OR WORKMANSHIP DEVELOP IN THE PRODUCT,
- CALL 1.800.42.555.43 OR VISIT www.hamiltonbeach.in FOR SERVICE CENTER LOCATIONS OR
- KINDLY TAKE THE PRODUCT TO THE PLACE OF PURCHASE OR
- CALL 1.800.42.555.43 FOR SERVICE AT HOME ^1
THE PRODUCT OR ANY COMPONENT OF PRODUCT FOUND TO BE DEFECTIVE WILL BE REPAIRED OR REPLACED FREE OF CHARGE DURING THE WARRANTY PERIOD OF 2 YEARS, FROM THE DATE OF PURCHASE. IF THE PRODUCT OR COMPONENT IS NO LONGER AVAILABLE, WE WILL REPLACE WITH A SIMILAR ONE OF EQUAL OR GREATER VALUE.
VALIDITY:
- THIS WARRANTY IS ISSUED SUBJECT TO THE PRODUCTION AND VERIFICATION OF THE ORIGINAL PROOF OF PURCHASE.
- THIS WARRANTY IS VALID IN INDIA ONLY AND IF PRODUCT HAS BEEN PURCHASED FROM AN AUTHORIZED HAMILTON BEACH DEALER.
- THIS WARRANTY DOES NOT COVER GLASS, FILTERS, WEAR FROM NORMAL USE, USE NOT IN CONFORMITY WITH THE PRINTED DIRECTIONS, OR DAMAGE TO THE PRODUCT RESULTING FROM ACCIDENT, ALTERATION, ABUSE, OR MISUSE. THIS WARRANTY ONLY EXTENDS TO THE ORIGINAL CONSUMER PURCHASER OR THE GIFT RECIPIENT.
THE WARRANTY WILL BE CONSIDERED INVALID IF:
- PRODUCT HAS NOT BEEN USED PER THE MANUFACTURER'S OPERATING INSTRUCTIONS.
- PRODUCT HAS BEEN SERVICED, REPAIRED, OPENED, OR TAMPERED WITH BY ANY UNAUTHORIZED PERSON.
- UNAUTHORIZED CORRECTION/ALTERATIONS IN INVOICE COPY/INSTALLATION NOTE/SERIAL NUMBER OF PRODUCT.
• INCOMPLETE WARRANTY CARD AFTER PURCHASE. - ANY ATTACHMENTS NOT RECOMMENDED BY THE MANUFACTURER HAVE BEEN USED ON THE PRODUCT.
- PRODUCT IS USED FOR OTHER THAN SINGLE-FAMILY HOUSEHOLD USE OR SUBJECTED TO ANY VOLTAGE AND WAVEFORM OTHER THAN 220–240V\~/ 50Hz.
^1 At-home service is limited to certain geographical areas in India; please call 1.800.42.555.43 for further details.
- Espresso Maker
- IMPORTANT SAFEGUARDS
- SAVE THESE INSTRUCTIONS!
- Other Consumer Safety Information
- Parts and Features
- Before First Use (Priming the Pump)
- Before First Use (cont.)
- How to Use
- How to Use (cont.)
- NOTES:
- How to Steam and Froth Milk
- WARNING
- How to Steam and Froth Milk (cont.)
- Recipes
- Cleaning
- Cleaning (cont.)
- Tips for Making Espresso
- Troubleshooting
- Espresso will not flow out.
- Machine is noisy when operating.
- Espresso is too weak.
- Espresso is too strong or bitter.
- Difficult to froth milk.
- Limited Warranty
- EXPIRY DATE:
- VALIDITY:
- THE WARRANTY WILL BE CONSIDERED INVALID IF:
Brand : HAMILTON BEACH
Model : 40791-IN
Category : Coffee maker