CA80550 - Weather Station LA CROSSE TECHNOLOGY - Free user manual and instructions
Find the device manual for free CA80550 LA CROSSE TECHNOLOGY in PDF.

User questions about CA80550 LA CROSSE TECHNOLOGY
0 question about this device. Answer the ones you know or ask your own.
Ask a new question about this device
Download the instructions for your Weather Station in PDF format for free! Find your manual CA80550 - LA CROSSE TECHNOLOGY and take your electronic device back in hand. On this page are published all the documents necessary for the use of your device. CA80550 by LA CROSSE TECHNOLOGY.
USER MANUAL CA80550 LA CROSSE TECHNOLOGY
text_image
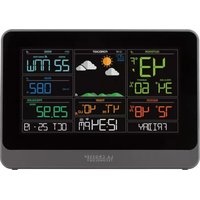
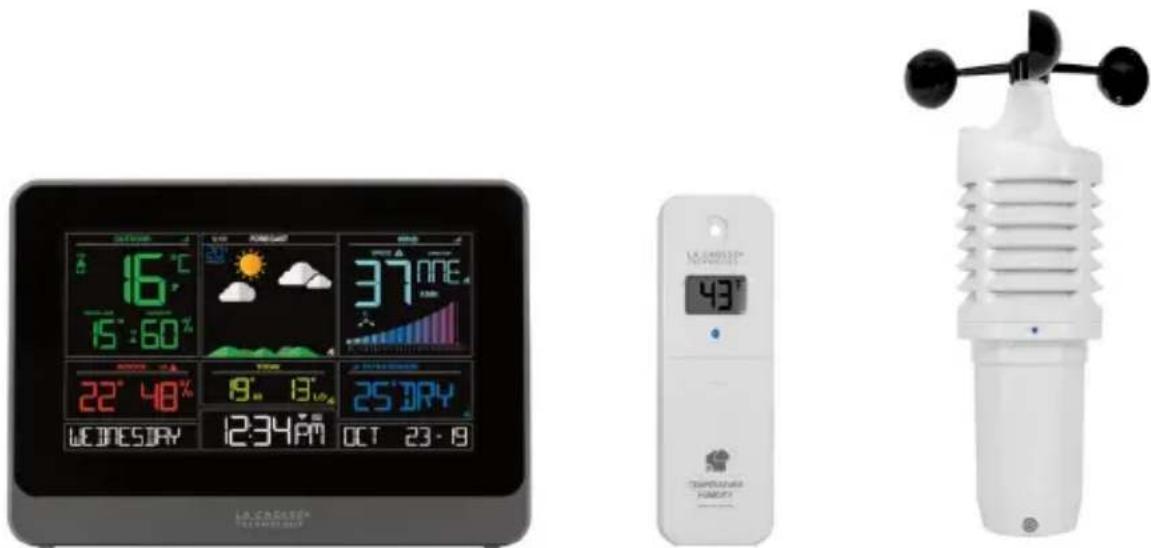
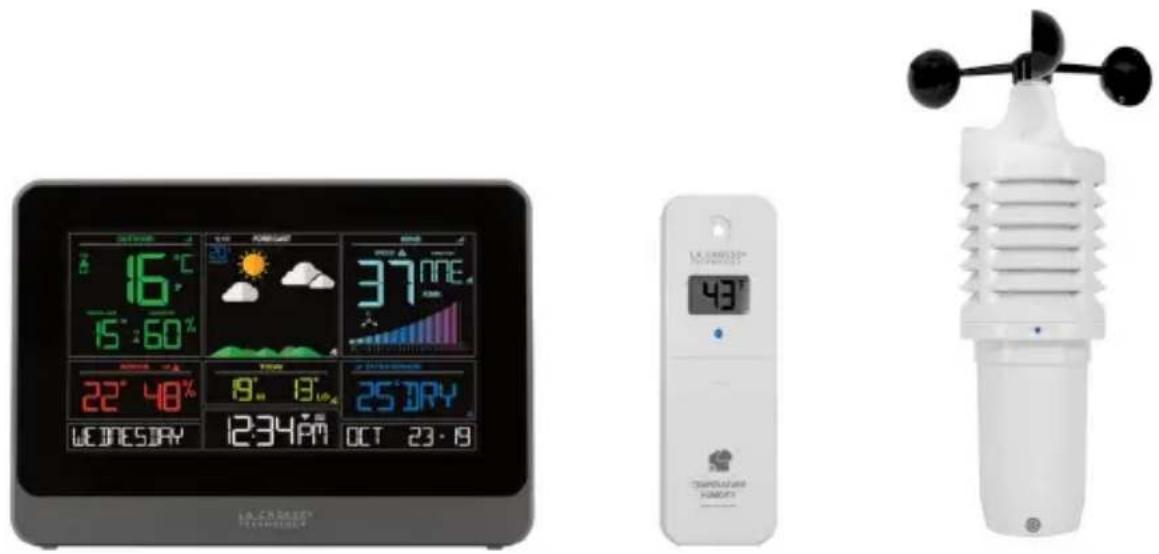
LA CROSSE® TECHNOLOGYWI-FI WIND & WEATHER STATION WITH AccuWeather FORECAST
INSTRUCTION MANUAL
text_image
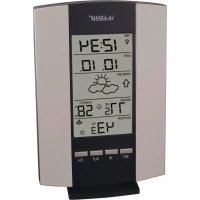
16°C 15:60% 37°NNE. 22°48% 9°13° 25°DRY 12:34PM OCT 23·8 LA CHALETH TECHNOLOGY 48° TEMPORARY MOUNTWelcome!
Congratulations on your new Wind & Weather Station and welcome to the La Crosse Technology family! This product was designed with you in mind by our hometown team of weather enthusiasts based in La Crosse, Wisconsin.
Model: CA80550
DC: 082219
WI-FI WIND & WEATHER STATION Page I 1
TABLE OF CONTENTS
3 Quick Setup
4 Quick Mounting Tips
4 Weather Station Icons
5 Connect to La Crosse View™ App
8 Benefits of Connecting to La Crosse View™
9 Enhanced Weather Forecasts w/La Crosse View™
9 Advanced Forecast & Chance Precipitation
10 AccuWeather Daily Forecasts
11 AccuWeather Hourly Forecasts
12 AccuWeather HI/LO Temperatures
12 AccuWeather Wind Direction
13 Custom Data Streams
14 Add Sensors to your app
14 Status Messages when Connected
16 Button Functions
16 Adjustable Backlight
17 Auto Dim Backlight
18 Settings Menu
19 Extra Sensor Area
21 Wind Speed Readings & History
23 Temperature/Humidity Readings & HI/LO Records
24 Alerts
26 Feels Like Temperature
26 Temperature Trend Arrows
27 Relative Pressure Reading
27 Sensor Reception Indicators
28 Sensor ID and Search
29 Delete Sensors
29 Low Battery Indicators
30 Factory Restart Station
30 Detailed Sensor Setup and Mounting
33 Join the Conversation
33 Care and Maintenance
33 Warranty and Support
34 Specifications
35 FCC Statement
36 Canada Statement
QUICK SETUP
- Insert 2 - C batteries into your LTV-W1 Wind Sensor.
- Insert 2 - AA batteries into your LTV-TH2 Thermo-Hygro Sensor.
- Insert the power cord into your CA80550 station. Remove the yellow insulation tab from the CR2032 battery compartment found on the back of your station.
- Download the La Crosse View™ App (App Store or Google Play)
- Follow along with our instructional videos to connect your station to the app:
http://bit.ly/LaCrosseView_Support_Vid_01_1
http://bit.ly/LaCrosseView_Support_Vid_01_2 - Mount your sensors in appropriate locations.
WARNING:
- This product contains a Button Cell Battery.
- If swallowed, it could cause severe injury or death in just 2 hours.
- Seek medical attention immediately.
WARNING - KEEP BATTERIES OUT OF REACH OF CHILDREN
- Swallowing may lead to serious injury in as little as 2 hours or death, due to chemical burns and potential perforation of the oesophagus.
- If you suspect your child has swallowed or inserted a button battery, immediately seek urgent medical assistance.
- Examine devices and make sure the battery compartment is correctly secured, e.g. that the screw or other mechanical fastener is tightened.
- Do not use if compartment is not secure.
- Dispose of used button batteries immediately and safely. Flat batteries can still be dangerous.
- Tell others about the risk associated with button batteries and how to keep their children safe.
WI-FI WIND & WEATHER STATION Page I 3
QUICK MOUNTING TIPS
WIND SPEED
- Ensure the sensor is mounted vertically – an unobstructed rooftop is ideal.
- Your wind sensor should be the tallest object in the area to avoid reduced wind speed values.
THERMO-HYGRO
- Keep out of direct sunlight and ensure the sensor is well-ventilated.
• We recommend mounting it on a north-facing wall under an eave or deck for best results.
WEATHER STATION ICONS
text_image
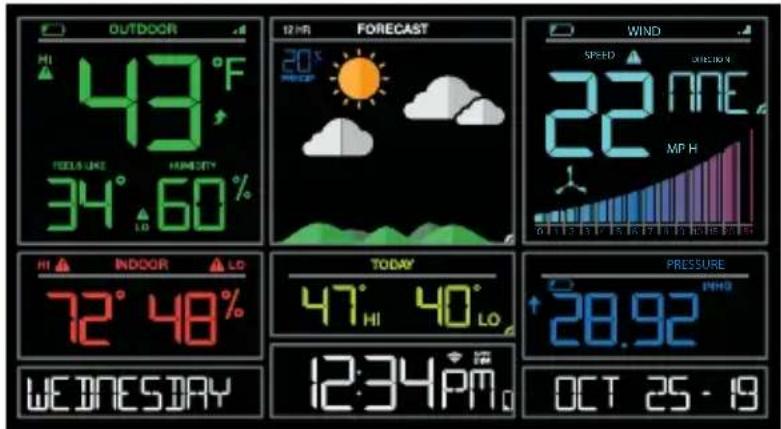
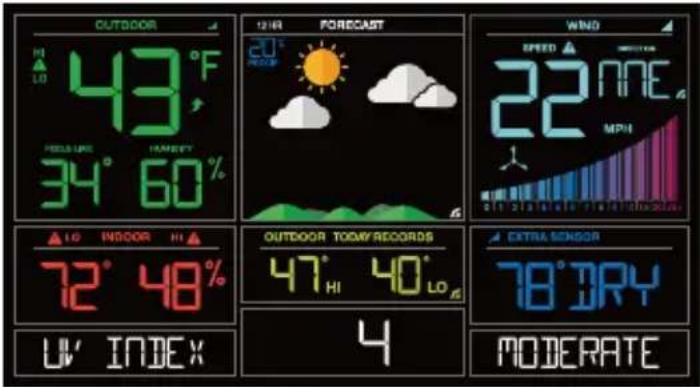
OUTDOOR HI 43°F TODLES: LIME HUMIDITY 34°60% 12 HTR FORECAST 20° SPEED SWEET 22 NME MP H INDOOR HI 72°48% INDOOR TODAY 47°40° INDOOR PRESSURE 28.92° WEDNESDAY 12:34PMo OCT 25 - 19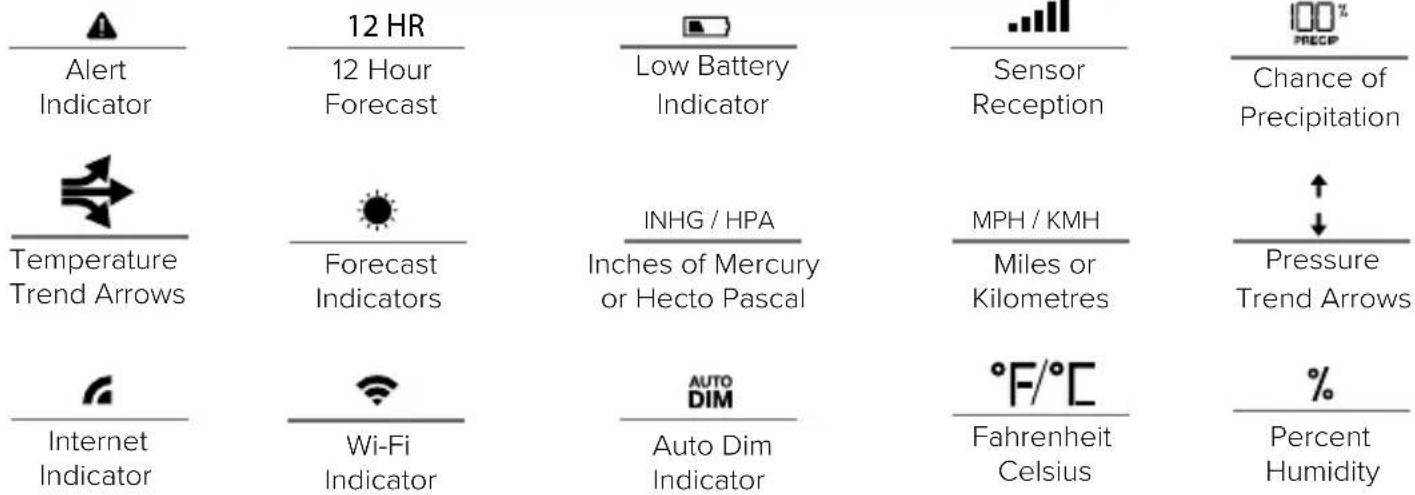
text_image
12 HR Alert Indicator 12 Hour Forecast Low Battery Indicator Sensor Reception Chance of Precipitation Temperature Trend Arrows Forecast Indicators INHG / HPA Inches of Mercury or Hecto Pascal MPH / KMH Miles or Kilometres Pressure Trend Arrows Internet Indicator Wi-Fi Indicator AUTO DIM Auto Dim Indicator °F/°C Fahrenheit Celsius % Percent HumidityWI-FI WIND & WEATHER STATION Page 14
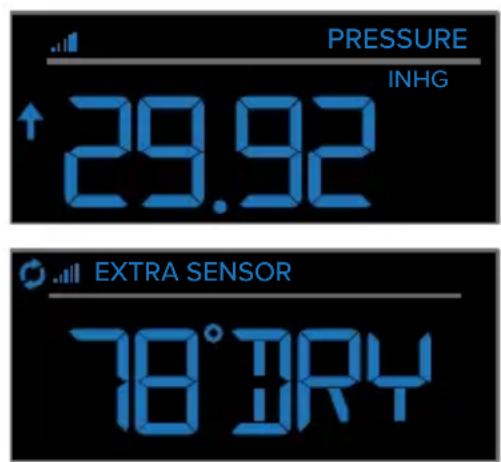
EXTRA SENSOR AREA ICONS:
- The Extra Sensor area of your station will default to Pressure when you first power up.
- When you choose to add additional sensors, the Sensor Reception Indicator will show in the upper left corner whether Pressure or Sensor reading is displayed.
- Press and release the EXTRA button to view any additional sensors.
text_image
PRESSURE INHG ↑ 29.92 EXTRA SENSOR 78°JRY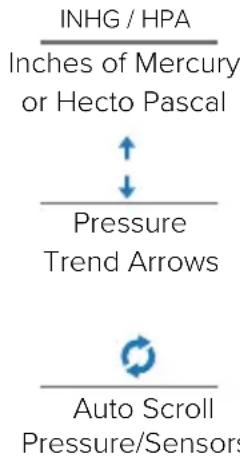
text_image
INHG / HPA Inches of Mercury or Hecto Pascal Pressure Trend Arrows Auto Scroll Pressure/Sensors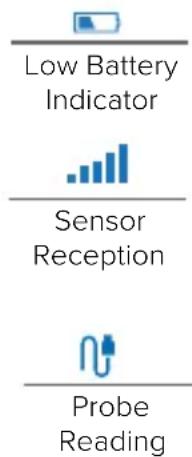
text_image
Low Battery Indicator Sensor Reception Probe ReadingCONNECT TO LA CROSSE VIEW™ APP
MOBILE DEVICE REQUIREMENTS
iOS Requirements:
Mobile device with iOS with cellular or Wi-Fi service
Android Requirements:
Mobile device with Android OS with cellular or Wi-Fi service
Ensure your station's Wi-Fi Indicator is flashing. If it is not, press and hold the Plus (+) and Minus (−) buttons down together until it begins flashing. This tells you that your station is ready to connect.
WI-FI WIND & WEATHER STATION Page I 5
DOWNLOAD
Visit the App Store or Google Play Store to download the free La Crosse View™ app onto your mobile device.


LAUNCH & FOLLOW
Open the La Crosse View™ app and follow the on-screen instructions.
HAVING TROUBLES CONNECTING?
Make sure your mobile device is connected to your router's 2.4GHz Wi-Fi network, and that you've correctly entered your Wi-Fi password.
For more troubleshooting tips and support visit:
www.lacrossetechnology.com/lacrosseviewsupport
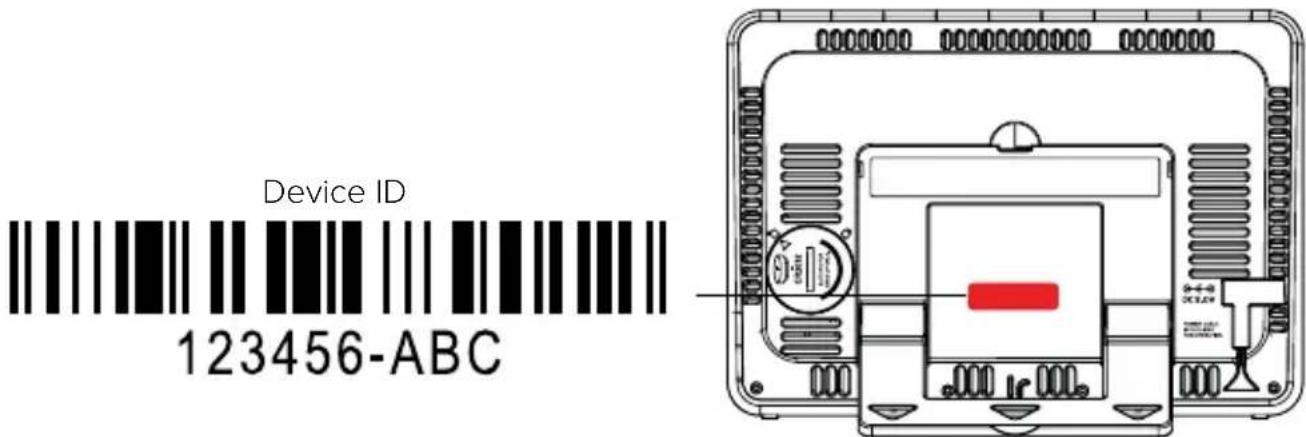
- Your station's device ID can be found on the back of the display.
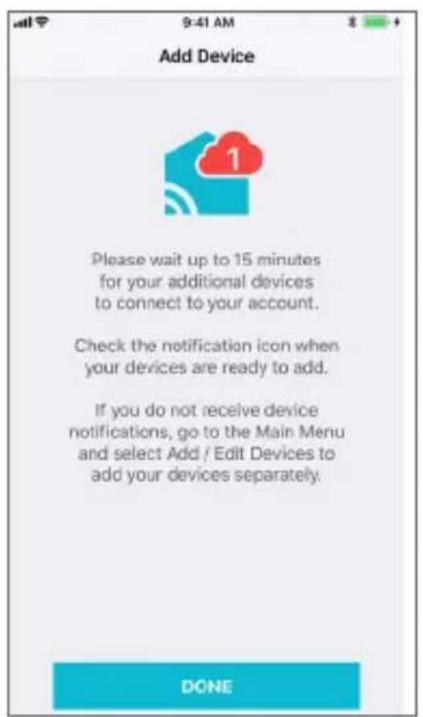
- Within 15 minutes after your station connects to the La Crosse View app, you should receive notifications to add your sensors. These will display in your app's Notification Center.
text_image
Device ID 123456-ABCWI-FI WIND & WEATHER STATION Page 16
When your sensors are ready to be added, you'll see your app's cloud turn red. Press this Cloud Icon to add your sensors.
text_image
Add Device Please wait up to 15 minutes for your additional devices to connect to your account. Check the notification icon when your devices are ready to add. If you do not receive device notifications, go to the Main Menu and select Add / Edit Devices to add your devices separately. DONE
text_image
Home Weather Station Updated 1 min ago 75° 47%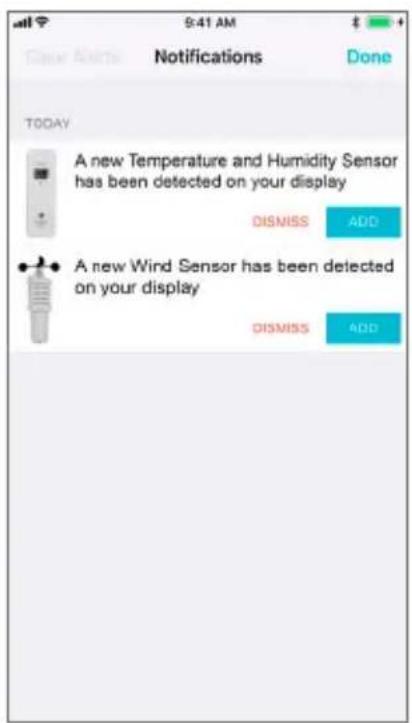
text_image
TODAY A new Temperature and Humidity Sensor has been detected on your display DISMISS ADD A new Wind Sensor has been detected on your display DISMISS ADDBENEFITS OF CONNECTING TO LA CROSSE VIEW™

La Crosse View™
Connecting You to Your Home Anytime, Anywhere.
FEATURES CONNECTEDSTANDALONE
| Wind Speed | √ | |
| Internet Wind Direction | √ | |
| Indoor & Outdoor Temperature | √ | √ |
| "Feels Like" Temperature | √ | √ |
| Indoor & Outdoor Humidity | √ | √ |
| 12-Hour Forecast | √ | √ |
| Barometric Pressure | √ | √ |
| Internet Time and Calendar | √ | |
| Advance Forecast Icons | √ | |
| Daily Forecast HIs & LOs | √ | |
| % Chance of Precipitation | √ | |
| Ability to Add Sensors | √ | √ |
| Data Stream Technology | √ | |
| Remote Monitoring | √ | |
| Set Alerts | √ | √ |
| View Graphs | √ |
ENHANCED LACROSSE VIEW CONNECTED FEATURES
- Advanced Forecast Icons & Chance of Precipitation (12 Hour Forecast)
• AccuWeather Daily & Hourly Forecasts - AccuWeather HI/LO Temperatures
- AccuWeather Wind Direction
- Custom Data Streams
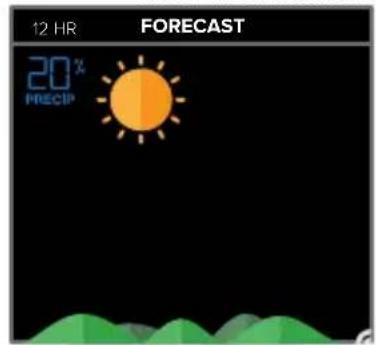
ADVANCED FORECAST & CHANCE OF PRECIPITATION
SUNNY CLOUDSPARTLY SUNNY
text_image
12 HR FORECAST 20% PRECIP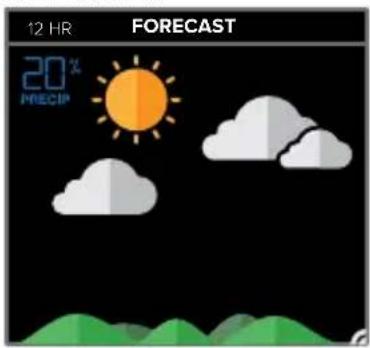
text_image
12 HR FORECAST 20% PRECIP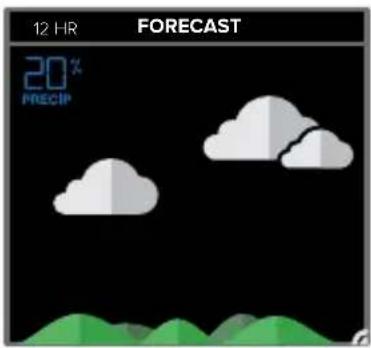
text_image
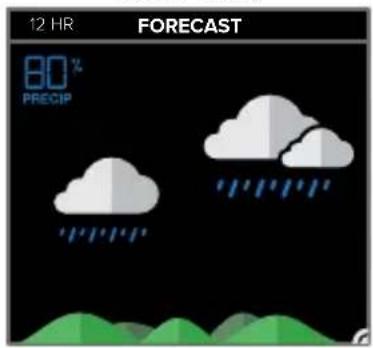
12 HR FORECAST 20% PRECIPLIGHT RAIN
text_image
12 HR FORECAST 80% PRECIP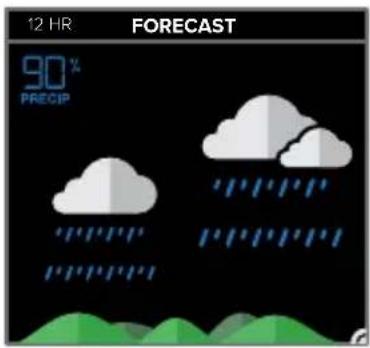
text_image
12 HR FORECAST 90% PRECIP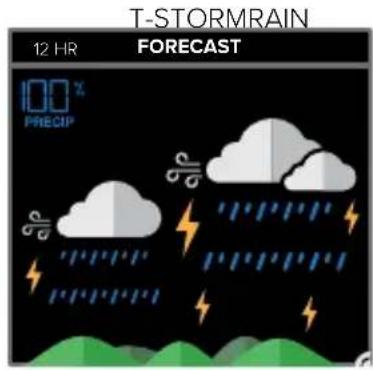
text_image
T-STORMRAIN 12 HR FORECAST 100% PRECIP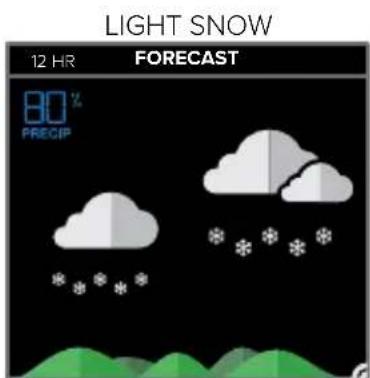
text_image
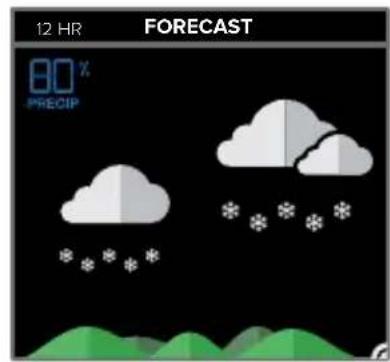
LIGHT SNOW 12 HR FORECAST 80% PRECIP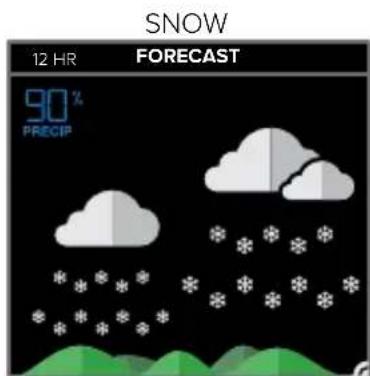
text_image
SNOW 12 HR FORECAST 90% PRECIP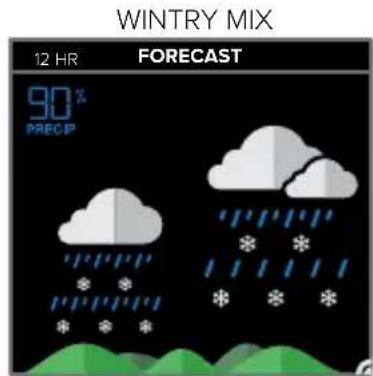
text_image
WINTRY MIX 12 HR FORECAST 90% PRECIP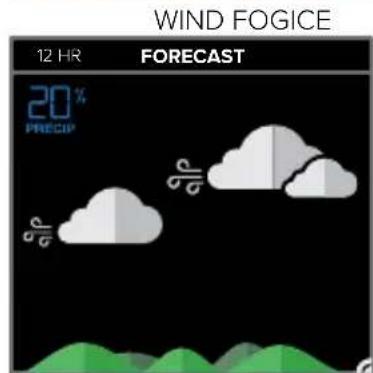
text_image
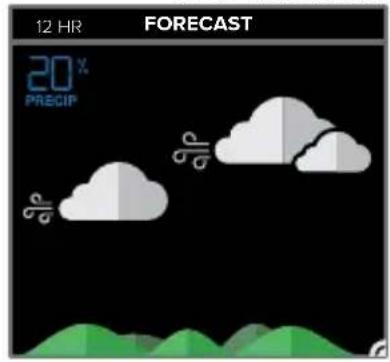
WIND FOGICE 12 HR FORECAST 20% PRECIP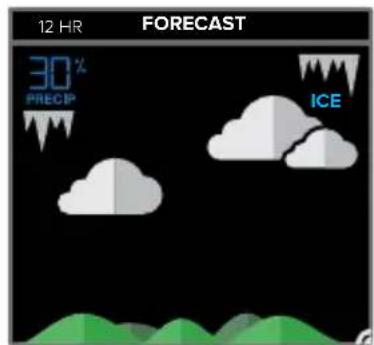
text_image
12 HR FORECAST 30% PRECIP ICE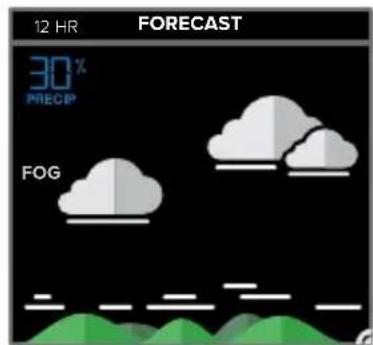
text_image
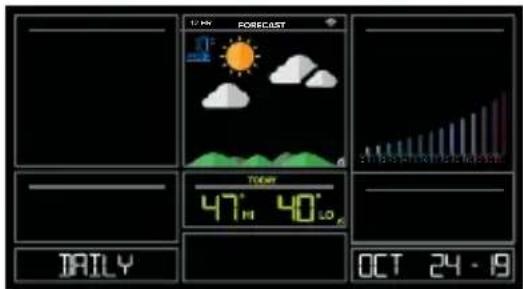
12 HR FORECAST 30% PRECIP FOGPress the DAY button on the side of your station to scroll through 7 days of future forecasts. You'll see changing forecast icons, HI/LO Temperature readings.
IMPORTANT: After viewing your Daily Forecast, the display will automatically revert back to the default 12 hour forecast after 10 seconds.
text_image
1/24 FORECAST TIME 47° 40° TAILY OCT 24 - 19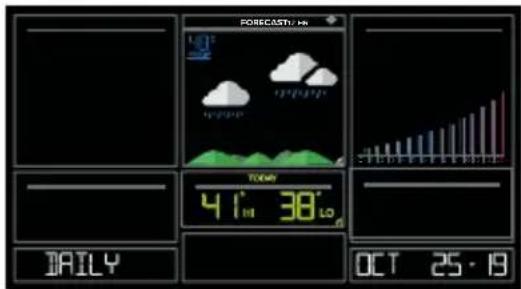
text_image
FORECAST: 10h TOWAY 41° 38° JAILY OCT 25·19WI-FI WIND & WEATHER STATION Page I 10
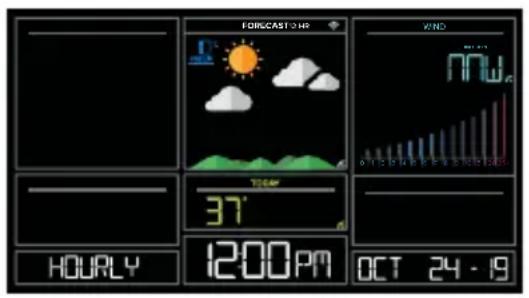
Press the HOUR button on the side of your station to scroll through 12 hours of future forecasts. You'll see hourly changes in:
- Weather Icons
- Chance of Precipitation
- Temperature
- Wind Direction
IMPORTANT: After viewing your Hourly Forecast, the display will automatically revert back to the default 12 hour forecast after 10 seconds.
text_image
FORECAST: HP WIND 37° 1200PM OCT 24 - 19 HOURS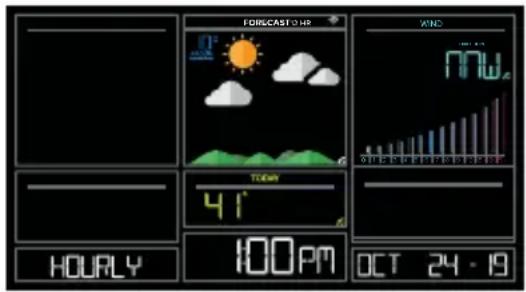
text_image
FORECAST OHR WIND 41' HOURLY 100PM OCT 24 - 19Note: If you press the HOUR or DAY button when not connected, station will say CONNECT TO WIFI. If your station is connected, but happens to lose connection with the weather service, it will say WAIT FOR WEATHER when your HOUR or DAY button is pushed.
IMPORTANT:
There may be small discrepancies between data displayed on your station and data shown through other AccuWeather services, such as their website and/or mobile app. This is common, as there are differences in the timing in which forecast data is fetched by these items. Our connected weather stations will receive forecast updates at least 4 times daily.
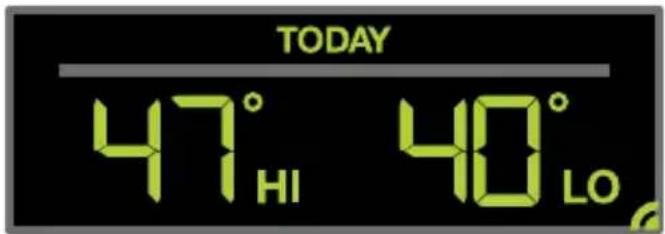
ACCUWEATHER HI/LO TEMPERATURES
TODAY Shows
text_image
TODAY 47° HI 40° LOInternet Indicator will appear in bottom right corner when connected.
- When connected, your daily AccuWeather HI/LO Temperature predictions will display in this section.
- If unconnected, this section will display your Outdoor Temperature Records registered daily by your Thermo-Hygro Sensor. These will automatically reset at Midnight everyday.
ACCUWEATHER WIND DIRECTION
text_image
WIND SPEED DIRECTION 18 NHE MP HInternet Indicator Appears and Wind Direction replaces Top 1HR
CUSTOM DATA STREAMS
Use the Data Stream Menu in the La Crosse View™ app to select up to 3 items to stream on your station.
- Open the La Crosse View™ app and swipe until you find your station's device page.
- Scroll down to the Data Stream section and press the blue stream icon in the upper right.
- Follow the app's instructions to customize your "Data Stream" to display on your station
Note: Allow up to 10 minutes for new Data Stream selections to appear on your station.
text_image
OUTDOOR HI LO 43°F PRESSURE HAREMY 34° 60% 12 HR FORECAST 20° RECORD WIND SPEED ▲ ◆ ◆ ◆ ◆ ◆ ◆ ◆ ◆ 22 MNE MPH OUTDOOR TOMY RECORDS 47° HI 40° LO 4 EXTRA SENSOR 78° DRY MODERATE UV' INDEXCustom Data Stream
Data Stream Items:

AccuWeather
Customizable Data Streams to enhance your in-home display:
Wind Speed • Wind Direction • Wind Gust • UV Index • Visibility • Dew Point
• Percentage of Clouds • Sunrise Time • Sunset Time • Hours of Sunlight • Moon Rise Time
- Moon Set Time • Temperature/Humidity • and more!
Personal Messages
Enter up to 20 characters for special events or reminders, such as:
• SOCCER TONIGHT • ICE CREAM IN FREEZER • GREAT JOB MATH TEST or anything you can think of!
Note: Allow up to 10 minutes for new Data Stream selections to appear on your station.
WI-FI WIND & WEATHER STATION Page I 13
ADD SENSORS TO YOUR APP
How to add Sensors to your La Crosse View App only:
- Install batteries in the sensor, and if the sensor has a TX button, press the TX button to force a signal.
- Scan sensor bar code ID so it will read in the La Crosse View app.
Details: Open your La Crosse View app to add sensors. Watch the video for adding devices to the La Crosse View app: http://bit.ly/LaCrosseView_Support_Vid_10
- From Main Menu - select "Devices" under "Add/Edit"
- On Edit Devices page - select "ADD DEVICE"
- Scan Device ID - Scan the bar code on your sensor or choose "ADD MANUALLY" to type in the number on the bar code. Select "CONTINUE".
- On Confirm Device page - Confirm the sensor image and select "YES"
- On Enter Device and Location Name page - enter Device Name and select a location or enter a Location Name for your sensor. Select "DONE".
Repeat steps 1-5 for any additional sensors you wish to add.
STATUS MESSAGES WHEN CONNECTED
Quick Tip:
- The Wi-Fi Icon 📤 indicates Wi-Fi connection- not necessarily app connection.
- The Internet Icons 📋 by your Forecast, Wind Direction and HI/LO Temperatures will indicate connection to the La Crosse View App and Weather Server.
Status Messages on your station will let you know if there are issues.
Press and release the SET button to view the status of your station.
ALL OK CONNECTED
- Station is connected all the way through to the La Crosse View app.
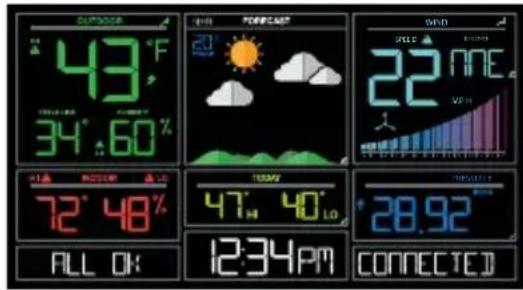
text_image
43°F 34°60% 72°48% ALL OK 12:34PM FORECAST 20° SUN WIND 22 NEE VDD 47° 40° LO 28.92 CONNECTEDCHECK APP
• The Wi-Fi router connection is working.
- Check your connection to the La Crosse View app.
- Check Notifications in the La Crosse View app
• Is there an update to install?
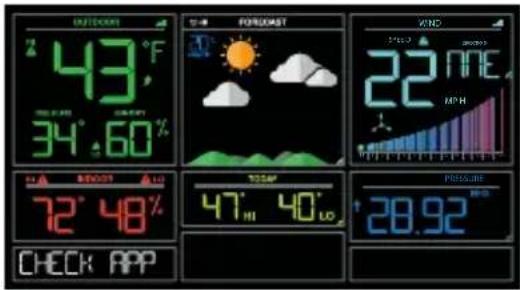
text_image
OUTDOOR 43°F 34°.60% BEOD 72° 48% CHECK APP FORECAST 22 NEE MPH 12.5m 47° 40° PRESSURE 28.92LOST WIFI
- Check your power cord connection (power cord required to connect)
- When trying to reestablish your station's Wi-Fi connection, be sure your mobile device is on the same 2.4GHz network you want your station to use.
- Check your network connection.
- Hold the + and – buttons together for 3 seconds to search for Wi-Fi.
text_image
OUTDOOR 43°F 34°.60% 72° 48% LOST WIFI FORECAST 12:34PM 22 MPH 23 12:34PM ACTIV vs. DRY 78 DRY OCT 24-19NO WEATHER SERVICE
• Wi-Fi, and App are fine.
- Weather/Time service not connecting. This will be resolved at the Weather Server. Please be patient.
- Weather Forecast, Precipitation and Internet HI/LO temperature will not be displayed.
text_image
OUTDOOR 43°F 34°60' NO WEATHER 72°48' 12:34PM POMEGRAT OUTDOOR 47°40'LO SERVICE VANG 22 23 MPH 78 DRYBUTTON FUNCTIONS
Buttons located on top of Professional Weather Station
| ALERTS ALERTES | WIND VENT | TEMP | + | SET RÉGLAGE | - | EXTRA | SENSOR CAPTEUR | LIGHT LUMIÈRE |
Buttons located on the right side of Professional Weather Station
| DAY JOUR | HOUR HEURE |
| ALERTS Hold to enter Alert Set Mode. | |
| WIND, TEMP Press to view history. | |
| + or – Use + or – to adjust values in settings. | |
| + & – Hold both buttons to search for Wi-Fi. | |
| SET Hold for basic settings. Press to view Wi-Fi status. | |
| EXTRA | Press to toggle through Extra Sensors & Barometric Pressure.Hold to add Sensors. |
| SENSOR | Press to view sensor ID numbers, then hold PLUS (+) to search, or holdMINUS (−) to remove. |
| LIGHT Press to adjust brightness. Hold to set Auto Dim. | |
| ALERTS & LIGHT Hold both buttons to reset all sensor ID’s and Wi-Fi settings. | |
| DAY, HOUR Press to see forecast. Must be connected to Wi-Fi. | |
Your station has 5 levels of brightness for the backlight:
- Press and release the LIGHT button to adjust the backlight at 5 levels of intensity.
Levels: OFF = 0% | level 1 = 1.5% | level 2 = 20% | level 3 = 50% | level 4 = 100%.
AUTO DIMMING BACKLIGHT
You can set your backlight to automatically dim to level 1 at a set hour for sleeping, then automatically return to full brightness when you wake.
Set Auto Dim (Hour only):
- Hold the LIGHT button 2 seconds to enter dimmer set mode. AUTO DIM OFF will show.
- Press the + or - buttons to turn dimmer (ON). AUTO DIM ON will show.
- Press the LIGHT button to select start time (Hour) for dimmer. AUTO DIM START TIME and the hour will flash.
- Press the + or – buttons to change the hour for the dimmer to be low light level.
- Press the LIGHT button to select start time for dimmer to be on High light level. AUTO DIM STOP TIME and the hour will flash.
- Press the + or – buttons to change the hour for the dimmer to be high light level.
- Press the LIGHT button to confirm exit.
Note: Hold LIGHT button at any time to exit dimmer settings.
text_image
AUTO JIM OFF
text_image
AUTO JIM ON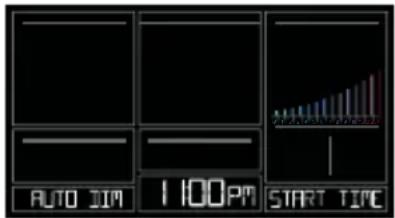
text_image
AUTO JIM 1:00PM START TIME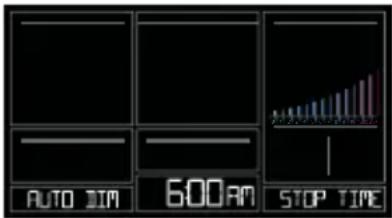
text_image
AUTO DIM 600AM STOP TIMENote: If you press the LIGHT button to manually adjust the backlight, the Auto Dim feature will resume at the next scheduled time to dim.
WI-FI WIND & WEATHER STATION Page I 17
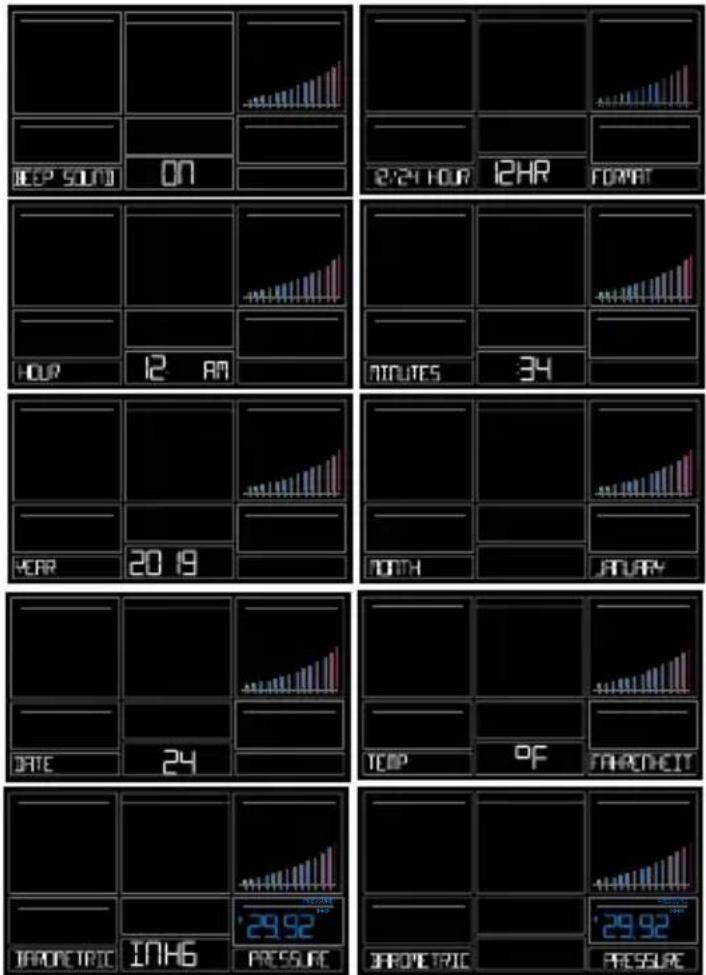
SETTINGS MENU
- Hold the SET button for 3 seconds to enter settings menu.
- Press and release the + or - buttons to adjust the flashing values. Hold to adjust quickly.
- Press and release the SET button to confirm and move to the next item.
Note: Press and release the LIGHT button any time to exit settings.
Settings menu order:
• BEEP ON | OFF
• 12/24 hour format
• Hour
- Minutes
- Year
- Month
- Date
• Temperature Fahrenheit | Celsius
- Pressure: InHg / hPa
• Pressure number setting
Note: Weekday sets automatically as Year, Month and Date are set.
WI-FI WIND & WEATHER STATION Page I 18
EXTRA SENSOR AREA
The Extra Sensor area of your station will show Relative Pressure when you first power up.
The Sensor Reception indicator will display when additional sensors are connected.
Note: On power up the station will search for any additional sensors.
Optional Extra Sensors: Up to 4 additional Thermo-Hygro, Wind Speed, Rain, Water Leak or any combination of these sensors can read to the EXTRA SENSOR area of your display. Simply press and release the EXTRA button to view these sensors or turn on Auto Scroll.
Note: Not all sensors will read to the station. Be sure to check the website to see if a sensor can read to the app only, or both station and app.
Add Extra Sensors to your station:
- Hold the EXTRA button 3 seconds, to add a sensor to the station.
- Install batteries in the sensor, and if the sensor has a TX button, press the TX button to force a signal.
- Allow up to 3 minutes to view sensor and ID on station.
Note: Once sensor is found the search will stop. Sensor, ID, and type will show for 3 seconds then return to normal display. - Scan sensor bar code ID so it will read in the La Crosse View app.
- Added sensors will be available for display in Extra Sensor area of station.
Delete Extra Sensors from your station:
- Press and release the EXTRA button until you see the sensor and ID you wish to delete.
- Hold the MINUS (-) button for 3 seconds to delete this sensor. The sensor readings and ID will show dashes.
- Sensor will no longer show in the Extra Sensor area.
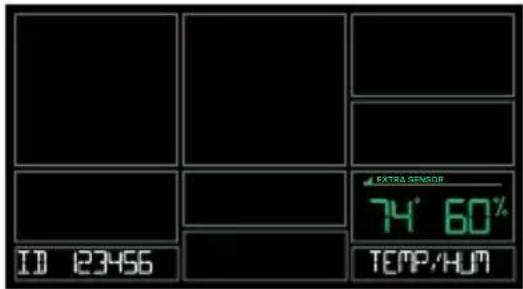
text_image
ID 123456 EXTRA SENSOR 74° 60% TEMP/HUM
text_image
EXTRA SENSOR IDPress and release the EXTRA button to view Pressure, and any Extra Sensors connected to your station.
IMPORTANT: The sensors reading in the Extra Sensor area will not provide history. These will be current readings only.
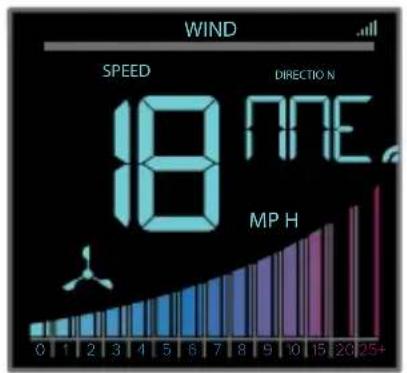
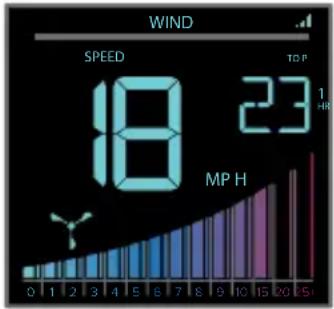
WIND SPEED READINGS & HISTORY
Current Speed: Highest wind speed in past 31 seconds. Samples every 3 seconds
Top Speed (1 HR): Highest wind speed in past 60 minute period.
Wind Direction: When connected wind direction in letters will replace Top 1HR. Top 1HR will still be viewable in history. Internet Indicator will show next to the direction letters.
Not Connected: Current & Top Speed Connected: Current Speed & Internet Wind Direction
bar
| Metric | Value | | :--- | :--- | | SPEED | 18 | | TOP | 23 | | MP H | 23 |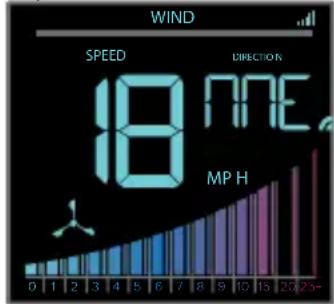
text_image
WIND SPEED DIRECTION 18 NEE MP H 0 1 2 3 4 5 6 7 8 9 10 15 20 25-Wind Speed History:
- Press and release the WIND button to view the maximum wind history values (Top Speed).
- When viewing MONTH history, press the PLUS button to toggle through the current month and past 11 months top speed.
Note: All other readings will disappear for 5 seconds.
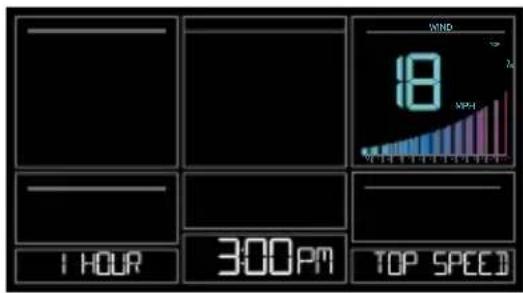
1 Hour: Highest wind speed in past 60 minute period.
24 Hours: Highest wind speed in past 24 hour period, from last record, with time/date stamp. This is a running total.
7 Days: Highest wind speed in past 7-day period, from last record, with time/date stamp. This is a running total.
Month: Highest wind speed in for the month with time/date stamp
o Current Month: First day to current day. o Previous 11 months. Defined by Calendar Month i.e. January 1 - January 31
Year: Highest wind speed in Current Year. Defined by Calendar Year i.e. January 1 - December 31 Top speed for the year with time/date stamp
WI-FI WIND & WEATHER STATION Page I 21
text_image
1 HOURS 300PM TOP SPEED WIND 18 APR-1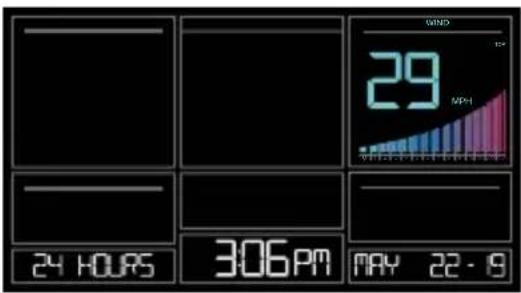
text_image
WIND 29 MPa 24 HOURS 306PM MAY 22-9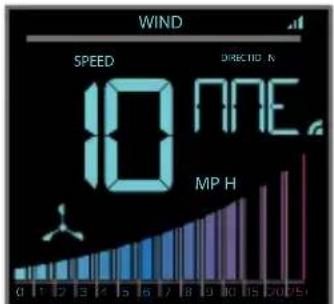
text_image
WIND SPEED 10 NFE MPH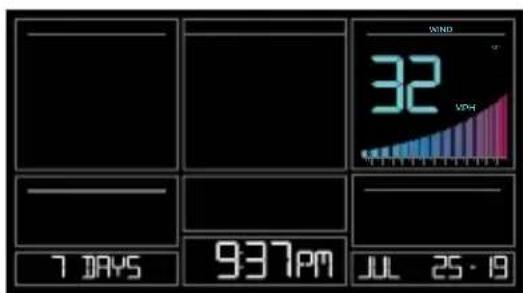
text_image
WIND 32 VPH 7 DAYS 937PM JUL 25·19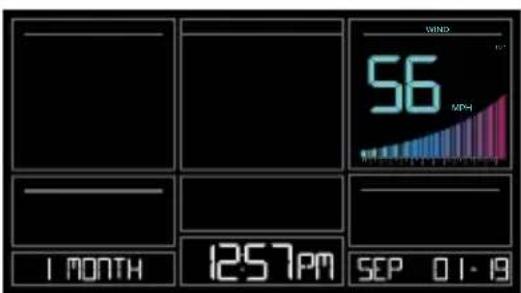
text_image
WIND 56 MPa 1 MONTH 12:57PM SEP 01-19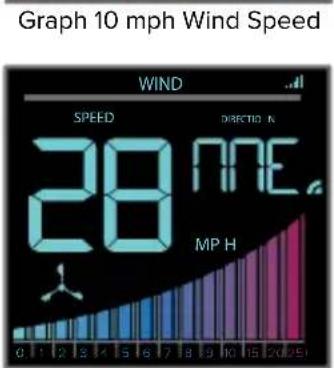
text_image
Graph 10 mph Wind Speed WIND SPEED DIRECTION & 28 MPE MP H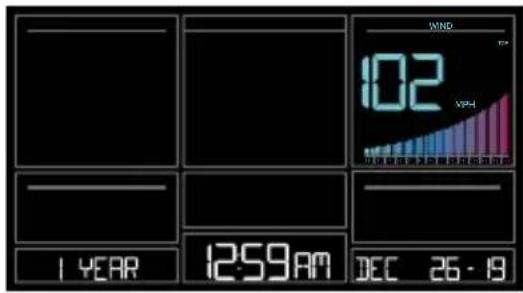
text_image
1 YEAR 12:59 AM DEC 26 - 19 WIND 102 VPHGraph 28 mph Wind Speed
Reset Wind Speed History:
- Press the WIND button to view individual wind speed readings.
- Hold the MINUS button for five seconds to reset the individual value.
- Wind speed reading will reset to current wind speed, time and date.
Wind Speed Graph
- The Wind Speed graph will fill with color as a visual indicator of wind speed.
- At speeds above 25MPH the graph will remain full.
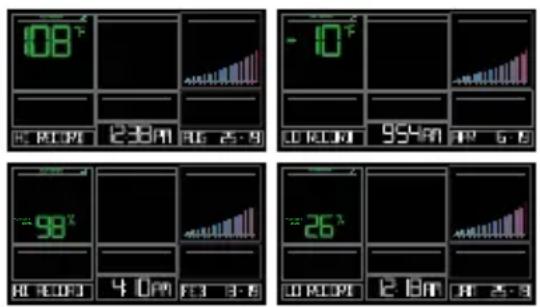
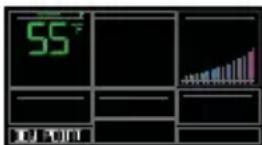
Your current Indoor and Outdoor temperature and Humidity are constantly displayed on your weather station. Your station records your HI and LO Temperature and Humidity with time and date of occurrence.
-
Press and release the TEMP button to view your HI and LO records with time and date of occurrence.
-
Any new HI or LO record will replace the existing record.
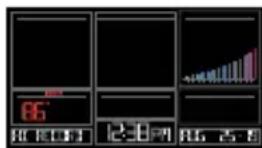
Viewing order:
• Outdoor HI Temp with Time/Date
• Outdoor LO Temp with Time/Date
• Outdoor HI Humidity with Time/Date
• Outdoor LO Humidity with Time/Date
- Indoor HI Temp with Time/Date
- Indoor LO Temp with Time/Date
- Indoor HI Humidity with Time/Date
- Indoor LO Humidity with Time/Date
• Feels Like HI Temp with Time/Date
- Feels Like LO Temp with Time/Date
• Outdoor Dew Point
text_image
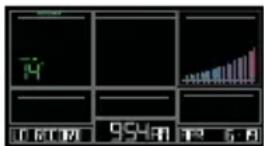
86 86 0.01 12:30 86 古 8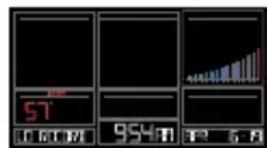
text_image
5T 0 6128 954H 12 6 A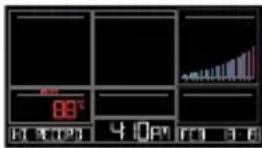
text_image
88℃ 4 0 PM 13 3 AM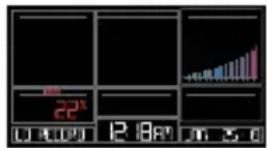
text_image
22x 0.40V 12.8A 3.50Reset HI/LO Temperature/Humidity Records:
- Press and release the TEMP button to view individual temperature/humidity readings.
- Hold the MINUS button for five seconds to reset the individual value.
- Temperature and Humidity readings will reset to current temperature, humidity, time and date.

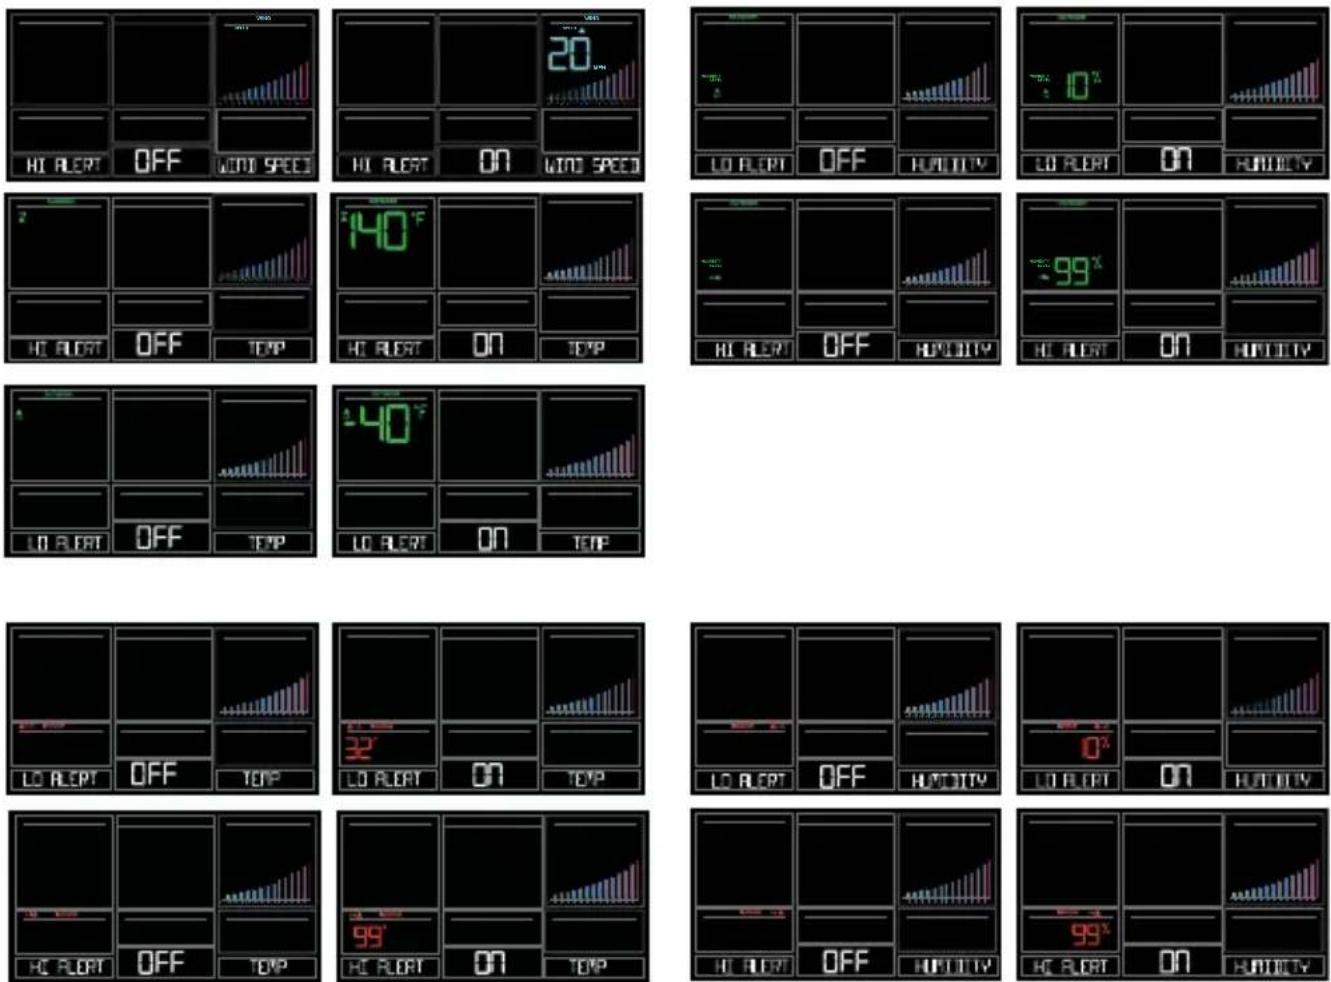
ALERTS
Set Alerts:
- Hold the ALERTS button for 3 seconds to enter alert set mode.
- Alert ON:
- Press the +/- buttons to arm the alert (ON).
- Press the ALERTS button and the alert value will flash
- Press the +/- buttons to set the alert value (Hold to set quickly).
- Press ALERTS button to move to next alert.
- Alert OFF:
- Alerts are OFF unless armed.
- If you do not wish to set an alert, simply press the ALERTS button again to move to the next alert.
Alert Setting Order:
• High Wind Speed
• Outdoor Low Temperature
• Outdoor High Temperature
• Outdoor Low Humidity
• Outdoor High Humidity
- Indoor Low Temperature
- Indoor High Temperature
- Indoor Low Humidity
- Indoor High Humidity
Alert Sounds:
- When armed alert value is reached, station will beep 5 times each minute, until out of alert range.
- The flashing alert icon will indicate if it is a LO or HI alert.
- Press any button to stop the temp alert sound. The alert icon will flash while value is in alert range.
FEELS LIKE TEMPERATURE
Your “Feels Like” Temperature is a combination of outdoor temperature humidity and wind speed. It is displayed in the Outdoor Temperature area.
- When outdoor temperature is higher than 80^ , your Feels Like Temperature is showing Heat Index.
- When outdoor temperature is lower than 50^ , your Feels Like Temperature is showing Wind Chill.
- When outdoor temperature is between 50^ and 80^ , your Feels Like Temperature will show Current Outdoor Temperature.
Note: When you have a high humidity reading, but the temperature is not over 80^ F, the Feels Like Temperature will remain the same as the current outdoor temperature.
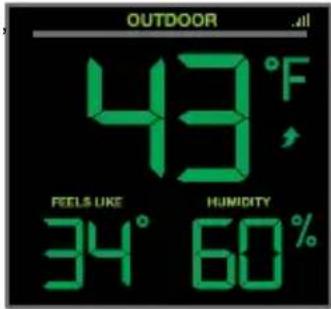
text_image
OUTDOOR 43°F FEELS LIKE HUMIDITY 34° 60%TEMPERATURE TREND ARROWS
Your Outdoor Temperature Trend Arrows update every 15 minutes. The trend reflects changes over the past one hour period.

UP ARROW: For this to show, the temperature will have to rise by 2^ F ( 1^ C), or more within the current hour.

RIGHT ARROW: Temperature is steady

DOWN ARROW: For this to show, the temperature will have to fall by 2^ F ( 1^ C), more within the current hour.
WI-FI WIND & WEATHER STATION Page | 26
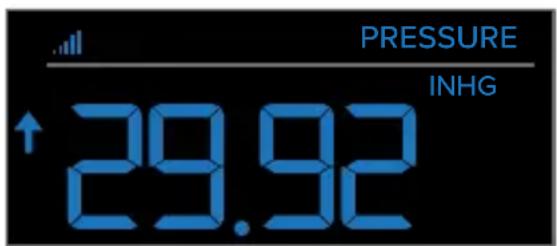
RELATIVE PRESSURE READING
- Your station itself has a Pressure Sensor inside to provide accurate Relative Pressure readings.
- The station will default to a Relative Pressure of 29.92 Inches of Mercury.
- Give it up to 3 days to automatically adjust to your environment.
- The Relative Pressure number is programmable in the Settings Menu.
- You can select INHG (Inches or Mercury) or HPA (Hecto Pascal) for Pressure units in the Settings Menu.
- The UP and DOWN Arrows indicate the Pressure Tendency (rising or falling). This is calculated when the average value of the current hour's barometric pressure is compared to the average of the past 3 hours. If the difference is greater than +1hpa, the air pressure trend will increase; if the difference is less than -1hpa, the air pressure trend will decrease; if it is between +1 and -1hpa, it will be flat.
Press the EXTRA button to switch between any extra sensor readings and Relative Pressure reading.
text_image
PRESSURE INHG ↑29.92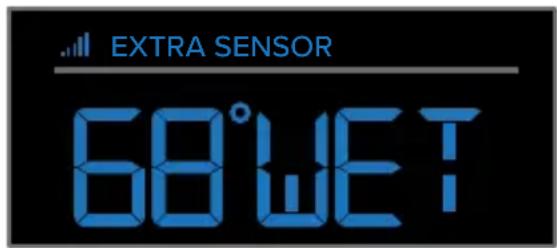
text_image
EXTRA SENSOR 68°WETSENSOR RECEPTION INDICATORS
There are Sensor Reception Indicators for your Temperature/Humidity Sensor, and Wind Sensor.
- When indicator is solid, sensor is connected.
- When indicator is flashing, it is searching for the individual sensor.
- If there is no indicator, the sensor is not connected.
WI-FI WIND & WEATHER STATION Page I 27
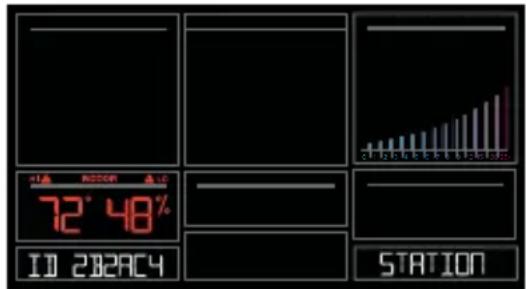
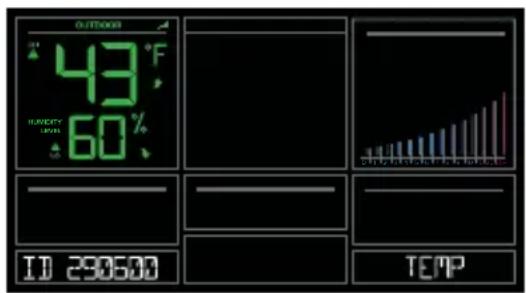
SENSOR ID & SENSOR SEARCH
Your station and each sensor have a unique ID number that will identify them in the La Crosse View app. This has the added bonus of locking them into your weather station until you manually delete them.
View ID numbers in station:
Press and release the SENSOR button. The ID number and type will show on the bottom of the station.
- Station
- TH Sensor
- Wind Sensor
- Extra Sensor (if connected to station)
text_image
72° 48% ID 2023C4 STATIONSearch for Individual sensors:
- Press and release the SENSOR button to view sensor type and ID.
- Hold the PLUS (+) button to search for the sensor. The reception indicator will flash for up to 3 minutes.
- Allow up to 3 minutes to view sensor and ID on station.
Note: Once sensor is found search will stop. The reception indication will stop flashing. Sensor and ID will show for 3 seconds.
text_image
OUTDOOR 43°F HAPPY 60% ID 290600 TEMP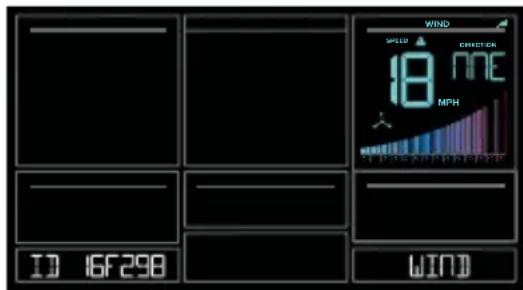
text_image
WIND SPEED EFFECTER 18 MHP ID 16F298 WINDWI-FI WIND & WEATHER STATION Page I 28
DELETE SENSORS
- Press and release the SENSOR button to view sensor type and ID.
- Hold the MINUS button to delete the sensor from the station.
- Deleted sensor can no longer show on station. Batteries should be removed.
- Station will automatically search for a replacement sensor of the same type.
Example: Delete a Wind sensor, the station will search for a new Wind sensor.
- If replacing a sensor, insert batteries into the new sensor. Once station receives sensor, press the SENSOR button to confirm sensor ID.
Note: Deleted, working, sensors with batteries installed, may still pass through to the app but will no longer show on the station.
text_image
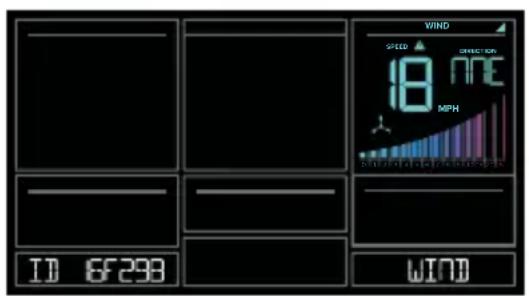
VIND SPEED 18 mph METHO ID 6F298 WIND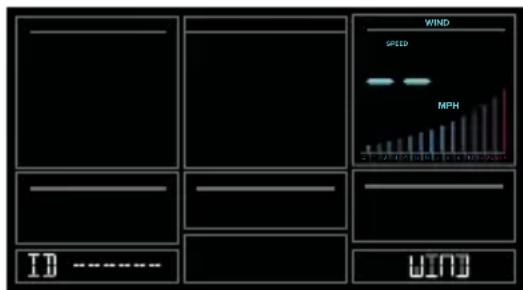
text_image
WIND SPEED MPH ID =**** WINDLOW BATTERY INDICATORS

- Low battery by Outdoor Temperature, replace batteries in the TH sensor.
- Low battery by Wind, replace batteries in the Wind Sensor.
- Low Battery by Indoor Temperature, replace batteries in Station.
- Low Battery by Extra Sensor, replace batteries in the Extra Sensor.
FACTORY RESTART STATION
A factory restart of your station will remove all sensor ID numbers and Wi-Fi settings and return it to its default settings and “out of the box” condition.
This may resolve connection issues with your sensors or Wi-Fi.
-
Hold the ALERTS and LIGHT buttons together for 5 seconds.
-
Your station will reset and search for all sensors.
-
Allow up to 3 minutes to reacquire all sensors.
-
You will need to reconnect to your La Crosse View app by selecting CONNECT WIFI from the menu in your La Crosse View App and entering your Wi-Fi password.
DETAILED SETUP & MOUNTING
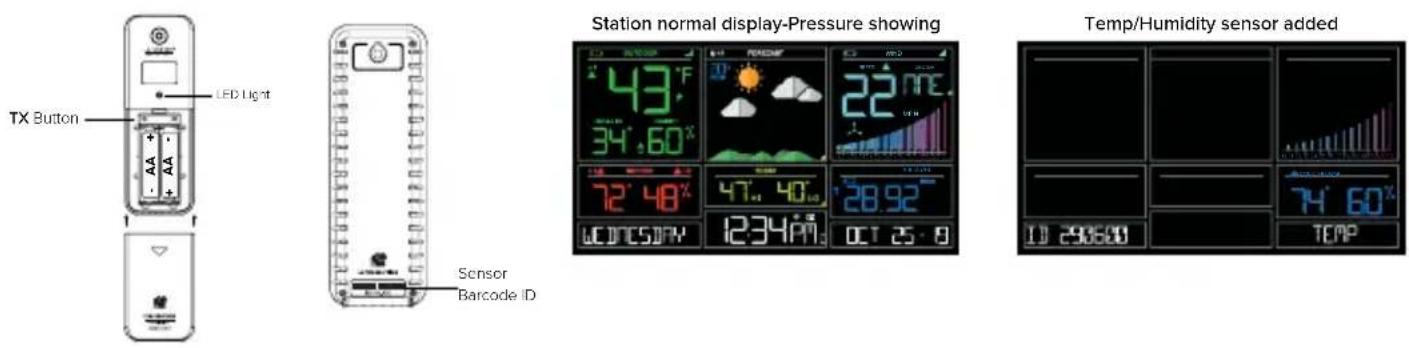
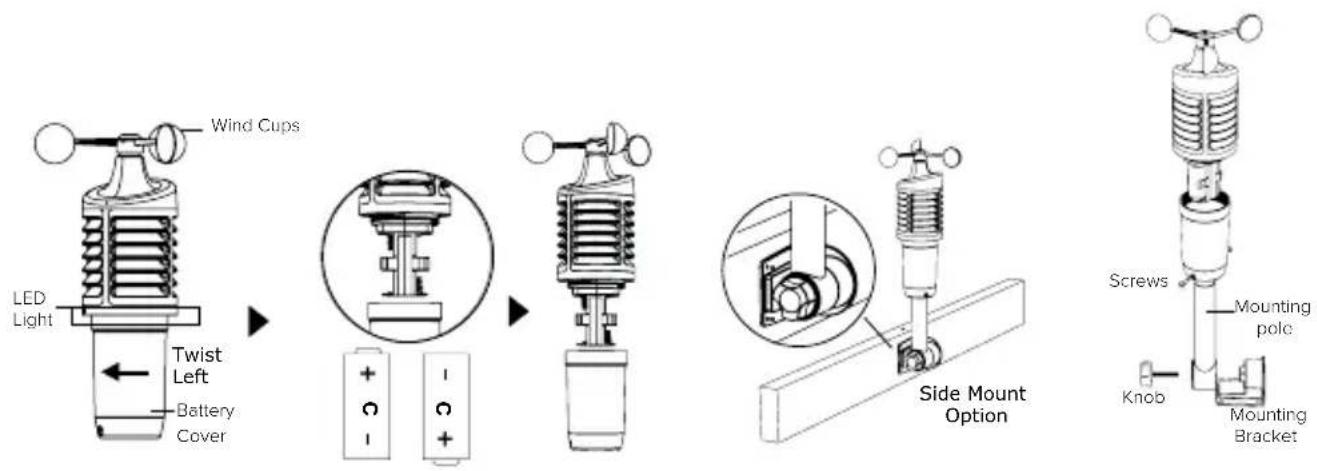
LTV-W1 Wind Speed Sensor
- Turn the battery cover of your wind sensor to the left.
- Install fresh "C" batteries.
- Carefully align and turn battery cover right to tighten.
- There is a blue LED light on the sensor that will flash when transmitting.
text_image
LED Light Wind Cups Twist Left Battery Cover + - + - Side Mount Option Screws Mounting pole Knob Mounting BracketWI-FI WIND & WEATHER STATION Page I 30
Mounting:
- Position in an open area that will have the least amount of interference with wind speed.
- Mount your sensor vertically with the wind cups on top.
-
The maximum wireless transmission range to the station is up to 400 feet (121 metres) in open air, not including walls or trees.
-
Use screws through the bottom of the mounting bracket to attach.
-
Insert bottom of pole into mounting bracket. Tighten knob to secure
-
Insert the included mounting pole into your sensor.
-
Tighten screws.
Alternatively:
- Insert your own mounting pole (no more than 1 inch outside diameter) into the sensor.
- Tighten screws
LTV-TH2 Thermo-Hygro Sensor
- Install 2-AA batteries according to polarity and replace battery cover.
Mounting:
- Use the hole at the top to hang your sensor from the back using a nail. Or, insert one mounting screw through the front of your sensor.
- Mount your sensor on a north-facing wall or in any shaded area. Under an eave or deck rail is preferred.
- The maximum wireless transmission range to the weather station is up to 400 feet (121 metres) in open air, not including walls or floors.
- Be sure your sensor is mounted vertically, to allow moisture to drain out properly.
Note: Watch sensor mounting video:
bit.ly/TH_SensorMounting
WI-FI WIND & WEATHER STATION Page I 31
text_image
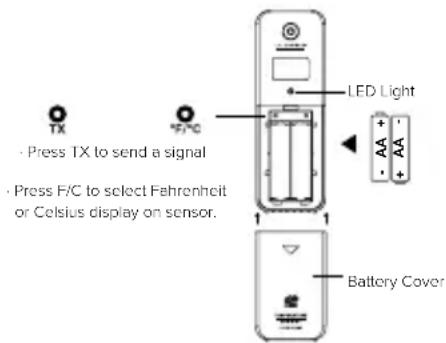
TX Press TX to send a signal Press F/C to select Fahrenheit or Celsius display on sensor. LED Light AA + - AA + Battery Cover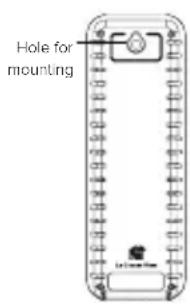
text_image
Hole for mountingCA80550 Weather Station:
- Insert the power cord into a wall outlet, then into your station. Remove the insulation tab from the CR2032 battery installed in the bottom of your weather station to maintain time/date in the event of a power outage.
Mounting:
- Place your station near an outlet. Power cord is required for operation.
- Use the mounting holes on the back to place your station on a wall.
- Use the pull down stand on the back of your station to place on a desk or counter.
- Your station should remain in good Wi-Fi range of your wireless router to use all the remote monitoring options using the La Crosse View app.
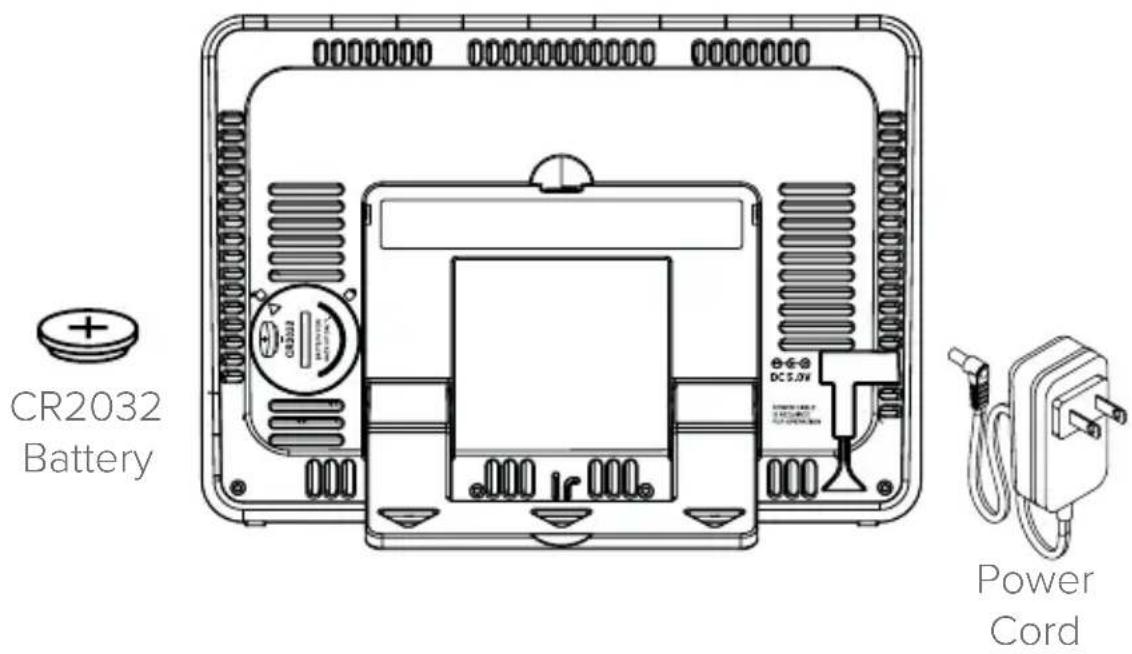
text_image
CR2032 Battery DC 5.0V Power CordJOIN THE CONVERSATION
Ask questions, watch detailed setup videos, and provide feedback on our social media outlets!

natural_image
Four black circular icons representing social media platforms: Facebook, Instagram, YouTube, and Twitter (no text or symbols beyond logos)CARE & MAINTENANCE
- Do not mix old and new batteries.
- Do not mix Alkaline, Standard, Lithium, or Rechargeable Batteries.
• Always purchase the correct size and grade of battery most suitable for intended use. - Replace all batteries of a set at the same time.
- Clean the battery contacts and also those of the device prior to battery installation.
- Ensure the batteries are installed with correct polarity (+ and -).
- Remove batteries from equipment when it is not used for an extended period of time.
- Promptly remove expired batteries.
WARRANTY & SUPPORT
LIMITED WARRANTY:
Springfield warrants this instrument to be free from defects in workmanship and material for a period of 1 year from date of purchase, and will repair or replace it at our option, without charge.
For warranty issues please contact Springfield Instruments, Inc.:
Phone: 1-844-687-4040
Email: info@springfieldinstruments.com
Springfield Instruments, Inc.
104 Barr Street
Saint-Laurent, QC H4T 1Y4
WI-FI WIND & WEATHER STATION Page I 33
SPECIFICATIONS
Indoor
| CA80550 Temperature Range: | 32°F to 99°F (0°C to 37°C) |
| Humidity Range: | 10% RH to 99%RH |
| Relative Pressure: | 23.62 to 32.48 InHg (800 to 1100 hPa) |
| Pressure is measured every 12 minutes |
Thermo-hygro Sensor
| Temperature Range: | -40°F to 140°F (-40°C to 60°C)Note: Temperatures below -20°F (-29°C) require Lithium batteries in the outdoor sensor. |
| Humidity Range: | 10% RH to 99%RH |
| Transmission Range: | Up to 400 feet (121 metres) in open air, RF 915 MHz |
Wind Speed Sensor
| Wind Speed Range: | 0-111 mph (0-178 kmh) |
| Transmission Range: | Up to 400 feet (121 metres) in open air, RF 915 MHz |
Wi-Fi
| Transmission: RF 2.4 GHz |
Power
| CA80550 Station: | 5.0 Volt power cord included (Required) |
| AC6: HX06-0500600-AU-001 (Input 100-240V) | |
| Battery Backup: | CR2032 battery included, backup for time and date |
| LTV-TH2 Thermo-hygro Sensor: | 2-AA batteries not included |
| TV-W1 Wind Speed Sensor: | 2-C batteries not included |
Battery Life
| CA80550 Station: | LTV-TH2, LTV-W1, Sensors: | Over 24 months with power cord useOver 24 months with reputable batteries. |
Dimensions
| CA80550 Station: | 8.22 in W x 1.18 in D x 5.83 in H (20.88 cm W x 2.99 cm D x 14.81 cm H) |
| LTV-TH2 Thermo-hygro Sensor: | 1.97 in W x 0.75 in D x 5.73 in H (5.0 cm L x 1.91 cm W x 14.55 cm H) |
| LTV-W1 Wind Speed Sensor: | 7.10 in W x 7.10 in D x 18.57 in H (18.03 cm L x 18.03 cm W x 47.17 cm H) with mounting bracket/pole |
Sensor Update Intervals
| LTV-TH2 Thermo-hygro Sensor: | Change of Temp +/- 0.5°C (0.9°F), Hum +/- 2% RH or 3 minutes if no change. Checks Temp/Humidity every 51 seconds |
| LTV-W1 Wind Speed Sensor: | Change of 0.8kmh (0.5mph) Wind Speed or 3 minutes if no change Checks for change in Wind Speed every 31 seconds, samples every 3 seconds |
FCC STATEMENT
This equipment has been tested and found to comply with the limits for a Class B digital device, pursuant to part 15 of the FCC Rules. These limits are designed to provide reasonable protection against harmful interference in a residential installation. This equipment generates, uses and can radiate radio frequency energy and, if not installed and used in accordance with the instructions, may cause harmful interference to radio communications. However, there is no guarantee that interference will not occur in a particular installation.
If this equipment does cause harmful interference to radio or television reception, which can be determined by turning the equipment off and on, the user is encouraged to try to correct the interference by one or more of the following measures:
- Reorient or relocate the receiving antenna.
- Increase the separation between the equipment and receiver.
- Connect the equipment into an outlet on a circuit different from that to which the receiver is connected.
- Consult the dealer or an experienced radio/TV technician for help.
This device must not be co-located or operating in conjunction with any other antenna or transmitter.
Operation is subject to the following two conditions:
(1) This device may not cause harmful interference, and
(2) This device must accept any interference received, including interference that may cause undesired operation.
Caution!
The manufacturer is not responsible for any radio or TV interference caused by unauthorized changes or modifications to this equipment. Such changes or modifications could void the user authority to operate the equipment. This equipment must be installed and operated in accordance with provided instructions and the antenna(s) used for this transmitter must be installed to provide a separation distance of at least 20 cm from all persons and must not be co-located or operating in conjunction with any other antenna or transmitter
All rights reserved. This manual may not be reproduced in any form, even in part, or duplicated or processed using electronic, mechanical or chemical process without the written permission of the publisher.
This booklet may contain errors or misprints. The information it contains is regularly checked and corrections are included in subsequent editions. We disclaim any responsibility for any technical error or printing error, or their consequences.
All trademarks and patents are recognized.
CANADA STATEMENT
This device complies with Industry Canada's licence-exempt RSSs. Operation is subject to the following two conditions:
(1) This device may not cause interference; and
(2) This device must accept any interference, including interference that may cause undesired operation of the device.
Apple and the Apple logo are trademarks of Apple Inc., registered in the U.S. and other countries. App Store is a service mark of Apple Inc.
Google Play and the Google Play logo are trademarks of Google Inc.

text_image
LA CROSSE® TECHNOLOGYSTATION MÉTÉO WI-FI AVEC ANÉMOMÈTRE ET PRÉVISIONS AccuWeather
MANUEL D'INSTRUCTIONS
text_image
Weather monitoring device displaying daily weather data including temperature, humidity, and an outdoor weather meter.Bienvenue!
text_image
EXTRA SENSOR 78°JRYwww.lacrossetechnology.com/lacrosseviewsupport
natural_image
Technical line drawing of a device front panel with no visible text or symbolsWI-FI WIND & WEATHER STATION Page | 6
text_image
Add Device Please wait up to 15 minutes for your additional devices to connect to your account. Check the notification icon when your devices are ready to add. If you do not receive device notifications, go to the Main Menu and select Add / Edit Devices to add your devices separately. DONE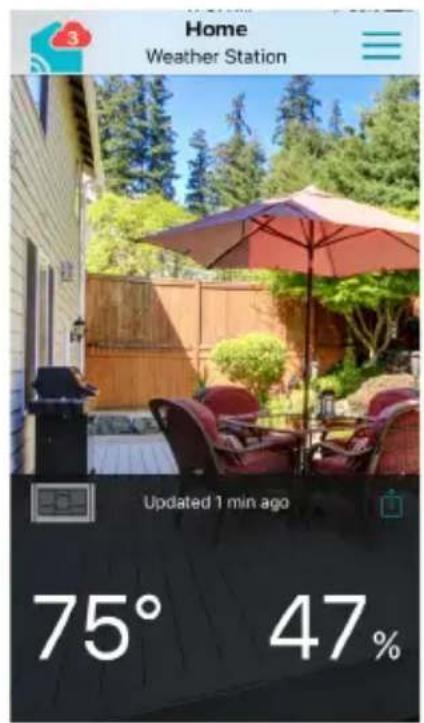
text_image
Home Weather Station Updated 1 min ago 75° 47%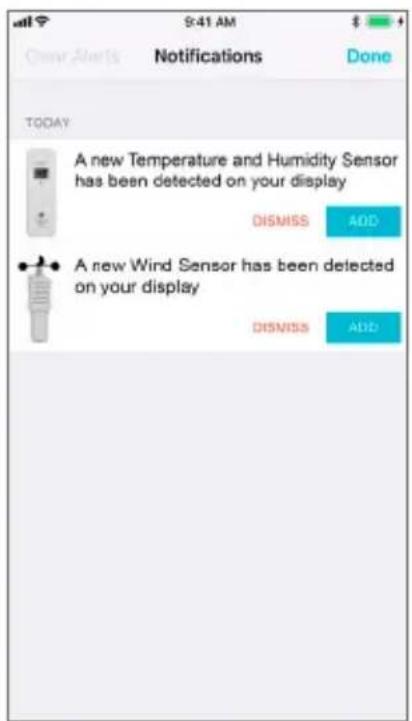
text_image
S:41 AM Over Alerts Notifications Done TODAY A new Temperature and Humidity Sensor has been detected on your display DISMISS ADD A new Wind Sensor has been detected on your display DISMISS ADDAVANTAGES DE LA CONNEXION À LA CROSSE

La Crosse View™
text_image
12 HR FORECAST 80% PRECIP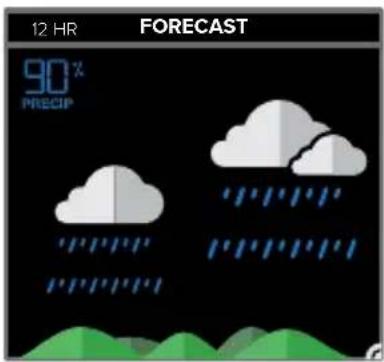
text_image
12 HR FORECAST 90% PRECIP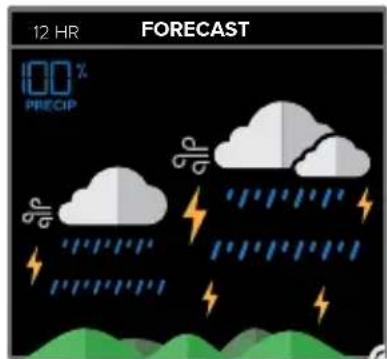
text_image
12 HR FORECAST 100 % PRECIPNEIGE LÉGÈRE MÉLANGE NEIGE/PLUIENEIGE
text_image
12 HR FORECAST 00 % PRECIP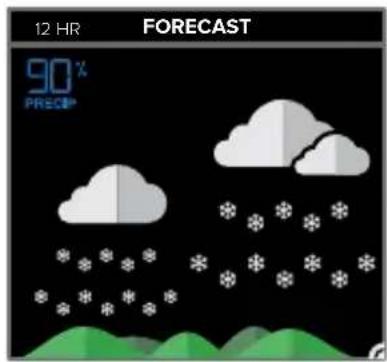
text_image
12 HR FORECAST 90% PRECIP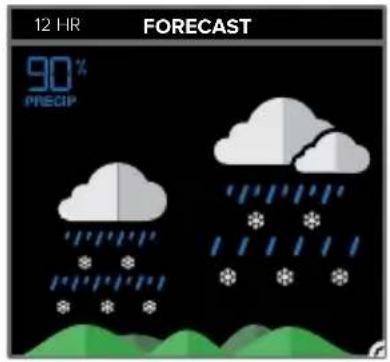
text_image
12 HR FORECAST 90% PRECIPVENT BROUILLARDGLACE
text_image
12 HR FORECAST 20% PRECIP
text_image
12 HR FORECAST 30% PRECIP ICE
text_image
12 HR FORECAST 30% PRECIP FOGPRÉVISIONS QUOTIDIENNES ACCUWEATHER
text_image
FORECAST:21R MNO 100PM OCT 24 - 19 HOURS 100PMtext_image
TODAY 47° HI 40° LODIRECTION DU VENT ACCUWEATHER
text_image
WIND SPEED DIRECTION 18 NHE MP Hbit.ly/LaCrosseView_Support_Vid_10
text_image
43°F 34°.60° 72° 48° LOST WIFI 12:34PM POKTAI SUN SUN SUN SUN SUN SUN SUN SUN SUN SUN SUN SUN SUN SUN SUN SUN SUN SUN SUN SUN SUN SUN SUN SUN SUN SUN SUN SUN SUN SUN SUN SUN SUN SUN
text_image
43°F 34°60′ 72°48′ NO WEATHER 12:34PM SAPP POKING SPEED 22 NPI ORDERER SERVICEFONCTIONS DES BOUTONS
text_image
AUTO JIM ON
text_image
AUTO JIM 1 100PM START TIME
text_image
AUTO DIM 600 AM STOP TIMEtext_image
1 HOUR 300PM TOP SPEED 18 MINI
text_image
24 HOURS 306PM VND 29 MPH MAY 22·19
text_image
WIND SPEED 10 NRE MP H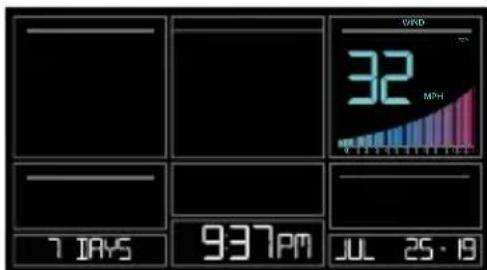
text_image
7 DAYS 937PM JUL 25·18 32 MONTH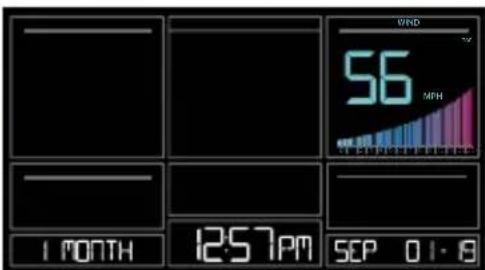
text_image
VND 56 MPH 1 MONTH 12:57PM SEP 01-8text_image
HI FLORT ON WINS SPEED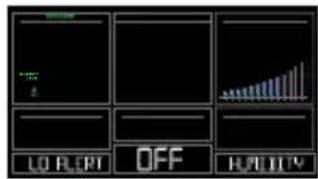
text_image
100% 2 100% OFF HAPPY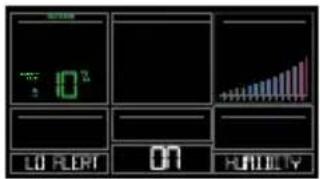
text_image
10² LO FLORT 01 HINDLY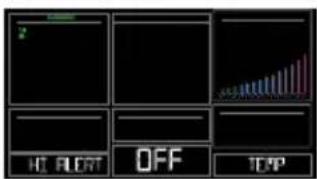
text_image
HC FLOR OFF TCP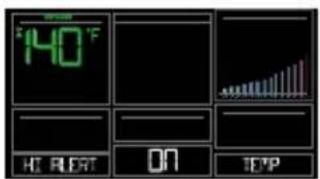
text_image
140°F HT RERT ON EPP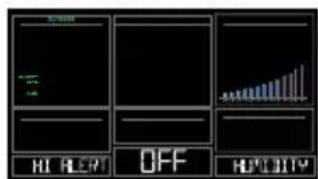
text_image
HI REM OFF HOLD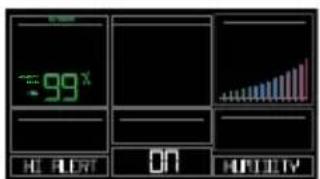
text_image
99x HI ALAT ON HISTORY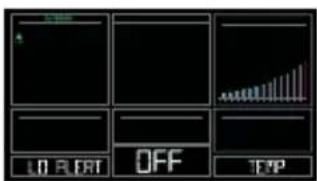
text_image
LO FLRT OFF TCP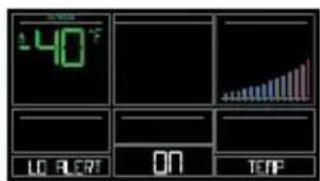
text_image
40°F LO FL ON TEMP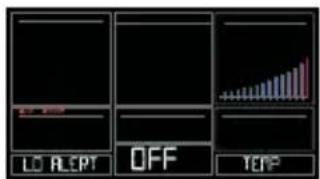
text_image
LO ALERT OFF YERP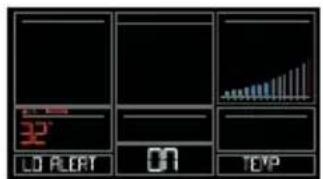
text_image
32' LO ALET ON TEVP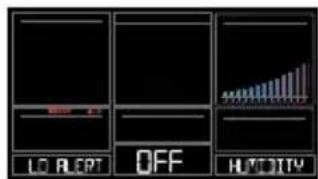
text_image
LO ALCEPT OFF HLDITY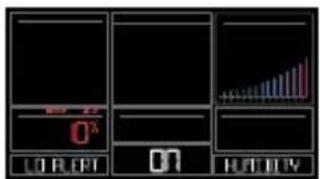
text_image
0² 0 HUTRY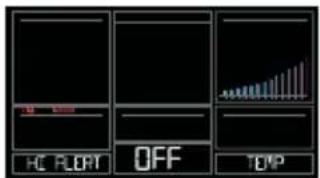
text_image
HC FLOAT OFF TOP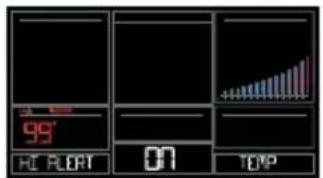
text_image
99° HC FLOAT 07 TOP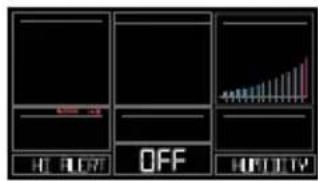
text_image
OFF 10 1.57 10 1.57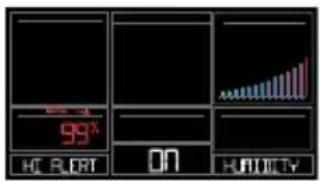
text_image
99° OK BLOT ON HUHTYTEMPÉRATURE RESSENTIE
text_image
Wind Cups LED Light Twist Left Battery Cover + - + - Side Mount Option Screws Mounting pole Knob Mounting BracketInstallation :
natural_image
Four black circular icons representing social media platforms: Facebook, Instagram, YouTube, and Twitter (no text or symbols beyond logos)PRÉCAUTIONS ET ENTRETIEN
Springfield Instruments, Inc.
104, rue Barr
This device complies with Industry Canada's licence-exempt RSSs. Operation is subject to the following two conditions:
(1) This device may not cause interference; and
(2) This device must accept any interference, including interference that may cause undesired operation of the device.