TRVL - Stroller Nuna - Free user manual and instructions
Find the device manual for free TRVL Nuna in PDF.
User questions about TRVL Nuna
0 question about this device. Answer the ones you know or ask your own.
Ask a new question about this device
Download the instructions for your Stroller in PDF format for free! Find your manual TRVL - Nuna and take your electronic device back in hand. On this page are published all the documents necessary for the use of your device. TRVL by Nuna.
USER MANUAL TRVL Nuna
You've just purchased a Nuna product, and you can be sure that your child is getting the best there is. Our products are expertly engineered for safety, with luxury fabrics and sophisticated style. Whatever made you fall in love with Nuna, rest assured your adventures with your little one will be easier from now on, freeing you to enjoy more happy family moments together.
Easy Installation
Our products are designed to make your life easier, so installing this child restraint doesn't require outside assistance. While we encourage the use of Certified Child Passenger Safety Technicians to ensure you have installed the seat correctly, you can install the child restraint in your vehicle without these professionals by carefully reading and following these instructions.
IMPORTANT! KEEP THESE INSTRUCTIONS FOR FUTURE REFERENCE: READ CAREFULLY
WARNING: Read and understand ALL warning labels affixed to the child restraint and all written instructions. Failure to do so can result in serious injury or death. Store instructions in the slot on the bottom of the leg rest for future use.
Contents
About PIPA ^TM urbn
Product Information 4
Product Registration 4
Recall Information 4
Limited Warranty 5
Contact 5
Child Usage Requirements 6
Warnings 6
Car Seat Use after a Crash 11
Vehicle Compatibility 12
Using Vehicle Lap/Shoulder 46 Belt
Using Vehicle lap belt 48
Installation in an Aircraft 52
Installation on a Stroller 52
Accessories 54
Seat Pad Removal 56
Cleaning and Maintenance 58
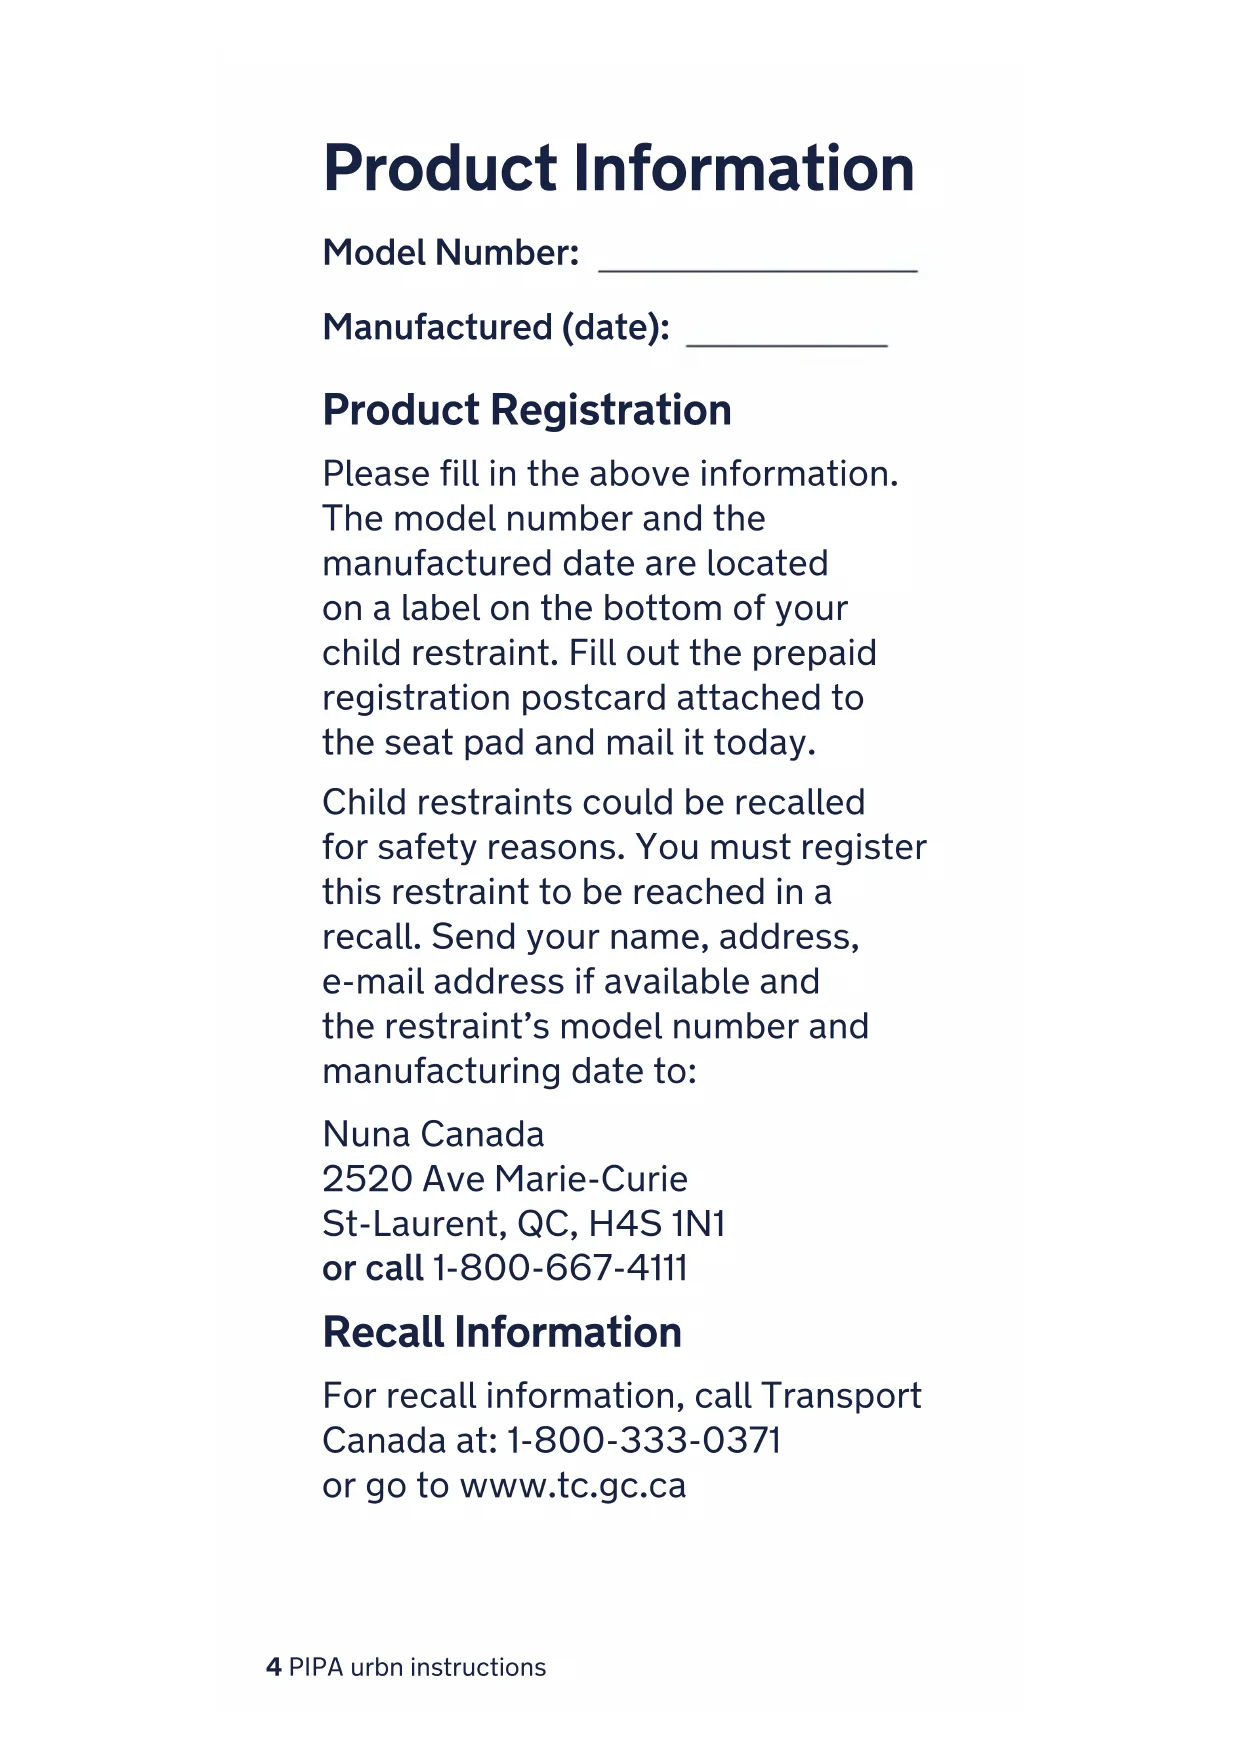
Product Information
Model Number: ____
Manufactured (date): ____
Product Registration
Please fill in the above information. The model number and the manufactured date are located on a label on the bottom of your child restraint. Fill out the prepaid registration postcard attached to the seat pad and mail it today.
Child restraints could be recalled for safety reasons. You must register this restraint to be reached in a recall. Send your name, address, e-mail address if available and the restraint's model number and manufacturing date to:
Nuna Canada 2520 Ave Marie-Curie St-Laurent, QC, H4S 1N1 or call 1-800-667-4111
Recall Information
For recall information, call Transport Canada at: 1-800-333-0371 or go to www.tc.gc.ca
Limited Warranty
We have purposely designed our high-quality products so that they can grow with both your child and your family. Because we stand by our product, our gear is covered by a custom limited warranty per product, starting from the day it was purchased. Please have the proof of purchase, model number and manufactured in date available when you contact us.
For warranty information, please visit: https://nunababy.ca/en/about-us/1143-warranty
Contact
For replacement parts, service, or additional warranty questions, please contact our customer service department.
In Canada:
info@nunababy.ca
www.nunababy.ca
1.800.667.4111
Child Usage Requirements
This child restraint is suitable for use with children who meet the following requirements:
Weight: 1.8 to 10 kg (4 to 22 lbs) Height: 38 to 74 cm (15 to 29 inches) It is recommended to keep your child rear facing as long as possible, until at least 2 years old.
WARNINGS
DEATH OR SERIOUS INJURY can occur if you fail to follow the warnings, instructions and labels on the child restraint.
A child's safety is your responsibility. NEVER leave your child unattended.
Read all instructions before use of this child restraint or installation in a vehicle. In addition, read the vehicle owner's manual for information on child restraint installation.
Store the instruction manual in the pocket located within the seat pad.
Register your child restraint with themanufacturer.
Secure this child restraint with the vehicle's child restraint anchorage system if available, or with a vehicle belt.
This child restraint can ONLY be used in a rear facing position when using in a vehicle. The child restraint cannot be properly secured in a forward facing position, and will be unsafe. Use only with children who weigh between 1.8 and 10 kg (4 and 22 lbs) and whose height is between 38 and 74 cm (15 and 29 inches). Exceeding these height and weight limits is unsafe.
Cover the child restraint when your vehicle is parked in sunlight. Parts of a child restraint can become very hot if left in the sun, and can burn a child's skin. Check for hot parts before putting your child in the child restraint.
NEVER use a car seat that has been involved in a moderate to severe crash. See page 11 to learn what is classified as a moderate to severe crash.
Snugly adjust the belts provided with this child restraint around your child.
If straps are not snugly adjusted, child may be ejected from seat in the event of an accident.
A snug strap should not allow any slack. It lies in a relatively straight line without sagging. It does not press on the child's flesh or push the child's body into an unnatural position.
EXPIRATION DATE: DO NOT use this child restraint if it is more than 7 years from date of purchase (proof of purchase required) or manufactured date otherwise. Please keep a copy of the receipt with this user guide for future reference. Check the label on the bottom of the child restraint.
FALL HAZARD Child's activity can move carrier. NEVER place carrier on counter tops, tables, or any other elevated surface. Always stay within arm's reach whenever carrier is not on floor/ground. Be sure handle locks into position before lifting carrier.
The carrier can fall from a shopping cart. DO NOT use on a shopping cart.
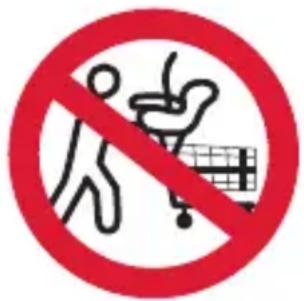
text_image
Prohibition sign with pictogram of person and shopping cart, crossed out by red circleSTRANGULATION
HAZARD Children have STRANGLED in loose or partially buckled harness straps. Fully restrain the child even when carrier is used outside the vehicle.
SUFFOCATION HAZARD Infant carrier can roll over on soft surfaces and suffocate child. Never place carrier on beds, sofas, or other soft surfaces.
DO NOT allow anyone who has not read the instruction manual to install or use this child restraint.
DO NOT allow child restraint to contact the vehicle interior (side of car door or seat in front).
DO NOT use child restraint if it has frayed or cut harness straps, or is damaged in any way. To find out if damaged parts are replaceable, call 1-800-667-4111.
NEVER modify any part of the child restraint.
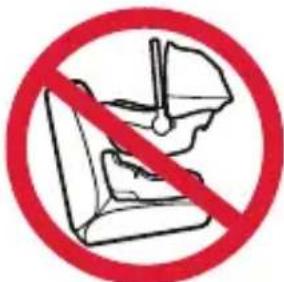
DO NOT attempt to use this carrier with a base.
DO NOT use any products or accessories with this child restraint unless they are approved by Nuna for use with this child restraint. Doing so may be unsafe and may void the warranty.
DO NOT leave child restraint in vehicle when uninstalled, even when unoccupied. In a crash, it could become a projectile and injure other vehicle occupants.
NEVER use clothing or blankets that interfere with providing a properly tightened harness. An unsecured or improperly harnessed child can come out of the restraint during a crash. Place blankets over child AFTER harness has been properly tightened.
Only use with Nuna strollers or appropriate Nuna adapters designed for use with other strollers.
This restraint system conforms to Canada Motor Vehicle Safety Standard 213.1
text_image
Prohibition sign with crossed-out computer and gear icon, red circle indicating no prohibitionCar Seat Use after a Crash
It is recommended that car seats be replaced following a moderate or severe crash. Car seats do not automatically need to be replaced following a minor crash.
What defines a minor crash?
A minor crash is one in which ALL of the following apply:
- The vehicle was able to be driven away from the crash site.
- The vehicle door nearest the car seat was not damaged.
- None of the passengers in the vehicle sustained any injuries in the crash.
- If the vehicle has air bags, none of the air bags deployed during the crash; and
- There is no visible damage to the car seat.
NEVER use a car seat that has been involved in a moderate to severe crash. Contact Nuna with questions or concerns about your seat.
Vehicle Compatibility
You MUST read and understand ALL child restraint related instructions and warnings in your vehicle owner's manual to correctly and safely use this child restraint in your vehicle.
This child restraint can ONLY be installed on vehicle seats facing forward equipped with a vehicle seat belt or UAS connector.
DO NOT install in seats that face
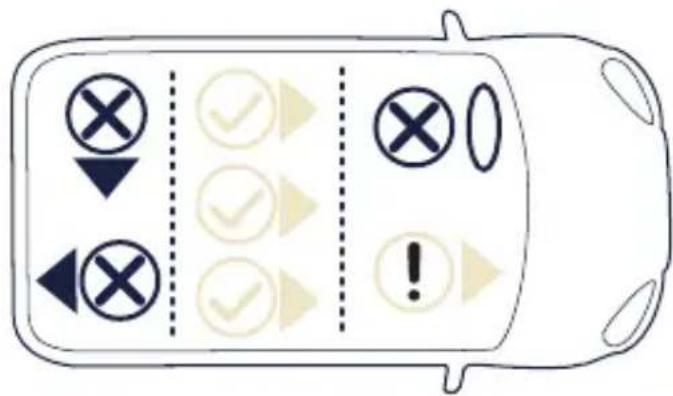
text_image
Diagram showing vehicle control panel with checkmarks, directional arrows, and warning symbols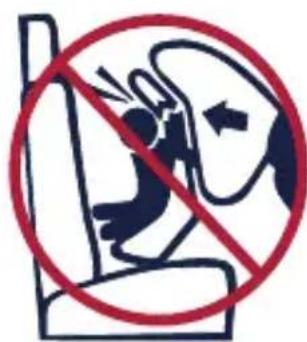
text_image
Prohibition sign showing a person in a seat with a 'No' symbol and a red circle, indicating no prohibition or caution.to the sides or rear of the vehicle.
NEVER install this child restraint rear facing in a vehicle seating position with a frontal air bag unless it is turned off. Airbags inflate with great force and can cause severe injury to a child's
neck and spine. If your vehicle is equipped with passenger side air bags, check your vehicle owner's manual for child restraint installation instructions.
According to accident statistics, children are safer when properly restrained in the rear seating positions than in the front seating positions.
This restraint system can only be used in these classes of vehicle: Passenger cars, multi-purpose vehicles and trucks that have lap, lap/shoulder belts and UAS connectors.
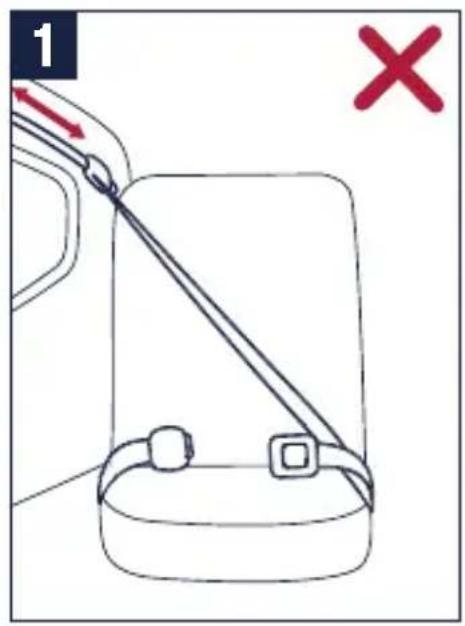
Vehicle Belt Use
Refer to your vehicle owner's manual to determine if the belts in your vehicle lock by switching the seat belt's retractor OR if they have a locking latch plate that locks the vehicle's seat belt so they will hold the child restraint tightly without loosening.
(Vehicle Belt Use continued on the next page).
These vehicle belts CANNOT BE USED with your child restraint. Install with lower anchors instead.
1 - Motorized Belts (Automatic) These should not be used unless the shoulder belt can be removed, the lap belt is locked and use is allowed by the vehicle manufacturer.
2 - Dual Retractor Belts If allowed by the manufacturer, the lap belt only may be used to secure the child restraint in accordance with this manual and the vehicle owner's manual.
3 - Non-Locking (ELR) Lap Belts This belt ONLY locks in a crash or sudden stop and should only be used with a belt shortening clip. Contact your vehicle manufacturer if needed.
4 - Airbag/Inflatable Belts This belt cannot be used to install this child restraint.
5 - Door Mounted Belts This belt cannot be used to install this child restraint.
6 - Lap Belts forward of Seat Bight This belt (is forward of where the seat back and seat bottom meet) cannot be used to install this child restraint.
text_image
1 X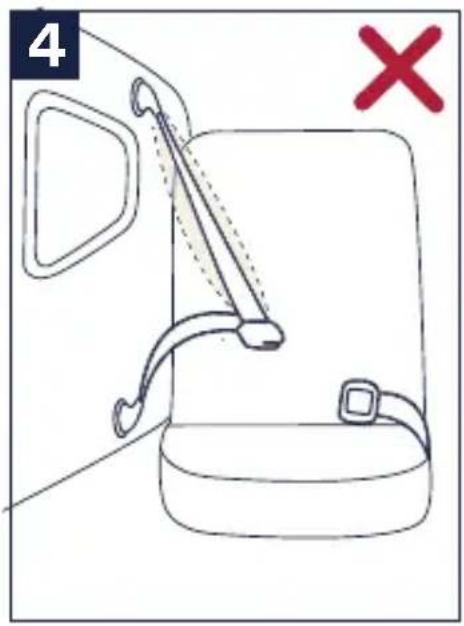
text_image
4 X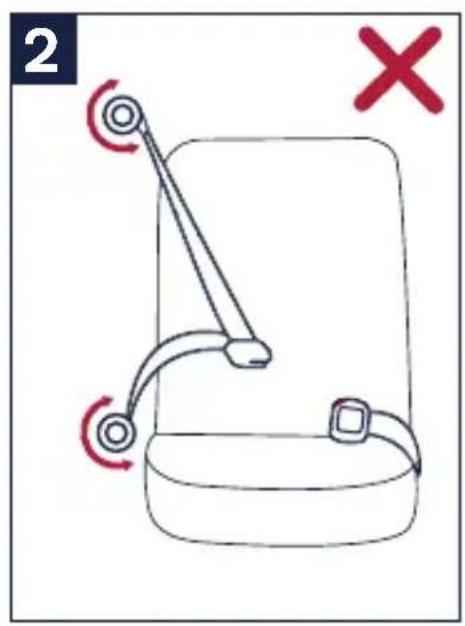
text_image
2 X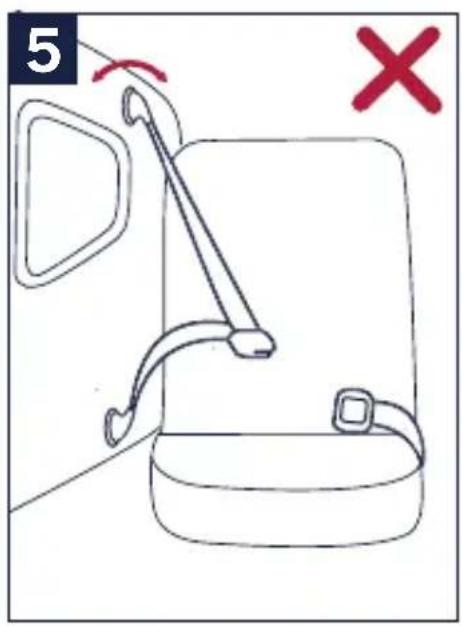
text_image
5 X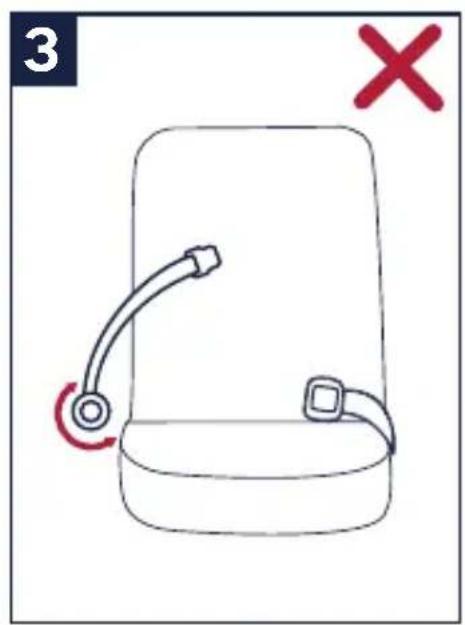
text_image
3 X
natural_image
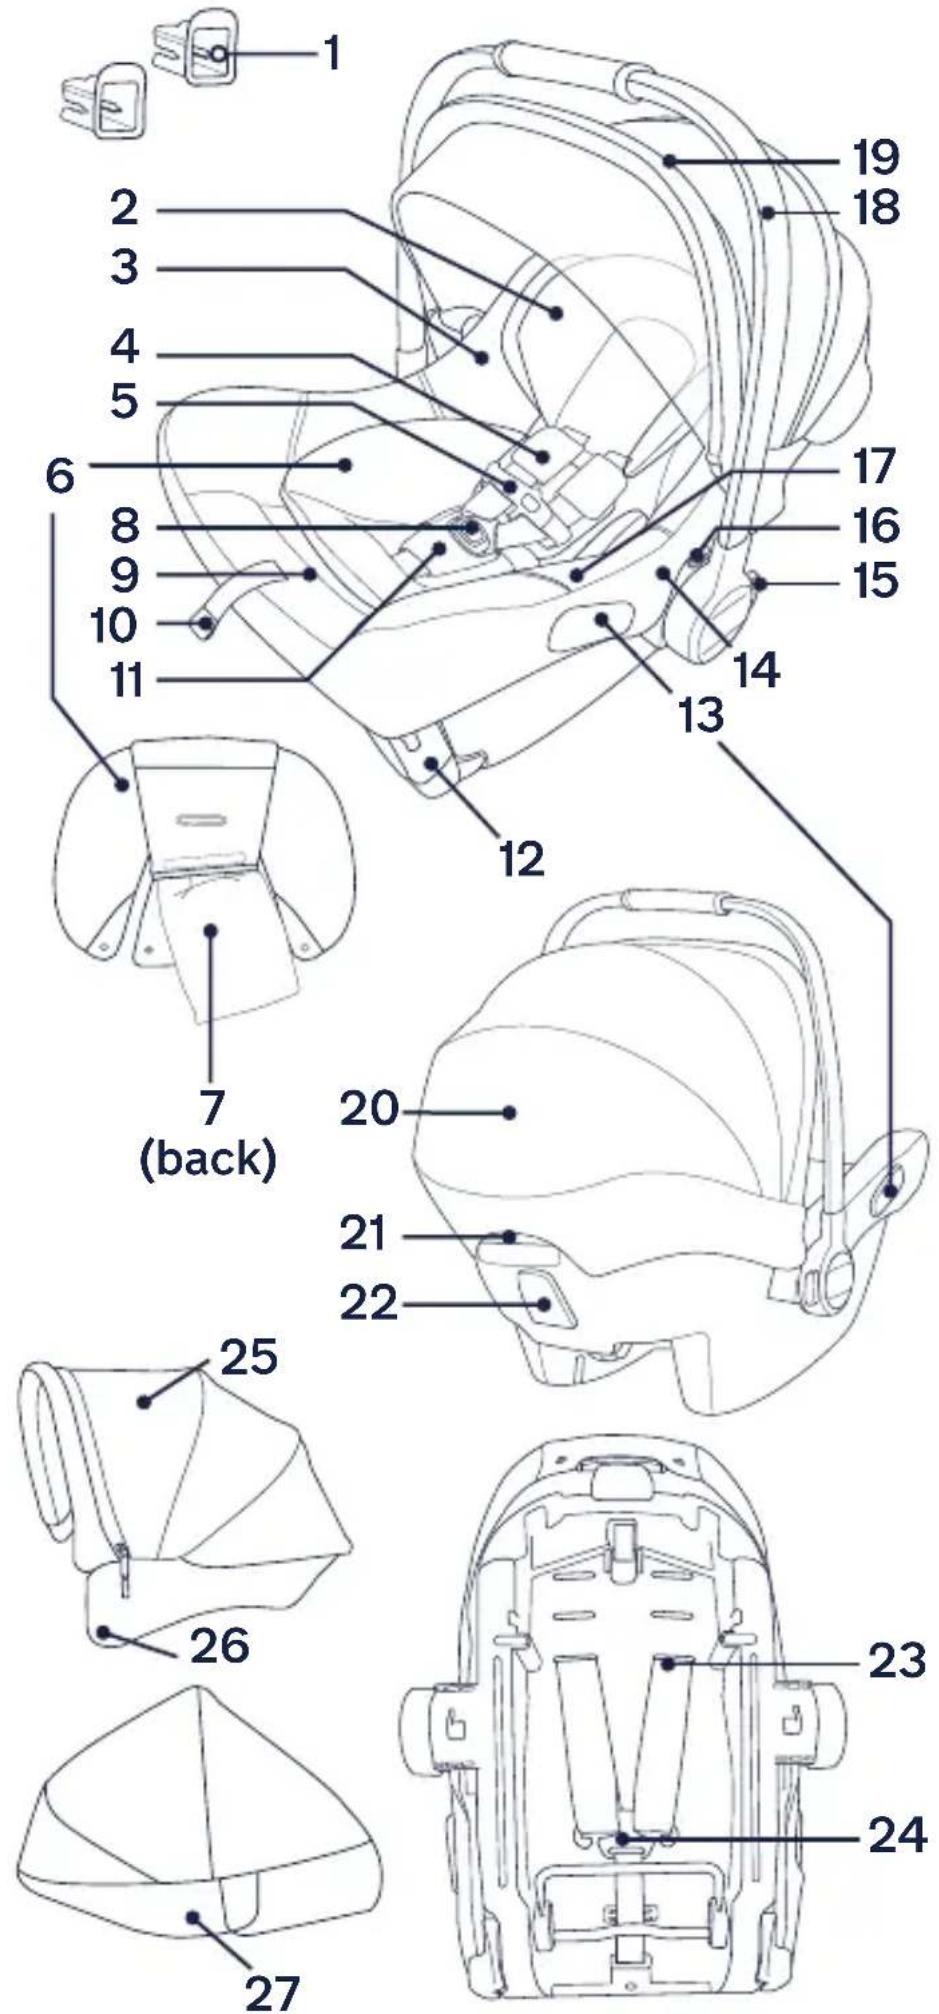
Simple line drawing of a closed book with a strap, marked with a red X (no text or symbols on the book itself)PIPA™ urbn Parts List
Make sure all parts are available before assembly. If any part is missing, please contact Nuna (see page 5 for information). No tools are required for assembly.
1 UAS Guides
2 Head Support
3 Seat Pad
4 Shoulder Pads
5 Chest Clip
6 Body Support
7 Low Birth Weight Pillow (inside Body Support)
8 Buckle
9 Harness Adjustment Button
10 Harness Adjustment Strap
11 Crotch Pad
12 UAS connector (Lower Anchors)
13 Lap Belt Guide
14 Magnetic Buckle Holder
15 Handle Adjustment Button
16 Post Adapter Release Button
17 Instruction Manual Pocket
18 Handle
19 Canopy Drape Zipper
20 Canopy Window
21 Rigid Latch & Stroller Release
22 Shoulder Belt Guide
23 Shoulder Harness Straps
24 Harness Splitter Plate
25 Canopy
26 Canopy Mount
27 Rain Cover*
*Included on some models; available for separate purchase
text_image
1 2 3 4 5 6 8 9 10 11 7 (back) 12 13 14 15 16 17 18 19 20 21 22 23 24 25 26 27Product Overview
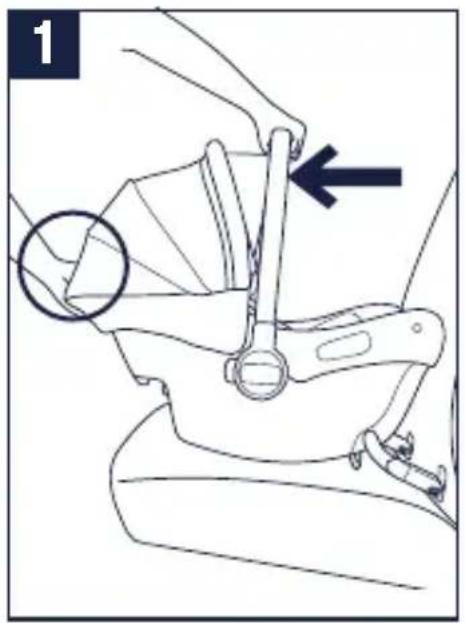
Magnetic Buckle Holders
1 - Loosen and unbuckle harness. Place the buckle tongues against the magnetic area on the side of the child restraint so that the tongues are held in place.
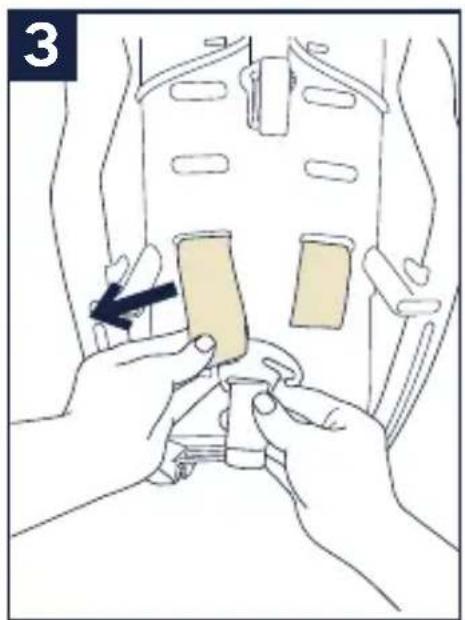
Canopy
2 - To assemble the canopy, slide the canopy mounts into the openings in the seat shell.
Check that the canopy is secure by pulling up on the canopy mount.
3 - Fasten the snaps on the back of the canopy to the seat soft goods on both sides.
4 - Unzip the zipper behind the front canopy bow.
5 - Pull the canopy drape out of the compartment and attach the canopy drape to the magnets on each corner at the front of the carrier.
(continued on the next page)
natural_image
Diagram of a car seatbelt mechanism with a highlighted belt and arrow indicating direction (no text or symbols)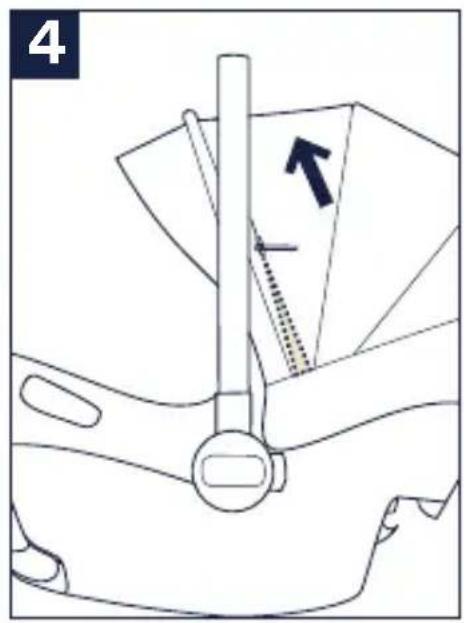
natural_image
Technical diagram of a mechanical device with a lever and directional arrow (no text or symbols)
natural_image
Diagram of a mechanical device with a belt switch and directional arrow (no text or symbols)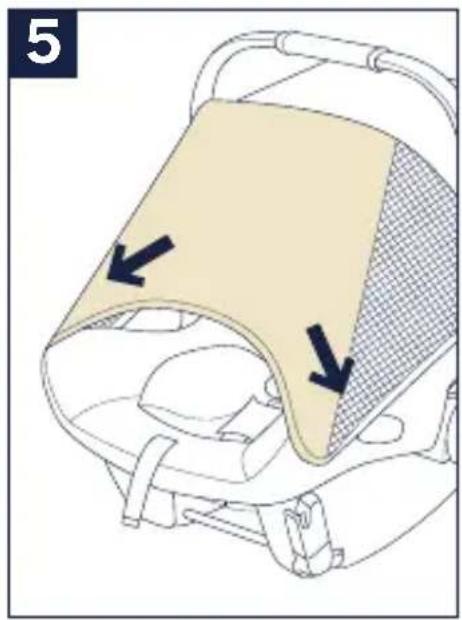
natural_image
Diagram of a baby car seat with a highlighted seat and two arrows indicating direction (no text or symbols present)
natural_image
Line drawing of a hand adjusting a small circular object on a device (no text or symbols)Canopy (continued)
1 - The canopy window can be opened for ventilation.
2 - To remove the canopy, first undo the snaps on the back of the canopy soft goods.
3 - Undo the snaps on the seat soft goods near the handle.
4 - Push the release button in the center of the canopy mounts and pull the canopy mounts out of the seat shell to remove.
natural_image
Diagram of a medical device with a highlighted internal area and arrow indicating direction (no text or symbols)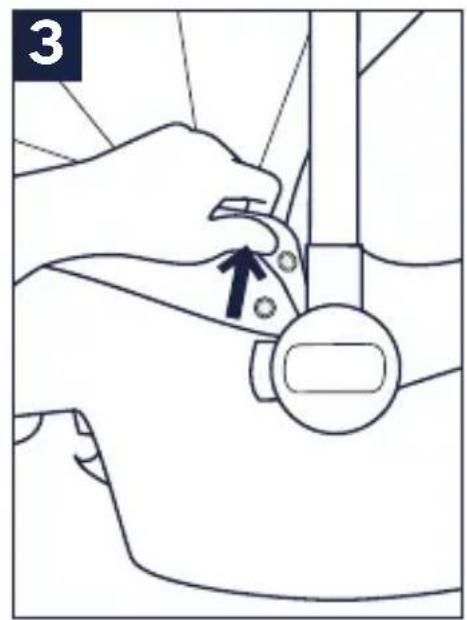
text_image
3
natural_image
Line drawing of a hand adjusting a small circular object on a device (no text or symbols)
text_image
4Shoulder Pads
1 - Shoulder pads are removable. Unbutton the two snaps to remove.
Crotch Pad
2 - Crotch pad is removable. To remove, slide the plastic tab out from behind the buckle.
3 - Pull the crotch pad off of the buckle.
Head and Body Support
The head and body supports can be used as necessary, to provide a snug fit for small babies.
The smaller head support piece can be removed when your child has outgrown it.
The head support straps cannot go through the same slots as the harness and should only be used in the top two harness slot positions.
⚠️ Remove smaller head support when inserts are at the highest position.
4 - To remove the head support, unfasten the hook and loop ends behind the seat fabric.
5 - Pull the head support straps through the harness slots.
(continued on the next page)
natural_image
Two books, one open and one folded with a paper corner and arrow indicating rotation (no text or symbols)
natural_image
Line drawing of a car seat assembly with no text or symbols
natural_image
Illustration of a hand holding a small object with a square hole, being cut by fingers (no text or symbols)
natural_image
Top-down anatomical diagram of a mechanical or biological structure, possibly a vehicle or implant, with no visible text or symbols.
natural_image
Illustration of a finger pressing down on a light bulb with an upward arrow indicating motion (no text or symbols)Head and Body Support (continued)
The head and body supports can be used as necessary, to provide a snug fit for small babies.
6 - To remove the body support, unbuckle the harness and route the buckle and crotch belt through the bottom slot of the body support.
The body support can be used for smaller babies, but MUST be removed once the child reaches 5 kg (11 lbs).
Low Birth Weight Pillow
7 - The low birth weight pillow inside the body support (highlighted) can be used for even smaller babies, but it must be removed once the child reaches 5 kg (11 lbs).
8 - To remove the low birth weight pillow, slide it out of the pocket on the body support.
natural_image
Anatomical diagram of a human pelvic region showing bone structures and soft tissue (no labels or text)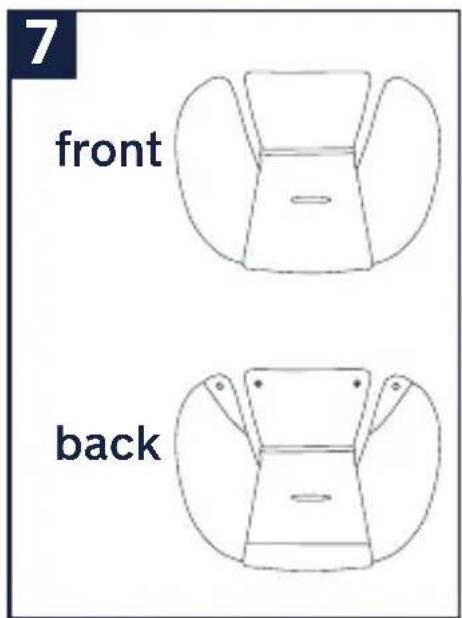
text_image
7 front back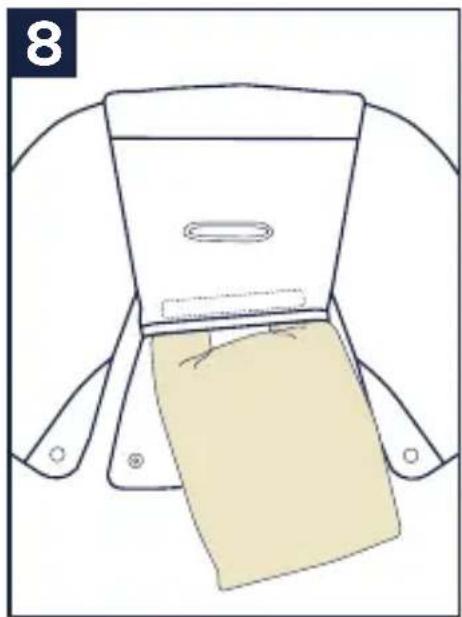
natural_image
Line drawing of a garment sleeve with a beige fabric patch and a small inset showing a slot (no text or symbols)Shoulder Belts
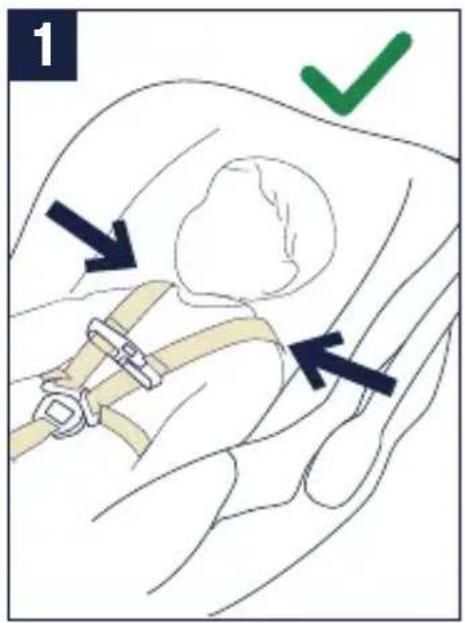
1 - Tighten harness to fit snugly on child's shoulders. It is snug if you cannot pinch a fold in the strap horizontally.
2 - Harness straps must be at or just below shoulders.
3 - To adjust shoulder harness height, remove child and loosen harness.
4 - Then turn child restraint over and remove one harness loop from metal splitter plate.
5 - Pull loose end of harness out through slots and place in correct slot.
(continued on the next page)
text_image
1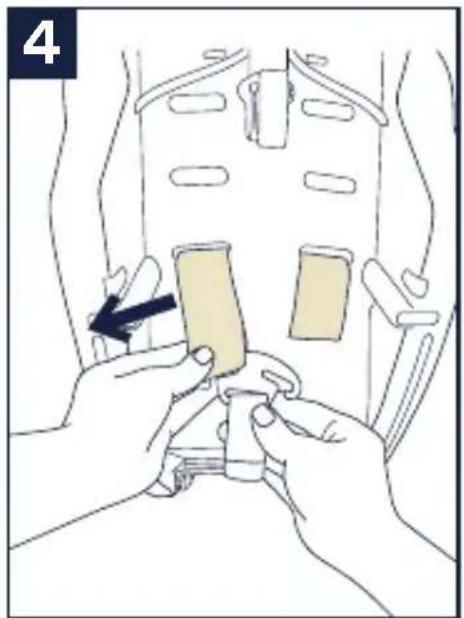
natural_image
Illustration of hands installing a seatbelt component with a black arrow indicating the mechanism (no text or symbols present)
text_image
2 X
text_image
5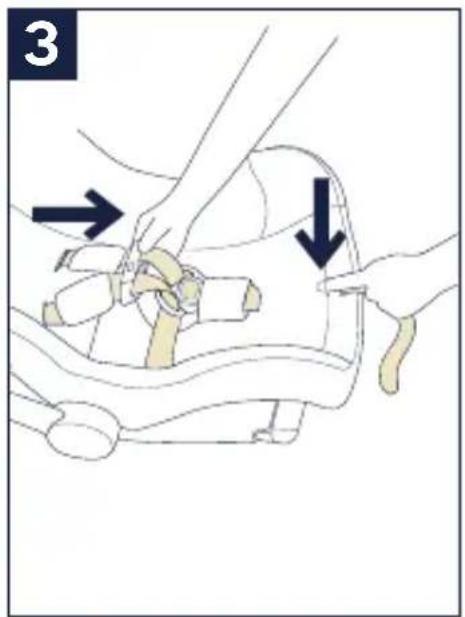
text_image
3Shoulder Belts (continued)
1 - Re-attach harness loop to splitter plate.
2 - ▲Do not allow harness to pass over bars. Repeat process for second shoulder harness strap.
natural_image
Illustration of hands installing a seatbelt component with a black arrow indicating the step (no text or symbols present)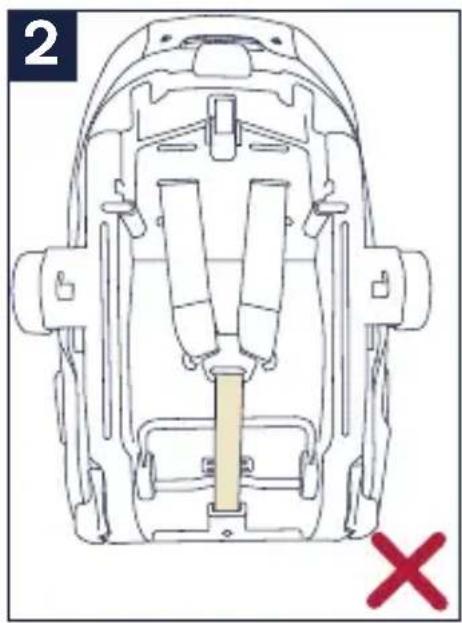
natural_image
Top-down diagram of a vehicle's seatbelt assembly with no text or symbols
natural_image
Technical line drawing of a backpack seat assembly with no visible text or symbolsHarness Length Adjustment
1 - Loosen the harness by pressing on adjustment button (1) while pulling on the harness straps. (2)
Handle Adjustment
2 - The carrier handle can be adjusted to 3 positions.
3 - To adjust the handle position, squeeze handle buttons on both sides. (1)
Rotate handle until it clicks into any of the 3 positions. (2) Handle can be used in vehicle in any locked position.
Be sure handle is locked in the carry position before lifting child restraint by handle. An unlocked handle could move unexpectedly, causing injury to child.
text_image
1 2 1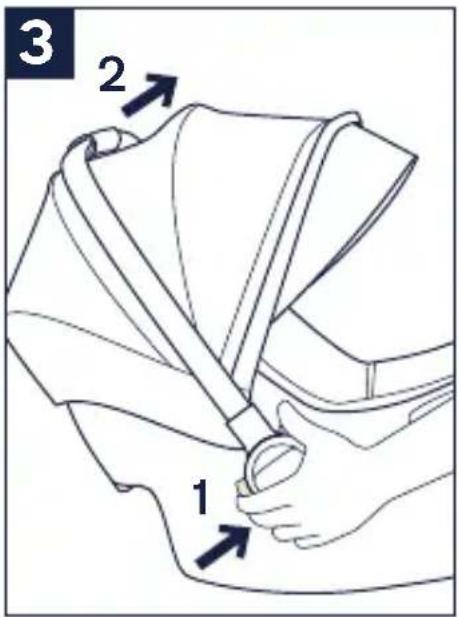
text_image
3 2 1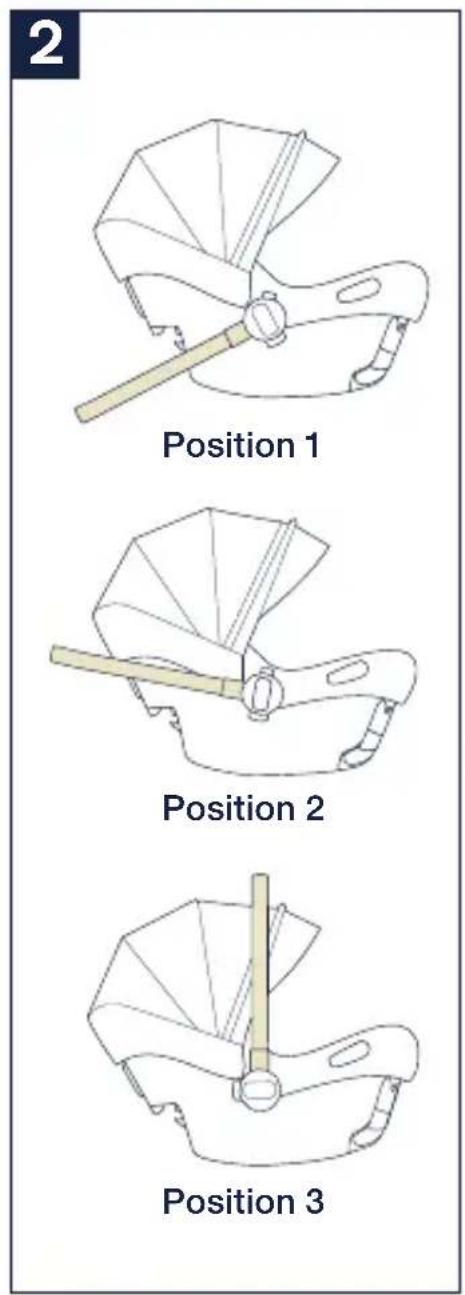
text_image
2 Position 1 Position 2 Position 3Product Use
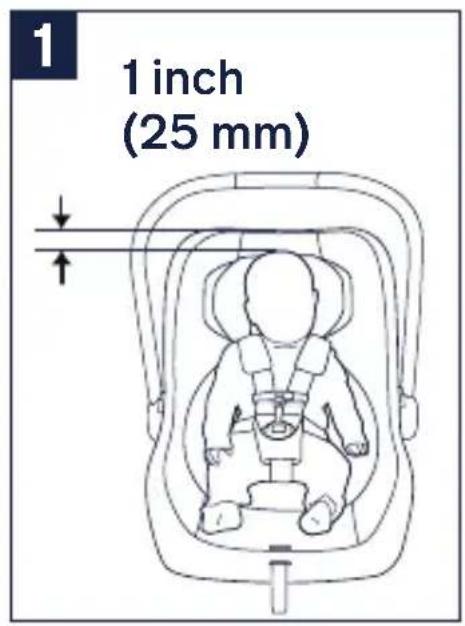
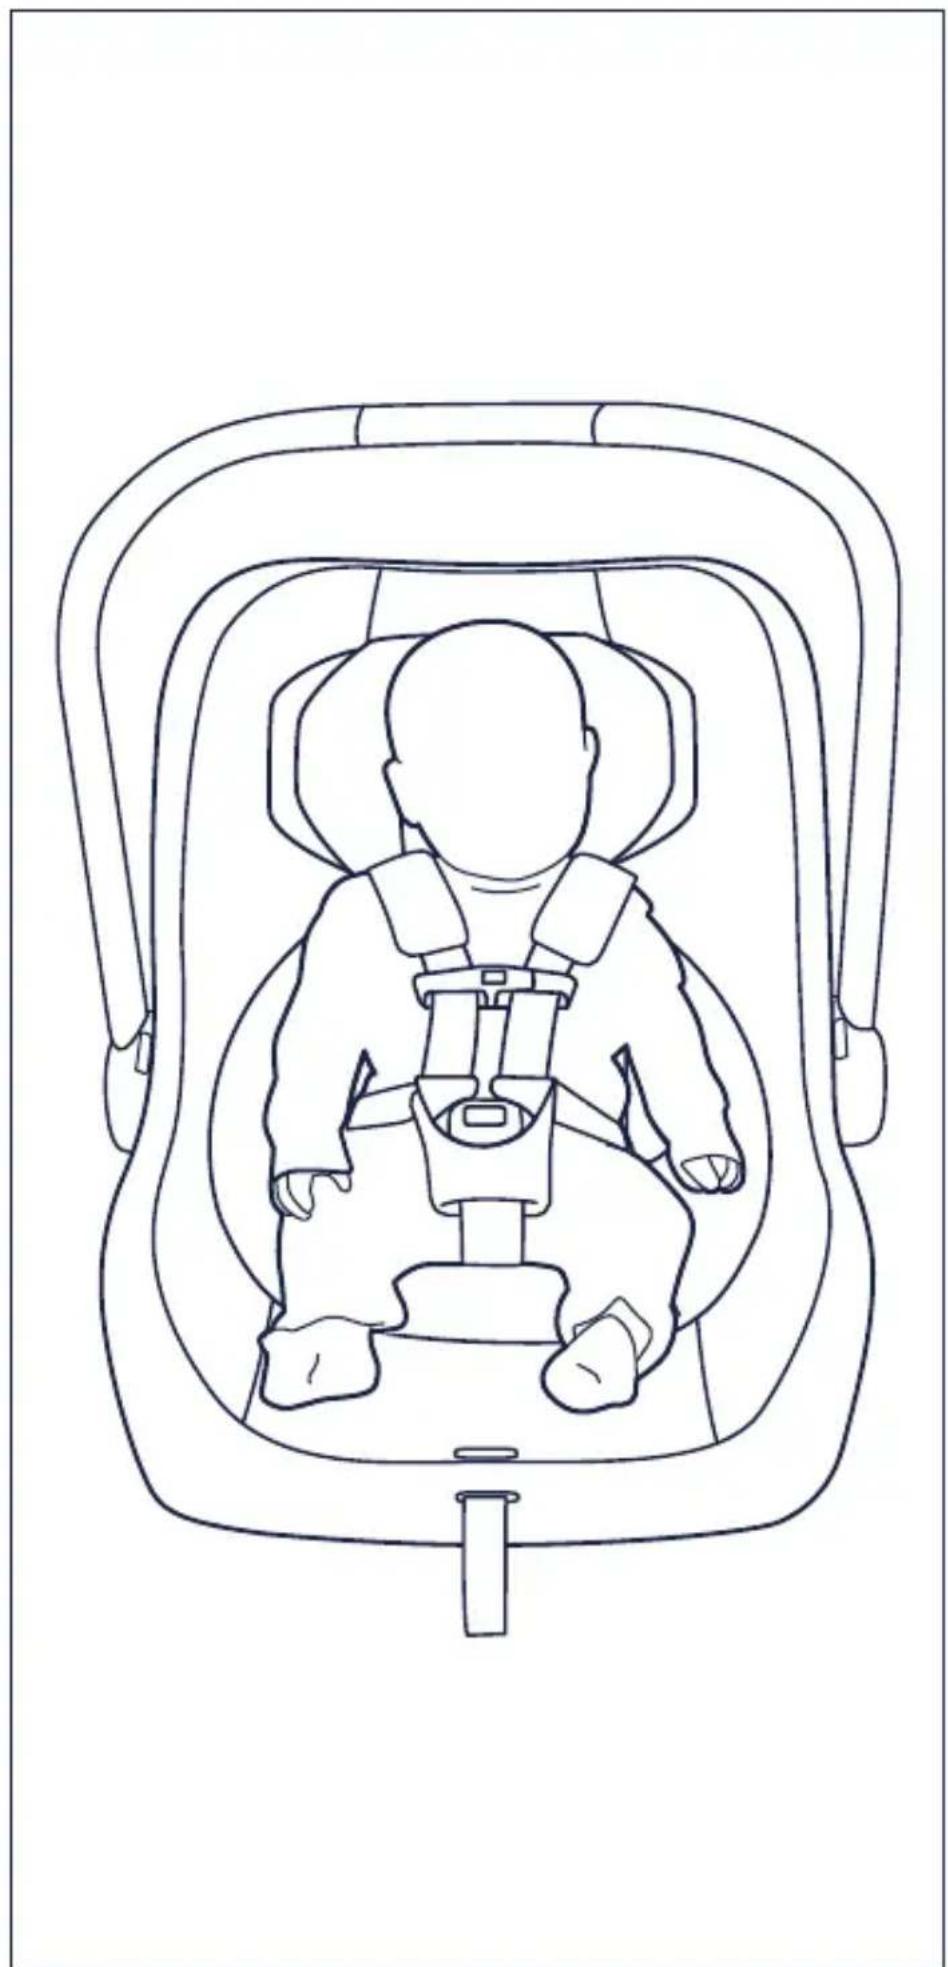
1 - Top of child's head should be at least 25 mm (1 inch) below top of child restraint.
Securing Child in Child Restraint
2 - Loosen harness by pressing on adjustment button (1) while pulling on the harness straps. (2)
3 - Press buckle button. (1) Press button to release the halves of the chest clip. (2) Separate chest clip and spread harness straps apart. (3)
4 - Place child in child restraint in seated position. The child should be seated against both the back and bottom of the seat with no gap behind the child. Do not allow child to slouch.
(continued on the next page)
text_image
1 inch (25 mm)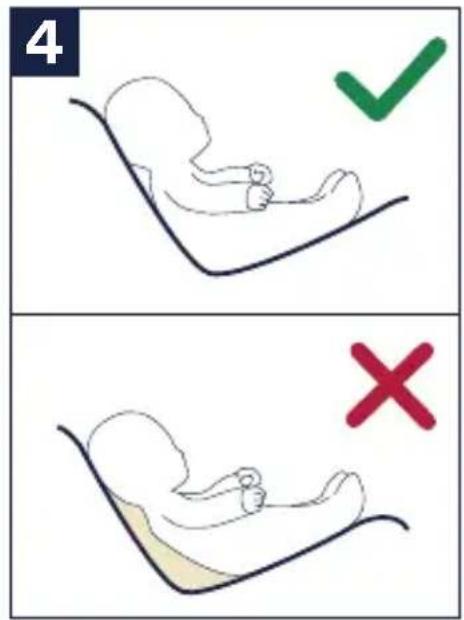
text_image
4 ✓ ×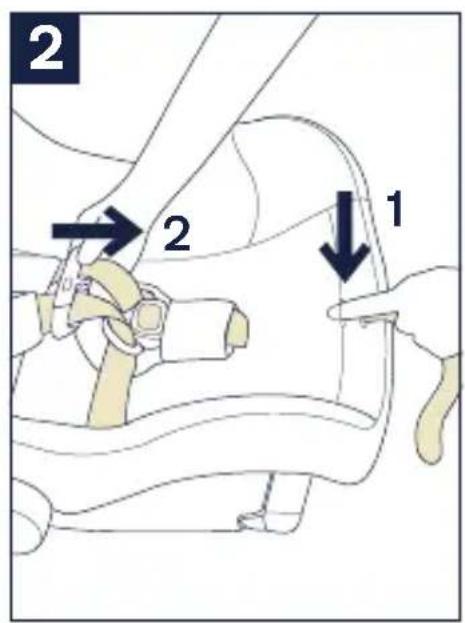
text_image
2 2 1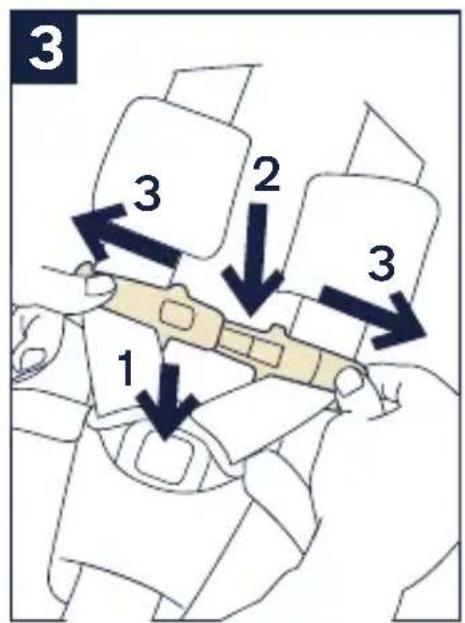
text_image
3 1 2 3Securing Child in Child Restraint (continued)
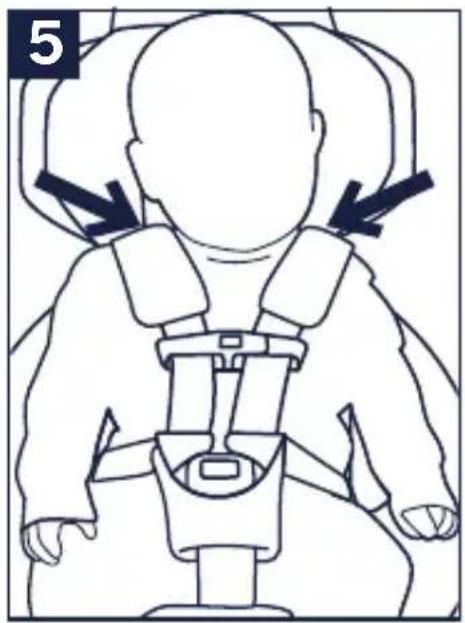
5 - Harness straps must be at or just below child's shoulders to avoid injury. If harness slots need to be moved, see Shoulder Belts section (p.26).
Gently guide child's arms through harness straps. If more harness length is needed, see page 26 for instructions.
(continued on the next page)
natural_image
Line drawing of a baby in a full-body seatbelt with arrows indicating pressure or movement (no text or symbols)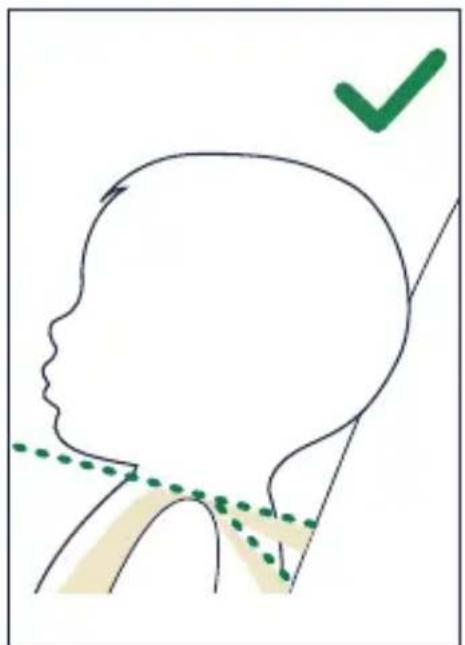
natural_image
Simple line drawing of a human head profile with a checkmark and dotted line indicating alignment or measurement (no text or symbols)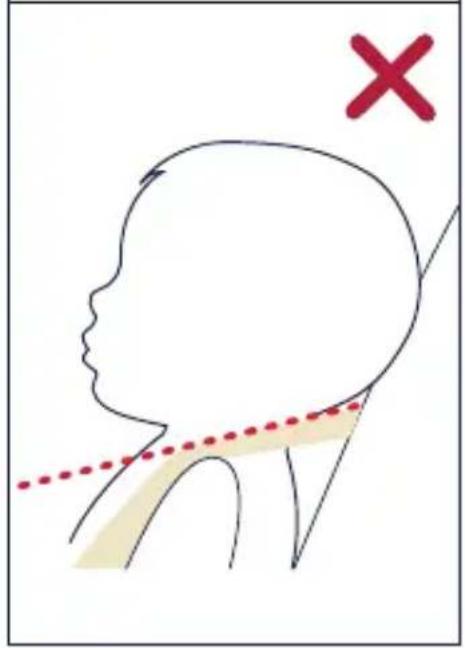
text_image
Diagram illustrating head and neck anatomy with a red X mark and a dotted line indicating a trajectory or path.Securing Child in Child Restraint (continued)
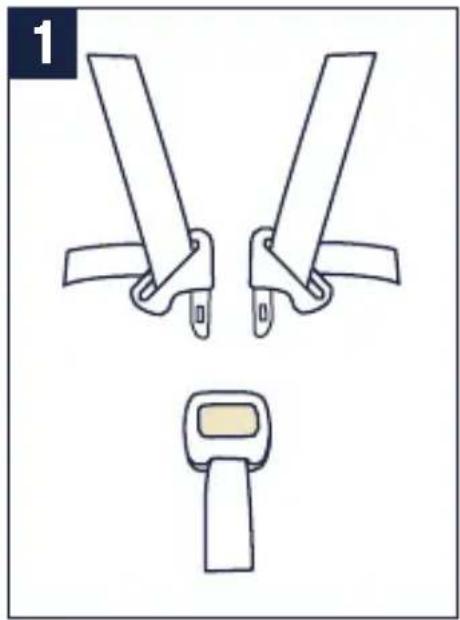
1 - Insert buckle tongues into buckle.
2 - Listen for clicks. Pull on buckle to verify it is latched.
3 - Snap the chest clip together and temporarily slide towards buckle for tightening of harness.
4 - Tighten harness by pulling on the adjustment strap (1). Pull any excess harness webbing through the buckle towards the child's shoulders (2) and pull again on the adjustment strap. This may need to be repeated several times for proper fit.
Verify that the harness is snug around the child's waist and shoulders.
5 - Position the chest clip at child's armpit level.
(continued on the next page)
natural_image
Diagram showing two mechanical components with clamps and a belt switch, no text or symbols present
text_image
4 2 2 1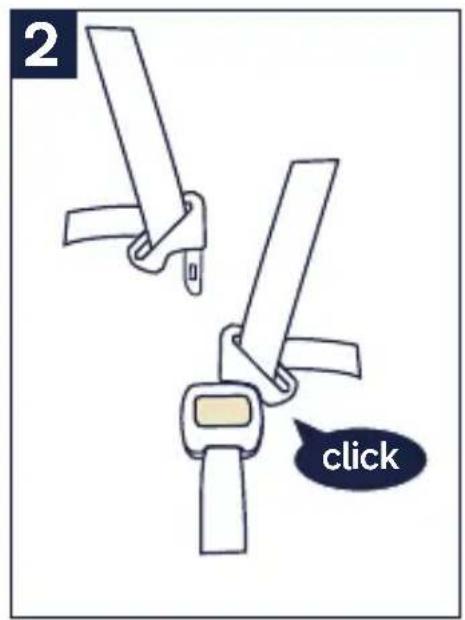
text_image
2 click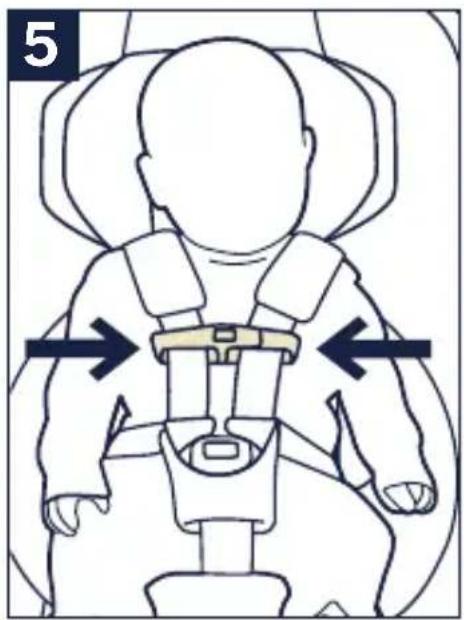
text_image
5
text_image
3 clickSecuring Child in Child Restraint (continued)
Make sure that nothing interferes with the harness. Make sure harness is snug around child and lays flat. Serious injury or death could occur to a child that is not secured properly.
If child is not secured properly, child could be ejected in a sudden stop or crash, resulting in serious injury or death.
Check that Child is Secure
□ Snugly adjust the belts provided with this child restraint around your child.
☐ If straps are not snugly adjusted, child may be ejected from seat in the event of an accident.
□ A snug strap should not allow any slack. It lies in a relatively straight line without sagging. It does not press on the child's flesh or push the child's body into an unnatural position.
☐ Harness is snug – A snug harness cannot be pinched horizontally, and should not allow any slack.
natural_image
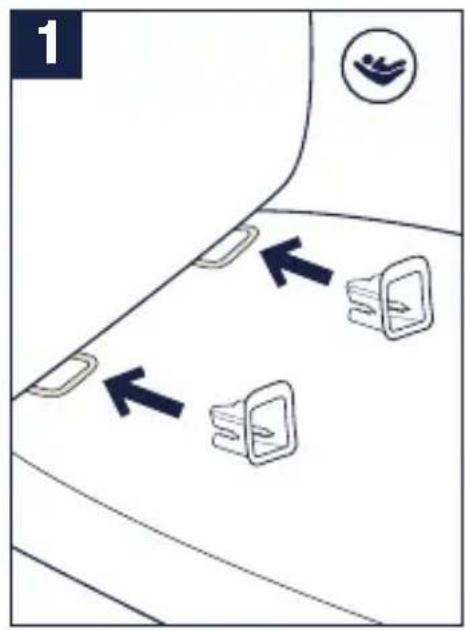
Line drawing of a baby car seat with seatbelt and seatbelt, no text or symbols presentInstallation
If child is not secured properly, child could be ejected in a sudden stop or crash, resulting in serious injury or death.
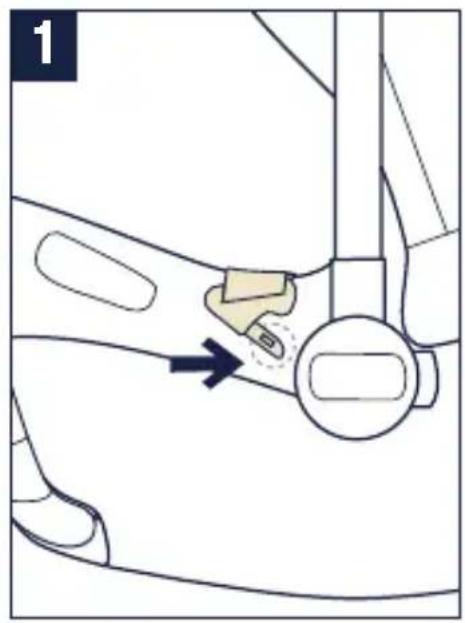
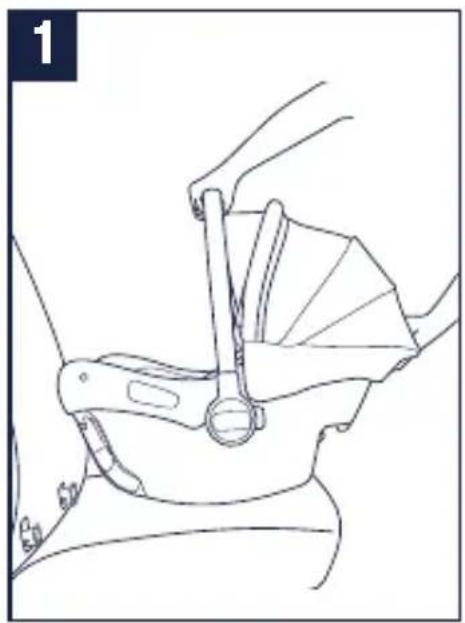
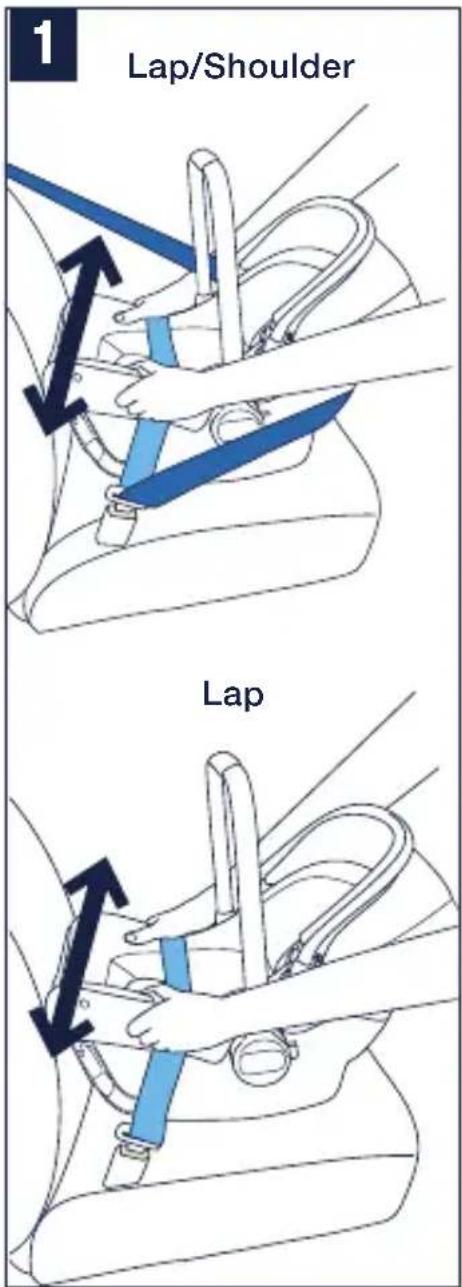
Installation Using UAS
1 - To help with installation of child restraint, install latch guides on vehicle lower anchor bars.
2 - Rotate UAS connector down. This also lowers the recline bar, which helps position the child restraint at the correct angle for installation.
3 - Position child restraint in a forward facing vehicle seat.
(continued on the next page)
text_image
1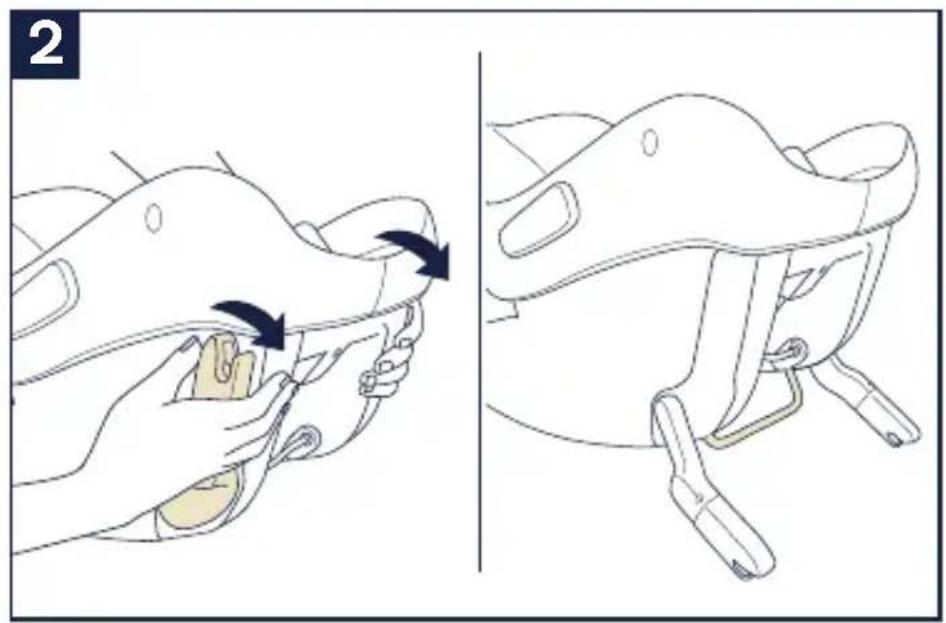
natural_image
Illustration of a person's head and neck adjustment, showing hand placement and movement arrows (no text or symbols)
natural_image
Line drawing of a car seatbelt mechanism (no text or symbols)Installation Using UAS (continued)
1 - Guide UAS connector onto vehicle lower anchor bars. Push both UAS connectors firmly onto vehicle lower anchor bars until they click into position.
2 - Check installation of UAS connector by pulling on child restraint AND seeing that green is indicated on the connectors. If child restraint moves freely side to side, or the indicator on the UAS connector is red, retry to secure UAS connector to vehicle lower anchors and re-check.
The UAS connector must be attached onto the vehicle lower anchor bars, and the indicator must be green.
3 - Make sure the level line on the child restraint label is as level as possible with the ground.
Note: There may be a gap between the child restraint and vehicle seatback, depending on the location of your vehicle's lower anchors. This is a correct and secure installation; therefore, nothing additional is required. However, if your preference is to close the gap, you have two options:
a. If you have reclining seats in your vehicle, you can adjust the vehicle seatback to a more upright position. b. Uninstall the UAS connectors and reinstall the seat using the lap/shoulder belt (p.46).
(continued on the next page)
text_image
1 click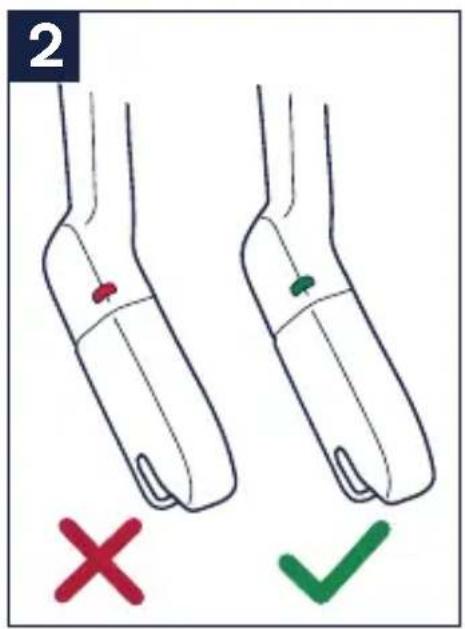
text_image
2 X ✓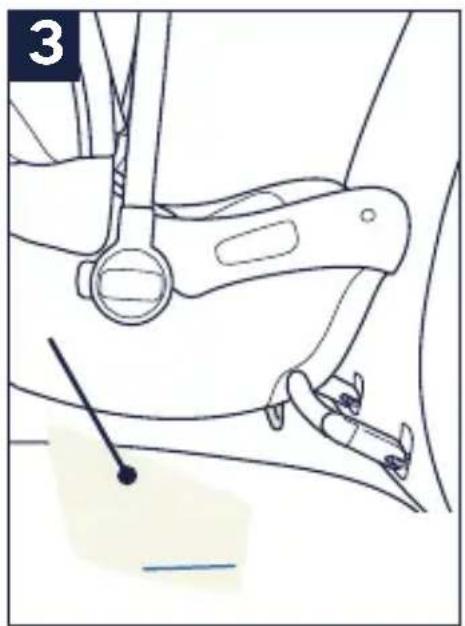
natural_image
Line drawing of a car seatbelt mechanism (no text or symbols)Installation Using UAS (continued)
Check the Installation
□ Make sure the UAS connectors are properly connected by pulling firmly on the child restraint.
□ Make sure the child restraint is properly leveled. Blue line must be level with ground.
It is acceptable to install with both UAS connectors and the vehicle belt, but proper leveling must be maintained.
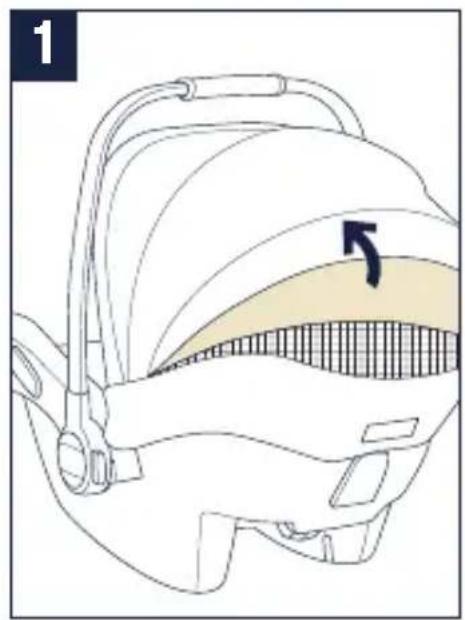
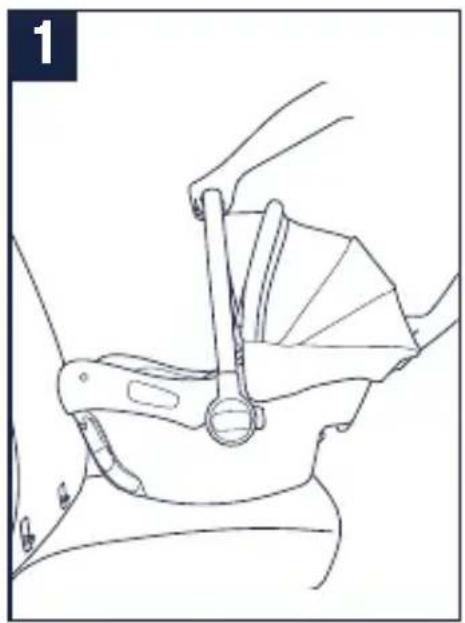
1 - To remove the child restraint, squeeze the UAS connector release on the back of child restraint and pull child restraint away from vehicle lower anchor bars.
2 - Rotate the UAS connectors up to storage position, and click them into place. Remove child restraint from the vehicle.
text_image
1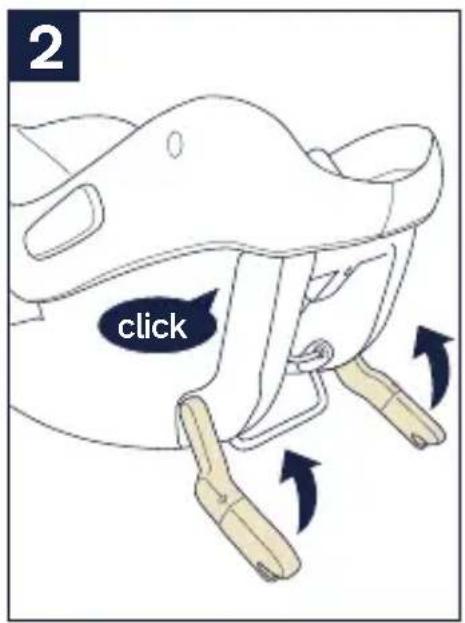
text_image
2 clickUsing Vehicle Lap/Shoulder Belt
Only install the child restraint in a forward facing vehicle seat.
1 - Position child restraint so that child is facing the rear of the vehicle.
2 - Option 1 (Preferred): Route the vehicle lap belt under both lap belt guides. Then route the shoulder belt around the back of the child restraint passing through the blue shoulder belt guide.
Option 2: Route the vehicle lap belt under both lap belt guides and buckle the vehicle belt. Allow shoulder belt to lay against vehicle seat back as shown.
3 - Adjust the angle of the child restraint. A rolled up towel or foam pool noodle may be used to adjust the amount of recline.
4 - Angle is correct when blue line on child restraint (located on the label on the side of the child restraint) is level with ground.
5 - Tighten vehicle belt while pushing child restraint firmly into vehicle seat. Remove all vehicle belt slack around belt guides and feed belt into vehicle belt retractor. Lock or switch vehicle belt to locked mode. Refer to vehicle owner's manual for instructions. If you cannot lock the vehicle belt, you must use a locking clip (p.52).
See p. 50 for final belt install steps.
natural_image
Line drawing of a hand holding a car seatbelt, no text or symbols present
natural_image
Line drawing of a car seatbelt device with blue and gold bands (no text or symbols)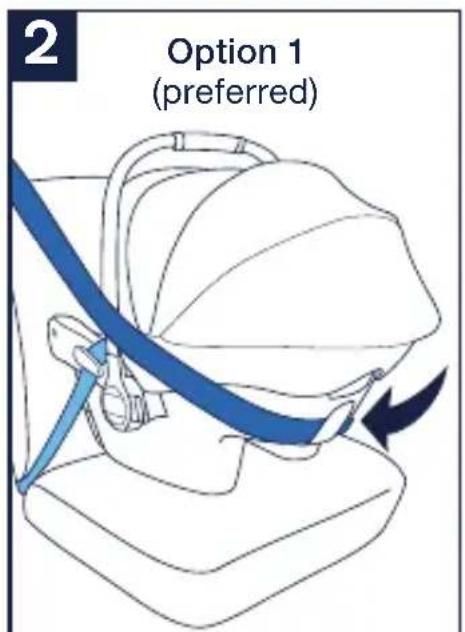
text_image
2 Option 1 (preferred)
natural_image
Line drawing of a baby car seat with a black arrow pointing to the seat (no text or symbols present)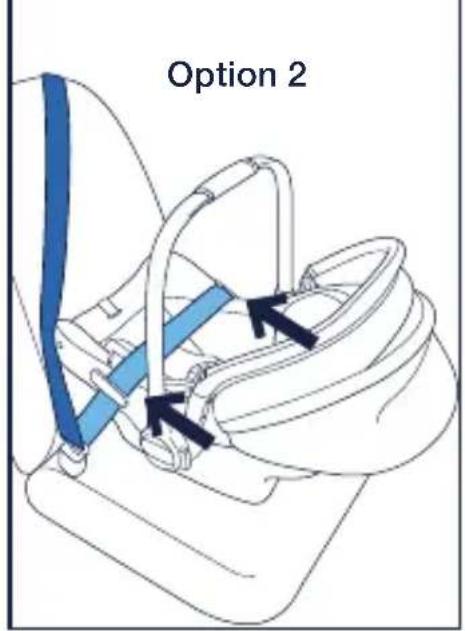
text_image
Option 2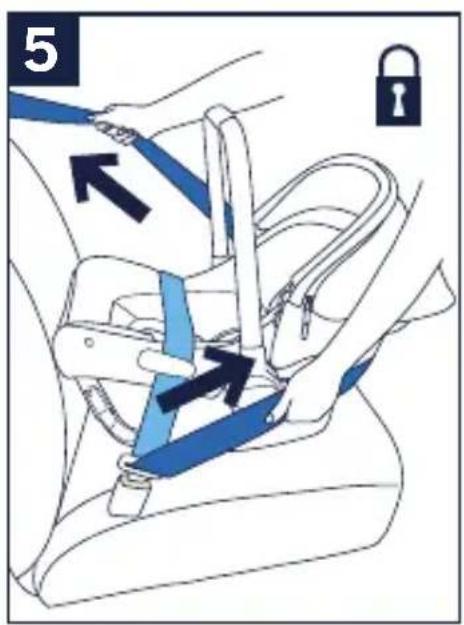
text_image
5Using Vehicle Lap Belt
Only install in a forward facing vehicle seat.
1 - Position child restraint so that child is facing the rear of the vehicle.
2 - If your vehicle does not have a shoulder belt, the lap belt only can be used. Route the belt across the belt guides, as shown.
3 - Adjust the angle of the child restraint. A rolled up towel or foam pool noodle may be used to adjust the amount of recline.
4 - Angle is correct when blue line on child restraint (located on the label on the side of the child restraint) is level with ground.
5 - Tighten vehicle belt while pushing child restraint firmly into vehicle seat. Remove all vehicle belt slack around belt guides and feed belt into vehicle belt retractor. LOCK the vehicle belt. Refer to vehicle owner's manual for instructions. If you cannot lock the vehicle belt, you must use a locking clip (p.52).
See p. 50 for final belt install steps.
natural_image
Line drawing of a mechanical device with hands operating a lever (no text or symbols)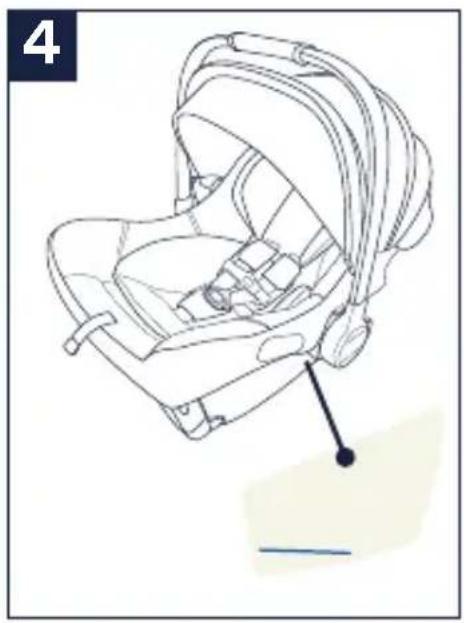
natural_image
Line drawing of a baby car seat with a black arrow pointing to the seat area (no text or symbols)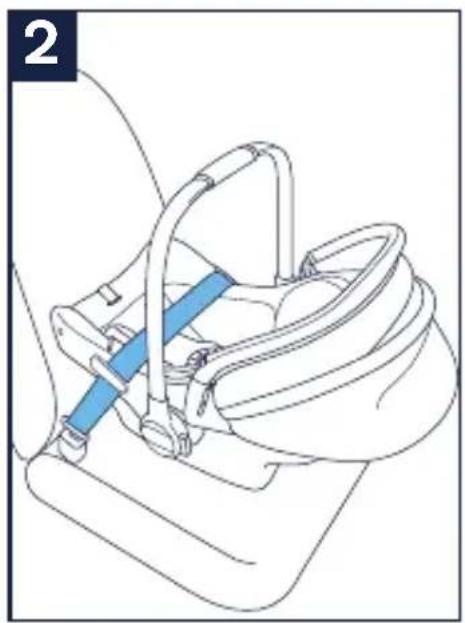
natural_image
Line drawing of a car seatbelt mechanism with blue belt (no text or symbols)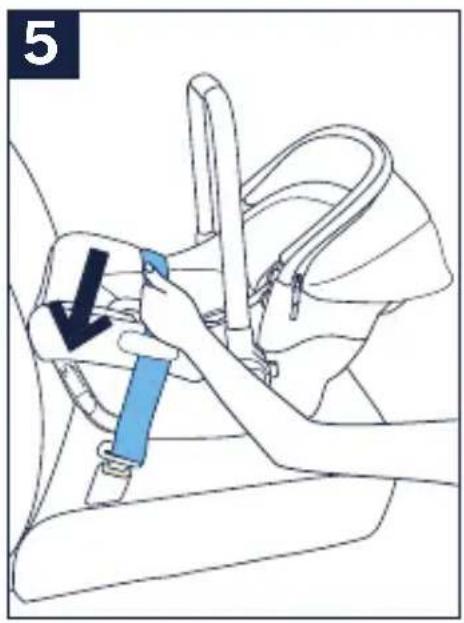
text_image
5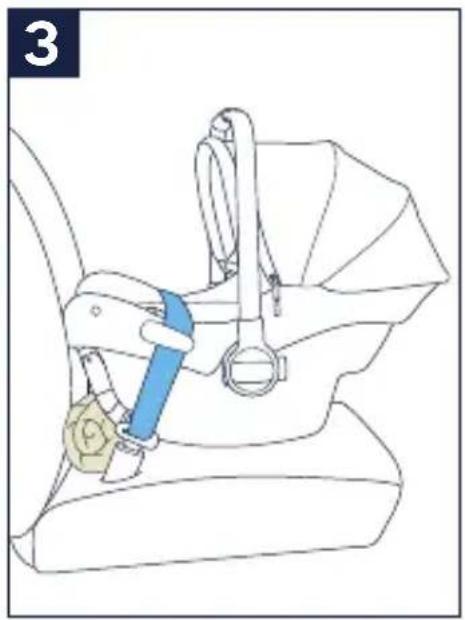
natural_image
Line drawing of a car seatbelt with a blue belt and yellow belt (no text or symbols)Check Vehicle Belt Install
1 - Make sure the vehicle belt is as tight as possible around the restraint, making sure the belt is not loose or twisted.
Check the Installation
☐ Blue line must be level with ground.
□ Vehicle belt must be buckled, tight and must stay locked.
☐ Child restraint should be stable and not move side to side more than 25 mm (1 inch) at belt path.
text_image
1 Lap/Shoulder LapLocking Clip
If you determine that you need to use a locking clip, please contact Nuna Customer Service.
By phone: 1.800.667.4111
By email: info@nunababy.ca
Installation in an Aircraft
Position child restraint so that child is facing the aircraft seat back.
1 - Route the aircraft lap belt under both lap belt guides. Then buckle the aircraft lap belt.
2 - Adjust the angle of the child restraint. The angle is correct when the blue line is level with the floor of the aircraft (1).
Tighten the aircraft belt while pushing the child restraint firmly into the seat. Making sure to remove any slack through belt guides.
This child restraint is certified for use in commercial aircraft. Be sure to contact your airline prior to travel to discuss their use policy.
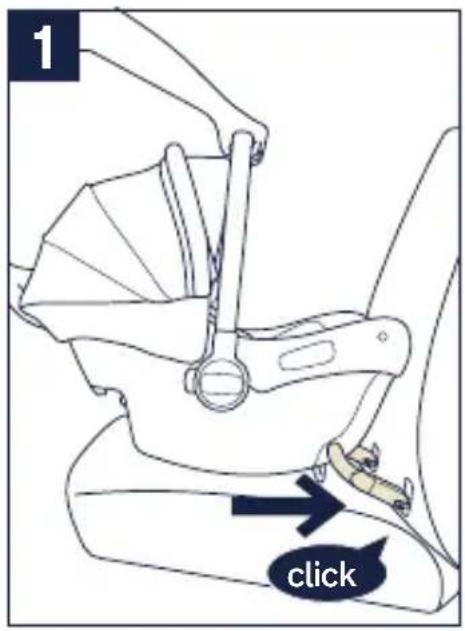
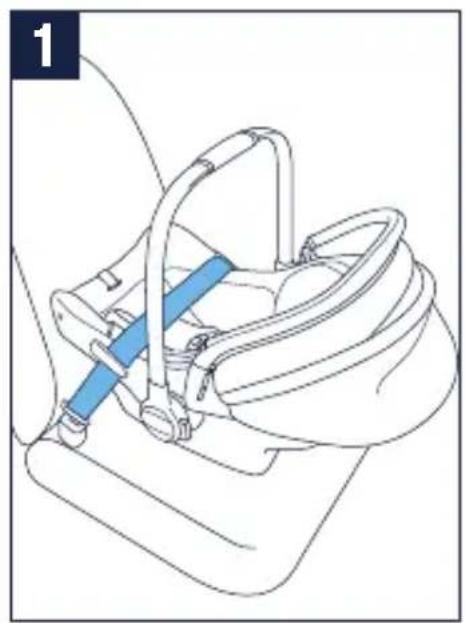
Installation on a Stroller
This infant carrier can easily attach to Nuna strollers* (see Accessories, p.54). Adapters are sold separately. Visit nunababy.ca for information.
*Attaches to Nuna TAVO™ series and TRVL™ without adapters
natural_image
Line drawing of a mechanical device with a blue lever handle (no text or symbols)
natural_image
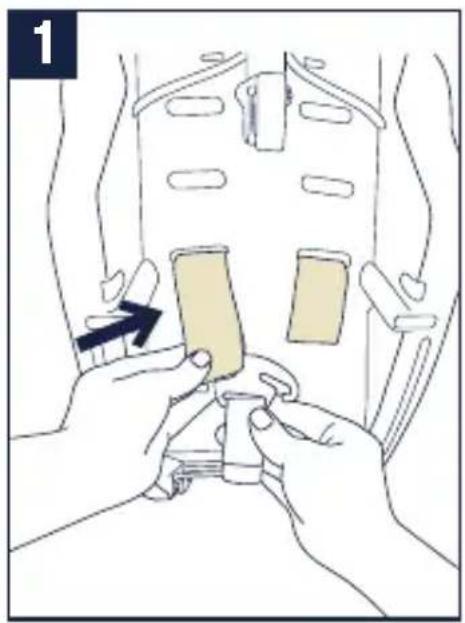
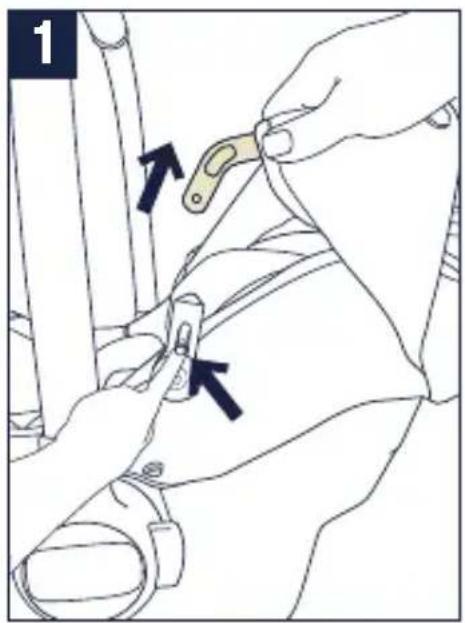
Line drawing of a car seat assembly with labeled parts (no text or symbols beyond labels)Accessories
PIPA series Adapters
The PIPA series can attach to Nuna strollers using adapters*. Instructions are included with the adapters, which are sold separately.
1 - Infant Car Seat Ring Adapter
2 - Infant Car Seat Post Adapters
Visit nunababy.ca for more information.
natural_image
Line drawing of a mechanical component with curved and rectangular features (no text or symbols)
natural_image
Line drawing of two abstract mechanical or architectural components (no text or symbols)Seat Pad Removal
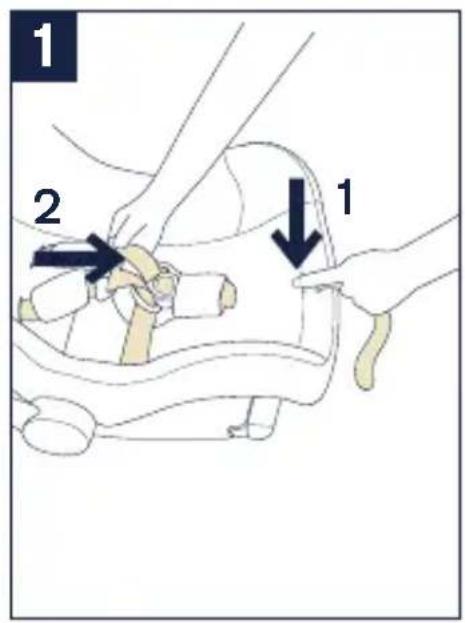
1 - To remove the canopy, undo the snap on the canopy fabric. Press the button in the canopy mount. Also, undo the fabric snap buttons and remove the crotch strap pad. See Product Overview section.
2 - Pull out the fastening pieces underneath the edge of the seat.
The best way to work this area (as some seat pads feel more tight in this area than others) is to pull the fabric towards the front of the seat at one corner. Once you have one corner out, you can easily work the other side out.
3 - Remove the harness from the splitter plate.
4 - Pull the adjuster strap out through the bottom adjuster strap opening.
Re-attach the seat pad following steps 1 through 3 in reverse.
text_image
1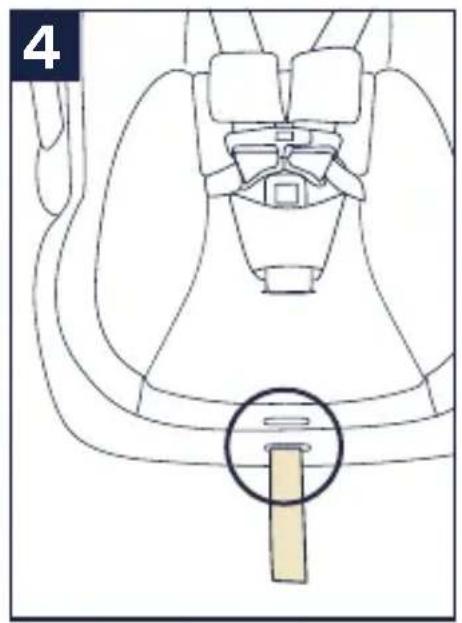
natural_image
Line drawing of a car seatbelt with a highlighted belt (no text or symbols)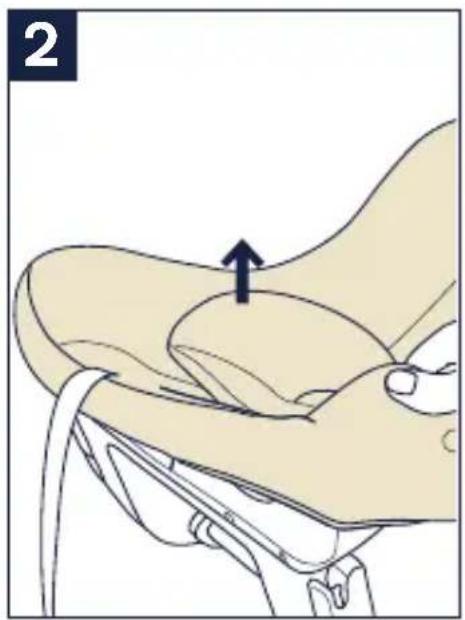
natural_image
Illustration of a hand holding a medical device with an arrow pointing to a specific area (no text or symbols present)
natural_image
Illustration of hands performing a medical procedure on a patient's abdomen, showing a tool and device placement (no text or symbols)Cleaning and Maintenance
Refer to the care label attached to the soft goods for washing and drying instructions.
DO NOT attempt to remove the foam or tape under the seat pad.
Use only mild detergent, water and a soft cloth to clean the infant carrier shell, handle and harness straps. Air dry.
To clean the buckle: rinse using warm water. DO NOT use any soaps, solvents or lubricants. Using anything other than water can cause the buckle to malfunction. Air dry.
Remove the infant carrier from the vehicle seat if not in use for a long period of time. Put the infant carrier in a cool, dry place and somewhere your child can not access it.
It is normal for fabric to color from sunlight and to show wear and tear after a long period of use, even when used normally.
Check regularly if everything functions properly. If any parts are torn, broken, or missing, stop using this product. Contact Nuna for replacement parts.
Nuna Baby Essentials, Inc. Nuna and all associated logos are trademarks.
Merci!
text_image
Prohibition sign with pictogram of person and shopping cart, no text presentRISQUE D'ÉTRANGLEMENT
RISQUE DE SUFFOCATION
text_image
Prohibition sign with crossed-out computer and chair icon, red circle indicating no prohibitiontext_image
Diagram of a car with directional and checkmark icons, including X, Y, V, O, I, and directional arrows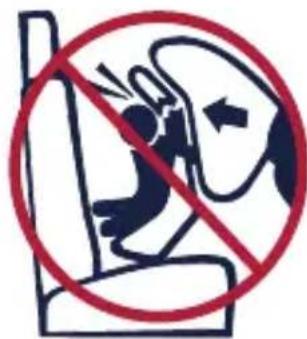
text_image
Prohibition sign showing a person in a seat with a red circle and crossed-out hand, indicating no prohibition or caution.natural_image
Simple line drawing of a closed book with a strap, marked with a red X (no text or symbols on the book itself)natural_image
Diagram of a car seatbelt mechanism with a highlighted belt and arrow indicating direction (no text or symbols)
natural_image
Technical diagram of a mechanical device with a lever and directional arrow (no text or symbols)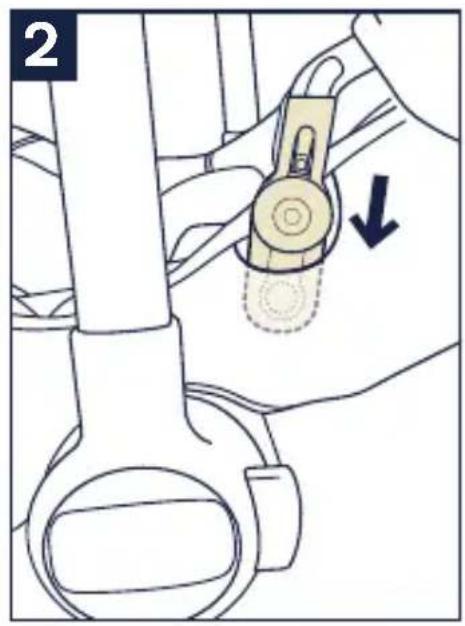
natural_image
Diagram of a mechanical device with a belt switch and directional arrow (no text or symbols)
natural_image
Diagram of a baby car seat with a shaded back cover and two arrows indicating direction (no text or symbols present)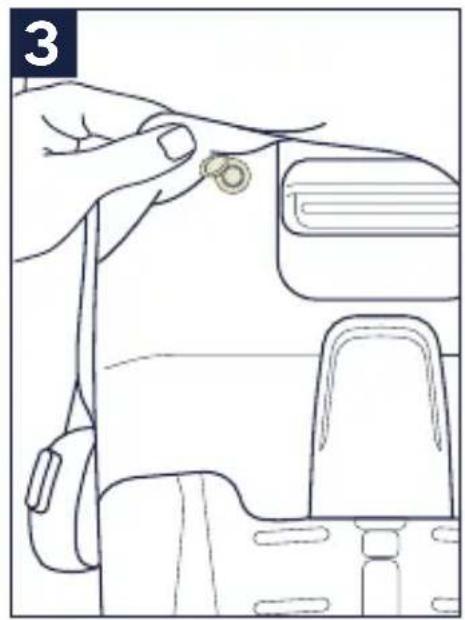
natural_image
Line drawing of a hand adjusting a small circular object on a device (no text or symbols)Capote (suite)
natural_image
Diagram of a medical device with a highlighted internal area and arrow indicating direction (no text or symbols)
text_image
3
natural_image
Line drawing of a hand adjusting a small circular object on a device (no text or symbols)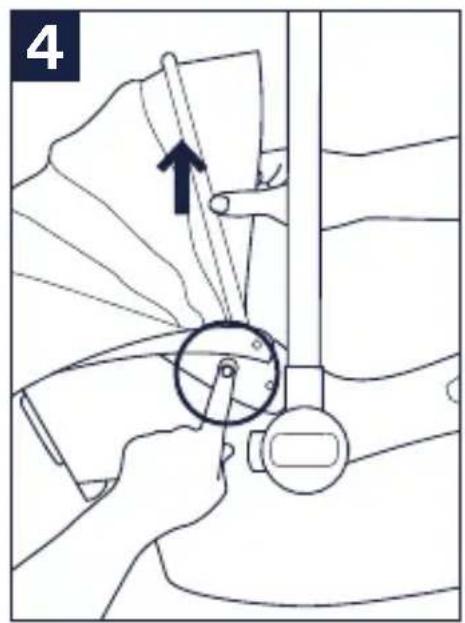
text_image
4Couvre-bretelles
natural_image
Two books, one open and one folded with a paper corner and arrow indicating rotation (no text or symbols)
natural_image
Line drawing of a car seat assembly with no text or symbols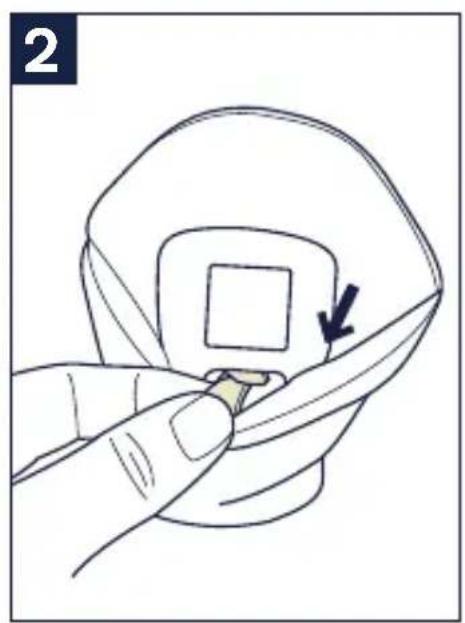
natural_image
Illustration of a hand holding a small object with a square hole, being cut by fingers (no text or symbols)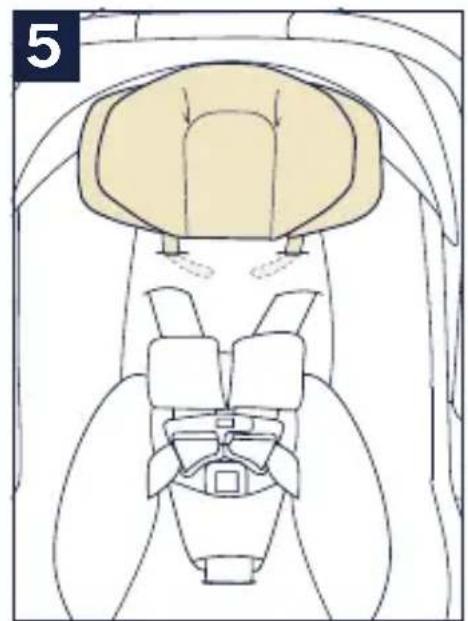
natural_image
Top-down anatomical diagram of a mechanical or biological structure, possibly a vehicle or implant, with no visible text or symbols.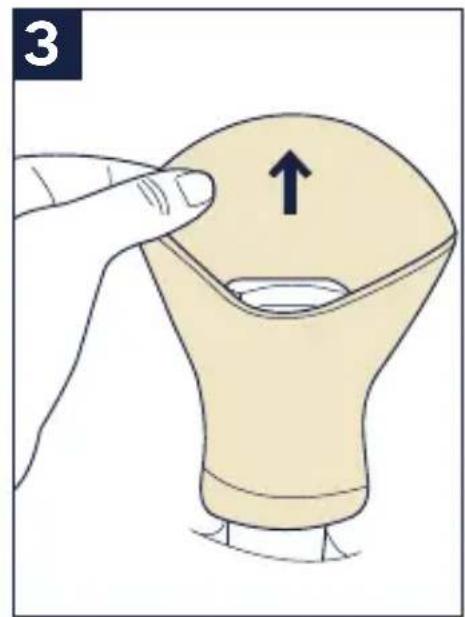
natural_image
Illustration of a finger pressing down on a light bulb with an upward arrow indicating motion (no text or symbols)natural_image
Anatomical line drawing of a human pelvic region (no text or labels)
natural_image
Line drawing of a garment sleeve with a beige fabric patch and a small oval detail (no text or symbols)Bretelles
natural_image
Illustration of hands installing a seatbelt component with a black arrow indicating the mechanism (no text or symbols present)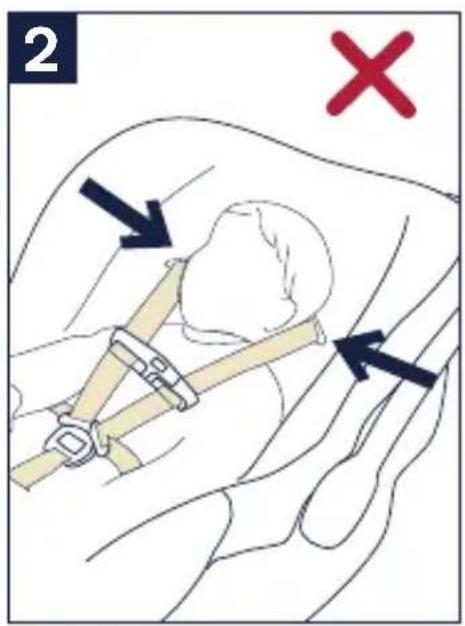
text_image
2 X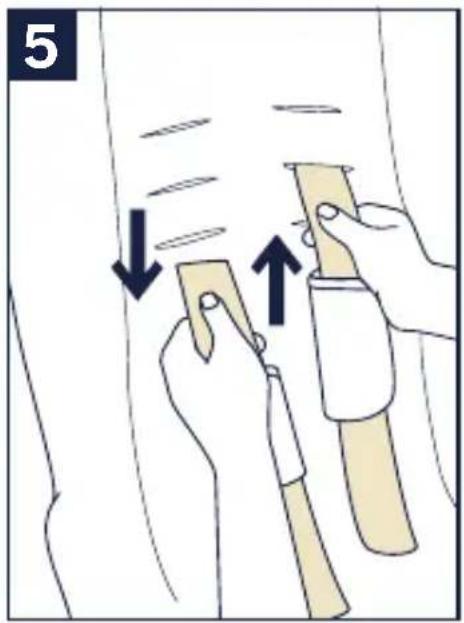
text_image
5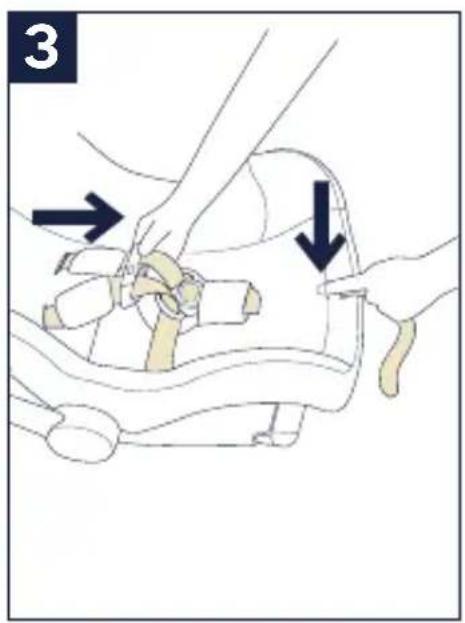
text_image
3Bretelles (suite)
natural_image
Illustration of hands installing a seatbelt component with a black arrow indicating the step (no text or symbols present)
natural_image
Top-down diagram of a vehicle's seatbelt assembly with no text or symbols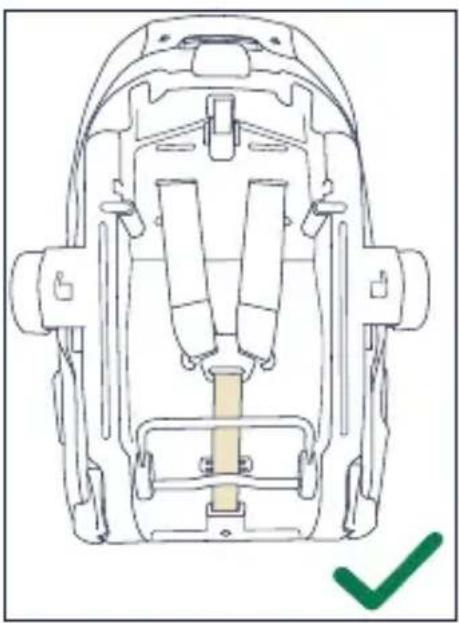
natural_image
Technical line drawing of a backpack seat assembly with no visible text or symbolsnatural_image
Line drawing of a baby in a car seatbelt with arrows indicating pressure points (no text or symbols)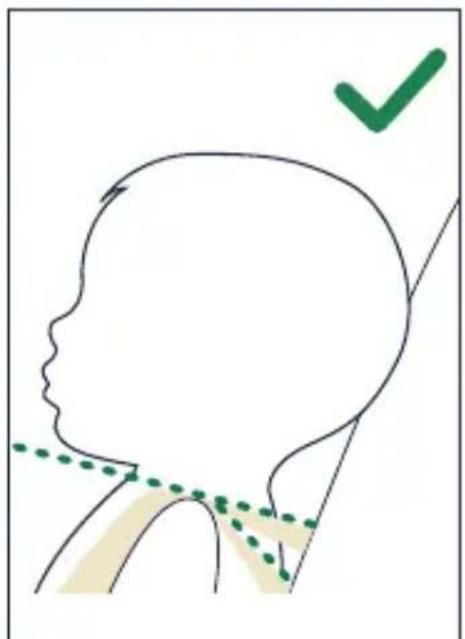
natural_image
Simple line drawing of a human head profile with a green checkmark and dotted line indicating alignment or measurement (no text or symbols)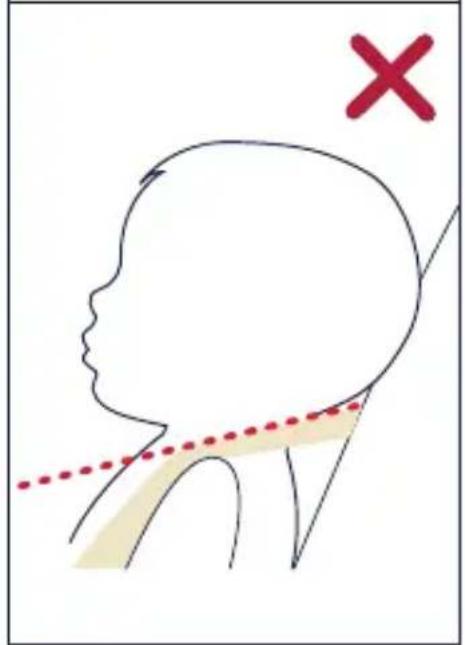
text_image
Diagram illustrating head and neck anatomy with a red X mark and a dotted line indicating a trend or reference.natural_image
Diagram showing two mechanical components with clamps and a belt switch, no text or symbols present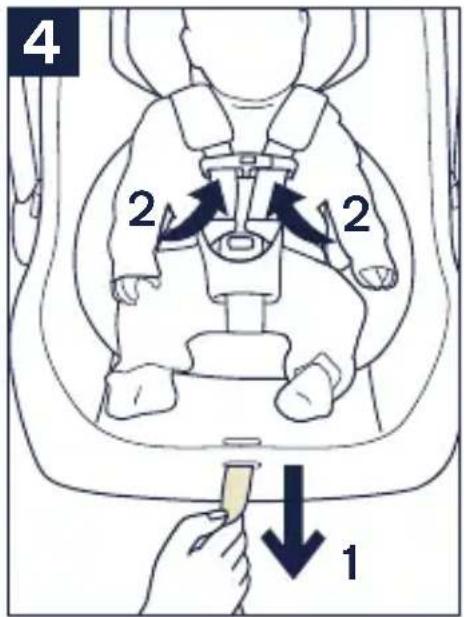
text_image
4 2 2 1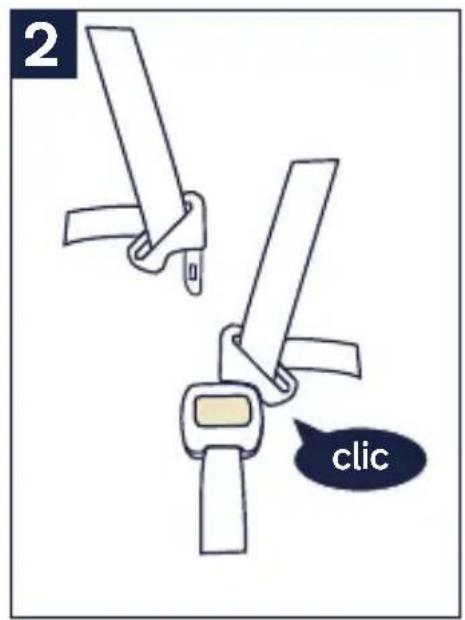
text_image
2 clic
text_image
5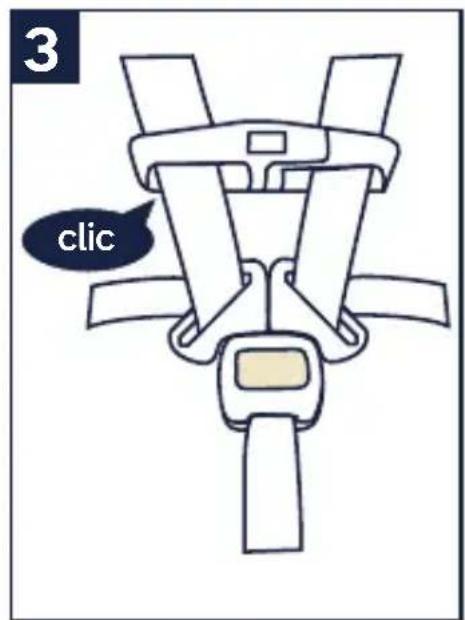
text_image
3 clicnatural_image
Line drawing of a baby car seat with seatbelt and seatbelt, no text or symbols presentInstallation
natural_image
Line drawing of a car seatbelt mechanism (no text or symbols)natural_image
Line drawing of a car seatbelt mechanism (no text or symbols)natural_image
Line drawing of a car seatbelt mechanism (no text or symbols)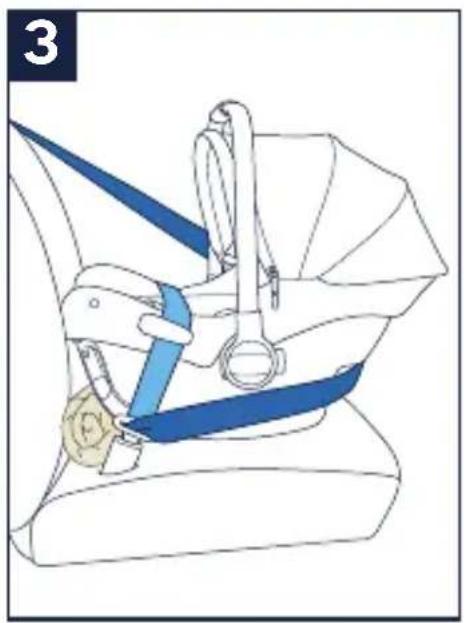
natural_image
Line drawing of a car seatbelt device with blue belt and gold connector (no text or symbols)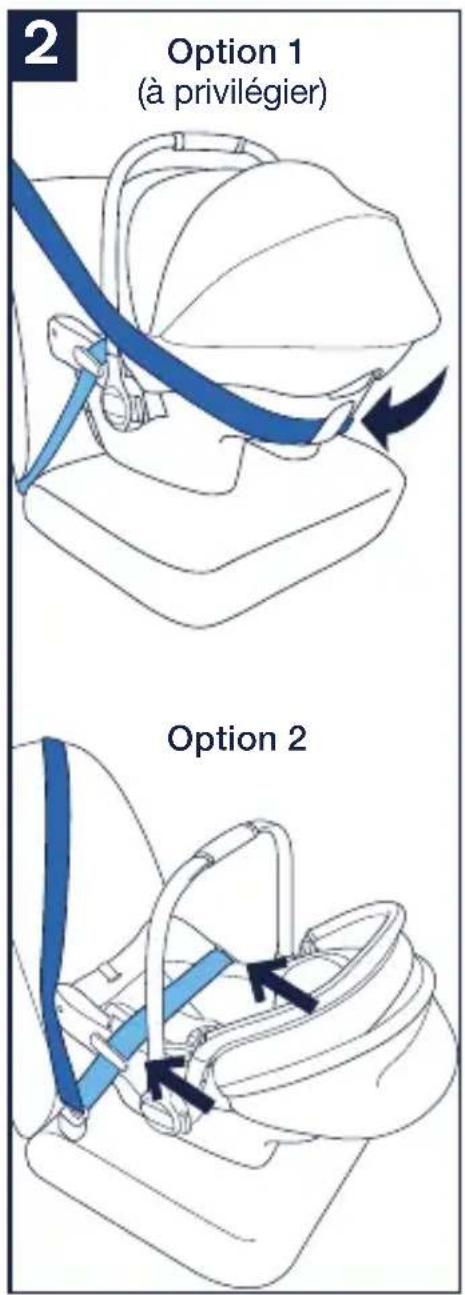
natural_image
Line drawing of a baby car seat with a black arrow pointing to the seat (no text or symbols)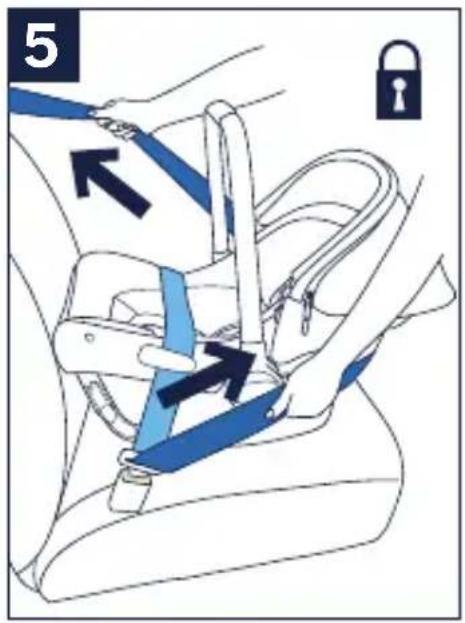
text_image
5natural_image
Line drawing of a mechanical device with hands operating a lever (no text or symbols)
natural_image
Line drawing of a baby car seat with a black arrow pointing to the seat area (no text or symbols)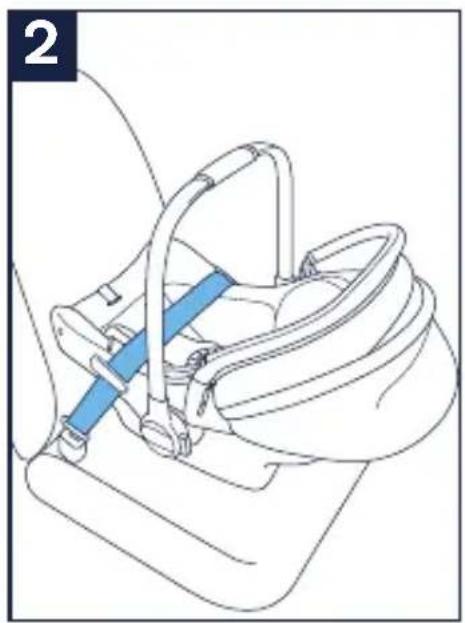
natural_image
Line drawing of a car seatbelt device with blue belt (no text or symbols)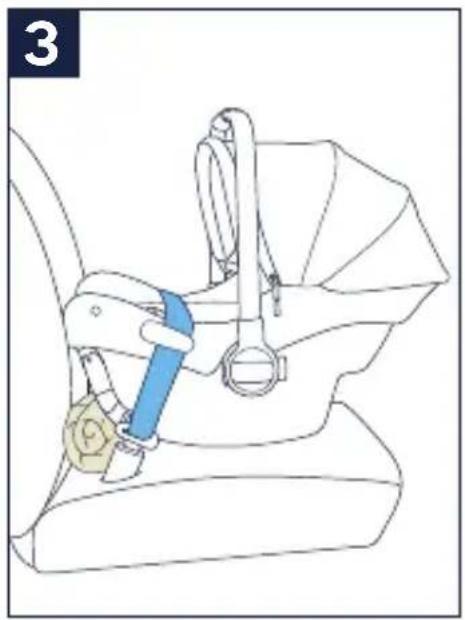
natural_image
Line drawing of a car seatbelt with a blue belt buckle and yellow belt (no text or symbols)natural_image
Line drawing of a mechanical device with a blue lever and handle (no text or symbols)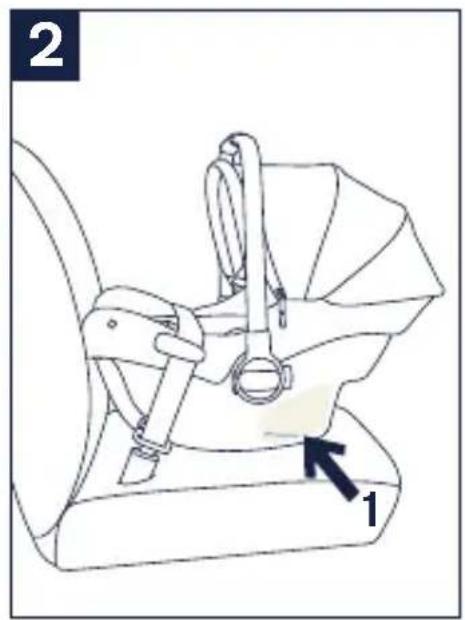
natural_image
Line drawing of a car seatbelt device with labeled parts (no text or symbols beyond labels)natural_image
Line drawing of a mechanical component with curved and rectangular features (no text or symbols)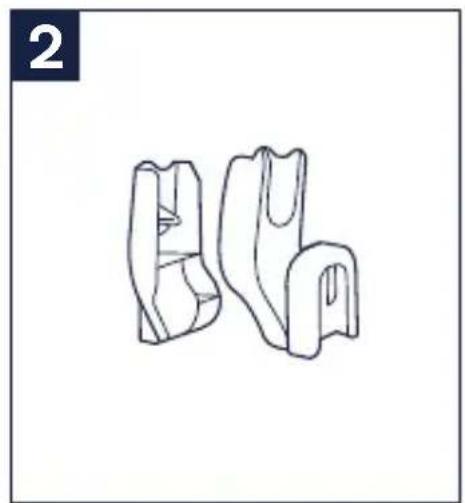
natural_image
Line drawing of two abstract 3D shapes resembling mechanical parts or brackets, with no text or symbols present.natural_image
Line drawing of a car seatbelt with a highlighted belt (no text or symbols)
natural_image
Illustration of a hand holding a medical device with an arrow pointing to a specific area (no text or symbols present)