
SWIV - Stroller Nuna - Free user manual and instructions
Find the device manual for free SWIV Nuna in PDF.


| Product type | Stroller |
| Brand | Nuna |
| Model | SWIV |
| Recommended use | From birth up to 22.7 kg (50 lb) or 114.3 cm (45 in) |
| Maximum child weight | 22.7 kg (50 lb) |
| Maximum child height | 114.3 cm (45 in) |
| Seat recline positions | 3 positions |
| Leg rest positions | 2 positions |
| Handle positions | 3 positions |
| Storage basket capacity | Up to 10 kg (22 lb) |
| Rear storage pocket capacity | Up to 0.5 kg (1 lb) |
| Cup holder capacity | Up to 0.5 kg (1 lb) |
| Swivel system | Unlock all 4 wheels for multidirectional rotation |
| Seat orientation | Reversible (facing forward or facing parent) |
| Safety harness | 5-point harness with magnetic buckle |
| Canopy | Extendable with ventilation window and zipper for shade |
| Parking brake | Lever brake on rear wheels |
| Car seat adapter | Round adapter compatible with Nuna PIPA™ car seats |
| Included accessories | Rain cover, travel bag, cup holder |
| Cleaning | Frame: damp cloth; Fabrics: per care label; Cup holder: dishwasher safe |
| Warranty | Limited warranty (see Nuna website) |
| Fold | Compact fold with strap, can stand after folding |
Frequently Asked Questions - SWIV Nuna
User questions about SWIV Nuna
0 question about this device. Answer the ones you know or ask your own.
Ask a new question about this device
Download the instructions for your Stroller in PDF format for free! Find your manual SWIV - Nuna and take your electronic device back in hand. On this page are published all the documents necessary for the use of your device. SWIV by Nuna.
USER MANUAL SWIV Nuna
natural_image
Stylized illustration of a baby stroller with blue outline and white body, no text or symbols presentnuna®

Thank you!
You've just purchased a Nuna product, and you can be sure that your child is getting the best there is. Our products are expertly engineered for safety, with luxury fabrics and sophisticated style. Whatever made you fall in love with Nuna, rest assured your adventures with your little one will be easier from now on, freeing you to enjoy more happy family moments together.
IMPORTANT! KEEP THESE INSTRUCTIONS FOR FUTURE REFERENCE:
READ CAREFULLY
Contents
Product Information
Product Registration 4
Limited Warranty 4
Contact
Child Usage Requirements 5
Warnings 6
Parts List 10
Product Setup 12
Product Use 14
Accessories 28
Cleaning and Maintenance 32
Manufactured in (date):
Product Registration (US residents only)
Please fill in the above information. The model number and the manufactured in date are located on a label on the stroller frame. Fill out the prepaid registration postcard attached to the product and mail it today.
To register your product, please visit:
www.nunababy.com
Click on the "Register Gear" link on the homepage.
Limited Warranty
We have purposely designed our high-quality products so that they can grow with both your child and your family. Because we stand by our product, our gear is covered by a custom limited warranty per product, starting from the day it was purchased. Please have the proof of purchase, model number and manufactured in date available when you contact us.
For warranty information please visit:
USA:
www.nunababy.com/warranty
Canada:
www.nunababy.ca/en/about-us/1143-warranty
Contact
For replacement parts, service, or additional warranty questions, please contact our customer service department.
In the USA:
infousa@nunababy.com
www.nunababy.com
1.855.NUNA.USA
In Canada:
Nuna Canada
2520 AV Marie-Curie
St-Laurent, QC, H4S 1N1
1-800-667-4111
www.nunababy.ca
Child Usage Requirements
This stroller is suitable for use with children who meet the following requirements:
Weight: up to 50 lb maximum (22.7 kg)
Height: up to 45 inches (114.3 cm)
When using the stroller frame with a PIPA ™ series infant carrier, refer to the child usage requirements listed in the infant carrier instruction manual.
WARNING
Failure to follow these warnings and instructions could result in serious injury or death.
A child's safety is your responsibility. NEVER leave your child unattended.
To avoid any danger of suffocation, remove all plastic covers before using the stroller and destroy or keep away from babies and children!
Keep small parts away from children as they pose a choking hazard.
Discontinue using the stroller if it becomes damaged or broken.
DO NOT make any changes or modifications to the stroller that are not specified in this manual.
Use original Nuna parts and accessories only.
Overloading, incorrect folding, and using accessories other than those approved by Nuna, e.g. child seats, bag hooks, rain covers, buggy boards, etc., may damage or make the stroller unsafe.
Use of the stroller with a child weighing more than 50 lb (22.7 kg) or taller than 45 inches (114.3 cm) in height will cause excessive wear and stress on the stroller, and could create an unstable condition. Use the stroller with only one child at a time.
To prevent a hazardous, unstable condition, do not place more than 22 lb (10 kg) in storage basket (including in pocket) and never place purses, shopping bags, parcels or other items on the handle or canopy.
To prevent a hazardous, unstable condition, do not place more than 1 lb (0.5 kg) in the storage pocket on the back of the seat.
DO NOT use the Nuna Sling bag or Stroller organizer with this stroller.
Avoid serious injury from falling or sliding out. ALWAYS use seat belt. After fastening buckles, adjust belts to get a snug fit around your child.
AVOID FINGER ENTRAPMENT Use care when folding and unfolding the stroller. Be certain the stroller is fully erected and locked before allowing your child near the stroller.
STRANGULATION HAZARDDo not place items with a string around your child's neck, suspend strings from the stroller, or attach strings to toys.
DO NOT let your child play with the stroller.
ALWAYS keep your child in view while in the stroller.
NEVER allow your child to stand on the stroller.
ALWAYS check that the ring adapter is correctly engaged before use.
The parking brake MUST be engaged when the stroller is stopped and when placing and removing child.
Negotiate curbs and rough ground carefully. Repeated impact could cause damage to the stroller.
The stroller is to be used only at walking speed and is not intended for use while jogging, skating, etc.
NEVER use the stroller on stairs or escalators. You may suddenly lose control of the stroller or your child may fall out.
The stroller does not replace a crib or a bed. Should your child need to sleep, they should be placed in a crib or sleeping area based on your child's requirements.
ALWAYS allow the fabric to dry naturally away from direct heat.
DO NOT leave the stroller in the vicinity of a strong source of heat, i.e. a radiator or open fire, or store the stroller in a damp place.
Magnetic Harness Buckle
The buckle and buckle clips contain magnets. If your child has a medical condition that prohibits the use of magnets near the child, do not use the stroller. Call Nuna to arrange an alternative product or different restraint solution.
Be mindful of the possible interaction of magnets in buckles and certain electronic devices.
Cup Holder
Only use the Nuna SWIV cup holder with this stroller.
To prevent a hazardous, unstable condition, DO NOT place more than 1 lb (0.5 kg) in the cup holder.
To prevent spills, NEVER use the cup holder for carrying a lidless container.
DO NOT use the cup holder for hot beverages
Rain Cover
ALWAYS check ventilation when the rain cover is on the product.
ALWAYS check that the rain cover has been cleaned and dried before folding.
DO NOT place your child into the stroller with the rain cover in place during hot weather.
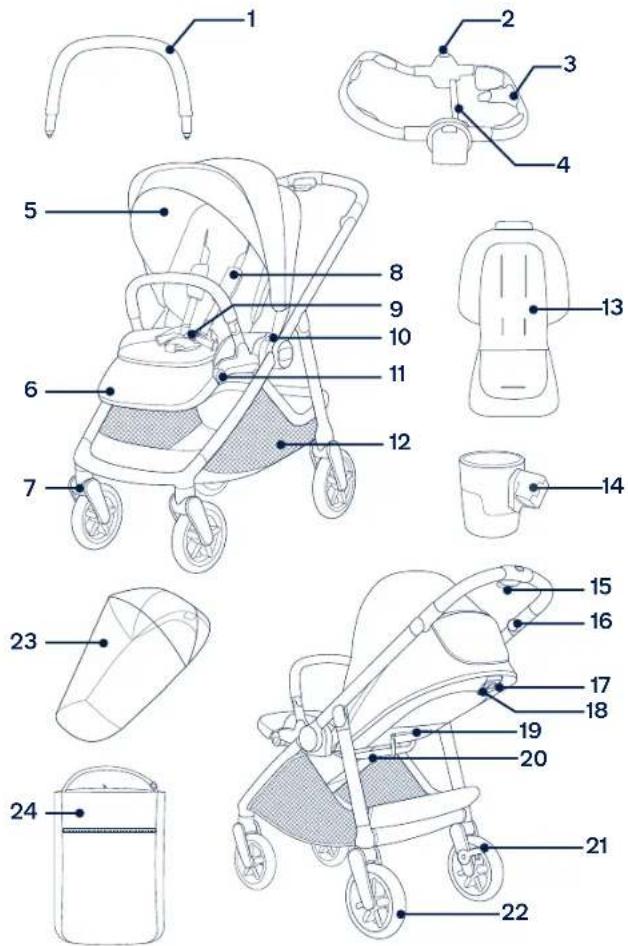
Parts List
Make sure all parts are available before assembly. If any part is missing, please contact Nuna (see page 5 for information). No tools are required for assembly.
1 Armbar
2 Adapter Release Button
3 Car Seat Ring Adapter
4 Adapter Fold Strap
5 Canopy
6 Seat Pad
7 Front Wheel
8 Shoulder Harness Pad
9 Buckle
10 Seat Release Button
11 Calf Support Adjustment Button
12 Storage Basket
13 Insert
14 Cup Holder
15 Drift Button
16 Handle Adjustment Button
17 Fold Button (in the middle of the Recline Adjustment Button)
18 Recline Adjustment Button
19 Storage Pocket
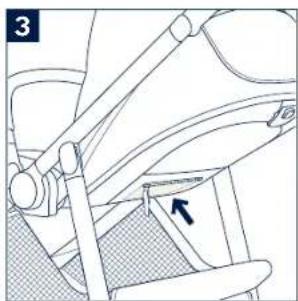
20 Stroller Fold Strap (under the seat)
21 Brake Lever
22 Rear Wheel
23 Rain Cover
24 Travel Bag
Product Setup
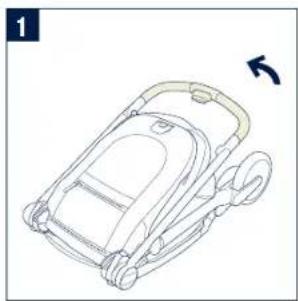
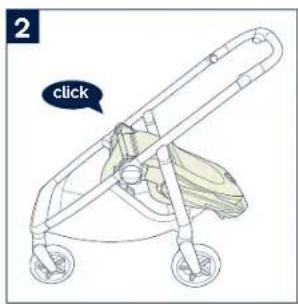
Open Stroller
1 - Lift the handle to open the stroller frame.
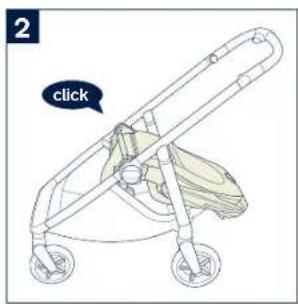
2 - A "click" sound means the stroller is fully opened.
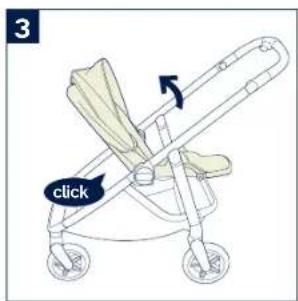
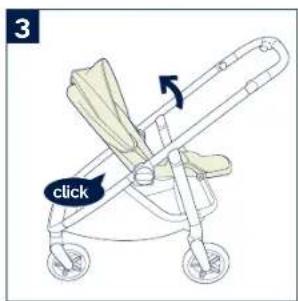
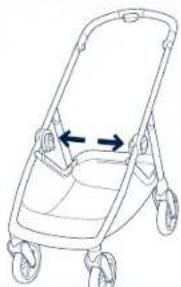
3 - Pull the seat to open it. A "click" sound means the seat is open.
Insert
4 - Release the buckle to assemble the insert, place the insert over the seat pad, and thread the shoulder, waist and crotch harness straps through their respective slots.
Armbar
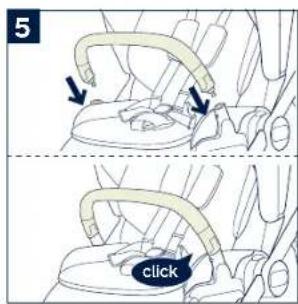
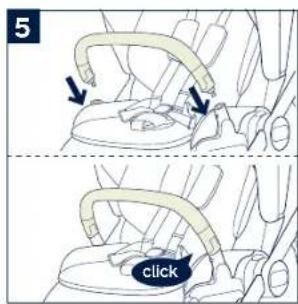
It is recommended that the armbar always be used, but it is not a restraint device. Always secure the child with the harness.
5 - Align the armbar ends with the armbar mounts, and insert until it clicks into place. A "click" sound means the armbar is assembled completely.
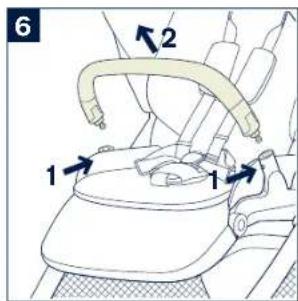
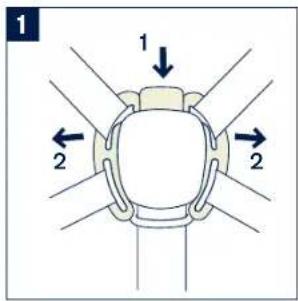
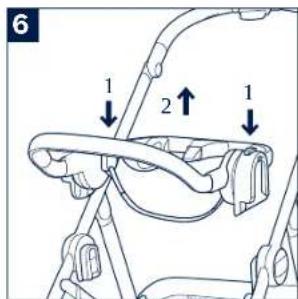
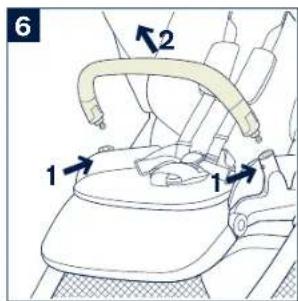
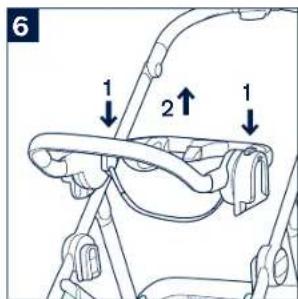
6 - To remove the armbar, press the armbar release buttons (1) and lift the armbar up (2).
Check Setup
□ Stroller frame is fully open and locked.
□ Seat is securely attached.
□ Armbar is securely attached.
natural_image
Line drawing of a car interior frame with a curved handle and arrow indicating rotation (no text or symbols)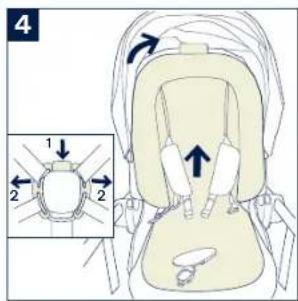
Product Use
Drift
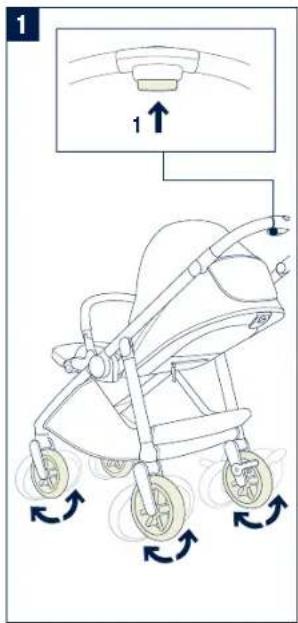
The drift feature unlocks all four wheels of the stroller, allowing them to rotate in any direction. This can be used for easier navigation through tight spaces.
ALWAYS maintain control of the stroller. Surfaces that are uneven or not level can be dangerous.
1 - Squeeze the drift button on the stroller handle to unlock all four wheels.
Push the stroller forward for a distance to make the wheels return to a locked state after using the drift feature.
Canopy
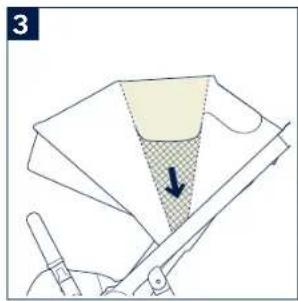
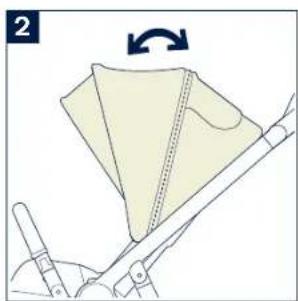
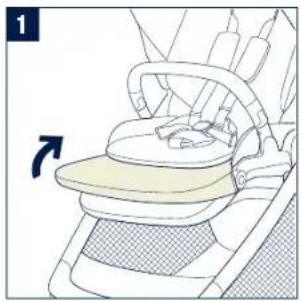
2 - To open the canopy, pull the canopy toward the front of the seat. To close the canopy, push it back.
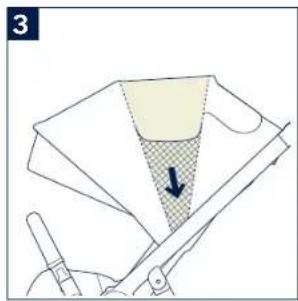
3 - Unzip the zipper for extra shade.
4 - For added ventilation, flip the canopy window cover up.
natural_image
Diagram of a sewing machine needle stitching fabric, showing measurement and angle (no text or symbols)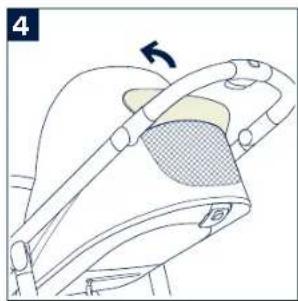
natural_image
Diagram of a car seatbelt mechanism with a shaded seat area and directional arrow (no text or symbols)Calf Support
The calf support has 2 use positions.
1 - To raise the calf support, lift up.
2 - To lower calf support, press the adjustment button (1), and push down (2).
EN
Recline
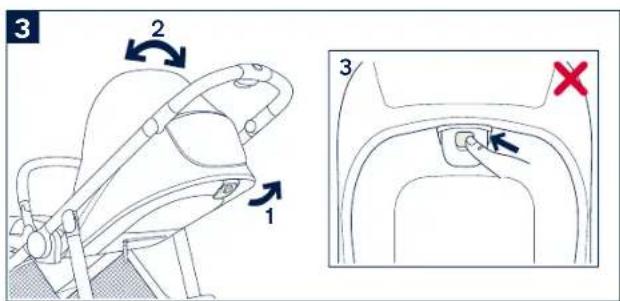
There are 3 recline positions for the backrest.
3 - To raise or lower the backrest, lift the recline adjustment button (1), and move the backrest up or down (2).
Please do not press the button (3) on the middle of the recline adjustment button when adjusting the angle for the recline.
natural_image
Illustration of a baby car seat with a hand pointing to the seat area (no text or symbols)
Brake
The parking brake MUST be engaged when the stroller is stopped and when placing and removing child.
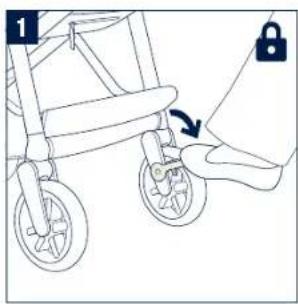
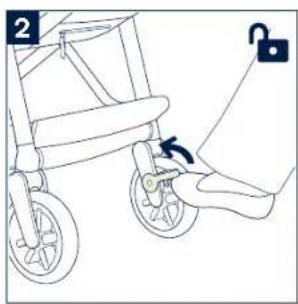
The rear wheels MUST be locked in the forward position to prevent movement when the brakes are engaged.
If using the drift feature, you may need to push the stroller forward for a short distance to make the wheels return to a locked state before engaging the brake.
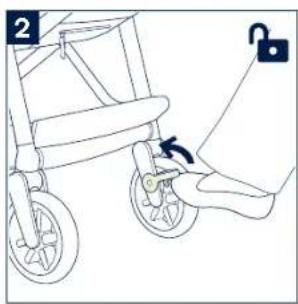
1 - To lock wheels, push the brake lever downwards.
CHECK: Push the stroller forward slightly to ensure the brakes are engaged.
2 - To release wheels, lift the brake lever upwards.
Storage Pocket
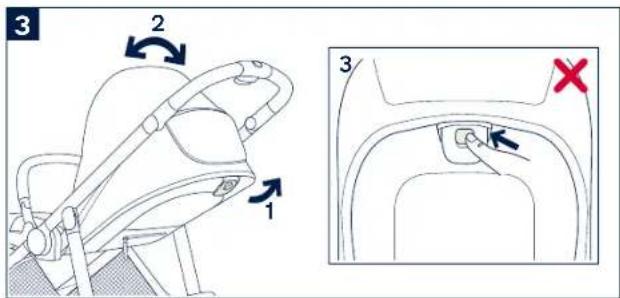
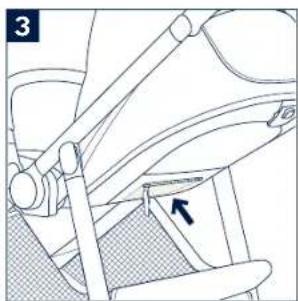
3 - Use the storage pocket on the back of the seat for lightweight storage.
To prevent a hazardous, unstable condition, DO NOT place more than 1 lb (0.5 kg) of items in the storage pocket.
Adjust Handle
The handle can be adjusted to 3 positions.
4 - To adjust the handle, press the left and right handle adjustment buttons at the same time, and rotate the handle to a desirable position.
5 - Before folding the stroller, please adjust the handle to the second position. The stroller can stand after folding.
natural_image
Line drawing of a stroller with wheels and a hand holding a padlock (no text or symbols)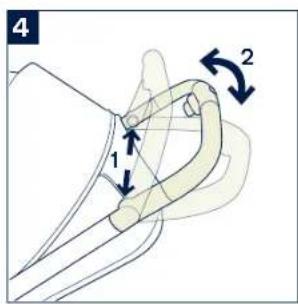
natural_image
Line drawing of a stroller with wheels and a key inserted, no text or symbols present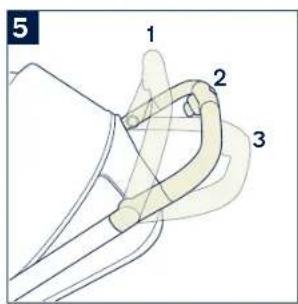
natural_image
Mechanical assembly diagram showing a bracket with a directional arrow and shaded base (no text or symbols)Securing Your Child
1 - Push the top button on the buckle (1) to release the buckle latch and remove the magnetic clips (2).
Place your child in the stroller.
2 - Insert the magnetic clips into the buckle.
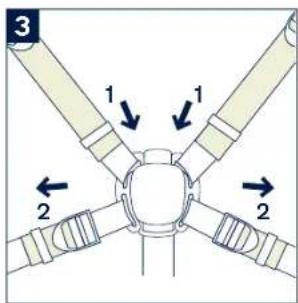
3 - Fit the harness snugly to your child by sliding the adjustment straps to tighten (1). Then pull the waist adjustment straps out (2).
Shoulder Harness Position
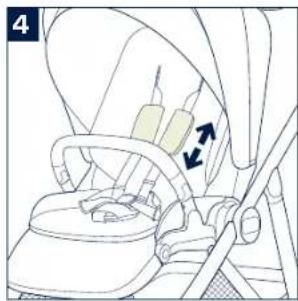
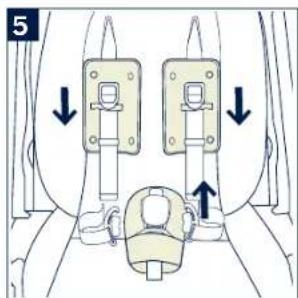
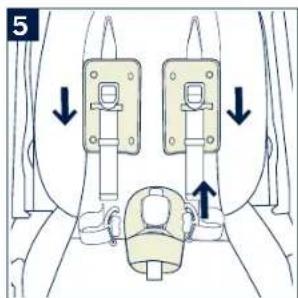
4 - The upper shoulder harness buckles can be moved up and down for added adjustment.
To avoid serious injury from falling or sliding out, always secure your child with the harness.
Make sure the harness is adjusted properly and your child is snugly secured. The space between the child and the shoulder harness should be about the thickness of one finger. DO NOT cross the shoulder belts. This will cause pressure on your child's neck.
Shoulder Harness Cover and Crotch Harness Cover
5 - The shoulder harness cover & crotch harness cover can be removed from the webbing.
natural_image
Line drawing of a car seatbelt with directional arrows indicating movement (no text or symbols)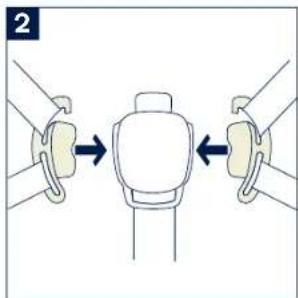
Reverse Seat
1 - Press the seat release button (1) and lift the seat up (2).
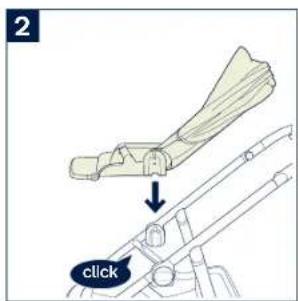
2 - Reverse the seat, and then attach it to the frame.
A "click" sound means the seat is attached completely.
The parking brake MUST be engaged when the stroller is stopped and when placing and removing child.

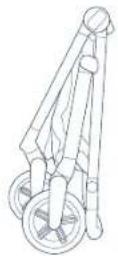
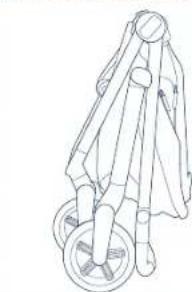
Fold
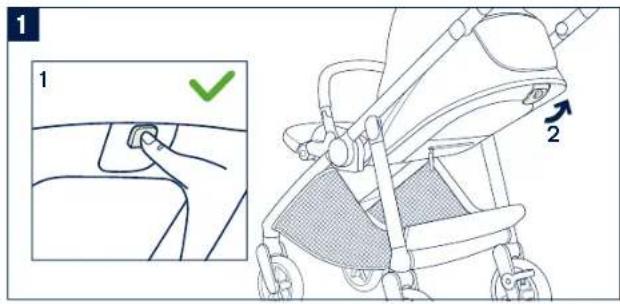
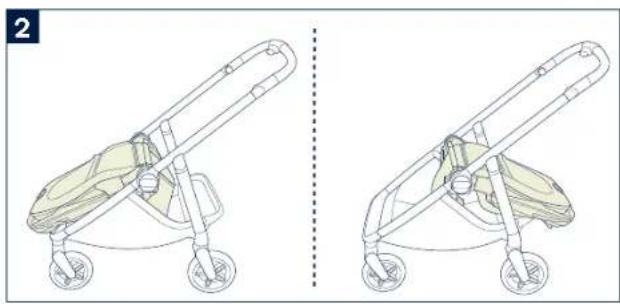
With Seat Attached
1 - Close the canopy. Press the fold button (1) on the middle of the recline adjustment button, then pull the recline adjustment button (2).
2 - Fold the seat down.
3 - Pull the stroller fold strap to fold the stroller.
natural_image
Two line drawings of a baby stroller with wheels, shown side by side (no text or symbols)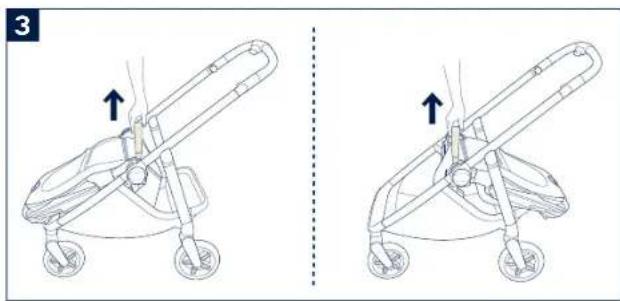
natural_image
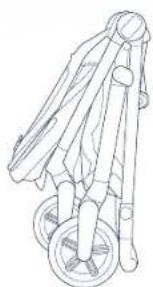
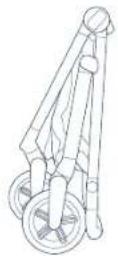
Line drawings of a baby stroller with wheels and a side view showing the same body (no text or symbols)1 - The stroller can stand after folding.
Without Seat Attached
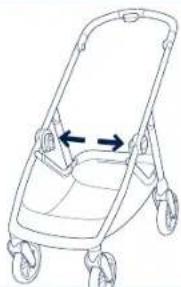
2 - After removing the seat, press the folding buttons of the seat mounts.
3 - The stroller frame can stand after folding.
EN
1
natural_image
Line drawing of a person standing beside a stroller with wheels (no text or symbols)3
natural_image
Line drawing of a person riding a stroller (no text or symbols)2
natural_image
Line drawing of a baby stroller with wheels and two arrows indicating measurement or orientation (no text or symbols)EN
Accessories
Car Seat Ring Adapter
Use the car seat ring adapter only with a Nuna PIPA ™ series infant carrier in combination with a Nuna SWIV stroller.
See PIPA series instruction manual for proper usage of the infant carrier.
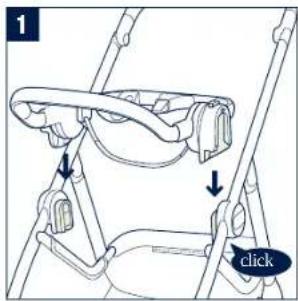
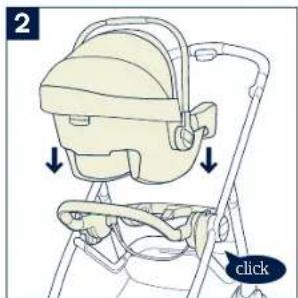
1 - To attach the car seat ring adapter, place the ring adapter on the seat mount. A "click" sound means the ring adapter is attached.
2 - To attach the infant carrier, place the infant carrier on the ring adapter. A "click" sound means the infant carrier is attached.
Pull up on the infant carrier to check that it is securely attached to the adapter and that the adapter is securely attached to the stroller.
3 - The ring adapter must be attached so that the infant carrier is rear facing.
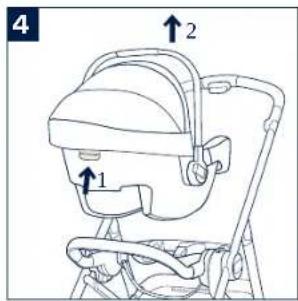
4 - To remove the infant carrier, squeeze the release button located on the back of the infant carrier (1) and lift up (2).
⚠️ Remove the infant carrier before folding.
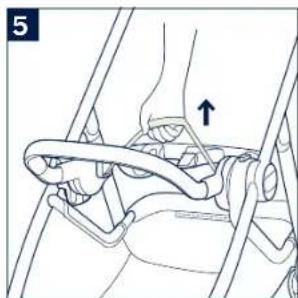
5 - To fold the stroller with the ring adapter attached, pull the adapter fold strap.
6 - To remove the ring adapter (with the stroller unfolded), push the adapter release buttons (1) and lift the adapter up (2).
natural_image
Anatomical illustration of a human foot and ankle joint with ligaments, showing no text or labels.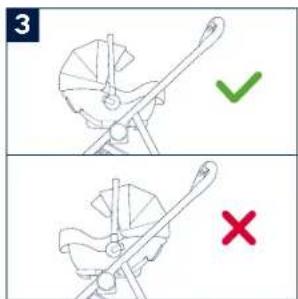
Rain Cover
1 - To assemble the rain cover, place it over the stroller.
ALWAYS check ventilation when the rain cover is on the product.
ALWAYS check that the rain cover has been cleaned and dried before folding.
DO NOT fold the stroller with the rain cover in place.
DO NOT place your child into the stroller with the rain cover in place during hot weather.
Cup Holder
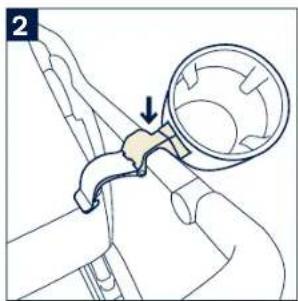
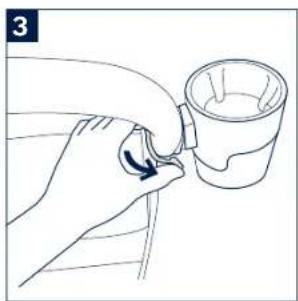
2 - To attach the cup holder, secure the right side of the cup holder clamp around the right side of the stroller handle, below the rivets.
3 - Rotate the left side of the clamp over the handle.
4 - Push the two pieces of the clamp together and listen for a "click". A click sound means the cup holder is securely attached.
5 - To remove the cup holder, push apart the two pieces of the clamp (1) and remove the cup holder from the handle (2).
Remove the cup holder before folding the stroller.
ALWAYS wash the cup holder before/after each use.
Travel Bag
6 - Place the folded stroller into the bag with the wheels at the bottom, and close the bag by tightening the drawstring. The bag can be carried by the carry strap.
1
Cleaning and Maintenance
Refer to the care label attached to the fabric for washing and drying instructions.
The cup holder is dishwasher safe on the top rack, or wash with lukewarm water and a mild dish soap. Rinse, then drip or towel dry.
Clean the frame, plastic parts, and fabric with a damp cloth, but do not use abrasives or bleach. Do not use silicone lubricants as they will attract dirt and grime. Do not store your stroller in a damp place.
Clean the stroller wheels regularly with water and remove any dirt.
To ensure long-lasting use, wipe off this product with a soft, absorbent cloth after using it in rainy weather.
It is normal for fabric to fade from sunlight and to show wear and tear after a long period of use, even when used normally.
For reasons of safety, only use original Nuna parts.
Check regularly if everything functions properly. If any parts are torn, broken, or missing, stop using this product.
Nuna Baby Essentials, Inc. Nuna and all associated logos are trademarks.

MERCI!
www.nunababy.ca/en/about-us/1143-warranty
Contact
infousa@nunababy.com
www.nunababy.com
1.855.NUNA.USA
Au Canada:
Nuna Canada
2520 avenue Marie-Curie
St-Laurent, QC, H4S 1N1
1-800-667-4111
www.nunababy.ca
natural_image
Line drawing of a car interior frame with a curved handle and arrow indicating rotation (no text or symbols)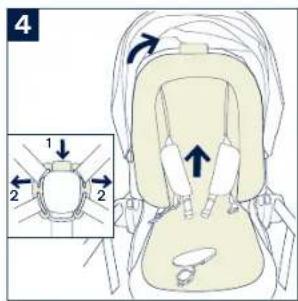
natural_image
Diagram of a mechanical device with a shaded triangular component and a downward arrow, no text or symbols present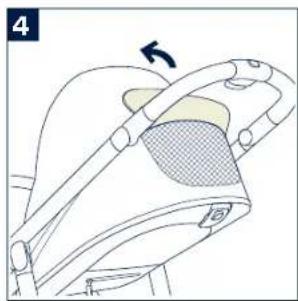
natural_image
Diagram of a car seatbelt mechanism with arrow indicating rotation (no text or symbols)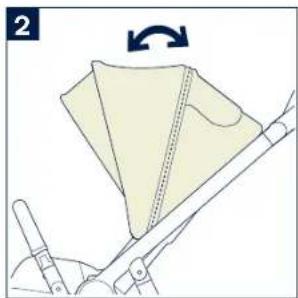
natural_image
Diagram of a sewing machine needle stitching fabric, showing a curved seam and base (no text or symbols)Repose-jambes
natural_image
Illustration of a baby car seat with a hand pointing to the seat area (no text or symbols)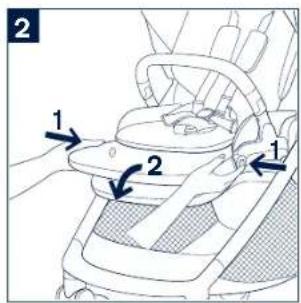
Frein
natural_image
Line drawing of a stroller with wheels and a hand holding a padlock (no text or symbols)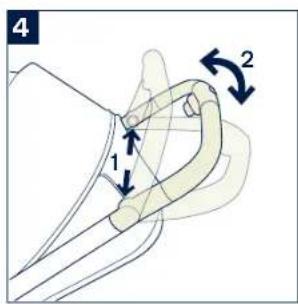
natural_image
Line drawing of a stroller with wheels and a key inserted, no text or symbols present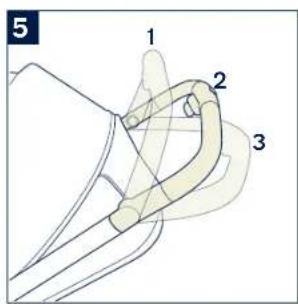
natural_image
Mechanical assembly diagram showing a lever mechanism with a directional arrow (no text or symbols)natural_image
Line drawing of a car seatbelt with directional arrows indicating movement (no text or symbols)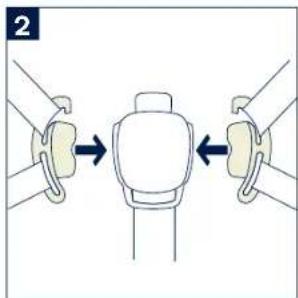

natural_image
Two line drawings of a baby stroller with wheels, shown from different angles (no text or symbols)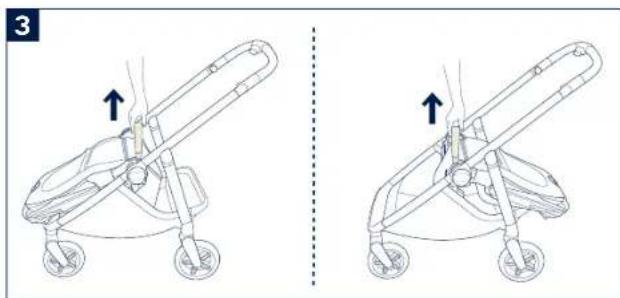
natural_image
Line drawings of a baby stroller with wheels and a side view showing the same body (no text or symbols)natural_image
Line drawing of a person standing beside a stroller with wheels (no text or symbols)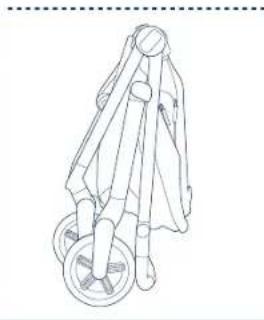
natural_image
Line drawing of a person standing on a stroller with wheels (no text or symbols)3
2
natural_image
Line drawing of a baby stroller with wheels and a side panel, no text or symbols presentAccessoires
natural_image
Anatomical illustration of a human hip joint with ligaments and a directional arrow (no text or labels)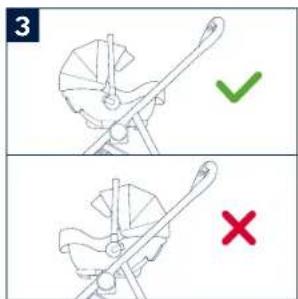
Housse de pluie
natural_image
Line drawing of a baby stroller with wheels and seat (no text or symbols)
natural_image
Mechanical diagram showing a joint or fastener being inserted into a circular component (no text or symbols present)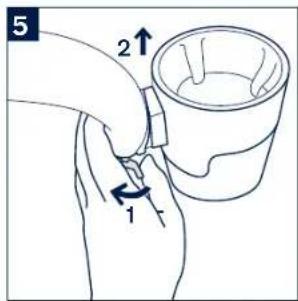
natural_image
Line drawing of a hand pouring liquid into a cup (no text or symbols)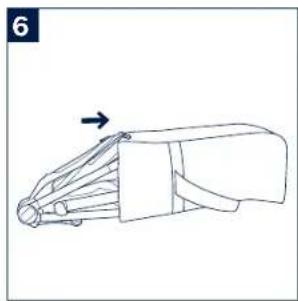
natural_image
Line drawing of a mechanical component with an arrow indicating direction (no text or symbols)Nuna Baby Essentials, Inc.
natural_image
Abstract pattern of blue right-angle corner shapes on white background (no text or symbols)nuna®
Nuna Baby Essentials, Inc.
70 Thousand Oaks Blvd. | Morgantown, PA 19543
1.855.NUNA.USA|nunababy.com
Nuna Canada
2520 Av. Marie-Curie | St-Laurent, QC, H4S 1N1
1-800-667-4111|nunababy.ca


- Thank you!
- IMPORTANT! KEEP THESE INSTRUCTIONS FOR FUTURE REFERENCE:
- Contents
- Product Registration (US residents only)
- Limited Warranty
- Contact
- Child Usage Requirements
- WARNING
- Magnetic Harness Buckle
- Cup Holder
- Rain Cover
- Parts List
- Product Setup
- Open Stroller
- Insert
- Armbar
- Check Setup
- Product Use
- Drift
- Canopy
- Calf Support
- EN
- Recline
- Brake
- Storage Pocket
- Adjust Handle
- Securing Your Child
- Shoulder Harness Position
- Shoulder Harness Cover and Crotch Harness Cover
- Reverse Seat
- Fold
- With Seat Attached
- Without Seat Attached
- Accessories
- Car Seat Ring Adapter
- Travel Bag
- Cleaning and Maintenance
- MERCI!
- Repose-jambes
- Frein
- Accessoires
- Housse de pluie
- nuna®
Brand : Nuna
Model : SWIV
Category : Stroller