ZIBTM180 - Cement mixer Zipper - Free user manual and instructions
Find the device manual for free ZIBTM180 Zipper in PDF.

| Product type | Cement mixer (concrete mixer) |
| Brand | Zipper |
| Model | ZIBTM180 |
| Drum capacity | 180 L |
| Supply voltage | 220-240 V ~50 Hz |
| Recommended fuse | 16 A |
| Protection device | Residual current circuit breaker 30 mA |
| Drum type | Steel, two-part assembly |
| Drive system | V-belt |
| Pivot wheel | For tilting and locking the drum |
| Weight (approx) | 85 kg |
| Dimensions (L × W × H, approx) | 100 × 70 × 120 cm |
| Intended use | Production of concrete and mortar |
| Working conditions | Max humidity 70 %, temperature +5 °C to +40 °C |
| Required protective equipment | Gloves, goggles, safety shoes, dust mask |
| Cleaning | With water, no solvents or aggressive detergents |
| Lubrication | Grease the ring gear every 100 h |
| Belt check | Play of approx 5 mm under finger pressure |
| Spare parts | Use original Zipper parts |
| Warranty | 2 years non-commercial use, 1 year commercial use |
| Electrical connection | Grounded socket, extension cord suitable for the cross-section |
Frequently Asked Questions - ZIBTM180 Zipper
User questions about ZIBTM180 Zipper
0 question about this device. Answer the ones you know or ask your own.
Ask a new question about this device
Download the instructions for your Cement mixer in PDF format for free! Find your manual ZIBTM180 - Zipper and take your electronic device back in hand. On this page are published all the documents necessary for the use of your device. ZIBTM180 by Zipper.
USER MANUAL ZIBTM180 Zipper
natural_image
Green ZIPPER ZIP-M160 cement mixer with black frame and wheels (no visible text or symbols on body)ZI-BTM160
EAN : 91020039233390
ZI-BTM180
EAN : 9120039233406
CE

1 INHALT / INDEX
1 INHALT / INDEX 2
11.1 Intended Use....25
11.2 Security instructions .... 26
11.3 Remaining risk factors....27
12 OPERATION 28
12.1 Operation instructions....28
12.2 Operation 28
13 MAINTENANCE 30
13.1 Maintenance plan 30
13.2 V-Belt adjusting....30
13.3 Transport....30
13.4 Cleaning 31
13.5 Disposal....31
14 TROUBLE SHOOTING 31
15 UVOD (SL) 32
16 VARNOST 33
16.1 Namenska uporaba....33
16.2 Varnostna opozorila ....33
16.3 Druga tveganja....35
17 OBRATOVANJE 36
17.1 Obratovalni napotki....36
17.2 Rokovanje 36
18 VZDRŽEVANJE 38
18.1 Vzdrževanje in plan servisiranja....38
18.2 Napenjanje klinastega jermena 38
18.3 Transport....38
18.4 Čiščenje....39
18.5 Odstranjevanje....39
19 ODPRAVLJANJE NAPAK 39
20 PREDGOVOR (HR) 40
21 SIGURNOST 41
21.1 Namjenska uporaba....41
21.2 Upute o sigurnosti 41
21.3 Ostale opasnosti....43
22 RAD 44
22.1 Upute o radu....44
22.2 Rukovanje 44
23 ODRŽAVANJE
23.1 Servisiranje i plan održavanja ....46
23.2 Zatezanje klinastog remena 46
23.3 Transport....46
23.4 Čišćenje....47
23.5 Zbrinjavanje 47
24 UKLANJANJE POGREŠAKA
25 AVANT-PROPOS (FR)
26 SECURITE
EN CE-CONFORM: This product complies with EC-directives
EN READ THE MANUAL! Read the user and maintenance manual carefully and get familiar with the controls in order to use the machine correctly and to avoid injuries and machine defects.
EN ATTENTION! Ignoring the safety signs and warnings applied on the machine as well as ignoring the security and operating instructions can cause serious injuries and even lead to death.
EN Protective clothing!

SL Obvezno nošenje zaščitne opreme!
EN Stop and pull out the power plug before any break and engine maintenance!
EN Only trained staff!
SL Samo usposobljeno osebje!
EN Set up and run the concrete mixer on a solid, level base only!
SL Mešalnik betona mora biti v mirovanju ali med obratovanjem samo v vodoravnem položaju in mora stati na ravnih in trdnih tleh!
HR Miješalicu za beton postavljajte i njome radite samo na ravnoj i čvrstoj podlozi!
EN Do not move the concrete mixer during operation!
SL Mešalnika betona med obratovanjem ne premikajte!
EN Do not reach into the drum when it is running!
SL Ne posegajte v vrteči se boben!
EN Warning of rotating parts!
SL Opozorilo pred rotirajočimi deli!
HR Upozorenje na rotirajuće dijelove!
EN Warning against hand injuries (bruises)!
EN Protect motor from moisture!
EN Keep safety distance!
EN Protection class II!
SL Zaščitni razred II!
text_image
Labeled diagram of a concrete mixer with numbered parts for identification| ZI-BTM160 ZI-BTM180 | |||
| 1 | TrommelDrumBobenBubanjTambour | 6 | TransportgriffTransport handleTransportna ročicaDrška za transportPoignée de transport |
| 2 | MotorMoteur | 7 | ZahnkranzSprocketZobati venecZupčanikCouronne dentée |
| 3 | EIN-AUS-SchalterON-OFF-SwitchStikalo za VKLOP-IZKLOPPrekidač za uključivanje-isključivanjeInterrupteur MARCHE-ARRÊT | 8 | RasterscheibeGrating discRešetkasta ploščaPloča za pozicioniranjePlateau à grille |
| 4 | TransporträderTransport wheelsTransportna kolesaTransportni kotačiRoues de transport | 9 | SchwenkradSwiveling wheelKrmilno koloZakretno koloRoue pivotante |
| 5 | StandfußBasePodnožjeNogaPied de soutien | 10 | SpannfederTension springVpenjalna vzmetZatezna oprugaRessort tendeur |
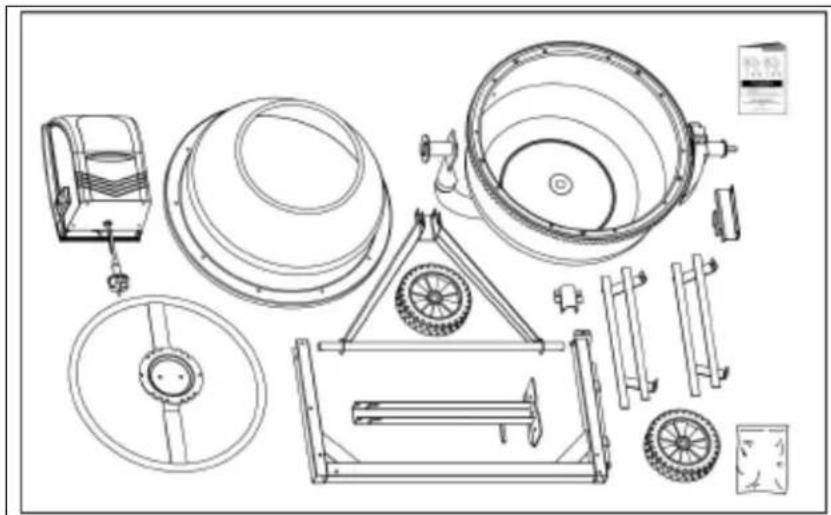
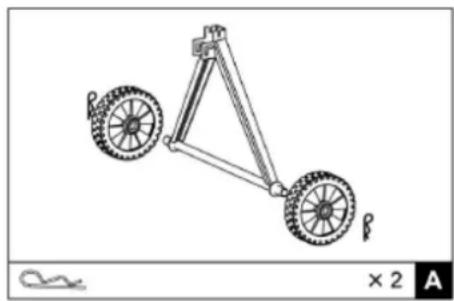
3.2 Lieferumfang / Delivery Content / Vsebina pošiljke / Opseg isporuke / Contenu de la livraison
natural_image
Technical line drawing of mechanical components including wheel, frame, and housing (no text or symbols)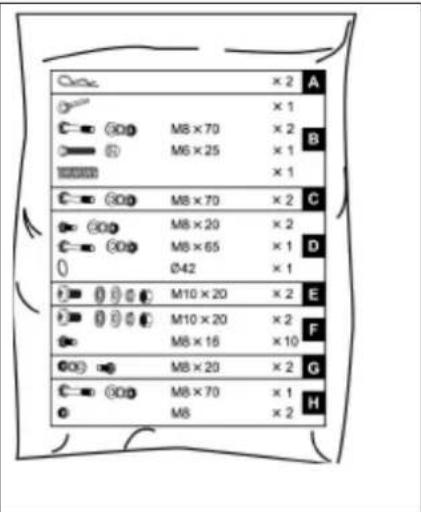
text_image
A × 2 × 1 M8 × 70 × 2 M6 × 25 × 1 × 1 B C M8 × 70 × 2 C M8 × 20 × 2 C M8 × 65 × 1 Ø42 × 1 D E M10 × 20 × 2 M10 × 20 × 2 M8 × 16 × 10 Ø3 M8 × 20 × 2 C M8 × 70 × 1 Ø M8 × 2 H3.3 Technische Daten /Technical data/ Tehnični podatki / Tehnički podaci / Données techniques
| Technische Daten / Technical Data / Données techniques | ||
| ZI-BTM160 | ZI-BTM180 | |
| Betriebsspannung / Voltage / Obratovalna napetost / Radni napon / Tension de fonctionnement | 230 V / 50 Hz | 230 V / 50 Hz |
| Motorleistung / Motor power / Moč motorja / Snaga motora / Puissance du moteur | 650 W (S6 30%) | 800 W (S6 30%) |
| Schutzklasse / Protection class / Zaščitni razred / Klasa zaštite / Classe de protection | II | II |
| Trommelvolumen / Drum capacity / Prostornina bobna / Volumen bubnja / Volume du tambour | 160 l | 180 l |
| Trommelumdrehungen / Drum speed / Število vrtljajev bobna / Broj okretaja bubnja / Rotations du tambour | 29.5 min ^-1 | 29.5 min ^-1 |
| Schutzart / Protection mode / Vrsta zaščite / Vrsta zaštite / Classe | IP 45D | IP 45D |
| Abmessungen / Dimension / Dimenzije / Dimenzije / Dimensions | 1200 x 710 x 1370 mm | 1200 x 710 x 1400 mm |
| Gewicht / Weight / Teža / Težina / Poids (netto / brutto; net/gross; net/brut) | 57 / 62 kg | 58/ 63 kg |
| Schalldruckpegel / Sound pressure level / Nivo zvočnega tlaka / Razina zvučnog tlaka /Niveau de pression acoustique L _PA | <71 dB (A) k: 3dB(A) | <71 dB (A) k: 3dB(A) |
| Schallleistungspegel / Sound power level / Nivo zvočne moči / Razina zvučne snage /Niveau de puissance sonore L _WA | <95 dB(A) k: 3dB(A) | <95 dB(A) k: 3dB(A) |
4 MONTAGE / ASSEMBLING / MONTAŽA /MONTAGE
Please check the product contents immediately after receipt for any eventual transport damage or missing parts. Claims from transport damage or missing parts must be placed immediately after initial machine receipt and unpacking before putting the machine into operation. Please understand that later claims cannot be accepted anymore.
(EN) With the frame lying on its side, attach the support leg as shown. Insert 2 M8x70 hex bolts through the holes from one side, then flat washers, lock washers, lock washers and nuts from the other side. Slide the spring on the lower plunger rod. Connect the plunger rods with a M6x25 hex bolt and nut. Hold the spring in place by inserting a split pin. Bend each side of the pin outward. Tighten down.
natural_image
Line drawing of a two-wheeled bicycle with wheels and a triangular frame (no text or symbols)
text_image
M8 × 70 M6 × 25 × 1 × 2 × 1 × 1 B(SL) Pritrdite podporno nogo, kot je prikazano na sliki. V ta namen potisnite 2 šestrobna vijaka M8x70 skozi odprtini na eni strani ter ju fiksimajte s ploščato podložko, z varnostno podložko in matico na drugi strani. Namestite vzmet na spodnjo batno palico. Batni palici povežite s pomočjo šestrobnega vijaka M6x25 in matice. Vzmet držite v položaju, v katerem boste lahko vstavili razcepko. Vsako stran razcepke upognite navzven. Nato zategnite vijak in matico.
(HR) Potpornu nogu pričvrstite kao što je prikazano na slici. Da biste to učinili 2 šesterokutna vijka M8x70 gurnite kroz rupe na jednoj strani i fiksirajte ih podloškom, sigurnosnom podloškom i maticom na drugoj strani. Oprugu navucite na donju klipnjaču. Klipnjače spojite šesterokutnim vijkom M6x25 i maticom. Oprugu zadržite umetanjem osigurača. Svaku stranu osigurača savijte prema van. Zatim zategnite.
(FR) Fixez le pied de soutien comme indiqué. Pour cela, insérez 2 vis à six pans M8x70 dans les trous d'un côté, fixez-les avec une rondelle, une rondelle d'arrêt et un écrou de l'autre côté. Faites glisser le ressort sur la tige de piston inférieure. Reliez les tiges de piston avec une vis à tête hexagonale M6x25 et un écrou. Maintenez le ressort en position en insérant une goupille fendue. Pliez chaque côté de la goupille fendue vers l'extérieur. Puis serrez fermement.
Rahmen auf Radstütze montieren / Mounting frame on the wheel / Montaža okvirja na opornik koles / Montaža okvira na oslonac s kotačima / Montage du châssis sur la roue de soutien
(DE) Radstütze analog Standfuß am Rahmen montieren.
(EN) Turn the frame over and attach the axle bracket with wheels in the same manner.
(SL) Enako kot podporno nogo montirajte opornik koles na okvir.
(HR) Oslonac s kotačima montirajte na okvir kao i potpornu nogu.
(FR) Montez la roue de soutien sur le châssis de la même manière que le pied de soutien.
Trommelunterteil auf Rahmen montieren / Mounting the drum (lower part) on the frame / Montaža spodnjega dela bobna na okvir / Montaža okvira na oslonac s kotačima / Montage de la partie inférieure du tambour sur châssis
(EN) Slide the bearing block on the shaft. Hold it in place with 42 spiral ring. Carefully, set the bottom drum with support arm onto the side supports of the stand as shown, so that the bearing blocks slot into the channels provided by the side support. The larger diameter shaft should be on the bottom bracket. Line up the holes in the side support with those in the bearing block and insert a M8x65 bolt and tight it with a flat washer, lock washer and nut from the other side.
Place the upper bracket on the larger diameter shaft with the holes lining up with the ones in the bottom bracket. Insert two M8x20 bolts through the holes, then the flat washers, lock washers and nuts from below.

natural_image
Technical line drawing of a bicycle support structure with wheels and railings (no text or symbols)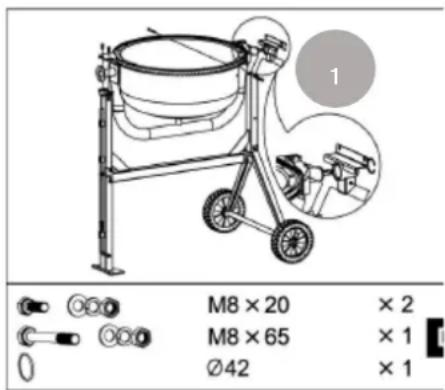
text_image
M8 × 20 M8 × 65 Ø42 × 2 × 1 × 1(EN) Mount the mixing blades inside the bottom drum loosely as shown- Two holes are provided at the base of the drum into which a M10x20 bolt may be inserted from the outside. A leather washer, flat washer, lock washer and a nut should be threaded on loosely on the inside. The leather washer should be placed under the blade down against the drum.
natural_image
Technical line drawing of a portable stove with wheels and a bucket (no text or symbols)Trommeloberteil montieren / Mounting the drum (upper part) on the frame / Montaža gornjeg dijela bubnja / Montage de la partie supérieure du tambour
(EN) Position the upper drum on bottom drum over the rim, making sure the mounting holes align in both as well as the labeled arrows. Screw a M8x16 hex bolt with lock and flat washers into each threaded hole in the rim/ring gear. Make sure the tightening process is carried out progressively. Secure the mixing blades to the upper drum by inserting two M10x20 cross headed screws from the outside through the holes in the drum.
A Leather washer should be positioned inside between the drum and blade. Secure the mixing blade on the inside using a flat washer, spring washer and nut. Finally, ensure top and bottom mixing blade mountings are tight.
natural_image
Technical line drawing of a mechanical device with two views (top and side), no text or symbols present.Motorgehäuse montieren / Mounting motor housing / Montaža ohišja motorja / Montaža kućišta motora / Montage du carter du moteur
(EN) Lining up the keyways, slide the transmission case over the pinion shaft. Screw a nut with flat and lock washers on each stud bolt. Secure the lower case bracket to the side support frame by inserting a M8x70 from one side, then flat washer, lock washer and nut from the other side.
natural_image
Technical line drawing of a mechanical device with mounting bracket and control panel (no text or symbols)When working with non-grounded machines: Severe injury or even death may arise though electrocution!
Therefore: The machine must be operated at a grounded power socket
The connection of the machine to the electric power supply and the following checks have to be carried out by a respectively trained electrician only!
- The electronic connection of the machine is designated for operation with a grounded power socket!
- The connector plug may not be manipulated.
- The mains supply must be secured with 16A:
- Check, whether the feeding voltage and the Hz comply to the required values of the machine. A deviation of feeding voltage of ±5% is allowed.
- After connecting check the right running direction
- Make sure that a possible extension cord is in good condition and suitable for the transmission of power. An undersized cord reduces the transmission of power and heats up.
- A damaged cable must be replaced immediately
Operation is only allowed with safety switch against stray current (RC max. stray current of 30mA)
Use only permitted extension cable with cross-section the one in the following table declared.
natural_image
Close-up of a yellow and red 3D button with a green handle, mounted on a black surface (no text or symbols visible)natural_image
Technical line drawing of two mechanical components mounted on a tripod, with no visible text or symbols.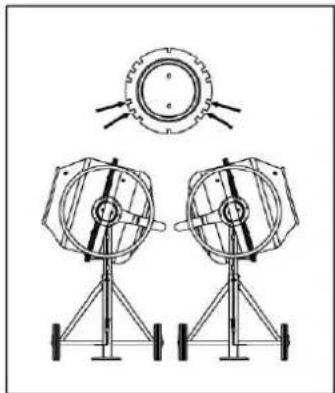
natural_image
Technical line drawing of two identical mechanical components mounted on a tripod, with a gear-like top view above (no text or symbols)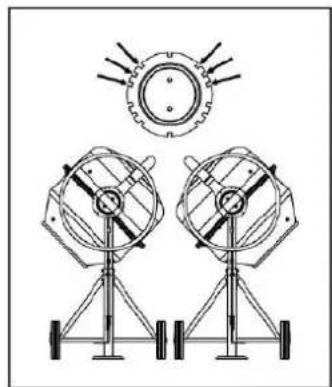
natural_image
Technical line drawing of two identical mechanical devices with wheels and a central gear assembly (no text or symbols)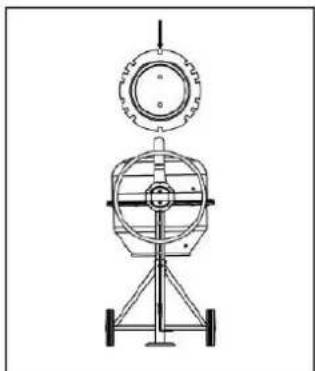
natural_image
Technical line drawing of a mechanical device with gears and a central hub (no text or symbols)8 WARTUNG

ACHTUNG
This manual contains important information and advice for the correct and safe use and maintenance of the concrete mixer ZI-BTM160 and ZI-BTM180.
Following the usual commercial name of the machine (see cover) is substituted in this manual with the name "machine".
The manual is part of the machine and may not be stored separately. Read it profoundly before first use of the machine and keep it for later reference. When the machine is handed to other persons always put the manual to the machine.
Please follow the security instructions!
Please read the entire manual, to prevent misunderstandings, machine damage or even injuries!

Due to continuous development of our products illustrations, pictures might differ slightly.
If you however find errors in this manual, please inform us.
Technical changes excepted!
Copyright law
© 2018
This manual is protected by copyright law – all rights reserved. Especially the reprinting as well as the translation and depiction of pictures will be prosecuted by law. Court of jurisdiction is the Landesgericht Linz or the competent court for 4707 Schlüsslberg, AUSTRIA.
Customer Support
The machine must only be used for its intended purpose! Any other use is deemed to be a case of misuse.
To use the machine properly you must also observe and follow all safety regulations, the assembly instructions, operating and maintenance instructions lay down in this manual.
All people who use and service the machine have to be acquainted with this manual and must be informed about the machine's potential hazards.
It is also imperative to observe the accident prevention regulations in force in your area.
The same applies for the general rules of occupational health and safety.
The machine is used for:
concrete and mortar production.
Any manipulation of the machine or its parts is a misuse, in this case ZIPPER-MASCHINEN and its sales partners cannot be made liable for ANY direct or indirect damage.
Even when the machine is used as prescribed it is still impossible to eliminate certain residual risk factors.
Ambient conditions
The machine may be operated:
humidity
max. 70%
temperature
+5^ to +40^ (+41^ to +104^)
The machine shall not be operated in areas exposed to increased fire or explosion hazard.
Prohibited use
- The operation of the machine outside the stated technical limits described in this manual is forbidden.
- Operation of the machine with open motor cover is prohibited.
- The use of the machine not being suitable for the use of the machine and not being certified is forbidden.
- Any manipulation of the machine and parts is forbidden.
- The use of the machine for any purposes other than described in this usermanual is forbidden.
- The unattended operation on the machine during the working process is forbidden!
- It is not allowed to leave the immediate work area during the work is being performed.
- The machine is not permitted for the processing of food!
- Any other utilisation counts as improper use especially mixing combustible or explosive materials is forbidden
11.2 Security instructions
Missing or non-readable security stickers have to be replaced immediately!
The locally applicable laws and regulations may specify the minimum age of the operator and limit the use of this machine!
To avoid malfunction, machine defects and injuries, read the following security instructions!

- Make sure the work area is lighted sufficiently
- Do not overload the machine
- Provide good stability and keep balance all times
- Always stay focused when working. Reduce distortion sources in your working environment. The operation of the machine when being tired, as well as under the influence of alcohol, drugs or concentration influencing medicaments is forbidden.

- Respectively trained people only and only one person shall operate the machine.
- Do not allow other people, particularly children, to touch the machine or the cable. Keep them away from your work area.
• Make your workshop childproof. - Make sure there is nobody present in the dangerous area. The minimum safety distance is 2m
- Use personal safety equipment: ear protectors, safety goggles, safety shoes S1, work wear, safety gloves (EN 388, class 3111) dust mask when working with or on the machine.

- Never leave the machine running unattended! Before leaving the working area switch the machine off and wait until the machine stops.
- Always disconnect the machine prior to any actions performed at the machine.
- Avoid unintentional starting
- Do not use the machine with damaged switch

- The plug of an electrical tool must strictly correspond to the socket. Do not use any adapters together with earthed electric tools
• Each time you work with an electrically operated machine, caution is advised! There is a risk of electric shock, fire, cutting injury; - Protect the machine from dampness (causing a short circuit)
- Use power tools and machines never in the vicinity of flammable liquids and gases (danger of explosion)
- Check the cable regularly for damage
- When working with the machine outdoors, use extension cables suitable for outdoor use
- Protect the cable from heat, oil and sharp edges
- Avoid body contact with earthed

- Keep Hands and feet away from rotating parts.
- Do not reach into the drum when it is running!
- Do not insert any object into the running drum e.g., shovel etc.
- Risk of physical injury when mixing drum is rotating.
• Warning against hand injuries (bruises on the sprocket)!
NOTICE
Emergency procedure
A first aid kitin accordance with ISO 3864 shouldalwaysbe readily availablefor apossible accident. Initiatetheviolationin accordance with thenecessaryfirst aidmeasures. Whenrequesting support,provide the following details:
- Place of accident
- Number of injured people
- Type of accident
- Injury type(s)
11.3 Remaining risk factors

WARNING
It is important to ensure that each machine has remaining risks. In the execution of all work (event the simplest) greatest attention is required. As safe working depends on you!
Even if the machine is used as required it is still impossible to eliminate certain residual risk factors totally. The following hazards may arise in connection with the machine's construction and design: Despite of correct and proper use and maintenance there remain some residual risk factors:
- Risk of injury to the hands / fingers by the rotating drum during operation.
- Risk of injury: hair and loose clothing, etc. can be captured and wound up! Safety regulations must be observed with regard to clothing.
- Risk of injury due to contact with live electrical components.
- Risk of injury by tipping the machine
- Risk of injury due to dust emissions from cement or additives
These risk factors can be minimized through obeying all security and operation instructions, proper machine maintenance, proficient and appropriate operation by persons with technical knowledge and experience.
12 OPERATION
Device to be operated in a perfect state only. Inspect the device visually every time it is to be used. Check in particular the safety equipment, electrical controls, electric cables and screwed connection for damage and if tightened properly. Replace any damaged parts before operating the device.
12.1 Operation instructions
| WARNUNG | ||
| Perform all machine settings with the machine being disconnected from the power supply! |
HINWEIS
- Install and operate the concrete mixer on a solid and flat surface (making sure it does not fall over).
- Keep the working area clear by tripping hazards.
- It should be possible to swivel the drum to the right and left. There must be sufficient space for a wheelbarrow under the drum, so that it can be emptied.
- The mixer drum to be only filled and emptied when the engine is running.
- Pay attention to the rotation direction of the mixer drum.
- Do not move the concrete mixer during operation!
- Regularly check the contact pressure of the swiveling wheel. If it were necessary, re-tighten the tension spring.
12.2 Operation
Switch On-Off:
Plug the machine into a socket.
Push „I“ (green button) to switch on Push „0“ (red button) to switch off
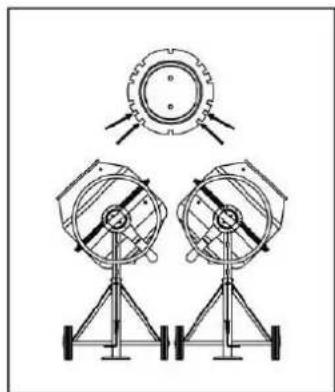
Swiveling the drum:
The tipping wheel provides an easy positive control of the drum which can be locked in the mix, discharge and storage position.
The drum is locked in the position by a self-locating plunger which engages into the tipping wheel. To tilt the drum, the locking plunger must be dis-engaged by pressing down the foot pedal. This allows the tipping wheel and drum to be turned in the same direction. To retain the drum in position, aligning the slot with the plunger, release the foot pedal and rotate the tipping wheel until the self-locating locking plunger engages into the tipping wheel.

natural_image
Close-up of a yellow and red 3D button with a green handle, mounted on a black surface (no text or symbols visible)Filling:
Before filling the drum, ensure that the opening is aligned in such a way that the mixture cannot fall out of the drum.
Put the mixture in when the drum is rotating (do not overfill the drum!)
Mixing:
Adjust the drum a little bit lower. Thus a good mixing result is achieved
Emptying:
Swivel the drum in the downward direction to empty it.
Ensure that there is an adequate container under the drum (e.g., wheelbarrow).
Ensure that no mixture falls on the ground
ATTENTION!
The full drum is heavy!
Storage and breaks:
Adjust the drum in the downward direction
natural_image
Technical line drawing of two mechanical components mounted on support frames, with a gear assembly above (no text or symbols)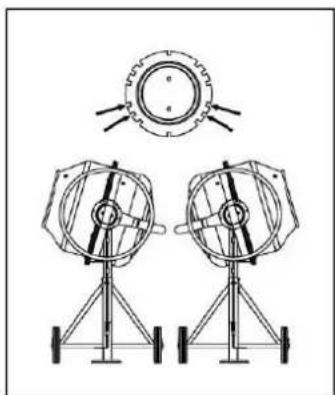
natural_image
Technical line drawing of two radar or radar systems with directional arrows indicating motion (no text or symbols)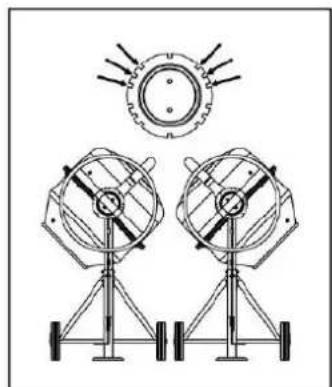
natural_image
Technical line drawing of two identical mechanical devices with wheels and a circular component above (no text or symbols)
natural_image
Technical line drawing of a mechanical device with gears and wheels (no text or symbols)13 MAINTENANCE
ATTENTION

Don't clean or do maintenance on the machine while it is still connected to the power supply:
Damages to machine and injuries might occur due to unintended switching on of the machine!
Therefore: Switch the machine off and disconnect it from the power supply be-fore any maintenance works or cleaning is carried out
The machine does not require extensive maintenance. If malfunctions and defects occur, let it be serviced by trained persons only.
Before first operation as well as later on every 100 operation hours you should lubricate all connecting parts (if required, remove beforehand with a brush all dust).
Check regularly the condition of the security stickers. Replace them if required.
Check regularly the condition of the machine.
The good condition and perfect adjustment of the guiding rollers is essential for a smooth band guidance and a clean cut.
Store the machine in a closed, dry location.
NOTICE
Clean your machine regularly after every usage – it prolongs the machines lifespan and is a prerequisite for a safe working environment.
Repair jobs shall be performed by respectively trained professionals only!
13.1 Maintenance plan
After each workshift:
- Clean the machine, especially the drum
After 25 hours of operation
- Grease the sprocket
- Check tension of the v-belt
13.2 V-Belt adjusting
Remove the cover of the motor housing, check the belt tension (on pressing the belt with the finger, it should yield by approx. 5mm.)
Belts are wear and tear parts that must be replaced after a certain period. If necessary, detach the screws on the motor, replace the belt, adjust the correct tension and tighten the screws again.
Reinstall the motor cover.
13.3 Transport
Set the filling opening downwards.
Lift the machine at the transport handles and move the machine
During transportation by motor vehicle, remove the screws and fold the stands.
Lock the mixer with a strap to prevent displacement
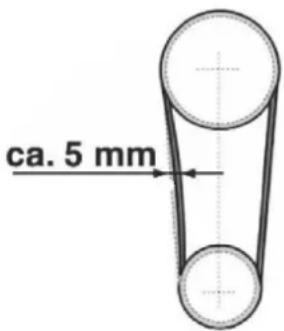
text_image
ca. 5 mm13.4 Cleaning
Clean the drum with water after each use of the concrete mixer.
Remove cement and mortar residues. Do not tap motor casing and drum with a shovel or any other hard object, as these can be damaged.
TIP: Fill the drum with water and a little crushed stone or gravel and turn on the machine. Empty after a few minutes.
NOTICE
The usage of certain solutions containing ingredients damaging metal surfaces as well as the use of scrubbing agents will damage the machine surface!
Clean the machine surface with a wet cloth soaked in a mild solution
13.5 Disposal
Do not dispose the machine in residual waste. Contact your local authorities for information regarding the available disposal options. When you buy at your local dealer for a replacement unit, the latter is obliged to exchange your old
14 TROUBLE SHOOTING
BEFORE YOU START WORKING FOR THE ELIMINATION OF DEFECTS, DISCONNECT THE MACHINE FROM THE POWER SUPPLY.
| Trouble | Possible cause | Solution |
| Motor does not start | Switch defective | Repair switch |
| Power supply is off | Repair power supply | |
| Fuse is defectivet | Change fuse | |
| Motor grows, runs but does not start | Sprocket blocked | Switch the machine off , unplug it and clean it or replace the ring gear components |
| Defective condenser | Contact Service hotline | |
| Machine starts but getting blocked under small load and switches automatically off | The extension cable is too long or with a small cross section | Check capture power supply |
| The socket is too far from the main line and the extension cable has a small cross section | Check capture power supply | |
| The contact pressure of the swiveling wheel is too loose | The tension spring is not sufficiently tight | Tighten the screw on the tension spring |
| Drum does not rotate after starting the machine | V-belt is damaged or not sufficiently tight | Check v-belt; Change v-belt if it is necessary |
MANY POTENTIAL SOURCES OF ERROR CAN BE CLEARED BY THE EXPERTLY CONNECTION TO THE ELECTRICITY GRID.
NOTICE
Should you in necessary repairs not able to properly to perform or you have not the prescribed training for it always attract a workshop to fix the problem.
15 UVOD (SL)
Spoštovani kupec!
natural_image
Close-up of a yellow and red 3D button with a green handle, mounted on a black surface (no text or symbols visible)Premikanje bobna:
natural_image
Technical line drawing of two mechanical components mounted on support frames, with a circular component above (no text or symbols)
natural_image
Technical line drawing of two radar or wind turbine components with a sun-like top view (no text or symbols)
natural_image
Technical line drawing of two identical mechanical or optical equipment units with a sun-like light source above (no text or symbols)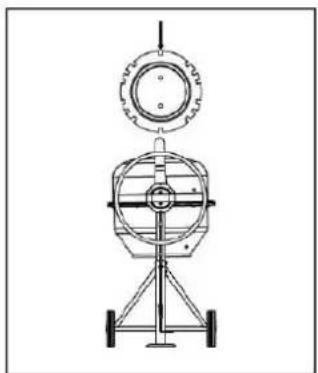
natural_image
Technical line drawing of a mechanical device with circular components and a stand (no text or symbols)18 VZDRŽEVANJE

POZOR
natural_image
Close-up of a yellow and red 3D button with a green handle, mounted on a black surface (no text or symbols visible)Namještanje bubnja:
Nagibno kolo omogućava lagano pozicioniranje bubnja (miješanje, pražnjenje/držanje)
natural_image
Technical line drawing of two mechanical components mounted on a tripod, with no visible text or symbols.
natural_image
Technical line drawing of two identical mechanical components with directional arrows indicating motion or force (no text or symbols)
natural_image
Technical line drawing of two identical mechanical components mounted on a tripod, with a circular component above (no text or symbols)
natural_image
Technical line drawing of a mechanical device with circular components and a stand (no text or symbols)23 ODRŽAVANJE

PAŽNJA
Cher client, chère cliente,
natural_image
Blue circular icons representing safety and equipment symbols (no text or labels)text_image
Safety warning symbols including warning circles, warning signs, and a no-smoking symbol with hazard symbolnatural_image
Close-up of a yellow and red 3D button with a green handle, mounted on a black surface (no text or symbols visible)natural_image
Technical line drawing of two mechanical components mounted on a tripod, with no visible text or symbols.
natural_image
Technical line drawing of two identical mechanical components with directional arrows indicating motion or force (no text or symbols)
natural_image
Technical line drawing of two identical mechanical devices with wheels and a circular component above (no text or symbols)
natural_image
Technical line drawing of a mechanical device with a circular top component and supporting frame (no text or symbols)28 MAINTENANCE

ATTENTION
text_image
L N FR SB1 KM SB2 M FR C31 ERSATZTEILE / SPARE PARTS / PIECES DE RECHANGE
(EN) With original ZIPPER spare parts you use parts that are attuned to each other shorten the installation time and elongate your machines lifespan.
IMPORTANT
The installation of other than original spare parts voids the warranty!
So you always have to use original spare parts
When you place a spare parts order please use the service form you can find in the last chapter of this manual. Always take a note of the machine type, spare parts number and part name. We recommend to copy the spare parts diagram and mark the spare part you need.
You find the order address in the preface of this operation manual.
text_image
Technical diagram of a mechanical device with numbered components and exploded views, likely for assembly or manufacturing purposes.spare parts list
| Item No. | size | Description | quantity | Item No. | size | Description | quantity |
| 1 | Upper Drum | 1 | 33 | 14X1.5 | Adjusting Washer 14X1.5 | 3 | |
| 2 | M8X16 | Bolt M8X16 | 10 | 34 | Drive Pinion | 1 | |
| 3 | Rubber Leather | 1 | 35 | 6X30 | Lock Pin 6X30 | 1 | |
| 4 | M8X12 | Bolt M8X12 | 5 | 36 | 6206 | Bearing 6206 | 2 |
| 5 | Cogwheel | 1 | 37 | 30 | Circlip 30 | 1 | |
| 6 | Lower Drum | 1 | 38 | 62 | Circlip 62 | 3 | |
| 7 | Bearing Block-up | 1 | 39 | Dustproof Cover | 1 | ||
| 8 | M8X20 | Bolt M8X20 | 2 | 40 | 3.5X16 | Self-tapping 3.5X16 | 2 |
| 8 | Flat Washer 8 | 2 | 41 | Switch | 1 | ||
| 8 | Spring Washer 8 | 2 | 42 | Gasket | 1 | ||
| M8 | Nut M8 | 2 | 43 | Strain Relief | 1 | ||
| 9 | Tipping Wheel | 1 | 44 | Power Cord | 1 | ||
| 10 | Support Arm | 1 | 45 | Strain Relief Cover | 1 | ||
| 11 | Stopping bar-up | 1 | 46 | Strain Relief Seal Cover | 1 | ||
| 12 | Spring | 1 | 47 | Strain Relief Nut | 1 | ||
| 13 | M6X25 | Bolt M6X25 | 1 | 48 | Motor Mount Bracket | 1 | |
| 14 | 8 | Flat Washer 8 | 2 | 49 | M8X30 | Bolt M8X30 | 3 |
| 15 | Frame | 1 | 50 | 47 | Circlip 47 | 1 | |
| 16 | 4X20 | Split Pin 4X20 | 1 | 51 | 30 | Circlip 30 | 1 |
| 17 | Stopping bar-down | 1 | 52 | 6906 | Bearing 6906 | 2 | |
| 18 | 8 | Spring Washer 8 | 2 | 53 | 4.6X16 | Self-tapping 4.8X16 | 9 |
| 19 | M8 | Nut M8 | 2 | 54 | End Plate | 1 | |
| 20 | M6 | Lock Nut M8 | 1 | 55 | Gasket | 1 | |
| 21 | Frame | 1 | 56 | Belt | 1 | ||
| 22 | M8X70 | Bolt M8X70 | 3 | 57 | Idle Pulley | 1 | |
| 8 | Flat Washer 8 | 3 | 58 | Motor | 1 | ||
| 8 | Spring Washer 8 | 3 | 59 | Fan | 1 | ||
| M8 | Nut M8 | 3 | 50 | Motor Cover | 1 | ||
| 23 | Axle Bracket | 1 | 61 | M10X20 | Bolt M10X20 | 4 | |
| 24 | Wheel | 2 | 62 | ||||
| 25 | 4X90 | Split Pin R 4X90 | 2 | 63 | 10 | Spring Washer 10 | 4 |
| 26 | 64 | Mixing Blade | 2 | ||||
| 27 | 65 | M10 | Nut M10 | 4 | |||
| 28 | 42 | Circlip 42 | 1 | 66 | 10 | Flat Washer 10 | 4 |
| 29 | 42 | O-ring 42 | 1 | 67 | Gear Guard-Long | 1 | |
| 30 | M8 | Lock Nut M8 | 2 | 68 | Bearing Block - right | 1 | |
| 31 | 6202 | Bearing 6202 | 2 | 69 | Gear Guard-Short | 1 | |
| 32 | Drive Shaft | 1 | 70 | M8X65 | Bolt M8X65 | 1 |
Company ZIPPER Maschinen GmbH grants for mechanical and electrical components a warranty period of 2 years for amateur use; and warranty period of 1 year for professional use, starting with the purchase of the final consumer. In case of defects during this period, which are not excluded by paragraph 3, ZIPPER will repair or replace the machine at its own discretion.
2.) Report:
In order to check the legitimacy of warranty claims, the final consumer must contact his dealer. The dealer has to report in written form the occurred defect to ZIPPER. If the warranty claim is legitimate, ZIPPER will pick up the defective machine from the dealer. Returned shippings by dealers which have not been coordinated with ZIPPER, will not be accepted and refused.
3.) Regulations:
a) Warranty claims will only be accepted, when a copy of the original invoice or cash voucher from the trading partner of ZIPPER is enclosed to the machine. The warranty claim expires if the accessories belonging to the machine are missing.
b) The warranty does not include free checking, maintenance, inspection or service works on the machine. Defects due to incorrect usage of the final consumer or his dealer will not be accepted as warranty claims either. Some examples: usage of wrong fuel, frost damages in water tanks, leaving fuel in the tank during the winter, etc.
c) Defects on wear parts are excluded, e.g. carbon brushes, collection bags, knives, cylinders, cutting blades, clutches, sealings, wheels, saw blades, splitting crosses, riving knives, riving knife extensions, hydraulic oils, oil/air/fuel filters, chains, spark plugs, sliding blocks, etc.
d) Also excluded are damages on the machine caused by incorrect or inappropriate usage, if it was used for a purpose which the machine is not supposed to, ignoring the user manual, force majeure, repairs or technical manipulations by not authorized workshops or by the customer himself, usage of non-original ZIPPER spare parts or accessories.
e) After inspection by our qualified personnel, resulted costs (like freight charges) and expenses for not legitimated warranty claims will be charged to the final customer or dealer.
f) In case of defective machines outside the warranty period, we will only repair after advance payment or dealer's invoice according to the cost estimate (incl. freight costs) of ZIPPER.
g) Warranty claims can only be granted for customers of an authorized ZIPPER dealer who directly purchased the machine from ZIPPER. These claims are not transferable in case of multiple sales of the machine.
4.) Claims for compensation and other liabilities:
The liability of company ZIPPER is limited to the value of goods in all cases. Claims for compensation because of poor performance, lacks, damages or loss of earnings due to defects during the warranty period will not be accepted. ZIPPER insists on its right to subsequent improvement of the machine.
35 GARANCIJA (SL)
1.) Garancija:
Product experience form
We observe the quality of our delivered products in the frame of a Quality Management policy.
Your opinion is essential for further product development and product choice. Please let us know about your:
- Impressions and suggestions for improvement.
- experiences that may be useful for other users and for product design
- Experiences with malfunctions that occur in specific operation modes
We would like to ask you to note down your experiences and observations and send them to us via FAX, E-Mail or by post:
Erworben von / purchased from:
E-Mail/ e-mail:
Please describe amongst others in the problem: What has cause the problem/defect, what was the last activity before you noticed the problem/defect? For electrical problems: Have you had checked you electric supply and the machine already by a certified electrician?
3. Bitte beachten
/ Additional information
INCOMPLETELY FILLED SERVICE FORMS CANNOT BE PROCESSED! FOR GUARANTEE CLAIMS PLEASE ADD A COPY OF YOUR ORIGINAL SALES / DELIVERY RECEIPT OTHERWISE IT CANNOT BE ACCEPTED. FOR SPARE PART ORDERS PLEASE ADD TO THIS SERVICE FORM A COPY OF THE RESPECTIVE EXPLODED DRAWING WITH THE REQUIRED SPARE PARTS BEING MARKED CLEARLY AND UNMISTAKABLE. THIS HELPS US TO IDENTIFY THE REQUIRED SPARE PARTS FASTLY AND ACCEL- LERATES THE HANDLING OF YOUR INQUIRY.