
O560RVS - Oven Pelgrim - Free user manual and instructions
Find the device manual for free O560RVS Pelgrim in PDF.

| Product type | Built-in oven |
| Brand | Pelgrim |
| Model | O560RVS |
| Category | Oven |
| Dimensions (H x W x D) | 595 x 595 x 550 mm (estimated) |
| Net weight | Approximately 35 kg |
| Power supply | 220-240 V, 50/60 Hz, 16 A |
| Total power | Approximately 3.3 kW |
| Energy class | A+ (estimated) |
| Internal volume | 65 L (estimated) |
| Cooking modes | Fan forced, fan forced + bottom heat, hot air + top heat, grill + fan forced, fast cooking, double grill, natural convection, slow cooking, ventilated top and bottom heat, ventilated double grill, large grill + bottom, grill + ventilated bottom |
| Automatic programs | 22 programs (biscuits, pizza, roast, fish, etc.) |
| Heating types | Top, bottom and grill elements; fan forced fan; steam injection (on some models) |
| Special functions | Quick preheat, automatic mode (autobake), professional mode (probake), step program, gratin, temperature probe, defrosting, reheating, Sabbath mode |
| Display | LCD screen with brightness adjustment, night mode (8pm-6am) |
| Controls | Touch keys + rotary selection/confirmation button |
| Timer | Up to 24 h, with delayed start and automatic stop |
| Interior lighting | Halogen lamp G9, 230 V, 25 W |
| Number of shelf levels | 5 levels |
| Included accessories | Grid, shallow baking tray, perforated baking tray for AirBake (depending on model), temperature probe (depending on model) |
| Cleaning and maintenance | AquaClean program, manual cleaning, door disassembly for glass cleaning, removal of sliding guides |
| Safety | Child safety, door lock, door switch (cuts heating when opened), chassis cooling |
| Spare parts and repairability | Halogen bulb G9, temperature probe, door glass, seals, sliding guides; repair by authorized service |
| General information | 167-page manual available in French and other languages; warranty according to manufacturer's conditions |
Frequently Asked Questions - O560RVS Pelgrim
User questions about O560RVS Pelgrim
0 question about this device. Answer the ones you know or ask your own.
Ask a new question about this device
Download the instructions for your Oven in PDF format for free! Find your manual O560RVS - Pelgrim and take your electronic device back in hand. On this page are published all the documents necessary for the use of your device. O560RVS by Pelgrim.
USER MANUAL O560RVS Pelgrim
natural_image
Simple line drawing of a rectangular cabinet or drawer with a circular handle and horizontal bar (no text or symbols)O500...
O560...
natural_image
Technical line drawing of a mechanical assembly with cross-sectional views (no text or symbols)natural_image
Simple line drawing of a rectangular tray or container with no text, numbers, or symbolsnatural_image
Line drawing of a rectangular tray with three vertical slots (no text or symbols)
Kokenoptijd
C.bereidingstijd
D.programma
1 Plaatsdeondiepebakplaatinheteerste geleideniveauengieter0,4literheetwaterin.
natural_image
Simple line drawing of a rectangular cabinet or drawer with a circular handle and horizontal bar (no text or symbols)O500...
O560...
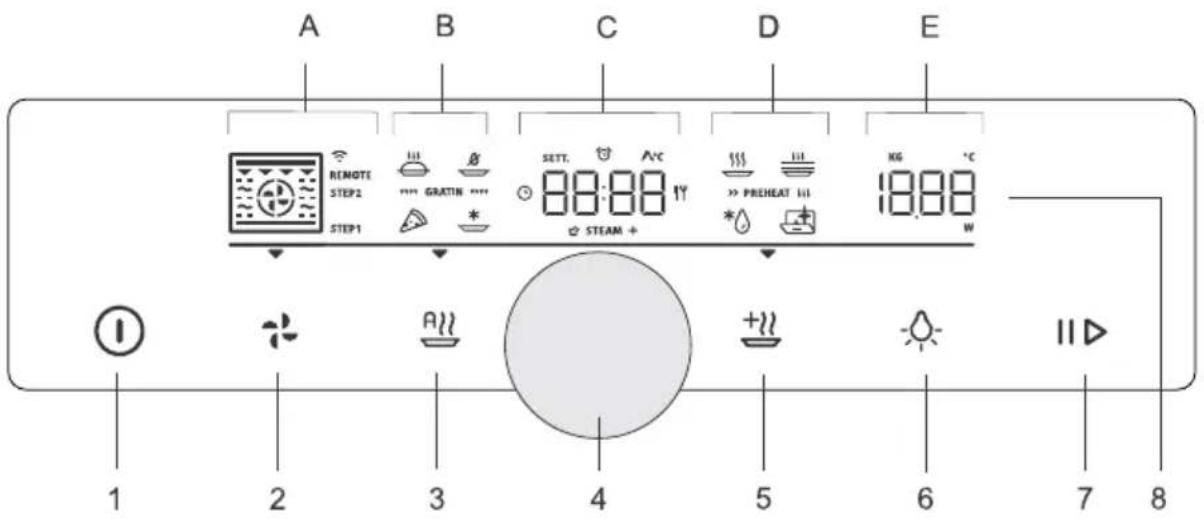
8Indicationsetsymbolesdeconformité4Marque
Bandeaudecommandes
(selonlemodèle)
natural_image
Technical line drawing of a mechanical assembly with cross-sectional views (no text or symbols)Interrupteursurlaportedufour
(selonlemodèle)
natural_image
Simple line drawing of a rectangular tray or container with no text, numbers, or symbolsLaPLAQUEDECUISSONPEUPROFONDE
natural_image
Line drawing of a rectangular tray with three vertical slots and a handle (no text or symbols)
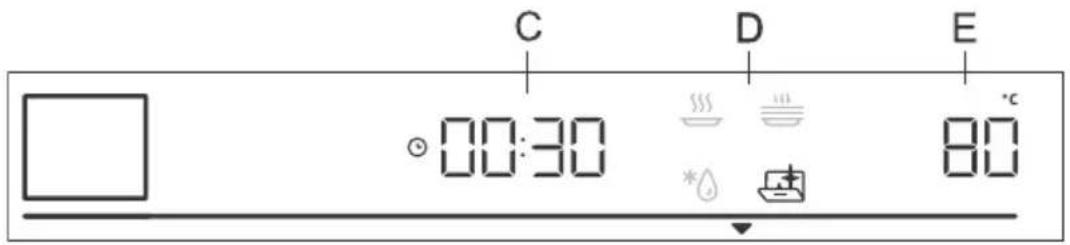
Cuissonprogrammée
C.cookingduration
D.program
E.presettemperature
flowchart
graph TD
    A["Step 1: Rear assembly"] --> B["Step 2: Rear assembly with valve"]
    B --> C["Step 3: Rear assembly with switch"]
    C --> D["Step 4: Rear assembly with bracket"]
    D --> E["Step 5: Rear assembly with guardrail"]
    E --> F["Step 6: Rear assembly with valve"]
    F --> G["Step 7: Rear assembly with handle"]
    G --> H["Step 8: Rear assembly with guardrail"]
1 Dévissezetretirezlecouvercle(danslesens inversedesaiguillesd'unemontre).Retirez l'ampoulehalogène.
natural_image
Simple line drawing of a rectangular cabinet or drawer with a circular handle and horizontal bar (no text or symbols)O500...
O560...
natural_image
Technical line drawing of a mechanical assembly with cross-sectional views (no text or symbols)natural_image
Line drawing of a rectangular tray with three vertical slots (no text or symbols)DasFLACHEPERFORIERTEBACKBLECH

C.Garzeit
D.Programm
flowchart
graph TD
    A["Step 1: Internal panel assembly"] --> B["Step 2: Rotation of part"]
    B --> C["Step 3: Panel assembly with directional arrows indicating motion"]
    C --> D["Step 4: Panel assembly with directional arrows indicating movement"]
    D --> E["Step 5: Internal structure with directional arrows indicating movement"]
    E --> F["Step 6: Internal assembly with directional arrows indicating movement"]
natural_image
Simple line drawing of a rectangular cabinet or drawer with a circular handle and horizontal bar (no text or symbols)O500...
O560...
Instructions for use Oven
Wethankyouforyourtrustandthepurchaseofourappliance.
This detailed instruction manual is supplied to make the use of this product easier. The instructions should allow you to learn about your new appliance as quickly as possible.
Makesureyouhavereceivedanundamagedappliance.Ifyoudofindtransportdamage, pleasecontactthesellerfromwhichyoupurchasedtheappliance,ortheregional warehousefromwhichitwassupplied.Thetelephonumbercanbefoundonthe invoiceoronthedeliverynote.
Instructions for installation and connection aresupplied on a separate sheet.
The following symbols are used throughout the manual and they have the following meanings:

INFORMATION!
Information, advice, tip, or recommendation

WARNING!
Warning-general danger

It is important that you carefully read the instructions.
Contents
Safety precautions 4
Other important safety warnings 6
Appliance description 7
Rating plate – product information 7
Control unit 8
Appliance equipment 9
Control lights 9
Guides 9
Oven door switch 10
Cooling fan 10
Oven equipment and accessories 10
Before first use 12
Switching on for the first time 13
Choosing the settings 14
PROFESSIONAL MODE (pro bake) 14
AUTOMATIC MODE (auto bake) 19
22CHOOSII
Child lock 22
Starting the cooking process 24
24Endofco
Choosing the general settings 25
General tips and advice for baking 27
Cooking with a temperature probe 28
30Recomm
Cleaning and maintenance 31
32Usingthe
33Removing
33Removing
Replacing the bulb 35
Troubleshooting table 36
Special warnings and fault reporting 36
Disposal 37
Cooking test 38
Safetyprecautions

natural_image
Warning symbol: black exclamation mark inside a triangle (no text or numbers)IMPORTANTSAFETYPRECAUTIONS-CAREFULLYREAD THEINSTRUCTION SANDSAVETHEMFORFUTURE REFERENCE.
Appliancemustbeconnectedtofixedwiringwhichhas incorporatedmeansofdisconnection.Fixedwiringmustbe madeinaccordancewiththewiringrules.
Meansfordisconnectionmustbeincorporatedinthefixed wiringinaccordancewiththewiringrules.
Theappliancemustnotbeinstalledbehindadecorativedoor inordertoavoidoverheating.
If the supply cord is damaged, it must bere placed by the manufacturer, its service agent or similarly qualified persons in order to avoid a hazard (only for appliance supplied with connection cord).
During usethe appliance becomeshot. Careshouldbetaken to avoid touching the heating elements inside the oven.
This appliance can be used by children aged 8 years and above, and by persons with reduced physical, sensory or mental capabilities or lack of experience and knowledge, if they have been given supervision or instruction concerning the use of the appliance in asafeway, and if they understand the hazards involved. Children shall not play with the appliance. Cleaning and user maintenance shall not be done by children without supervision.
WARNING: Accessible parts may become hot during use. Young children should be kept away.
WARNING:Theapplianceandsomeofitsaccessibleparts maybecomeveryhotduringuse.Careshouldbetakentoavoid touchingheatingelements.Childrenlessthan8yearsofage shallbekeptawayunlesscontinuouslysupervised.
The appliance is not intended to be controlled by external timers or separateremote control system.
Onlyusethetemperatureproberecommendedforuseinthis oven.
Donotuseharshabrasivecleanersorsharpmetalscrapersto cleantheovendoorglass/theglassofhingedlidsofthehob (asappropriate),sincetheycanscratchthesurface,whichmay resultinshatteringoftheglass.
Donotusesteamcleanersorhigh-pressurecleanerstoclean theapplianceasthismayresultinanelectricshock.
WARNING: Before replacing the light bulb, makes sure the appliance has been disconnected from themains power, in ordertoprevent the hazard of an electric shock.
Neverpourwaterdirectlyonthebottomoftheovencavity.
Temperaturedifferencescouldresultindamagetotheenamel coating.
Otherimportantsafetywarnings
The appliance is intended for household use. Donot use it for any other purpose, such as room heating, drying of pets or other animals, paper, fabrics, herb setc. Asthism may lead to injury or fire hazard.
Appliancemustbeconnectedtofixedwiringwhichhasincorporatedmeansofdisconnection.Fixed wiringmustbemadeinaccordancewiththewiringrules.
Donotlifttheappliancebyholdingitbythedoorhandle.
Ovendoorhingesmaybedamagedwhenunderexcessiveload.Donotstandorsitontheopenoven door, and donotleanagainst. Also, donotplaceanyheavyobjectsontotheovendoor.
If the power cord so of other appliances placed near this appliance get entangled in the ovendoor, they can be damaged, which inturn can result in a short circuit. Therefore, makes sure the power cord so of other appliances are always at as a fast distance.
Ovendoorbecomeveryhotduringoperation.Athirdglassisinstalledforextraprotection,reducing thetemperatureoftheoutsidesurface(onlywithsomemodels).
Makesuretheventsarenevercoveredorobstructedinanyotherway.
Donotlinetheovencavitywithaluminiumfoil, and donotplaceanybakingtraysorothercookware ontheovenbottom. This would obstruct and reduce aircirculation in the oven, slowdown the baking process, and destroy the enamel coating.
Werecommendyouavoidopeningtheovendoorduringbaking,asthisincreasespowerconsumption andincreasescondensateaccumulation.
Attheendofthebakingprocess, and during baking, be careful when opening the ovendoor, asthere is dangerofscalding.
Topreventlimescaleaccumulation,leavetheovendooropenafterbakingorusingtheoven,toallow theovencavitytocooldowntoroomtemperature.
Cleantheovenwhenithascompletelycooleddown.
Eventualmismatchesincolourshadesbetweendifferentappliancesorcomponentswithinasingledesignlinemayoccurduetovariousfactors,suchasdifferentanglesunderwhichtheappliancesareobserved,differentcolouredbackgrounds,materials,androomillumination.
Neverpourwaterontotheovencavitybottom. Temperaturedifferencescouldresultindamagetothe enamelcoating.
Donotusetheapplianceifitisdamaged.Callanauthorizedservicecentre.

WARNING!
Carefullyreadtheinstructionsforusebeforeconnectingtheappliance.Repairorany warrantyclaimresultingfromincorrectconnectionoruseoftheapplianceshallnotbe coveredbythewarranty.
Appliancedescription

INFORMATION!
Appliancefunctionsandequipmentdependonthemodel.
Basicequipmentofyourapplianceincludeswireguides,shallowbakingtray,andawirerack.

5Guides-cookinglevels1Controlunit
6Ratingplate2Doorswitch
7Ovendoor3Lighting
8Doorhandle4Temperatureprobesocket
Ratingplate-productinformation
Aratingplatewithbasicinformationabouttheapplianceisattachedtotheedgeoftheoven.Precise informationonappliancetypeandmodelcanalsobefoundonthewarrantysheet.

Oven light: oven light is switched on when you open or close the oven door, when you switch on the oven, attheendofthebakingprocess, and whenyoutouchtheovenlightkeyonthecontrolunit.
Guides
•Theguidesallowcookingorbakingon5racklevels.
• The height levels of guides into which the racks can be inserted shall be counted from bottom up.
•Guidelevels4and5areintendedforgrilling/broiling.
- Wheninsertingequipment, it should be correctly rotated.
Wireguides
natural_image
Technical line drawing of a front view of a double door with internal components and structural details (no text or symbols)Incaseofwireguides,alwaysinsertthewire rackandthebakingtrayintotheslotbetween theupperandlowerpartofeachguidelevel.
Fixedpull-outguides
(dependingonthemodel)
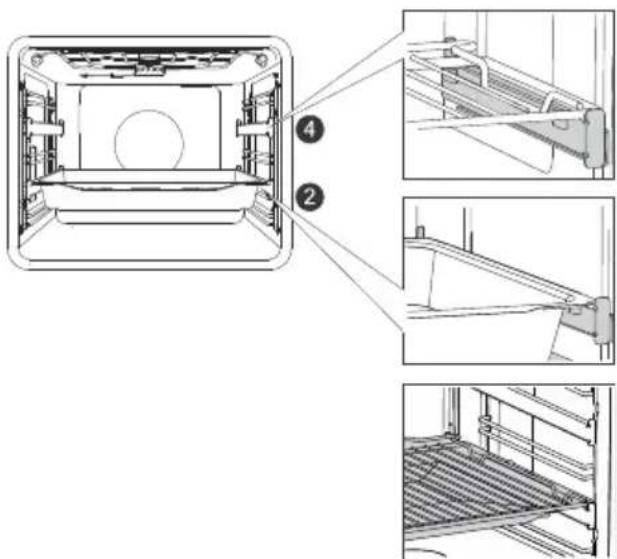
Pull-outguidesmaybefittedforthe2ndand 4thlevel.
Incaseoffixedpull-outguides, placetherack orbaking tray onto the guide. You can place the wirerack directly onto abaking tray (shallow or deepall-purpose baking tray) and place both onto the same guide; in this case, the baking tray acts as adriptay.
Click-onpull-outguides
(dependingonthemodel)
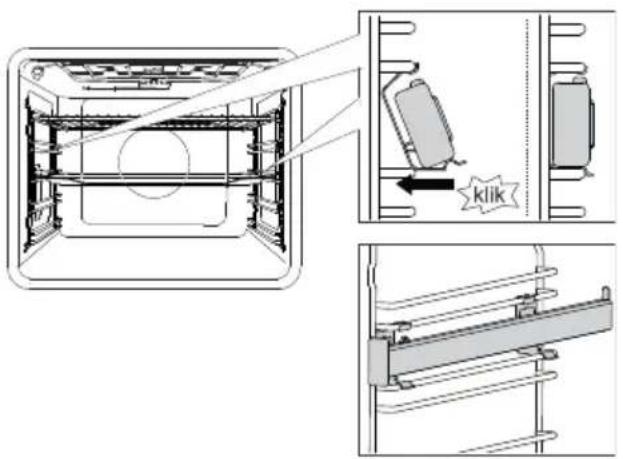
Theclick-onpull-outguidecanbeinsertedinto anyspacebetweentwowireguides.
Placetheguidesymmetricallyontothewire guidesontheleftandtherightsideoftheoven cavity.First,hooktheupperclipoftheguide underthewireofthewireguide.Then,press thelowerclipintotherightpositionuntilyou hearaCLICK.
NOTE: Theguidescanbeattachedtoany heightbetweentwolevelsofwireguides.

INFORMATION!
Theclick-onpull-outguidescannotbemountedontoguideswithfixeddouble-levelpartial extension. Theycan, however, bemountedontosingle-levelpartiallyextendibleguides, tolevels 3–4 and 4–5.
Makesurethepull-outguideiscorrectlyrotatedandthatitextendsoutwards,i.e.outfromthe oven.
Ovendoorswitch
(dependingonthemodel)
If theovendoorisopened during oven operation, the switchturnsofftheheaterandfanintheoven cavity. Whenthedoorisclosed, the switchturnstheapplianceoperationbackon.

WARNING!
Using the oven with the door open and the door switch engaged (closed) is not allowed. The oven will signal an error, and it will have to be reset.
Coolingfan
The appliance is fitted with a cooling fan that cold the housing, the door, and the appliance control unit. After the oven is switched off, the cooling fan continues to operate for short while in order to cooldown the oven.
Ovenequipmentandaccessories
(dependingonthemodel)

The WIRERACK is used for grilling/broilingor assupport forapan, baking tray or baking dish with the foody you are baking.

INFORMATION!
Thereisasafetylatchonthewirerack. Therefore,thewirerackhastobelifted slightlyatthefrontwhenpullingitoutfrom theoven.

SHALLOWBAKINGTRAYisusedforflatand smallpastry.Itcanalsobeusedasadriptray.

WARNING!
Theshallowbakingtraymaydeformas itheatsupintheoven.Onceitcools down,itreturnstotheinitialshape. Suchdeformationdoesnotaffectits function.

natural_image
Line drawing of a rectangular tray with multiple slots and a central slot (no text or symbols)The AIRFRYBAKINGTRAY is used for cooking with system that feature steaminjection and for Air Bake. The perforation improves Air Bake around the food for acrispier crust. When cooking food with high liquid content (water, fat), placeth shallow baking tray or all-purposed deep baking tray on a rack low to serve as driptray.

TemperaturePROBE(BAKESENSOR).

WARNING!
The appliance and some of the accessible part tend to heat up during cooking.
Beforefirstuse
- Removeovenaccessoriesandanypackaging(cardboard,polystyrenefoam)fromtheoven.
- Wipetheovenaccessoriesandinteriorwithadampcloth.Donotuseabrasiveoraggressive clothsorcleaners.
- Heatanemptyovenforapproximatelyonehourwiththetopandbottomheatersystemata temperatureof250°C.Thecharacteristic"newovenscent"willbereleased;therefore,ventilate theroomthoroughlyduringthisprocess.
Switchingonforthefirsttime
Afterconnectingyourapplianceorafteranextendedpoweroutage,12:00willflashonthedisplay.
First, choose and confirm the following basic settings.

INFORMATION!
Change them by rotating the KNOB. To confirm the desired setting, press the KNOB or touch the key.

1.CLOCKSETTING
Settheclock/timeofday.First,setandconfirmtheminutes;thenset and confirmthehours.

INFORMATION!
Tosetoradjusttheclocklateron,seechapterExtrafunctions.

2.ACOUSTIC SIGNALVOLUME
Mediumvolumeisthedefaultsetting.ThesignVoLandthecurrentlyset valuefortheacousticsignalvolumewillappearonthedisplayunit.Rotate theKNOBtoincreaseordecreasethekeyvolume.

3.DISPLAYDIMMER
Mediumlightintensityisthedefaultsetting.Thesignbrhtandthe currentlysetvalueforthedisplaylightintensitywillappearonthedisplay unit.RotatetheKNOBtoincreaseordecreaselightingintensity.
Afteryouconfirmtheselectedsettings, theclockwillappearonthedisplayunit. Theapplianceisin standbymode.
Choosingthesettings
The interface allows choosing several operating modes:
•Professionalmode(probake)
•Automaticmode(autobake)
•Extrafunctions(extrabake)
- Stepprogram(STEP)intheprofessionalmode(probake)
•Automaticprogramsinautomaticmode(autobake)

INFORMATION!
- RotatetheKNOBtoscrollthroughthesettings.
- First, confirm these selected setting bypassing the KNOB; then, changethesetting.
- ConfirmeachsettingbypassingtheKNOB.
- Alineandanarrowindicatethelocationoftheparameterthatyouarelookingtoset.
• Pressthekeytostarttheprogram.
• Operationofthekey:
-brieftouch:switchtheovenonoroff,stopthebakingprocessorfunction.
-longtouch:theovenswitchestolowpowerconsumption(powersaving)mode.
NokeyorKNOBareactive, exceptforthekey. To switchontheoven, long-touch this key.

PROFESSIONALMODE(probake)
This function allows setting the baking parameters – baking system, temperature, fast preheating, and bakingtime–freely, attheuser'sdiscretion.
Touchthekeyandsetthefollowing:
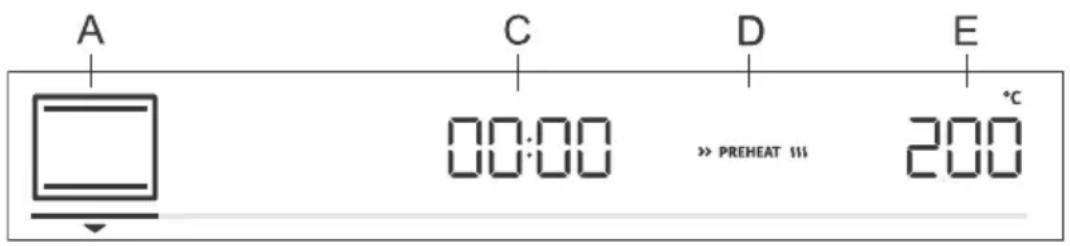
A.bakingsystem
C.programduration
D.preheating
E.temperature
Additionally, the following can beset:
-timerfunctions(seechapterTimerfunctions)
-stepbakingmode(STEP)(seechapterStepprogram)
-gratin(GRATIN)(seechapterStartingthecookingprocess)
Fastpreheat
Usethefastpreheatingfunctionifyouwishtoheattheoventothedesiredtemperatureasquicklyas possible.
Toactivatefastpreheating, rotatetheKNOBtothesetting(seeimage, labelD). Confirm theselection. RotatetheKNOBtoselectthefullylitsignandconfirmit. Thefunctionisnowactivated.
When theselectedtemperatureisreached, the preheating process stops and an acoustic signal is emitted. door will appear on the display unit. Open the door and insert the food. The program will automatically continue baking with selected settings.

INFORMATION!
Whenthefastpreheatfunctionisactivated, delayedstartfunctioncannotbeused.
Appliancefunctionsandequipmentdependonthemodel.
| UseSymbol | |
 | HOTAIRHotairallowsbetterflowofhotairaroundthefood.Thisway,itdriesoutthesurface andcreatesathickercrust.Usethissystemtocookmeat,pastryandvegetables, andtodryfoodonasinglerackormultiplerackssimultaneously. |
 | HOTAIRANDBOTTOMHEATERThissystemisoptimalforbakinghomemadepizzaandpastrywithhigherwater content.Useittobakeonasinglerack,whenyouwantthefoodtobedonefaster andtobecrunchy. |
 | HOTAIRANDTOPHEATERThiscookingmethodresultsinacrunchycrustwithoutaddedfat.Thisisahealthy versionoffast-foodfrying,withfewercaloriesinthecookedfood.Suitablefor smallercutsofmeat,fish,vegetables,andfrozenproductsreadyforfrying(French fries,chickennuggets). |
 | GRILLWITHHOTAIRHotairallowsbetterflowofhotairaroundthefood.Thiswilldryoutthesurface.Incombinationwiththegrillheater/broiler,thiswillalsoresultinamoreintensive colour.Forfasterbakingofmeatandvegetables. |
 | TURBOBAKEFordisheswhereevencrispinessfromallsidesidesirable.Thesystemisalso suitableasthefirststepinthestepbakingmode,asitallowsquickbrowningof thesurfaceinthefirststageandslowbakinginthesecondstage.Themeatwillbe juicywithanicelybrownedcrust. |
 | LARGEGRILLUsethissystemtogrillargeamountsofflat-shapedfoodliketoast,open sandwiches,grillsausages,steaks,fish-skewersetc.,aswellasforcookingau gratinandforbrowningthecrust.Theheatersmountedonthetopoftheovencavity evenlyheattheentiresurface.Maximumallowedtemperature:240°C |
 | TOPANDBOTTOMHEATERUsethissystemforconventionalbakingonasinglerack,makingsoufflés,and bakingatlowtemperatures(slowcooking). |
 | GENTLEBAKINGForgentleandcontrolledslowcookingofdelicatefood(softcutsofmeat)and bakingpastrywithacrunchybottom. |
 | TOPANDBOTTOMHEATERWITHFANForevenbakingoffoodonasinglerack,andformakingsoufflés. |
Tablecontinuedfromlastpage
| UseSymbol | |
 | LARGEGRILLWITHFANForroastingpoultryandlargercutsofmeatunderabroiler. |
 | LARGEGRILLANDBOTTOMHEATERForfasterbakingonasinglerackandforcrisplybrowningthetopofyourpastry. |
 | GRILLWITHBOTTOMHEATERANDFANForoptimumbakingofyeast-leaveneddough,alltypesofbread,andforpreservation. |

INFORMATION!
Inthesesystems,itispossibletousethegratinfunction(seechapterStartingthecooking process).
Touchthekeytostartthecookingprocess.Selectedsettingswillappearondisplayunit.
TIMERFUNCTIONS
RotatetheKNOBtoselectthetimerfunctions.


Timedcooking
Inthismode, you can specify the duration of oven operation (cooking time).
The cooking durations symbol will appear on the display unit. Rotate the KNOB to set the desired cooking time. Confirm these setting by pressing on the KNOB.
Touchthekeytostartbaking.

Settingthedelayedstart

INFORMATION!
Delayedstartisnotpossiblewhenthepreheatingfunctionis activated.
Usethisfunctionwhenyouwishtostartcookingthefoodintheoven afteracertainperiodoftime.Placethefoodintotheoven,thensetthe systemandtemperature.Then,settheprogramdurationandthetime whenyouwishyourfooddone.
Example:
Currenttime:12:00(noon)
Cookingtime:2hours
Endofcooking:at18:00(6p.m.)
The cooking durations symbol will appear on the display unit. Choose the setting and confirm it by pressing the KNOB (in our case, 2:00). Press the KNOB again and rotate it to select the symbol. Confirm handset the time when you wish your food to be done (in our case, this is 18:00, or 6p.m.). Desired cooking and timewill appear on the display unit (18:00). Confirm these settings by pressing on the KNOB.
Touchthekeytostartbaking.
Whilewaitingtobeeactivated,theovenswitchestoapartialstand-by (thedisplayunitgoesdark).Theovenwillswitchonwiththeselected settingsautomatically(inourcaseat16:00,or4p.m.).Theovenwill switchoffatthesetime(inourcase,thisis18:00,or6p.m.).

INFORMATION!
Cookingendtimeandtheclockwillalternateonthedisplayunit.
Afterthesetimeexpires, the oven will automatically stop operating. Sign End and 00.00 will alternate on the display unit. An acoustic signal will be emitted, which can be turned off by touching any key. After one minute, the acousticsignal will be switched off automatically.

WARNING!
Thisfunctionisnotsuitableforfoodrequiringfastpreheating.
Perishablefoodshouldnotbekeptintheovenforalongtime. Beforeusingthismode, checkwhethertheclockonthe applianceisaccuratelyset.

Minutemindersetting
Theminutemindercanbeusedindependentlyofovenoperation.The longestpossiblesettingis24hours.Duringthelastminute,theminiteminderisdisplayedinseconds.
RotatetheKNOBtoselectthesymbolandconfirmyoursetting. RotatetheKNOBandsettheminuteminderduration.Confirmthesetting bypassingontheKNOB.

INFORMATION!
Theselecttimerfunctioncanberesetto00:00bylong-pressingtheKNOB.

INFORMATION!
Themostrecentlyusedtimerfunctionvaluescanbestoredandofferedaspresetvaluesthe nexttimeyouusethetimer.Asafactorysetting,thisfunctionisoff,butitcanbeactivated(see chapterSelectingextrafunctions,Adaptivefunction).
STEPPROGRAM
Thisfunctionallowsbakingintwostepsorstages(twoconsecutivebakingstepsarecombinedina singlecookingprocess).
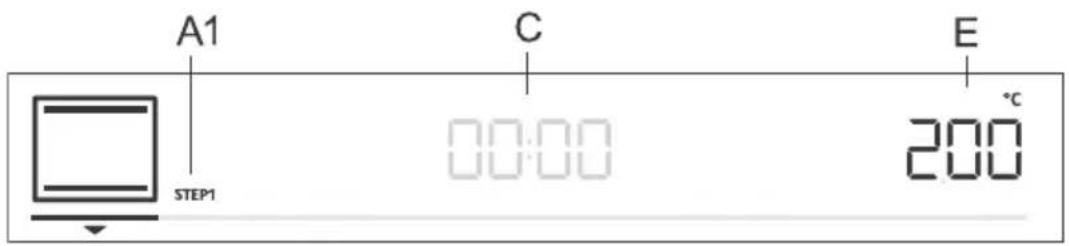
A1.firstcookingstepSTEP1,(STEP2)
C.programduration/endofprogram(seechapterTimerFunctions)
E.temperature
Step:STEP1
Inthemode, setthebakingsystemandtemperature. Youcanalsochoosetherapidpreheating function. Then, setthebakingdurationforSTEP1(seechapterTimerFunctions). Confirmthesetting bypassingontheKNOB.

INFORMATION!
InSTEP1,youcansetthedelayedstart;however,ifyoudoso,youcannotactivatefastpreheating.
Step:STEP2
Pressandholdthekey.STEP2(secondcookingstep)willappearonthedisplayunit(thefirst onehasalreadybeenset).Setthebakingsystem,temperature,andduration.Confirmthesettingby pressingontheKNOB.
If you wish, you can also modify STEP1 or STEP2 before starting them.
TouchthekeyandselectSTEP1.Nowyoucanchangethesettings.Then,dothesamefor STEP2.
Todeletethestepmode, pressandholdthekey.

Touchthekeytostartbaking.Theovenfirststartstooperatewiththesettingsselectedfor STEP1.WhentheSTEP1isdone,STEP2isactivated.

AUTOMATICMODE(autobake)
In this mode, you may choose between special bakings systems or automatic programs (preset programs for particular types of food).
Specialbakingsystems
Touchthekeyandsetthefollowing:
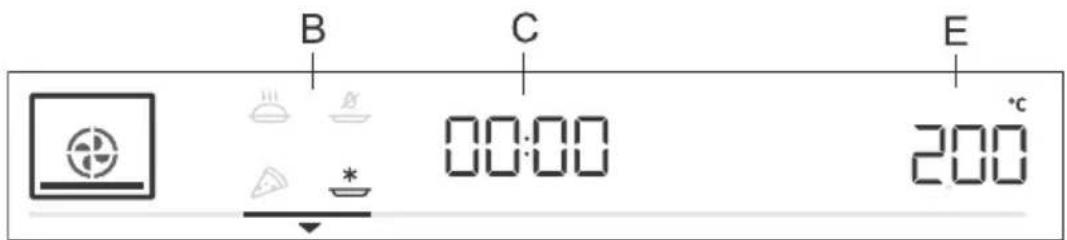
B.specialbakingsystems
C.programduration(seechapterTimerfunctions)
E.temperature
RotatetheKNOBandchooseyoursettings.Presetvalueswillbedisplayed:Youcanchangethe temperatureandprogramduration.
| UseSymbol | |
 | BAKINGFROZENFOOD1)Thismethodallowsbakingfrozenfoodinashorterperiodoftimewithout pre-heating.Optimumforpre-bakedfrozenproducts(bakeryproducts,croissants, lasagne,Frenchfries,chickennuggets),meatandvegetables. |
 | PIZZASYSTEM1)Thissystemisoptimalforbakinghomemadepizzaandpastrywithhigherwater content.Useittobakeonasinglerack,whenyouwantthefoodtobedonefaster andtobecrunchy. |
 | SLOWBAKING2)Forgentle,slowandevencookingofmeat,fishandpastryonasinglerack.This cookingmethodwillleavethemeatwithahigherwatercontent,makingitjuicier andmoretender,whilepastrywillbeevenlybrowned/baked.Thissystemisused inthetemperaturerangebetween 140^ Cand 220^ C. |
 | AIRBAKE1)Thiscookingmethodresultsinacrunchycrustwithoutaddedfat.Thisisahealthy versionoffast-foodfrying,withfewercaloriesinthecookedfood.Suitablefor smallercutsofmeat,fish,vegetables,andfrozenproductsreadyforfrying(French fries,chickennuggets). |
1) Inthesesystems,itispossibletousethegratinfunction(seechapterStartingthecookingprocess).
2) ThisfunctionisusedfordeterminingtheenergyefficiencyclasspursuanttotheEN60350-1standard.
Fastpreheat
Cookingproceduresforsomedishesintheautobakemodealsoincludethefastpreheatingfunction. Thesignwillbefullylit.Whentheselectedtemperatureisreached,thepreheatingprocessstopsand an acoustic signal is emitted. door will appear on the display unit. Open the door and insert the food. Theprogramwillautomaticallycontinuebakingwithselectedsettings.
Automaticprograms
Intheautomaticmode(autobake),youmaychoosebetweennumerousautomaticprograms(the appliancewillrecommendtheoptimumcookingmethod,temperature,andcookingdurationdependingonthetypeoffoodspecified).
Pressandholdthekeytodisplaytheautomaticprogramsonthedisplayunit(seetable).
Suggestedbakingsystem, temperature and duration can also be changed at your discretion. Where possible, you can also set the weight of the food.
ConfirmyoursettingbypassingtheKNOB.Touchthekeytostartbaking.Presetvalueswill appearonthedisplayunit.
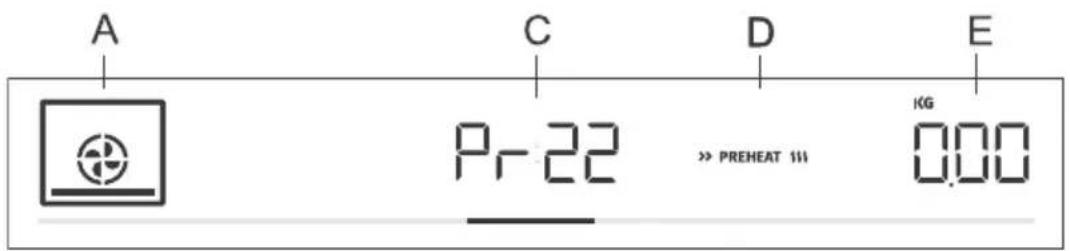
A.bakingsystem
C. automaticprogramindication/programduration
D.fastpreheating
E.selectedamount
| TurningPreheatingl | |||||
| noyes3shallowbal | |||||
| noyes3shallowbal | |||||
| Pr03 | spongecake | wirerack | noyes2bakingpan | ||
| Pr04 | smallpastry | noyes2shallowbal | |||
| noyes2shallowbal | |||||
| Pr06 | applepie | wirerack | 2bakingpan/dishon | no | |
| Pr07 | apple strudel | shallow baking tray | 2 | no | no |
| Pr08 | chocolatesoufflé | wirerack | noyes3bakingpan | ||
| Pr09 | rising and proofing | shallow baking tray | 2 | no | no |
| noyes2shallowbal | |||||
| Pr11 | porkroast | wirerack | 2smallbakingdishon | no | |
| Pr12 | roastedbeef | wirerack | 2smallbakingdishon | no | |
| Pr13 | poultry-whole | tray | 2wirerackwithadrip | after2/3of cooking time | |
Tablecontinuedfromlastpage
| TurningPreheatingI | |||||
| Pr14 | poultry-smaller pieces | tray | no3wirerafterwith/adfip cooking time | kickingpan/ | |
| meatloafPr15 | wirerack | nono2bakingpan/ | |||
| Pr16 | oven-bakedbeef steak | tray | no4wirerafterwith/adfip cooking time | smallbakin | |
| Pr17 | meat-slow cooking | wirerack | noyes2s | ||
| baked/grilledfishPr18 | tray | no4wirerafterwith/adfip cooking time | allowbak | ||
| Pr19 | wedges | nono3shallowbak | |||
| VegetablesouffléPr20 | wirerack | nono2bakingpan/ | |||
| lasagnePr21 | wirerack | nono2bakingpan/ | |||
| noyes1shallowbal |

INFORMATION!
Gratinfunctioncanbeusedwithsomeautomaticprograms(seechapterStartingthecooking process).

CHOOSINGEXTRAFUNCTIONS(extrabake)
Touchthekeytodisplayextrafunctionswiththeirrespectivepresetvaluesonthedisplayunit.
C.cookingduration
D.program
E.presettemperature
RotatetheKNOBandselecttheprogram.Presetvalueswillbedisplayed:Someprogramsallow settingthetemperatureandcookingtime.

INFORMATION!
RotatetheKNOBtoscrollthroughtheprograms.ConfirmeachsettingbypassingtheKNOB.

Aquaclean
Thisprogramallowseasyremovalofstainsfromtheoven(seechapterCleaningandMaintenance.)

Defrosting
Usethisfunctiontoslowlydefrostfrozenfood(cakes,pastry,bread,rolls,anddeep-frozenfruit).Presetprogramvaluesmaybechanged (temperature,cookingduration).
Halfwaythroughedefrosttime, thepiececesshouldbeturnedover, stirredandseparatediftheywerefrozentogether.

Reheating
Thisisusedtokeepwarmthefoodthathasalreadybeencooked.You maysetthetemperatureandreheatingstartandendtime.

Platewarming
Use this function to restore your dinnerware (plates, cups) before serving food in it to keep the food warm longer. You may set the temperature and reheating start and end time.
Childlock
To activate the child lock, press and hold (for 5 seconds) the light key 🔍. Loc will appear on the displayunit.Whenyoulong-pressthelightkeyagain,thechildlockisdeactivated.
- If the child lock is activated with no timer function engaged (only clock is displayed), then the oven will not operate.
-
If the child lock is activated after a timer function has been set, then the oven will operate normally; however, it will not be possible to change the settings.
-
When the child lock is activated, cooking or baking systems (modes) or additional functions cannot be changed. The cooking/baking/roasting process can only be stopped or switched off.
- Child lock will remain active after the oven is switched off. To select a new system, the child lock mustfirstbedeactivated.
Startingthecookingprocess

Startthecookingprocessbypassingthekey. II
Until these temperature is reached for the first time, the current and the temperature will alternate on the display unit. The temperatures symbol flashes at first. When the desired temperature is reached, it goes off.

INFORMATION!
If notimer function is selected, cooking time will appear on the display unit. A short acoustic signal is emitted when the oven reaches these selected temperature.
*** GRATIN ***
Extragratin
You may only activate this function 10 minutes after the start of the cooking process (thesymbol will appear on the display unit).
PresstheKNOBtoopensettings.RotatetheKNOBtothesign
*** GRATIN *** andconfirmyourselection.RotatetheKNOBagainand selectthefullylitsign.Confirmyourselection.Thefunctionisnow activated.Cookingtimeof10minutes(10:00)willappearonthedisplay unit.
Tochangetheduration, pressontheKNOBtwiceandrotateittoadjust thetime(max.30min). Confirmyourselection.
The function is used in the last stage of the cooking process when you add sauce/wetrubordryrubonto the food, or when you wish to additionally brown the crust. A golden-brown crust will form the dish during the gratin process, which protect the food from drying out, while also imparting amore pleasant appearance and better flavour.

INFORMATION!
The function can also be switched off while it is in progress. Rotate the KNOB to setting. Choose the immed sign and confirm by pressing on the KNOB.
Endofcookingandswitchingofftheoven
Stopthecookingprocessbytouchingthekey. Endappearsondisplayunitandanacoustic signalisemitted.

INFORMATION!
Aftertheoperationiscompleted, alltimersettingsarealsostoppedanddeleted, exceptforthe minuteminder.Timeofday(clock)willbedisplayed.Thecoolingfanwillcontinuetooperatefor awhile.
Aftertheuseoftheoven, somewhat may be left in the condensate channel (underneath the door). Wipethechannel with as spongeoracloth.
Choosing the general settings
Press and hold the ⏻ key. SEtt will appear on the display unit for a few seconds. Then, the general settingsmenuwillappear.

INFORMATION!
RotatetheKNOBtoscrollthroughthesettings.ConfirmeachsettingbypassingtheKNOBor thekey.

Clockdisplay
RotatetheKNOBtosettheclock.CLocwillappearonthedisplayunit. Afterconfirming,youcanchoosebetweenthe12hand24hclockdisplay. Confirm,thensettheclock/timeofday.First,settheminutes.Confirm, andthensetthehoursandconfirmagain.

Acousticsignalvolume
Choosebetweenthreeacousticsignalvolumelevels.RotatetheKNOB tochoosetheVoLsetting.Confirmthesettingandsetthevolume.There arefouravailablevolumelevels(zerobars-OFF,one,twoorthreebars).

Displayillumination
Choosebetweenthreelevelsofdisplaylightintensity. RotatetheKNOB toselectthebrhtsetting. Confirmyourselectionandchooseloweror higherintensity. Therearethreeavailableilluminationlevels(one,twoor threebars).

Displayunit-nightmode
Thisfunctionwillautomaticallydimthedisplay(switchfromhightolow displayilluminationlevel)duringnighttime(8:00p.m.to6:00a.m.). ChoosethenGhtsetting RotatetheKNOBtoswitchOnorOFF.

Standby
Thisfunctionswitchestheclockdisplayonoroff.SelectthehidEsetting. RotatetheKNOBtoswitchOnorOFF.

Adaptivefunction
The function allows adjusting the set cooking temperature and the cooking time. As a factory default, this function is deactivated, but you can activate it. When the function is activated, the most recent cooking time is displayed. Settings for the most recent cooking session lasting at least 1 minute are taken into account.
AdPtwillappearonthedisplayunit. Todeactivatethefunction, rotate theKNOBtopositionOFF. Followthesameproceduretoactivate the function. Select "On" onthedisplayunit.

Automaticfastpreheating
Thisfunctionallowsautomaticadditionoffastpreheatingtothebaking systemsthatallowit.
RotatetheKNOBtoselecttheAutosetting.ChooseOnorOFF.

Sabbath
The Sabbath function allows keeping the food warmtine hoven without having to switch the oven on or off.
RotatetheKNOBtoselectSAbb.ChooseOnorOFF.
Settheduration(between24and72hours)andtemperature. Confirm eachsettingbypassingtheKNOB.
If you wish the oven light to be on all the time, switch it on by touching the symbol.
Touchthekeybstartthecountdown.SAbbwillappearonthe displayunit.
Allsoundsandoperation,exceptforthekey,willbedeactivated.

INFORMATION!
In case of a power outage, the Sabbath modewill bedeactivated and the oven will return to the initial state.

Factorysettings
Thisfunctionallowsresettingtheappliancetofactorysettings.FActwill appearonthedisplayunit.RotatetheKNOBtoselectrES.Pressthe // keyuntiltheendoftheanimationtoconfirm.

WARNING!
Afterapoweroutageoraftertheapplianceisswitchedoff,additionalfunctionsettings willremainstoredfornomorethanafewminutes.Then,allsettings,exceptfortheacoustic signalvolumeanddisplaydimmerwillberesettofactorydefaults.
Generaltipsandadviceforbaking
- Remove all unnecessary equipment from theovenduringbaking
- Use equipment made of heat-resistant non-reflective materials (supplied baking trays and dishes, enamel-coatedcookware,temperedglasscookware).Bright-colouredmaterials(stainlesssteel oraluminium)materialsreflectheat.Asaresult,thermalprocessingoffoodinthemislesseffective.
- Always insert the baking sheets and trays to the end of the guides. When baking on the wire rack, placethebakingdishesortraysinthemiddleoftherack.
- Foroptimumfoodpreparation, were recommendobservingtheguidelinessspecifiedinthecooking table.Choosethelowerspecifiedtemperatureandtheshortestspecifiedcookingtime.Whenthis timeexpires,checktheresultsandthenadjustthesettingsasnecessary.
- Unlessitisabsolutelynecessary, donotopentheovendoorduringbaking.
- Donotplacethebakingtraysdirectlyontotheovencavitybottom.
- Do not use the all-purpose deep baking tray on the 1st guide level while the appliance is operating.
- Donotcovertheovencavitybottomorthewirerackwithaluminiumfoil.
- Withlongercookingprograms,youcanswitchchofftheovenapproximately10minutesbeforethe endofcookingtimetomakeuseoftheaccumulatedheat.
•Alwaysplacethebakingdishesontothewirerack.
- When baking on several levels at the same time, insert the all-purpose deep baking tray into the lowerlevel.
- When cooking according to recipes from older cookbooks, use the bottom and top theaters system (asin conventionallovens) and set the temperature 10^ Clower than specified in the recipe.
- If you are using parchment paper, make sure it is resistant to high-temperatures. Always trim it accordingly. Parchmentpaperpreventsthefoodfromstickingtothebakingtrayandmakesit easiertoremovethefoodfromthebakingtray.
- When cooking larger cut of meat or pastry with higher water content, alot of steam will be generated inside the oven, which inturn may condense on the ov endoor. This is an normal phenomenon which will not affect the operation of the appliance. After the cooking process, wipe the door and the doorglass dry.
- When baking directly on the wire rack, insert the all-purpose deep tray one level lower to serve asadriptray.
Fast preheating of the oven: If you are using the fast preheating function, do not insert the food into theovenuntiltheovenisfullyheated.Temperaturehasasubstantialeffectonthefinalresult.Fast preheatingisrecommendedfordelicatecutsofmeat(sirloin),andforyeast-leavenedandsponge doughthatrequireashorterbakingtime.Heatinganemptyovenconsumesalotofenergy.Therefore, ifpossible,werecommendcookingseveraldishesinsuccession,ormakingseveraldishes simultaneously.
GentleBake: Allows slow and controlled cooking at a low temperature. The meat juices are distributed evenly, and themeatremainsjuicyandtender. The Gentle Bakeslowcooking method dissuitable for delicate bonelessmeatcuts. Before slow cooking, searthemeatthoroughly from all sidesinafrying pan.
Cookingwithatemperatureprobe (BAKESENSOR)
(dependingonthemodel)
Thetemperatureprobeallowsforaccuratemonitoringofthecoretemperatureofthefoodduring cooking.

WARNING!
Thetemperatureprobeshouldnotbeindirectvicinityoftheheatingelements.
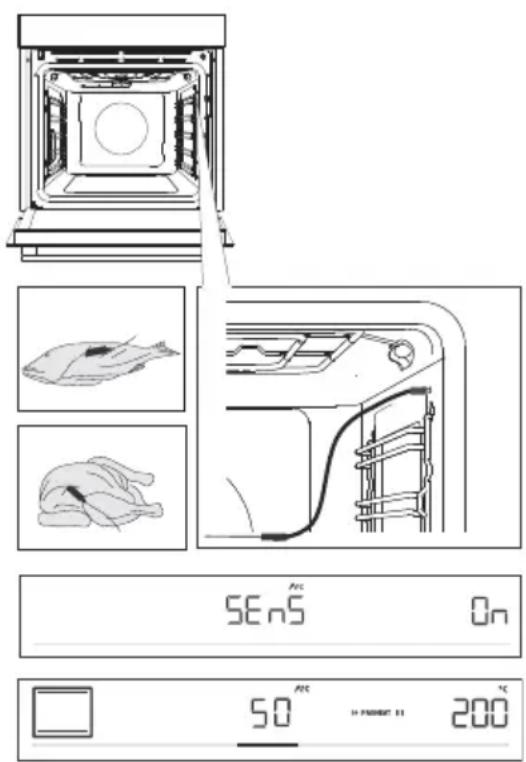
1 Stickthemetalendoftheprobeintothe thickestpartofthefood.
2 Plug the probe plug into the socket located in the upper-right corner at the front of the oven cavity (see figure). SEnS will appear on the display unit. To activate the function, rotate the KNOB toposition On. Follow the same procedure to deactivate the function. Select OFF on the display unit.
NOTE: To enter the SEnS menu, stop the current cooking process and connect the probe to the socket. When you insert the probe into the socket, the previously selected or preset functions on the oven are deleted.
3 Choosethedesiredsystemandcooking temperature(inthetemperaturerangeofupto 230°C). Probeoperationsymbolandthepreset temperaturewillappearonthedisplayunit. To changethetemperature, rotatetheKNOB. Selectthedesiredfinalcoretemperatureofthe food(inthetemperaturerangebetween30and 99°C).
NOTE: When using the probe, setting the cooking time is not possible.
4 Confirm the setting bypassing the key.
5 When the set core temperature is reached, the oven will stop operating. End will appear on the display unit. An acoustic signal will be heard which you may turn off by touching any key. After on minute, the acoustic signal will be switched off automatically.

INFORMATION!
During the cooking process, set and current food core temperature alternate on the display unit. You may change the cooking temperature or that target food core temperature during the cooking process.
Correctuseoftheprobe,bytypeoffood:
- poultry:sticktheprobeinthethickestpartofthebreast;
- redmeat:sticktheprobeintoaleanpartthatisnotmarbledwithfat;
- smallerchunkswithbone:stickthemintoanareaalongthebone;
- fish:sticktheprobebehindthehead,towardsthespine.

WARNING!
Afteruse, carefullyremovetheprobefromthefood, unplugfromthesocketintheoven cavity, andcleanit.
IfSEnSappearsonthedisplayunitwhenthetemperatureprobeisnotconnected,clean thesocket.Tryconnectinganddisconnectingthetemperatureprobeseveraltimesina row.

INFORMATION!
If you donot usethe probe, remove it from the oven.
Recommendeddonenesslevelsfordifferenttypesofmeat
| Typeoffood | blue (raw) | medium rare | medium | medium well | welldone |
| BEEF | |||||
| 68-7359-6553-584 | |||||
| 63-6658-6254-574 | |||||
| 63-6658-6254-574 | |||||
| 71-7466-6860-635 | |||||
| VEAL | |||||
| 63-6658-6254-574 | |||||
| 63-6658-6254-574 | |||||
| PORK | |||||
| 75-8565-70///roast | |||||
| /60-69///pork,loi | |||||
| 80-85///meatloaf | |||||
| LAMB | |||||
| 77-8072-7666-716 | |||||
| MUTTON | |||||
| 77-8072-7666-716 | |||||
| GOATMEAT | |||||
| 77-8072-7666-716 | |||||
| POULTRY | |||||
| 82-90///poultry,wl | |||||
| 62-65///poultry,br | |||||
| FISHANDSEAFOOD | |||||
| /62-65///trout | |||||
| /55-60///tuna | |||||
| /52-55///salmon | |||||
Cleaningandmaintenance

WARNING!
Beforecleaning, unplugtheappliance from the power mains and wait for the appliance to cooldown.
Childrenshouldnotcleantheapplianceorperformmaintenancetaskswithoutproper supervision.
Foreasiercleaning, ovencavity and baking tray are coated with special enamelforasmooth and resistant surface.
Regularlycleantheapplianceandusewarmwaterandhanddishwashingliquidtoremovelarger impuritiesandlimescale.Useacleansoftclothorspongecloth.
Appliance exterior: use hot soapsuds and a soft cloth to remove impurities, then wipe the surfaces dry.
Appliance interior: for stubborn dirt and grime, use conventional oven cleaners. When using such cleaners, thoroughly wipe the appliance with a wet cloth to remove all cleaner residues.
Accessoriesandguides:cleanwithhotsoapsudsandadampcloth.Forstubborndirtandgrime, werecommendpriorsoakinganduseofabrush.

INFORMATION!
Neveruseaggressiveorabrasivecleanersandaccessories(abrasivespongesanddetergents, stainandrustremovers,scrapersforglassceramicplates).
Ovenequipmentisdishwasher-safe.
Foodresidue(fat,sugar,protein)canigniteduringtheuseoftheappliance.Therefore,remove largerchunksofdirtfromtheoveninteriorandaccessoriesbeforeeachuse.
UsingtheAquaCleanprogramtocleantheoven
Thisprogrammakesiteasiertoremoveanystainsfrominsidetheoven.
Thefunctionisthemosteffectiveifusedregularly,aftereachuse.
Before running the cleaning program, remove all large visible chunks of dirt and food residues from the ovencavity.
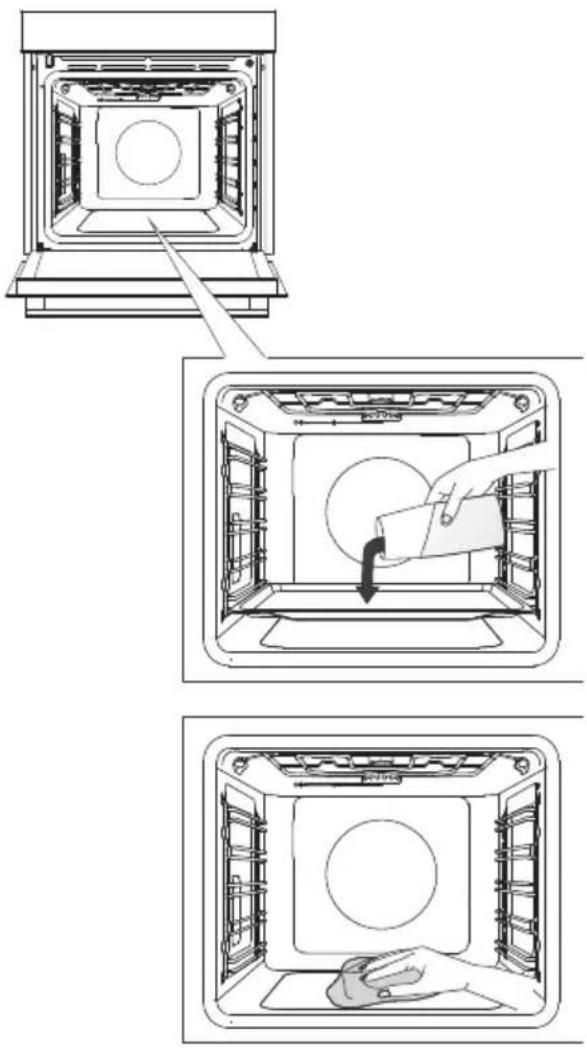
1 Inserttheshallowbakingtrayintothefirst guidelevelandpour0.4litresofhotwaterinto it.
2 Touchthekeytodisplayextra functionsonthedisplayunit.RotatetheKNOB tothesymbol.Presetvalueswillappear onthedisplayunit.
3 The program will operate for 30 minutes. Whenthe program is complete, End will appear on the display unit.
4 When the program is completed, carefully removethebaking tray, using oven mitts (there can still besomewater on the baking tray). Wipedown thestains with damp cloth and soapsuds. Thoroughly wipethe appliance with awet cloth to remove all cleaner residue.

WARNING!
UsetheAquaCleansystemwhentheovenhasfullycooleddown.
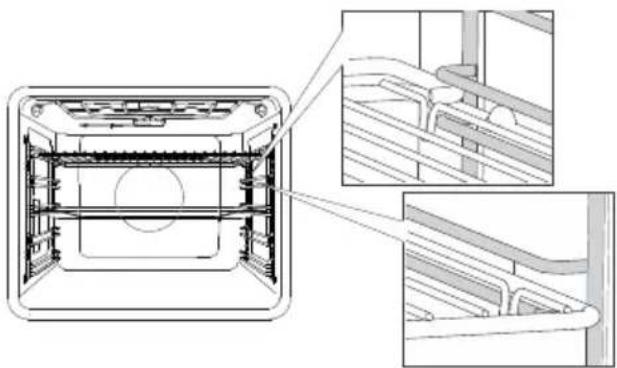
Removingwireandfixedpull-out(extendible)guides
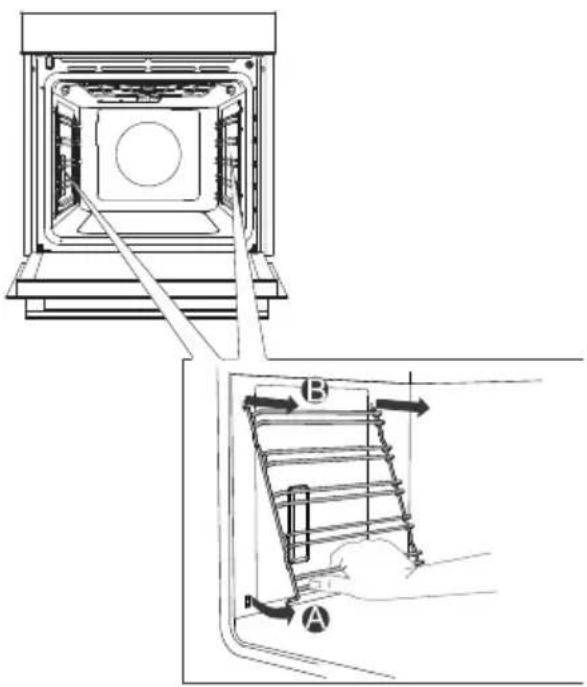
A Holdtheguidesbythebottomsideand pullthemtowardsthecenteroftheovencavity.
BRemovethemfromtheopeningsatthetop.
INFORMATION!
Whenremovingtheguides, takecarenot todamagetheenamelcoating.
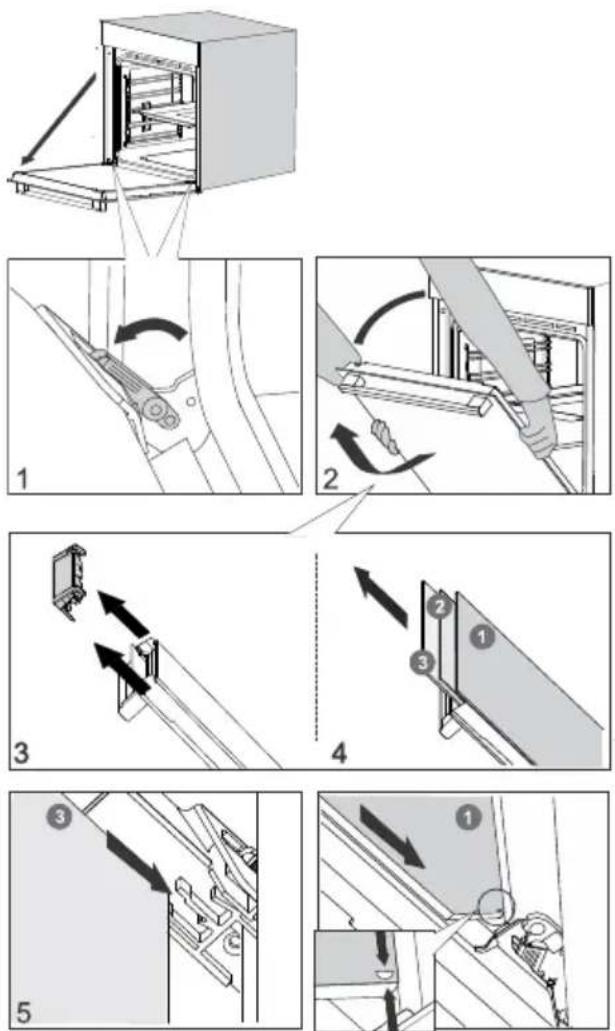
Removing andreplacing theovendoorandglasspanes
flowchart
graph TD
    A["1: Linger with handle"] --> B["2: Rear assembly"]
    B --> C["3: Panel lock switch"]
    C --> D["4: Panel bracket with valve"]
    D --> E["5: Disassembly with valve"]
    E --> F["1: Close-up assembly"]
    style A fill:#f9f,stroke:#333
    style F fill:#bbf,stroke:#333
1 First, fullyopenthedoor (asfarasitwillgo).
2 Ovendoorisattachedtothehingeswith specialsupportsthatalsoincludesafetylevers. Rotatethesafetyleverstowardsthedoorby 90°.Slowlyclosethedoortoa45°angle (relativetothepositionofthefullycloseddoor); then,liftthedoorandpullitout.
Ovendoorglasspanecanbecleanedfrom theinside,butithastoberemovedfromthe appliancedoorfirst.First,proceedasdescribed underitem2,butdonotremoveit.
3Removetheairguide.Holditontheleft-andright-handsideofthedoorwithyour hands.Removeitbyslightlypullingittowards you.
4 Holdthedoorglassattheupperedge and removeit. Tothesameforthesecondandthird glasspane(dependingonthemodel).
5 Toreplacetheglasspanes, observethe reverseorder.

INFORMATION!
Toreplacethedoor, followthereverseorder. If the doordoes not open or close properly, make sure thenotches on the hinges are aligned with the hinge beds.

WARNING!
Theovendoorhingecanclosewithconsiderableforce.Therefore,alwaysrotateboth safetyleverstothesupportwhenfittingorremovingtheappliancedoor.
Softdoorclosingandopening
(dependingonthemodel)
Ovendoorisfittedwithasystemthatdampensthedoorclosingforce,startingatthea75°angle.It allowssimple,quiet,andgentleopeningandclosingofthedoor.Agentlepush(toa15°anglerative tothecloseddoorposition)isenoughforthedoortocloseautomaticallyandsoftly.

WARNING!
If the force applied to closeted doorist or strong, the effect of the system is reduced for the system will be bypassed for safety.
Replacingthebulb
Thebulbisaconsumableandthereforenotcoveredbywarranty.Beforereplacingthebulb,remove allaccessoriesfromtheoven.
Halogenlamp:G9,230V,25W
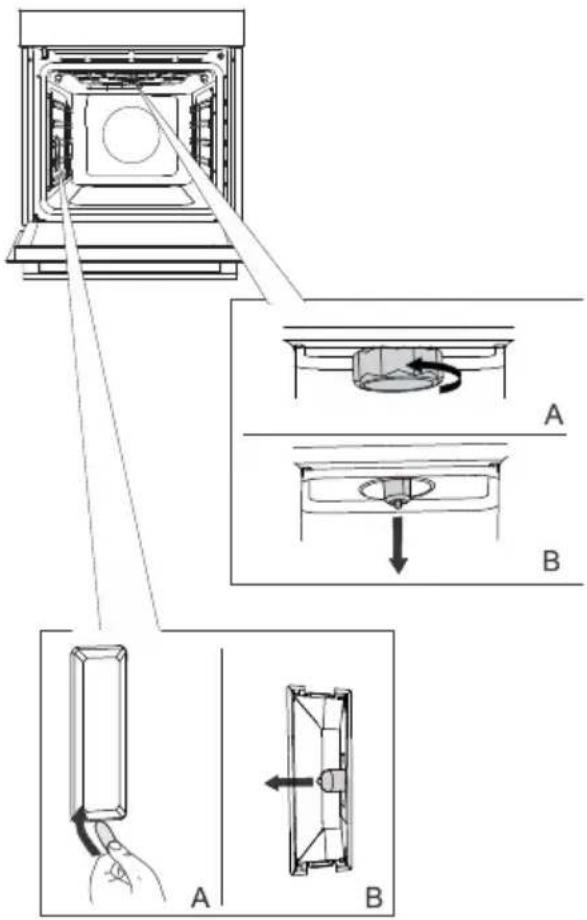
1 Unscrewandremovethecover(in anti-clockwisedirection).Removethehalogen bulb.
2 Useaflatplastictooltoremovethecover. Removethehalogenbulb.
INFORMATION!
Takecarenottodamagetheenamel coating. Useprotectiontoavoidburningyourself.

WARNING!
Onlyreplacethelightbulbwhentheapplianceisdisconnectedfrompowersupply.
Troubleshootingtable
Specialwarningsandfaultreporting
Duringthewarrantyperiod,onlyaservicecenterauthorizedbythemanufacturermaycarryout anyrepairs.
Beforemakinganyrepairs, makesuretheapplianceisdisconnectedfromthepowermainseitherby removingthefuseorbydisconnectingthepowerplugfromthewalloutlet.
Anyunauthorizedrepairsoftheappliancemayresultinelectricshockandshortcircuithazard;therefore, donotperformthem.Leavesuchworktoanexpertoraservicetechnician.
In caseofminorproblemswithapplianceoperation, check this manual to see if you can fix the problem yourself.
If the appliance is not operating properly or at all duetoin appropriate operation or handling, a visit from as servicetechnicians shall not be free of charge, even during the warranty period.
Savetheinstructionsforfuturereferenceandpassthemontoanysubsequentownersorusersofthe appliance.
Followingissomeadviceonrectifyingsomecommonproblems.
| CauseProblem/error | |
| Callaservicetechnician.Themainfuseinyourhometripsoften. | |
| Theovenlightingdoesnotwork. | Theprocessofchangingthelightbulbintheovenis describedinthechapterReplacingthebulb. |
| Controlunitisnotresponding,the screenisfrozen. | Disconnectttheappliancefromthepowermainsforafew minutes(undothefuseorswitchoffthemainswitch); then,reconnecttheapplianceandswitchiton. |
| ErrorCodeErrXisdisplayed.Incaseofadouble-digiterrorcode, ErXXwillbedisplayed. | Thereisanerrorintheelectronicmoduleoperation.Disconnectttheappliancefromthepowermainsforafew minutes.Iftheerrorisstillindicated,callaservicetechnician. |
If the problem persist despite observing the above advice, call an authorized servicetechnician. Repair or any warranty claim resulting from incorrect connection or use of the appliances shall not be covered by the warranty. In this case, the user will cover the cost of repair.
Disposal

Ourproductpackagingismadeofenvironmentallyfriendlymaterialsthat canberecycled, disposedof, ordestroyedwithoutanyhazardtothe environment. To thisend, packagingmaterials are labelled appropriately.
Thesymbolontheproductoritspackagingindicatesthattheproduct shouldnotbetratedasnormalhouseholdwaste.Taketheproductto anauthorizedcollectioncentreforwasteelectricandelectronic equipmentprocessing.
Correctdisposaloftheproductwillhelppreventanynegativeeffects ontheenvironmentandhealthofpeople,whichcouldoccurincaseof incorrectproductremoval.Fordetailedinformationonremovaland processingoftheproduct,pleasecontacttherelevantmunicipalbody inchargeofwastemanagement,yourwastedisposalservice,orthe storewhereyouboughttheproduct.
Wereservetherighttoanychansanderrorsintheinstructionsforuse.
Cookingtest
EN60350-1: Only usee equipments supplied by the manufacturer.
Alwaysinsertthebakingtrayallthewaytotheendpositiononthewireguide.Placepastryorcakes bakedinmouldsassshownintheimage.
*Preheattheapplianceuntiltreachesthesettemperature.Donotusetherapidpreheatmode.
**Preheattheappliancefor10minutes.Donotusetherapidpreheatmode.
***Turnafter2/3ofcookingtime.
| BAKING | ||||||
| EquipmentDish | mould placement | (KDWH) | (W338) |  | (ZT78) | |
| biscuits/cookies-singlerack | 25-401503 | shallowbakingt | ||||
| biscuits/cookies-singlerack | 35-50135* | [34CB] hallowbakin | ||||
| cookies-two racks/levels | 25-40140* | [40XXX] shallowbak | ||||
| cookies-three racks/levels | 45-60135* | [7032] shallowbak | ||||
| cupcakes-singlerack | 160-1703shallowbakingtray | 20-30 | [135W] | |||
| cupcakes-singlerack | 20-30155**3 | shallowbakin | ||||
| cupcakes-two racks/levels | 30-45140* | [W3DB] shallowbak | ||||
| cupcakes-three racks/levels | 30-50140- | [3433] 1,3,5shallow | ||||
| spongecake | roundmetalmould,diameter26cm/wirerack | 45-551502 |  | |||
| spongecake | roundmetalmould,diameter26cm/wirerack | 45-551602 | ||||
| spongecake-two racks/levels | 2×roundmetalmould,diameter26cm/wirerack | ○○ | 2,4 | 170* | 45-55 |  |
| applepie | 2×roundmetalmould,diameter20cm/wirerack | ○○ | 160**2 | 70-120 | ||
| applepie | 2×roundmetalmould,diameter20cm/wirerack | ○○ | 1602 | 70-120 |  | |
| BROILING | ||||||
| EquipmentDish | mould placement | °C | min |  | ||
| 4-7max5wireracktoasted | ||||||
| pljeskavica (mincedmeat patty) | wirerack+shallowbaking sheetasdriptray | 5 | 230 | 25-40*** |  | |

The appliance rating label is located on the inside of the appliance.
When contacting the service department, have the complete type number to hand.
You will find the addresses and phone numbers of the service organisation on the guarantee card.
Pelgrim


- Kokenoptijd
- Bandeaudecommandes
- Interrupteursurlaportedufour
- LaPLAQUEDECUISSONPEUPROFONDE
- Cuissonprogrammée
- DasFLACHEPERFORIERTEBACKBLECH
- INFORMATION!
- WARNING!
- Contents
- Safetyprecautions
- IMPORTANTSAFETYPRECAUTIONS-CAREFULLYREAD THEINSTRUCTION SANDSAVETHEMFORFUTURE REFERENCE.
- Neverpourwaterdirectlyonthebottomoftheovencavity.
- Temperaturedifferencescouldresultindamagetotheenamel coating.
- Otherimportantsafetywarnings
- Appliancedescription
- Ratingplate-productinformation
- Guides
- Click-onpull-outguides
- Ovendoorswitch
- Coolingfan
- Ovenequipmentandaccessories
- Beforefirstuse
- Switchingonforthefirsttime
- 1.CLOCKSETTING
- 2.ACOUSTIC SIGNALVOLUME
- 3.DISPLAYDIMMER
- Choosingthesettings
- PROFESSIONALMODE(probake)
- Fastpreheat
- TIMERFUNCTIONS
- Timedcooking
- Settingthedelayedstart
- Minutemindersetting
- STEPPROGRAM
- AUTOMATICMODE(autobake)
- Specialbakingsystems
- Automaticprograms
- CHOOSINGEXTRAFUNCTIONS(extrabake)
- Aquaclean
- Defrosting
- Reheating
- Platewarming
- Childlock
- Startingthecookingprocess
- Extragratin
- Endofcookingandswitchingofftheoven
- Choosing the general settings
- Clockdisplay
- Acousticsignalvolume
- Displayillumination
- Displayunit-nightmode
- Standby
- Adaptivefunction
- Automaticfastpreheating
- Sabbath
- Factorysettings
- Generaltipsandadviceforbaking
- Cookingwithatemperatureprobe (BAKESENSOR)
- Correctuseoftheprobe,bytypeoffood:
- Cleaningandmaintenance
- UsingtheAquaCleanprogramtocleantheoven
- Removingwireandfixedpull-out(extendible)guides
- Removing andreplacing theovendoorandglasspanes
- Softdoorclosingandopening
- Replacingthebulb
- Troubleshootingtable
- Specialwarningsandfaultreporting
- Disposal
- Cookingtest
Brand : Pelgrim
Model : O560RVS
Category : Oven