ZIGHAS2800 - Mechanical chipper Zipper - Free user manual and instructions
Find the device manual for free ZIGHAS2800 Zipper in PDF.

User questions about ZIGHAS2800 Zipper
0 question about this device. Answer the ones you know or ask your own.
Ask a new question about this device
Download the instructions for your Mechanical chipper in PDF format for free! Find your manual ZIGHAS2800 - Zipper and take your electronic device back in hand. On this page are published all the documents necessary for the use of your device. ZIGHAS2800 by Zipper.
USER MANUAL ZIGHAS2800 Zipper
natural_image
Green stylized letter 'Z' on black background, no text or symbols presentSilent garden shredder
FR MANUEL D'UTILISATION
natural_image
Green and white ZIPPER industrial machine with a handle and wheels (no visible text or symbols on the device body)CE
ZI-GHAS2800
EAN : 9120039231846


1 INHALT / INDEX
1 INHALT / INDEX 3
11.1 Main Components and Controls.... 20
11.2 Technical Data 21
11.3 Scope of delivery.... 21
12 SAFETY
12.1 General Safety 21
12.2 Intendend Use 22
12.3 Residual Risks.... 23
13 ASSEMBLY
13.1 Start up.... 25
13.2 Electrical Connection.... 25
14 OPERATION
14.1 Lock button of safety switch 25
14.2 Panel....26
14.2.1 On/Off 26
14.2.2 Rotation direction switch....26
14.2.1 Motor protection 26
14.3 Operation instructions 26
14.3 Operation instructions 26
14.3 Operation instructions 26
14.3 Operation instructions 26
14.3 Operation instructions 26
14.3 Operation instructions 26
14.3 Operation instructions 26
14.3 Operation instructions 26
14.3 Operation instructions 26
14.3 Operation instructions 26
14.3 Operation instructions 26
14.3 Operation instructions 26
14.3 Operation instructions 26
14.3 Operation instructions 26
14.3 Operation instructions 26
14.3 Operation instructions 26
14.3 Operation instructions 26
14.3 Operation instructions 26
14.4 To start and stop.... 27
14.5 To empty the collection box 27
14.6 Tips....27
14.7 Adjust buffle 28
15 MAINTENANCE
15.1 Disposal 29
16 TROUBLESHOOTING 29
17 PREFACE (FR) 30
18 TECHNIQUE 31
EN READ THE MANUAL! Read the user and maintenance manual carefully and get familiar with the controls n order to use the machine correctly and to avoid injuries and machine defects.
EN Stop and pull out the power plug before any break and engine maintenance!
EN Warning about cut injuries!
FR Risque de coupure!

EN Warning of rotating parts!
FR Risque dû aux parties rotatives!

EN Keep safety distance!
Fig.1A
natural_image
Person adjusting a tire with a hand, showing mechanical components and a labeled arrow (no text or symbols on the object itself)Fig.1E
natural_image
White plastic waste bin with a labeled component 'A' and an arrow pointing to it, next to a wheeled cart (no text or symbols on the container itself)Fig. 2


ACHTUN G
ABSCHLIESSEND PRÜFEN SIE JEDE MUTTER UND JEDE SCHRAUBE AUF ABSOLUT FESTEN SITZ!
natural_image
Close-up of a white plastic waste bin with yellow top and orange handle, showing a small yellow component and a red arrow pointing to it (no text or symbols visible)This manual contains Information and important instructions for the installation and correct use of the Garden shredder ZI-GHAS2800. This manual is part of the machine and shall not be stored separately from the machine. Save it for later reference and if you let other persons use the machine, add this instruction manual to the machine.
Please read and obey the security instructions!

Before first use read this manual carefully. It eases the correct use of the machine and prevents misunderstanding and damages of machine and the user's health.
Due to constant advancements in product design construction pictures and content may diverse slightly. However, if you discover any errors, inform us please.
Technical specifications are subject to changes!
Please check the product contents immediately after receipt for any eventual transport damage or missing parts. Claims from transport damage or missing parts must be placed immediately after initial machine receipt and unpacking before putting the machine into operation. Please understand that later claims cannot be accepted anymore.
Copyright
© 2015
This document is protected by international copyright law. Any unauthorized duplication, translation or use of pictures, illustrations or text of this manual will be pursued by law – court of jurisdiction is Wels, Austria!
CUSTOMER SERVICE CONTACT
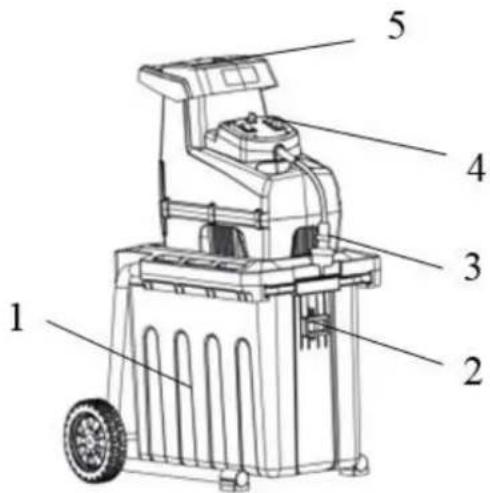
11.1 Main Components and Controls
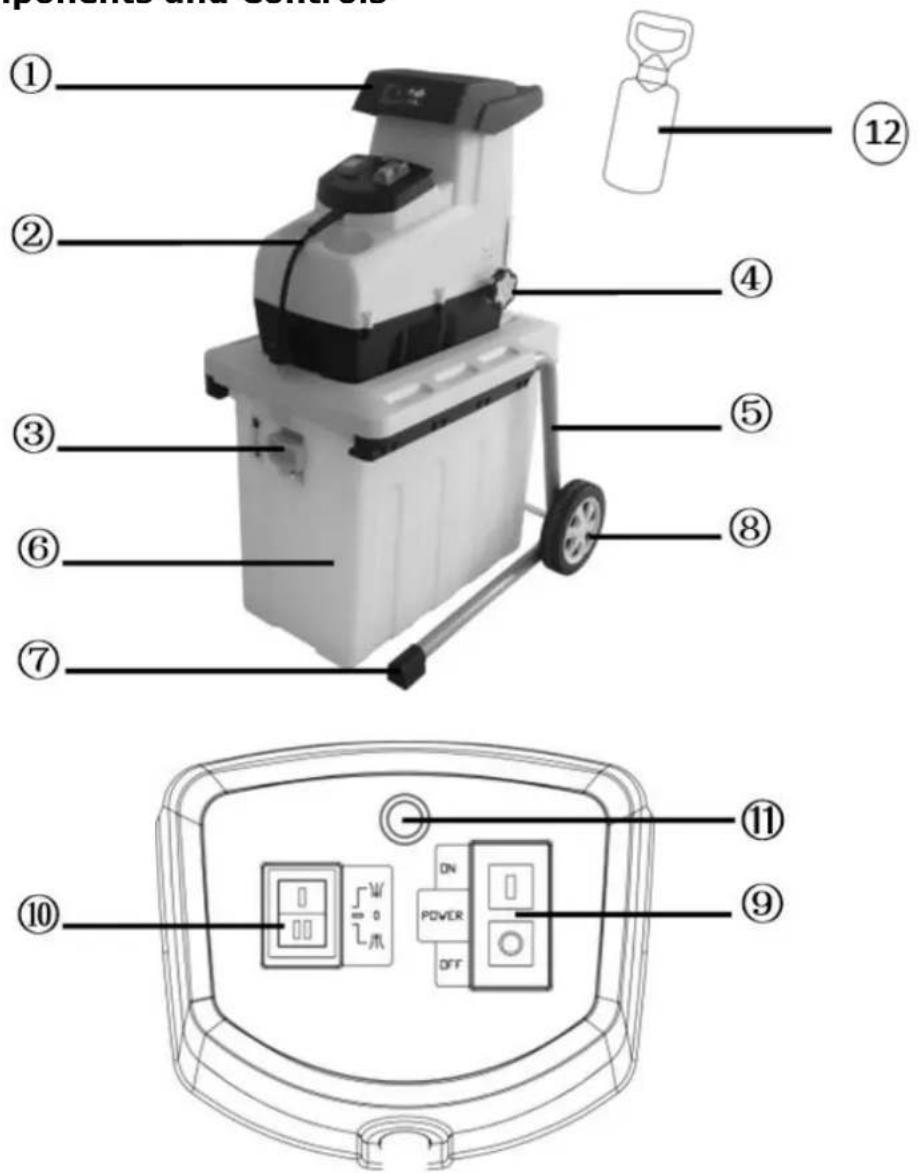
| ZI-GHAS2800 | |||
| 1 | Feeding hopper | 7 | Base foot |
| 2 | Plug | 8 | Wheel |
| 3 | Lock button | 9 | On/Off - switch |
| 4 | adjusting knob | 10 | Rotation direction switch |
| 5 | Support | 11 | Reset button (Motor protection) |
| 6 | Collection box | 12 | Push stick |
11.2 Technical Data
| ZI-GHAS2800 | |
| Voltage | 230V, 50 Hz, |
| Motor power S6(40%) | 2800 W |
| No load speed | 60 min ^-1 |
| Collection box capacity | 60 l |
| Weight | 19 kg |
| Branch diameter | max. ∅ 44 mm |
| Guaranteed Sound power level LWA | 94 dB(A) |
| Sound pressure level LPA | 71,7 dB(A) k: 3 dB(A) |
| Protection class | II |
| Protection degree | IPX4 |
11.3 Scope of delivery
Unpack the lawnmower ZIPPER GHAS2800 and check if the machine is in perfect condition and the delivery is complete.
Package Contents:
Engine 1x, 1x base frame, 1x user manual, 1x Allen / Star screwdriver, 1x collection box, 1x bolts for wheels, wheels 2x, 2x wheels, 2x wheel cover, 1x Push stick
12 SAFETY
12.1 General Safety
To avoid malfunctions, damage and physical injury MUST be observed:
• Safety must be observed and regularly inspected for completeness!
- Warning signs and / or labels on the machine which have been removed must be replaced immediately!


ATTENT ION
Unauthorized modifications and tampering with the machine immediately invalid at all warranty and damage claims.

Unauthorized modifications and tampering with the machine immediately invalid at all warranty and damage claims.

The machine may only be operated by qualified personnel enrolled. Third people, especially children, and people are not trained to think of the work environment away!
12.2 Intendend Use
- The ZIPPER garden shredder ZI GHAS2800 is exclusively used for chopping of branches of all kinds (depending on the type of wood and freshness).
• Wilted, moist, garden waste already stored several days alternating with tree branches. - Set during the operation could ensure that no foreign objects (such as stones, glass, metal, earth, and plastic) are filled into the chopper, such as foreign bodies blunt the chopping blade and severely damage the engine. Use your chopper solely for the purposes for which it was designed.
- The chopper should be carefully checked before use. Never use a chopper that is not in good condition. If you notice a defect on the machine, which could pose a danger to the user, do not use the chopper until the defects have been corrected
Caution! Please read and follow the safety instructions carefully.
- The shredder must be properly assembled before use.
- Caution! This appliance must be earthed!
• Caution! Use only three-wire earthed extension cord. - Use only approved for outdoor use extension cord before use and check whether they are in good condition.
- Protect you from any damage caused by excessive mechanical stress, sharp edges, moving parts and contact with corrosive liquids, etc., the cable.
- Caution! Do not use an extension cord, which shows signs of damage. Connect a completely new cable before you accept any permanent or temporary repairs. Let the cable replace from a qualified professional.
- Before inserting the plug into the mains power socket, ensure that the mains voltage corresponds to the specifications on the nameplate of the chopper.
- Never move the chopper by pulling the cables.
- Disconnect the machine from the mains power socket always before transport.
• Turn off the shredder before disconnecting any plug-in or extension cord. - Let the shredder unattended while it is turned on. Turn off the engine and pull out the mains power socket before you leave the chopper. Do the same in case of a power failure.
- Keep children and pets away from the chopper.
- Do not allow children to operate the machine and no person who has not read these instructions or is unfamiliar with the chopper.
- The user is responsible for other people working with the chopper.
• Use the chopper only for the intended purpose.
Caution! This machine contains a rotating chopper blades.
Caution! This knife does not stop immediately after stopping.
Turn the shredder always, unplug the power cord and wait until the chopper blade has come to a complete stop before making any maintenance or cleaning work.
• Be careful when you clean the Harvester or maintenance work
DANGER! Watch your fingers! Wear gloves!
• It is forbidden to bring any electrical and mechanical safety devices elsewhere or to change.
• The chopper should be only during operation on solid level ground.
- Use it only in daylight or good artificial light.
- Wear gloves when chopping, long pants and eye protection. We recommend the use of hearing protectors.
Caution! The funnel must be completely assembled and fixed prior to use.
- Neither put your hands into the hopper still in the chute.
- If the chopper start to vibrate abnormally, stop the engine immediately and locate the cause. Vibrations generally terminate in malfunction.
- Make sure before shredding any material that the chopper blade is securely attached. Do not work with the chopper when the chopper blade is not properly mounted.
- Replace your safety all worn or damaged parts. Use only original spare parts. Parts that were not made by the manufacturer could sit bad and may cause injury.
• Work. Using your chopper only in places where it is protected from water Use it in the rain never outdoors.
- Store it in a dry and safe place out of reach of children.
Caution! Always wear safety glasses, hearing protection, gloves and sturdy work clothes! We recommend the use of a headgear.
12.3 Residual Risks
Also in compliance with all safety regulations and when used following residual risks are considered:
- Risk of injury to the hands / fingers when you grab during the operation with his hands in the hole on the blade unit.
- Risk of injury to the hands / fingers during assembly and cleaning the blade unit.
- Risk of injury due flying away chopped in the funnel.
• Working without hearing protection can cause hearing damage over time. - Electrical hazard, using improper electrical connection cables.
• Through compliance with all safety regulations such hazards can be reduced to a minimum!
13 ASSEMBLY
- Turn the shredder upside down and pivot the legs up ward (Fig. 1A)
- Place the supplied wheel axle (A) through the respective openings (Fig. 1A)

Fig.1A
- Put the supplied washer (B) and sleeve (C) onto the wheel axle (Fig. 1B)

Fig.1B
- Place the wheels (D) and install nut hand tight (E). (Fig.1C)
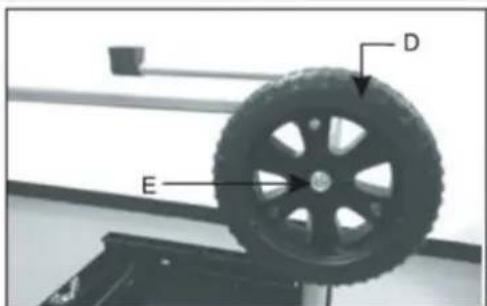
Fig.1C
-
Using the supplied wrench (F) to fix the wheel axle and at the same time firmly lock the nut by using the wrench (G). (Fig.1D)
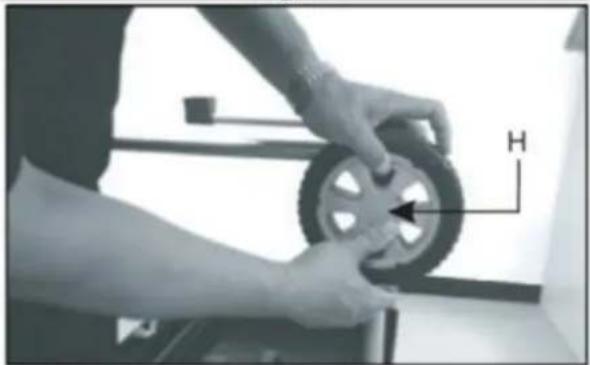
-
Place the wheel cover (H) in the center of the wheel.(Fig.1E)
Mount collection box
-
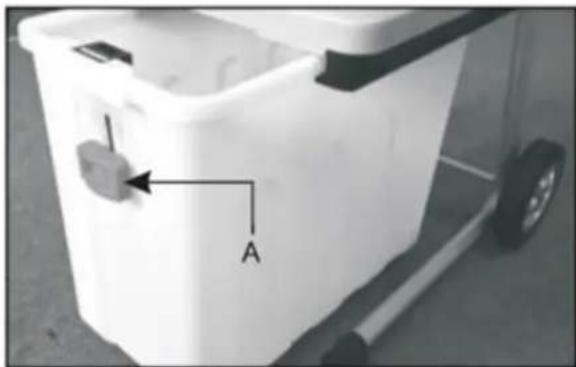
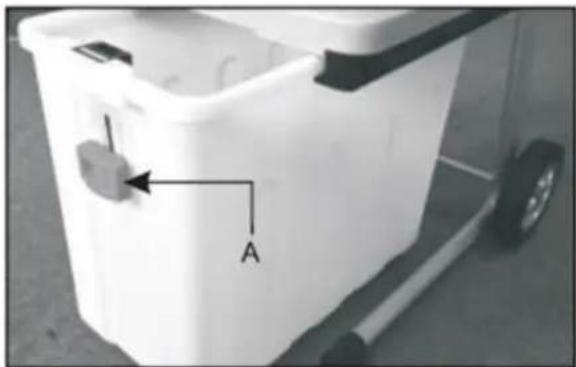
Press down the lock button(A) and then insert the collection box into the undercarriage.(Fig.2)
-
Press the lock button (A) totally upward!
Remove collection box
- Switch off and disconnect the machine from the power supply.
- Press down the lock button (A) (Fig.2).
- Remove the collection box from the undercarriage.
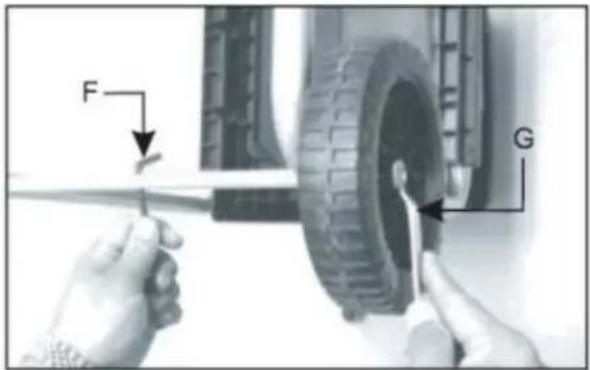
Fig.1D
natural_image
Person adjusting a tire with a directional arrow labeled 'H' (no text or symbols on the tire itself)Fig.1E
natural_image
White plastic waste bin with a labeled switch and arrow pointing to the handle (no text or symbols beyond label 'A')Fig. 2


ATTENTION
ANY FINAL JAM NUT AND BOLT ON ANY DEAD TIGHT! WHILE OPERATING THE VIBRATING MACHINE NOT TIGHTEN THE SCREWS CAN BREAK OFF AND LOST AND DANGEROUS SITUATION TO BE CARRIED!
13.1 Start up
• Make sure that the device is completely and correctly assembled.
- Set the shredder for use on firm, horizontal ground (tipping).
- Use the device only in the open. Keep a safe distance (at least 2 m) from a wall or other rigid object.
- Check before each use:
- the connection cables for defects (cracks, cuts, etc.) do not use damaged cables
- the device for damage (see Safety)
- that all screws are tightened
13.2 Electrical Connection
The supply voltage must comply with the specifications that are listed on the nameplate of your harvester. Chopper with a nominal value of 230 V can be connected to a mains voltage of 230V. The chopper is to be supplied via a residual current protective device with a tripping current not exceeding 30 mA. An extension cord with too small a cross section causes a significant reduction in the efficiency of the machine. For cables with a length of up to 25 m, a diameter of at least 3 × 1.5 mm^2 is required, for cables with a length of about 25 m, the cross section must be at least 2.5 mm^2 .
Note!
When starting (start) this equipment, a brief voltage drop occur, especially in poor network quality. These dips can affect other devices (eg flicker of a lamp). For a line impedance Z_max 0.42HM such disturbances are not expected. (Please contact you their local power company for further information).
14 OPERATION
14.1 Lock button of safety switch
● Make sure that the lock button after mounting the collection box is on position ☐.
● Make sure that the lock button after removing the collection box is on position 📋.
How to use the lock button:
● The lock button in positon close: safety switch is off.
● The lock button in open position: safety switch is on.

natural_image
Close-up of a gray plastic waste bin with yellow top and orange button, no visible text or symbolslock button of safety switch
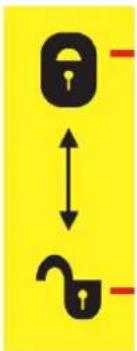
close:
safety switch activated
open:
safety switch not activated
14.2 Panel
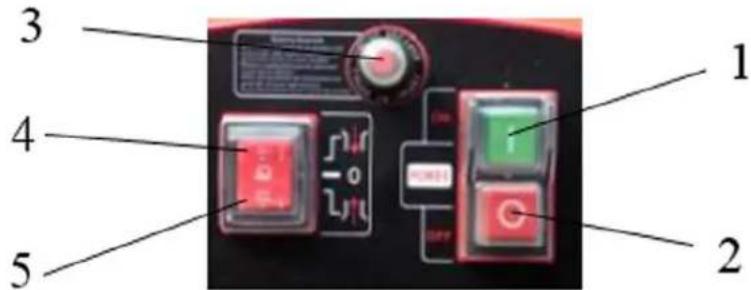
1 ON - switch „1“
2 OFF - switch „2"
3 Motor protection
4 Forward button
5 Reverse button
14.2.1 On/Off
- Push green button (1 ON - switch)"1" — the shredder starts
- Push red button (2 OFF - switch)"0" — the shredder stops
14.2.2 Rotation direction switch

ATTENTI ON
Use the rotation direction switch only when machine is off!
- 4 Forward button"↓". The material is automatically pulled in and shredded by knife.
- 5 Reverse button" ↑ " The Knife works in the opposite direction of rotation, jammed material will be released.
If the material is jammed, first press the red button to stop the machine. Press the reverse button and then the green button to start the machine again. Remove the jammed material. Press the red button to stop the machine again and press the forward button. Then you can continue to work.
14.2.1 Motor protection
This machine is equipped with an overload protection system. To protect the motor from being damaged the safety switch will automatically switch off the power.
When the motor is overloaded wait at least 2min to cool down the motor and:
- Reset button (Motor protection)
button "1" to restart
14.3 Operation instructions
- Press the on switch, the unit starts up.
- The reverse button can be used when the machine is in good working condition. Then press the forward button in order to run counterclockwise. Press reverse button to run it clockwise.
- When removing the collection container during operation of the device the unit will stop automatically.
- After mounting the collection box. The unit will start after pressing the on switch.
- If power is suddenly interrupted during operation, the machine stops. The unit starts again when you press the on switch.
- Press only to stop the off the device. After that, the pressing of the manual forward and reverse switch is no longer possible.
14.4 To start and stop
- Mount the collection box ①;
- Pull the lock button ② totally upward
- Plug the power supply ③;
- Push the green button "1" to start the shredder;
- Start to work;
- Push the red button "0" to stop the shredder.
14.5 To empty the collection box
- Push the red button "0" to stop the shredder;
- Press down the lock button②;
- Remove the collection box from the undercarriage.①.
14.6 Tips

ATTENTI ON
Always wait for the rest of the chaff, before turning it on again. Longer material that protrudes out of the machine could turn out if it is confiscated by the chopper blades
- Longer material that protrudes out of the machine could turn out if it is confiscated by chopping!
- Keep at a safe distance!
- Caution! Always use the slide when you try to push the material into the feed tube. Make this never directly with your hands! Insert the slide after use back to its original position.
- Heavy material or branches lead to blocking of the chopper blade when they are chopped through.
- Fill out the material to be chopped from the right corner of the hopper a forth.
- Examine the material to be chopped carefully. Make sure that it is not in contact with stones or nails, as these could damage the shredder heavy.
- Check for signs of vibration. Strong vibrations caused by damaged or worn blades. Replace the blade if necessary.
- Large objects or pieces of wood may be removed by the material removed is changed and the same between the cutting and release direction of the chopper blade.
- Perform only so much material that the feed tube is not clogged.
- You chopping garden waste that has been stored for several days and are wilted and moist, alternating with tree branches.
• This avoids that the chopping blades is blocked.
- Do not put soft material such as kitchen scraps into the chopper, but compost it.
- Widespread material with leaves must first be completely shredded before new material is introduced.
- Make sure that the shredded material is free to fall out of the chute – there is the risk of back!
• The ventilation slots must not be covered by the collector or chopped
14.7 Adjust buffle
The best distance between baffle ② and the cutting blades ① is 0 from 0,50 mm. This distance should be adhered to in order to achieve successful work.
There is an adjustment on the right side of the plastic case. To adjust the distance, turn the knob ③ clockwise, so that the bolt is towards blade rotates. With a half circle, the panel moved 0.50 mm toward cutter. Perform after adjusting cutting tests to check whether the best result is achieved. Make sure that the blade does not strike against the panel to prevent damage to the appliance.

15 MAINTENANCE
The machine is low maintenance and contains little parts that must undergo a maintenance operator. Faults or defects that may affect the safety of the machine, must be rectified immediately. Repairing work may only be performed by qualified personnel!
- Make sure that your machine and clean it regularly to get a long-lasting effectiveness and efficiency.
- Keep the air vents clean and free of dust.
- Only use a warm damp cloth and a soft brush to clean your machine.
- Clean the machine. Never under water or even with high pressure.
- Do not use detergents or solvents as these could cause irreparable damage to your machine. Chemicals can damage the plastic parts.
- Check from time to time, the tightness of the mounting bolts on the undercarriage.
- To protect the chopper in storage for a long time against corrosion, handle the chopping blade with something biodegradable oil.
- When the machine for maintenance, inspection or storage or for the replacement of accessories is off, turn the engine off, unplug the power cord out and make sure that all moving parts have come to a standstill. Let the machine cool down before you make any inspection, adjustment, etc.
- The chopper can be packed into the container for storage and transport. Follow the steps listed below:
- Store the machine in a dry place. Let the unit run for longer retention periods short dry. Allow the engine to cool before you store it.
- If you wait for the chopper blade set, be aware about the fact that the knife can still be moved by a manual start mechanism, although the engine will not start due to the locking of the guard.
15.1 Disposal
Do not dispose the machine in residual waste. Contact your local authorities for information regarding the available disposal options. When you buy at your local dealer for a replacement unit, the latter is obliged to exchange your old.
16 TROUBLESHOOTING
Disconnect the machine from the power supply prior to any checks performed at the machine itself!
| Trouble | Possible cause | Solution |
| Engine will not start | The overload protection has respondedpower failureSafety switch not closed to the collecting container capable | Removed jammed parts. Let the motor cool down for about 2min and push the reset button of the motor protection.Check the mains cord, the plug and the fuse in your home port and the residual current circuit breakerMake sure that the On-collecting vessel, and be locked in the safe position |
| The material to be chopped is not feeding | The chopping blade rotates backwards.The media is jammed in the feed hopper. | Change the direction of rotation.Push Reverse switch and turn the shredder on. Put out the material from the shredder. |
| The cutting of the material is not good | The distance of the baffle to the cutting blades is wrong | Adjust the right distance with the adjusting knob |
MANY POTENTIAL SOURCES OF ERROR CAN BE CLEARED BY THE EXPERTLY CONNECTION TO THE ELECTRICITY GRID.

NOTICE
Should you in necessary repairs not able to properly to perform or you have not the prescribed training for it always attract a workshop to fix the problem.
17 PREFACE (FR)
Cher client!
Fig.1A
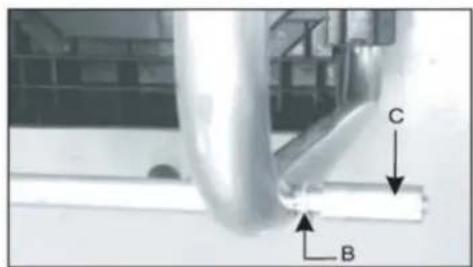
Fig.1B
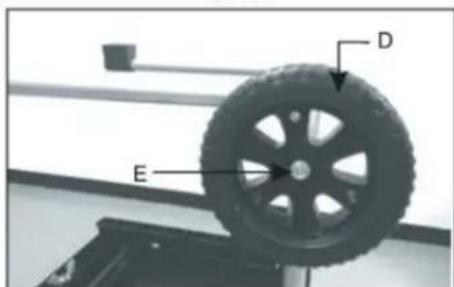
Fig.1C
natural_image
Person adjusting a tire with a directional arrow labeled 'H' (no text or symbols on the tire itself)Fig.1E
natural_image
White plastic waste bin with a labeled arrow pointing to its side, next to a wheeled cart (no text or symbols visible)Fig. 2

ATTENTI ON
MACHINE VIBRANTE! S'ASSURER QUE CHAQUES VIS, BOULONS, ÉCROUS SONT BIEN FIXÉS!
LORS DE L'UTILISATION DE LA MACHINE EN VIBRATION, NE RIEN RESSERRER, RISQUE DE CASSE ET MISE EN DANGER!
20.1 Démarrage
natural_image
Close-up of a white plastic waste bin with a red arrow pointing to a small component (no text or symbols visible)flowchart
graph TD
    A["Lock"] <--> B["Unlock"]
21.6 Conseils

ATTENTI ON
(EN) With original Zipper spare parts you use parts that are attuned to each other shorten the installation time and elongate your machines lifespan.
IMP ORT ANT
The installation of other than original spare parts voids the warranty!
So you always have to use original spare parts
By the order of spare parts use the service formular that you can find at the end of this manual. Make always a note of the type, spare part number and a definition of the machine. That there are no mistakes, we recommend to make a copy of the spare part list where you can mark with a pen the spare parts which you order.
You find the order address in the preface of this operation manual.
| No. | Name | OTY | No. | Name | OTY | No. | Name | OTY |
| 1 | cable | 1 | 51 | front end | 1 | 101 | pin boss | 2 |
| 2 | cable sheath | 1 | 52 | stop pin | 1 | 102 | screw | 5 |
| 3 | screw | 2 | 53 | end plate | 2 | 103 | connection | 1 |
| 4 | cable sheath | 1 | 54 | hex nut | 4 | 104 | connection | 1 |
| 5 | switch panel | 1 | 55 | hob | 1 | 105 | connection | 1 |
| 6 | Rocker Switch | 1 | 56 | set piece | 1 | 106 | connection | 1 |
| 7 | magnet switch | 1 | 57 | flat key | 1 | 107 | connection | 1 |
| 8 | switch label | 1 | 58 | cutter shaft | 1 | |||
| 9 | overcurrent protective de- | 1 | 59 | cutter shaft | 2 | |||
| 10 | capacitance | 1 | 60 | internal hex | 4 | |||
| 11 | upper cover | 1 | 61 | adjusting | 1 | |||
| 12 | main label | 1 | 62 | adjusting | 1 | |||
| 13 | feeder hopper | 1 | 63 | locknut | 1 | |||
| 14 | pole | 1 | 64 | knife rest | 1 | |||
| 15 | screw | 2 | 65 | connection | 1 | |||
| 16 | carbon brush holder | 1 | 66 | switch box | 1 | |||
| 17 | Carbon brush set | 2 | 67 | microswitch | 1 | |||
| 18 | carbon brush | 2 | 68 | switch lifting | 1 | |||
| 19 | connection line | 2 | 69 | microswitch | 1 | |||
| 20 | PCB | 1 | 70 | screw | 1 | |||
| 21 | motor upper cover | 1 | 71 | warning | 1 | |||
| 22 | Wave type gasket | 1 | 72 | engine base | 1 | |||
| 23 | bearing | 1 | 73 | hexagon | 3 | |||
| 24 | Wave type gasket | 1 | 74 | gasket | 3 | |||
| 25 | stator | 1 | 75 | left tube | 1 | |||
| 26 | motor lower cover | 1 | 76 | right tube | 1 | |||
| 27 | air director | 1 | 77 | feedstock | 1 | |||
| 28 | sponge mat | 1 | 78 | screw | 14 | |||
| 29 | internal hex nut | 4 | 79 | lower cover | 1 | |||
| 30 | motor fore-stock | 1 | 80 | screw | 18 | |||
| 31 | fan | 1 | 81 | bavonet | 1 | |||
| 32 | bearing | 1 | 82 | shrapnel | 2 | |||
| 33 | sponge cover | 1 | 83 | bavonet | 1 | |||
| 34 | Ventilation cover | 1 | 84 | bavonet | 1 | |||
| 35 | gear case | 1 | 85 | connection | 2 | |||
| 36 | small gear ring | 1 | 86 | Terminal | 2 | |||
| 37 | Level 1 planetary gear | 2 | 87 | connection- | 1 | |||
| 38 | Level 1 pin roll | 2 | 88 | safety | 1 | |||
| 39 | Level 1 axle sleeve | 2 | 89 | hex nut | 2 | |||
| 40 | Level 1 planet carrier | 1 | 90 | collection | 1 | |||
| 41 | Level 2 sun gear | 1 | 91 | mat | 2 | |||
| 42 | jump ring | 2 | 92 | screw | 19 | |||
| 43 | spacer bush | 1 | 93 | supporting | 2 | |||
| 44 | grooved metal gasket | 1 | 94 | axle sleeve | 2 | |||
| 45 | Level 2 planetary gear | 3 | 95 | gasket | 2 | |||
| 46 | Level 2 axle sleeve | 3 | 96 | axle | 1 | |||
| 47 | Level 2 pin roll | 3 | 97 | wheel | 2 | |||
| 48 | Level 2 planet carrier | 1 | 98 | Non-slip | 2 | |||
| 49 | big gear ring | 1 | 99 | wheel cap | 2 | |||
| 50 | internal hex nut | 4 | 100 | plastic pin | 2 | |||
Company ZIPPER Maschinen GmbH grants for mechanical and electrical components a warranty period of 2 years for amateur use; and warranty period of 1 year for professional use, starting with the purchase of the final consumer. In case of defects during this period, which are not excluded by paragraph 3, ZIPPER will repair or replace the machine at its own discretion.
2.) Report:
In order to check the legitimacy of warranty claims, the final consumer must contact his dealer. The dealer has to report in written form the occurred defect to ZIPPER. If the warranty claim is legitimate, ZIPPER will pick up the defective machine from the dealer. Returned shippings by dealers which have not been coordinated with ZIPPER, will not be accepted and refused.
3.) Regulations:
a) Warranty claims will only be accepted, when a copy of the original invoice or cash voucher from the trading partner of ZIPPER is enclosed to the machine. The warranty claim expires if the accessories belonging to the machine are missing.
b) The warranty does not include free checking, maintenance, inspection or service works on the machine. Defects due to incorrect usage of the final consumer or his dealer will not be accepted as warranty claims either. Some examples: usage of wrong fuel, frost damages in water tanks, leaving fuel in the tank during the winter, etc.
c) Defects on wear parts are excluded, e.g. carbon brushes, collection bags, knives, cylinders, cutting blades, clutches, sealings, wheels, saw blades, splitting crosses, riving knives, riving knife extensions, hydraulic oils, oil/air/fuel filters, chains, spark plugs, sliding blocks, etc.
d) Also excluded are damages on the machine caused by incorrect or inappropriate usage, if it was used for a purpose which the machine is not supposed to, ignoring the user manual, force majeure, repairs or technical manipulations by not authorized workshops or by the customer himself, usage of non-original ZIPPER spare parts or accessories.
e) After inspection by our qualified personnel, resulted costs (like freight charges) and expenses for not legitimated warranty claims will be charged to the final customer or dealer.
f) In case of defective machines outside the warranty period, we will only repair after advance payment or dealer's invoice according to the cost estimate (incl. freight costs) of ZIPPER.
g) Warranty claims can only be granted for customers of an authorized ZIPPER dealer who directly purchased the machine from ZIPPER. These claims are not transferable in case of multiple sales of the machine.
4.) Claims for compensation and other liabilities:
The liability of company ZIPPER is limited to the value of goods in all cases. Claims for compensation because of poor performance, lacks, damages or loss of earnings due to defects during the warranty period will not be accepted. ZIPPER insists on its right to subsequent improvement of the machine.
29 GARANTI ET SERVICE (FR)
1.) Garantie:
Product experience form
We observe the quality of our delivered products in the frame of a Quality Management policy.
Your opinion is essential for further product development and product choice. Please let us know about your:
- Impressions and suggestions for improvement.
- experiences that may be useful for other users and for product design
- Experiences with malfunctions that occur in specific operation modes
We would like to ask you to note down your experiences and observations and send them to us via FAX, E-Mail or by post:
Erworben von / purchased from:
E-Mail/ e-mail:
service inquiry spare part inquiry guarantee claim
Please describe amongst others in the problem: What has cause the problem/defect, what was the last activity before you noticed the problem/defect? For electrical problems: Have you had checked you electric supply and the machine already by a certified electrician?
3. Bitte beachten
Additional information
INCOMPLETELY FILLED SERVICE FORMS CANNOT BE PROCESSED! FOR GUARANTEE CLAIMS PLEASE ADD A COPY OF YOUR ORIGINAL SALES / DELIVERY RECEIPT OTHERWISE IT CANNOT BE ACCEPTED. FOR SPARE PART ORDERS PLEASE ADD TO THIS SERVICE FORM A COPY OF THE RESPECTIVE EXPLODED DRAWING WITH THE REQUIRED SPARE PARTS BEING