
PHN23103X - Oven PROGRESS - Free user manual and instructions
Find the device manual for free PHN23103X PROGRESS in PDF.
| Product type | Built-in oven |
| Brand | Progress |
| Model | PHN23103X |
| Oven type | Built-in electric under-counter oven |
| Volume | 65 L |
| Dimensions (front) | W 594 x H 598 x D 561 mm |
| Dimensions (rear) | W 558 x H 579 x D 561 mm |
| Minimum recess dimensions | W 560 x H 590 x D 540 mm |
| Weight | 28.8 kg |
| Power supply | 220-240 V, 50 Hz |
| Energy class | A |
| Energy consumption (conventional mode) | 0.89 kWh/cycle |
| Energy consumption (fan-assisted mode) | 0.78 kWh/cycle |
| Cooking functions | Fan-assisted, Turbo grill, Bottom heat, Top/Bottom heat, Grill, Defrost, Fan-assisted with moisture |
| Cleaning | Aqua Clean (steam cleaning) |
| Interior lighting | Bulb resistant to 300°C |
| Safety | Safety thermostat, cooling ventilation |
| Door | Removable, double glazing |
| Included accessories | Wire shelf, baking tray |
| Repairability | Original parts, authorised after-sales service |
| General information | Manual available in French, German, English |
Frequently Asked Questions - PHN23103X PROGRESS
User questions about PHN23103X PROGRESS
0 question about this device. Answer the ones you know or ask your own.
Ask a new question about this device
Download the instructions for your Oven in PDF format for free! Find your manual PHN23103X - PROGRESS and take your electronic device back in hand. On this page are published all the documents necessary for the use of your device. PHN23103X by PROGRESS.
USER MANUAL PHN23103X PROGRESS
Subject to change without notice.
1. SAFETY INFORMATION
Before the installation and use of the appliance, carefully read the supplied instructions. The manufacturer is not responsible for any injuries or damage that are the result of incorrect installation or usage. Always keep the instructions in a safe and accessible location for future reference.
1.1 Children and vulnerable people safety
- This appliance can be used by children aged from 8 years and above and persons with reduced physical, sensory or mental capabilities or lack of experience and knowledge if they have been given supervision or instruction concerning the use of the appliance in a safe way and understand the hazards involved. Children of less than 8 years of age and persons with very extensive and complex disabilities shall
be kept away from the appliance unless continuously supervised.
- Children should be supervised to ensure that they do not play with the appliance.
- Keep all packaging away from children and dispose of it appropriately.
- WARNING: Keep children and pets away from the appliance when it operates or when it cools down. Accessible parts become hot during use.
- If the appliance has a child safety device, it should be activated.
- Children shall not carry out cleaning and user maintenance of the appliance without supervision.
1.2 General Safety
- Only a qualified person must install this appliance and replace the cable.
- Do not use the appliance before installing it in the built-in structure.
- Disconnect the appliance from the power supply before carrying out any maintenance.
- If the mains power supply cable is damaged, it must be replaced by the manufacturer, its Authorised Service Centre or similarly qualified persons to avoid an electrical hazard.
- The control panel must be connected to specified heating unit with matching colours of connectors, to avoid possible hazard.
- WARNING: Ensure that the appliance is switched off before replacing the lamp to avoid the possibility of electric shock.
- WARNING: The appliance and its accessible parts become hot during use. Care should be taken to avoid touching heating elements.
- Always use oven gloves to remove or put in accessories or ovenware.
-
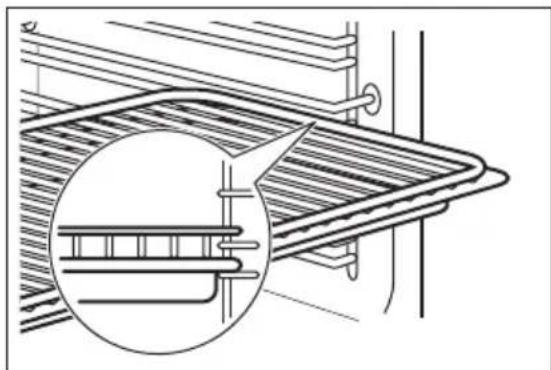
To remove the shelf supports first pull the front of the shelf support and then the rear end away from the side walls. Install the shelf supports in the opposite sequence.
-
Do not use a steam cleaner to clean the appliance.
- Do not use harsh abrasive cleaners or sharp metal scrapers to clean the glass door since they can scratch the surface, which may result in shattering of the glass.
2. SAFETY INSTRUCTIONS
2.1 Installation

WARNING!
Only a qualified person must install this appliance.
- Remove all the packaging.
- Do not install or use a damaged appliance.
- Follow the installation instructions supplied with the appliance.
Always take care when moving the appliance as it is heavy. Always use safety gloves and enclosed footwear. - Do not pull the appliance by the handle.
- Install the appliance in a safe and suitable place that meets installation requirements.
- The kitchen cabinet and the recess must have suitable dimensions.
- Keep the minimum distance from other appliances and units.
- Before mounting the appliance, check if the oven door opens without restraint. If not the oven has to be lifted.
- Parts of the appliance carry current. Close the appliance with furniture to prevent touching the dangerous parts.
- The appliance is equipped with an electric cooling system. It must be operated with the electric power supply.
Cabinet minimum height 590 (600) mm
(Cabinet under the worktop minimum height)
Cabinet width 560 mm
Cabinet depth 550 (550) mm
Height of the front of the 598 mm appliance
Height of the back of the 579 mm appliance
Width of the front of the 594 mm appliance
Width of the back of the 558 mm appliance
Depth of the appliance 561 mm
Built in depth of the ap- 540 mm plance
Depth with open door 1007 mm
Ventilation opening mini- 560× 20mm mum size. Opening placed on the bottom rear side
Mains supply cable 1100 mm length. Cable is placed in the right corner of the back side
Mounting screws 4 × 25 ~mm
Before you install the appliance, fit it with the applicable hob from the table.
Type Maximum power
PES6001E 6000 W
PES6061E 7600 W
2.2 Electrical connection

WARNING!
Risk of fire and electric shock.
- All electrical connections should be made by a qualified electrician.
The appliance must be earthed.
Make sure that the parameters on the rating plate are compatible with the
electrical ratings of the mains power supply.
Always use a correctly installed shockproof socket.
- Do not use multi-plug adapters and extension cables.
- Make sure not to cause damage to the mains plug and to the mains cable. Should the mains cable need to be replaced, this must be carried out by our Authorised Service Centre.
- Do not let mains cables touch or come near the appliance door or the niche below the appliance, especially when it operates or the door is hot.
- The shock protection of live and insulated parts must be fastened in such a way that it cannot be removed without tools.
- Connect the mains plug to the mains socket only at the end of the installation. Make sure that there is access to the mains plug after the installation.
- If the mains socket is loose, do not connect the mains plug.
- Do not pull the mains cable to disconnect the appliance. Always pull the mains plug.
- Use only correct isolation devices: line protecting cut-outs, fuses (screw type fuses removed from the holder), earth leakage trips and contactors.
- The electrical installation must have an isolation device which lets you disconnect the appliance from the mains at all poles. The isolation device must have a contact opening width of minimum 3 mm.
- This appliance is supplied with a main plug and a main cable.
- The hob connection socket is at the top of the oven cabinet. The hob has connection leads for the cooking zones and the ground cable. The leads have plug-in connectors. Plug the connectors into the correct oven socket to connect the hob to the oven. The design of the plugs and sockets prevents incorrect connections. If the mains voltage is different, rearrange the jumpers on the terminal board (refer to the connection diagram below). Connect the ground cable to the terminal. After you connect the supply cable to the terminal board, attach it with a junction clamp.
Connecting to terminal board
The appliance has a six-pole terminal board. The jumpers (bridges) are set for operation on a 400V three-phase with a neutral wire.

L 1-2-3 = phase cables
N 4 = neutral cable
= earth cable

Cable types applicable for installation or replacement for Europe:
H07 RN-F, H05 RN-F, H05 RRF, H05 VV-F, H05 V2V2-F (T90), H05 BB-F
For the section of the cable refer to the total power on the rating plate.
2.3 Use
WARNING!
Risk of injury, burns and electric shock or explosion.
- This appliance is for household use only.
- Do not change the specification of this appliance.
Make sure that the ventilation openings are not blocked. - Do not let the appliance stay unattended during operation.
- Deactivate the appliance after each use.
- Be careful when you open the appliance door while the appliance is in operation. Hot air can release.
- Do not operate the appliance with wet hands or when it has contact with water.
- Do not apply pressure on the open door.
- Do not use the appliance as a work surface or as a storage surface.
- Open the appliance door carefully. The use of ingredients with alcohol can cause a mixture of alcohol and air.
- Do not let sparks or open flames to come in contact with the appliance when you open the door.
- Do not put flammable products or items that are wet with flammable products in, near or on the appliance.

WARNING!
Risk of damage to the appliance.
- To prevent damage or discoloration to the enamel:
- do not put ovenware or other objects in the appliance directly on the bottom.
- do not put aluminium foil directly on the bottom of cavity of the appliance.
- do not put water directly into the hot appliance.
- do not keep moist dishes and food in the appliance after you finish the cooking.
- be careful when you remove or install the accessories.
- Discoloration of the enamel or stainless steel has no effect on the performance of the appliance.
- Use a deep pan for moist cakes. Fruit juices cause stains that can be permanent.
- This appliance is for cooking purposes only. It must not be used for other purposes, for example room heating.
Always cook with the oven door closed.
2.4 Care and cleaning

WARNING!
Risk of injury, fire, or damage to the appliance.
- Before maintenance, deactivate the appliance and disconnect the mains plug from the mains socket.
Make sure the appliance is cold. There is the risk that the glass panels can break. - Replace immediately the door glass panels when they are damaged. Contact the Authorised Service Centre.
- Be careful when you remove the door from the appliance. The door is heavy!
- Clean regularly the appliance to prevent the deterioration of the surface material.
- Clean the appliance with a moist soft cloth. Use only neutral detergents. Do not use abrasive products, abrasive cleaning pads, solvents or metal objects.
- If you use an oven spray, follow the safety instructions on its packaging.
2.5 Internal lighting

WARNING!
Risk of electric shock.
- Concerning the lamp(s) inside this product and spare part lamps sold separately: These lamps are intended to withstand extreme physical conditions in household appliances, such as temperature, vibration, humidity, or are intended to signal information about the operational status of the appliance. They are not intended to be used in other applications and are not suitable for household room illumination.
- Use only lamps with the same specifications.
2.6 Service
To repair the appliance contact the Authorised Service Centre.
- Use original spare parts only.
2.7 Disposal

WARNING!
Risk of injury or suffocation.
-
Disconnect the appliance from the mains supply.
-
Cut off the mains electrical cable close to the appliance and dispose of it.
-
Remove the door catch to prevent children or pets from becoming trapped in the appliance.
3. INSTALLATION

WARNING!
Refer to Safety chapters.
3.1 Building in

3.2 Securing the oven to the cabinet

4.PRODUCT DESCRIPTION
4.1 General overview

4.2 Accessories
- Wire shelf
For cookware, cake tins, roasts.
1 Control panel
Knobs for the hob
3 Power lamp / symbol
4 Knob for the heating functions
5 Display
6 Control knob (for the temperature)
7 Temperature indicator / symbol
8 Air vents for the cooling fan
Heating element
10 Lamp
Fan
12 Shelf support, removable
13 Cavity embossment - Aqua cleaning container
14 Shelf positions
Baking tray
For cakes and biscuits.
5. CONTROL PANEL
5.1 Knobs for the cooking zones
You can operate the hob with the knobs for the cooking zones.

You must read the Safety chapters in the hob user manual.
5.2 Heat settings
Knob indication Function
0 Off position
1-9 Heat settings

Double zone switch
- Turn the knob to a necessary heat setting.
- To complete the cooking process, turn the knob to the off position.
5.3 Using the double zone (if applicable)
To activate the double zone, turn the knob clockwise. Do not turn it through the stop position.
- Turn the knob clockwise to position 9.
- Turn the knob slowly to the symbol until you can hear a click. The two cooking zones are on.
- To set the necessary heat setting refer to "Heat settings".
5.4 Retractable knobs
To use the appliance press the knob. The knob comes out.
5.5 Sensor fields / Buttons
| - | To set the time. |
| ◎ | To set a clock function. |
| + | To set the time. |
5.6 Display

A. Clock functions
B. Timer
6. BEFORE FIRST USE

WARNING!
Refer to Safety chapters.
6.1 Before first use
The oven can emit an odour and smoke during preheating. Make sure that the room is ventilated.

Step 1 Step 2


Step 3
Set the clock Clean the oven Preheat the empty oven
-
, press to set the time. After approximately 5 sec., the flashing stops and the display shows the time.
-
Remove all accessories and removable shelf supports from the oven.
-
Clean the oven and the accessories with a soft cloth, warm water and a mild detergent.
-
Set the maximum temperature for the function:
Time: 1 h.
- Set the maximum temperature for the function:
Time: 15 min.
7. DAILY USE

WARNING!
Refer to Safety chapters.
7.1 How to set: Heating function
Step 1
Turn the knob for the heating functions to select a heating function.
Step 2
Turn the control knob to select the temperature.
Step 3
When the cooking ends, turn the knobs to the off position to turn off the oven.
7.2 Heating functions
Heating function
Application

Off position

Fan Cooking
The oven is off.

Turbo Grill-ing
To roast or roast and bake food with the same cooking temperature on more than one shelf position, without flavour transference.
To bake cakes with crispy bottom and to preserve food.

Bottom Heat

Conventional Cooking / Aqua Clean
To bake and roast food on one shelf position.
Refer to "Care and cleaning" chapter for more information about: Aqua Clean.
Heating function
Application

To grill thin pieces of food and to toast bread.
Grill

Defrost
To defrost food (vegetables and fruit). The defrosting time depends on the amount and size of the frozen food.

Moist Fan Baking
This function is designed to save energy during cooking. When you use this function, the temperature in the cavity may differ from the set temperature. The heating power may be reduced. For more information refer to "Daily Use" chapter, Notes on: Moist Fan Baking.
7.3 Notes on: Moist Fan Baking
This function was used to comply with the energy efficiency class and ecodesign requirements according to EU 65/2014 and EU 66/2014. Tests according to EN 60350-1.
The oven door should be closed during cooking so that the function is not interrupted and the oven operates with the highest energy efficiency possible.
For the cooking instructions refer to "Hints and tips" chapter, Moist Fan Baking. For general energy saving recommendations refer to "Energy Efficiency" chapter, Energy Saving.
8. CLOCK FUNCTIONS
8.1 Clock functions
| Clock function Application | |
| Time of Day | To set, change or check the time of day. |
| |→|Duration | To set how long the oven works. |
| Minute Minder | To set a countdown. This function has no effect on the operation of the oven. You can set this function at any time, also when the oven is off. |
8.2 How to set: Clock functions
| How to set: Time of Day |
| - flashes when you connect the oven to the electrical supply, when there was a power cut or when the timer is not set. |
| + , - press to set the time. After approximately 5 sec., the flashing stops and the display shows the time. |
| How to change: Time of Day | |
| Step 1 | - press repeatedly to change the time of day. starts to flash. |
| Step 2 | + , - press to set the time. After approximately 5 sec., the flashing stops and the display shows the time. |
| How to set: Duration | |
| Step 1 | Set an oven function and the temperature. |
| Step 2 | - press repeatedly. - starts to flash. |
| Step 3 | +, - press to set the duration. The display shows: |→| |→| - flashes when the set time ends. The signal sounds and the oven turns off. |
| Step 4 | Press any button to stop the signal. |
| Step 5 | Turn the knobs to the off position. |
| How to set: Minute Minder | |
| Step 1 | - press repeatedly. starts to flash. |
| Step 2 | + , - press to set the time. The function starts automatically after 5 sec. When the set time ends, the signal sounds. |
| Step 3 | Press any button to stop the signal. |
| Step 4 | Turn the knobs to the off position. |
| How to cancel: Clock functions | |
| Step 1 | - press repeatedly until the clock function symbol starts to flash. |
| Step 2 | Press and hold: The clock function turns off after few seconds. |
9. USING THE ACCESSORIES

WARNING!
Refer to Safety chapters.
9.1 Inserting accessories
A small indentation at the top increases safety. The indentations are also anti-tip
devices. The high rim around the shelf prevents cookware from slipping of the shelf.
Wire shelf:
Push the shelf between the guide bars of the shelf support and make sure that the feet point down.

Baking tray:
Push the tray between the guide bars of the shelf support.

Wire shelf, Baking tray:
Push the tray between the guide bars of the shelf support and the wire shelf on the guide bars above.
10. ADDITIONAL FUNCTIONS
10.1 Cooling fan
When the oven operates, the cooling fan turns on automatically to keep the surfaces of the oven cool. If you turn off the oven, the cooling fan can continue to operate until the oven cools down.
10.2 Safety thermostat
Incorrect operation of the oven or defective components can cause dangerous overheating. To prevent this, the oven has a safety thermostat which interrupts the power supply. The oven turns on again automatically when the temperature drops.
11. HINTS AND TIPS

Refer to Safety chapters.
11.1 Cooking recommendations
The oven has four shelf positions.
Count the shelf positions from the bottom of the oven floor.
Your oven may bake or roast differently to the oven you had before. The below tables provide you with the standard settings for temperature, cooking time and shelf position.
If you cannot find the settings for a special recipe, look for the similar one.
The oven has a special system which circulates the air and constantly recycles the steam. With this system you can cook in a steamy environment and keep the food soft inside and crusty outside. It decreases the cooking time and energy consumption.
Baking cakes
Do not open the oven door before 3/4 of the set cooking time is up.
If you use two baking trays at the same time, keep one empty level between them.
Cooking meat and fish
Leave the meat for approximately 15 minutes before carving so that the juice does not seep out.
To prevent too much smoke in the oven during roasting, add some water into the deep pan. To prevent the smoke condensation, add water each time after it dries up.
Cooking times
Cooking times depend on the type of food, its consistency, and volume.
Initially, monitor the performance when you cook. Find the best settings (heat setting, cooking time, etc.) for your cookware, recipes and quantities when you use this appliance.
11.2 Moist Fan Baking - recommended accessories
Use the dark and non-reflective tins and containers. They have better heat absorption than the light colour and reflective dishes.
| Pizza pan | Baking dish | Ramekins | Flan base tin |
| Dark, non-reflective 28 cm diameter | Dark, non-reflective 26 cm diameter | Ceramic 8 cm diameter, 5 cm height | Dark, non-reflective 28 cm diameter |
11.3 Moist Fan Baking
For the best results follow suggestions listed in the table below.
| Sweet rolls, 12 pieces | baking tray or dripping pan 180 2 35 - 40 | |
| Rolls, 9 pieces baking tray or dripping pan 180 2 35 - 40 | ||
| Pizza, frozen, 0.35 kg | wire shelf 220 2 35 - 40 | |
| Swiss roll baking tray or dripping pan 170 2 30 - 40 | ||
| Brownie baking tray or dripping pan 180 2 30 - 40 | ||
| Souffle, 6 pieces ceramic ramekins on wire shelf | 200 3 30 - 40 | |
| Sponge flan base flan base tin on wire shelf 170 2 20 - 30 | ||
| Victoria sandwich baking dish on wire shelf 170 2 35 - 45 | ||
| (℃) (min) | ||
| Poached fish, 0.3kg | baking tray or dripping pan 180 3 35 - 45 | |
| Whole fish, 0.2 kg baking tray or dripping pan 180 3 35 - 45 | ||
| Fish fillet, 0.3 kg pizza pan on wire shelf 180 3 35 - 45 | ||
| Poached meat, 0.25kg | baking tray or dripping pan 200 3 40 - 50 | |
| Shashlik, 0.5 kg baking tray or dripping pan 200 3 25 - 35 | ||
| Cookies, 16 pieces baking tray or dripping pan 180 2 20 - 30 | ||
| Macaroons, 20pieces | baking tray or dripping pan 180 2 40 - 45 | |
| Muffins, 12 pieces baking tray or dripping pan 170 2 30 - 40 | ||
| Savory pastry, 16pieces | baking tray or dripping pan 170 2 35 - 45 | |
| Short crust biscuits,20 pieces | baking tray or dripping pan 150 2 40 - 50 | |
| Tartlets, 8 pieces baking tray or dripping pan 170 2 20 - 30 | ||
| Vegetables, poached, 0.4 kg | baking tray or dripping pan 180 3 35 - 40 | |
| Vegetarian omelette pizza pan on wire shelf 200 3 30 - 45 | ||
| Mediterranean veg-etables, 0.7 kg | baking tray or dripping pan 180 4 35 - 40 | |
11.4 Information for test institutes
Tests according to IEC 60350-1.
| X | (℃) (min) | i | ||
| Small cakes, 20 per tray | Convention-al Cooking | Baking tray | 3 170 20 - 30 - | |
| Apple pie, 2 tins Ø20 cm | Convention-al Cooking | Wire shelf | 1 170 80 - 120 - | |
| X | (℃) (min) | |||
| Sponge cake, cake mould∅26 cm | Convention-al Cooking | Wire shelf | 2 170 35 - 45 - | |
| Short bread | Convention-al Cooking | Baking tray | 3 150 20 - 35 Preheat the oven | for 10 minutes. |
| Toast, 4 - 6 pieces | Grill Wire | shelf | 3 max. 2 - 4 minutesfirst side; 2 - 3minutes secondside | Preheat the oven for 3 minutes. |
| Beef bur-ger, 6 pieces, 0.6 kg | Grill Wire | shelf and dripping pan | 3 max. 20 - 30 Put the wire shelf | on the third level and the dripping pan on the second level of the oven. Turn the food half-way through the cooking time. Preheat the oven for 3 minutes. |
12. CARE AND CLEANING

WARNING!
Refer to Safety chapters.
12.1 Notes on cleaning

Cleaning Agents
Clean the front of the oven with a soft cloth with warm water and a mild detergent. Clean and check the door gasket around the frame of the cavity.
Use a cleaning solution to clean metal surfaces.
Clean stains with a mild detergent.

Everyday Use
Clean the cavity after each use. Fat accumulation or other residue may cause fire.
Moisture can condense in the oven or on the door glass panels. To decrease the condensation, let the oven work for 10 minutes before cooking. Do not store the food in the oven for longer than 20 minutes. Dry the cavity with a soft cloth after each use.

Accessories
Clean all accessories after each use and let them dry. Use a soft cloth with warm water and a mild detergent. Do not clean the accessories in a dishwasher.
Do not clean the non-stick accessories using abrasive cleaner or sharp-edged objects.
12.2 How to remove: Shelf supports
Remove the shelf supports to clean the oven.
Step 1 Turn off the oven and wait until it is cold.
Step 2 Pull the front of the shelf support away from the side wall.
Step 3 Pull the rear end of the shelf support away from the side wall and remove it.
Step 4 Install the shelf supports in the opposite sequence.


12.3 How to use: Aqua Clean
This cleaning procedure uses humidity to remove remaining fat and food particles from the oven.
Step 1 Pour water into the cavity embossment: 150ml
Step 2 Set the function:
Step 3 Set the temperature to 90^
Step 4 Let the oven work for 30min
Step 5 Turn off the oven.
Step 6 Wait until the oven is cold. Dry the cavity with a soft cloth.
12.4 How to remove and install: Door
The oven door has two glass panels. You can remove the oven door and the internal glass panel to clean it. Read the whole "Removing and installing door" instruction before you remove the glass panels.

CAUTION!
Do not use the oven without the glass panels.
Step 1
Open the door fully and hold both hinges.
Step 2
Lift and turn the levers fully on both hinges.


Step 3
Close the oven door halfway to the first opening position. Then lift and pull forward and remove the door from its seat.
Step 4
Put the door on a soft cloth on a stable surface and release the locking system to remove the internal glass panel.


Step 5
Turn the fasteners by 90^ and remove them from their seats.
Step 6
First lift carefully and then remove the glass panel.


Step 7
Clean the glass panels with water and soap. Dry the glass panels carefully. Do not clean the glass panels in the dishwasher.
Step 8
After cleaning, install the glass panel and the oven door.
When installed correctly the door trim clicks.
Make sure that you install the internal glass panel in the seats correctly.

12.5 How to replace: Lamp

WARNING!
Risk of electric shock. The lamp can be hot.
Before you replace the lamp:
| Step 1 Step 2 Step 3 | ||
| Turn off the oven. Wait until the oven is cold. | Disconnect the oven from the mains. | Put a cloth on the bottom of the cavity. |
Back lamp
Step 1 Turn the glass cover to remove it.
Step 2 Clean the glass cover.
Step 3 Replace the lamp with a suitable 300^ heat-resistant lamp.
Step 4 Install the glass cover.
13. TROUBLESHOOTING

WARNING!
Refer to Safety chapters.
13.1 What to do if...
In any cases not included in this table please contact with an Authorised Service Centre.
Problem Check if...
| The oven does not heat up. | The fuse is blown. |
| The door gasket is damaged. | Do not use the oven. Contact an Authorised Service Centre. |
Problem Check if...
| The display shows "12.00". | There was a power cut. Set the time of day. |
| The lamp does not work. | The lamp is burnt out. |
13.2 Service data
If you cannot find a solution to the problem yourself, contact your dealer or an Authorised Service Centre.
The necessary data for the service centre is on the rating plate. The rating plate is on the
front frame of the oven cavity. Do not remove the rating plate from the oven cavity.
We recommend that you write the data here:
Model (MOD.)
Product number (PNC)
Serial number (S.N.)
14. ENERGY EFFICIENCY
14.1 Product Information and Product Information Sheet*
Supplier's name Progress
Model identification PHN23103X 944068157
Energy Efficiency Index 95.1
Energy efficiency class A
Energy consumption with a standard load, conventional mode 0.89 kWh/cycle
Energy consumption with a standard load, fan-forced mode 0.78 kWh/cycle
Number of cavities 1
Heat source Electricity
Volume 651
Type of oven Built-Under Oven
Mass 28.8kg
- For European Union according to EU Regulations 65/2014 and 66/2014.
For Republic of Belarus according to STB 2478-2017, Appendix G; STB 2477-2017, Annexes A and B.
For Ukraine according to 568/32020.
Energy efficiency class is not applicable for Russia.
EN 60350-1 - Household electric cooking appliances - Part 1: Ranges, ovens, steam ovens and grills - Methods for measuring performance.
14.2 Energy saving
The oven has features which help you save energy during everyday cooking.
Make sure that the oven door is closed when the oven operates. Do not open the oven door too often during cooking. Keep the door
gasket clean and make sure it is well fixed in its position.
Use metal cookware to improve energy saving.
When possible, do not preheat the oven before cooking.
Keep breaks between baking as short as possible when you prepare a few dishes at one time.
Cooking with fan
When possible, use the cooking functions with fan to save energy.
Residual heat
When the cooking duration is longer than 30 min, reduce the oven temperature to minimum 3 - 10 min before the end of cooking. The residual heat inside the oven will continue to cook.
Use the residual heat to warm up other dishes.
Keep food warm
Choose the lowest possible temperature setting to use residual heat and keep a meal warm.
Moist Fan Baking
Function designed to save energy during cooking.
15. ENVIRONMENTAL CONCERNS
Recycle materials with the symbol. Put the packaging in relevant containers to recycle it. Help protect the environment and human health by recycling waste of electrical and electronic appliances. Do not dispose of
appliances marked with the symbol with the household waste. Return the product to your local recycling facility or contact your municipal office.
VISITEZ NOTRE SITE WEB POUR :

Sous reserve de modifications.
1. INFORMATION SUR LA SECURITE
5.5 Touches sensitives

- SAFETY INFORMATION
- Children and vulnerable people safety
- General Safety
- SAFETY INSTRUCTIONS
- Installation
- WARNING!
- Type Maximum power
- Electrical connection
- Connecting to terminal board
- Cable types applicable for installation or replacement for Europe:
- Use
- Care and cleaning
- Internal lighting
- Service
- Disposal
- INSTALLATION
- Building in
- Securing the oven to the cabinet
- 4.PRODUCT DESCRIPTION
- General overview
- Accessories
- CONTROL PANEL
- Knobs for the cooking zones
- Heat settings
- Knob indication Function
- Using the double zone (if applicable)
- Retractable knobs
- Sensor fields / Buttons
- Display
- BEFORE FIRST USE
- Before first use
- Set the clock Clean the oven Preheat the empty oven
- DAILY USE
- How to set: Heating function
- Step 1
- Step 2
- Step 3
- Heating functions
- Heating function
- Application
- Notes on: Moist Fan Baking
- CLOCK FUNCTIONS
- Clock functions
- How to set: Clock functions
- USING THE ACCESSORIES
- Inserting accessories
- Wire shelf:
- Baking tray:
- Wire shelf, Baking tray:
- ADDITIONAL FUNCTIONS
- Cooling fan
- Safety thermostat
- HINTS AND TIPS
- Cooking recommendations
- Baking cakes
- Cooking meat and fish
- Cooking times
- Moist Fan Baking - recommended accessories
- Moist Fan Baking
- Information for test institutes
- CARE AND CLEANING
- Notes on cleaning
- How to remove: Shelf supports
- How to use: Aqua Clean
- How to remove and install: Door
- CAUTION!
- Step 4
- Step 5
- Step 6
- Step 7
- Step 8
- How to replace: Lamp
- Back lamp
- TROUBLESHOOTING
- What to do if...
- Service data
- We recommend that you write the data here:
- ENERGY EFFICIENCY
- Product Information and Product Information Sheet*
- Energy saving
- Cooking with fan
- Residual heat
- Keep food warm
- Moist Fan Baking
- ENVIRONMENTAL CONCERNS
- VISITEZ NOTRE SITE WEB POUR :
- INFORMATION SUR LA SECURITE
Brand : PROGRESS
Model : PHN23103X
Category : Oven