PCC771B - Radio Porter-Cable - Free user manual and instructions
Find the device manual for free PCC771B Porter-Cable in PDF.

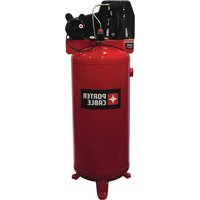
| Product Type | 20V Max Jobsite Radio with Bluetooth |
| Brand | Porter-Cable |
| Model | PCC771B |
| Power Source | 20V Max battery pack (not included) or 120V, 60Hz AC adapter |
| Frequency Bands | AM and FM |
| Connectivity | Bluetooth, auxiliary input (AUX) |
| Functions | Manual tuning and auto scan, 6 FM and 6 AM presets, clock, equalizer (bass/treble) |
| Display | LCD screen |
| Backup Battery | CR2032 button cell battery for clock and preset memory |
| Battery Compatibility | Use only Porter-Cable 20V Max battery packs |
| Care and Cleaning | Disconnect before cleaning; use a damp cloth with water and mild soap; do not use solvents |
| Safety | Do not expose to water or moisture; do not open; risk of explosion if incompatible battery |
| Spare Parts and Repairability | Parts available at portercable.com; repairs by authorized service center only |
| Warranty | 3-year limited tool, 2-year battery packs; 1-year free maintenance service |
| Support | Customer service: 1-888-848-5175; website: www.portercable.com |
Frequently Asked Questions - PCC771B Porter-Cable
User questions about PCC771B Porter-Cable
0 question about this device. Answer the ones you know or ask your own.
Ask a new question about this device
Download the instructions for your Radio in PDF format for free! Find your manual PCC771B - Porter-Cable and take your electronic device back in hand. On this page are published all the documents necessary for the use of your device. PCC771B by Porter-Cable.
USER MANUAL PCC771B Porter-Cable
20v Max* Radio with Bluetooth
Thank you for choosing PORTER-CABLE! To register your new product, go to: www.portercable.com/ServiceAndSupport/ProductRegistration.aspx
It is important for you to read and understand this manual.
The information it contains relates to protecting YOUR SAFETY and PREVENTING PROBLEMS. The symbols below are used to help you recognize this information.
⚠️DANGER: Indicates an imminently hazardous situation which, if not avoided, will result in death or serious injury.
⚠ WARNING: Indicates a potentially hazardous situation which, if not avoided, could result in death or serious injury.
⚠️ CAUTION: Indicates a potentially haz ard ous situation which, if not avoided, may result in minor or mod er ate injury.
CAUTION: Used without the safety alert symbol indicates a potentially hazardous situation which, if not avoided, may result in property damage.
IMPORTANT SAFETY INSTRUCTIONS
WARNING:
- Read these instructions.
- Keep these instructions.
- Heed all warnings.
- Follow all instructions.
- Do not use this apparatus near water.
- Do not block any ventilation openings. Install in accordance with the manufacturer's instructions.
- Do not install near any heat sources such as radiators, heat registers, stoves or other apparatus (including amplifiers) that produce heat.
- Do not defeat the safety purpose of the polarized or grounding-type plug. A polarized plug has two blades with one wider than the other. A grounding type plug has two blades and a third grounding prong. The wide blade or the third prong are provided for your safety. If the provided plug does not fit into your outlet, consult an electrician for replacement of the obsolete outlet.
- Protect the power cord from being walked on or pinched particularly at plugs, convenience receptacles, and the point where they exit from the apparatus.
- Only use attachments/accessories specified by the manufacturer.
- Unplug this apparatus during lightning storms or when unused for long periods of time.
- Refer all servicing to qualified service personnel. Servicing is required when the apparatus has been damaged in any way, such as power-supply cord or plug is damaged, liquid has been spilled or objects have fallen into the apparatus, the apparatus has been exposed to rain or moisture, does not operate normally, or has been dropped.
- Apparatus shall not be exposed to dripping or splashing and no objects filled with liquids, such as vases, shall be placed on the apparatus.
WARNING
RISK OF ELECTRIC SHOCK DO NOT OPEN

The lightning flash with arrowhead symbol, within an equilateral triangle, is intended to alert the user to the presence of uninsulated “dangerous voltage” within the product’s enclosure that may be of sufficient magnitude to constitute a risk of electric shock to persons.

The exclamation point within an equilateral triangle is intended to alert the user to the presence of important operating an maintenance (servicing) instructions in the literature accompanying the product.
This Class B digital apparatus complies with Canadian ICES-003.
NOTE: This equipment has been tested and found to comply with the limits for a Class B digital device, pursuant to Part 15 of the FCC Rules. These limits are designed to provide reasonable protection against harmful interference in a residential installation. This equipment generates, uses and can radiate radio frequency energy and, if not installed and used in accordance with the instructions, may cause harmful interference to radio communications. However, there is no guarantee that interference will not occur in a particular installation. If this equipment does cause harmful interference to radio or television reception, which can be determined by turning the equipment off and on, the user is encouraged to try to correct the interference by one or more of the following measures:
- Reorient or relocate the receiving antenna.
- Increase the separation between the equipment and the receiver.
- Connect the equipment into an outlet on a circuit different from that to which the receiver is connected.
- Consult the dealer or an experienced radio/TV technician for help.
NOTICE: Per FCC Part 15, changes or modifications to this equipment not expressly approved by PORTER-CABLE could void your authority to operate this equipment.
⚠ WARNING: To reduce the risk of fire or electric shock, do not expose this apparatus to rain or moisture. Use only in dry locations. USE ONLY WITH PORTER CABLE BATTERY PACKS. OTHERS MAY BURST CAUSING PERSONAL INJURY AND DAMAGE. WHEN USING THE AC RECEPTACLE, FULLY INSERT ATTACHMENT PLUGS. DO NOT USE THE RECEPTACLE IF THE ATTACHMENT PLUG CANNOT BE FULLY INSERTED.
⚠ WARNING: DO NOT INGEST BATTERY, CHEMICAL BURN HAZARD
- This product contains a coin/button cell battery. If the coin button cell battery is swallowed, it can cause severe internal burns in just 2 hours and can lead to death.
- Keep new and used batteries away from children. If the battery compartment does not close securely, stop using the product and keep it away from children.
- If you think batteries might have been swallowed or placed inside any part of the body, seek immediate medical attention.
⚠ WARNING: To prevent electric shock, match wide blade of plug to wide slot fully insert.
- Do not disassemble radio. Take it to an authorized service center when service or repair is required. Incorrect reassembly may result in a risk of electric shock, electrocution or fire.
- Disconnect the radio from the outlet before attempting any cleaning. This will reduce the risk of electric shock. Removing the battery pack will not reduce this risk.
- This radio is designed to operate on 120 Volts, 60 Hz AC. It also operates on Porter-Cable battery packs. Do not use any other voltage. Only use adapter provided.
The label on your tool may include the following symbols. The symbols and their definitions are as follows:
| V......volts | A......amperes |
| Hz......hertz | W......watts |
| min......minutes | ~ or AC......alternating current |
| ---or DC...direct current | no......no load speed |
| !!......Class I Construction(grounded) | ±......earthing terminal |
| ⚠......safety alert symbol | |
| ☐......Class II Construction(double insulated) | ../min or rpm...revolutions orreciprocation per minute |
| △......shock hazard symbol | NBC......no battery connection |
- USE PROPER EXTENSION CORD. Make sure your extension cord is in good condition. When using and extension cord, be sure to use one heavy enough to carry the current your product will draw. An undersized cord will cause a drop in line voltage resulting in loss of power and overheating. The following table shows the correct size to use depending on cord length and nameplate ampere rating. If in doubt, use the next heavier gauge. The smaller the gauge number, the heavier the cord.
| Minimum Gauge for Cord Sets | |||||
| Volts | Total Length of Cord in Feet | ||||
| 120V | 0-25 | 26-50 | 51-100 | 101-150 | |
| (0-7,6m) | (7,6-15,2m) | (15,2-30,4m) | (30,4-45,7m) | ||
| 240V | 0-50 | 51-100 | 101-200 | 201-300 | |
| (0-15,2m) | (15,2-30,4m) | (30,4-60,9m) | (60,9-91,4m) | ||
| Ampere Rating | |||||
| More | Not more | American | Wire | Gage | |
| Than | Than | ||||
| 0 | - | 6 | 18 | 16 | 16 |
| 6 | - | 10 | 18 | 16 | 14 |
| 10 | - | 12 | 16 | 16 | 14 |
| 12 | - | 16 | 14 | 12 | Not Recommended |
SAVE THESE INSTRUCTIONS
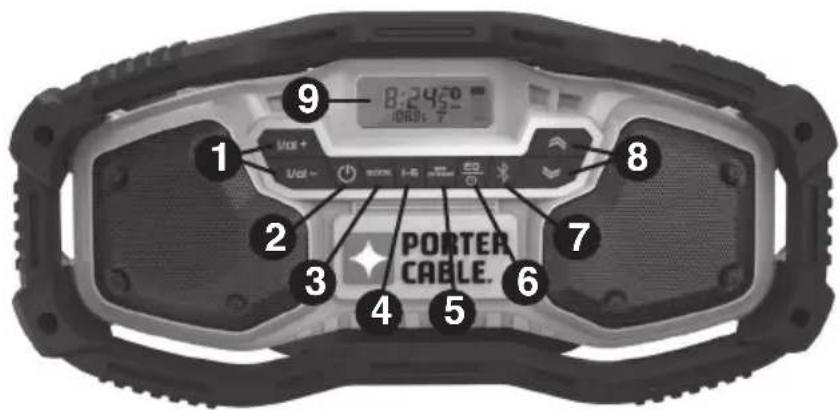
COMPONENTS
- Volume buttons
- Power button
- Mode button
- Preset Toggle button
- Set Preset button
-
Equalizer / Clock button
-
Bluetooth button
-
Tune / Seek buttons
-
LCD display
-
Antenna
-
AC adapter port
-
20v Max* battery port
-
Auxiliary port
-
Coin cell battery door
-
AC adapter
text_image
8:24:0 VOL+ VOL- PORTER CABLE. 1 2 3 4 5 6 7 8 9
text_image
Labeled diagram of a device interior with numbered components for identification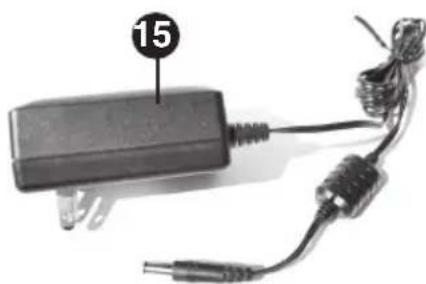
natural_image
Close-up of a black rectangular electronic device with wires and connectors, labeled with number 15 (no text or symbols on the device itself)OPERATING THE RADIO
Your radio is equipped with memory capacity in order to store the time and your selected preset channels. When the radio is in the OFF position, this memory capacity is powered by one coin cell battery that is included with the radio.
TO INSTALL COIN CELL BATTERY
⚠ WARNING: Danger of explosion if battery is incorrectly replaced. When replacing battery, replace it with the same or equivalent type CR2032. Observe correct polarity (+ and −) when replacing batteries. Do not store or carry batteries so that metal objects can contact exposed battery terminals.
⚠ WARNING: To reduce the risk of serious personal injury, turn tool off and disconnect radio from power source before installing/changing battery.
- Remove the screw from the coin cell battery door (14). Remove the door from the radio.
- Install the coin cell battery so that the writing on the battery faces out away from the radio.
- Replace the battery door and tighten screw.
NOTE: To reset the LCD display (9), clock and pre-sets, remove the coin cell battery and reinstall. Follow this procedure if the screen seems to lock in place.
POWER/VOLUME ADJUSTMENT
- To operate as a corded product, insert the AC adapter (15) into the AC adapter port (11), then plug the adapter into an appropriate AC power outlet or generator.
- To operate as a cordless product, insert a fully charged 20v Max* Porter Cable battery (not included) into the battery port (12). Be sure battery is fully seated.
- To turn the radio on, press the power button (2). Press the power button again to turn the radio off.
- Press the top volume button (1) to increase the volume. To decrease the volume, press the bottom volume button.
NOTE: If the battery is attached to the radio and the AC adapter is plugged in at the same time, the radio will run off of the adapter and not drain the battery. Having both attached simultaneously will not charge the battery.
MODE FUNCTION
To choose one of the mode functions (FM, AM, AUX, or Bluetooth ^® ) push the mode button (3) until the desired function is displayed on the LCD screen. For example, if the radio is on FM, push the mode button two times to change to AUX.
TUNE OR SEEK FUNCTION
To Tune:
Press the top tune / seek button (8) to quickly move the tuner up the frequency band. To move the tuner down the frequency band, press the bottom tune / seek button.
To Seek:
Press and hold the top tune / seek button (8), then release to quickly scan up the frequency band to the next available station. Press and continue to hold the button to seek directly to a desired station. Press and hold the bottom tune / seek button (8), the release to quickly seek down the frequency band.
TO PROGRAM THE CLOCK
The clock can be programmed with the power on or off.
- Press and hold the equalizer / clock button (6) until the hour numbers of the digital time flashe on the LCD display (9), then release the equalizer / clock button.
- Press the tune/ scan buttons (8) up or down to set the hour.
- When the correct hour is set, press the equalizer / clock button once so the minute numbers flash.
- Press the tune/ scan buttons up or down to set the minutes.
- If you do not press a button within 5 seconds, the clock programming feature will automatically return to the previous setting. The clock is set once the numbers stop flashing.
TO PROGRAM THE PRESETS
6 FM and 6 AM radio stations may be independently set. After programming the buttons, pressing the "1-6" preset toggle button (4) will instantly change the frequency to the preset station.
To program the channels:
- Turn power on.
- Press the mode button (3) until the desired mode is selected (AM or FM).
- Tune the radio to the desired station (see Tune or Scan Function).
- Press and hold the set / preset button (5). The "MEM" icon will flash in the LCD display (9).
- Press the "1-6" preset toggle button (4) to scroll through the 6 presets.
- Once it displays the desired preset number, press the set / preset button.
- Repeat steps 3 through 6 to set the other memory buttons.
EQUALIZER BUTTON
To set the bass and treble:
- Press the equalizer / clock button (6) once. The base equalizer will appear on the LCD display (9).
- Press the up and down volume buttons (1) to set the desired bass level.
- Press the equalizer / clock button a second time to get to the treble equalizer.
- Press the up and down volume buttons to set the desired treble level.
- Press the equalizer / clock button a third time to exit.
NOTE: If you do not press a button within 5 seconds, the equalizer programming feature will automatically return to the previous setting.
USING Bluetooth ^® WIRELESS TECHNOLOGY ^*
- Turn the radio on.
- Go to the Bluetooth settings on your Bluetooth enabled device.
- Find "P3BTR" under devices and select to pair your device. The Bluetooth symbol will flash on the LCD display (9) while the pairing takes place. Once the pairing is successful the Bluetooth symbol will remain steady.
- To listen to your Bluetooth enabled device through the radio, press the Bluetooth button (7) or press the mode button (3) until "bt" appears on the LCD display (9).
- Begin playing music on your device.
NOTE: The radio does not have to be in the Bluetooth mode when pairing, only when listening.
*The Bluetooth® word mark and logos are registered trademarks owned by Bluetooth SIG, Inc. and any use of such marks by Porter Cable is under license. Other trademarks and trade names are those of their respective owners.
INCOMING CALL
If your phone receives a call while it is connected to the radio it will ring through the radio speakers.
Samsung\*\*
When the call is answered, the caller's voice will be heard through the radio. To transfer the call to your phone, deselect the headset option on your phone. The radio will remain mute until the call is over.
End the call normally with your cell phone. The radio will resume previous function.
**Samsung® is a registered trademarks of Samsung Group.
iPhone ^® \*\*\*
When the call is answered, the call should be taken through your phone. If it is taken through the radio, transfer the call to your phone. Select “audio source” on your phone, then select “iPhone.” The radio will remain mute until the call is over.
End the call normally with your cell phone. The radio will resume previous function.
IMPORTANT RADIO NOTES
- Reception will vary depending on location and strength of radio signal.
- Certain generators may cause background noise.
-
AM reception will most likely be clearer when powered by a battery pack.
-
To use the auxiliary port (13), plug the output jack from a CD or iPod ^® ***/MP3 player into the auxiliary port. The sound from the external source plays through the speakers. ***iPod ^® and iPhone ^® are registered trademarks of Apple Inc.
TROUBLESHOOTING
PROBLEM
POSSIBLE CAUSE
POSSIBLE SOLUTION
- Unit will not - Cord not plugged in. - Plug tool into a working outlet.
power on • Circuit fuse is blown. product repeatedly causes the circuit fuse to blow, discontinue use immediately and have it serviced at a Porter Cable service center or authorized servicer.)
- Circuit breaker is tripped. • Reset circuit breaker. (If the product repeatedly causes the circuit breaker to trip, discontinue use immediately and have it serviced at a Porter Cable service center or authorized servicer.)
- Cord or switch is damaged. • Have cord or switch replaced at a Porter Cable Service Center or Authorized Servicer
- Battery not charged. • Charge battery
- NBC appears on the LCD display. - Battery is not fully connected. Push battery fully into battery port and ensure it is properly connected.
- Battery does not have enough power.
- Battery has been removed.
- Adapter unplugged without battery in place.
- Power to outlet is off when using adapter.
- Bluetooth disconnected.
the radio again. See "Using
- Charge battery.
- Replace battery.
- Plug adapter into outlet or properly insert battery.
- Ensure wall outlet is receiving power or properly insert battery.
- Device roamed out of range. • Bring device into range of radio.
• Device may need to be paired to
Bluetooth® Wireless Technology"
• If two or more devices are paired
to radio, forget the radio in settings of the other devices.
For assistance with your product, visit our website at www.portercable.com for a list of service centers, or call the Porter-Cable Customer Care Center at (888) 848-5175.
MAINTENANCE
⚠ WARNING: Disconnect the radio from the AC outlet before cleaning. Dirt and grease may be removed from the exterior of the radio using a cloth. Do not use water or any cleaning solutions.
⚠ WARNING: Never use solvents or other harsh chemicals for cleaning the non-metallic parts of the radio. These chemicals may weaken the materials used in these parts. Use a cloth dampened only with water and mild soap. Never let any liquid get inside the tool; never immerse any part of the tool into a liquid.
⚠️CAUTION: NEVER spray or in any other way apply lubricants or cleaning solvents inside the tool. This can seriously affect the life and performance of the tool.
- Use only mild soap and damp cloth to clean the tool. Never let any liquid get inside the tool; never immerse any part of the tool into a liquid.
SERVICE NOTES
This product is not user serviceable. There are no user serviceable parts inside the radio. Servicing at an authorized service center is required to avoid damage to static sensitive internal components.
REPLACEMENT PARTS
Use only identical replacement parts. For a parts list or to order parts, visit our service website at www.portercable.com. You can also order parts from your nearest PORTER-CABLE Factory Service Center or PORTER-CABLE Authorized Warranty Service Center. Or, you can call our Customer Care Center at (888) 848-5175.
SERVICE AND REPAIRS
All quality tools will eventually require servicing and/or replacement of parts. For information about PORTER-CABLE, its factory service centers or authorized warranty service centers, visit our website at www.portercable.com or call our Customer Care Center at (888) 848-5175. All repairs made by our service centers are fully guaranteed against defective material and workmanship. We cannot guarantee repairs made or attempted by others.
You can also write to us for information at PORTER-CABLE, 4825 Highway 45 North, Jackson, Tennessee 38305, (888) 848-5175 - Attention: Product Service. Be sure to include all of the information shown on the nameplate of your tool (model number, type, serial number, etc.).
ACCESSORIES
⚠ WARNING: Since accessories, other than those offered by PORTER-CABLE, have not been tested with this product, use of such accessories with this tool could be hazardous. To reduce the risk of injury, only PORTER-CABLE recommended accessories should be used with this product. A complete line of accessories is available from your PORTER-CABLE Factory Service Center or a PORTER-CABLE Authorized Warranty Service Center. Please visit our Web Site www.portercable.com for a catalog or for the name of your nearest supplier.
THREE YEAR LIMITED WARRANTY
PORTER-CABLE will repair or replace, without charge, any defects due to faulty materials or workmanship for three years from the date of purchase for tools (two years for batteries). This warranty does not cover part failure due to normal wear or tool abuse. For further detail of warranty coverage and warranty repair information, visit www.portercable.com or call (888) 848-5175. This warranty does not apply to accessories or damage caused where repairs have been made or attempted by others. This warranty gives you specific legal rights and you may have other rights which vary in certain states or provinces.
In addition to the warranty, PORTER-CABLE tools are covered by our:
1 YEAR FREE SERVICE: PORTER-CABLE will maintain the tool and replace worn parts caused by normal use, for free, any time during the first year after purchase.
90 DAY MONEY BACK GUARANTEE: If you are not completely satisfied with the performance of your PORTER-CABLE Power Tool for any reason, you can return it within 90 days from the date of purchase with a receipt for a full refund – no questions asked.
LATÍN AMERICA: This warranty does not apply to products sold in Latin America. For products sold in Latin America, see country specific warranty information contained in the packaging, call the local company or see website for warranty information.
To register your tool for warranty service visit our website at www.portercable.com. WARNING LABEL REPLACEMENT
If your warning labels become illegible or are missing, call (888) 848-5175 for a free replacement.
PORTER CABLE.
4825 Highway 45 North Jackson, Tennessee 38305
(888) 848-5175
www.portercable.com
LIGNES DIRECTRICES EN MATIÈRE DE SÉCURITÉ - DÉFINITIONS
text_image
Labeled diagram of a device interior with numbered components for identification
natural_image
Close-up of a black rectangular electronic device with coiled cable and connectors, labeled with number 15 (no text or symbols on the device itself)UTILISATION DE LA RADIO
4825 Highway 45 North, Jackson, Tennessee 38305
text_image
Labeled diagram of a device interior with numbered components for identification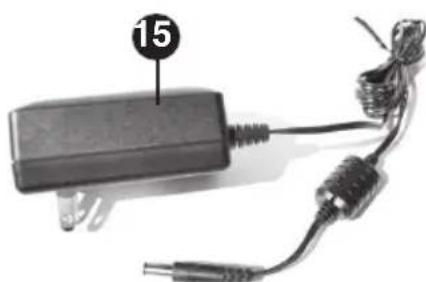
natural_image
Close-up of a black rectangular electronic device with attached wires and connectors (no visible text or symbols)OPERACIÓN DEL RADIO
4825 Highway 45 North
Jackson, Tennessee 38305
(888) 848-5175
Catalog Number PCC771B
November 2014
Form # 90616598 REV02
Printed in