PGP 113 - Heating QLIMA - Free user manual and instructions
Find the device manual for free PGP 113 QLIMA in PDF.

| Product type | Gas patio heater |
| Brand | Qlima |
| Model | PGP 113 |
| Maximum power | 13 kW |
| Gas type | Propane, butane or LPG |
| Gas pressure | 28-30/37 mbar depending on country |
| Ignition | Piezo electric with AA battery |
| Max. cylinder diameter | 33 cm |
| Max. cylinder height | 65 cm |
| Gas hose length | 60 to 80 cm (not supplied) |
| Use | Outdoor only |
| Tube material | Tempered glass |
| Main functions | Radiant heating with pilot light, variable flame adjustment |
| Safety | Safety thermocouple, flame cut-off, tip-over protection (safety strap) |
| Maintenance and cleaning | Cleaning of orifices with pipe cleaner, soapy water solution for leak test |
| Spare parts and repairability | Injector, thermocouple, gas hose, regulator: replacement by a certified professional |
| General information | 24-month warranty on manufacturing defects. Approximate weight: 15 kg |
Frequently Asked Questions - PGP 113 QLIMA
User questions about PGP 113 QLIMA
0 question about this device. Answer the ones you know or ask your own.
Ask a new question about this device
Download the instructions for your Heating in PDF format for free! Find your manual PGP 113 - QLIMA and take your electronic device back in hand. On this page are published all the documents necessary for the use of your device. PGP 113 by QLIMA.
USER MANUAL PGP 113 QLIMA
natural_image
Exterior view of a tall industrial chimney with metal lattice structure and black base (no text or symbols visible)guarantee

YEARS
| E | INSTRUCCIONES DE USO | 10 |
| F | MANUEL D’UTILISATION | 24 |
| GB | OPERATING MANUAL | 36 |
| I | ISTRUZIONI D’USO | 48 |
| N | BRUKSANVISNING | 60 |
| NL | GEBRUIKSAANWIJZING | 72 |
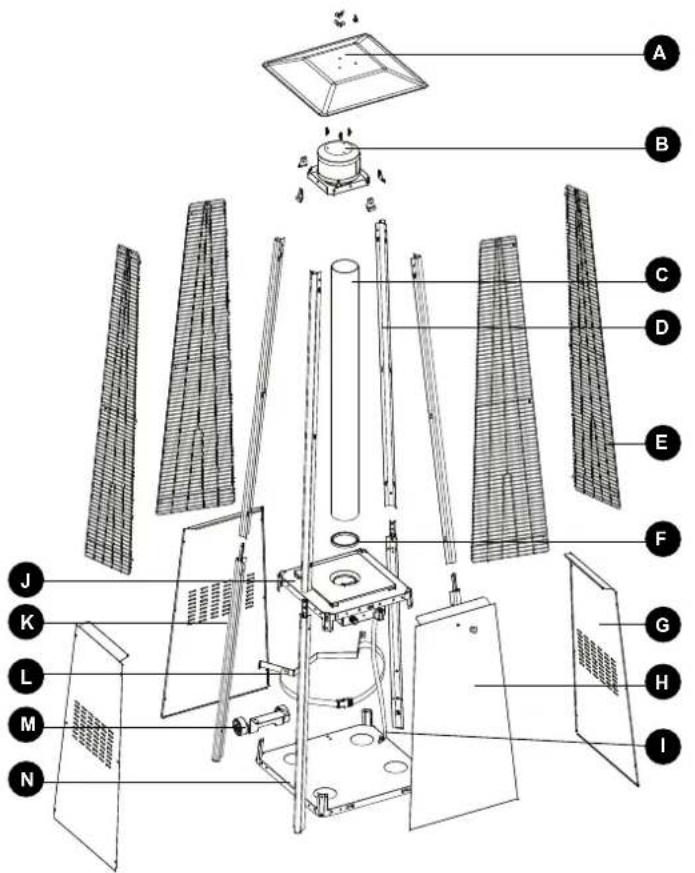
| Herramientas necesarias:• Llave Philips con hoja media• Spray de solución jabonosa para comprobación de fugasListado de piezasA. ReflectorB. Pantalla de llamaC. Puerta de vidrioD. Soporte superiorE. Cubierta protectoraF. Anillo negro de siliconaG. Panel lateralH. Panel frontalI. Manguera del gasJ. Montaje del cuadro de controlK. Soporte inferiorL. Cinta de bloqueoM. Montaje de ruedaN. Placa inferior | Outils requis :• Tournevis Philips lame moyenne• Vaporisateur d'eau savonneuse pour test de fuiteListe des piècesA. RéflecteurB. Coupe-flammeC. Tube en verreD. Support supérieurE. Capot de protectionF. Anneau silicone noirG. Panneau latéralH. Panneau frontalI. Tuyau de gazJ. Boîtier de commandeK. Support inférieurL. Sangle de sécuritéM. Ensemble roueN. Plaque inférieure |
| Tools needed:• Philips screw driver w/ medium blade• Spray bottle of soap solution for leakage testParts listA. ReflectorB. Flame ScreenC. Glass TubeD. Upper SupportE. Protective GuardF. Black Silicone RingG. Side PanelH. Front PanelI. Gas HoseJ. Control Box AssemblyK. Lower SupportL. Block BeltM. Wheel assemblyN. Bottom Plate | Strumenti necessari:• Cacciavite Philips con lama media• Flacone spray di acqua saponata per la prova di tenutaElenco delle partiA. RiflettoreB. Schermo della fiammaC. Tubo in vetroD. Supporto superioreE. Carter di protezioneF. Anello in silicone neroG. Pannello lateraleH. Pannello frontaleI. Tubo del gasJ. Gruppo centralina di controlloK. Supporto inferioreL. Cinghia di fissaggioM. Gruppo ruotaN. Piastra di fondo | Nødvendige verktøy:• Stjerneskrutrekker med medium blad• Sprayflaske med såpevann for lekkasjetestDelelisteA. ReflektorB. FlammeskjermC. GlassrørD. ∅vre støtteE. BeskyttelsesvaktF. Svart silikonringG. SidepanelH. FrontpanelI. GasslangeJ. Kontrollboks- monteringK. Nedre støtteL. Blokkér bändM. HjulinnretningN. Bunnplate | Benodigd gereedschap:• Philipsschroevendraaier met een medium profiel• Sproeier of zeepsop voor lektestenLijst van onderdelenA. ReflectorB. VlamschermC. Glazen buisD. Hoek profile - hoogE. VeiligheidsschermF. Zwarte siliconen ringG. Zij paneelH. Voor paneelI. GasslangJ. Behuizing regeleenheidK. Hoek profile - laagL. SpanriemM. WieleenheidN. Onderplaat |
PARTSLIST
| Part Part | name QTY Pictures | |||
| AA ES: Tu | erca mariposaFR: Écrou papillonGB: Wing NutIT: Dado con perno di articolazioneNO: VingemutterNL: Vleugelmoer | 3 | 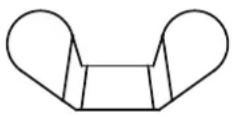 | |
| BB ES: Ar | andela planapequeña ø6FR: Rondelles platesø6 (petite taille)GB: Small flat washerø 6IT: Rondella piattapiccola ø6NO: Liten flat skiveø6NL: Kleine plattesluitring ø6 | 6 | 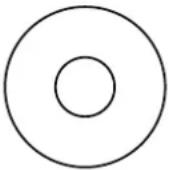 | |
| CC ES: Perno | FR: MontantGB: StudIT: BottoneNO: PinneNL: Tapbout | 3 | 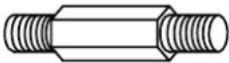 | |
| DD ES: Tornillo | Tornillo 3/16"FR: Vis 3/16"GB: 3/16" ScrewIT: Vite 3/16"NO: Skrue 3/16"NL: 3/16" schroef | 42 | 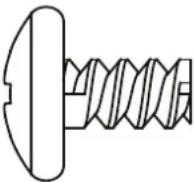 | |
| EE ES: Perno | M6x12FR: Boulon M6x12GB: Bolt M6 x 12IT: Bullone M6x12NO: Bolt M6x12NL: Bout M6x12 | 4 | 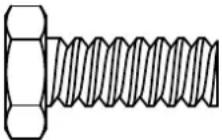 | |
| FF ES: Tuesca de rebor-de M6FR: Écrou bride demontage M6GB: M6 Flange nutIT: Dado con flangiaM6NO: M6 flensmutterNL: M6 flensmoer | 4 | 4 | 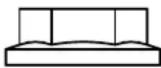 | |
| GG ES: Tornillo | M5x12FR: Vis M5x12GB: Screw M5 x 12IT: Vite M5x12NO: Skrue M5x12NL: Schroef M5x12 | 6 | 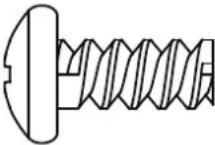 | |
| HH ES: So | porte de ajusteFR: Patte de fixationGB: Fixing bracketIT: Staffa di fissaggioNO: FestebrakettNL: Bevestigings-beugel | 4 | 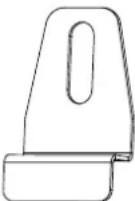 |
| II ES: Llave | FR: DouilleGB: WrenchIT: Chiave ingleseNO: NøkkelNL: Steeksleutel | 1 | 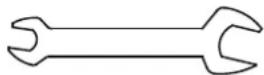 | |
| JJ ES: Llave PhilipsFR: Tournevis PhilipsGB: Philips screwdriverIT: Cacciavite a croceNO: Philips skrutrek-kerNL: Philips schroeven-draaier | 1 | 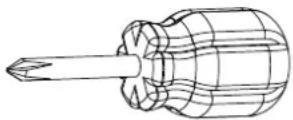 | ||
| KK ES: MandoFR: Bouton de com-mandeGB: KnobIT: ManopolaNO: KnottNL: Knop | 1 | 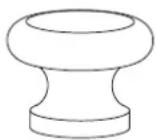 | ||
| LL ES: Tomillo M4x6FR: Vis M4x6GB: Screw M4 x 6IT: Vite M4x6NO: Skrue M4x6NL: Schroef M4x6 | 1 | 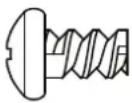 | ||
| MM ES: CadenaFR: ChaîneGB: ChainIT: CatenaNO: KjedeNL: Ketting | 1 |  | ||
| NN | ES: Encendedor de rabo largoFR: Tige longue d'allumageGB: Long stem ligh-terIT: Accendino a stelo lungoNO: Lighter med lang halsNL: Aansteker met lange steel | 1 |  | |
| OO | ES: Pila AAFR: Batterie AAGB: AA batteryIT: Batteria AANO: AA-batteriNL: AA batterij | 1 | 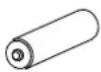 |
Picture 3
PICTURES
natural_image
Simple line drawing of a light bulb inside a transparent cube, no text or symbols present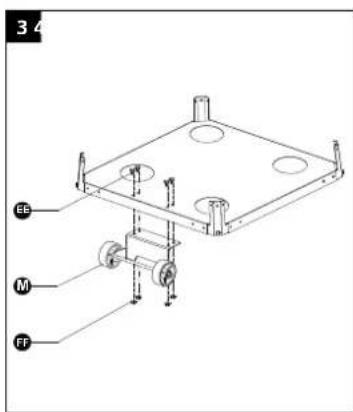
natural_image
Technical line drawing of a mechanical device with labeled components (no readable text or symbols)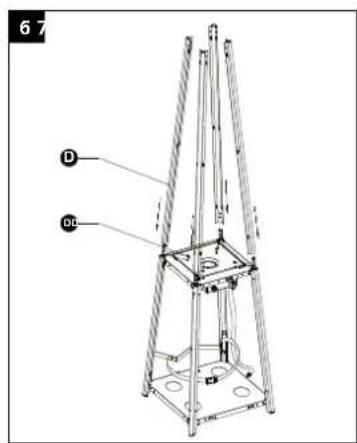

natural_image
Technical line drawing of a gas cylinder mounted on a metal frame, with an inset showing a close-up of the cylinder (no text or symbols present)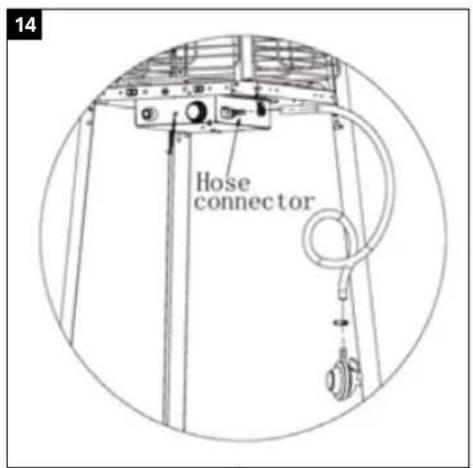
natural_image
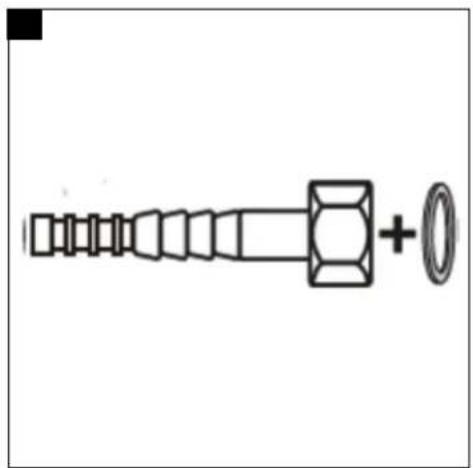
Diagram of a mechanical component with hexagonal shaft and circular end (no text or symbols)E Regulador de manguera no incluida.
F Régulateur de gaz non inclus.
GB Hose regulator not included.
Tubo del gas non incluso.
N Slangeregulatoren følger ikke med.
NL Slang van de gasregelaar niet inbegrepen.
E TABLE DES MATIÈRES
Directions for use 38
Assembling the heater.... 40
Operation 43
Storage 45
Cleaning and care 46
Troubleshooting.... 46
End of life time 47
Warranty provisions.... 48
INDICE
N INNHOLDSFORTEGNELSEN
Bruksanvisning 62
natural_image
Symbol of a trash bin with crossed lines indicating no waste, and a solid black rectangle below (no text or labels)natural_image
Symbol of a trash bin with crossed lines indicating no waste or restriction, and a solid black rectangle below (no text or labels)GARANTIE DISPOSITIONS
This heater is for outdoor use only. Indoor use is dangerous and strictly forbidden.
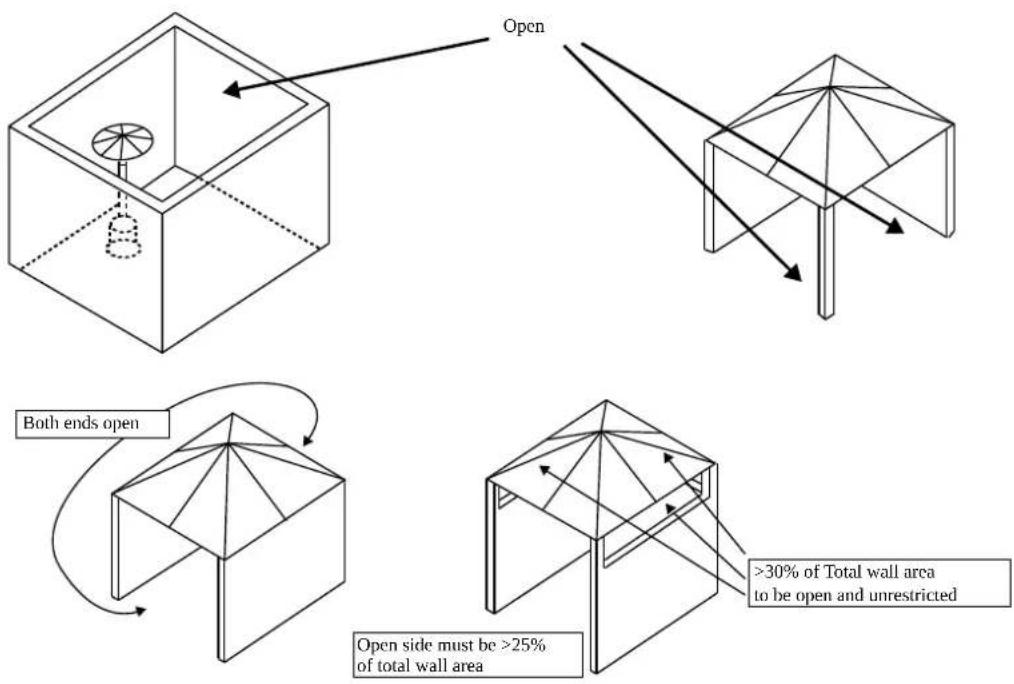
Always use in amply ventilated areas. An amply ventilated area must have a minimum of 25% of the surface area open. The surface area is the sum of the walls surface

- Read this user manual carefully before using the appliance and keep it for future reference. Install this device only when it complies with local/national legislation, ordinances and standards.
- The gas fired patio heater is designed for outdoor use only, it will provide radiant heat which warms people and objects rather than the air in between.
- This product is intended to be used as patio heater around residential houses in normal household conditions and environment.
- After unpacking, check the appliance for any damages. When in doubt, do not use the appliance, but contact customer service at your local dealer's. Keep the packaging materials (plastic bags, etc.) away from children, as they may cause hazardous situations to children.
- No modifications to the safety system are allowed.
- This heater is constructed in conformity with relevant texts in the EN14543:2005+A1:2007 standard
- Keep the instructions for future reference

WARNINGS
- Read the instructions before installation and use. This appliance must be installed and the gas cylinder stored in accordance with the regulations in force.
- Only use the device for its intended purpose. Other usage may lead to burns, fire, explosion, crash, etc.
• Install the heater only if it complies with local regulations, laws and standards; - Check if the information indicated on the type plate corresponds your situation before you connect the appliance.
- Install the heater according to the instructions as described in the installation section of the directions for use;
- This heater is manufactured according to CE safety standards. Nevertheless, as with any other heating device, care must be taken;
- RISK OF FIRE Never use the heater in places where inflammable and/or harmful Gases, products or fumes may be present (e.g. exhaust gases, paint fumes, curtains, paper, clothes);
- If the heater is positioned too close to inflammable materials you may risk fire;
- For safety reasons take care when children or animals are in the proximity of the heater, as with any other heating device, and make sure that children are always aware of the presence of a hot heater;
- This appliance is not intended for use by persons (including children) with reduced physical, sensory or mental capabilities, or lack of experience and knowledge, unless they have been given supervision or instruction concerning use of the appliance by a person responsible for their safety.
-
If the heater is damaged, it shall be repaired by the manufacturer, its service agent or similarly qualified persons in order to avoid a hazard.
-
Children should be supervised to ensure that they do not play with the appliance.
• In order to avoid overheating, do not cover the device. - The guard of this heater is intended to prevent direct access to heating elements and must be in place when the heater is in use.
- Do not insert objects into the openings of the device.
- The guard does not give full protection for young children and infirm persons.
- This appliance can be used by children aged from 12 years and above and persons with reduced physical, sensory or mental capabilities or lack of experience and knowledge if they have been given supervision or instruction concerning use of the appliance in a safe way and understand the hazards involved.
- Cleaning and user maintenance shall not be made by children without supervision.
- Children of less than 3 years should be kept away unless continuously supervised.
- Children aged from 3 years and less than 8 years shall only switch on/off the appliance provided that it has been placed or installed in its intended normal operating position and they have been given supervision or instruction concerning use of the appliance in a safe way and understand the hazards involved.
- Children aged from 3 years and less than 8 years shall not plug in, regulate and clean the appliance or perform user maintenance.
- CAUTION - some parts of this product can become very hot and cause burns. Particular attention has to be given where children and vulnerable people are present.
- During operation and just after operation the appliance will be extremely hot. NEVER touch it during operation or just operation. NEVER move the appliance during this time.
- Switch off the appliance when it is unattended.
- Do not cover or obstruct the heater when in use.
If you fail to consult and/or follow up the rules, instructions and explanation, the warranty will no longer be valid, and the manufacturer will no longer deal with any damage to the appliance and/or your environment under the warranty.
- Read the instructions before installation and use.
- This appliance must be installed and the gas cylinder stored in accordance with the regulations in force.
- Do not obstruct the ventilation holes of the cylinder housing.
- Do not move the appliance when in operation.
- Shut off the valve at the gas cylinder and/or the regulator:
a. before moving the appliance
b. after use
- The tubing or the flexible hose must be changed within the prescribed intervals
- Use only the type of gas and the type of cylinder specified by the manufacturer
-
In case of violent wind particular attention must be taken against tilting of the appliance
-
Have any repairs and/or maintenance carried out by a recognized service engineer only
- Make sure that the correct gas is used and that the gas containers are not exposed to heat or extreme temperature changes. Always store the gas containers in a cool, dry and dark place.
- Always use a suitable and approved low-pressure regulator. In case of any doubt contact your local dealer.
- Turn of the appliance immediately if smell of any gass is detected and extinguish any open flame.
ASSEMBLING THE HEATER
The manufacturer is not responsible for any harm or damage if attention is not paid to the points described above.
The use of this product and the elements required for that purpose is entirely at the end user's own risk.
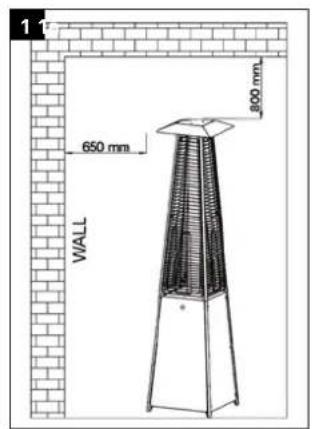
HEATER LOCATION AND CLEARANCE
Always maintain: (pic.1)
- 120 cm clearance from combustible materials,
- minimum 80 cm top clearance
- minimum 65 cm side clearance
- Heater must only be placed and used on a firm, level and stable underground.

WARNINGS
- Never use the heater while it is raining, the glass tube would break when it suddenly met water.
• Always turn off the heater while there is a rain. - Never splash any liquid to the glass tube when the heater is working.
- The glass tube will be extremely hot when it is working, never try to touch it and keep the children away from the heater.
- Always ensure the heater stands firmly, the glass tube may break if the heater was fell down onto ground.
- Never use the heater if the glass tube has any crack.
GAS REQUIREMENTS
Use propane, butane or LGP only. See rating label on the appliance.
• Maximum size of cylinder suitable for the appliance is ∅ 33 cm x 65 cm (high).
- The appliance requires approved gas hose in 60 cm length and a gas regulator. The hose and regulator assembly must conform to local standard codes.
• Regulator maximum inlet pressure must not exceed 690 kPa.
- Regulator outlet pressure to be 28 mbar (2.8 kPa) to 50 mbar (5 kPa) depending on countries.
- The installation must conform to local codes, or in the absence of local codes, to the standard for the storage and handling of liquid petroleum gases.
- A dented, rusted or damaged gas cylinder may be hazardous and should be checked by an authorized dedicated gas specialist.
- Never use a gas cylinder with a damaged valve connection.
- The gas cylinder must be arranged to provide for vapor withdrawal from the operating cylinder.
- Never twist the flexible tubes and hoses.
• Never connect an unregulated gas cylinder to the heater.
- Disconnect the gas cylinder when the heater is not use.
LEAK TESTING
Gas connections on the heater are leak tested at the factory prior to shipment. A complete gas tightness check must be performed at the installation site due to possible mishandling in shipment and/or installation or because of excessive pressure being applied to the heater. The heater must be checked with a full cylinder.
- Make sure the safety control valve is in the OFF position.
- Make a soapy water solution of one part liquid detergent and one part water. The soapy water solution can be applied with a spray bottle, brush or rag to all gas connections. Soap bubbles will appear in case of a leak.

WARNING: Never leak test while smoking!
WARNING: In the event of gas leakage, the appliance shall not be used or if alight, the gas supply shall be shut off and the appliance shall be investigated and rectified before it is used again.
- Turn the gas supply ON. And check all the connections with the soapy water solution. No bubbles may appear!
- In case of a leak, turn off the gas supply. Tighten any leaking fittings, then turn the gas supply ON and recheck. Contact your dealer or gas supplier for assistance if bubbles continue to appear.
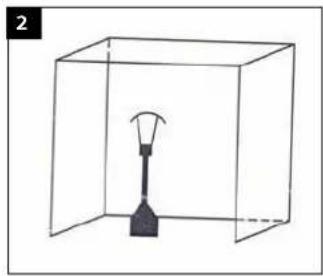
DIAGRAMMATICAL REPRESENTATIONS OF OUTDOOR AREAS
SPECIFICATIONS
Max.Wattage: 13 kW
Min. Wattage: 5 kW
Gas Consumption: 450 g/hr-945 g/hr
Height: 227 cm including stand
Weight: 25 kg
| Model PGP113 | ||
| Gas type propane, | butane or LPG only | |
| Countries of destination (*) | BE, DK, FIN, FR, IT, NL, NO, SE, SL, LUX | BE, ES, FR, GB, GR, IT, LUX, PT, SL |
| Gas Category I3 B/P | (30) I3+ (28-30/37) | |
| Pressure (mBar) 30 | 28-30/37 | |
(*) This appliance is not suitable for Germany, Austria, Swiss
ASSEMBLY PROCEDURES
Hardware Used
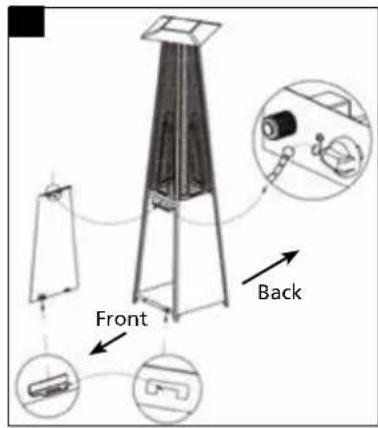
Step 1: pic. 3
- Assemble the wheel assembly to the bottom plate. Fix the wheel assembly to the bottom plate using 4 pcs bolt M6X12 and 4 pcs flange nut M6.
Step 2.1-2.2: pic. 4
- Unscrew the switch button, load small battery, tighten the switch button. Insert the pins of the base to the holes of lower support, press to secure the pins. Using 4 pcs screw M5X12 to secure the lower support and base. Insert the pins of the control box assy to the holes of upper support, press to secure the pins. Using 4 pcs screw 3/16" screw to secure the upper support and control box assy.
Step 3: pic. 5
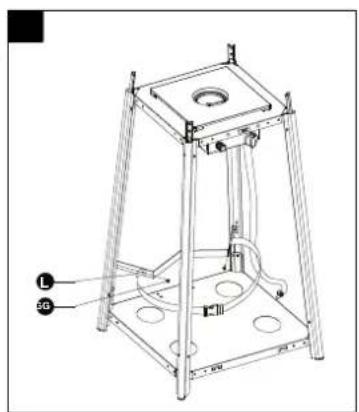
- Assemble block belt. Fix the block belt to the 2 pcs of lower support behind the front door, using 2 pcs screw M5X12.
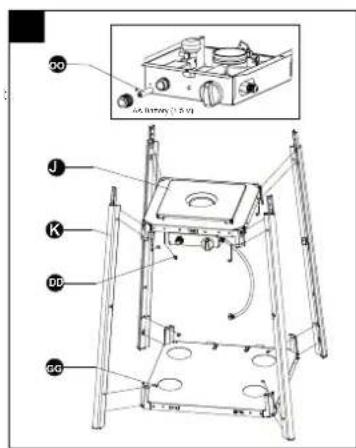
Step 4: pic. 6
- Assemble the middle support. Insert the 4 pcs upper support to the lower support. Secure them with 8 pcs screw 3/16".
Step 5: pic. 7
- Assemble the flame screen to the upper support. Secure the flame screen to the upper support using 8 pcs screw 3/16".
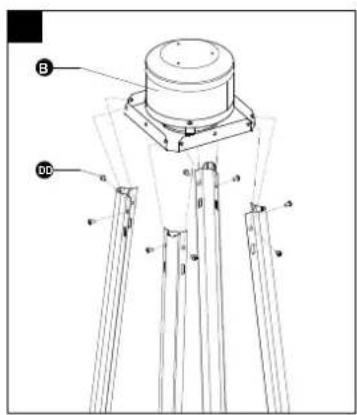
Step 6: pic. 8
- Assemble the reflector onto the flame screen. Screw the 3 pcs stud on the flame screen, put 3 pcs washer 6 onto the top of stud, then put the reflector onto the stud, secure them with 3 pcs washer 6 and 3 pcs wing nut.
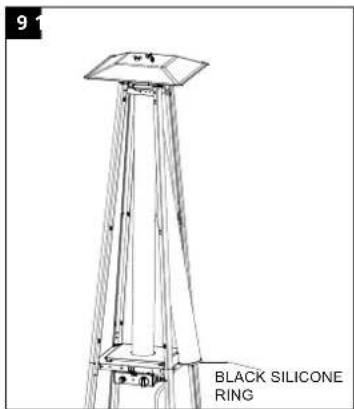
Step 7: pic. 9
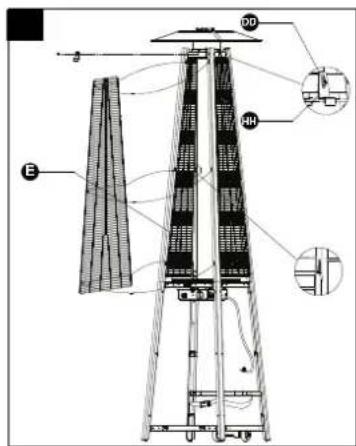
- Carefully install the glass tube by lifting up and inserting through the center hole in the upper plate. Ensure the black silicone ring is attached to the lower edge of the glass tube as illustrated. Slide the glass tube through the hole of the lower plate cover and onto the middle plate. Check and ensure that the glass tube is positioned properly and is completely covering the center hole of the middle plate.
To aid in installation place black silicone ring on the middle plate and then install glass tube. Ensure the rim of the glass tube sits firmly in the black silicone ring.
WARNING! The black silicone ring must be in place prior to operating the heater.
Step 8: pic. 10
- Assembly the protective guard. Hang the hooks of the protective guard onto the holes in supports. Secure the protective guards with fixing brackets with 4 pcs 3/16" screws.
Step 9: pic. 11
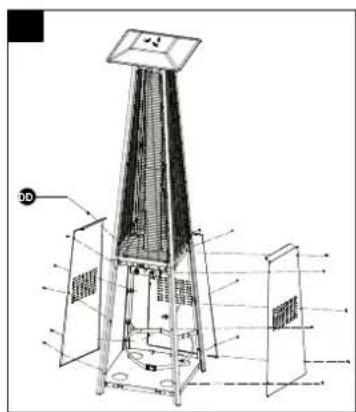
- Attach the three side panels to the heater using 18 pcs screw 3/16". Note: Do not cover the front side where the control knob is.
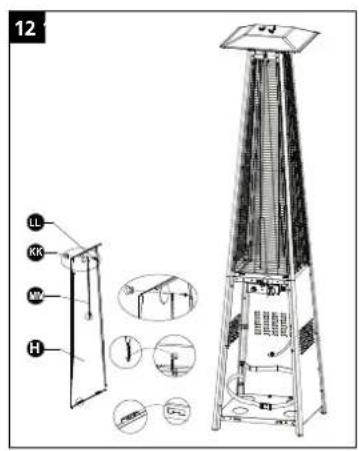
Step 10: pic. 12
- Install the knob to M4X6 screw. Hang the chain to the hole on the control box assy and put the pothook of front panel to the holes of bottom plate.
Step 11: pic. 13
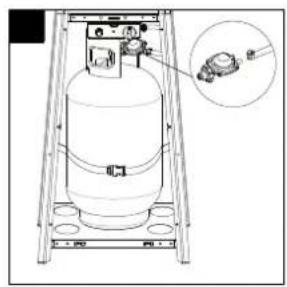
- Connect the gas hose and regulator after that connect the regulator to the gas cylinder.
WARNING! Ensure the hose does not contact any high temperature surfaces, or it may melt and leak causing a fire. After the cylinder is placed inside the heater, secure the cylinder with block belt tightly.
OPERATION
- Connect the gas hose to the gas connector. (pic. 14)
Please note:
- The gas hose is NOT included with the heater. Hose must be purchased separately
- Minimum / Maximum length gas hose: 60-80 cm
- Screw connection (France G1/2) is fitted as standard
- Hoses 8-13 mm. can be fitted as well. When required: use the multi country connector supplied. Fitting of the multi country connector is described in the separate manual supplied in with the included multi country kit. When using the multi country connector: ALWAYS make sure to use hose clamps!
- For gas hose with threaded connectors: bind 2 or more rounds of plumbing tape around the gas pipe before connecting the gas hose for security.
- Bind 2 or more rounds of Teflon plumbing tape around the gas burner inlet connector and connect the gas pipe. Use a wrench to tighten the connection.
- Connect the other end of your gas hose according to the mounting instruction as supplied with the gas hose and/or supplied with the gas regulator.
Note:
- The gas hose is NOT included with the heater
- The gas regulator is not included with the heater
- Connect the regulator to the gas cylinder (not included) according to the
mounting instruction as supplied together with the gas regulator and/or the gas cilinder
- Put gas cylinder on the base.
LIGHTING INSTRUCTION
- Check and ensure that an AA battery is inside the ignition chamber. Use a new battery so you are sure the battery is full of power.
- Ensure that the ‘+’ side of the battery is facing outside (so ‘+’ faces towards the user)
TO TURN ON THE HEATER
Check that the regulator seal is correctly fitted and able to fulfil its function.
a) Open the valve on the gas supply cylinder.
b) Press and turn the variable control knob to PILOT position (counter-clockwise 90°).
c) Press down the variable control knob and hold for 30 seconds. While holding down the variable control knob press the igniter button several times until the pilot flame ignited. Release the variable control knob 10\~20 seconds after the ignition.
Note:
- If a new tank has just been connected, please allow at least one minute or more for the air in the gas pipeline to purge out through the pilot hole,
- When lighting the pilot flame make sure that the variable control knob is continuously depressed while pressing the igniter button. Variable control knob can be released after the pilot flame lit for 10-20 seconds.
- Pilot flame can be watched and checked from the peephole located on the base of burnerhead. If the pilot flame does not light or it goes out, repeat step c.
d) Turn the variable control knob to LO and leave it there for 5 minutes or more before turning the knob to desired temperaturesetting.
e) If the burner flame goes out accidentally or it is blown out by wind, turn off the heater and wait at least 5 minutes or more to let the gas dissipate before re-lighting to avoid possible gas explosion. Repeat steps b to d.
| E FR GB IT N | NL | |||||
| Off Off Spenta | Uit | |||||
| Position d'allumage | Ignite position | Posizione di accensione | Ontstekings positie | |||
| Lo | Capacité faible | Low capa-city | Bassa capa-cità | Laag vermogen | ||
| Hi | Capacité élevée | High capa-city | Alta capa-cità | Hoog vermogen | ||
Table 1
TO TURN OFF THE HEATER
a) Turn the variable control knob to PILOT position.
b) Press and turn the variable control knob to OFF position.
c) Turn off the valve on the gas cylinder and disconnect the cylinder.

WARNINGS
- The whole gas system. hose, regulator, pilot and burner should be inspected for leak before use. But at least once a month and each time the gas cylinder is changed. Check the hose assembly for sign of extreme abrasion, cuts or wears. Suspected areas should be leak tested. If the hose leaks, it must be replaced with a new one that conforms to local standard codes. ). If it shows signs of cracking, splitting or other deterioration it shall be exchanged for new hose of the same length and of the equivalent quality.
- Make sure the ventilation opening of the cylinder enclosure, control compartment, burner and circulation air passageways of the heater are free and clear of debris. If debris, spider or insect nests are found, clean the holes with heavy duty pipe cleaner or compressed air.
• Always keep a dry chemical fire extinguisher readily available. - For safety, always allow a 5-minute complete shut off period before re-lighting a hot heater.
- Replace the gas tube/hose within the interval described with the hose.
REPLACING THE GAS CYLINDER
- Shut off heater.
- Close the valve of the gas cylinder.
- Disconnect the regulator from the cylinder following the instructions that came with your regulator.
- Replace the cylinder.
- Make sure there is no flame. Only when no flame: remove the plug or seal cap from the cylinder valve.
- Check for the presence and good state of the gasket before connecting the regulator to the new cylinder
- Check that the regulator seal is correctly fitted and able to fulfil its function.
• Perform leak test using soapy water solution.
WARNING: only change the gas cylinder in a amply ventilated area, away from any ignition source (candle, cigarettes, other flame producing appliances, ...).
STORAGE
• Make sure the heater is in off position
- Always close the valve of the gas cylinder after use or in case of a disturbance.
- Disconnect the gas container from the gas heater.
- Store the gas container in a well-ventilated room. Position it far away from inflammable, explosive or hot materials and preferably not in the home. In addition it should never be stored in the basement or attic.
- Cylinder must be stored out of the reach of children.
- Disconnected cylinder must have threaded valve plugs tightly installed and must not be stored in garage or any other enclosed area. Only store in ventilated area!
- Storage of heater indoors is permissible only if the cylinder is disconnected and removed from the heater.
- Check the tightness of the gas valve and for damage. If you suspect a damage, have it changed by your gas dealer.
- Never store liquid gas cylinder in a sub-terrain, or at places without adequate air ventilation.
CLEANING AND CARE
Warning: Make sure the heaer is in off position and is cool!
Warning: Do not clean heater with cleaners that are combustible or corrosive.
- Wipe off powder coated surfaces with soft, moist rag and soap water.
- Remove debris, spider and insect nests from ventilation opening of the cylinder enclosure, control compartment, burner and circulation air passageways of the heater with heavy duty pipe cleaner or compressed air to keep appliance clean and safe for use.
- Never clear ports or other openings with toothpic.ks or other article that will break and block the ports.
- If carbon deposits develop, remove the reflector and flame screen and clean them with soap water.
- Do not paint the flame screen, control panel or reflector.
- Cover the burner unit with the optional supplied protective cover when the heater is not in use. Wait until the heater is cool before covering.
- In a salt-air environment, such as near an ocean, corrosion occurs more quickly than normal. Check frequently for corroded areas and repair them promptly.
TROUBLESHOOTING
Review these tips first and you may not need to call for service.
| Problem Probable cause Solution | ||
| Pilot will not light | Gas valve may be OFF T | Turn the gas valve ON. |
| Tank fuel empty Refill gas tank. | ||
| Pilot injector blocked C | lean or replace pilot injector. | |
| Air in supply system Purge air from lines by pressing the control knob until you smell gas. | ||
| Loose connections Check all fittings. | ||
| Low gas pressure | Replace cylinder with a new cylinder. | |
| Battery is empty | Replace battery with a full battery | |
| Pilot will not stay on | Lack of fuel pressure | Keep the variable knob depressed for 10-20 seconds or more after the pilot light ignited.Tank near empty. Refill gas tank. |
| Debris around pilot | Clean dirty area. | |
| Loose connections Tighten connections. | ||
| Thermocouple bad | Replace thermocouple. | |
| Gas leak in line | Check connections. | |
| Burner will not light | Pressure is low Tank near | empty. Refill gas tank. |
| Opening blocked Remove | ve and clean. | |
| Control is not ON Turn valve | valve to ON. | |
| Thermocouple bad Rep | ace thermocouple. | |
| Pilot light assembly bent | Place pilot properly. | |
| Not in correct location | Position properly and retry. | |
| Burner flame is low | Supply hose is bent or twisted | Straighten hose and perform leak teston hose. |
| Blockage in burner injector | Clean or replace burner injector. | |
| Burner flame goes off immediately after ignition | Low gas pressure Let the pilot flame stay lit for 10 minutes before setting variable knob to LO. | |
| Emitter glows uneven | Blockage in burner injector | Clean or replace burner injector |
| Base is not on a level surface | Place heater on a level surface | |
| Low gas pressure Replace cylinder with a new cylinder. | ||
| Thick black smoke Blockage in burner Turn off the heater and let it cool.Remove blockage and clear burner inside and outside. | ||
| Carbon bulld-up Dirt or film on reflector and flame screen Clean reflector and flame screen. | ||
END OF LIFE TIME
natural_image
Symbol of a trash bin crossed with a diagonal line and a horizontal bar below (no text or labels)If it is decided that the gas heater is not to be used any more, it is recommended that it be disconnected from the gas container. Also cut the rubber hose. If children play with the heater, make sure that dangerous parts are removed.
Never dispose of non-biodegradable products in the environment, but dispose of them in accordance with current national legislation. At the end of its lifetime, the product must not be disposed of as urban waste. It must be taken to a special local authority differentiated waste collection center or to a dealer providing this service.
Disposing of a household appliance separately avoids possible negative consequences for the environment and health deriving from inappropriate disposal and enables the constituent materials to be recovered in order to make significant savings in energy and resources. As a reminder of the need to dispose of household appliances separately.
WARRANTY PROVISIONS
The appliance is supplied with a 24-month guarantee, commencing on the date of purchase. All material and manufacturing defects will be repaired or replaced free of charge within this period. The following rules apply:
- We expressly refuse all further damage claims, including claims for collateral and/or consequential damage.
- Repairs to or replacement of components within the guarantee period will not result in an extension of the guarantee.
- The guarantee is invalidated if any modifications have been made, non-genuine parts are fitted or repairs are carried out by third parties.
- Components subject to normal wear, such as filters, batteries, lamps and heating elements are not covered by the guarantee.
- The guarantee is valid only when you present the original, dated purchase invoice and if no modifications have been made to it.
- The guarantee is invalid for damage caused by neglect and/or by actions that deviate from those in this instruction booklet.
- Transportation costs and the risks involved during the transportation of the appliance or components of the appliance shall always be for the account of the purchaser
- Damage caused by not using suitable spare parts is not covered by the guarantee.
To prevent unnecessary expense, we recommend that you always first carefully consult the instructions for use. Take the appliance to your dealer for repairs if these instructions do not provide a solution.
www.Qlima.com

natural_image
Symbol of a trash bin crossed with diagonal lines, no text or labels presentnatural_image
Symbol of a trash bin crossed with two crossed lines and a solid black rectangle below (no text or labels)natural_image
Symbol of a trash bin with crossed lines and a solid black rectangle below (no text or labels)Distributed in Europe by PVG Holding B.V.
①Benötigen Sie weitere Informationen oder treten Probleme auf, besuchen Sie bitte unsere Website www.qlima.com, oder setzen Sie sich mit unserem Kundendienst in Verbindung (Telefonnummer auf www.qlima.com).
For alle yulerligere oplysninger eller ved eventuelle problemer med apparatet henvises til www.qlima.com eller det lakale Kundecenter (telefon-nurare finies i www.qlima.com).
Si necesita información o si tiene algún problema, visite nuestra página Web www.qlima.com, o póngase en contacto con el servicio cliente (hallará el número de teléfono en www.qlima.com).
① Si vous souhaitez obtenir des informations supplémentaires ou si vous rencontrez un problème, rendez-vous sur notre site Web (www.qlima.com) ou contactez notre service client (vous trouverez l'adresse et numéro de téléphone sur www.qlima.com).
Jos haluat hailinapua, lisatietroja tai laitteen kanssa rulere ongelmia, tutuura verlösivustion osaittessa www.qlima.com tai lysy nuivoa PVG kulatta-japalvelukeskuksesta (www.qlima.com).
(2) If you need information or if you have a problem, please visit the our website (www.glima.com) or contact our sales support (you find its phone number on www.glima.com).