
VCO32803AF - Vacuum Cleaner BEKO - Free user manual and instructions
Find the device manual for free VCO32803AF BEKO in PDF.



| Product type | Bagless canister vacuum cleaner |
| Brand | Beko |
| Model | VCO32803AF |
| Nominal power | 800 W |
| Supply voltage | 220-240 V ~ |
| Frequency | 50-60 Hz |
| Operating radius | 7.5 m |
| Dust container type | Bagless dust container |
| Filtration system | Washable HEPA filter + motor protection filter + exhaust filter |
| Noise level | Not specified |
| Included accessories | High-performance floor/carpet brush, turbo brush, crevice tool, upholstery brush, dusting brush |
| Telescopic tube | Yes, with adjustment latch |
| Automatic cord rewind | Yes, with dedicated button |
| Suction power adjustment | Yes, via rotary knob |
| Intended use | Domestic |
| Materials | Recyclable packaging |
| Filter maintenance | Wash with cold water, dry for at least 24 hours before reinstalling |
| Safety | Automatic shut-off not specified, but On/Off switch |
Frequently Asked Questions - VCO32803AF BEKO
User questions about VCO32803AF BEKO
0 question about this device. Answer the ones you know or ask your own.
Ask a new question about this device
Download the instructions for your Vacuum Cleaner in PDF format for free! Find your manual VCO32803AF - BEKO and take your electronic device back in hand. On this page are published all the documents necessary for the use of your device. VCO32803AF by BEKO.
USER MANUAL VCO32803AF BEKO
natural_image
Simple line drawing of a decorative patterned square with circular motifs (no text or symbols)VC032803AF
EN - FR - RO - IT - PL - HU - SR - HR - RU - MK - SL - SQ
Please read this manual first!
Dear Valued Customer,
Thank you for preferring this Beko appliance. We hope that you get the best results from your appliance which has been manufactured with high quality and state-of-the-art technology. For this reason, please read this user manual and all other provided documents carefully before using the appliance and keep it as a reference for future use. If you hand over the appliance to someone else, give the user manual as well. Follow the instructions by paying attention to all the information and warnings in the user manual.
Meanings of the Symbols
Following symbols are used in various sections of this manual:

Important information and useful hints about usage.

WARNING: Warnings against dangerous situations concerning the security of life and property.

Protection class for electric shock.
CONTENTS
| ENGLISH | 4-12 |
| FRANÇAIS | 13-22 |
| ROMANIAN | 23-36 |
| ITALIANO | 37-48 |
| POLSKI | 49-60 |
| MAGYAR | 61-70 |
| SRPSKI | 71-80 |
| HRVATSKI 81-90 | |
| СРПСКИ 91-104 | |
| MAKEДОНСКИ | 105-114 |
| SLOVENŠČINA | 115-124 |
| ALBANIAN | 125-135 |
1 Important safety and environmental instructions
This section contains safety instructions that will help protect from risk of personal injury or property damage.
Failure to follow these instructions invalidates the granted warranty.
1.1 General safety
- This appliance complies with the international security standards.
- This appliance is not intended for use by persons (including children) with reduced physical, sensory or mental capabilities, or lack of experience and knowledge, unless they have been given supervision or instruction concerning use of the appliance by a person responsible for their safety.
- This appliance can be used by children aged from 8 years and above if they have been given supervision or instruction concerning use of the appliance in a safe way and understand the hazards involved.
Cleaning and user maintenance shall not be made by children unless they are aged from 8 years and above and supervised. Keep the appliance and its cord out of reach of children aged less than 8 years.
•Children should be supervised to ensure that they do not play with the appliance.
- If the supply cord is damaged, it must be replaced by the manufacturer or its agent or similarly qualified person in order to avoid hazard.
- Do not use it if the power cable or the appliance itself is damaged. Contact an authorized service.
- Your mains power supply should comply with the information supplied on the rating plate of the appliance.
- The mains supply of the appliance must be secured with a minimum 16 A fuse.
- Do not use the appliance with an extension cord.
1 Important safety and environmental instructions
- In order to prevent the power cable from getting damaged, make sure that it doesn't get stuck, twisted or rub against sharp surfaces.
- Do not touch the appliance or its plug when it is plugged if your hands are damp or wet.
- Do not pull the power cable when unplugging the appliance.
- Do not vacuum flammable materials and when vacuuming cigarette ashes make sure that it got cold.
- Do not vacuum water or other liquid materials.
- Protect the appliance from rain, humidity and heat sources.
- Never use the appliance in or near to combustible or inflammable places and materials.
- Unplug the appliance before cleaning and maintenance.
- Do not dip the appliance or its cable in water to clean it.
- Check the hose of the appliance regularly. Do not use if it is damaged and contact an authorized service.
- Do not attempt to dismantle the appliance.
- Only use the original parts or parts recommended by the manufacturer.
- The plug must be removed from the socket-outlet before cleaning or maintaining the appliance.
- If heavily used for cleaning dust such as cement or grout the dust indicator will lit earlier then expected, in such case replace the dust bag even it is empty.
- Do not use the appliance without filters; otherwise it can get damaged.
- Keep fingers, hair and loose clothing from moving parts and openings whilst using the vacuum cleaner.
- When vacuuming the stairs, the appliance should be located below the user.
1 Important safety and environmental instructions
- If you keep the packaging materials, store them out of the reach of children.
1.2 Compliance with the WEEE Directive and Disposing of the Waste Product
This product complies with EU WEEE Directive (2012/19/EU). This product bears a classification symbol for waste electrical and electronic equipment (WEEE).
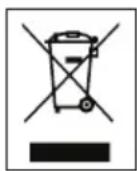
This symbol indicates that this product shall not be disposed with other household wastes at the end of its service life. Used device must be returned to offical collection point for recycling of electrical and electronic devices. To find these collection systems please contact to your local authorities or retailer where the product was purchased. Each household performs important role in recovering and recycling of old appliance. Appropriate disposal of used appliance helps prevent potential negative consequences for the environment and human health.
1.3 Compliance with RoHS Directive
The product you have purchased complies with EU RoHS Directive (2011/65/EU). It does not contain harmful and prohibited materials specified in the Directive.
1.4 Package information

Packaging materials of the product are manufactured from recyclable materials in accordance with our National Environment Regulations. Do not dispose of the packaging materials together with the domestic or other wastes. Take them to the packaging material collection points designated by the local authorities.
2 Your vacuum cleaner
2.1 Overview

- On/Off button
- Suction power adjustment knob
- Power cable winding button
- Dust container
- Suction nozzle
- Hose cap
- Hose
- Dust container removal button
- Parquet/carpet brush parking hook
- Brush adjustment latch
- High performance parquet/carpet brush
- Telescopic tube adjustment latch
- Telescopic tube
- Vacuum control
- Handle
- Top lid
- Turbo brush
2.2 Technical data
Supply voltage : 220-240 V\~, 50-60 Hz
Power :800 W
Operating radius : 7.5 m
Rights to make technical and design changes are reserved.
The values which are declared in the markings affixed on your appliance or other printed documents supplied with it represent the values which were obtained in the laboratories pursuant to the pertinent standards. These values may vary according to the usage of the appliance and ambient conditions.
3 Usage
3.1 Intended use
The appliance has been designed for household use and is not suitable for industrial use.
3.2 Attaching/removing the hose
- To attach the hose (7), push the hose cap (6) in the direction of arrow until it is aligned with the housing (you will hear a click).

natural_image
Line drawing of a vacuum cleaner with a hose and pipe connection (no text or symbols)- Projecting parts on the hose cap should be aligned correspondingly.
- To remove the hose (7), press the unlocking buttons on the sides of the hose cap (6) and pull the hose.
3.3 Attaching/removing the telescopic tube
- Attach the telescopic tube (13) to the handle (15).

natural_image
Technical line drawing of a curved mechanical component with an arrow indicating direction (no text or symbols)-
Pull the telescopic tube (13) from the handle (15) to remove it.
-
You can extend or shorten the telescopic tube (13) by sliding the telescopic tube adjustment latch (12) back and forth.

natural_image
Diagram of a mechanical tool with a directional arrow indicating movement or force (no text or symbols present)3.4 Attaching/removing the parquet/carpet brush
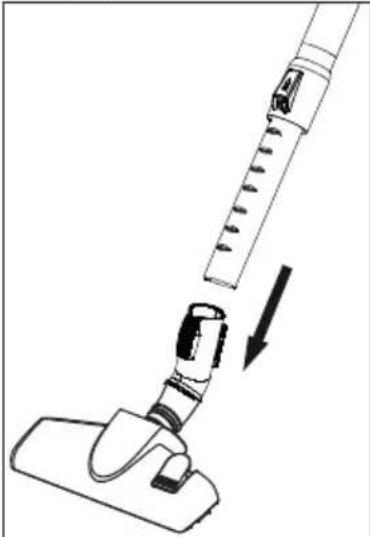
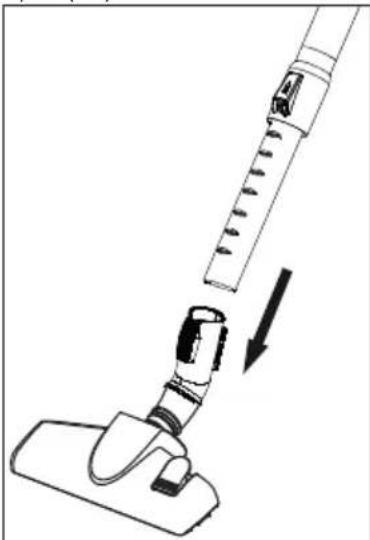
- Attach the telescopic tube (13) to the parquet/ carpet brush (11) in the arrow direction.
natural_image
Diagram of a vacuum cleaner with a downward arrow indicating motion (no text or symbols present)- You can remove the telescopic tube (13) from the parquet/carpet brush (11) by pulling it.
3 Usage
3.5 Adjusting the parquet/ carpet brush
Press the adjustment latch (10) located on the parquet/carpet brush (11) and;
• Vacuum on firm ground and parquet; extend the brush before vacuuming.

•Vacuum on carpets and rugs; retract the brush before vacuuming.

3.6 Operation
- Plug in the appliance after pulling the power plug located at the back of the appliance.

WARNING: Stop pulling the appliance cable when it comes to the yellow mark located on it. After the yellow mark, the red mark will come. Do not pull any more after reaching the red mark.
-
Use the suction power adjustment knob (3) found on the appliance to set it to the desired suction power (see 3.6).
-
Press the on/off button (1) to switch on your appliance.
3.7 Accessories
Accessories have been designed in one piece to save space and provide practical use.
Upholstery tool

Suitable for cleaning the floorings, stair steps, inside of the cars, sofas, armchairs etc.
Dust brush

natural_image
Pure technical line drawing of a mechanical component without any text, numbers, or symbolsSuitable for cleaning the curtains, and sensitive and fragile objects.
Crevice tool

natural_image
Simple line drawing of a rectangular object with a curved top and bottom edge (no text or symbols)Suitable for the cleaning of the surfaces which are difficult to clean, such as the areas remaining under the sofas and furniture.

WARNING: The crevice tool must be adjusted to remain outside.
- Pull the accessory to remove it when the process is complete.

WARNING: Do not make cleaning by using the handle's (15) end part.
3 Usage
3.8 Additional brushes
3.8.1 Turbo brush
The turbo brush (17) allows you to clear the hair on carpets in a faster and more efficient way. Thus you can even remove the hair -which is hard to remove such as dog hair or cat hair- easily.
3.9 Switching off the vacuum cleaner and parking feature
- Switch off the appliance with the on/off button (1) and unplug it.
- Press the cable winding button (3) to wind the cable inside the appliance.
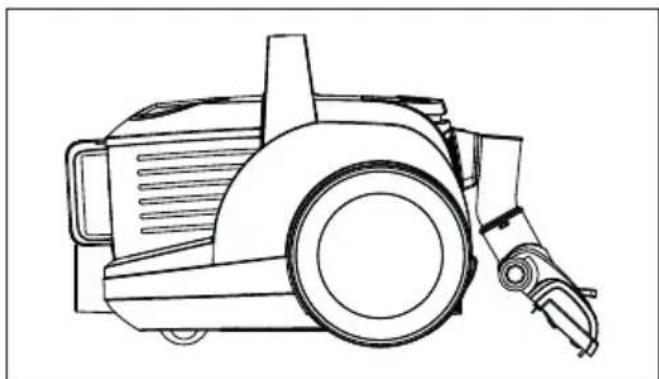
Vertical parking feature
Attach the hook of the parquet/carpet brush (9) to the parking groove located at the bottom part of the appliance.
Horizontal parking feature
Attach the hook of the parquet/carpet brush (9) to the parking groove located at the rear side of the appliance.
natural_image
Line drawing of a portable air purifier with handle and wheels (no text or symbols)4 Cleaning and care
Switch off and unplug the appliance before cleaning it.

WARNING: Never use gasoline, solvent, abrasive cleaning agents, metal objects or hard brushes to clean the appliance.
4.1 Emptying the dust container
- Press the dust container removal button (8) to remove the dust container (4) and remove the dust container in the direction of the arrow by holding from the dust container carrying handle.

natural_image
Line drawing of a mechanical device with an upward arrow indicating motion (no text or symbols)- Open the lid of the dust container (4) by pressing the inner latch and empty the container.
- When you have emptied the dust, close the dust container lid (4).
- A click will be heard.
- Insert the dust container (4) into its place by holding it from the handle.
4.2 Cleaning the filters

WARNING: Do not use appliances producing hot air such as hair dryer or heater to dry the filters.

WARNING: Do not install the filters without completely drying them; otherwise, smell of moisture may occur during use, water can leak from the back of the appliance or the filters may get damaged.

WARNING: Attach the filters into their places after they have dried.
4.2.1 Motor protection filter and HEPA filter
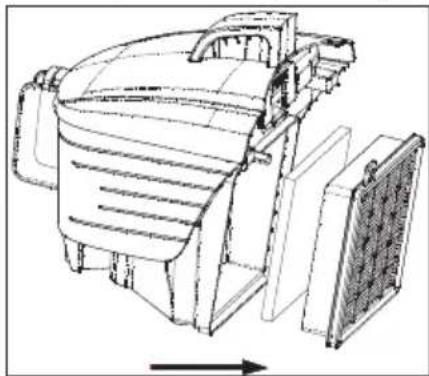
These filters are located on the rear side of the dust container (4).
- Press the dust container removal button (8) and remove the dust container (4).
- Remove the HEPA filter and motor protection filter found at the back of the dust container (4).

natural_image
Technical line drawing of a mechanical component with internal structure and mounting bracket (no text or symbols)- After washing the sponge protection filter under running water, wring it out slightly and leave it to dry (for 24 hours minimum).
- Shake off the HEPA inlet filter to eliminate the dusts on it. After that, you can wash it by holding its clean side under running cool water.
- If you wash the HEPA filter, dry it at room temperature (for 24 hours minimum). Do not use it before ensuring that it is completely dry.
4 Cleaning and care
4.2.2 HEPA filter and outlet filter
HEPA outlet filter is located on the rear side of the appliance.

natural_image
Line drawing of a vacuum cleaner with three additional components shown in separate views (no text or symbols)- Remove the HEPA filter by pulling it from its handle.
- Shake off the HEPA outlet filter to eliminate the dusts on it. After that, you can wash it by holding its clean side under running cool water.
- If you wash the HEPA filter, dry it at room temperature (for 24 hours minimum). Do not use it before ensuring that it is completely dry.
- Remove the outlet filter that is found at the back of the cover.
- After washing the outlet filter under running water, wring it out slightly and let it dry (for 24 hours minimum).
4.3 Storage
- If you do not intend to use the appliance for a long time, store it carefully.
- Unplug the appliance.
- Keep the appliance out of the reach of children.
4.4 Handling and transportation
- During handling and transportation, carry the appliance in its original packaging. The packaging of the appliance protects it against physical damages.
- Do not place heavy loads on the appliance or on the packaging. The appliance may get damaged.
- Dropping the appliance may render it non-operational or cause permanent damage.
natural_image
Line drawing of a vacuum cleaner with a pipe fitting and directional arrow (no text or symbols)natural_image
Technical line drawing of a curved mechanical component with an arrow indicating direction (no text or symbols)natural_image
Diagram of a mechanical tool with a directional arrow indicating movement or force (no text or symbols present)natural_image
Diagram of a vacuum cleaner with a downward arrow indicating motion (no text or symbols present)natural_image
Pure technical line drawing of a mechanical component (no text or symbols)natural_image
Simple line drawing of a rectangular object with a curved top and base (no text or symbols)natural_image
Line drawing of a mechanical device with a handle and spool (no text or symbols)natural_image
Line drawing of a mechanical device with an upward arrow indicating motion (no text or symbols)natural_image
Technical line drawing of a mechanical component with no visible text or symbolsnatural_image
Line drawing of a vacuum cleaner with three additional components shown in separate views (no text or symbols)natural_image
Line drawing of a vacuum cleaner with a hose and pipe assembly (no text or symbols)natural_image
Technical line drawing of a curved pipe or duct with an arrow indicating upward motion (no text or symbols)natural_image
Diagram of a mechanical tool with a directional arrow indicating movement or force (no text or symbols present)natural_image
Diagram of a vacuum cleaner with a downward arrow indicating motion (no text or symbols present)natural_image
Pure technical line drawing of a mechanical component without any text, numbers, or symbolsnatural_image
Simple line drawing of a bent rectangular object with a curved top edge (no text or symbols)natural_image
Line drawing of a mechanical device with a handle and wheels (no text or symbols)natural_image
Line drawing of a mechanical device with an upward arrow indicating motion (no text or symbols)natural_image
Technical line drawing of a mechanical device with internal components and a directional arrow (no text or symbols)natural_image
Line drawing of a vacuum cleaner with three additional components shown in separate views (no text or symbols)□ □ Convector electric
Model / Serie:
VÂNZĂTOR
Nr. factură:......Data:......
natural_image
Line drawing of a vacuum cleaner with a hose and pipe assembly (no text or symbols)natural_image
Diagram of a curved pipe or duct with directional arrows indicating flow or movement (no text or symbols)natural_image
Diagram of a mechanical tool with a directional arrow indicating movement or force (no text or symbols present)natural_image
Diagram of a vacuum cleaner with a downward arrow indicating motion (no text or symbols present)natural_image
Pure technical line drawing of a mechanical component without any text, numbers, or symbolsnatural_image
Pure geometric line drawing of a 3D rectangular prism with an internal curved cutout (no text or symbols)natural_image
Line drawing of a mechanical device with a handle and wheels (no text or symbols)natural_image
Line drawing of a mechanical device with an upward arrow indicating motion (no text or symbols)natural_image
Technical line drawing of a mechanical device with internal components and a directional arrow (no text or symbols)natural_image
Line drawing of a vacuum cleaner with three additional components (no text or symbols)natural_image
Line drawing of a vacuum cleaner with a hose and pipe, showing no text or symbolsnatural_image
Technical line drawing of a curved mechanical component with an arrow indicating direction (no text or symbols)natural_image
Diagram of a mechanical tool with a directional arrow indicating movement or force (no text or symbols present)natural_image
Diagram of a vacuum cleaner with a downward arrow indicating motion (no text or symbols present)natural_image
Simple line drawing of a mechanical component with no text or symbolsnatural_image
Simple line drawing of a bent rectangular object with a curved top edge (no text or symbols)natural_image
Line drawing of a portable air purifier with handle and wheels (no text or symbols)natural_image
Line drawing of a mechanical device with an upward arrow indicating motion (no text or symbols)natural_image
Technical line drawing of a mechanical component with internal structure and directional arrow (no text or symbols)natural_image
Line drawing of a vacuum cleaner with three additional components shown in separate views (no text or symbols)natural_image
Line drawing of a vacuum cleaner with a hose and pipe assembly (no text or symbols)natural_image
Diagram of a curved pipe or duct with directional arrows indicating flow or movement (no text or symbols)natural_image
Diagram of a mechanical tool with a directional arrow indicating movement or force (no text or symbols present)natural_image
Diagram of a vacuum cleaner with a downward arrow indicating motion (no text or symbols present)natural_image
Pure technical line drawing of a mechanical component without any text, numbers, or symbolsnatural_image
Simple line drawing of a bent rectangular object with a curved top edge (no text or symbols)natural_image
Line drawing of a portable air purifier with handle and wheels (no text or symbols)natural_image
Line drawing of a mechanical device with an upward arrow indicating motion (no text or symbols)natural_image
Technical line drawing of a mechanical device with internal components and directional arrow (no text or symbols)natural_image
Line drawing of a vacuum cleaner with three additional components shown in separate views (no text or symbols)natural_image
Line drawing of a vacuum cleaner with a hose and pipe connection (no text or symbols)- Izbočene delove na poklopcu za crevo treba poravnati na isti način.
- Da biste uklonili crevo (7), pritisnite dugmad za otključavanje sa strana poklopca za crevo (6) i povucite crevo.
3.3 Postavljanje/uklanjanje teleskopske cevi
- Povežite teleskopsku cev (13) sa drškom (15).

natural_image
Technical line drawing of a curved mechanical component with an arrow indicating direction (no text or symbols)-
Povucite teleskopsku cev (13) sa drške (15) da biste je uklonili.
-
Možete proširiti teleskopsku cev (13) pomeranjem klizne bravice za podešavanje teleskopske cevi (12) napred i nazad.

natural_image
Diagram of a mechanical tool with a directional arrow indicating movement or force (no text or symbols present)3.4 Postavljanje/uklanjanje četke za parket/tepih
- Povežite teleskopsku cev (13) sa četkom za parket/tepih (11) u smeru strelice.
natural_image
Diagram of a vacuum cleaner with a downward arrow indicating motion (no text or symbols present)- Možete ukloniti teleskopsku cev (13) sa četke za parket/tepih (11) tako što ćete je povući.
3 Korišćenje
natural_image
Pure technical line drawing of a mechanical component without any text, numbers, or symbolsPogodna za čišćenje zavesa i osetljivih i lomljivih predmeta.
natural_image
Simple line drawing of a rectangular object with a curved top and bottom edge (no text or symbols)Pogodan za čišćenje površina koje je teško očistiti, kao što su oblasti ispod kauča i nameštaja.

UPOZORENJE: Nastavak za teško dostupne površine mora da bude podešen tako da ostane spolja.
natural_image
Line drawing of a portable electric vehicle with a handle and wheels (no text or symbols)natural_image
Line drawing of a mechanical device with an upward arrow indicating motion (no text or symbols)-
Otvorite poklopac posude za prašinu (4) pritiskom na unutrašnju bravu i ispraznite posudu.
-
Kada izbacite prašinu, zatvorite poklopac na posudi za prašinu (4).
- Čuće se zvuk „klika”.
natural_image
Technical line drawing of a mechanical device with internal components and a directional arrow (no text or symbols)-
Nakon pranja sunderastog zaštitnog filtera pod mlazom vode, blago ga iscedite i ostavite da se osuši (minimalno 24 sata).
-
Otresite HEPA filter ulaznog otvora da uklonite prašinu sa njega. Nakon toga, možete ga oprati držeći njegovu čistu stranu pod mlazom hladne vode.
-
Ako perete HEPA filter, osušite ga na sobnoj temperaturi (minimalno 24 sata). Nemojte ga koristiti dok se ne uverite da je potpuno suv.
natural_image
Line drawing of a vacuum cleaner with three additional components (no text or symbols)- Uklonite HEPA filter povlačenjem sa drške.
- Otresite HEPA filter izlaznog otvora da uklonite prašinu sa njega. Nakon toga, možete ga oprati držeći njegovu čistu stranu pod mlazom hladne vode.
- Ako perete HEPA filter, osušite ga na sobnoj temperaturi (minimalno 24 sata). Nemojte ga koristiti dok se ne uverite da je potpuno suv.
- Uklonite izlazni filter koji se nalazi iza poklopca.
- Nakon pranja izlaznog filtera pod tekućom vodom, iscedite ga blago i ostavite ga da se osuši (minimalno 24 časa).
4.3 Skladištenje
- Ako ne nameravate da koristite uređaj duže vreme, pažljivo ga odložite.
- Izvucite utikač uređaja iz utičnice.
- Držite uređaj van domašaja dece.
4.4 Prenos i transport
- Tokom prenosa i transporta nosite uređaj u njegovom originalnom pakovanju. Pakovanje uređaja ga štiti od fizičkih oštećenja.
•Nemojte stavljati teške predmete na uređaj ili njegovo pakovanje. Uređaj se može oštetiti. - Ako vam uređaj ispadne, to može izazvati trajno oštećenje, odnosno uređaj može postati nefunkcionalan.
Prije uporabe pročitajte korisnički priručnik!
Poštovani i cijenjeni kupci,
Zahvaljujemo na kupnji Beko uređaja. Nadamo se da ćete izvući maksimum iz svog uređaja, koji je izrađen visokokvalitetnom i vrhunskom tehnologijom. Iz tog razloga pažljivo pročitajte ovaj korisnički priručnik i sve ostale popratne dokumente prije uporabe proizvoda i spremite ih za buduću upotrebu. Ako ovaj uređaj predate trećoj strani, priložite ovaj korisnički priručnik. Slijedite upute obraćajući pozornost na sve informacije i upozorenja navedena u korisničkom priručniku.
Značenje simbola
natural_image
Line drawing of a vacuum cleaner with a hose and pipe connection (no text or symbols)natural_image
Technical line drawing of a curved mechanical component with an arrow indicating direction (no text or symbols)natural_image
Diagram of a mechanical device with a directional arrow indicating motion or force (no text or symbols present)3.4 Postavljanje/uklanjanje četke za parket/tepih
natural_image
Diagram of a vacuum cleaner with a downward arrow indicating motion (no text or symbols present)- Teleskopsku cijev (13) možete skinuti s četke za parket/tepih (11) povlačenjem.
3 Uporaba
natural_image
Pure technical line drawing of a mechanical component without any text, numbers, or symbolsnatural_image
Simple line drawing of a rectangular object with a curved top and bottom edge (no text or symbols)natural_image
Line drawing of a mechanical device with a cylindrical body and attached cable (no text or symbols)natural_image
Line drawing of a mechanical device with an upward arrow indicating motion (no text or symbols)-
Otvorite poklopac spremnika za prašinu (4) pritiskom na unutarnju bravu i ispraznite spremnik.
-
Kada ste izbacili prašinu, zatvorite poklopac na spremniku za prašinu (4).
-
Čut će se zvuk „klika”.
-
Postavite spremnik za prašinu (4) na odgovarajuće mjesto držeći ga za ručku.
4.2 Čišćenje filtera

UPOZORENJE: Nemojte koristiti uređaje koji proizvode topli zrak, poput sušila za kosu ili grijača, za sušenje filtara.

UPOZORENJE: Nemojte postavljati filtere prije nego ih potpuno osušite; u suprotnom, tijekom uporabe može se osjetiti miris vlage, voda može curiti sa stražnje strane uređaja ili se filteri mogu oštetiti.

UPOZORENJE: Zamijenite filtere nakon što se osuše.
4.2.1 Filtar za zaštitu motora i HEPA filtar
Ovi filteri nalaze se na stražnjoj strani spremnika za prašinu (4).
- Pritisnite gumb za uklanjanje spremnika za prašinu (8) i uklonite spremnik za prašinu (4).
- Uklonite HEPA filtar i filtar za zaštitu motora koji se nalaze iza spremnika za prašinu (4).
natural_image
Technical line drawing of a mechanical device with internal components and a directional arrow (no text or symbols)-
Nakon pranja spužvastog zaštitnog filtra pod mlazom vode, lagano ga iscijedite i ostavite da se osuši (najmanje 24 sata).
-
Protresite ulazni HEPA filtar kako biste s njega uklonili prašinu. Nakon toga ga možete oprati držeći njegovu čistu stranu pod hladnom vodom.
-
Ako perete HEPA filtar, osušite ga na sobnoj temperaturi (najmanje 24 sata). Nemojte ga koristiti dok niste sigurni da je potpuno suh.
natural_image
Line drawing of a vacuum cleaner with three additional components (no text or symbols)- Uklonite HEPA filtar povlačenjem iz ručke.
- Protresite izlazni HEPA filtar kako biste uklonili prašinu. Nakon toga ga možete oprati držeći njegovu čistu stranu pod hladnom vodom.
- Ako perete HEPA filtar, osušite ga na sobnoj temperaturi (najmanje 24 sata). Nemojte ga koristiti dok niste sigurni da je potpuno suh.
- Uklonite izlazni filtar koji se nalazi iza poklopca.
- Nakon pranja izlaznog filtra pod tekućom vodom, lagano ga iscijedite i ostavite da se osuši (najmanje 24 sata).
4.3 Pohrana
natural_image
Simple line drawing of a decorative pattern with circular motifs inside a square frame (no text or symbols)VC032803AF
RU
natural_image
Line drawing of a vacuum cleaner with a cylindrical component being inserted (no text or symbols)natural_image
Diagram of a curved mechanical component with an arrow indicating direction (no text or symbols)natural_image
Diagram of a mechanical tool with a directional arrow indicating movement or force (no text or symbols present)natural_image
Diagram of a vacuum cleaner with a downward arrow indicating motion (no text or symbols present)natural_image
Pure technical line drawing of a mechanical component (no text or symbols)natural_image
Simple line drawing of a rectangular object with a curved top and rectangular base (no text or symbols)natural_image
Line drawing of a mechanical device with a cylindrical body and attached lever (no text or symbols)4 Чистка и уход
natural_image
Line drawing of a mechanical device with an upward arrow indicating motion (no text or symbols)natural_image
Technical line drawing of a mechanical device with internal components and a directional arrow (no text or symbols)natural_image
Line drawing of a vacuum cleaner with three additional components shown in separate views (no text or symbols)natural_image
Line drawing of a vacuum cleaner with a cylindrical component being inserted (no text or symbols)natural_image
Diagram of a curved pipe or duct with directional arrows indicating flow or movement (no text or symbols)natural_image
Diagram of a mechanical tool with a directional arrow indicating movement or force (no text or symbols present)natural_image
Diagram of a vacuum cleaner with a downward arrow indicating motion (no text or symbols present)natural_image
Simple line drawing of a mechanical component with no text or symbolsnatural_image
Simple line drawing of a bent rectangular object with a curved top edge (no text or symbols)natural_image
Line drawing of a mechanical device with a handle and wheels (no text or symbols)natural_image
Line drawing of a mechanical device with an upward arrow indicating motion (no text or symbols)natural_image
Technical line drawing of a mechanical assembly with no visible text or symbolsnatural_image
Line drawing of a vacuum cleaner with three additional components shown in separate views (no text or symbols)natural_image
Line drawing of a vacuum cleaner with a cylindrical component being inserted (no text or symbols)natural_image
Technical line drawing of a curved mechanical component with an arrow indicating direction (no text or symbols)-
Teleskopsko cev (13) povlecite z ročaja (15) in jo odstranite.
-
Zapah za nastavitev teleskopske cevi (12) povlecite v smeri puščice in povlecite teleskopsko cev (13), da nastavite njeno dolžino.

natural_image
Diagram of a mechanical tool with a directional arrow indicating movement or force (no text or symbols present)natural_image
Diagram of a vacuum cleaner with a downward arrow indicating motion (no text or symbols present)natural_image
Pure technical line drawing of a mechanical component without any text, numbers, or symbolsnatural_image
Simple line drawing of a rectangular object with a curved top and bottom edge (no text or symbols)natural_image
Line drawing of a portable air purifier with handle and wheels (no text or symbols)natural_image
Line drawing of a mechanical device with an upward arrow indicating motion (no text or symbols)natural_image
Technical line drawing of a mechanical device with internal components and directional arrow (no text or symbols)natural_image
Line drawing of a vacuum cleaner with three additional components (no text or symbols)natural_image
Line drawing of a vacuum cleaner with a hose and pipe assembly (no text or symbols)natural_image
Technical line drawing of a curved mechanical component with an arrow indicating direction (no text or symbols)natural_image
Diagram of a mechanical tool with a directional arrow indicating movement or force (no text or symbols present)natural_image
Diagram of a vacuum cleaner with a downward arrow indicating motion (no text or symbols present)natural_image
Pure technical line drawing of a mechanical component without any text, numbers, or symbolsnatural_image
Simple line drawing of a rectangular object with a curved top and bottom edge (no text or symbols)natural_image
Line drawing of a mechanical device with a handle and wheels (no text or symbols)natural_image
Line drawing of a mechanical device with an upward arrow indicating motion (no text or symbols)natural_image
Technical line drawing of a mechanical assembly with no visible text or symbolsnatural_image
Line drawing of a vacuum cleaner with three additional components shown in separate views (no text or symbols)- Please read this manual first!
- Meanings of the Symbols
- CONTENTS
- Important safety and environmental instructions
- General safety
- Compliance with the WEEE Directive and Disposing of the Waste Product
- Compliance with RoHS Directive
- Package information
- Your vacuum cleaner
- Overview
- Technical data
- Usage
- Intended use
- Attaching/removing the hose
- Attaching/removing the telescopic tube
- Attaching/removing the parquet/carpet brush
- Adjusting the parquet/ carpet brush
- Operation
- Accessories
- Upholstery tool
- Dust brush
- Crevice tool
- Additional brushes
- Turbo brush
- Switching off the vacuum cleaner and parking feature
- Vertical parking feature
- Horizontal parking feature
- Cleaning and care
- Emptying the dust container
- Cleaning the filters
- Motor protection filter and HEPA filter
- HEPA filter and outlet filter
- Storage
- Handling and transportation
- VÂNZĂTOR
- Postavljanje/uklanjanje teleskopske cevi
- Postavljanje/uklanjanje četke za parket/tepih
- Korišćenje
- Skladištenje
- Prenos i transport
- Prije uporabe pročitajte korisnički priručnik!
- Značenje simbola
- Uporaba
- Čišćenje filtera
- Filtar za zaštitu motora i HEPA filtar
- Pohrana
- Чистка и уход
Brand : BEKO
Model : VCO32803AF
Category : Vacuum Cleaner