
AR7450R - Chopper ARDES - Free user manual and instructions
Find the device manual for free AR7450R ARDES in PDF.
| Product Type | Multifunction electric meat grinder |
| Brand | Ardes |
| Model | AR7450R |
| Uses | Meat grinding, tomato pureeing, charcuterie preparation (sausages), kibbeh making |
| Reverse function | Yes, for unblocking the screw |
| Switch | On/off and rotation direction selector |
| Screw | Stainless steel, with Teflon gasket and metal washer |
| Star knife | Steel, very sharp |
| Grinding discs | 3 grinding discs: 3 mm, 5 mm, 7 mm |
| Conical strainer | For tomato pureeing, with fineness adjustment screw |
| Charcuterie accessory | Cone for sausages and charcuterie |
| Kibbeh accessory | Specific cone (do not use blade or disc) |
| Drip tray | For pulp and waste |
| Splash guard | Yes, plastic |
| Pusher | Included to push food |
| Maximum continuous use time | 10 minutes, then let cool down |
| Cleaning the motor unit | Soft, slightly damp cloth, never immerse |
| Cleaning accessories | Water and mild detergent; steel accessories (blade and discs) dishwasher safe; not plastic or aluminum |
| Safety | Do not use by children; unplug before cleaning; do not insert bones or hard foods; sharp blade handle with care |
| Warranty | 2 years from purchase date, upon presentation of receipt |
Frequently Asked Questions - AR7450R ARDES
User questions about AR7450R ARDES
0 question about this device. Answer the ones you know or ask your own.
Ask a new question about this device
Download the instructions for your Chopper in PDF format for free! Find your manual AR7450R - ARDES and take your electronic device back in hand. On this page are published all the documents necessary for the use of your device. AR7450R by ARDES.
USER MANUAL AR7450R ARDES
natural_image
Line drawing of a food robotic arm with chopsticks and bowl (no text or symbols)natural_image
Illustration of a hand inserting a plug into a cylindrical device (no text or symbols)natural_image
Illustration of a hand turning a mechanical component with a directional arrow (no text or symbols)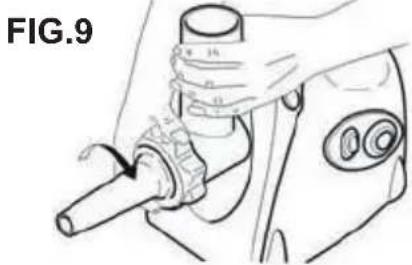
natural_image
Line drawing of a hand operating a mechanical device with a lever and adjustment knob (no text or symbols)INSTRUCTIONS FOR USE - TOMATO PROCESSOR / MEAT GRINDER
This appliance shall not be used by children. Keep the appliance and its cord out of reach of children.
Children shall not play with the appliance.
Appliances can be used by persons with reduced physical sensory or mental capabilities or lack of experience and knowledge if they have been given supervision or instruction
Concerning use of the appliance in a safe way and if the understand the hazards involved.
Place the appliance on a flat and stable surface when you use it.
Do not use this appliance for more than 10 minutes. Allow it to cool down before using it again.
Switch off the appliance and disconnect from supply before changing accessories or approaching parts that move in use.
Always disconnect the appliance from the supply if it is left unattended and before assembling, disassembling or cleaning.
The appliance has been conceived to work in domestic environments and must be used in accordance with this instruction manual; any other use is considered improper and therefore dangerous.
Pay attention while handling the cutting blade during assembling, disassembling and clearing operations.
Before using the appliance for the first time, wash the parts in contact with food as specified in section MAINTENANCE.
If the power cable gets damaged, it has to be replaced only at a service centre approved by the manufacturer.
ATTENTION : read this booklet carefully it contains important instructions for a safe installation, use and maintenance.
Important instructions to be kept for future reference.
Keep handy the guarantee, receipt of payment and these instructions for future use and reference.
After removing the packaging, check the appliance for any signs of damage. In case of visible damage, do not use it and contact a qualified technician.
Do not leave parts of the packaging within the reach of children.
This appliance is not a children's toy: it is an electrical device and must be treated with the necessary caution.
Before connecting the appliance, make sure that the power supply voltage matches the indication on the data plate.
If the plug and socket are not compatible, the socket has to be replaced with a suitable type by skilled persons. Do not use adapters or extension cables which do not meet current safety standards or that exceed the current carrying capacity limits.
When you don't use the appliance disconnect it from the power supply and assure that the interruptor is off.
Do not tug on the power cable or on the appliance itself to remove the plug from the socket.
The use of any electrical appliance requires that a number of basic rules are observed, namely:
- Never touch the appliance with wet or humid hands.
- Do not use the appliance when barefoot.
- Do not leave the appliance exposed to weathering (rain, sunlight).
- Do not subject it to rough handling.
In case of a breakdown or malfunctioning of the appliance, disconnect it at once. Do not attempt to repair it, but take it to a service centreapproved by the manufacturer.
If you decide you do not want to use this appliance any longer, disable it by cutting the power cable - of course, after disconnecting it from the socket.
The power cable should be extended to its full lenght to avoid over heating.
If the power cable gets damaged, it has to be replaced only at a service centre approved by the manufacturer.
For safety reasons, the appliance should never be opened.
Do not insert your fingers into the feed channel.
Do not insert utensils or metal objects into the feed channel.
Always use the press to push the tomato or meat.
Do not cover the ventilation holes of the appliance during operation.
Do not process hard foods such as bones, dried fruit, etc, as this may damage the appliance.
Do not press foods into the feed channel with excessive force.
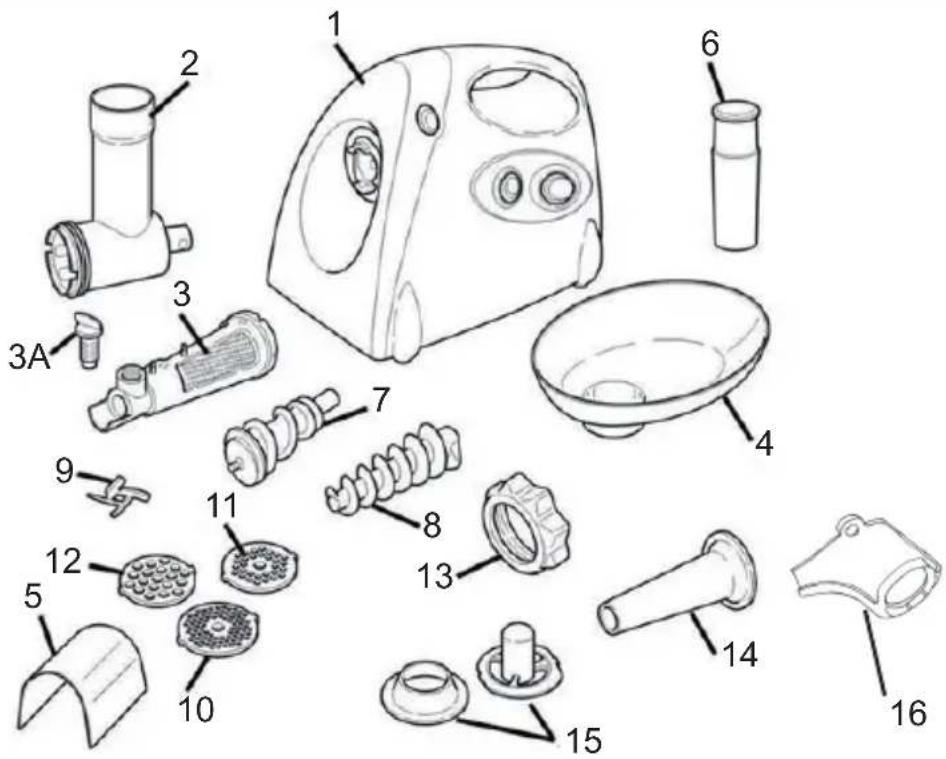
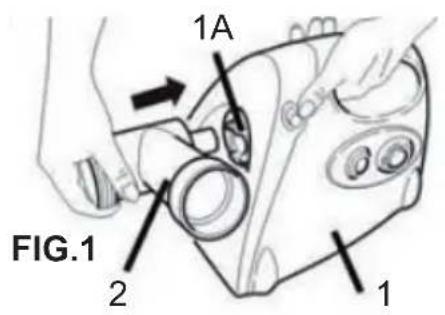
1 - Motor base unit
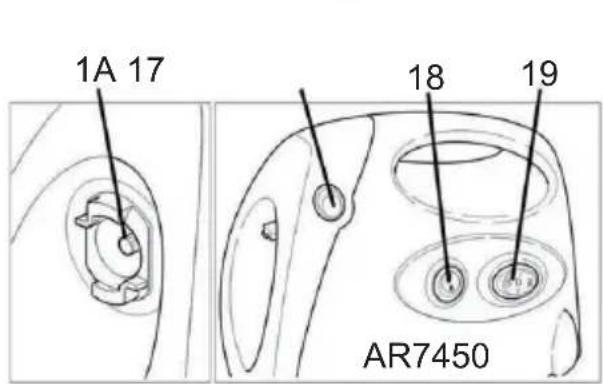
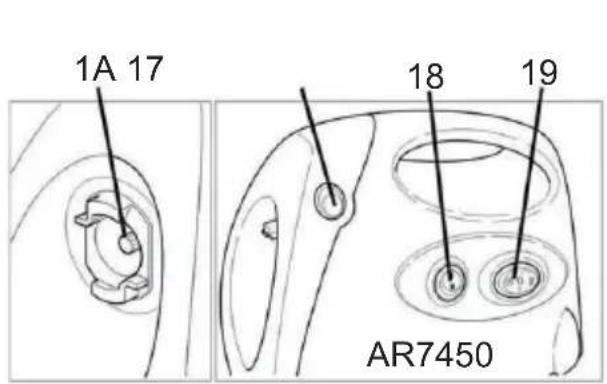
1A - Feed channel coupling
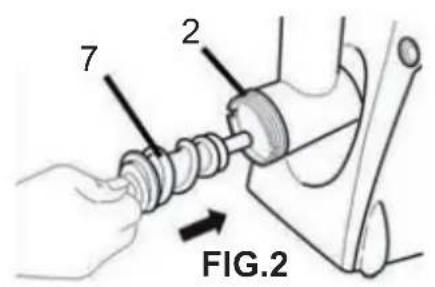
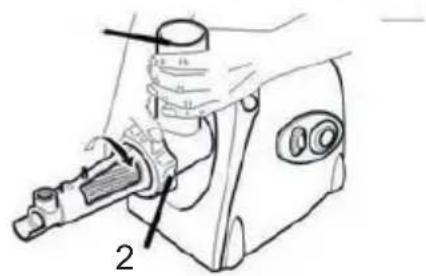
2 - Feed channel
3 - Conic sieve (AR7450 - AR7460)
3A - Plastic adjusting screw (AR7450 - AR7460)
4 - Tray (AR7450 - AR7460)
5 - Sauce guard (AR7450 - AR7460)
6 - Press
7 - Worm
8 - Worm (extension for tomato processing) (AR7450 - AR7460)
9 - Star blade
10 - Fine plate with 3mm holes
11 - Medium plate with 5mm holes
12 - Coarse plate with 7mm holes
13 - Ring nut
14 - Cone for sausages and salami
15 - Kibbeh accessory
16 - Pulp collection tray (AR7450 - AR7460)
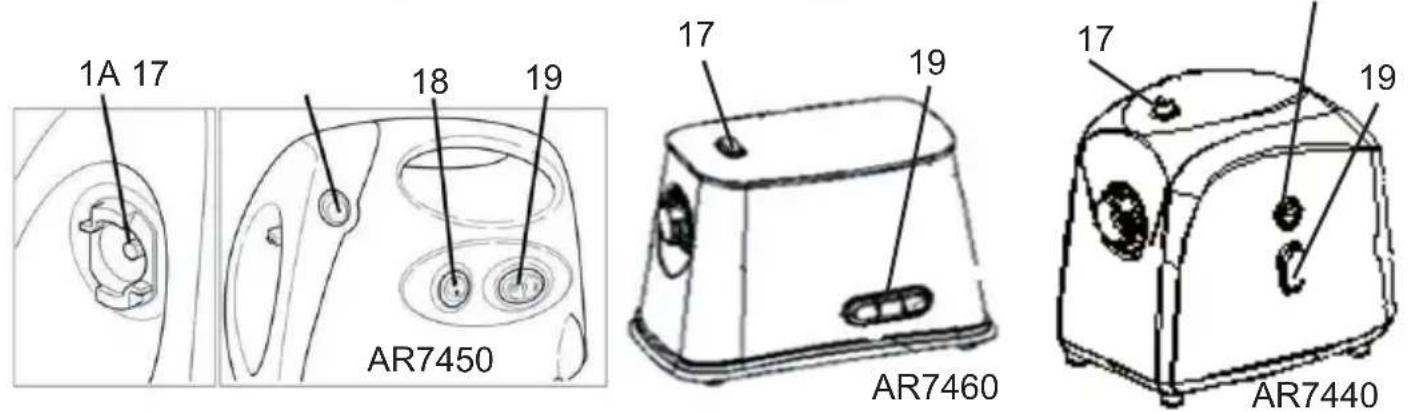
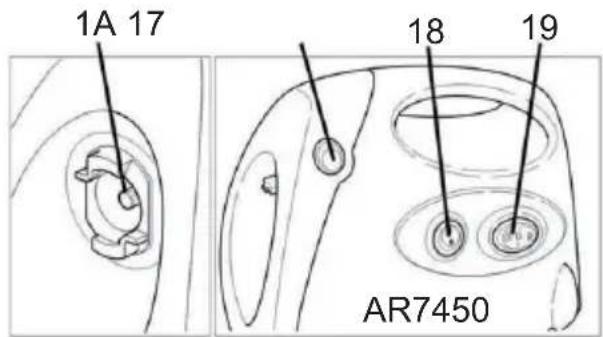
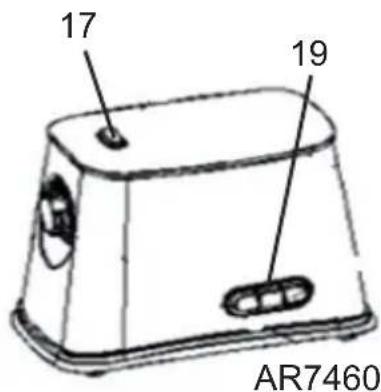
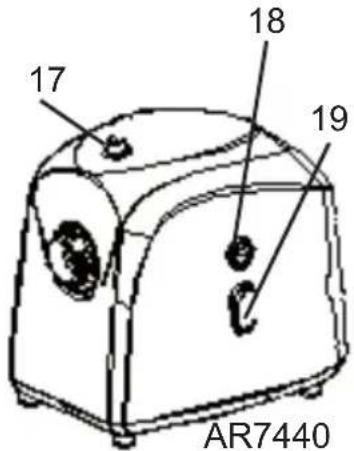
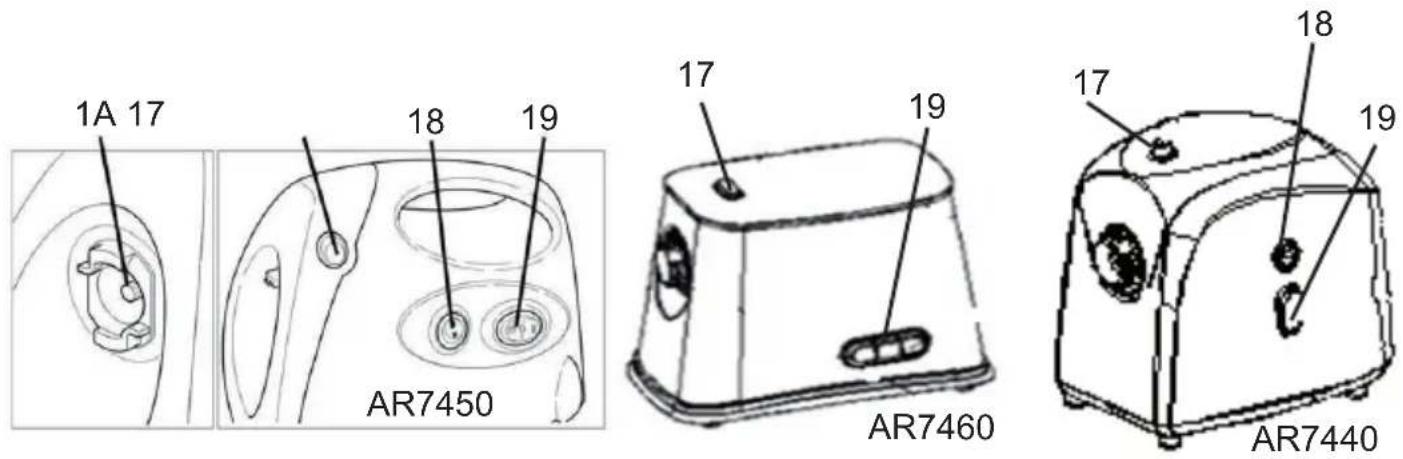
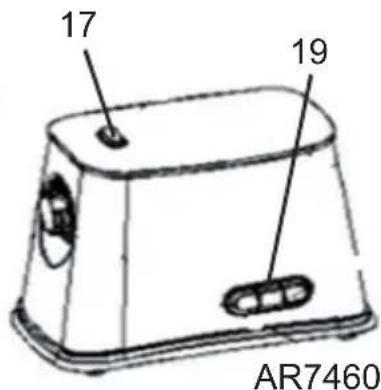
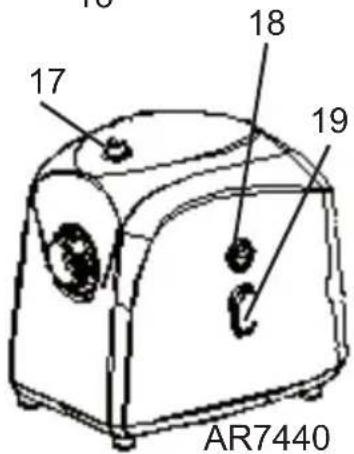
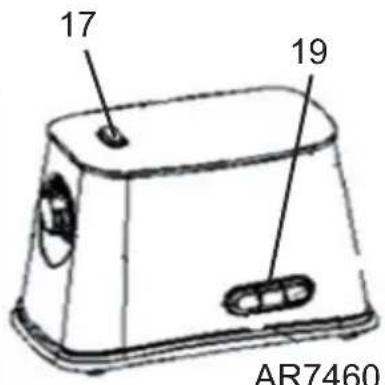
17 - Feed channel lock / release button
18 - Direction of rotation selection switch.
19 - Power switch
Technical date: see the label on the motor support.
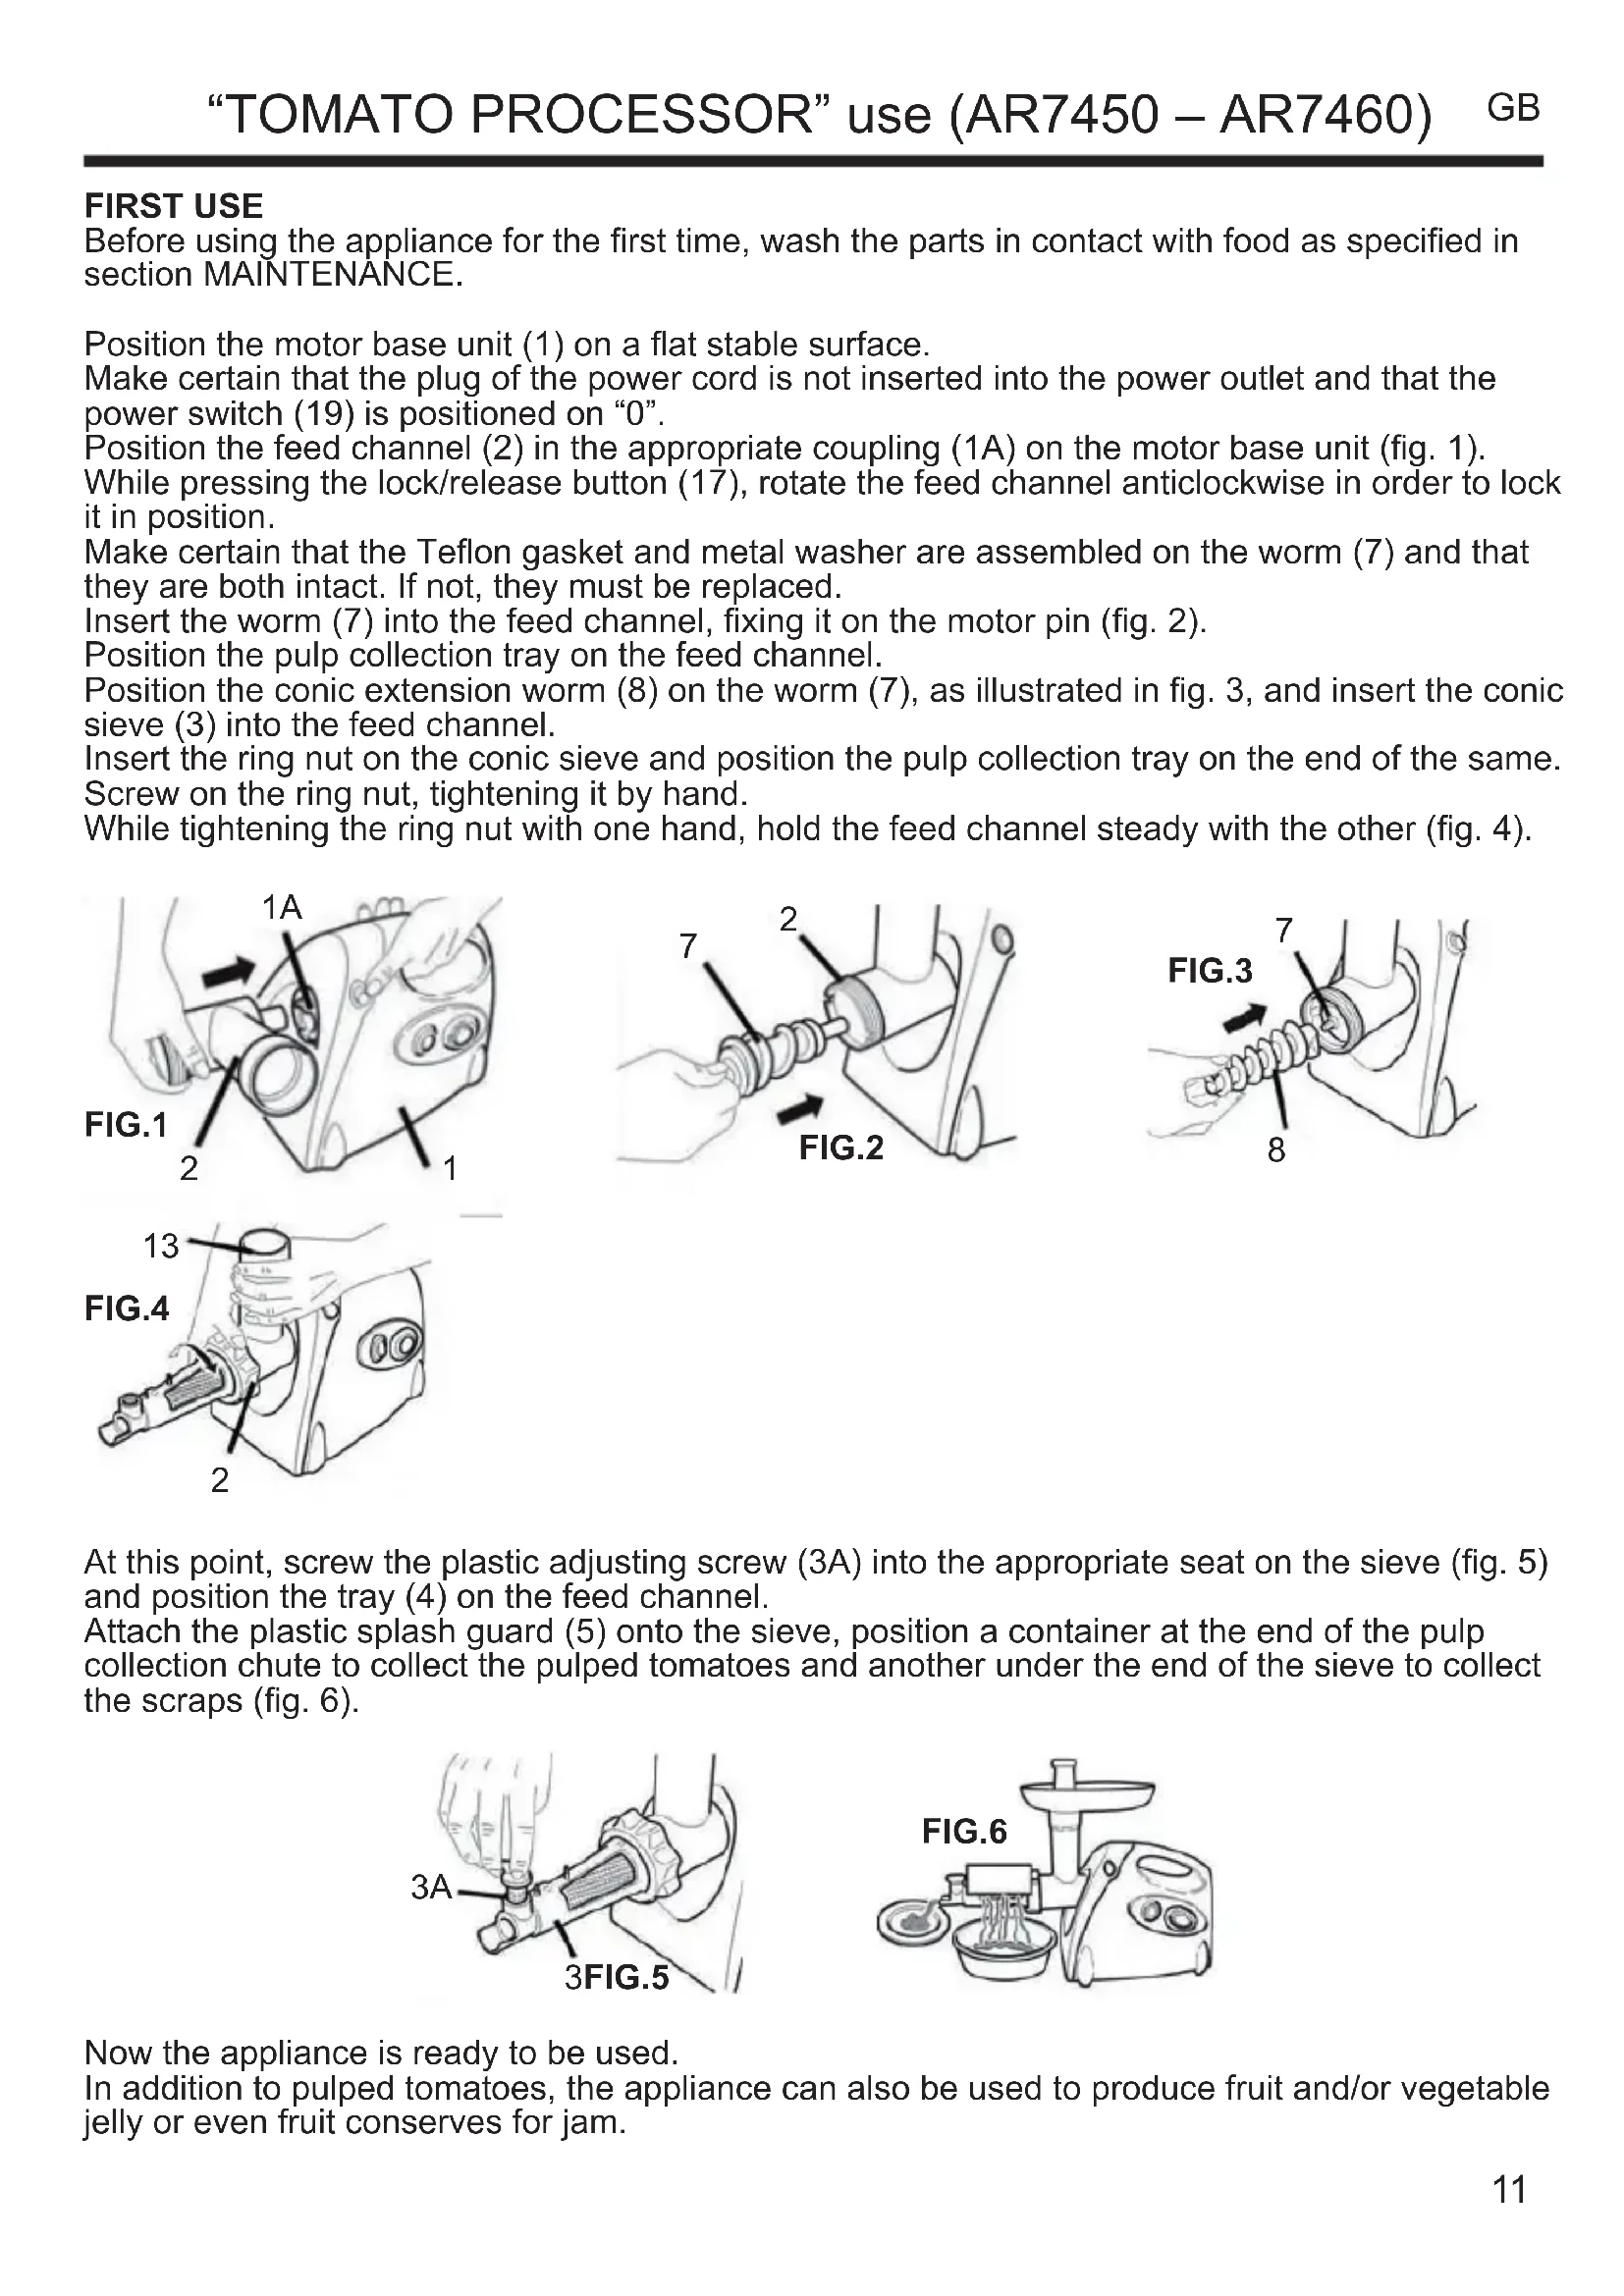
FIRST USE
Before using the appliance for the first time, wash the parts in contact with food as specified in section MAINTENANCE.
Position the motor base unit (1) on a flat stable surface.
Make certain that the plug of the power cord is not inserted into the power outlet and that the power switch (19) is positioned on "0".
Position the feed channel (2) in the appropriate coupling (1A) on the motor base unit (fig. 1).
While pressing the lock/release button (17), rotate the feed channel anticlockwise in order to lock it in position.
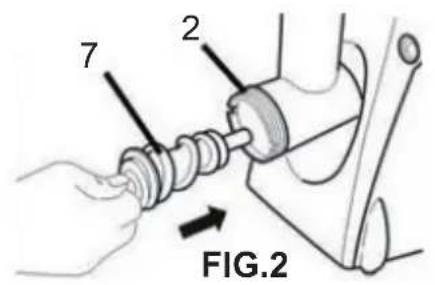
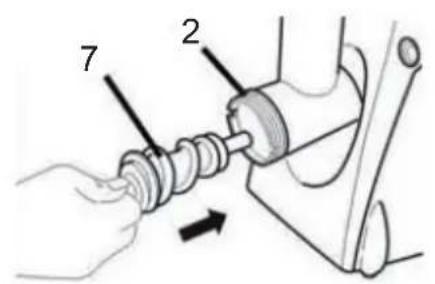
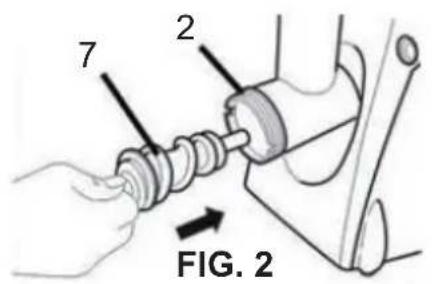
Make certain that the Teflon gasket and metal washer are assembled on the worm (7) and that they are both intact. If not, they must be replaced.
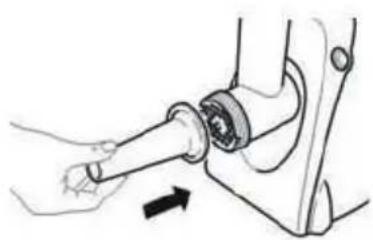
Insert the worm (7) into the feed channel, fixing it on the motor pin (fig. 2).
Position the pulp collection tray on the feed channel.
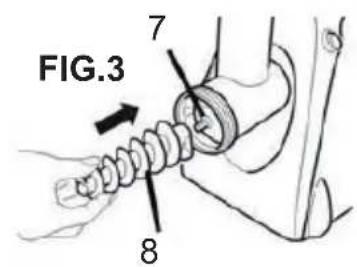
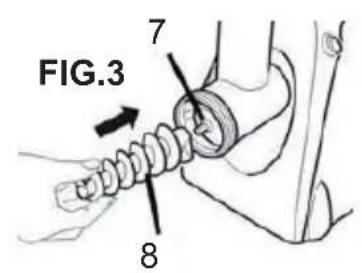
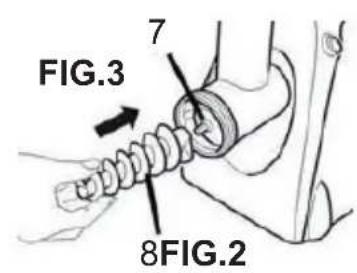
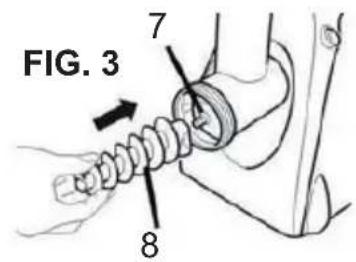
Position the conic extension worm (8) on the worm (7), as illustrated in fig. 3, and insert the conic sieve (3) into the feed channel.
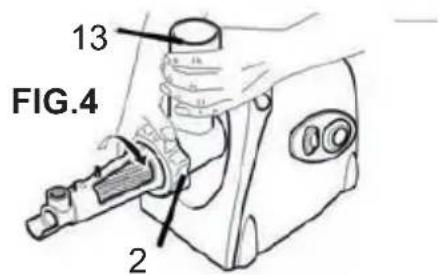
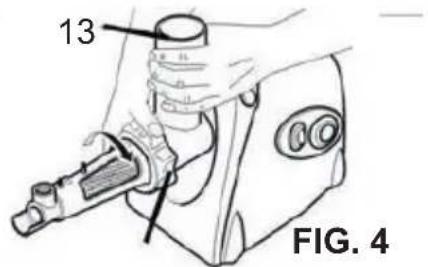
Insert the ring nut on the conic sieve and position the pulp collection tray on the end of the same. Screw on the ring nut, tightening it by hand.
While tightening the ring nut with one hand, hold the feed channel steady with the other (fig. 4).
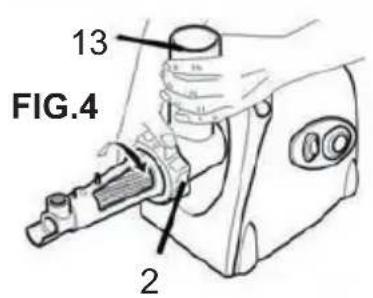
At this point, screw the plastic adjusting screw (3A) into the appropriate seat on the sieve (fig. 5) and position the tray (4) on the feed channel.
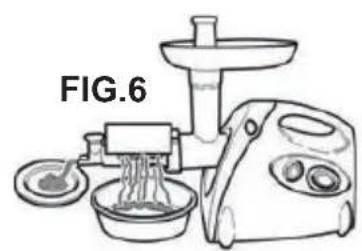
Attach the plastic splash guard (5) onto the sieve, position a container at the end of the pulp collection chute to collect the pulped tomatoes and another under the end of the sieve to collect the scraps (fig. 6).

natural_image
Line drawing of a food robotic arm with a side bowl and spoon, labeled FIG.6 (no text or symbols on the diagram itself)Now the appliance is ready to be used.
In addition to pulped tomatoes, the appliance can also be used to produce fruit and/or vegetable jelly or even fruit conserves for jam.
FIRST USE
Before using the appliance for the first time, wash the parts in contact with food as specified in section MAINTENANCE.
Carry out the same operations indicated in the “Tomato Processor Use” section, up to the illustration in fig. 2.
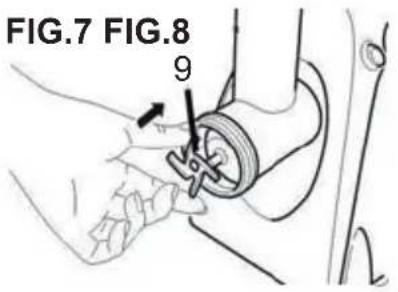
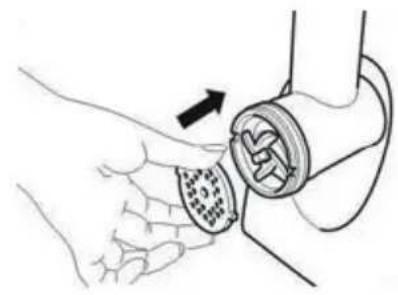
Position the blade (9), taking care to turn the sharp part towards the exterior, otherwise the appliance will not function properly (fig. 7).
Be careful not to injure yourself when handling the blade! Position the desired grinding disc in the feed channel, aligning the 2 slots in their respective seats (fig. 8).
Screw on the ring nut while holding the feed channel steady.
natural_image
Illustration of a hand holding a connector with a circular component inserted, showing mechanical assembly (no text or symbols)"SAUSAGE-MAKING" use
GB
FIRST USE
Before using the appliance for the first time, wash the parts in contact with food as specified in section MAINTENANCE.
Carry out the same operations indicated in the "Meat Grinder Use" section, up to the illustration in fig. 8.
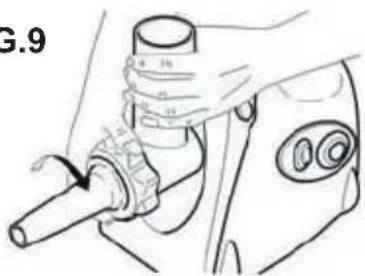
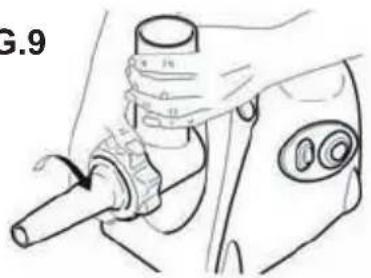
Position the cone (14) on the feed channel and screw on the ring nut while holding the feed channel steady (fig. 9).
natural_image
Diagram of a hand turning a mechanical component with an arrow indicating rotation (no text or symbols present)FIG.9
natural_image
Line drawing of a hand operating a mechanical device with a lever and adjustment knob (no text or symbols)"KIBBEH" use
GB
FIRST USE
Before using the appliance for the first time, wash the parts in contact with food as specified in section MAINTENANCE.
Carry out the same operations indicated in the “Tomato Processor Use” section up to the illustration in fig. 2.
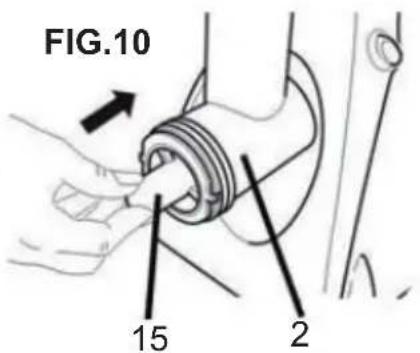
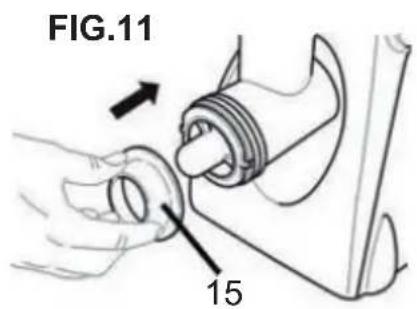
Position the kibbeh accessory (15) on the feed channel, aligning the 2 slots in their respective seats (fig. 10).
Position the conic part of the accessory (fig. 11) and screw on the ring nut while holding the feed channel steady.
Do not use the blade nor the grinding discs when preparing kibbeh.
After having prepared the machine, follow the instructions below.
Do not operate the appliance continuously for more than 10 minutes. Do not use the appliance consecutively for more than 10 minutes. Let it cool before using it again.
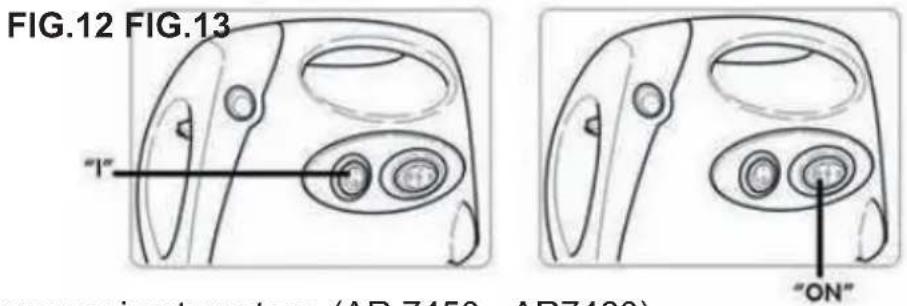
Insert the plug into the power outlet and position the switch (18) on "I" (AR 7440 - AR7450) and the power switch (19) on "ON" (fig. 12-13).
Place the food to be processed into the tray (4) and push it into the feed channel using the appropriate press (6).
If the worm should block, you must switch off the appliance, position the switch (19) on “(AR 7440 - AR7450) and the power switch (19) on “R”.
At this point the appliance can be used again.
Instructions for processing tomatoes (AR 7450 - AR7460).
Cut the tomatoes into pieces before inserting them into the feed channel.
Using the plastic adjusting screw (3A), it is possible to regulate the degree of pressing. Screwing the adjusting screw in completely obtains the maximum pressing of the tomatoes, producing a very dry pulp and thus a very concentrated puree. Do not insert tomatoes or other vegetables into the appliance while they are hot, but wait for them to cool first.
Instructions for processing meat.
Remove the bones and cartilage from the meat to be processed, and then cut the meat into 2x2x6cm pieces. When finished grinding the meat, insert some pieces of bread into the meat grinder to remove any small parts of meat that may have remained inside the appliance.
Instructions for making sausages.
Remove the bones and cartilage from the meat to be made into sausages, and then cut the meat into 2x2x6cm pieces.
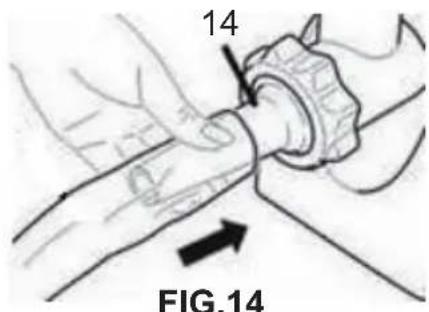
Wet the skin with lukewarm water in order to give it more elasticity and slide about 5cm of the skin onto the cone (fig. 14).
Insert the meat with the appropriate press.
When finished making sausages, make a knot on the extra 5cm of skin and push it down in order to prevent air from remaining inside 14
Maintenance
GB
The appliance does not require particular maintenance; a regular cleaning is sufficient.
Make certain that the appliance is turned off and disconnect the plug from the power outlet before performing any maintenance or cleaning operation.
Clean the appliance only when it is cool.
The motor base unit (1) must be cleaned with a soft, slightly damp cloth.
Do not use substances, liquids or excessively dampened cloths because any infiltrations could damage the appliance beyond repair.
Do not use sponges or abrasive products.
Do not use sponges or abrasive products.
Remove the feed channel from the motor unit by holding the lock/release button pressed and rotating the feed channel clockwise.
Wash all the accessories with water and dish detergent without using abrasive sponges.
Only the steel accessories (star blade and hole plates) can be washed in the dishwasher.
Be extremely careful when handling the star blade, as it is very sharp.
Do not put the aluminium accessories into the dishwasher since they may change colour as a result of chemical agent aggression.
Do not put the plastic accessories into the dishwasher since the high temperatures may deform them.
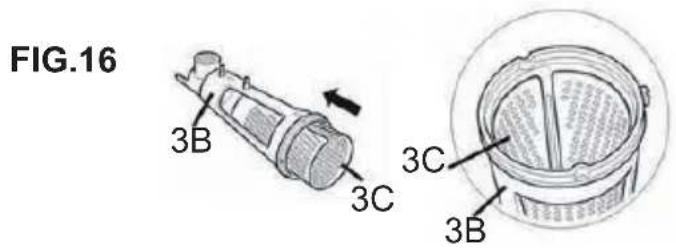
For a thorough cleaning of the conic sieve, remove the plastic adjusting screw before washing it. Remove the perforated screen by pressing on it and slipping it out (fig. 15).
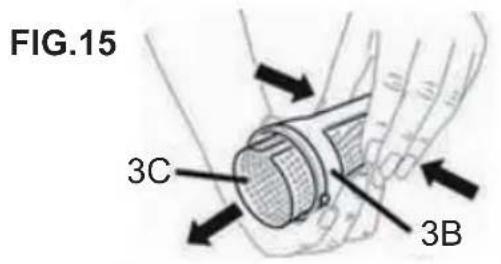
To reposition the perforated screen correctly on the sieve body, press it in completely and make certain that the open part of the screen is positioned on the top side of the body.
Make certain that the setscrew located on the conic sieve is tightened in order to prevent loosing it.
NEVER IMMERSE THE APPLIANCE IN WATER.
MODE D'EMPLOI - BROYEUR TOMATES/HACHOIR VIANDE
1 - Bloc moteur
1A - Raccord goulotte
natural_image
Line drawing of a hand using a handheld device to adjust a mechanical component (no text or symbols visible)natural_image
Line drawing of a food robotic arm with a side-mounted kitchen tool and bowl (no text or symbols)natural_image
Illustration of a hand holding a connector with a magnified inset showing internal structure (no text or symbols)natural_image
Diagram of a hand turning a mechanical component with an arrow indicating rotation (no text or symbols present)FIG.9
natural_image
Line drawing of a hand operating a mechanical device with a lever and adjustment knob (no text or symbols)Utilisation kibbé
GB
PREMIÈRE UTILISATION
natural_image
Line drawing of a hand operating a mechanical device with a tool inserted (no text or symbols)natural_image
Illustration of a hand holding a connector with a magnified inset showing internal components (no text or symbols)natural_image
Illustration of a hand turning a mechanical component with an arrow indicating direction (no text or symbols)
natural_image
Line drawing of a hand operating a mechanical device with a tool (no text or symbols)Χρήση «ΓΙΑ ΚΙΒΒΕ»
GR
ΠΡΩΤΗ ΧΡΗΣΗ
natural_image
Illustration of a hand holding a mechanical component with an arrow indicating direction (no text or symbols present)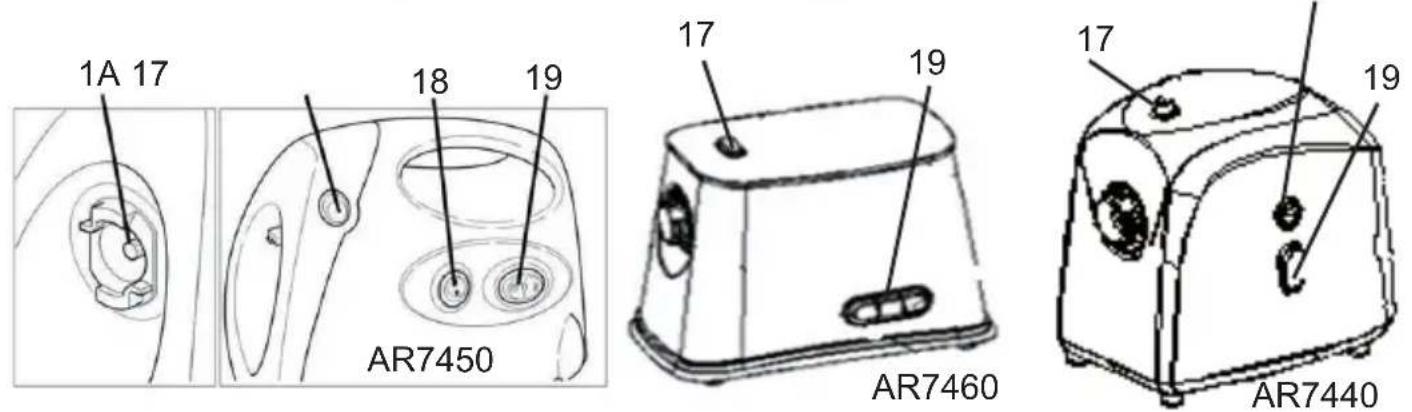
1- Enota baza motorja
1A - Spoj za povezavo na vod
2 - Vod napajalnika
3 - Konično sito (AR7450 - 7460)
3A - Vijak za regulacijo v plastiki (AR7450 - 7460)
4 - Pladenj (AR7450 - 7460)
5 - Varovalo za omako (AR7450 - 7460)
6 - Stiskalnik
7 - Vijak brez konca
8 - Vijak brez konca (podaljšek za paradižnik) (AR7450 - 7460)
9 - Rezalnik v obliki zvezde
10 - Ozek stiskalnik z luknjami 3mm
11 - Srednji stiskalnik z luknjami 5mm
12 - Debel stiskalnik z luknjami 7mm
13 - Okovje
14 - Stožec za klobase in salame
15 - Dodatek za kibbe
16 - Pladenj za zbiranje pulpe (AR7450 - 7460)
17 - Gumb za priklop / izklop napajalnega voda
18 - Stikalo za določitev smer delovanja
19 - Stikalo za delovanje
Podatki na tablici na aparatu
PRVA UPORABA
natural_image
Illustration of a hand turning a mechanical component with a rotating arrow (no text or symbols)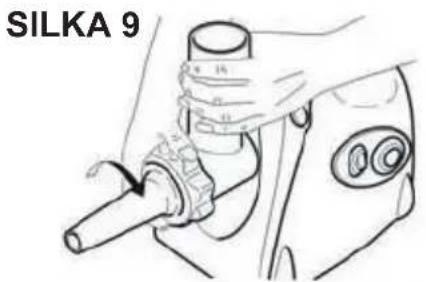
Uporaba "ZA KIBBE"
SL
PRVA UPORABA
INSTRUCTIUNI DE UTILIZARE - MAŞINĂ DE TOCAT CARNE ȘI ROŞII

natural_image
Line drawing of a food robotic arm with chopsticks and bowl (no text or symbols)natural_image
Illustration of a hand turning a mechanical component with a curved arrow indicating rotation (no text or symbols)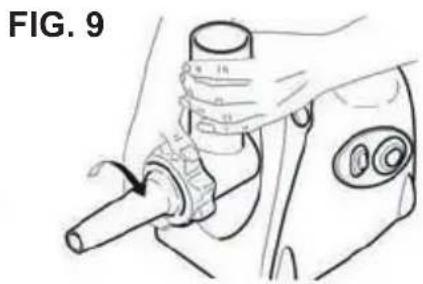
natural_image
Line drawing of a hand holding a cylindrical object with a mechanical component inserted (no text or symbols)natural_image
Illustration of a hand holding a wrist with a mechanical device, showing motion direction (no text or symbols)Condizioni
Terms and Conditions
The guarantee is valid for 24 months.
This guarantee applies only if it has been duly filled in and is submitted with the receipt showing the date of purchase.
The guarantee covers the replacement or repair of parts making up the appliance which were faulty at source due to manufacturing faults.
After the guarantee has expired, the appliance will be repaired against payment.
The manufacturer declines any responsibility for damage to persons, animals or property due to misuse of the appliance and failure to observe the directions contained in the instructions.
Limits
All rights under this guarantee and any responsibility on our part will be voided if the appliance has been:
- mishandled by unauthorized persons
- improperly used, stored or transported.
The guarantee does not cover damage to the outward appearance or any other that does not prevent regular operation.
If any faults should be found despite the care taken in selecting the materials and in creating the product, or if any information or advice are required, please contact your local dealer.

USER INFORMATION
"Implementation of Directive 2012/19/EU on Waste Electrical and Electronic Equipment (WEEE)", pertaining to reduced use of hazardous substances in electrical and electronic equipment, as well as to waste disposal". The symbol of the crossed-out wheelie bin on the equipment or on its packaging indicates that the product must be disposed of separately from other waste at the end of its service life.
The user must therefore take the dismissed equipment to suitable separate collection centres for electrical and electronic waste, or return it to the dealer in case they purchase a new device of equivalent type, at a one-to-one-ratio.
Suitable segregated collection of the equipment for subsequent recycling, treatment or environmentally friendly disposal helps prevent damage to the environment and to human health, and encourages the re-use and/or recycling of the materials that make up the equipment.
Abusive disposal of the product by the user shall result in the application of administrative fines in accordance with the laws in force.
Conditions

- INSTRUCTIONS FOR USE - TOMATO PROCESSOR / MEAT GRINDER
- FIRST USE
- "SAUSAGE-MAKING" use
- "KIBBEH" use
- MODE D'EMPLOI - BROYEUR TOMATES/HACHOIR VIANDE
- Utilisation kibbé
- PREMIÈRE UTILISATION
- Χρήση «ΓΙΑ ΚΙΒΒΕ»
- ΠΡΩΤΗ ΧΡΗΣΗ
- PRVA UPORABA
- Uporaba "ZA KIBBE"
- INSTRUCTIUNI DE UTILIZARE - MAŞINĂ DE TOCAT CARNE ȘI ROŞII
- Condizioni
- Terms and Conditions
- The guarantee is valid for 24 months.
- Limits
- USER INFORMATION
- Conditions
Brand : ARDES
Model : AR7450R
Category : Chopper