
DigiFrame 8 Slim - Digital photo frame BRAUN - Free user manual and instructions
Find the device manual for free DigiFrame 8 Slim BRAUN in PDF.

| Product Type | Digital Photo Frame |
| Brand | Braun |
| Model | DigiFrame 8 Slim |
| Screen Size | 8 inches (20.3 cm) IPS |
| Resolution | 1024 x 768 pixels |
| Supported Image Format | JPEG, BMP, GIF, TIF, PNG |
| Supported Audio Format | MP3, WMA, OGG, APE, FLAC, WAV |
| Supported Video Format | MPEG-1, MPEG-2, MPEG-4 (DivX 4.0, 5.0, XviD), AVI, M-JPEG, MKV, MOV, H.264, 3GP |
| Compatible Memory Cards | SD, SDHC, MMC |
| USB Connectivity | USB 2.0 (host), Mini USB (device) |
| Power Supply | AC adapter 100-240 V 50/60 Hz, DC output 5 V/1.5 A |
| Main Features | Automatic slideshow, zoom, rotation, background music, clock, calendar, alarm, motion detection, HD 1080p video playback |
| Viewing Angle | 80° horizontal / 80° vertical |
| Contrast Ratio | 200:1 - 300:1 |
| Brightness | 200 - 300 cd/m² |
| Maintenance | Clean the screen with a soft, non-abrasive cloth (e.g., lens cloth) slightly dampened |
| Safety | Indoor use only, do not expose to moisture or rain, do not block ventilation, do not disassemble (risk of electric shock and warranty void) |
| Spare Parts / Accessories | Remote control (CR2025 battery included), power adapter, long USB cable (optional) |
| Repairability | No user-serviceable parts inside |
| Operating Temperature | 0 °C to 40 °C, humidity 10-85% |
Frequently Asked Questions - DigiFrame 8 Slim BRAUN
User questions about DigiFrame 8 Slim BRAUN
0 question about this device. Answer the ones you know or ask your own.
Ask a new question about this device
Download the instructions for your Digital photo frame in PDF format for free! Find your manual DigiFrame 8 Slim - BRAUN and take your electronic device back in hand. On this page are published all the documents necessary for the use of your device. DigiFrame 8 Slim by BRAUN.
USER MANUAL DigiFrame 8 Slim BRAUN
natural_image
Illustration of a flat-screen TV displaying a beach scene with three children and adults, no visible text or symbols.DigiFrame 8 Slim
Bedienungsanleitung
Vorsichtsmaßnahmen
natural_image
Simple line drawing of a rectangular frame with a numbered label (1) at the bottom, no text or symbols inside the frame.natural_image
Top-down view of a black rectangular device with a white circular component and a small protruding knob (no text or symbols visible)5. Erste Schritte
4.3 Musikmodus
natural_image
Jellyfish in a blue background with a context menu on the right (no text extraction needed)natural_image
Illustration of a desktop computer connected to a monitor (no text or symbols visible)Computer USB
DPF MINI USB OTG
natural_image
Illustration of a flat-screen TV displaying a beach scene with three children and adults, no visible text or symbols.DigiFrame 8 Slim
User manual
Cautions
English
Precautions and maintenance
- For indoor use only.
● To avoid risk of fire or electric shock, do not expose the unit to moisture or condensation. - To avoid overheating, do not block the ventilation holes on the back of the Digital Photo Frame.
- Keep the Digital Photo Frame out of direct sunlight.
- Do not dismantle the Digital Photo Frame. There is a risk of electric shock and there are no user-serviceable parts inside. Dismantling the Digital Photo Frame will void your warranty.
Cleaning the LCD Screen
● Treat the screen carefully. Because the screen of the Digital Photo Frame is made of glass and it would easily be broken or scratched.
- If fingerprints or dust accumulate on the LCD screen, we recommend using a soft, non-abrasive cloth such as a camera lens cloth to clean the LCD screen.
- Moisten the cleaning cloth with the cleaning solution and apply the cloth to the screen.
WARNING:
To reduce the risk of electric shock, do not expose the unit to rain or excessive moisture. This device is intended for private use and not suitable for commercial use!
Introduction:
Thank you for the purchase of the Digital Photo Frame. It is designed to allow quick and easy view of photos taken from your digital camera, mobile phone, or from a memory storage card. Please read this User Manual carefully to learn the correct way to use the Digital Photo Frame.
Features :
- Supported picture format: JPEG, BMP, GIF, TIF, PNG
- Supported audio format: MP3, WMA, OGG, APE, FLAC, WA
- Supported video format: MPEG-1, MPEG-2, MPEG-4 (DivX 4.0, DivX 5.0, Xvi) AVI, M-JPEG, MKV, MOV, H.264, 3GP
- Supported memory card: SD, SDHC, MMC
- USB connection: Mini USB & USB 2.0
- Auto-Start with photo, music, video, calendar, setting or selecting the main menu.
- Auto Slideshow when inserting Memory Card
- Picture & Music: Slideshow with background music
- Support viewing pictures in preview mode
- Built-in Clock and calendar with slideshow Window, schedule auto on/off.
- Image-display mode: slideshow, preview, zoom, rotate function.
- Adjustable slideshow speed
- Delete files from memory cards and internal memory
- Support 1080P HD video and Built-in motion sensor
Packaging Check List:
- 20.3cm (8 inch) digital photo frame
1 piece - AC/DC adapter
1 piece - Remote control
1 piece - Use manual
1 piece - Long USB Cable (optional)
1 piece
CONTENTS
- Product Diagram 5
1.1 Remote Control 5
1.2 Front Side and Back Side 6
1.3 Rear Side Button 6
-
Installing & Replacing the Battery 6
-
Getting Started 6
-
Operating Instruction 7
4.1 Card and USB 7
4.2 Picture Mode 8
4.3 Music Mode 8
4.4 Video Mode 9
-
Calendar 9
-
Clock 10
-
File (Delete) 10
-
Setting 10
-
PC Connection (Optional) 11
-
Technical Specifications....12
-
Troubleshooting Guide....12
1. Product Diagram
1.1 Remote Control
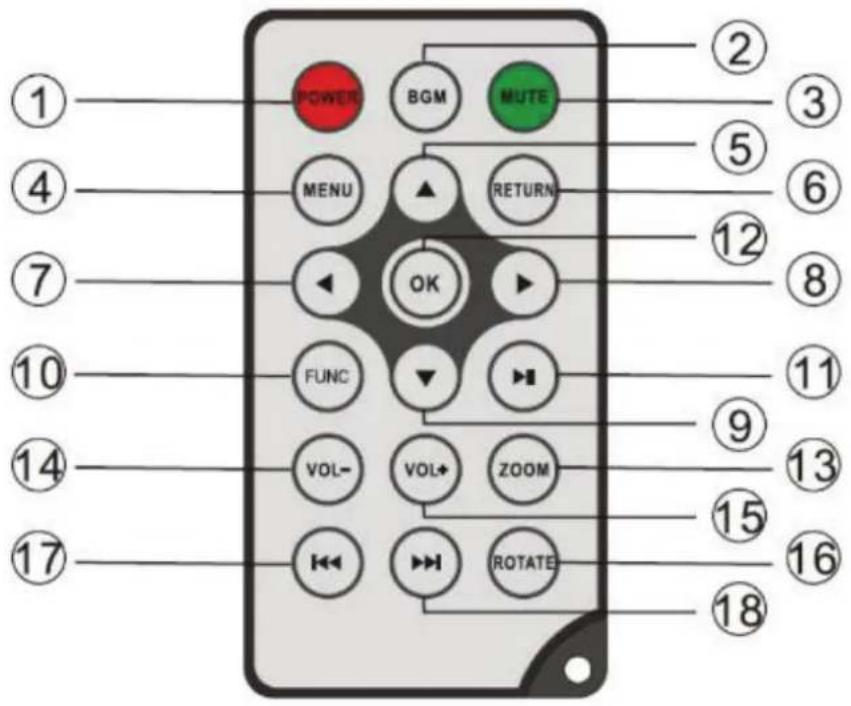
1) POWER – Switch On/Off
2) BGM – Press BGM button to play the background music in slideshow mode
3) MUTE – Press Mute button to switch of the sound temporarily.
4) MENU – Enter Main Menu interface.
5) ▲- Functional selection button from the bottom to the top cursor.
6) RETURN – Return to previous page.
7) -functional selection button from right to left cursor
8) ➤ Functional selection button from left to right cursor
9) ▼ – Functional selection button from the top to the bottom cursor.
10) SETUP – Go to Setup mode
11) PLAY/PAUSE – In the playing mode, press this button, it will pause; repress this button, it will play again.
12) OK – Press to confirm. Play/pause: In the playing mode, press this button, it will pause; repress this button, it will play again.
13) ZOOM – In the pause state of single picture, press ZOOM to magnify picture display size.
14 /15) VOL +/- - Turn up/down the volume.
16) ROTATE – In the pause state of single picture, press this button to revolve the picture 90° in clockwise direction each time.
17) – Move back to previous music or video file.
18) ▶▶ – Move forward to next music or video file.
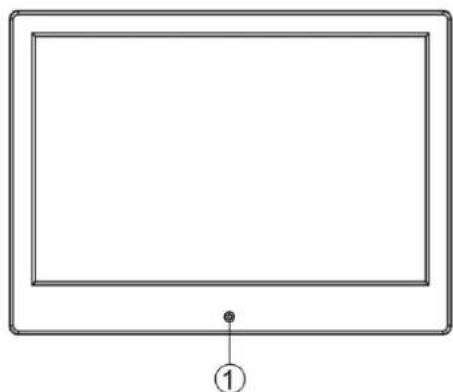
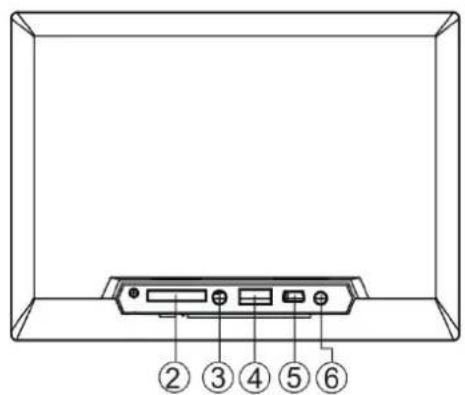
1.2 Front Side and Back Side
natural_image
Simple line drawing of a rectangular monitor with a labeled point (1) at the bottom, no text or symbols present.- IR remote control hole
-
SD/MMC card slot
-
USB(Type A)
-
Audio output
-
Mini USB
-
DC IN
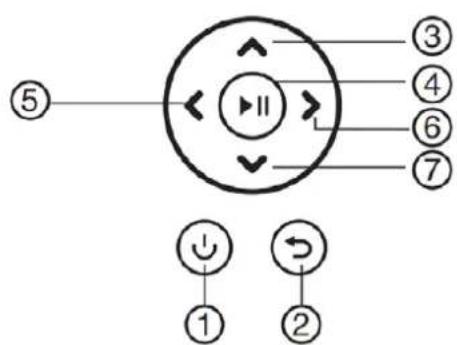
1.3 Rear Side Button
flowchart
graph TD
    A["⑤"] --> B(( ))
    B --> C["③"]
    B --> D["④"]
    B --> E["⑥"]
    B --> F["⑦"]
    B --> G["↓"]
    B --> H["②"]
    style A fill:#f9f,stroke:#333
    style B fill:#ccf,stroke:#333
    style C fill:#cfc,stroke:#333
    style D fill:#fcc,stroke:#333
    style E fill:#cff,stroke:#333
    style F fill:#ffc,stroke:#333
    style G fill:#fcf,stroke:#333
    style H fill:#cff,stroke:#333
-
Return
-
Up
-
Play/Pause/OK
-
Right/Volume-
-
Left/Volume+
-
Down
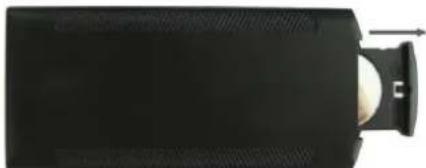
2. Installing & Replacing the Battery
To open the battery compartment of the remote control, press the battery cover and pull the drawer out, Insert a CR2025 lithium button battery with the "+" side facing up. Close the drawer
natural_image
Top-down view of a black rectangular device with a white circular component and a small protruding knob (no visible text or symbols)3. Getting Started
3.1 Put the digital photo frame with installing bracket on a flat position steadily, then plug one end of the AC adapter into a standard 110-240V AC electrical outlet and the other end into the DC IN slot on the left side of the frame.
3.2 Slowly remove the protective film covering on the Screen.
3.3 Remove the plastic battery insulator from the battery compartment and make sure the remote control has a battery inside. Please refer to "Installing & Replacing Battery" if you need a new battery.
3.4 Press the Power Button on the Remote Control to Switch On/Off.
4. Operating Instruction

BRAUN®
Power on the unit for the first time it will show the startup logo first. The unit will start an auto slideshow from the internal Memory. It will preferentially play the files from the inserted storage device or the files selected in the Auto start Mode.
You can set Auto start Mode in the Setup-Menu.
4.1 Card and USB
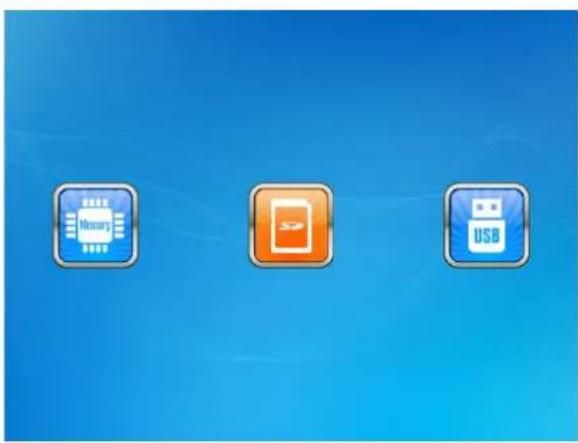
The Frame supports SD/SDHC/MMC Cards and USB 2.0. After inserting a card or USB device, the frame plays automatically the file format you selected in the Autostart-Menu. Press Return to access to Photo, Music, Video, Calendar, Clock, Browser and Setting. Press OK to confirm.
natural_image
Three icons on a blue background: a microchip, a smartphone with 'S' logo, and a USB flash drive (no text or symbols)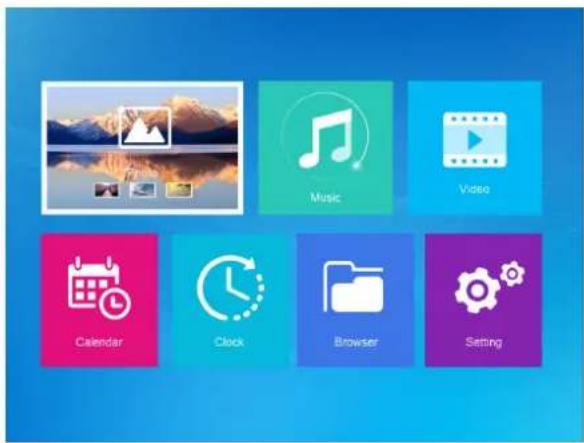
Note:
1) Make sure there are supported Picture-, Music- or Video-files on the Card or USB device.
2) If there are supported picture and music files in the Card or USB Device, the frame will start the playback automatically.
4.2 Picture Mode
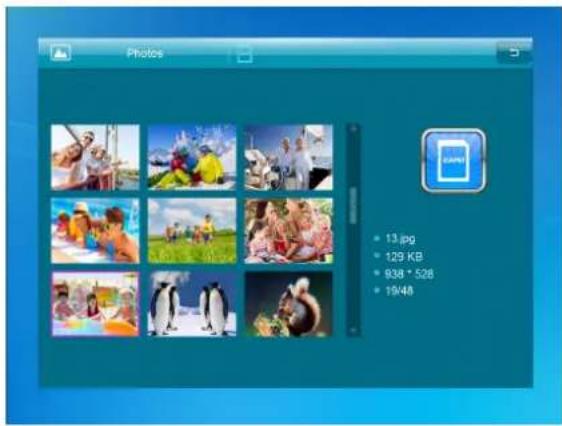
Press Return to select the Storage Device. Press OK to open the main menu, select Photo and press OK to start slideshow. Press Return to open the Preview mode and use ▶▶▲▼ Select the desired function. Press OK to confirm your selection. To play back the slideshow with background Music, the Music must be stored in the same memory device! You can use Vol+/Vol-to turn up /down the volume, you can also use ▶▶ to go to the previous/next picture.

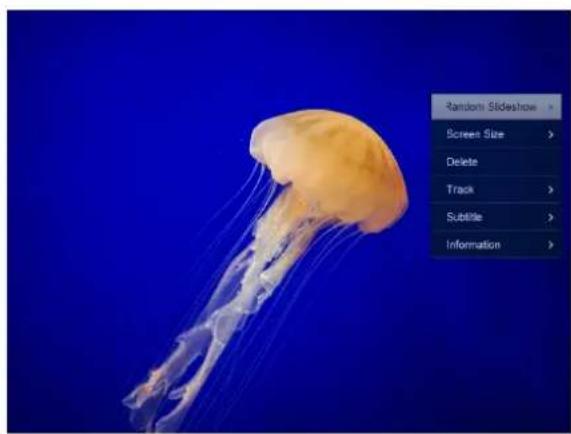
During the photo slideshow press pause, then press setup for 2 sec. The current photo options will then be shown on the screen.
4.3 Music Mode
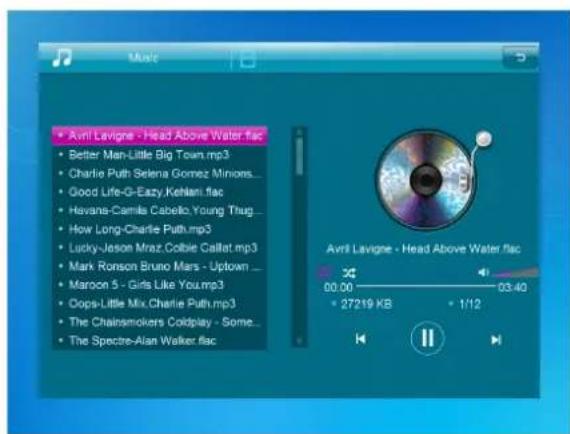
Press Return (RETURN) to open the main menu Select Music Icon and press OK to enter, press ▲▼ to select the music in the playlist. Press OK to Play/Pause. Press VOL+/- to turn up/ down the volume. With ◀▶ you can enter the previous or next music playing directly.
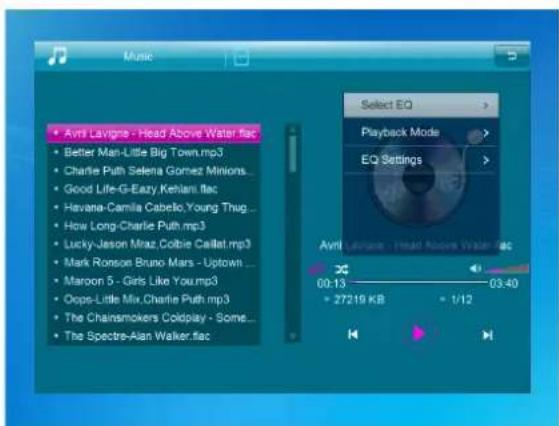
During the music slideshow press pause, then press setup for 2 sec. The current music options will then be shown on the screen.
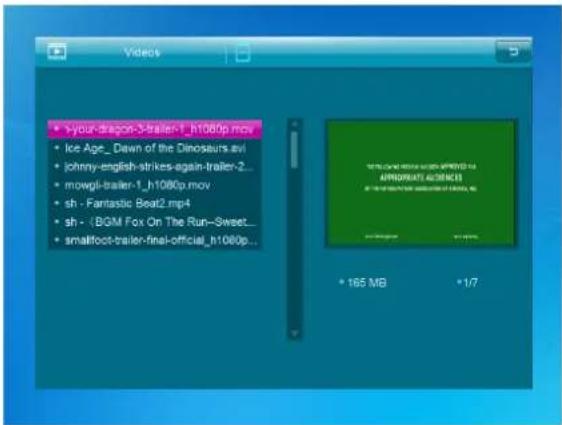
4.4 Video Mode
5. Calendar
 Select Calendar in the Main Menu, press OK to enter. The calendar will be shown on the right side of the screen. On the left side a slideshow will start. The supported Picture files must be stored in the selected storage device. Adjust date with ▲▼◀▶  Press [OK] in [Calendar] interface, you can edit alarm directly.6. Clock
 Select [Clock] in the Main Menu, press [OK] to enter. Then press [OK] to change clock skins.7. File
 Select Browser in the main menu and press OK to enter. You can browse all files on your selected storage device. Press ▲ or ▼ to choose the file and press OK to open the file or folder. Press ▶ to copy or delete the selected file. 8. Setting
 Select Setting in the main menu. Press OK to enter the Setting interface and press ▲▼ to highlight your selection. Press OK to enter the sub-menu items. Press ◀▶ to set the Value. In this menu basic settings can be set as language or time, the playback quality or the timer.9.PC Connection
You can connect the unit to the external equipment by using USB Cable for file copy &delete or edit Operation. A. Please turn on the digital photo frame, then connect it with the USB cable to your PC. The Frame supports Windows 2000/XP/Vista/7/8/10. B. The unit will be automatically detected and it will display "PC Connecting" on the screen. You can edit or delete files in the internal memory or an inserted in the picture frame storage media copy from the computer. You need to restart the digital photo frame after you finished the operation.  NOTE: Never disconnect the USB cable during any operational process. Doing so may damage your DPF. Press Safely Remove Hardware Icon on the computer to disconnect the PC-Connection.10. Technical Specifications
● Adapter: Input AC 100-240V 50/60HZ Output DC 5V/1.5A ● Picture Format: JPEG, BMP, GIF, TIF, PNG ● Audio Format: MP3, WMA, OGG, APE, FLAC, WAV - Video formats: MPEG-1, MPEG-2, MPEG-4 (DivX 4.0, DivX 5.0, Xvi) AVI, M-JPEG, MKV, MOV, H.264, 3GP ● Memory Cards: SD, SDHC, MMC USB: USB Host, Mini USB \- Screen Parameter: Screen Size: 8 inch IPS Resolution : 1024\*768 pixels Contrast: 200-300:1 Aspect Ratio: 4:3 Brightness: 200-300cd/ m2 Response Time: 20ms Viewing Angle: 80°(left/right/vertical), 80°(horizontal) Working Temperature: 0 °C\~40 °C, Humidity: 10-85%11. Troubleshooting Guide
If you come across when using the photo frame on problems, consult the suggested solutions below, and the corresponding sections of this manual. If you need additional assistance, please contact technical support. - No power: Please check whether the AC-Adaptor is inserted correctly. ● Remote control has no function: Please check whether the battery has power (the battery can be used for half a year in normal conditions). Replace with a new battery if necessary. ● Cannot read the Memory Card or USB-Device: Please confirm there are supported files on your memory card or USB device. Empty devices cannot be read. - Cannot play the file: Please confirm if the file format is compatible with the player. ● Display too bright or too dark: Please adjust the brightness or contrast in the setup menu. ● The color is light or no color: Please adjust the color and contrast setup. No sound: Please check whether the volume is correct and the player is not in Mute mode.Technical support
We strive to provide the best customer service. If you need help with your BRAUN product, contact BRAUN Technical Support before returning the device. You can reach us in one of the following ways: Email: post@braun-phototechnik.de Web: www.braun-phototechnik.de +49 (0) 7457 / 9465-60Declaration on CE regulations
This device has been tested and complies with the requirements for a digital device in accordance with CE regulations. These limits are intended to provide adequate protection against detrimental disturbances in domestic installations. BRAUN PHOTO TECHNIK GmbH Merkurstrasse 8 72184 Eutingen / Germany Phone: +49 (0) 7457 / 9465-60 natural_image
Digital TV displaying a beach scene with children playing on a beach, next to a black remote control panel (no visible text or symbols)DigiFrame 8 Slim
Mode d'emploi�ertissements
Précautions et entretien
- «niquement pour une utilisation en intérieur. - Pour éviter tout risque d'incendie ou d'électrocution, n'exposez pas l'appareil à l'humidité ou à la condensation. - Pour éviter toute surchauffe, ne bloquez pas les orifi ces de ventilation à l'arrière du cadre photo numérique. -e placez pas le cadre photo numérique en plein soleil. - -e démontez pas le cadre photo numérique. °isque d'électrocution ; aucune pièce interne réparable par l'utilisateur. -e désassemblage du cadre photo numérique annulera votre garantie.Nettoyage de l'écran LCD
- Prenez soin de l'écran. –'écran du cadre photo numérique est en verre. Il peut donc se casser ou s'égratigner facilement. - Si des traces de doigt ou de la poussière s'accumulent sur l'écran –)D, nous conseillons d'utiliser un chiffon doux et non abrasif, tel qu'un chiffon pour objectif d'appareil photo, afin de nettoyer l'écran –)D. - 9umidifiez le chiffon avec le produit de nettoyage et nettoyez l'écran.(VERTISSEMENT +
Ofin de réduire les risques d'électrocution, gardez l'appareil à l'abri de la pluie et de l'humidité excessive. )et appareil est destiné à l'usage privé et ne convient pas à un usage commercial !Introduction +
Merci d'avoir acheté ce cadre photo numérique. Ce produit est conçu pour permettre une visualisation simple et rapide des photos prises à partir de votre appareil photo numérique, de votre téléphone portable ou d'une carte mémoire. Veuillez lire attentivement ce manuel de l'utilisateur pour maîtriser l'utilisation de ce cadre photo numérique.Caractéristiques +
1. Formats d'images pris en charge : JPEG, BMP, GIF, +IF et PNG 2. Formats audio pris en charge : MP3, WMA, OGG, APE, F-AC et WA 3. Formats vidéo pris en charge : MPEG-1, MPEG-2, MPEG-4 (DivX 4.0, DivX 5.0, Xvi) AVI, M-JPEG, MKV, MOV, H.264 et 3GP 4. +ypes de cartes mémoire pris en charge : SD, SDHC, MMC 5. Connexion USB : mini USB et USB 2.0 6. Démarrage automatique avec photos, musique, vidéo, calendrier, réglage ou sélection du menu principal. 7. Un diaporama automatique s'exécute à l'insertion d'une carte mémoire 8. Image et musique : diaporama accompagné de musique 9. Prise en charge de l'affichage des photos en mode aperçu 10. Horloge intégrée et calendrier avec une fenêtre du diaporama, activation/désactivation d'un programme automatique. 11. Modes d'affichage des images : diaporama, prévisualisation, zoom, pivotement. 12. Vitesse de diaporama réglable 13. Suppression de fichiers dans la carte mémoire et la mémoire interne 14. Prise en charge de la vidéo HD 1080P et du capteur de mouvements intégréListe du contenu de la confection +
1. Cadre photo numérique de 20.3 cm (8 po) 1 pièce 2. Adaptateur CA/CC 1 pièce 3. +élécommande 1 pièce 4. Manuel d'utilisation 1 pièce 5. Câble USB long (en option) 1 pièceSOMM(IRE
1. Schéma du produit .... 5 1.1 +élécommande .... 5 1.2 Vues de face et arrière....6 1.3 Boutons face arrière ....6 2. Installation et remplacement de la pile ....6 3. Mise en route 6 4. Consignes d'utilisation....7 4.1 Carte et USB....7 4.2 Mode image 8 4.3 Mode musique....8 4.4 Mode vidéo....9 5. Calendrier 10 6. 9orloge....10 7. Fichier ....10 8. Réglages....11 9. Connexion à l'ordinateur....12 10. Spécifications techniques....12 11. Guide de dépannage .... 131. Schéma du produit
1.1 Télécommande
 1) POWER – Mise en marche/arrêt 2) BG M – Appuyez sur le bouton BGM pour lire la musique de fond en mode diaporama. 3) MUTE – Appuyez sur le bouton Muet pour couper temporairement le son. 4) MENU – Ouvrez l'interface du menu principal. 5) - ▲ Bouton de sélection des fonctions avec déplacement du curseur du bas vers le haut. 6) RETURN – Revenir à la page précédente. 7) - Bouton de sélection des fonctions avec déplacement du curseur de la droite vers la gauche 8) - Bouton de sélection des fonctions avec déplacement du curseur de la gauche vers la droite 9) - Bouton de sélection des fonctions avec déplacement du curseur du haut vers le bas. 10) SETUP – Allez au mode Réglages. 11) LECTURE/PAUSE – En mode lecture, appuyez une fois sur ce bouton pour effectuer une pause de lecture, et une seconde fois pour reprendre la lecture. 12) OK – Appuyez pour confirmer. Lecture/pause : en mode lecture, appuyez une fois sur ce bouton pour effectuer une pause de lecture, et une seconde fois pour reprendre la lecture. 13) ZOOM – En mode pause de lecture d'une image unique, appuyez sur ZOOM pour agrandir la taille d'affichage de l'image. 14) /15) VOL +/- - Augmentez/baissez le volume. 16) ROTATE – En mode pause de lecture d'une image unique, appuyez sur ce bouton pour faire pivoter l'image par incréments de 90° dans le sens horaire. 17) -Aller à la chanson ou au fichier vidéo précédent. 18) ▶▶▶ Aller à la chanson ou au fichier vidéo suivant.5.6 Vues de face et arrière
natural_image
Simple line drawing of a blank rectangular frame with a numbered label (1) at the bottom, no text or symbols inside the frame.5.7 Boutons face arrière
flowchart
graph TD
    A["⑤"] --> B(( ))
    B --> C["③"]
    B --> D["④"]
    B --> E["⑥"]
    B --> F["⑦"]
    B --> G["②"]
    H["①"] --> I["②"]
    J["→"] --> K["②"]
6. Installation et remplacement de la pile
Pour ouvrir le compartiment à piles de la télécommande, appuyez sur le couvercle du compartiment et retirez le compartiment. Insérez une pile bouton au lithium CR2025 avec la face « + » orientée vers le haut. Fermez le compartiment. natural_image
Top-down view of a black cylindrical device with a small white component and an arrow pointing upward (no text or symbols visible)7. Mise en route
3.1 Disposez le cadre photo numérique, avec son anneau préalablement fixé, dans une position plane et stable. Branchez un bout de l'adaptateur CA dans une prise électrique CA standard de 110 à 240 V et l'autre dans le port d'entrée CC situé à gauche du cadre. 3.2 Enlevez délicatement le film protecteur recouvrant l'écran. 3.3 Retirez l'isolateur plastique du compartiment de la pile et vérifiez d'avoir inséré une pile à l'intérieur de la télécommande. Veuillez consulter la section « Installation et remplacement de la pile » si une nouvelle pile est nécessaire. 3.4 Appuyez sur le bouton d'alimentation de la télécommande pour allumer/arrêter l'appareil.8. Consignes d'utilisation
BRAUN®
-ors de la première mise en marche de l'appareil, le logo de démarrage s'affiche d'abord. 6nsuite, l'appareil démarre un diaporama automatique à partir de sa mémoire interne. Il lit en priorité les fichiers contenus dans le périphérique de stockage inséré, ou ceux sélectionnés dans le mode Démarrage automatique. Vous pouvez définir le mode Démarrage automatique dans le menu Réglages.8.5 Carte et USB
-'appareil prend en charge les cartes mémoire SD/SDHC/MMC et les périphériques US5 2.0. Une fois une carte mémoire ou un périphérique inséré dans l'appareil, le système démarre automatiquement la lecture du fichier avec le format sélectionné dans le menu Démarrage automatique. Appuyez sur Retour pour accéder à l'interface Photo, Music, Video, Calendar, Clock, Browser et Setting. Appuyez sur la touche OK pour confirmer. natural_image
Three icons on a blue background: a microchip, a USB flash, and a USB tag, all without any text or symbols.Remarque +
1) assurez-vous que les fichiers images, vidéos ou musicaux contenus dans la carte mémoire ou le périphérique US5 sont pris en charge par l'appareil. 2) Si la carte mémoire ou le périphérique US5 contient des fichiers images et musicaux pris en charge par l'appareil, le système démarre la lecture automatiquement.4.2 Mode image
 4.3 Mode musique
 Appuyez sur la touche RETOUR pour sélectionner le dispositif de stockage. Appuyez sur OK pour ouvrir le menu principal ; sélectionnez Photo et appuyez sur OK pour démarrer le diaporama. Appuyez sur Retour pour ouvrir le mode Aperçu, et utilisez le bouton ◀ pour sélectionner la fonction désirée. Pressez sur OK pour confirmer votre sélection. Pour lire le diaporama avec la musique de fond, la musique doit être stockée dans le même périphérique de stockage ! Vous pouvez utiliser les touches VO—+/VO— pour augmenter/baisser le volume de la musique, et les touches ◀ pour aller à la musique précédente/suivante. Pendant le diaporama photo, appuyez sur Pause, puis pendant 2 secondes sur setup. —es options de la photo en cours s'affichent à l'écran. Appuyez sur (RETURN) pour ouvrir le menu principal. Sélectionnez l'icône Music et appuyez sur OK pour l'ouvrir. Appuyez sur ▲ pour sélectionner la musique dans la liste de lecture. Appuyez sur OK pour démarrer la lecture ou faire une pause. Appuyez sur VOL+ ou VOL- pour augmenter ou baisser le volume. Appuyez sur ▶ pour lire directement la piste musicale précédente ou suivante. 4.4 Mode vidéo
 natural_image
Jellyfish in a blue background with a context menu on the right (no text extraction needed)9. Calendrier
6. Horloge
7. Fichier
 Sélectionnez l'icône « Calendar » dans le menu principal et appuyez sur « OK » pour l'ouvrir. —e calendrier s'affiche à droite de l'écran. Un diaporama démarre à gauche. —es fichiers images pris en charge doivent être stockés dans le périphérique de stockage sélectionné. Oppuyez sur ▲ pour régler la date. Oppuyez sur 'OK] d ans l'interface 'Calendar] pour modifier directement l'alarme. Sélectionnez 'Clock] dans le menu principal et appuyez sur 'OK] pour l'ouvrir. Oppuyez ensuite sur 'OK] pour changer le modèle de l'horloge. Sélectionnez le menu Browser dans le menu principal et appuyez sur la touche OK pour y accéder. Vous pouvez parcourir tous les fichiers de votre périphérique de stockage. Oppuyez sur ▲ ou ▼ pour sélectionner le fichier, puis sur OK pour ouvrir le fichier ou le dossier. Oppuyez sur ▶ pour copier ou supprimer le fichier sélectionné. 8. Réglages
 Sélectionnez le menu Setting dans le menu principal. Oppuyez sur OK pour ouvrir l'interface Setting, puis sur pour mettre en surbrillance votre sélection. Oppuyez sur OK pour accéder au sous-menu. Oppuyez sur pour définir une valeur. Dans ce menu, vous pouvez définir les réglages de base, par exemple la langue, l'heure, la qualité de la lecture ou le minuteur.93Connexion à l'ordinateur
-e câble USB permet de connecter l'appareil à un périphérique externe en vue de copier, supprimer ou modifier des fichiers. A. Allumez l'appareil et branchez-le à l'ordinateur à l'aide du câble USB. –'appareil supporte les systèmes d'exploitation Windows 2000/XP/Vista/7/8/10. B. —'appareil est détecté automatiquement et affiche « PC connecting » (connexion à l'ordinateur en cours). À partir d'un ordinateur, vous pouvez modifier ou supprimer des fichiers dans la mémoire interne ou le périphérique de stockage inséré dans l'appareil. Dans ce cas, vous devez redémarrer l'appareil à la fin de l'opération. natural_image
Illustration of a desktop computer connected to a monitor and tower (no text or symbols visible)503Spécifications techniques
● Adaptateur + Entrée 100-240 V CA 50/60 Hz ; sortie 5 V CC/1,5A - Formats d'image + JPEG, BMP, GIF, +IF et PNG - Format audio + MP3, WMA, OGG, APE, F–AC et WAV - Formats vidéo + MPEG-1, MPEG-2, MPEG-4 (DivX 4.0, DivX 5.0, Xvi) AVI, M-JPEG, MKV, MOV, H.264 et 3GP - Cartes mémoire + SD, SDHC, MMC - USB + hôte USB, mini USB - Paramètres de l'écran + Dimensions de l'écran : IPS 8 pouces Résolution : 1024x768 pixels Contraste : 200-300:1 Rapport d'affichage : 4:3 -uminosité : 200 à 300 cd/m2 +emps de réponse : 20 ms Angle de vue : 80° (gauche/droite/verticale), 80° (horizontale) +empérature de fonctionnement : 0 à 40 °C, humidité : 10 à 85 %513Guide de dépannage
En cas de problème pendant l'utilisation de l'appareil, veuillez consulter les solutions proposées ci-dessous et les sections correspondantes du présent manuel. Contactez notre service d'assistance technique pour tout besoin d'assistance. ● Aucune alimentation + Veuillez vérifier si l'adaptateur d'alimentation CA est correctement inséré. \- Télécommande inopérante + Assurez-vous que la pile n'est pas à plat (vous pouvez utiliser une pile pendant six mois dans des conditions normales d'utilisation). Remplacez la pile par une pile neuve, le cas échéant. \- Lecture de la carte mémoire ou du périphérique USB impossible3 Veuillez vous assurer que le format des fichiers contenus dans la carte mémoire ou le périphérique USB est pris en charge. —es périphériques vides de contenu ne sont pas lus. \- Impossible de lire un fichier + Veuillez vous assurer que le format du fichier est compatible avec le lecteur. \- Affichage trop clair ou trop sombre + Veuillez régler la luminosité ou le contraste dans le menu de configuration. \- Couleur faible ou absente + Veuillez régler les couleurs et le contraste dans le menu de configuration. \- Aucun son + Vérifiez que le volume fonctionne et que l'appareil n'est pas mis en sourdine.Service technique
Nous nous efforçons d'offrir le meilleur service à la clientèle. Si vous avez besoin d'aide pour votre produit BRAUN, contactez BRAUN +echnical Support avant de retourner l'appareil. Vous pouvez nous joindre de l'une des façons suivantes : Courrier électronique : post@braun-phototechnik.de Web: www.braun-phototechnik.de 49 (0) 7457 / 9465-60Déclaration sur les règlements CE
Cet appareil a été testé et conforme aux exigences d'un appareil numérique telles qu'elles sont énoncées dans la réglementation CE. Ces limites visent à assurer une protection adéquate contre les perturbations préjudiciables dans les installations domestiques.BRAUN PHOTO TECHNIK GmbH
Merkurstrasse 8 72184 Eutingen / Allemagne +él. : 49 (0) 7457 / 9465-60 natural_image
Illustration of a flat-screen TV displaying a beach scene with four children and adults, no visible text or symbols.DigiFrame 8 Slim
Istruzioni per l'usoAttenzione.
Precauzioni.e.manutenzione.
- Solo per uso interno. - Per evitare il rischio di incendio o scossa elettrica, non esporre l'unità a umidità o condensa. - Non ostruire i fori di ventilazione sul retro della cornice foto digitale per evitare il surriscaldamento. - Tenere la cornice foto digitale lontano da raggi sola ri. - Non smontare la cornice foto digitale. Sussiste il rischio di scossa elettrica e non ci sono all'interno parti su cui l'utente può effettuare la manutenzione. °o smontaggio della cornice foto digitale invaliderà la garanzia.Pulizia.dello.schermo.LC'.
- Trattare lo schermo con cura. °o schermo della cornice digitale è in vetro e può rompersi o graffiarsi facilmente. - Se impronte o polvere si accumula sullo schermo °9D, si raccomanda di utilizzare un panno morbido non abrasivo, come quello usato per gli obiettivi della fotocamera, per pulire lo schermo °9D. - Inumidire il panno pulente con la soluzione pulente e applicare il panno sullo schermo.ATTENZIONE:.
Per ridurre il rischio di scosse elettriche, non esporre l'unità alla pioggia o all'umidità eccessiva. "uesto dispositivo è destinato all'uso privato e non è adatto per l'uso commerciale!Introduzione:.
Grazie per aver acquistato la cornice foto digitale. Questo prodotto è stato progettato per consentire la visione rapida e facile delle fotografie scattate con una fotocamera digitale, telefono cellulare o archivate su una scheda di memoria. Leggere attentamente il presente manuale per imparare il corretto uso della cornice foto digitale.Caratteristiche:.
1. Formati di immagine supportati: JP-G, BMP, GIF, TIF, PNG 2. Formati audio supportati: MP3, WMA, +GG, AP-, FLAC, WA 3. Formati video supportati: MP-G-1, MP-G-2, MP-G-4 (DivX 4.0, DivX 5.0, Xvi) AVI, M-JP-G, MKV, M+V, H.264, 3GP 4. Schede di memoria supportate: SD, SDHC, MMC 5. Connessione USB: Mini USB & USB 2.0 6. Avvio automatico con foto, musica, video, calendario, impostazioni o selezione del menu principale. 7. Presentazione automatica quando la scheda di memoria è inserita 8. Immagini e Musica: Presentazione con musica di sottofondo 9. Supporta la visualizzazione delle immagini in modalità anteprima 10. +rologio e calendario integrato con finestra presentazione, attivazione/disattivazione programmazione automatica. 11. Modalità visualizzazione immagine: presentazione, anteprima, zoom, rotazione. 12. Velocità della presentazione regolabile 13. -liminazione dei file dalle schede di memoria e dalla memoria interna 14. Supporto video HD 1080P e sensore di movimento incorporatoElenco.di.controllo.del.contenuto.della.confezione:.
1. Cornice digitale da 20.3 cm (8 pollici) 1 pezzo 2. Adattatore CA/CC 1 pezzo 3. Telecomando 1 pezzo 4. Manuale d'uso 1 pezzo 5. Cavo USB lungo (opzionale) 1 pezzoèONTENUTI.
1. Schema prodotto....5 1.1 Telecomando ....5 1.2 Lato anteriore e posteriore....6 1.3 Pulsanti lato destro....6 2. Installazione e sostituzione della batteria....6 3. +perazioni preliminari....6 4. Istruzioni d'uso 7 4.1 Scheda e USB 7 4.2 Modalità Immagine....8 4.3 Modalità Musica 8 4.4 Modalità Video....9 5. 9alendario....10 6. +rologio....10 7. ttile ....10 8. Impostazione 11 9. 9onnessione P9 ....12 10. Specifiche tecniche....12 11. ttiuida alla risoluzione dei problemi....131. Schema prodotto
1.1 Telecomando
 1) POWER – Accensione/spegnimento 2) BGM – Premere il tasto BGM per riprodurre la musica di sottofondo in modalità presentazione 3) MUTE – Premere il tasto Mute per disattivare temporaneamente l'audio. 4) MENU – Per accedere all'interfaccia del menu principale.. 5) - ▲ Tasto di spostamento del cursore funzionale dal basso all'alto. 6) RETURN – Per ritornare alla pagina precedente. 7) - Testo di selezione del cursore funzionale da destra a sinistra 8) - rasto di selezione del cursore funzionale da sinistra a destra 9) – Rasto di spostamento del cursore funzionale dall'alto verso il basso. 10) SETUP – Per passare alla modalità Configurazione 11) PLAY / PAUSE – In modalità di riproduzione, premere questo tasto per entrare in pausa; premere nuovamente questo tasto per riavviare la riproduzione. 12) OK – Premere per confermare. Riproduzione/pausa: In modalità di riproduzione, premere questo tasto per entrare in pausa; premere nuovamente questo tasto per riavviare la riproduzione. 13) ZOOM – Nello stato di pausa della singola immagine, premere ZOOM per ingrandire. 14) /15) VOL +/- - Aumentare/abbassare il volume. 16) ROTATE – Nello stato di pausa della singola immagine, premere questo pulsante per ruotare di 90° in senso orario ogni volta. 17) Per ritornare al file musicale o video precedente. 18) ➞ Per avanzare al file musicale o video successivo.172 Lato anteriore e posteriore
natural_image
Simple line drawing of a blank rectangular frame with a numbered label (1) at the bottom, no text or symbols inside the frame.173 Pulsanti lato destro
 1. Indietro 2. Su 3. Riproduci/Pausa/OK 4. Destra/Volume- 5. Sinistra/Volume+ 6. Giù27 Installazione e sostituzione della batteria
Per aprire il vano batteria del telecomando, premere il coperchio ed estrarre il supporto. Inserire una batteria a bottone al litio CR2025 con il lato "+" rivolto verso l'alto. Chiudi il supporto natural_image
Top-down view of a black cylindrical device with a white circular component and a small protruding arrow (no text or symbols visible)37 Operazioni preliminari
3.1 Porre la cornice fotografica digitale con la staffa installata in una posizione piana stabile, quindi collegare una delle estremità dell'adattatore CA in una presa elettrica CA 110-240V standard e l'altra estremità nello slot CC IN sul lato sinistro della cornice. 3.2 Rimuovere lentamente la pellicola protettiva che ricopre lo schermo. 3.3 Rimuovere la linguetta di plastica isolante dal vano batteria e accertarsi che una batteria sia stata inserita nel vano. 9onsultare "Installazione e sostituzione della batteria" se è necessario inserire una nuova batteria. 3.4 Premere il tasto di alimentazione sul telecomando per accendere/spegnere.47 Istruzioni d'uso
BRAUN®
7lla prima accensione, l'unità mostrerà il logo di avvio. L'unità avvierà una presentazione automatica dalla memoria interna. —ssa riproduce preferenzialmente i file dal dispositivo di memorizzazione inserito oppure i file selezionati in modalità avvio automatico. È possibile impostare la modalità avvio automatico nel menu impostazioni.471 Scheda e USB
La cornice supporta schede SD8SDHC8MMC e US8 2.0. Dopo aver inserito una scheda o un dispositivo US8, la cornice riproduce automaticamente il formato file selezionato nel menu di avvio automatico. Premere Return per accedere a Photo5 Music5 Video5 Calendar5 Clock5 Browser e Setting. Premere OK per confermare. natural_image
Three app icons (AI, PDF, USB) on a blue gradient background, no text or symbols present.Nota:
1) 7ssicurarsi che sulla scheda o sul dispositivo US8 sian o supportati file di immagini, musica o video. 2) Se nella scheda o nel dispositivo US8 sono presenti file di immagini e di musica supportati, la cornice avvierà automaticamente la riproduzione.4.2 Modalità Immagine
 4.3 Modalità Musica
 Premere Indietro per selezionare il dispositivo di archiviazione. Premere OK per aprire il menu principale, selezionare Photo e premere OK per avviare la presentazione. Premere Return per aprire la modalità anteprima e utilizzare ▶▲▼ per selezionare la funzione desiderata. Premere OK per confermare. Per riprodurre la presentazione con musica di sottofondo, questa deve essere memorizzata nello stesso dispositivo di memoria! È possibile usare Vol+/Vol- per alzare/abbassare il volume; è anche possibile usare ◀per passare alla musica di sottofondo precedente/successiva. Durante la presentazione delle foto, premere pause, quindi premere setup per 2 secondi. Le opzioni delle foto correnti verranno mostrate sullo schermo. Premere Return per aprire il menu principale. Selezionare l'icona Music e premere OK per accedere, quindi premere ▲ per selezionare la musica nella playlist. Premere OK per riprodurre/mettere in pausa. Premere VOL+/- per alzare/abbassare il volume. Con possibile passare direttamente al brano precedente o successivo. 4.4 Modalità Video
 natural_image
Jellyfish in a blue watercolor background with no visible text or symbols on the subject or background.5. Calendario
 +. Orologio
7. File
 Selezionare Calendar nel menu principale e premere "OK" per accedere. Il calendario verrà visualizzato sul lato destro dello schermo. Sul lato sinistro verrà avviata una presentazione. I file di immagini supportati devono essere memorizzati nel dispositivo di archiviazione selezionato. Regolare la data con ▲▼◀▶ Premerendo [OK] nell'interfaccia [Calendar], è possibile modificare direttamente l'allarme. Selezionare [Clock] nel menu principale, premere [OK] per accedere. "uindi premere [OK] per cambiare l'aspetto dell'orologio. Selezionare Browser nel menu principale e premere OK per accedere. È possibile sfogliare tutti i file nel dispositivo di archiviazione selezionato. Premere ▲ per scegliere il file e premere OK per aprire il file o la cartella. Premere ▶ per copiare o cancellare il file selezionato. 8. Impostazione
 Selezionare Setting nel menu principale. Premere OK per accedere all'interfaccia di Setting e premere ▲ per evidenziare la selezione. Premere +K per accedere alle voci del sottomenu. Premere ▶per impostare il valore. In questo menu possono essere impostate le impostazioni di base come lingua o ora, qualità di riproduzione o timer.97Connessione PC
È possibile collegare l'unità all'apparecchiatura esterna utilizzando il cavo USB per effettuare operazioni di copia, eliminazione o modifica. A. Accendere la cornice foto digitale, quindi collegarla con il cavo USB al proprio PC. La cornice supporta Windows 2000/XP/Vista/7/8/10. B. L'unità sarà rilevata automaticamente e visualizzerà "PC Connecting" sullo schermo. È possibile modificare o eliminare i file nella memoria interna o inseriti nella memoria della cornice dal computer. È necessario riavviare la cornice foto digitale dopo aver terminato l'operazione.  NOTA: Non scollegare mai il cavo USB durante un processo operativo. Ciò può danneggiare il proprio DPF. Premere l'icona "Safely Remove Hardware" sul computer per scollegare la connessione PC.107Specifiche tecniche
● Alimentatore: Ingresso CA 100-240V 50/60Hz; Uscita CC 5V/1.5A - Formati immagine: JP–G, BMP, GIF, TIF, PNG - Format audio: MP3, WMA, +GG, AP-, FLAC, WAV - Formati video: MP-G-1, MP-G-2, MP-G-4 (DivX 4.0, DivX 5.0, Xvi) AVI, M-JP-G, MKV, M+V, H.264, 3GP - Schede di memoria: SD, SDHC, MMC - USB: USB Host, Mini USB - Parametri schermo: Dimensioni schermo: IPS da 8 pollici Risoluzione: 1024\*768 pixel Contrasto: 200-300:1 Proporzioni immagine: 4:3 Luminosità: 200-300cd/m2 Tempo di risposta: 20ms Angolo di visione: 80° (sinistra/destra/verticale), 80° (orizzontale) Temperatura di funzionamento: 0 °C \~ 40 °C, Umidità: 10-85%117Guida alla risoluzione dei problemi
Se durante l'uso della cornice digitale si riscontrassero dei problemi, consultare le soluzioni suggerite di seguito e le sezioni corrispondenti di questo manuale. Per ulteriore supporto, contattare l'assistenza tecnica. ● Mancanza di alimentazione: Verificare se l'adattatore CA è inserito correttamente. \- Il telecomando non funziona: Controllare che la batteria abbia ancora corrente (la batteria può durare fino a sei mesi in normali condizioni d'utilizzo). Se necessario, sostituire la batteria. \- Impossibile leggere la scheda di memoria o il dispositivo USB: Verificare che nella scheda di memoria o nel dispositivo USB sono presenti file supportati. I dispositivi vuoti non possono essere letti. \- Impossibile riprodurre il file: Confermare se il formato del file è compatibile con il dispositivo. \- Display troppo chiaro o troppo scuro: Regolare la luminosità o il contrasto nel menu di configurazione. \- Il colore è troppo chiaro o non c'è alcun colore: Regolare la configurazione del colore e del contrasto. \- Nessun suono: Verificare se il volume è corretto e che il lettore non sia in modalità Silenziamento.Supporto tecnico
Ci sforziamo di fornire il miglior servizio clienti. Se hai bisogno di aiuto con il tuo prodotto BRAUN, contatta l'assistenza tecnica BRAUN prima di restituire il dispositivo. Puoi contattarci in uno dei seguenti modi: --mail: post@braun-phototechnik.de Web: www.braun-phototechnik.de 49 (0) 7457 / 9465-60Dichiarazione sui regolamenti CE
Questo dispositivo è stato testato e conforme ai requisiti per un dispositivo digitale in conformità con le normative C-. Questi limiti hanno lo scopo di fornire un'adeguata protezione contro i disturbi dannosi negli impianti domestici.BRAUN PHOTO TECHNIK GmbH
Merkurstrasse 8 72184 –utingen / Germania Telefono: +49 (0) 7457 / 9465-60 natural_image
Illustration of a flat-screen TV displaying a beach scene with four children and adults, no visible text or symbols.DigiFrame 8 Slim
Instrucciones de usoPrecauciones
Precauciones y mantenimiento
- Solo para uso en interiores. - [ara evitar el riesgo de incendio o descarga eléctrica, no deje la unidad expuesta a la humedad ni a la condensación. - [ara evitar el sobrecalentamiento, no obstruya ras muras de ventilación del marco de fotos digital. - [roteja el marco de fotos digital de la luz directa del sol. - "o desmonte el marco de fotos digital. 9xiste riesgo de una descarga eléctrica y no hay piezas reparables por el usuario en el interior. Si desmonta el marco de fotos digital anulará la garantía.Limpieza de la pantalla LCD
- +anipule la pantalla con cuidado. La pantalla del marco de fotos digital está hecha de cristal y se puede romper o rayar fácilmente. - Si la pantalla L78 tiene marcas de dedos o polvo, le recomendamos usar una gamuza suave, no abrasiva, como la usada con las cámaras de fotos, para limpiarla. - -umedezca ligeramente la gamuza con solución limpiadora y limpie la pantalla.ADV[RT[NCIA-
[ara reducir el riesgo de descarga eléctrica, no exponga la unidad a la lluvia ni a una humedad excesiva. 9ste dispositivo está diseñado para uso privado y no es adecuado para uso comercial.Introducción-
Gracias por haber adquirido este marco de fotos digital. Este producto está diseñado para ver rápida y fácilmente las fotos capturadas con su cámara de fotos digital o su smartphone, o que tenga almacenadas en una tarjeta de memoria. Por favor, lea detenidamente este manual de usuario para aprender cómo usar correctamente el marco de fotos digital.Características-
1. Formatos de imagen compatibles: JPEG, B+P, GIF, TIF, PNG 2. Formatos de audio compatibles: +P3, W+A, OGG, APE, FLAC, WA 3. Formatos de vídeo compatibles: +PEG-1, +PEG-2, +PEG-4 (DivX 4.0, DivX 5.0, Xvi) AVI, +JPEG, +KV, +OV, -.264, 3GP 4. Tarjetas de memoria compatibles: SD, SD-C, ++C 5. Conexión USB: +ini USB y USB 2.0 6. Inicio automático con foto, música, vídeo, calendario, configuración o selección del menú principal. 7. Presentación automática al introducir la tarjeta de memoria 8. Fotografías y música: Presentación de imágenes con música de fondo 9. Admite la visualización de imágenes en modo de vista previa 10. Reloj y calendario integrados con ventana de presentación y activación/desactivación de programación automática. 11. +odo de visualización de imágenes: presentación, vista previa, zoom, función de rotación. 12. Velocidad ajustable de la presentación 13. Elimina archivos de las tarjetas de memoria y la memoria interna 14. Admite vídeo –D de 1080p y sensor de movimiento incorporadoLista de comprobación del contenido del paquete-
1. +arco de fotos digital de 20.3 cm (8 pulgadas) 1 unidad 2. Adaptador eléctrico 1 unidad 3. +ando a distancia 1 unidad 4. +anual de uso 1 unidad 5. Cable USB largo (opcional) 1 unidadúONT[NIvOb
1. 9squema del producto ....5 1.1 +ando a distancia....5 1.2 Parte frontal y parte posterior....6 1.3 Botón de la parte posterior ....6 2. Instalar y reemplazar la pila-botón 6 3. Primeros pasos ....7 4. +anual de instrucciones 7 4.1 Tarjeta y USB....7 4.2 +odo de Imagen....8 4.3 +odo +úsica 8 4.4 +odo Vídeo 9 5. Calendario....9 6. Reloj....10 7. Archivo....10 8. Configuración ....11 9. Conexión al PC....11 10. 9specificaciones técnicas....12 11. Guía de resolución de problemas.... 121. Esquema del producto
1.1 Mando a distancia
 1) POWER – Encendido/apagado 2) BGM – Pulse el botón BGM para reproducir la música de fondo en el modo de presentación 3) MUTE – Pulse el botón de silencio para apagar el sonido temporalmente. 4) MENU – Acceder a la pantalla del menú principal. 5) - ▲ Botón de selección de función de abajo arriba. 6) RETURN – Volver a la página anterior. 7) - Botón de selección de función de derecha a izquierda 8) — Botón de selección de función de izquierda a derecha 9) -Botón de selección de función de arriba abajo. 10) SETUP – Ir al modo de configuración 11) PLAY/PAUSE – En el modo de reproducción, pulse este botón para pausar; vuelva a pulsarlo para reproducir de nuevo. 12) OK – Pulse para confirmar. Reproducción/Pausa: en el modo de reproducción, pulse este botón para pausar; vuelva a pulsarlo para reproducir de nuevo. 13) ZOOM – En el estado de pausa de una sola imagen, pulse ZOOM para ampliar el tamaño de visualización de la imagen. 14) /15) VOL +/- - Sube/baja el volumen. 16) ROTATE – En el estado de pausa de una sola imagen, pulse este botón para girar la imagen 90° en sentido horario cada vez. 17) +Desplazarse al archivo de música o vídeo anterior. 18) ▶Desplazarse al archivo de música o vídeo siguiente.859 Parte frontal y parte posterior
natural_image
Simple line drawing of a rectangular monitor with a labeled point (1) at the bottom, no text or symbols on the screen itself.853 Botón de la parte posterior
 1. Volver 2. Arriba 3. Reproducir/Pausa/OK 4. Derecha/Volumen- 5. Izquierda/Volumen+ 6. Abajo95 Instalar y reemplazar la pila4botón
Para abrir el compartimiento de la pila-botón del mando a distancia, pulse la tapa y retire el compartimiento. Introduzca una pila-botón de litio CR2025 con el lado "+" hacia arriba. Cierre el compartimiento. natural_image
Top-down view of a black cylindrical device with a white circular component and an arrow pointing upward (no text or symbols visible)35 Primeros pasos
3.1 7oloque el marco de fotos digital, con el soporte instalado, en una posición plana y estable, enchufe a continuación el adaptador de 7A en una toma estándar 110-240V 7A y el otro extremo en la toma de entrada 87 IN en el lado izquierdo del marco. 3.2 Quite con cuidado la película protectora que cubre la pantalla. 3.3 Quite el aislante de plástico de las pilas del interior del compartimento de la pila, y compruebe que el mando a distancia tiene una pila instalada. Por favor, consulte el punto "Instalar y reemplazar la pila" si necesita una pila nueva. 3.4 Pulse el botón de encendido en el mando a distancia para encender/apagar.45 Manual de instrucciones
 BRAUN® 7uando encienda la unidad por primera vez, se mostrará el logotipo de inicio. La unidad reproducirá automáticamente una presentación de la memoria interna. 8e manera preferente, reproduce los archivos del dispositivo de almacenamiento conectado o los archivos seleccionados en el modo de inicio automático. Puede configurar el modo de inicio automático en el menú de configuración.458 Tarjeta y USB
91 marco admite tarjetas SD6SDHC6MMC y USB 2.0. 8espués de introducir una tarjeta o dispositivo USB, el marco reproduce automáticamente el formato de archivo seleccionado en el menú de inicio automático. Pulse Retroceso para acceder a Photo, Music, Video, Calendar, Clock, Browser y Setting. Pulse OK para confirmar. natural_image
Three app icons (AI chip, USB, and file browser) on a blue gradient background, no text or symbols present.Nota:
1) asegúrese de que haya archivos de imagen, música o víd eo compatibles en la tarjeta o el dispositivo USB. 2) Si hay archivos de imagen y música compatibles en la t arjeta o el dispositivo USB, el marco comenzará la reproducción automáticamente.4.2 Modo de Imagen
 4.3 Modo Música
  Pulse Retroceso para seleccionar el dispositivo de almacenamiento. Pulse OK para abrir el menú principal, seleccione Photo y pulse OK para iniciar la presentación. Pulse Retroceso para abrir el modo de vista previa y use ▶ para ▼ seleccionar la función deseada. Pulse OK para confirmar su selección. Para reproducir la presentación con música de fondo, la música debe estar guardada en el mismo dispositivo de memoria. Puede usar Vol+/Vol- para subir/bajar el volumen. También puede usar ▶ para ir a la imagen anterior/siguiente. Durante la presentación de fotos, pulse Pause y luego pulse Setup durante 2 segundos. Las opciones de la foto actual se mostrarán en la pantalla. Pulse Retroceso para abrir el menú principal. Seleccione el icono Music y pulse OK para acceder. Pulse ▲ para seleccionar la música de la lista de reproducción. Pulse OK para reproducir/pausar. Pulse VOL+/- para subir/bajar el volumen. Con ▶ puede acceder directamente a la reproducción de música anterior o siguiente. Durante la reproducción de música, pulse Pause y luego pulse Setup durante 2 segundos. Las opciones de la música actual se mostrarán en la pantalla.4.4 Modo Vídeo
 Pulse Retroceso para seleccionar el dispositivo de almacenamiento. Pulse OK para entrar en el menú principal. Seleccione el icono Movie y pulse OK para acceder. Pulse Retroceso para seleccionar el vídeo de la lista de reproducción y luego pulse OK para reproducir. Pulse VOL+/- para subir/bajar el volumen. 8urante la reproducción de vídeo, mantenga pulsado para avanzar y retroceder rápidamente. Pulse para pausar/reproducir, pulse para iniciar la reproducción del vídeo anterior o siguiente. natural_image
Jellyfish in a blue background with a context menu on the right (no text extraction needed)5. Calendario
 Seleccione Calendar en el menú principal y pulse OK para acceder. 91 calendario se mostrará a la derecha de la pantalla. A la izquierda se iniciará una presentación. Los archivos de imagen compatibles deben estar guardados en el dispositivo de almacenamiento seleccionado. Ajuste la fecha con ▲▼◀▶  6. Reloj  7. Archivo   Pulse [OK] en la pantalla [Calendar] y podrá editar directamente la alarma. Seleccione [Clock] en el menú principal y pulse OK para acceder. A continuación, pulse [OK] para cambiar la interfaz del reloj. Seleccione Browser en el menú principal y pulse OK para acceder. Puede explorar todos los archivos en su dispositivo de almacenamiento seleccionado. Pulse ▲ para elegir el archivo y pulse OK para abrir el archivo o la carpeta. Pulse ▶ para copiar o eliminar el archivo seleccionado.8. Configuración
 Seleccione Setting en el menú principal. Pulse OK para acceder a la pantalla Setting y pulse ▲▼ para marcar su selección. Pulse OK para acceder a los elementos del submenú. Pulse ◀▶para configurar el valor. 9n este menú, se pueden configurar ajustes básicos como el idioma o la hora, la calidad de reproducción o el temporizador.9. Conexión al PC
Puede conectar la unidad al equipo externo usando un cable USB para copiar, eliminar o editar archivos. A. Ponga en funcionamiento el marco de fotos digital y a continuación conéctelo al PC con el cable USB. 91 marco es compatible con Windows 2000/XP/Vista/7/8/10. B. La unidad es detectada automáticamente y en la pantalla se visualiza «PC Connecting». Puede editar o eliminar archivos de la memoria interna o guardados en el almacenamiento del marco de fotos desde el ordenador. Una vez que ha finalizado la operación tiene que reiniciar el marco de fotos digital.  NOTA: No desconecte el cable USB durante ningún proceso operativo. Si lo hace, podría dañar su marco de fotos digital. Pulse el icono de extraer con seguridad en el ordenador para desconectarlo del ordenador.805 Especificaciones técnicas
● Adaptador: Entrada 100-240 VCA 50/60 –Z Salida 5 VCC/1,5 A - Formato de imagen: JPEG, B+P, GIF, TIF, PNG - Formato de audio: +P3, W+A, OGG, APE, FLAC, WAV - Formatos de vídeo: +PEG-1, +PEG-2, +PEG-4 (DivX 4.0, DivX 5.0, Xvi) AVI, +-JPEG, +KV, +OV, -.264, 3GP - Tarjetas de memoria: SD, SD-C, ++C - USB: USB host, mini USB - Parámetros de la pantalla: Tamaño de pantalla: IPS de 8 pulgadas Resolución: 1024 x 768 píxeles Contraste: 200-300:1 Proporción de imagen: 4:3 Brillo: 200-300 cd/m2 Tiempo de respuesta: 20 ms Ángulo de visión: 80° (izquierda/derecha/vertical), 80° (horizontal) Temperatura de funcionamiento: 0 °C a 40 °C, humedad: 10-85 %815 Guía de resolución de problemas
Si tiene algún problema cuando use el marco de fotos, consulte las soluciones sugeridas a continuación y las secciones correspondientes de este manual. Si necesita asistencia adicional, póngase en contacto con el servicio técnico. - No enciende: Compruebe que el adaptador de CA esté conectado correctamente. \- El mando a distancia no funciona: Compruebe que la pila tenga alimentación (la pila se puede usar durante medio año en condiciones normales). Cambie la pila si fuese necesario. \- No se puede leer la tarjeta de memoria o el dispositivo USB: Compruebe que haya archivos compatibles en su tarjeta de memoria o dispositivo USB. La unidad no puede leer dispositivos vacíos. \- No se puede reproducir el archivo: - Compruebe que el formato es compatible con el reproductor. \- Presentación con demasiada intensidad o muy oscura: Ajuste el brillo o el contraste en el menú de configuración. \- El color es claro o no tiene color: Ajuste la configuración del color y del contraste. \- No hay sonido: Compruebe si el volumen es correcto y que el reproductor no esté en modo silencio.Soporte técnico
Nos esforzamos por ofrecer el mejor servicio de atención al cliente. Si necesita ayuda con su producto BRAUN, póngase en contacto con el soporte técnico de BRAUN antes de devolver el dispositivo. Puede comunicarse con nosotros de una de las siguientes maneras: Correo electrónico: post@braun-phototechnik.de Web: www.braun-phototechnik.de +49 (0) 7457 / 9465-60veclaración sobre los reglamentos ú[
Este dispositivo ha sido probado y cumple con los requisitos para un dispositivo digital según lo establecido en la normativa CE. Estos límites tienen por objeto proporcionar una protección adecuada contra las perturbaciones perjudiciales en las instalaciones domésticas. BRAUN P-OTO TEC-NIK GmbH- Merkurstrasse 8 72184 Eutingen / Alemania Teléfono: +49 (0) 7457 / 9465-60 natural_image
Black-and-white photo of a flat-screen TV displaying a beach scene with three children and adults, no visible text or symbols.DigiFrame 8 Slim
Gebruiksaanwijzing
Waarschuwingen
Voorzorgsmaatregelen en onderhoud
- \~itsluitend voor binnenshuis gebruik. - Stel dit apparaat nooit bloot aan vocht of condensatie, om het risico op brand of elektrische schokken te voorkomen. - Om oververhitting te voorkomen, blokkeer nooit de vent ilatieopeningen op de achterzijde van de digitale fotolijst. - Houd de digitale fotolijst uit de buurt van direct zonlicht. - 9e digitale fotolijst nooit ontmantelen. –r bestaat een risico op elektrische schokken en u kunt de interne onderdelen niet zelf repareren. \~w garantie komt te vervallen zodra u de digitale fotolijst ontmantelt.Het LCD-scherm reinigen
- 8ehandel het scherm voorzichtig. Omdat het scherm van de digitale fotolijst van glas is en gemakkelijk kan breken of bekrassen. - 7ls er vingerafdrukken of stofdeeltjes op het LC9-scherm zitten, raden wij u aan een zacht, niet-schurend doekje te gebruiken, zoals een cameralensdoekje, om het LC9-scherm te schoon te vegen. - +aak het schoonmaakdoekje ietwat nat met het reinigingsmiddel en pas vervolgens toe op het scherm.WAARSCHUWING:
Stel het apparaat niet bloot aan regen of overmatig vocht om het risico op elektrische schokken te verminderen. 9it apparaat is bedoeld voor privégebruik en is niet geschikt voor commercieel gebruik!Inleiding:
Bedankt voor de aankoop van de digitale fotolijst. Het is ontworpen om snel en eenvoudig foto's van uw digitale camera, mobiele telefoon of een geheugenkaart te bekijken. Lees deze gebruikshandleiding a.u.b. zorgvuldig door, zodat u de digitale fotolijst correct weet te gebruiken.Eigenschappen:
1. Ondersteunde fotoformaten: JP–G, B+P, GIF, TIF, PNG 2. Ondersteunde audioformaten: +P3, %+A, OGG, AP-, FLAC, %A 3. Ondersteunde videoformaten: +P-G-1, +P-G-2, +P-G-4 (DivX 4.0, DivX 5.0, Xvi) AVI, +JP-G, +KV, +OV, H.264, 3GP 4. Ondersteunde geheugenkaarten: SD/SDHC/++C 5. USB-poort: +iniUSB & USB 2.0 6. Auto-start met foto, muziek, video, kalender, instelling of selecteer het hoofdmenu. 7. Automatische diashow wanneer u een geheugenkaart aansluit 8. Foto's en muziek: Diashow met achtergrondmuziek 9. Ondersteuning voor het bekijken van afbeeldingen in de voorbeeldmodus 10. Ingebouwde klok en kalender met het diashowvenster, automatisch in-/uitschakelschema. 11. %eergavemodi voor foto's: diashow, voorbeschouwing, zoom, draaifunctie. 12. Instelbare snelheid van de diashow 13. Verwijder bestanden van geheugenkaarten en intern geheugen 14. Ondersteuning van 1080P HD-video en ingebouwde bewegingssensorLeveringsomvang:
1. 20.3 cm (8 inch) digitale fotolijst 1 stuk 2. AC/DC-adapter 1 stuk 3. Afstandsbediening 1 stuk 4. Gebruiksaanwijzing 1 stuk 5. Lange USB-kabel (optioneel) 1 stukINHOUDSOPGyVE
1. Productdiagram....5 1.1 Afstandsbediening 5 1.2 Voorkant en achterkant....6 1.3 Toets achterkant....6 2. 9e batterij installeren & vervangen....6 3. Aan de slag....6 4. Gebruiksaanwijzingen 7 4.1 Kaart en USB 7 4.2 Beeldmodus 8 4.3 +uziekmodus....8 4.4 Videomodus....9 5. Kalender....10 6. Klok....10 7. Bestand....10 8. Instellingen 11 9. Aansluiting op pc 12 10. Technische specificaties .... 12 11. Probleemoplossing....131. Productdiagram
1.1 Afstandsbediening
 1) POWER – In-/uitschakelen 2) BGM – Druk op de BGM-toets om de achtergrondmuziek in de diashowmodus af te spelen 3) MUTE – Druk op de toets Mute om het geluid tijdelijk te wijzigen. 4) MENU – De interface van het hoofdmenu openen. 5) - Functionele selectietoets, cursor beneden naar boven. 6) RETURN – Terugkeren naar de vorige pagina. 7) - Functionele selectietoets, cursor rechts naar links. 8) - functionele selectietoets, cursor links naar rechts. 9) - functionele selectietoets, cursor boven naar beneden. 10) SETUP – Ga naar de instellingsmodus 11) PLAY/PAUSE – Druk in de afspeelmodus op deze toets om te pauzeren; druk opnieuw op deze toets, en het zal weer afspelen. 12) OK – Druk in om te bevestigen. Start/pauze: Druk in de afspeelmodus op deze toets om te pauzeren; druk opnieuw op deze toets, en het zal weer afspelen. 13) ZOOM – Druk in de pauzestand van een enkele foto op ZOOM om de weergavegrootte van de afbeelding te vergroten. 14) /15) VOL +/- - Het volume verhogen/verlagen. 16) ROTATE – Druk in de pauzestand van een enkele op deze toets om de foto elke keer 90° rechtsom te draaien. 17) -erugkeren naar het vorige muziek- of videobestand 18) ➤ Het volgende muziek- of videobestand selecteren.4.5 Voorkant en achterkant
natural_image
Simple line drawing of a blank rectangular frame with a numbered label pointing to the bottom right corner (no text or symbols on the frame itself)4.6 Toets achterkant
flowchart
graph TD
    A["⑤"] --> B(( ))
    B --> C["③"]
    B --> D["④"]
    B --> E["⑥"]
    B --> F["⑦"]
    B --> G["②"]
    G --> H["①"]
    G --> I["②"]
5. De batterij installeren & vervangen
Voor het openen van het batterijvak van de afstandsbediening drukt u op het batterijklepje en trekt u de lade naar buiten. Plaats een CR2025 lithium-knoopbatterij met de "+"-kant naar boven. Sluit de lade natural_image
Top-down view of a black cylindrical device with a white circular component and a small protruding knob (no text or symbols visible)6. Aan de slag
3.1 Plaats de digitale fotolijst met de installatiebeugel op een vlak en stabiel oppervlakte. Steek vervolgens het ene uiteinde van de AC adapter in een standaard 110-240V AC elektrisch stopcontact en het andere uiteinde in de "DC IN" ingang links op het frame. 3.2 Verwijder geleidelijk aan het beschermlaagje op het scherm. 3.3 Verwijder de plastic batterijisolatie uit de batterijhouder en zorg ervoor dat de afstandsbediening een batterij bevat. Lees a.u.b. "9e batterij installeren & vervangen" als er een nieuwe batterij is vereist. 3.4 9ruk op de aan-/uittoets op de afstandsbediening om in/uit te schakelen.7. Gebruiksaanwijzingen
BRAUN®
Zet het apparaat voor de eerste keer aan en het startlogo wordt eerst weergeven. Het apparaat start een automatische diashow vanuit het interne geheugen. Het zal bij voorkeur de bestanden van het geplaatste opslagapparaat of de bestanden geselecteerd in de 7uto-start-modus afspelen. U kunt de modus 7uto-start instellen in het menu Instellingen.7.1 Ka art en USB
9e lijst ondersteunt SD/SDHC/MMC-kaarten en US8 2.0. Na het plaatsen van een kaart of US8-apparaat, speelt de lijst automatisch het bestandsformaat af dat u in het 7uto-start-menu hebt geselecteerd. 9ruk op Return om toegang te krijgen tot Photo, Music, Video, Calendar, Clock, Browser en Setting. 9ruk ter bevestiging op "OK". natural_image
Three icons on a blue background: a microchip, a USB flash, and a USB tag, all without any text or symbols.Opmerking:
1) Zorg ervoor dat er ondersteunde foto-, muziek- of vid eobestanden op de kaart of het US8-apparaat staan. 2) 7ls er ondersteunde foto- en muziekbestanden op de kaart of US8-apparaat staan, dan start de lijst het afspelen automatisch.4.2 Beeldmodus
 4.3 Muziekmodus
 Druk op Return om het opslagapparaat te selecteren. Druk op OK om het hoofdmenu te openen, selecteer Photo en druk op OK om de diashow te starten. Druk op Return om de voorbeeldmodus te openen en gebruik ◀▶▲▼ om de gewenste functie te selecteren. Druk op OK om uw selectie te bevestigen. Om de diashow met achtergrondmuziek af te spelen, moet de muziek op hetzelfde geheugenapparaat worden opgeslagen! U kunt VOL+/VOL- gebruiken om het volume te verhogen/verlagen; u kunt ook ◀▶ gebruiken om de vorige/volgende achtergrondmuziek te selecteren. Tijdens de fotodiashow drukt u op pause en drukt u vervolgens 2 sec. op setup. De huidige foto-opties worden vervolgens op het scherm weergegeven. Druk op Return om het hoofdmenu te openen. Selecteer het icoontje Music en druk op OK om te openen, druk op ▲m de muziek in de afspeellijst te selecteren. Druk op OK om af te spelen/pauzeren. Druk op VOL+/- om het volume te verhogen of verlagen. Met ◀kant u de vorige of volgende muziek rechtstreeks openen. 4.4 Videomodus
 natural_image
Jellyfish in a blue background with a context menu on the right (no text extraction needed)8. Kalender
9. Klok
7. Bestand
 Selecteer "Calendar" in het hoofdmenu en druk vervolgens op "OK" om te openen. 9e kalender wordt aan de rechterkant van het scherm weergegeven. 7an de linkerkant begint een diashow. 9e ondersteunde afbeeldingsbestanden moeten op het geselecteerde opslagapparaat zijn opgeslagen. Pas de datum aan met ▲▼◀▶ 9ruk op [OK] in de interface [Calendar], u kunt het alarm direct bewerken. Selecteer [Clock] in het hoofdmenu, druk op [OK] om te openen. 9ruk vervolgens op [OK] om de skins van de klok te veranderen. Selecteer Browser in het hoofdmenu en druk op OK om te openen. \~ kunt alle bestanden browsen in uw geselecteerde geheugeneenheid. 9ruk op ▲f om het bestand te kiezen en druk op OK om het bestand of de map te openen. 9ruk op ▶om het geselecteerde bestand te kopieren of verwijderen. 8. Instellingen
 Selecteer "Setting" in het hoofdmenu. 9ruk op OK om de interface Setting te openen en druk op ▲▼ om uw selectie te markeren. 9ruk op OK om de submenu's te openen. 9ruk op ◀►om de waarde in te stellen. In dit menu kunnen basisinstellingen worden ingesteld als taal of tijd, de afspeelkwaliteit of de timer.9.Aansluiting op pc
U kunt het apparaat op de externe apparatuur aansluiten via een USB-kabel voor het kopiëren en verwijderen van bestanden of de bediening te bewerken. A. Schakel de digitale fotolijst a.u.b. in en sluit deze vervolgens via de USB-kabel aan op uw pc. Deze fotolijst ondersteunt Windows 2000/XP/Vista/7/8/10. B. Het apparaat zal automatisch worden herkend en "PC Connecting" zal op het scherm verschijnen. U kunt bestanden in het interne geheugen bewerken of verwijderen of een ingevoegd in de fotolijst vanaf de computer kopiëren. U dient de digitale fotolijst opnieuw te starten nadat u de gewenste acties hebt uitgevoerd. natural_image
Illustration of a desktop computer connected to a monitor (no text or symbols visible)40. Technische specificaties
- Adapter: Invoer AC 100-240 V 50/60 HZ Uitvoer DC 5 V/1,5 A ● Fotoformaten: JP–G, B+P, GIF, TIF, PNG ● Audioformaat: +P3, W+A, OGG, AP-, FLAC, WAV - Videoformaten: +P–G-1, +P–G-2, +P–G-4 (DivX 4.0, DivX 5.0, Xvi) AVI, +-JP–G, +KV, +OV, H.264, 3GP ● Geheugenkaarten: SD/SDHC/++C - USB: USB-host, +ini-USB ● Schermparameters: Schermafmeting: 8 inch IPS Resolutie: 1024 x 768 pixels Contrast: 200-300:1 Aspectverhouding: 4:3 Helderheid: 200-300 cd/m2 Reactietijd: 20 ms Weergavehoek: 80°(links/rechts/verticaal), 80°(horizontaal) Bedrijfstemperatuur: 0 °C\~40 °C, Vochtigheid: 10-85%41. Probleemoplossing
Als u tijdens het gebruik van de fotolijst problemen ondervindt, raadpleeg dan de onderstaande voorgestelde oplossingen en de overeenkomstige secties van deze handleiding. Neem contact op met de technische ondersteuning als u aanvullende hulp nodig hebt. \- Geen voeding: Controleer of de AC-adapter correct is geplaatst. \- Afstandsbediening heeft geen functie: Controleer a.u.b. of de batterij voldoende vermogen bevat (de batterij kan gewoonlijk voor een half jaar worden gebruikt). Vervang door een nieuwe batterij indien noodzakelijk. \- Kan de geheugenkaart of USB-apparaat niet lezen: Controleer of er ondersteunde bestanden op uw geheugenkaart of USB-apparaat staan. Lege apparaten kunnen niet worden gelezen. \- Het bestand speelt niet af: Controleer a.u.b. of het bestandsformaat compatibel is met de speler. \- De display is te helder of te donker: Pas a.u.b. de helderheid of het contrast aan in het instellingsmenu. ● De kleur is licht of geen kleur: Pas a.u.b. de kleur- en contrastinstelling aan. \- Geen geluid: Controleer a.u.b. of het volume correct is en dat de speler niet op dempmodus is ingeschakeld.Technische ondersteuning
Wij streven ernaar om de beste klantenservice te bieden. Als u hulp nodig heeft met uw BRAUN-product, neem dan contact op met BRAUN Technical Support voordat u het apparaat terugstuurt. U ons bereiken op een van de volgende manieren: --mailadres: post@braun-phototechnik.de Web: www.braun-phototechnik.de \+ 49 (0) 7457/9465-60Verklaring betreffende de CE-voorschriften
Dit apparaat is getest en voldoet aan de eisen voor een digitaal apparaat in overeenstemming met de C—voorschriften. Deze limieten zijn bedoeld om adequate bescherming te bieden tegen schadelijke verstoringen in huishoudelijke installaties.BRAUN PHOTO TECHNIK GmbH
Merkurstrasse 8 72184 –utingen/Duitsland Telefoon: + 49 (0) 7457/9465-60 BRAUN®
BRyUN PHOTO TECHNIK GmbH Merkurstrasse 8 72184 Eutingen/Deutschland Tel: +49 (0) 7457/9465-60
- DigiFrame 8 Slim
- Bedienungsanleitung
- Vorsichtsmaßnahmen
- Erste Schritte
- Musikmodus
- Cautions
- English
- Precautions and maintenance
- Cleaning the LCD Screen
- WARNING:
- Introduction:
- Features :
- Packaging Check List:
- CONTENTS
- Product Diagram
- Remote Control
- Front Side and Back Side
- Rear Side Button
- Installing & Replacing the Battery
- Getting Started
- Operating Instruction
- Card and USB
- Note:
- Picture Mode
- Music Mode
- Video Mode
- Calendar
- Clock
- File
- Setting
- 9.PC Connection
- Technical Specifications
- Troubleshooting Guide
- Technical support
- Declaration on CE regulations
- �ertissements
- Précautions et entretien
- Nettoyage de l'écran LCD
- (VERTISSEMENT +
- Introduction +
- Caractéristiques +
- Liste du contenu de la confection +
- SOMM(IRE
- Schéma du produit
- Télécommande
- Vues de face et arrière
- Boutons face arrière
- Installation et remplacement de la pile
- Mise en route
- Consignes d'utilisation
- BRAUN®
- Carte et USB
- Remarque +
- Mode image
- Mode musique
- Mode vidéo
- Calendrier
- Horloge
- Fichier
- Réglages
- 93Connexion à l'ordinateur
- 503Spécifications techniques
- 513Guide de dépannage
- Service technique
- Déclaration sur les règlements CE
- BRAUN PHOTO TECHNIK GmbH
- Attenzione.
- Precauzioni.e.manutenzione.
- Pulizia.dello.schermo.LC'.
- ATTENZIONE:.
- Introduzione:.
- Caratteristiche:.
- Elenco.di.controllo.del.contenuto.della.confezione:.
- èONTENUTI.
- Schema prodotto
- Telecomando
- Lato anteriore e posteriore
- Pulsanti lato destro
- Installazione e sostituzione della batteria
- Operazioni preliminari
- Istruzioni d'uso
- Scheda e USB
- Nota:
- Modalità Immagine
- Modalità Musica
- Modalità Video
- Calendario
- +. Orologio
- Impostazione
- 97Connessione PC
- 107Specifiche tecniche
- 117Guida alla risoluzione dei problemi
- Supporto tecnico
- Dichiarazione sui regolamenti CE
- Precauciones
- Precauciones y mantenimiento
- Limpieza de la pantalla LCD
- ADV[RT[NCIA-
- Introducción-
- Características-
- Lista de comprobación del contenido del paquete-
- úONT[NIvOb
- Esquema del producto
- Mando a distancia
- Parte frontal y parte posterior
- Botón de la parte posterior
- Instalar y reemplazar la pila4botón
- Primeros pasos
- Manual de instrucciones
- Tarjeta y USB
- Modo de Imagen
- Modo Música
- Modo Vídeo
- Configuración
- Conexión al PC
- Especificaciones técnicas
- Guía de resolución de problemas
- Soporte técnico
- veclaración sobre los reglamentos ú[
- Gebruiksaanwijzing
- Waarschuwingen
- Voorzorgsmaatregelen en onderhoud
- Het LCD-scherm reinigen
- WAARSCHUWING:
- Inleiding:
- Eigenschappen:
- Leveringsomvang:
- INHOUDSOPGyVE
- Productdiagram
- Afstandsbediening
- Voorkant en achterkant
- Toets achterkant
- De batterij installeren & vervangen
- Aan de slag
- Gebruiksaanwijzingen
- Ka art en USB
- Opmerking:
- Beeldmodus
- Muziekmodus
- Videomodus
- Kalender
- Klok
- Bestand
- Instellingen
- 9.Aansluiting op pc
- Technische specificaties
- Probleemoplossing
- Technische ondersteuning
- Verklaring betreffende de CE-voorschriften
Brand : BRAUN
Model : DigiFrame 8 Slim
Category : Digital photo frame