TSE Prime Set 5013 - Electronic lock Burg Wächter - Free user manual and instructions
Find the device manual for free TSE Prime Set 5013 Burg Wächter in PDF.

| Product type | Electronic radio key lock (E-KEY) |
| Brand | Burg Wächter |
| Model | TSE Prime Set 5013 |
| Cylinder power supply | 2 alkaline LR6 (AA) 1.5 V batteries |
| Remote control power supply | 1 lithium CR2032 battery |
| Max. number of users | 48 |
| Remote control range | 3 m |
| Max. door thickness | 118 mm (59/59 mm at screw center) |
| Operating temperature | -15 °C to +50 °C |
| Permissible relative humidity | Up to 93% (non-condensing) |
| Keyboard protection rating (optional) | IP65 (PIN keypad) / IP55 (FS keypad) |
| Lockout after errors | 3 incorrect entries: 1 min, then 3 min each time |
| Display | 12 selectable languages |
| Optical signaling | LED on interior button |
| Emergency function | Emergency mechanical key included |
| Cylinder battery type | 2 × LR6 (AA) alkaline |
| Remote control battery type | CR2032 |
| Battery replacement | Cylinder and keypad batteries replaceable by user |
| Cleaning | Damp cloth, no aggressive or alcohol-based products |
| Security | Factory admin code to be changed, mechanical emergency key, lockout after errors |
| Repairability | Replaceable batteries; spare parts available via customer service |
Frequently Asked Questions - TSE Prime Set 5013 Burg Wächter
User questions about TSE Prime Set 5013 Burg Wächter
0 question about this device. Answer the ones you know or ask your own.
Ask a new question about this device
Download the instructions for your Electronic lock in PDF format for free! Find your manual TSE Prime Set 5013 - Burg Wächter and take your electronic device back in hand. On this page are published all the documents necessary for the use of your device. TSE Prime Set 5013 by Burg Wächter.
USER MANUAL TSE Prime Set 5013 Burg Wächter
natural_image
Close-up of a metallic cylindrical mechanical component with no visible text or symbols on its body.www.burg.biz ww
vw.burg.biz
Language
de Deutsch....5
en English 23
fr. Français: 41
nl Nederlands 60
it Download: www.burg.biz
es Descarga: www.burg.biz
pt Download: www.burg.biz
se Download: www.burg.biz
no Download: www.burg.biz
dk Download: www.burg.biz
fi Ladattava tiedosto: www.burg.biz
el λήψη: www.burg.biz
tr Indir: www.burg.biz
ro Descărcare: www.burg.biz
p1 Pobieranie pliku: www.burg.biz
α Stähnout: www.burg.biz
hu Letölthetö: www.burg.biz
sl Download: www.burg.biz
sk. Download: www.burg.biz
hr Download: www.burg.biz
ru загрузка: www.burg.biz
bg Download (зареди): www.burg.biz
et Download: www.burg.biz
THE TIME
Structure
text_image
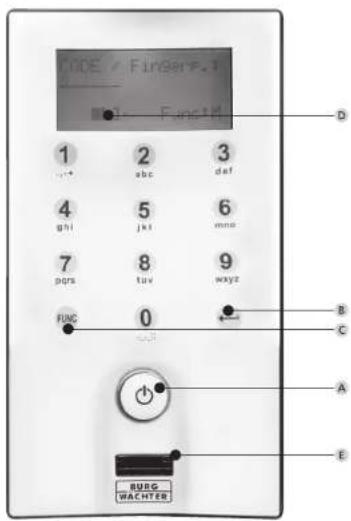
CODE - FunGenF 1 2 3 + + abc def 4 5 6 ghi jkl mno 7 8 9 pors tuv wxyz func 0 B C A E BURG WACHTERTSE Keypad FS
Abbildung
AOn Taste
Low Power 2.4 GHz Transceiver
Maximum Transmit Output Power 1dBm
Frequency usage range 2,400GHz ... 2,4835 GHz ISM/SRD band system
- Priorität
natural_image
Black rectangular electronic device with a small circular top and a small square on the side (no visible text or symbols)
natural_image
Close-up of a black plastic object with a white circular top and label '2' in the corner (no readable text or symbols on the object itself)
natural_image
Close-up of a handheld electronic device with a dial and control panel (no visible text or symbols)Montage des Keypads
natural_image
Two views of a hand holding a small black electronic component with white connectors, and a close-up of its black plastic housing (no text or symbols visible)natural_image
Black and white photo of a handheld electronic device with a vertical arrow indicating downward motion (no visible text or symbols)natural_image
Close-up of a black-and-white photo of a hand holding a screwdriver above a wall, no visible text or symbols.natural_image
Stacked hard drives with a visible label and a curved arrow on the side (no readable text or symbols)natural_image
Close-up of a black VARTA battery pack with two cylindrical batteries (no visible text or symbols on the main body)natural_image
Black triangular structural component with a curved arrow indicating rotation (no text or symbols)natural_image
Close-up of a black graduation cap on a wall, partially lifted by a tool (no visible text or symbols)natural_image
Two black-and-white photos showing hands using a tool to adjust or install a door lock (no text or symbols visible)natural_image
Close-up of hands installing or adjusting a door lock mechanism (no text or symbols visible)natural_image
Two black-and-white photos showing hands installing or adjusting a door lock mechanism (no text or symbols visible)natural_image
Close-up of a hand holding a mechanical knob, showing the mechanism (no text or symbols visible)natural_image
Two views of a mechanical switch or knob component, showing internal components and mounting holes (no text or symbols visible)natural_image
Close-up of a hand holding a black cylindrical object with an arrow pointing to it, against a plain background (no text or symbols visible)Activation of the keypad for entry of an opening code.
B Enter button
Selection of a menu item.
c Function button
The function button provides for a variety of actions depending on the actual status of the keypad. The display indicates, which function is active.
1) Entry into the menu for programming
When the "Func:M" symbol is displayed, the menu can be reached by pressing the "Function" button. In the menu, the buttons "1" and "2" can be used as a scroll function to navigate through its structure.
2) Deleting an entry action
When the "Func:C" symbol is displayed, the last entry can be cancelled by pressing the "Function" button.
3) Entry into the previous programming level / Back
When you are in the menu, the symbol "Func:<" is displayed. By pressing the "Function" button, you return into the menu structure on the next higher level.
D Battery status indication
Battery full Battery empty
The display indicates the battery statuses of the cylinder unit and the keypad unit. The indication on the display concerns the batteries with the lowest status. In case a battery is empty, the display indicates as follows: Replace the battery inside the keypad or replace the battery inside the knob.
When the battery has been replaced and then the opening code has been entered twice, the actually lowest battery status is displayed. When only a single battery set is replaced, the display can still indicate an "incomplete" status, despite the replacement. In case you do not replace the batteries in spite of the replacement indication, you will have to enter the valid opening code once more in order to open the door. At the same time, the LED of the inner knob flashes 5 x5 times. You can still open the door in this way approx. 50 times. Then it can only be opened using the administrator code. Now the batteries must be replaced, otherwise the door cannot be opened any more.
E Fingerscan-Sensor
To open with or register the particular finger.
Dear customer,
Thank you very much for your decision for the TSE Series 5000 electronic locking system by BURG-WACHTER. This system has been developed and manufactured using the latest technical potential and satisfies high security requirements. The electronic cylinder can be used easily without any drilling and installation of cables in any door prepared for profile cylinder up to a door thickness of 118 mm (59 / 59, measured at the central detent bolt). The electronic cylinder is perfectly suitable for both new installations and upgrading.
Besides this, you have diverse additional options, e. g. on which identification medium shall be used. You can find out more on the following pages.
Remove the battery protection strip from the inner knob in order to energise the cylinder.
Important: Please read the entire User Manual before you start programming. We hope you enjoy your new locking system.
TSE Set 5021 PINCODE
The electronic cylinder operates using a 6-digit numeric code. Optionally, the TSE 5103 E-KEY remote key can as well be used.
Functions (standard)
– Total number of users: up to 48
- Also an E-KEY can be assigned to each pin code user (except for administrator).
Optional locking media
- TSE 5103 E-KEY remote key
Additional functions available using the optional TSE Software, for example:
- User administration
– Time and calendar functions - Assignment of authorisations
– History functions
Administratorcode
- Factory set to 1-2-3-4-5-6 (please be sure to change)
Optical signalling
The optical signal in form of a LED is incorporated in the knob on the inner side of the door. This LED informs you on the following:
- 1 xbrief: lock has been opened
- 2 xbrief: lock has been shut
– every 5 sec. 1 x brief: permanent opening activated - 1 x brief, 1 x long, 2 sec. pause, repetition: lock in programming mode
- 5 x brief, 2 sec. pause, repetition after 20 sec.: cylinder battery empty
Technical data
| Blocking times After | 3 x wrong code is entered 1 minute, then always 3 minutes |
| Display Adjustable to | 12 languages |
| Power supply for keypad | 2 xMIGNON LR6 AA ALKALINE |
| Power supply for cylinder | 2 xMIGNON LR6 AA ALKALINE |
| Permissible ambient conditions* | -15 °C / +50 °C / up to 93 %rel. air humidity (noncondensing)Allowed temperature range: -20 °C / +50 °CAs a result of extreme temperature changes, the display can react slowly or darken. |
| Keypad protection IP65 | |
* In case the temperature exceeds the specified range, a corresponding warning message is indicated on the display. Provide for appropriate corrective action!
TSE Set 5022 FINGERSCAN
The electronic cylinder operates using a fingerscan. In addition, the cylinder can be operated by entering the 6-digit numeric code, or also using the optionally delivered TSE 5103 E-KEY.
In add. to that, you can also use the 6-digit numeric code, as well as the TSE 5103. E-Key in order to control the cylinder.
Up to 24 fingers can be programmed using the keypad. The users are created separately (USER XXX_FP). If a code and / or an E-KEY should additionally be assigned to a user, it needs to be created separately.
Attention! The fingerscanner must not be cleaned with detergents. Please use a slightly moist cloth for this purpose.
TSE 5022 FINGERSCAN functions (standard)
- Total number of users: up to 48, out of which 24 can be programmed with fingerscan
- One E-KEY can be assigned to each code user (except administrator)
- Also a code can be assigned to every E-KEY user
Optional locking media
- TSE 5103 E-KEY
Additional functions available using the optional TSE Software, for example:
- User administration
– Time and calendar functions - Assignment of authorisations
– History functions
Administrator code
- Factory set to 1-2-3-4-5-6 (please be sure to change it)
Optical signalling
The optical signal in form of a LED is incorporated in the knob on the inner side of the door. This LED informs you on the following:
- 1 xbrief: lock has been opened
- 2 xbrief: lock has been shut
– every 5 sec. 1 x brief: permanent opening activated - 1 x brief, 1 x long, 2 sec. pause, repetition: lock in programming mode
- 5 x brief, 2 sec. pause, repetition after 20 sec.: cylinder battery empty
Technical data
| Blocking times After 3 x wrong code is entered 1 minute, then always 3 minutes | |
| Display Adjustable to 12 languages | |
| Power supply for keypad | 2 xMIGNON LR6 AA ALKALINE |
| Power supply for cylinder | 2 xMIGNON LR6 AA ALKALINE |
| Permissible ambient conditions* | -15 °C / +50 °C / up to 93 %rel. air humidity (noncondensing)Allowed temperature range: -20 °C / +50 °CAs a result of extreme temperature changes, the display can react slowly or darken. |
| Keypad protection class | P55 |
* In case the temperature exceeds the specified range, a corresponding warning message is indicated on the display. Provide for appropriate corrective action!
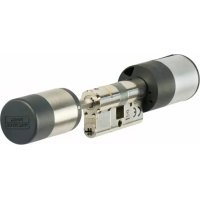
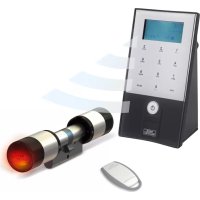
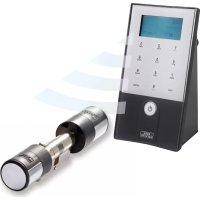
TSE Set 5013 E-KEY
The electronic cylinder operates using the E-KEY remote key. The principle of its function is similar to that of the car locking system. The cylinder can be controlled when the button is pressed once. The E-KEY can be subsequently programmed by means of a keypad or of a TSE software. The radio range of the E-KEY is up to 3 m.
TSE 5013 E-KEY functions (standard)
- Total number of users: up to 48
Optional locking media
- TSE 5151 Keypad PIN
– TSE 5152 Keypad FS (up to 24 fingerscans possible)
Additional functions available using the optional TSE Software, for example:
- User administration
– Time and calendar functions - Assignment of authorisations
– History functions
Administrator code
The code is delivered separately on a sticker. It shall be carefully preserved.
Attention: If it is lost, any programming changes or the use of all the administrator functions are no more possible.
Power supply for the cylinder
- 2 x MIGNON LR6 AA ALKALINE
Power supply for the E-KEY
-1×CR2032
Optical signalling
The optical signal in the form of a LED is incorporated in the knob on the inner side of the door. This LED informs you on the following:
- 1 xbrief: lock has been opened
- 2 xbrief: lock has been shut
– every 5 sec. 1 x brief: permanent opening activated
- 1 x brief, 1 x long, 2 sec. pause, repetition: lock in programming mode
- 5 x brief, 2 sec. pause, repetition after 20 sec.: cylinder battery empty
Opening
The TSE, depending on thr version can be operated by use of a 6-digit code, or with fingerprint or with a TSE E-KEY.
Opening with Pincode
- Press the ⏻ key
- Enter the 6 digit PIN code (factory-set to 1-2-3-4-5-6). The display indicates "Please use rotating knob!" and the LED integrated in the cylinder flashes once when the opening is successful.
- Turn the cylinder knob.
Opening with E-KEY
- Press the button on the TSE E-KEY. The LED which is integrated in the cylinder flashes once upon successful opening.
- Turn the cylinder knob.
When using the opening procedure with an E-KEY, please note that the keypad should not be previously activated using the Ⓤkey!
Opening with Fingerprint
- Press the Key
- Move the registered finger from the top to the bottom centrally over the sensor. The display indicates "Please use rotating knob!" and the LED integrated in the cylinder flashes once when opening is successful.
– Turn the cylinder knob.
Description of menu functions
The functions for the products TSE 5021 and TSE 5022 are described below.
Code change menu
Changing the administrator code and the user cod
- Activate the keypad using the ⏻ key
- Then press FUNC, the "Code Change" menu is displayed
- Confirm your selection using
- Now you can use the keys 1 or 2 to scroll until the administrator / user, whose user code should be changed, is displayed
- Confirm with
- Enter the code valid so far (existing code) and press
- Enter the new code and confirm it with ←
- Repeat your entry and confirm it again with “Code change accomplished” is displayed after a correct entry
Sprache/Language menu
Various submenus are available under the Administrator menu
- Activate the keypad using the ⚫key
- Then press FUNC, the "Code Change" menu is displayed
- Scroll using the 2 key until reaching the Administrator menu
- Confirm with
- Use the keys 1 or 2 to scroll until the required language is displayed
- Confirm with
Administrator menu
Various submenus are available under the Administrator menu
Create User with Code submenu
- Activate the keypad using the ⏻ key
- Then press FUNC, the "Code Change" menu is displayed
- Scroll using the 2 key until reaching the Administrator menu
- Confirm with ←The "Create User" menu item appears
- Confirm with ←
- Scroll using the 2 key until reaching the "Create User: E-Key" item
- Confirm with ←
- Enter the administrator code in order to acquire the authorisation for programming
- The next free memory cell is indicated (e. g. USER.003), press
- Switch the E-KEY into programming mode (see instructions E-KEY)
- Confirm 2 xwith
- "Data has been saved" is displayed
Create User with E-Key submenu
- Activate the keypad using the ⏻ key
- Then press FUNC, the "Code Change" menu is displayed
- Scroll using the 2 key until reaching the Administrator menu
- Confirm with The "Create User" menu item appears
- Confirm with
- Scroll using the 2 key until reaching the "Create User: E-Key" item
- Confirm with
- Enter the administrator code in order to acquire the authorisation for programming
- The next free memory cell is indicated (e. g. USER.003), press
- Switch the E-KEY into programming mode (see instructions E-KEY)
- Confirm 2 xwith
- "Data has been saved" is displayed
Create User with Fingerprint submenu
- Activate the keypad using the Key
- Then press FUNC, the "Code Change" menu is displayed
- Scroll using the 2 key until reaching the Administrator menu
- Confirm with The "Create User" menu item appears
- Confirm with
- Scroll using the 2 key until I reaching the "Create User: Fingerprint" item
- Confirm with
- Enter the administrator code in order to acquire the authorisation for programming
- "Register finger" is displayed
- Move the finger to be registered several times centrally over the sensor (the number of moves is indicated on the display)
- "User_XXX_FP successfully registered" is displayed
Submenu Assign E-KEY
Using this function, you can subsequently assign an E-KEY radio code to an already existing user. For this purpose, proceed as follows:
- Activate the keypad using the ⚡key
- Then press FUNC, the "Code Change" menu is displayed
- Scroll using the 2 key until reaching the Administrator menu
- Confirm with
- Scroll using the 2 key until reaching the "Assign E-Key" item
- Enter the administrator code in order to acquire the authorisation for programming
- Scroll till reaching the user, to whom you intend to assign an E-Key, and confirm 2 x with
- Switch the E-KEY into programming mode (see instructions E-KEY)
- Once the E-KEY is in programming mode, confirm on the keypad with
- "Data has been saved" is displayed
Submenu Delete
Using this menu, you can delete a user or an E-KEY.
- Activate the keypad using the key
- Then press FUNC, the "Code Change" menu is displayed
- Scroll using the 2 key until reaching the Administrator menu
- Confirm with
- Scroll using the 2 key until reaching the "Delete" item
- Enter the administrator code in order to acquire the authorisation for programming
- Scroll till reaching the user or the identification medium (E-KEY) you wish to delete and confirm your selection 2 x with
- "Data has been deleted" is displayed
Submenu Time functions
This is intended for setting the time and date
- Setting the time:
- Activate the keypad using the ⚫key
- Then press FUNC, the "Code Change" menu is displayed
- Scroll using the 2 key until reaching the Administrator menu
- Confirm with
- Scroll with the button 2 until the menu item „Admin. Settings Timer functions „is displayed
- Confirm with
- "Time functions Time" appears
- Confirm with
- Enter the administrator code in order to acquire the authorisation for programming
- Enter the hour (2 digits), confirm with
- Enter the minute (2 digits), confirm with
- "Data has been saved" is displayed
- Setting the date:
- Activate the keypad using the Ⓧkey
- Then press FUNC, the "Code Change" menu is displayed
- Scroll using the 2 key until reaching the Administrator menu
- Confirm with
- Scroll with the button 2 until the menu item „Admin. Settings Timer functions „is displayed
- Confirm with ←
- "Time functions Date" appears
- Confirm with
- Enter the administrator code in order to acquire the authorisation for programming
- Enter the day (2 digits), confirm with
- Enter the month (2 digits), confirm with
- Enter the year (2 digits), confirm with
- "Data has been saved" is displayed
Submenu TSE Setup
General system settings
- Radio channel
The radio channel can be set up here (12 channels to select from).
This might be required when the radio channel is already used by another application, e. g. WLAN, which can possibly lead to interference. In such case,
please select another channel with a spacing of at least 3 channels.
Transmitting power and frequency range:
Low Power 2.4 GHz Transceiver, Maximum Transmit Output Power 1dBm, Frequency usage range 2,400GHz ... 2,4835 GHz ISM/SRD band system
- Priority
In case the door cannot be opened after several attempts with the E-KEY, the priority of the door can be increased by this function. Conversely, it might be advisable in such a case to reduce the priority of doors in a direct vicinity.
- Reorganize
The use of this function is recommended when several users have been deleted.
- Activate the keypad using the ⏻ key
- Then press FUNC, the "Code Change" menu is displayed
- Scroll using the 2 key until reaching the Administrator menu
- Confirm with
- Scroll using the 2 key until reaching the "Admin. TSE Setup" menu item
- Confirm with The "TSE-Setup Reorganise" menu item appears
- Confirm with
- Enter the administrator code in order to acquire the authorisation for programming "Reorganisation in progress" is displayed
- Register
After a replacement of the cylinder or the keypad, the two units have to be newly aligned, so that they can resume communication..
Registration of a keypad
- Activate the keypad using the ⚫key
- Then press FUNC, the "Code Change" menu is displayed
- Scroll using the 1 or 2 keys until reaching the Administrator menu
- Confirm with
- Now scroll using the 1 or 2 keys until reaching the Admin. TSE Setup menu
- Confirm with
- Now scroll using 1 or 2 keys until reaching the Admin.
TSE Setup Register menu - Confirm with
- Enter the administrator code in order to acquire the authorisation for programming
- "Data has been saved" is displayed after a successful registration
Attention: Make sure that no other powered TSE unit is placed within a direct reach of the device when registering a new keypad of a new cylinder, as such unit could mistakenly be addressed instead of the intended one.
When in doubt, disconnect such units from power.
• Energy-saving mode
With the setting of the power saving mode, an optimal power consumption of the units is ensured. The power saving mode can be switched on or off. If the mode is turned on, no programming of the unit can be performed via the PC software.
By default upon delivery the power saving mode is turned on, thus for a possible programming via the PC software it has to be turned off.
Setting the power saving mode
- Activate the keypad using the Ⓧkey
- Then press FUNC, the "Code Change" menu is displayed
- Scroll using the 1 or 2 keys until reaching the Administrator menu Confirm with ←
- Now scroll using the 1 or 2 keys until reaching the Admin. TSE Setup menu
- Confirm with
- Scroll using the button 1 or 2 as long as you reach the menu „TSE Setup power saving mode“
- Confirm with ←
- Enter the administrator code for the unit you want to change
- Using the button 1 or 2 you can activate or deactivate the power saving mode
- Confirm with
- "Data has been saved" is displayed
Submenu FS reset
(Function only active with TSE Fingerprint units)
All stored fingerprints are deleted, however, the corresponding users are retained. Please select this menu and follow the instructions on the display in case of repeated errors related to the use of fingerprints.
In this menu, the channel of the E-KEY can be adapted to the channel of the input unit. This function is necessary when the radio channel of the cylinder is modified, although E-KEYs with the old channel setup are still in use.
- Activate the keypad using the Key
- Then press FUNC, the "Code Change" menu is displayed
- Scroll using the 1 or 2 keys until reaching the KEY synchronization menu
- Confirm with
- Enter the administrator code of unit that needs to be synchronised
- "Data has been saved" is displayed after a successful registration
Attention: Make sure that no other powered TSE unit is placed within a direct reach of the device when registering a new keypad of a new cylinder, as such unit could mistakenly be addressed instead of the intended one.
When in doubt, disconnect these units from power.
Info menu
The version and serial number of the system are displayed using this function. For security reasons, the complete serial number is indicated only in the administrator mode.
- Activate the keypad using the ⏻key
- Then press FUNC, the "Code Change" menu is displayed
- Scroll using the 2 key until reaching the Info menu
- Confirm with
- Serial numbers of the keypad (EA) and of the cylinder (AA) are displayed.
Remark: For security reasons, the serial number (AA) of the cylinder is not completely displayed before the entry of a valid administrator code.
TSE E-KEY user instructions
The E-KEY is intended as radio transmitter for releasing the cylinder. The E-KEY can be subsequently programmed by means of a keypad or of a TSE software. The radio range of the E-KEY is up to 3 m. The principle of its function is similar to that of a car locking system. The cylinder can be controlled when the button is pressed once.
Functions of E-KEY
Door opening:
- Press 1 xbriefly, green LED flashes
- Automatic function (only together with a keypad) Hold the button pressed for 6 seconds, green LED flashes briefly 2 x in a row
- Permanent mode (only together with optional software) Press the button 2 x, the green LED flashes always 2 x in a row per pressed button
In the automatic mode the door can be opened by pressing the button on the keypad. For this purpose, the E-KEY must be within the radio range. This function will be deactivated automatically after a period of 15 minutes.
In the permanent mode, the door is unlocked for a period defined in the software without the need for entry of a code. When entering an opening code during this period, the permanent release will be deactivated.
Programming mode:
The programming mode has three purposes:
- Registration of an E-KEY by means of a keypad or of the TSE software
- Synchronization of the radio signal set up in the E-KEY with the channel set in the lock
- Searching for the E-KEY within the TSE software
Programming E-KEY
When programming the E-KEY for the first time, please press the button once (green LED flashes) when being required to do so by the keypad or by the software. When programming the E-KEY later on, please keep the button pressed for a period of 10 seconds, until the green LED flashes three times in a row. Then release the button.
Remarks:
In case the door opens with a delay of 3 to 7 seconds after the button on the E-KEY is pressed once, and the red LED flashes, the battery (CR2032) in the E-KEY should be replaced immediately. In case the door opens with a delay of 3 to 7 seconds after the button on the E-KEY is pressed once, and the red LED does not flash, the batteries (2x 1.5V LR06 alkaline) in the cylinder should be replaced. This applies also to the keypad, if installed.
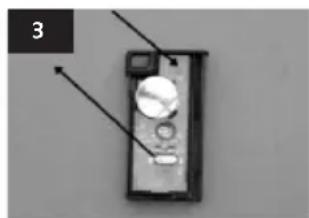
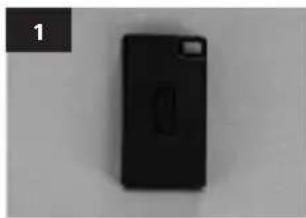
E-KEY battery replacement
1 Open the housing cover by carefully forcing open the detent lugs.
2 Lift the silicon pad and replace the battery.
3 Clap the silicon pad back and close the cover.
natural_image
Black rectangular electronic device with a small circular top and a small square on the side (no visible text or symbols)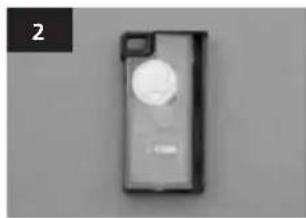
natural_image
Close-up of a black plastic object with a white circular top and label '2' in the corner (no readable text or symbols on the object itself)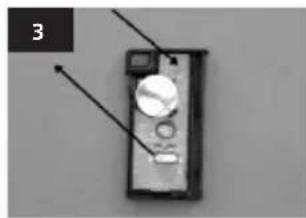
natural_image
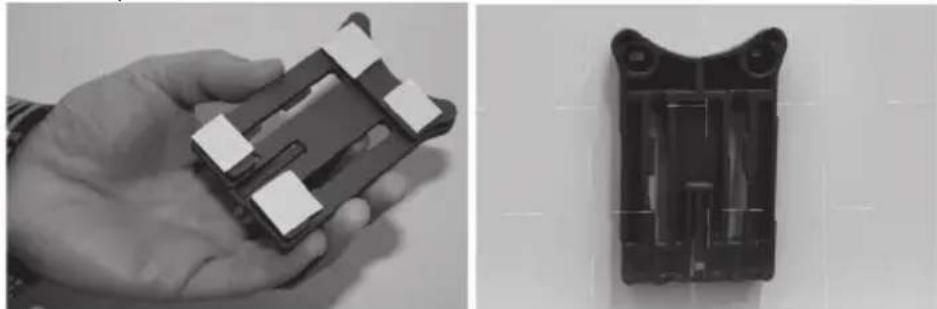
Close-up of a handheld electronic device with a dial and control panel (no visible text or symbols)Keypad installation
The keypad is only included in TSE Prime PINCODE and TSE Prime FINGERSCAN sets.
Attention! Please remember that the keypad should not be attached to the door itself, otherwise it would transmit shocks when the door is being shut. The membrane affixed to the keypad rear side should not be sealed with glue and/or any other substance under any circumstances! Exchange of air must also be possible after the installation!
- Determine the installation place for the keypad. For that purpose, enter the opening code (e.g. PIN code, fingerprint,...) at the desired mounting place and check whether the lock opens.
- Place the keypad correspondingly.
You can then decide whether you want to glue the wall holder directly on the wall or whether you prefer having it screwed on. The slotted holes in the wall holder provide for an exact alignment.
If you decide for gluing the wall holder, please be sure to provide for clean surfaces free from fat, oil and silicon films and any other impurities. Remove completely the protective film from the included adhesive pads, attach all the pads on the wall holder and then press the whole firmly to the required position. When mounting in colder temperatures, please remember that the full adhesive force cannot be achieved before 72 hours in 20 °C, with warmth accelerating the process (e. g. in 65°C, the full adhesive force will be achieved in one hour).
When gluing the holder plate on the colour sight protection fi lm, the above described conditions relating to cleanliness of surfaces and fi rmness of the adhesive pad should be observed.
natural_image
Two black plastic components held in hand: one with white connectors, the other with internal structure (no visible text or symbols)To provide for a bubble-free application of the colour sight protection film, please proceed as follows:
- Pour some water with a couple of drops of dishwashing detergent into a glass, stir it cautiously free of foam, and then use it to moisture gently the surface, on which the film is to be applied.
- At an edge, pull off the white protective sheet from 1 cm of fi lm and straighten it out. To change the position, lift this surface carefully and attach it again as required.
- Then swipe the adhesive film, e. g. with a plastic spatula, out from the contact surface in the direction of protective sheet still attached.
Attention! Do not use more liquid than absolutely necessary.
- Slide the keypad in from above until the locking peg of the mounting plate engages into the keypad housing. In this way, the keypad is protected against undesired removal.
- Perform a function test of the unit with the door open. For this purpose, enter repeatedly a valid opening code (e.g. PIN code, fingerprint,...).
natural_image
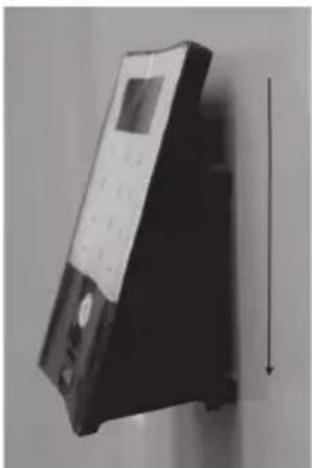
Black and white photo of a handheld electronic device with a vertical arrow pointing downward (no visible text or symbols)Battery replacement for the keypad
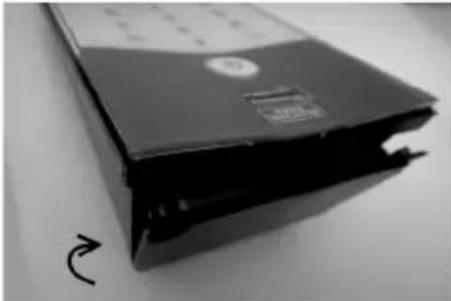
- Remove the housing cover on the bottom side by loosing the 2 screws (Tx 8).
natural_image
Close-up of a black plastic cap mounted on a wall, with a tool partially visible (no text or symbols)- Pull the battery compartment lid downwards until it disengages and replace the batteries.
natural_image
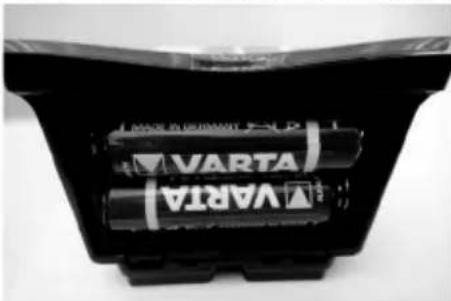
Black-and-white photo of a closed electronic device with a circular label and a curved arrow on the side (no readable text or symbols)When inserting the new batteries, be careful to observe the correct polarity as indicated on the housing.
text_image
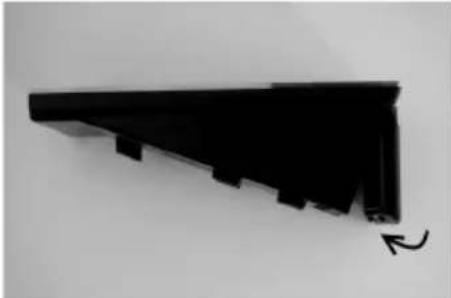
VARTA VARTA- To close the battery compartment, first press the battery compartment lid close to the screw holes to make them slide into the recesses, then snap the bottom side into position by pressing on it.
natural_image
Black metal bracket with a curved arrow indicating rotation (no text or symbols)- Fasten the battery compartment lid with screws.
natural_image
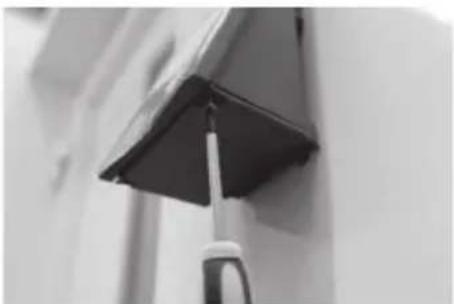
Close-up of a black cap and screwdriver inserted into a wall corner (no text or symbols visible)Attention! Make sure that no moisture enters the keypad when replacing the battery.
Cleaning instruction
The surface finish of the keypad prevents adherence of impurities. Dust or dirt can be removed from the surfaces using a damp cloth.
No alcohol-based detergents (spirit, SIDOLIN® etc.) or aggressive detergents (acetone etc.) may be used, as they can damage the surface or the sensor.
Assembly manual for TSE Cylinder
The installation of the TSE cylinder is described below.
Please read this Assembly Manual carefully before the assembly and then store it in at a safe place.
The cylinder has a special detent system, offering you a possibility of using the cylinder for doors with a thickness up to 120 mm (60/60 mm, measured at the central detent bolt). No prior adjustment is necessary.
Attention:
Be careful to not bang the knob anywhere, as the knob can break in such case. The lock should not be greased or oiled.
An incorporated locking screw in each knob is to fix the rotary knobs.
Attention: Never pull the inner knob completely from the shaft, as this might cause damage to the electronics! The locking screw, which ensures the detent on the shaft, may be loosened only lightly and it always remains in the plastic knob, providing protection against pulling it out.
Outer side Inner side
Outer knob Inner knob

natural_image
Technical diagram of a mechanical assembly with labeled components (no readable text or symbols)Cover Adapter 2 Adapter 1 Detent bolt Locking screw
Schematic
illustration of an
assembled cylinder
incl. the two
adapter parts.
for fixation onto the shaft
Remark
The base size of the cylinder is 30 mm per side. When delivered, the cylinder is completely collapsed (the smallest door thickness). Before you insert the cylinder into the door, you should adjust it to your door thickness.
When installing the cylinder, proceed as follows:
1 Take a rough measurement of the door thickness (incl. fittings)
2 Pull the outer knob from the shaft, move the inner knob over the detent system (spacing 2.85 mm) to the required dimension.
Attention: Never pull the inner knob completely from the shaft, as this might cause damage to the electronics!
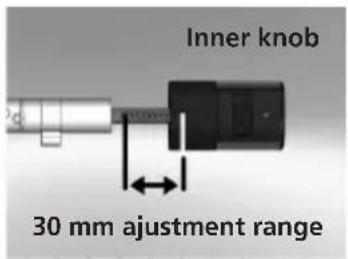
text_image
Inner knob 30 mm adjustment rangeSchematic illustration of setup of the inner knob ajustement
3 Depending on the door thickness, you can affix an appropriate adapter on the outer side, in order to improve the path for the emergency key.
The following combinations are possible:
| Space detent bolt / fitting (mm) on the outer side | Adapter 1 Adapter 2 |
| <43-- | |
| 44-53X- | |
| 54-60XX |
X: selection -: not provided
Tab. 1: Space detent bolt/mounting [mm] on the outer side and the required adapter
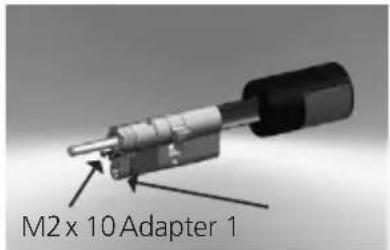
text_image
M2 x 10 Adapter 1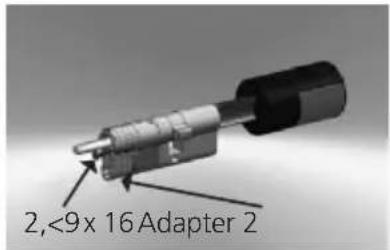
text_image
2,<9x 16Adapter 2Systematic illustration of adapter fixing
4 Move the TSE cylinder from inside to outside through the mortise lock into the door and then tighten the detent bolt.
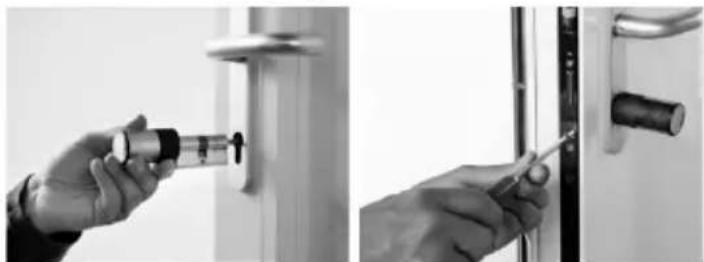
natural_image
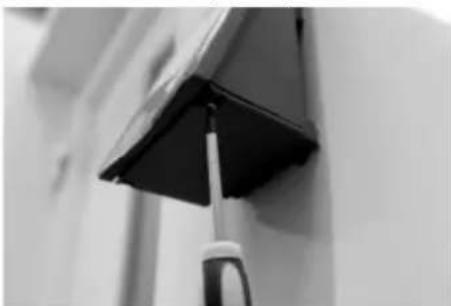
Two black-and-white photos showing hands using a tool to adjust or install a door lock (no text or symbols visible)5 Shift the inner knob over the shaft until attaining the required dimension. Please make sure that the clearance between the rotary knob and the door mounting is at least 1 mm. Then fix the rotary knob using the hex key.
6 Before you fix the outer knob, please consider whether you wish to use the attached cover panel for the profile cylinder section. If so, remove the protective sheet and fix the cover panel onto the lock section.
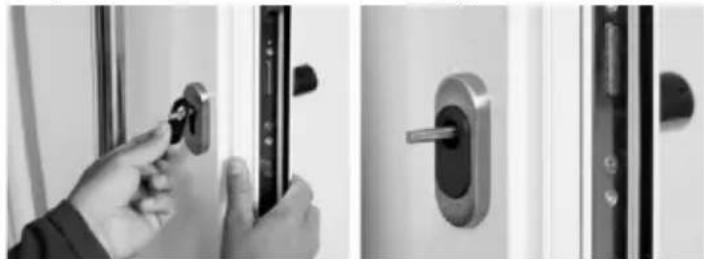
natural_image
Close-up of a hand adjusting a door lock mechanism, showing lock type and door number (no text or symbols visible)7 Shift the outer knob into the required position on the shaft and fix it with a clearance of at least 1 mm from the mounting using the hex!
natural_image
Two black-and-white photos showing hands adjusting a door lock and securing a key (no text or symbols visible)8 The function test must be made with the door open.
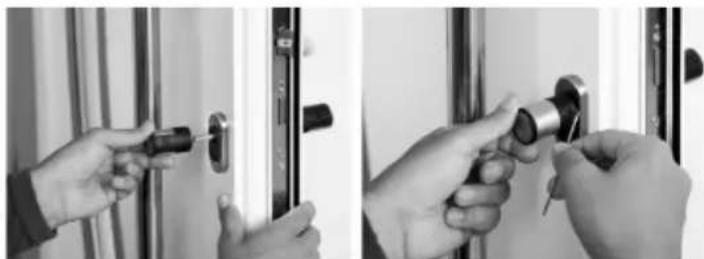
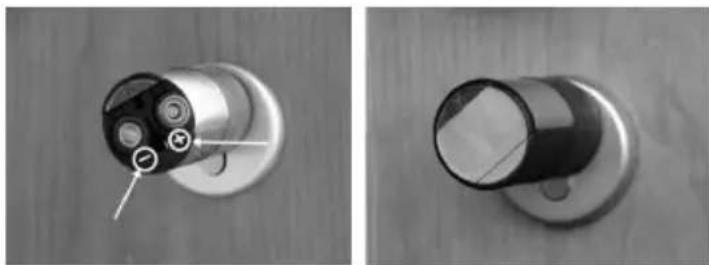
Replacement of batteries – knob (inner side)
1 Using the attached hex key, loose the top locking screw on the cylinder cover. It can be turned out only up to the opening of the cover and will not fall out.
2 Open the cover
natural_image
Two-panel image showing a hand holding a black object on a doorbell, with no visible text or symbols.3 Replace the batteries. Make sure the batteries are inserted with the correct polarity, indicated at the marked point on the housing.
4 Replace the cover.
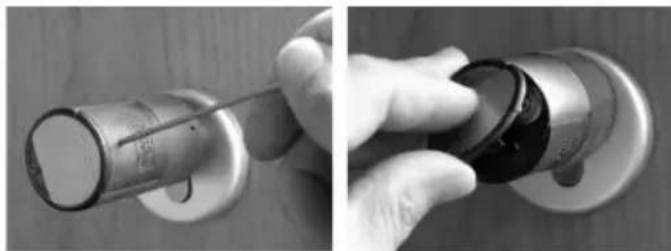
natural_image
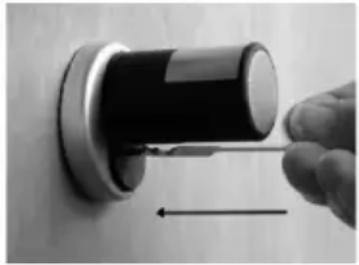
Two views of a mechanical component with internal cross-sections, shown from top and side angles (no text or symbols visible)Emergency key function (outer side)
Using the mechanical emergency key, you can provide access in case of failure of the system.
1 Swing the emergency key open and then insert it into the indicted slot in the cover panel.
natural_image
Close-up of a hand holding a black cylindrical object with an arrow pointing to it, against a plain background (no text or symbols visible)2 Turn the key 90° clockwise. If required, move the outer knob slightly to the right and left in order to release the mechanism.
3 Turn the outer knob. The lock opens when fully turned at the latest.
Turn the key to its initial position and take it out. To close the emergency lock, the knob shall be turned twice fully in both directions.
Disposal
Dear customer,
Please help us avoid unnecessary waste.
Should you intend to dispose of this device at any time, please remember that many components of this device contain valuable materials, which can be recycled.

Please be aware that electrical and electronic equipment and batteries shall not be disposed of as household waste, but rather collected separately. Please obtain information on the collecting points for electrical waste from the responsible authority of you municipality.

BURG-WÄCHTER KG hereby declares that this device complies with Directive 2014/53/EU, (RED) 2014/30/EU, (EMC) and 2011/65/EU (RoHS). The full text of the EU Declaration of Conformity can be found on the following website
www.burg.biz.
Figure
A Touche ON
Low Power 2.4 GHz Transceiver, Maximum Transmit Output Power 1dBm, Frequency usage range 2,400GHz ... 2,4835 GHz ISM/SRD band system
- Priorité
natural_image
Black rectangular electronic device with a small circular lens on top, placed on a plain surface (no text or symbols visible)
natural_image
Close-up of a small electronic device with a circular lens and rectangular body (no visible text or symbols)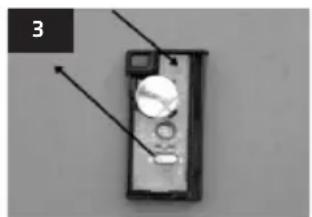
natural_image
Close-up of a handheld electronic device with a circular component and two arrows pointing to it (no visible text or symbols)Montage du clavier
natural_image
Two black plastic components: one held in a hand, the other on a wall (no visible text or symbols)natural_image
Black and white photo of a handheld electronic device with a vertical measurement arrow (no visible text or symbols)natural_image
Close-up of a black cap and screwdriver inserted into a wall corner (no text or symbols visible)natural_image
Black-and-white photo of a compact hard drive with visible internal components and a curved arrow indicating rotation (no text or symbols)natural_image
Black triangular structural component with a curved arrow indicating rotation (no text or symbols)natural_image
Close-up of a black-and-white photo of a medical or surgical instrument inserted into a wall, no visible text or symbols.The base size of the cylinder is 30 mm per side. When delivered, the cylinder is completely collapsed (the smallest door thickness). Before you insert the cylinder into the door, you should adjust it to your door thickness.
natural_image
Hand holding a metallic tool inserted into a wall-mounted lock (no text or symbols visible)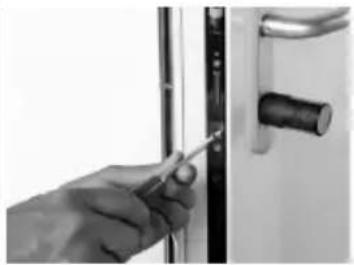
natural_image
Close-up of a hand using a screwdriver to adjust or install a door handle (no text or symbols visible)natural_image
Close-up of hands holding a small electronic device with a black handle (no visible text or symbols)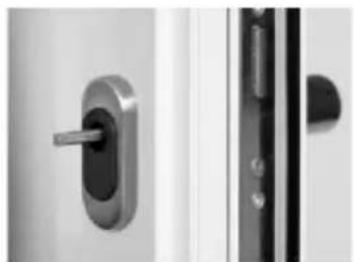
natural_image
Close-up of a metallic door lock and door handle mechanism (no text or symbols visible)natural_image
Close-up of a hand using a tool to lock or install a door (no visible text or symbols)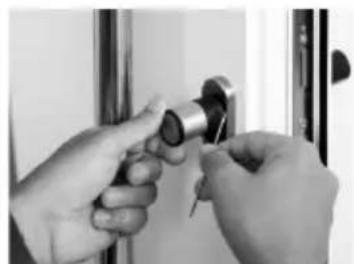
natural_image
Close-up of hands installing or adjusting a metal component on a door (no text or symbols visible)natural_image
Close-up of a hand using a tool to adjust or install a mechanical component, no visible text or symbolsnatural_image
Two views of a mechanical component with internal cross-sections, shown from top and side angles (no text or symbols visible)natural_image
Close-up of a hand holding a black cylindrical object with a directional arrow, no visible text or symbolsLow Power 2.4 GHz Transceiver
Maximum Transmit Output Power 1dBm
Frequency usage range 2,400GHz ... 2,4835 GHz ISM/SRD band system
- Prioriteit
natural_image
Black rectangular electronic device with a small display on top, placed on a plain surface (no visible text or symbols)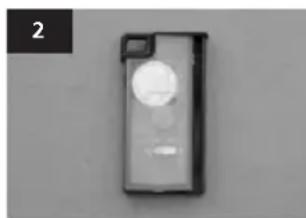
natural_image
Close-up of a small electronic device with a circular lens and rectangular body (no visible text or symbols)