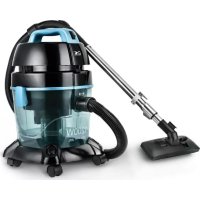
WFVC 46130 - Vacuum Cleaner KALORIK - Free user manual and instructions
Find the device manual for free WFVC 46130 KALORIK in PDF.

User questions about WFVC 46130 KALORIK
0 question about this device. Answer the ones you know or ask your own.
Ask a new question about this device
Download the instructions for your Vacuum Cleaner in PDF format for free! Find your manual WFVC 46130 - KALORIK and take your electronic device back in hand. On this page are published all the documents necessary for the use of your device. WFVC 46130 by KALORIK.
USER MANUAL WFVC 46130 KALORIK
WARNING: To reduce the risk of fire, electric shock or injury, when using
your appliance, basic safety precautions should always be followed, including the following:
1. READ ALL INSTRUCTIONS
2. Check that your mains voltage corresponds to that stated on the
rating plate of the appliance or the adapter.
3. Do not leave the appliance unattended when plugged in. Unplug
from outlet when not in use and before servicing.
4. Do not use outdoors.
5. Do not allow to be used as a toy. Close attention is necessary when
used by or near children.
6. Please keep out of reach of children and pets. This product is not
intended for use by children, by persons with reduced physical, sensory or mental capabilities, or lacking experience or knowledge, unless they have been given supervision or instruction concerning the use of the product, by a person responsible for their safety. Extra caution is always necessary when using this product.
7. Use only as described in this manual. Use only manufacturer's
recommended attachments.
8. Never immerse the motor part in water or other liquids.
9. Do not use with damaged cord or plug. If appliance is not working
as it should, has been dropped, damaged or left outdoors, return it to the service center of the manufacturer.
10. Do not abuse the cord. Never carry the base by the cord or yank to
disconnect from an outlet; instead grasp the plug and pull to disconnect.
11. Keep the cord and the appliance away from heated or warm
surfaces. Do not pull cord around sharp edges or corners. Do not close the door on the cord. Do not run appliance over cord.
12. Do not store in places exposed to direct sunlight. Store the
appliance only in a dry, cool place.
13. Do not handle plug or appliance with wet hands.
14. Use extra care when cleaning on stairs.
16. Do not put any object into openings. Do not use with any opening
blocked; keep free of dust, lint, hair, and anything that may reduce airflow.
17. Keep hair, loose clothing, fingers, and all parts of body away from
openings and moving parts.
18. Do not use without water in the tank.
19. Turn off the unit before unplugging.
20. Do not pick up anything that is burning or smoking, such as
cigarettes, matches, or hot ashes.
21. Do not use to pick up flammable or combustible liquids such as
gasoline or use in areas where they may be present.
22. Do not use to pick up liquids from containers, sinks, tubs, etc.
23. To avoid the risk of electrical shock, do not disassemble or attempt
to repair the vacuum. Incorrect re-assembly or repair can cause a risk of electrical shock or injury to persons when the vacuum is used. If needed, return the appliance to the nearest authorized service facility for examination, repair, or adjustment.
SAVE THESE INSTRUCTIONS
This appliance has a polarized plug (one blade is wider than the other). To reduce the risk of electric shock, this plug will fit into the polarized outlet only one way. If the plug does not properly fit into the outlet at first, reverse it. If it still does not fit, contact a competent qualified electrician. Do not attempt to modify the plug in any way. PARTS DESCRIPTION See pages 2 & 3.6
UNPACKING AND ASSEMBLING
Step 1: Release the side latches and remove the main body (Fig. 1). Step 2: Lift the filtration assembly and unpack the casters and attachments from the barrel (Fig. 2). Step 3: Insert the casters into the holes in the base, in a turning motion. Then press down and make sure the casters are firmly attached (Fig. 3). Step 4: Put down the filtration assembly (Fig. 4). Step 5: Insert part 1 (on main body) into part 2 (of barrel). Then lock the latches (Fig. 5).7
www.KALORIK.com WFVC 46130 - 200616 Step 6: Insert the hose insert into the barrel (for vacuuming function) or in the “blower” hole (1) located in the main body (for blower function). Gently rotate to the right to lock the hose in place and make sure it fits tightly (Fig. 6). Step 7: Insert the adjustable tube into the hook and set the tube in place (Fig. 7). Fasten with the screw. Step 8: Insert curved tube of the hose into the adjustable tube (Fig. 8). Make sure the connection is tight. Step 9: Insert the end of the extension tube into the floor brush (Fig. 9). Make sure the brush is tightly attached to the tube.
USING YOUR VACUUM CLEANER
- Assemble the vacuum cleaner before use.
- ADD WATER TO THE BARREL BEFORE USE. Vacuuming without water can damage the motor.
- DO NOT operate the vacuum when water level is below the “Working Level” line on the water tank.
- Unwind the power cord and attach the cord to the hook located on the base (17). This allows more stability when the unit is rolled from one location to another.
- Plug into a wall outlet.8
Use: The water filtration vacuum cleaner can be used on dry and wet surfaces. To use as a wet pick-up vacuum, operate the unit on the wet surface as you would for a dry surface.
WARNING: DO NOT overfill the water tank. The unit will stop working if
the tank is full. If full, turn off and unplug the unit. Then empty the tank and clean. Refill with clean water at the “Working Level”, then plug unit back in and continue working. DO NOT tip over. On/Off Switch: Turn the unit on or off by pressing the power switch located on top of the main body (Fig. 10). Air Flow Control: Adjust the suction level by moving the pusher up or down (Fig. 11). Floor Brush: The floor brush can be used for hard floors and carpets. Use the switch located on top of the brush to adjust the brush to the type of floor you are cleaning. Lower the brush for bare floors, raise it for carpets (Fig. 12). On/Off Switch Fig. 10 Fig. 139
www.KALORIK.com WFVC 46130 - 200616 Adjustable Tube: Adjust the tube to the desired length by pushing the control switch. Release the button to lock (Fig. 13). Motor thermostat: The vacuum cleaner is equipped with a motor protective thermostat. If the unit overheats, the thermal protector will shut off the unit. Should this occur, turn off the vacuum cleaner and unplug from the wall outlet. Allow the unit the cool before using again.
USING THE ACCESSORIES
Caution: Never attach or detach tools while the vacuum cleaner is running. Turn off and unplug the vacuum before attaching accessories. Using the crevice tool:
- Use the crevice nozzle to clean narrow, hard-to-reach places, such as heater gaps, wall ends and corners, etc.
- When using the crevice tool, remove the floor brush and insert the crevice tool directly into the extension tube.
Using the dust brush:
- Use the dust brush to clean lamps, blinds, shelves, upholstery and baseboards.
- When using the dust brush, remove the floor brush and insert the dust brush directly into the extension tube. Using the pet brush:
- Powerful suction for picking up pet hair and carpet debris. Easy to use on stairs and upholstery.10
- When using the pet brush, remove the floor brush and insert the pet brush directly into the extension tube.
CLEANING AND MAINTENANCE
Step 1: To empty the dirty water from your vacuum cleaner, release the latches and remove the main body and filtration assembly (Fig. 14). Note: Make sure to remove the hose before releasing the latches. Step 2: Pour the dirty water in a bucket or in the toilet (Fig. 15). Then, rinse under clear water. Step 3: Remove the sponges from the filtration assembly and rinse them under clean water (Fig. 16).11
To clean the cyclone generator: Remove the cyclone generator from the filtration assembly and rinse under clear water (Fig. 17). To clean the filter: Remove the filter from the main body and rinse under clear water. Let the filter air dry before putting back into place (Fig. 18). Notes:
- Do not wash the filter in the dishwasher or in the washing machine. Do not use a hair dryer to dry the filter.
- Always make sure the filter is in place before operating the appliance. Never use without the filter.
- The filter should be cleaned twice a year. If visibly dirty, clean it at once. Replace the filter if damaged.
- To replace the filters, please follow instructions provided in the separate installation guide. STORAGE: Wrap the power cord around the main body. Insert the hook of the adjustable tube into the side of the main body. Then, insert the dust brush and crevice tool into the base (Fig. 19). TROUBLESHOOTING ISSUE POSSIBLE REASON POSSIBLE SOLUTION The vacuum cleaner won’t run.
1. Switch button is not
2. Power cord is not
firmly plugged into the outlet.
2. Check that the plug is
inserted firmly into the electrical outlet.
3. Allow cleaner to cool.12
3. Thermal protector is
4. There is too much
water in the barrel.
4. Remove some of the
water. Suction is reduced
1. The hose or tube is
2. Filter is clogged.
1. Clean tube and/or hose.
2. Clean the filter.
3. Check floor brush and
clean if necessary. CAUTION
- Do not pick up anything that is burning or smoking, such as cigarettes, matches, or hot ashes.
- Do not use to pick up flammable or combustible liquids such as gasoline or use in areas where they may be present.13
www.KALORIK.com WFVC 46130 - 200616 WARRANTY We suggest that you complete and return the enclosed Product Registration Card promptly to facilitate verification of the date of original purchase. However, return of the Product Registration Card is not a condition of these warranties. You can also fill out this warranty card online, at the following address: www.KALORIK.com This KALORIK product is warranted in the U.S.A. and in Canada for 1 year from the date of purchase against defects in material and workmanship. This warranty is not transferable. Keep the original sales receipt. Proof of purchase is required to obtain warranty performance. During this period, if the KALORIK product, upon inspection by KALORIK, is proven defective, it will be repaired or replaced, at Kalorik’s option, without charge to the customer. If a replacement product is sent, it will carry the remaining warranty of the original product. This warranty does not apply to any defect arising from a buyer's or user's misuse of the product, negligence, failure to follow KALORIK instructions noted in the user’s manual, use on current or voltage other than that stamped on the product, wear and tear, alteration or repair not authorized by KALORIK, or use for commercial purposes. There is no warranty for glass parts, glass containers, filter basket, blades and agitators, and accessories in general. There is also no warranty for parts lost by the user. ANY WARRANTY OF MERCHANTABILITY OR FITNESS WITH RESPECT TO THIS PRODUCT IS ALSO LIMITED TO THE ONE YEAR LIMITED WARRANTY PERIOD. Some states do not allow limitation on how long an implied warranty lasts or do not allow the exclusion of incidental or consequential damages, so the above limitations may not apply to you. This warranty gives you specific legal rights, and you may also have other rights which vary from state to state. If the appliance should become defective within the warranty period and more than 30 days after date of purchase, do not return the appliance to the store: often, our Customer Service Representatives can help solve the problem without having the product serviced. If14
www.KALORIK.com WFVC 46130 - 200616 servicing is needed, a Representative can confirm whether the product is under warranty and direct you to the nearest service location. If this is the case, bring the product, or send it, postage prepaid by the user (all Kalorik customers are responsible for the initial shipment back to the warranty center), along with proof of purchase and a return authorization number indicated on the outer package, given by our Customer Service Representatives. Send to the authorized KALORIK Service Center (please visit our website at www.KALORIK.com or call our Customer Service Department for the address of our authorized KALORIK Service Center). When sending the product, please include a letter explaining the nature of the claimed defect. If you have additional questions, please call our Customer Service Department (please see below for complete contact information), Monday through Thursday from 9:00am - 5:00pm (EST) and Friday from 9:00am - 4:00pm (EST). Please note hours are subject to change. If you would like to write, please send your letter to: KALORIK Customer Service Department Team International Group of America Inc. 16175 NW 49th Avenue Miami Gardens, FL 33014 USA Or call: Toll Free: +1 888-521-TEAM / +1 888-KALORIK Only letters can be accepted at this address above. Shipments and packages that do not have a return authorization number will be refused.15