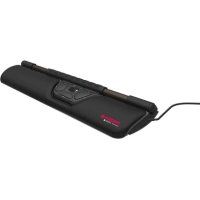
Rollermouse - Mouse Cherry - Free user manual and instructions
Find the device manual for free Rollermouse Cherry in PDF.


| Product type | Ergonomic mouse with moving bar |
| Brand | Cherry |
| Model | Rollermouse |
| Connection | USB |
| Power supply | 5.0 V/DC ±5% |
| Current consumption | Max. 50 mA |
| Resolution (DPI) | 600 to 2800 dpi, 10 levels |
| Supported operating systems | Windows, macOS, Linux |
| Operating temperature | 0 °C to +40 °C |
| Storage temperature | -15 °C to +60 °C |
| Dimensions (approximate) | 450 x 80 x 35 mm |
| Weight (approximate) | 550 g |
| Main functions | Pointer movement via moving bar, left click, right click, scroll wheel, double-click, speed and sensitivity adjustment |
| Included accessories | Keyboard supports, palm rest removal key, transport lock |
| Palm rest | Removable using the provided key |
| Care and cleaning | Disconnect before cleaning; use a slightly damp cloth with mild detergent; do not use solvents or abrasive products |
| Safety | Avoid liquid ingress; disconnect before cleaning; observe operating temperatures |
| Disposal | In accordance with applicable legislation for electrical devices |
| Warranty and contact | Cherry GmbH, Cherrystraße, 91275 Auerbach/OPf., Germany, www.cherry.de |
Frequently Asked Questions - Rollermouse Cherry
User questions about Rollermouse Cherry
0 question about this device. Answer the ones you know or ask your own.
Ask a new question about this device
Download the instructions for your Mouse in PDF format for free! Find your manual Rollermouse - Cherry and take your electronic device back in hand. On this page are published all the documents necessary for the use of your device. Rollermouse by Cherry.
USER MANUAL Rollermouse Cherry
natural_image
Front view of a black Cherry brand electronic device with control panel and antenna (no visible text or symbols)CHERRY ROLLERMOUSE™
Ergonomic Mouse Solution
CHERRY
powered by contour

Operating Manual....6
Mode d'emploi....9
64410088-01, DE, EN, FR, © Jul 2020. |ROLLERMOUSE™ is a trademark of the Contour Design Group |
FUNKTIONEN / FUNCTIONS / FONCTIONS
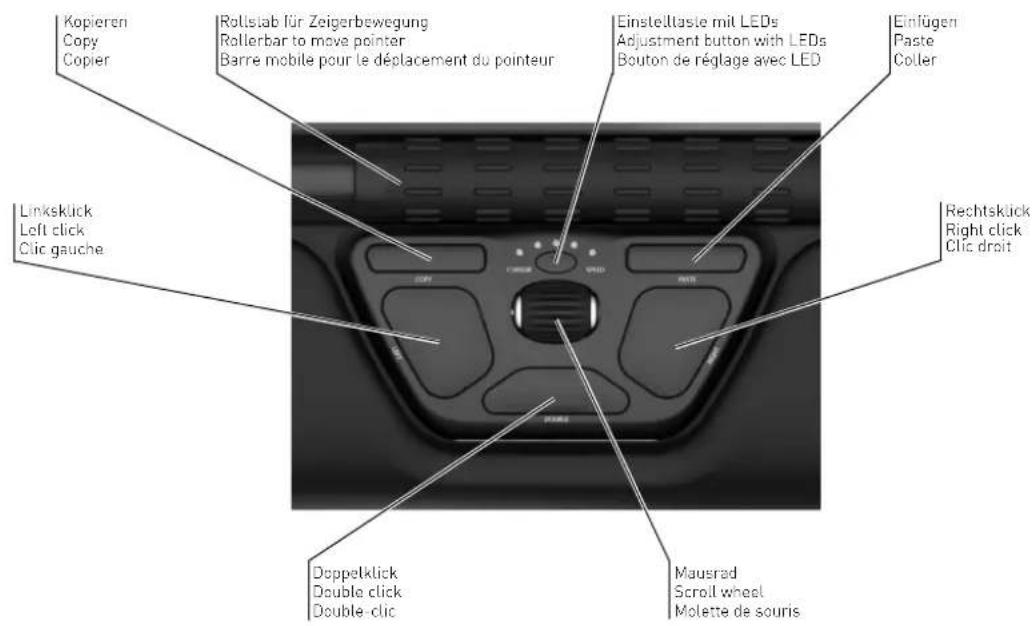
BEDIENUNGSANLEITUNG
Before you begin ...
EN

The operating instructions contain information on effective and reliable use.
- Read the operating instructions carefully.
- Keep the operating instructions and pass them on to other users.
The CHERRY ROLLERMOUSETM is an ergonomic alternative to a conventional mouse for use with PCs and laptops.

Switching from a conventional mouse to the ROLLERMOUSETM often feels a little unfamiliar at first.
• Give yourself a week to get used to it
- Adjust the keyboard to the correct height using the keyboard supports provided (see 2 "Attaching the keyboard supports").
- Make sure to only use the ROLLERMOUSETM and do not use your conventional mouse in parallel.
For information on other products, downloads and much more, visit us at www.cherry.de.
1 For your safety
RSI stands for "Repetitive Strain Injury
RSI results from small, continually repeated movements.
- Set up your workspace for maximum ergonomic benefit.
- Position the keyboard with the supports provided so that your wrists are at a comfortable angle.
• Take several short breaks, with stretching exercises if necessary. - Change the position of your body often.
2 Attaching the keyboard supports
Use the keyboard supports to connect the ROLLERMOUSETM to the keyboard and adjust the height of the keyboard.
1 If necessary, fold in the feet of your keyboard so that it lies flat.
2 Insert the two keyboard supports provided with the ROLLERMOUSETM laterally into the holder section on the back of the ROLLERMOUSETM so that the rubber pads face upwards.
3 Place your keyboard on the keyboard supports.
4 Position the ROLLERMOUSE™ so that it is centered under the space bar.
5 Fold the feet at the ends of the keyboard supports in or out until you have found a comfortable keyboard position. Ideally, this should be slightly higher than the rollerbar, as otherwise you may accidentally operate it while typing.
6 If the keyboard is too high for you, you can reduce the size of the keyboard supports. To do this, remove the long part of the supports (with the hinges) from the short part that is in the holder section of the ROLLERMOUSETM.

3 Connecting the ROLLERMOUSE™ to the PC or laptop
- Connect the USB plug of the ROLLERMOUSE™ to the USB port on the PC or laptop. The driver is installed automatically.
4 Setting the operating system
1 Press and hold the copy button and the adjustment button simultaneously for 2 seconds. The LEDs show which operating system is set:
LEDs Operating system
| Light up red from left to right PC (Windows) |
| Light up red from right to left macOS [Apple] |
| Light up red from both sides towards the middle HID [Linux] |
2 Release the copy button and change the adjustment by pressing the copy button while still holding down the adjustment button. The LEDs show the new setting.

In order for the copy and paste functions to work in macOS, the driver must be installed.
5 Using the rollerbar

If the lateral range of the rollerbar is not enough to move the mouse pointer to the left or right edge of the screen, the mouse pointer is automatically accelerated to the edge of the screen.
- To avoid this, increase the speed of the mouse pointer (see 5.3 "Setting the speed of the mouse pointer"
- Remove the transport lock from the glide bar of the rollerbar.
The rollerbar has two functions: - Moving the mouse pointer: Roll the rollerbar or move it sideways
• Left click: Press the rollerbar
5.1 Adjusting the click strength of the rollerbar
1 Press and hold the left click button and the adjustment button simultaneously for 2 seconds.
The LEDs show which click strength is set:
The further to the right the LED lights up, the more you have to press the rollerbar to trigger a left click.
When all the LEDs are on, the rollerbar click function is deactivated.
2 Release the adjustment button and change the setting with the scroll wheel while still holding down the left click button. The LEDs show the new setting.
5.2 Adjusting the click volume of the rollerbar
1 Press and hold the right click button and the adjustment button simultaneously for 2 seconds. The LEDs show which volume is set:
The further to the right the LEDs lights up, the louder the click.
When all the LEDs are on, the rollerbar click sound is deactivated.
2 Release the adjustment button and change the setting with the scroll wheel while still holding down the right click button.
The LEDs shows the new setting and you hear the corresponding click sound.

The click function remains active even if you switch off the click sound.
5.3 Setting the speed of the mouse pointer
The speed of the mouse pointer increases with the DPI number.
You can set the DPI number in 10 levels from 600 to 2800 dpi. The first 5 levels are indicated by blue LEDs, the second 5 levels by green LEDs.
- Press the adjustment button.
The LEDs show which level is set.
6 Using the double click button as middle mouse button
- Press and hold the double click button and the adjustment button simultaneously for 2 seconds.
The LEDs flash and the function is changed.
Pressing the two buttons again reverses the change.
7 Removing the palm rest
1 Insert the enclosed removal key into one of the both recesses on the edge of the underside of the ROLLERMOUSE™ and turn it in the direction of the arrow.
The palm rest is released.
2 Pull the palm rest off the ROLLERMOUSETM.
EN
Cleaning the device
1 Disconnect the device from the PC or laptop.
2 Remove the palm rest (see 7 "Removing the palm rest").
NOTE! Aggressive cleaning agents and liquids can damage the device.
- Do not use solvents such as gasoline or alcohol and scouring agents or scouring sponges for cleaning.
- Do not let liquid get into the device.
3 For information about cleaning the sensor, visit www.cherry.de.
4 Clean the device with a slightly damp cloth and some mild detergent (such as washing-up liquid).
5 Dry the device with a soft, lint-free cloth.
9 Disposal

Electrical devices contain substances that can be harmful to health and the environment.
- Dispose of the device in accordance with the legal regulations.
10 Technical data
| Designation Value |
| Supply voltage 5.0 V/DC ±5% |
| Current consumption Max. 50 mA |
| Storage temperature -15 °C ... +60 °C |
| Operating temperature 0 °C ... +40 °C |
11 Contact
For Europe:
Cherry GmbH
Cherrystraße
91275 Auerbach/OPf., Germany
Cherry Americas, LLC
5732 95th Avenue
Suite 850
Kenosha, WI 53144, USA
Tel.: +1 262 942 6508
Email: sales@cherryamericas.com
Internet: www.cherryamericas.com
12 Certifications
12.1 Federal Communications Commission (FCC) Radio Frequency Interference Statement
This device complies with part 15 of the FCC Rules. Operation is subject to the following two conditions: (1) This device may not cause harmful interference, and (2) this device must accept any interference received, including interference that may cause undesired operation.
Note: This equipment has been tested and found to comply with the limits for a Class B digital device, pursuant to part 15 of the FCC Rules. These limits are designed to provide reasonable protection against harmful interference in a residential installation. This equipment generates, uses and can radiate radio frequency energy and, if not installed and used in accordance with the instructions, may cause harmful interference to radio communications. However, there is no guarantee that interference will not occur in a particular installation. If this equipment does cause harmful interference to radio or television reception, which can be determined by turning the equipment off and on, the user is encouraged to try to correct the interference by one or more of the following measures:
- Reorient or relocate the receiving antenna.
- Increase the separation between the equipment and receiver.
- Connect the equipment into an outlet on a circuit different from that to which the receiver is connected.
- Consult the dealer or an experienced radio/TV technician for help.
Caution: Any changes or modifications not expressly approved by the party responsible for compliance could void the user's authority to operate the equipment.
12.2 For UL
For use with Listed Personal Computers only!
MODE D'EMPLOI
linkedin.com/company/cherry-



- BEDIENUNGSANLEITUNG
- Before you begin ...
- EN
- For your safety
- RSI stands for "Repetitive Strain Injury
- Attaching the keyboard supports
- Connecting the ROLLERMOUSE™ to the PC or laptop
- Setting the operating system
- Using the rollerbar
- Adjusting the click strength of the rollerbar
- Adjusting the click volume of the rollerbar
- Setting the speed of the mouse pointer
- Using the double click button as middle mouse button
- Removing the palm rest
- Cleaning the device
- NOTE! Aggressive cleaning agents and liquids can damage the device.
- Disposal
- Contact
- For Europe:
- Certifications
- Federal Communications Commission (FCC) Radio Frequency Interference Statement
- For UL
- MODE D'EMPLOI
Brand : Cherry
Model : Rollermouse
Category : Mouse