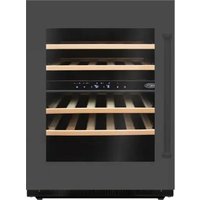
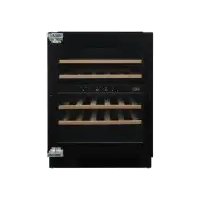
BPWKN82 - Wine cellar BORETTI - Free user manual and instructions
Find the device manual for free BPWKN82 BORETTI in PDF.
| Product type | Dual zone wine cellar |
| Brand | Boretti |
| Model | BPWKN82 |
| Number of temperature zones | 2 (upper and lower) |
| Upper compartment temperature range | 5 °C to 10 °C |
| Lower compartment temperature range | 10 °C to 18 °C |
| Interior lighting | LED with automatic mode (lights up when door opens) or continuous |
| Display | LED for each compartment |
| Temperature memory function | Yes (keeps setting after power off) |
| Open door alarm | Yes, after 5 minutes |
| Door opening direction | Reversible (left/right) |
| Adjustable feet | Yes (at front) |
| Climate class | Ambient temperature 5 °C to 35 °C |
| Recommended use | Wine storage and aging only |
| Interior cleaning | Solution of hot water and cleaning salt (2 tablespoons per liter) |
| Exterior cleaning | Hot water and mild liquid detergent |
| Safety | Do not damage the refrigerant circuit; unplug before cleaning; repairs by qualified technician |
| Restart delay | 3 to 5 minutes after unplugging |
| Warning | Do not use electrical appliances inside; do not store flammable substances |
| Disposal | In accordance with local WEEE regulations |
Frequently Asked Questions - BPWKN82 BORETTI
User questions about BPWKN82 BORETTI
0 question about this device. Answer the ones you know or ask your own.
Ask a new question about this device
Download the instructions for your Wine cellar in PDF format for free! Find your manual BPWKN82 - BORETTI and take your electronic device back in hand. On this page are published all the documents necessary for the use of your device. BPWKN82 by BORETTI.
USER MANUAL BPWKN82 BORETTI
text_image
Power Light Run Upper Chamber Lower Chamber Set Upper Set Lower\* Run
\* Upper compartment
\* Lower compartment
natural_image
Technical line drawing of a mechanical assembly with no visible text or symbols
natural_image
Technical line drawing of a mechanical assembly with three parallel plates and a central component (no text or symbols)text_image
1 2 6 Limited block B Limited block A 3 4 6 7 location-planeVoor de BPWKN 82
- Rechter onderscharnier
- Schroeven
- Deuras
- Deur
- Rechter bovenscharnier
-
Scharnierschroeven
-
Linker bovenscharnier (meegeleverd)
- Afdekdopje
- Linker onderscharnier
- Deurbegrenzer
- Schroef
- Plug

text_image
Power Light Run Upper Chamber Lower Chamber Set Upper Set Lower\* Run
natural_image
Technical line drawing of a mechanical assembly with no visible text or symbols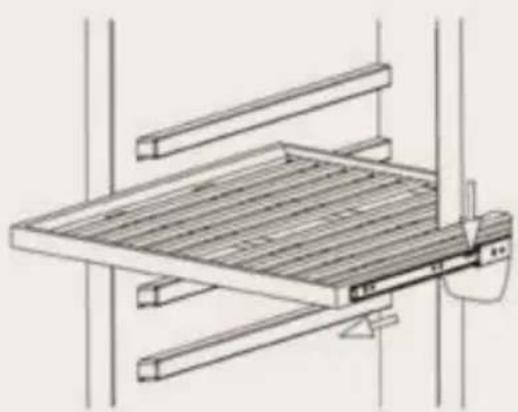
natural_image
Technical line drawing of a mechanical assembly with no visible text or symbolstext_image
1 2 3 4 5 6 7 Limited Block B Limited Block A Support location-planePour le BPWKN 82
text_image
Technical diagram showing two views of a door frame with numbered components and labeled partsPROBLÈME CAUSE POSSIBLE
Congratulations! You are the official owner of a Boretti wine cabinet now. In the years to come you will discover that the use of a Boretti wine cabinet gives a new dimension to cooling.
We advise you to read this manual carefully before usage to get to know all the ins and outs of this beautiful appliance.
Please inform us if you have any questions. You are welcome to visit our Experience Center anytime, we are happy to inspire and help with your questions.
We wish you a lot of cooling pleasure!
Boretti
Contents
Introduction 34
Before use 36
Important safety instructions 37
Installation of the wine cabinet 38
Usage of the wine cabinet
* The controls 39
* Temperature memory function 41
* "Close door" reminder function 41
* How to remove the shelf 41
Changing door opening side
* For the BPWKN 60/88 42
* For the BPWKN 82 43
* Cleaning the wine cabinet 44
* Power failure 44
* Vacation time 45
* Moving the wine cabinet 45
* Energy saving tips 45
Problems with the wine cabinet? 46 Disposal of old appliances 48
Before use
Warning
Before powering up the wine cabinet, please open the door for 5 minutes to ventilate it.
Read the instructions supplied with the appliance – failure to install or use the appliance in accordance with the instructions may invalidate any warranty.
Boretti does not accept any liability for damage caused through improper use, or incorrect installation.
Do not install this appliance if it has been damaged during transportation. This includes the plug and supply cord.
Please keep these instructions in a safe place for future reference.
Note
This appliance is intended to be used exclusively for the storage and cooling of wine.
Important safety instructions
* To prevent damage to the door and door gasket, make sure the door is fully opened before pulling out any shelves.
* Do not move the wine cabinet when it is loaded with wine, you might distort the appliance.
* If the power lead becomes damaged it should only be replaced by the manufacturer or a suitably qualified person.
* Never allow children to operate, play with the appliance.
* Never clean appliance parts with flammable fluids.
* Do not store or use gasoline or any other flammable vapours and liquids in the vicinity of this or any other appliance. This can create a fire hazard or explosion.
* Always remember to unplug the appliance before cleaning. When disconnecting from the electricity supply, pull the plug, not the power cord.
* Do not use anything electrical inside the wine cabinet.
* All repairs must be carried out by a qualified service engineer. Inadequate repairs may result in a major source of danger for the user and invalidate any warranty.
* Never store anything dangerous inside the appliance, such as combustibles, explosives, strong acid or alkali etc.
* Always keep any ventilation openings clear of obstruction. Should they become blocked, clear them straight away.
* Make sure that the plug is in an accessible place when installation is complete.
* Only use this appliance for domestic purposes in accordance with these instructions.
* The wine cabinet is suitable for storing wine (or other bottled beverages). It is not suitable for storing fresh or frozen foods.
Warning
Do not allow the refrigerant circuit to become damaged while using or installing the appliance. Should it become damaged, do not use the appliance until you are instructed to do so by a service engineer. Refrigerant can ignite or cause damage to the eye when leaking.
Installation of the wine cabinet
Note
Before connecting the wine cabinet to the power source, let it stand upright for approximately 2 hours. This will reduce the possibility of a malfunction in the cooling system from handling during transportation.
* Remove the exterior and interior packing.
* Clean the interior surface with lukewarm water using a soft cloth.
* Install the handle on the left side of the door.
* Place the wine cabinet on a floor that is strong enough to support it when it is fully loaded. To level the wine cabinet, adjust the front levelling foot at the bottom of the wine cabinet.
* Locate the wine cabinet away from direct sunlight and sources of heat (stove, heater, radiator, etc.). Direct sunlight may affect the acrylic coating and heat sources may increase electrical consumption. Extreme cold ambient temperatures may also cause the unit not to perform properly.
* Avoid locating the unit in moist areas.
* The wine cabinet should be positioned where the ambient temperature is between 5°C and 35°C. If the ambient temperature is above or below this range, the performance of the unit may be affected. Placing the appliance in extreme cold or hot conditions may cause the interior temperatures to fluctuate. The range of setting temperatures may not be reached.
* Put the plug of the wine cabinet into an appropriate socket. Should the plug require changing, get help from a qualified service technician.
Usage of the wine cabinet
The wine cabinet should be placed in where the ambient temperature is between 0-35°C (32-95°F). If the ambient temperature is above or below this range, the performance of the unit may be affected. For example, placing your unit in extreme cold or hot conditions may cause interior temperatures to fluctuate. The range of 40-65°F (5-18°C) may not be reached.
The controls

text_image
Power Light Run Upper Chamber Lower Chamber Set Upper Set Lower\* Run
Indicator light illuminates to signify the cooling mode is currently in operation.
\* Light
To turn the inner light on/off. If you would like to change the light control mode, please follow the instructions below.
* Factory defaults setting is LF mode: The interior light will be on when you open the door, and the light will be off when you close the door.
* The LED light can be remained on continuously by pressing and holding the "LIGHT" button for 5 seconds, there is one BP sound and the display will show "LP" for 4 times before the display will revert back to normal. Then the light will remain on despite if the door is open or closed.
* If you press the light button for 5 seconds, there is one BP sound. It displays "LF", four times of display blinking, then it will revert back to LF mode automatically.
Caution
When the door is open, you can manually press the "LIGHT" button to turn on or off the light, and when the door is closed, the light keeps as your last operation before door closed. But when you open the door again, the light will remain on automatically.
\* Power
To turn this appliance on/off.
\* "Set Upper" button
To set the temperature of the upper chamber.
\* "Set Lower" button
To set the temperature of the lower chamber.
\* "Upper chamber"
To shows the temperature of the up chamber.
\* "Lower chamber"
To shows the temperature of the lower chamber.
\* Upper compartment
The temperature setting can be adjusted from 5^ C to 10^ C.
\* Lower compartment
The temperature setting can be adjusted from 10^ C to 18^ C.
Note
If the unit is unplugged, power lost, or turned off, you must wait 3 to 5 minutes before restarting the unit. If you attempt to restart before this time delay, the wine cabinet will not start.
When you use the wine cabinet for the first time or restart the wine cabinet after having been shut off for a long time, there could be a few degrees variance between the temperature you select and the one indicated on the LED readout. This is normal and it is due to the length of the activation time. Once the wine cabinet is running for a few hours the temperature will be back to normal.
Temperature memory function
If the power is suddenly lost, the set temperature will be saved by the unit. Once the power is back on the unit will be at the same set temperature.
"Close door" reminder function
When you forget to close the door or the door is not fully closed, there will be warning alarm after 5 minutes.
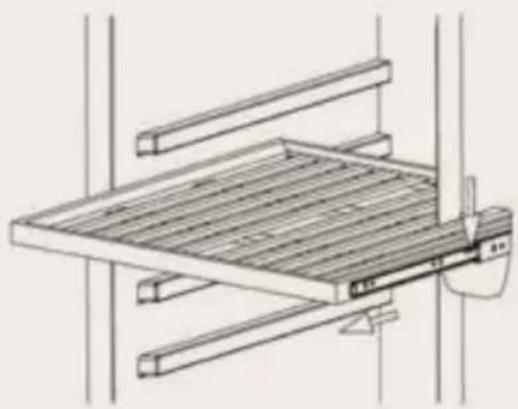
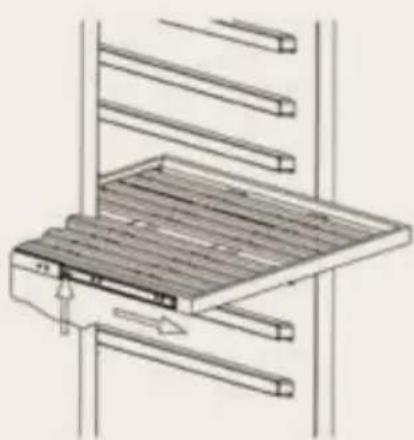
How to remove the shelf
* Open the door completely.
* Remove all of the contents loaded on the shelf, if applicable.
* Pull the shelf towards yourself until it is fully extended outward.
* The shelf has plastic posts on both sides as indicated in the diagram below. While facing the unit, press the plastic post on the right side down while pulling up on the left plastic post. You may choose to do this by hand or by using a flathead screwdriver.
* Evenly pull out the shelf from the track until it is completely removed from the inner compartment.
natural_image
Technical line drawing of a mechanical assembly with no visible text or symbols
natural_image
Technical line drawing of a mechanical assembly with three parallel rods and a central bracket (no text or symbols)Changing door opening side
For the BPWKN 60 / BPWKN 88
This appliance has reversible doors but is delivered with a right hinged door. The left hand hinge kit comes with the unit (in the box), should you wish to reverse the hinge on your unit.
For your safety, please unplug appliance before doing this operation.
* Incline the wine cabinet with 45°, take out right lower hinge's screws with screwdriver. (Fig. 1)
* Lift the cellar and unscrew the upper right hinge with a screwdriver and pull out the door, secure it, put the door down safely and remove the screws, then remove the hinge, place it and screw it on the other side, unscrew the magnet located at the bottom and center of the frame to install it on the top position of the frame. Finally turn the door 180°. (Fig. 2/3/4)
* Take off the decorated nail from left upper side then fit the door with screws then fit the decorated nail to right side of A location. (Fig. 5/6)

text_image
1 2 3 4 5 6 7 Limited block B Limited block A support location-plateFor the BPWKN 82
This appliance has reversible doors but is delivered with a right hinged door. The left hand hinge kit comes with the unit (in the box), should you wish to reverse the hinge on your unit.
For your safety, please unplug appliance before doing this operation.
- Right lower hinge
- Screws
- Door axis
- Door
- Right top hinge
-
Hinge screws
-
Left top hinge
- Decorative nail
- Left lower hinge
- Door limit device
- Screw
- Plug

text_image
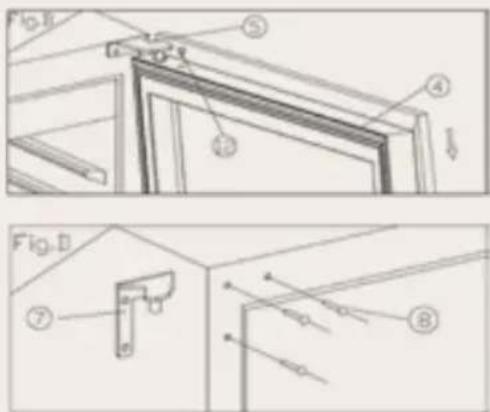
Fig.4 ⑪ ⑪ ④ ② ③ ④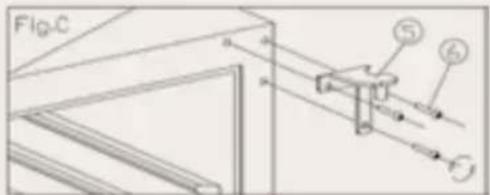
text_image
Fig.C ⑮ ⑥
text_image
Fig. E ⑨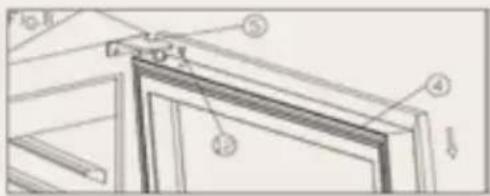
text_image
Technical diagram of a door frame with numbered components and structural details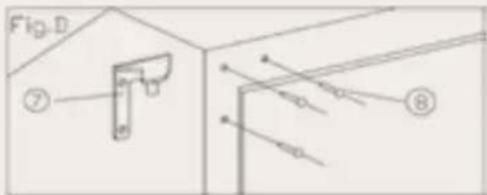
text_image
Fig. D ⑦ ⑧* When the door is open to 90°, take out 2 screws (2) from lower door axis (3), remove the door (4), then pull out the door and door axis. (Fig. A)
* Put the door (4) down safely and take out the plug (12) from top of door frame, unscrew one screw (11) at bottom and remove the door limit device (10), then install the door limit device (10) at top of door frame, please use spare plug (12) to block the hole at top of door frame. (Fig. A/B)
* Remove decorative nail (6) from the right top hinge (5) and remove it. (Fig. C)
* Remove the decorative nail (8) from the left top of cabinet and install the spare left top hinge (7) at left top of cabinet with three screws. (Fig. D)
* According above procedure, install the spare left lower hinge (9). (Fig. E)
* The door revolves 180°, install the door in same way it was removed and fix it with door aligned.
* Block the hole at right top of cabinet with spare decorative nail (8).
Cleaning the wine cabinet
* Turn off the power, unplug the appliance, and remove all items including shelves and rack.
* Wash the inside surfaces with a warm water and baking soda solution. The proportion should be about 2 tablespoons of baking soda to a quart of water.
* Wash the shelves with a mild detergent solution.
* Wring excess water out of the sponge or cloth when cleaning area of the controls, or any electrical parts.
* Wash the outside cabinet with warm water and mild liquid detergent. Rinse well and wipe dry with a clean soft cloth.
Power failure
Most power failures are corrected within a few hours and should not affect the temperature of your appliance if you minimize the number of times the door is opened. If the power is going to be off for a longer period of time, you need to take the proper steps to protect your contents.
Vacation time
* Short vacations: Leave the wine cabinet operating during vacations of less than three weeks.
* Long vacations: If the appliance will not be used for several months, remove all items and turn off the appliance. Clean and dry the interior thoroughly. To prevent odor and mold growth, leave the door open slightly: blocking it open if necessary.
Moving the wine cabinet
* Remove all items.
* Securely tape down all loose items (shelves) inside your appliance.
* Turn the adjustable leg up to the base to avoid damage.
* Tape the door shut.
* Be sure the appliance stays secure in the upright position during transportation. Also protect outside of appliance with a blanket, or a similar item.
Energy saving tips
The wine cabinet should be located in the coolest area of the room, away from heat producing appliances, and out of the direct sunlight.
Problems with the wine cabinet
You can solve many common wine cabinet problems easily, saving you the cost of a possible service call. Try the suggestions below to see if you can solve the problem before calling the servicer.
Troubleshooting guide
| PROBLEM POSSIBLE | CAUSE |
| The wine cabinet is not operative. | * It isn't plugged in.* The appliance is turned off.* The circuit breaker tripped or there is a blown fuse. |
| The wine cabinet isn't cold enough. | * Check the temperature control setting.* External environment may require a higher setting.* The door is opened too often.* The door isn't closed completely.* The door gasket doesn't seal properly. |
| The wine cabinet turns on and off frequently. | * The room temperature is hotter than normal.* A large amount of contents has been added to the wine cabinet.* The door is opened too often.* The door isn't closed completely.* The door gasket doesn't seal properly.* The temperature control isn't set correctly. |
PROBLEM POSSIBLE CAUSE
| The light doesn't work. | * The light isn't plugged in.* The circuit breaker tripped or there is a blown fuse.* The bulb has burned out.* The light button is "off". |
| Vibrations. | * Check to assure that the wine cabinet is level. |
| The wine cabinet seems to make too much noise. | * The rattling noise may come from the flow of the refrigerant, which is normal.* As each cycle ends, you may hear gurgling sounds caused by the flow of refrigerant in the wine cabinet.* Contraction and expansion of the inside walls may cause popping and crackling noises.* The wine cabinet isn't level. |
| The door won't close properly. | * The wine cabinet isn't level.* The door was reversed and not properly installed.* The gasket is dirty.* The shelves are out of position. |
Disposal of old appliances
Before disposing an old appliance remove any plugs and power leads to ensure that the appliance is inoperative.
Remove the door, but leave the shelves in place.
This symbol on the product indicates that it must not be discarded as general household waste. Instead it should be handed over to the applicable collection point for the recycling of electrical and electronic equipment.
Disposal must be carried out in accordance with local environmental regulations for waste disposal. By disposing this product correctly you will help prevent potential negative consequences for the environment and human health, which would otherwise be caused by inappropriate waste handling of this product.
Warning
When disposing of an old appliance make sure that the pipe work does not get damaged.
Prefazione
text_image
Power Light Run Upper Chamber Lower Chamber Set Upper Set Lower\* Run
\* Upper compartment
\* Lower compartment
natural_image
Technical line drawing of a mechanical assembly with no visible text or symbols