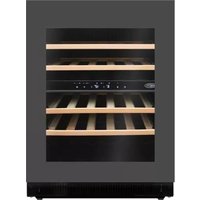
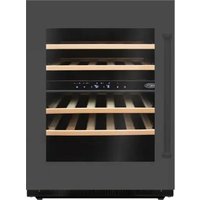
MLWC82ZGAN - Wine cellar BORETTI - Free user manual and instructions
Find the device manual for free MLWC82ZGAN BORETTI in PDF.


| Product type | Wine cellar |
| Brand | Boretti |
| Model | MLWC82ZGAN |
| Dimensions (H x W x D) | 820 x 595 x 590 mm (max 885 mm height) |
| Net weight | 52 kg |
| Power supply | 220-240 V ~ 50 Hz, 0.6 A |
| Refrigerant | R600a, 35 g |
| Temperature range | Upper zone: 5 to 10 °C, Lower zone: 10 to 18 °C |
| Maximum bottle capacity | 35 bottles (Bordeaux 0.75 L) |
| Climate class | N/ST (ambient temperature 16-38 °C) |
| Installation type | Built-in |
| Reversible door opening | Yes, reversible hinges |
| Interior lighting | LED, adjustable brightness with modes: door open/continuous/timed |
| Operating modes | Standard, Eco, Intelligent, Demo |
| Charcoal filter | Yes, replacement every 6 to 9 months |
| Humidity control | Integrated system with optional water reservoir |
| Safety | Child lock, open door alarm, UV protection (double glazing) |
| Defrost | Automatic (automatic cycle) |
| Cleaning | Interior surface with warm water and mild detergent |
| Spare parts and repairability | Available from Boretti after-sales service and authorized dealers |
Frequently Asked Questions - MLWC82ZGAN BORETTI
User questions about MLWC82ZGAN BORETTI
0 question about this device. Answer the ones you know or ask your own.
Ask a new question about this device
Download the instructions for your Wine cellar in PDF format for free! Find your manual MLWC82ZGAN - BORETTI and take your electronic device back in hand. On this page are published all the documents necessary for the use of your device. MLWC82ZGAN by BORETTI.
USER MANUAL MLWC82ZGAN BORETTI
__SUPPIMER__
EN | USER MANUAL
EN | USER MANUAL
www.boretti.com
Introduction
Congratulations! You are the official owner of a Boretti wine cabinet. In the years to come you will discover that the use of a Boretti wine cabinet gives a new dimension to cooling. We advise you to read this manual carefully before taking the cabinet in use to get to know all the ins and outs of this beautiful appliance. Please inform us if you have any questions. You are welcome to visit our Experience Center anytime, we are happy to inspire and help with your questions.
We wish you a lot of cooling pleasure! Enjoy the aperitivo's and dinners like never before!
Boretti
Product Registration
To register ownership, please ensure you complete the online registration form www.boretti.com.
Contents
* 1. Important safety issues....6 * 2. Installation....9 * 3. Usage of product....17 * 4. Care & Cleaning .... 23 * 5. Troubleshooting....24
1. Important safety issues
* To prevent damage to the door and door gasket, make sure the door is fully opened before pulling out any shelves. * Do not move the wine cabinet when it is loaded with wine, you might distort the appliance. * If the power supply cord becomes damaged it should only be replaced by the manufacturer or qualified person. * Never allow children to operate on playing with the appliance. * Never clean appliance parts with flammable fluids. * Do not store or use gasoline or any other flammable vapours and liquids in the vicinity of this or any other appliance. This can create a fire hazard or explosion. * Always remember to unplug the appliance before cleaning. When disconnecting from the electricity supply, pull the plug, not the power cord. * Do not use anything electrical inside the wine cabinet. * All repairs must be carried out by a qualified service engineer. Inadequate repairs may result in a major source of danger for the user and invalidate any warranty. * Never store anything dangerous inside the appliance, such as combustibles, explosives, strong acid or alkali etc. * Always keep any ventilation openings clear of obstruction. Should they become blocked, clear them straight away. * Make sure that the plug is in an accessible place when installation is complete. * Only use this appliance for domestic purposes in accordance with these instructions. * The wine cabinet is suitable for storing wine (or other bottled beverages). It is not suitable for storing fresh or frozen foods. * If the refrigerant of these appliances are R600a, Flammable and explosive articles should not be put in or near the cabinet, to avoid the fire or explode caused.
Warning
Do not allow the refrigerant circuit to become damaged while using or installing the appliance. Should it become damaged, do not use the appliance until you are instructed to do so by a service engineer.
Refrigerant can ignite or cause damage to the eye when leaking.
Environmental protection
Waste electrical products should not be disposed of with household waste. Please recycle where facilities exist. Check with your Local Authority or retailer for recycling advice. This appliance is marked according to the European directive on Waste Electrical and Electronic Equipment (WEEE). By ensuring this product is disposed of correctly, you will help prevent potential negative consequences for the environment and human health, which could otherwise be caused by inappropriate waste handling of this product. The symbol on the product indicates that this product may not be treated as household waste. Instead it shall be handed over to the applicable collection point for the recycling of electrical and electronic equipment. Disposal must be carried out in accordance with local environmental regulations for waste disposal. For more detailed information about treatment, recovery and recycling of this product, please contact your local council, your household waste disposal service or the retailer where you purchased the product.
CE declaration of conformity
Hereby, Boretti B.V. declares that this appliance has been manufactured to the standards of the CE guidelines and directives applicable for CE conformity.

Warranty
Your new wine cabinet is covered by warranty. Registration can be completed online by visiting www.boretti.com. Spare parts are only available from Boretti Service department and spare part authorized resellers.
Technical fiche
This appliance conforms to all current and applicable energy regulations. To view the Technical Fiche that supports the energy labelling data, please visit the product page on our website www.boretti.com. Or scan the QR-code to contact the EPREL database.

MLWC82
2. Installation
2.1 Before use
Before connecting the wine cabinet to the power source, let it stand upright for at least 6 hours. This will reduce the possibility of a malfunction in the cooling system from handling during transportation.
Clean the interior surface with lukewarm water using a soft cloth.
Read the instructions supplied with the appliance – failure to install or use of the appliance in accordance with the instructions may invalidate any warranty.
Boretti does not accept any liability for damage caused through improper use, or incorrect installation. Do not install this appliance if it has been damaged during transportation. This includes the plug and supply cord.
Please keep these instructions in a safe place for future reference.
2.2 Installation of the wine cabinet
- Place your wine cabinet on a flat floor that is strong enough to support it when it is fully loaded.
- This appliance uses flammable refrigerant. Never damage the cooling pipework during transportation and installation.
- Locate the wine cabinet away from direct sunlight and sources of heat (stove, heater, radiator, etc.). Direct sunlight may affect the acrylic coating and heat sources may increase electrical consumption. Extreme cold ambient temperatures may also cause the unit not to perform properly.
- Avoid locating the unit in moist areas.
- Put the plug of the wine cabinet into an appropriate socket. Should the plug require changing, get help from a qualified service technician.
- Ensure the product is correctly ventilated (See section 1.3).
- Plug the wine cabinet into an exclusive, properly installed-grounded wall outlet. Do not under any circumstances cut or remove the third (ground) pin from the plug. Any questions concerning power and/or grounding should be directed toward a certified electrician or Customer Service Boretti.
2.3 Ventilation
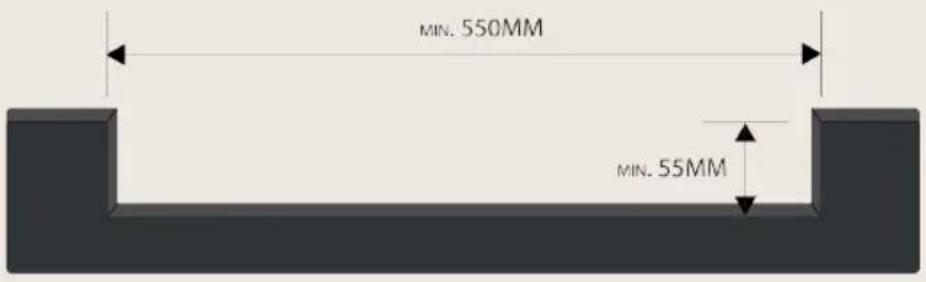
The MLWC82 is already equipped with a vent slot on the front side. This model is also recessed to fit a kitchen plinth. If fitting a kitchen plinth is desired, please remove the air grid by removing both screws in front. A 55mm high vent slot is required in the plinth to ensure air is able to ventilate properly. See the diagram below.
Failure to include this vent slot will invalidate the guarantee. Please note that the appliance doesn't come with a grille which slots-onto the kitchen plinth.
2.4 Appliance dimensions
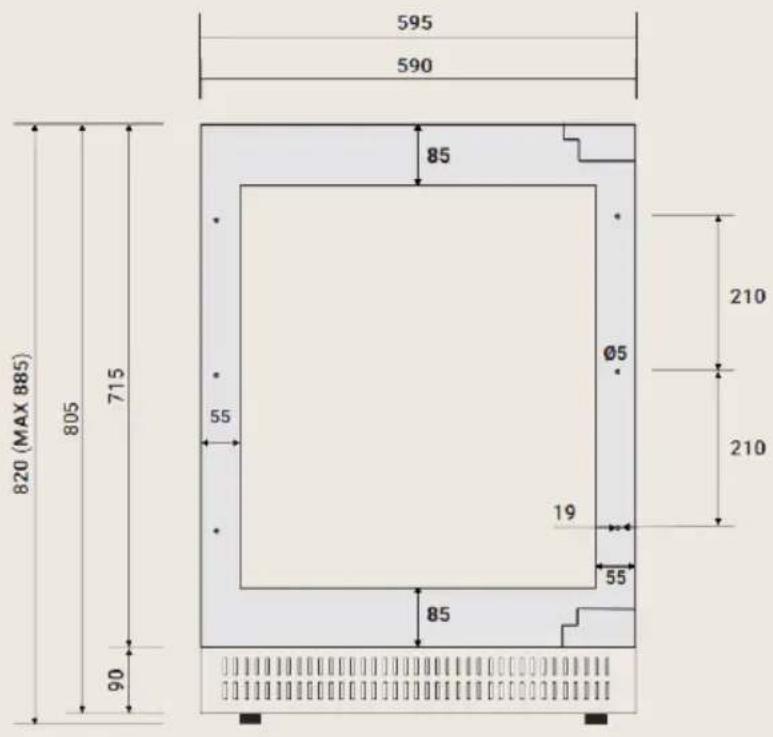
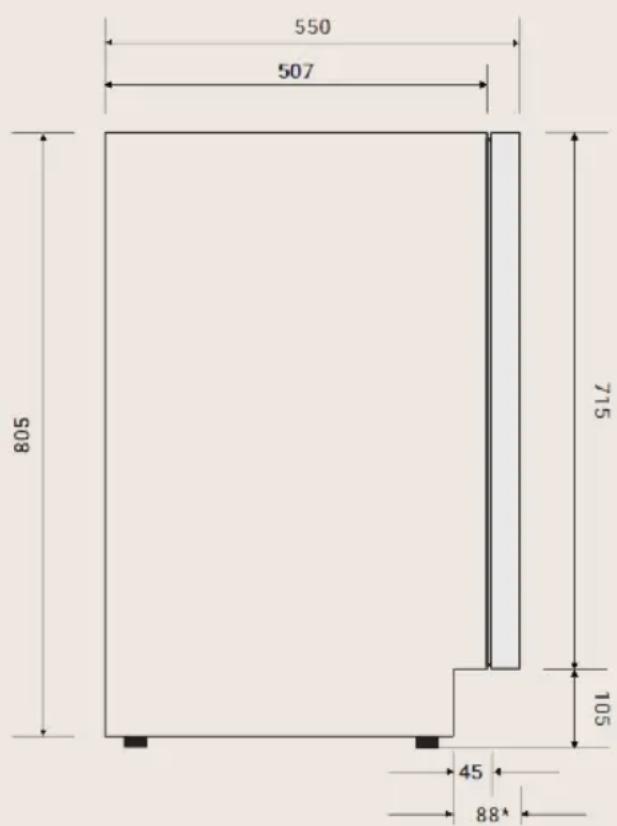
* Measurement will be deeper if the front is installed on the cabinet Length of power cord: 200cm Maximum door opening angle: 100°
2.5 How to change the door opening
This appliance has reversible doors but is delivered with a right hand hinged door. Should wish to reverse the hinge on your unit, follow the directions below:
- Decorative screws
- Door
- Door hinge, 4 screws
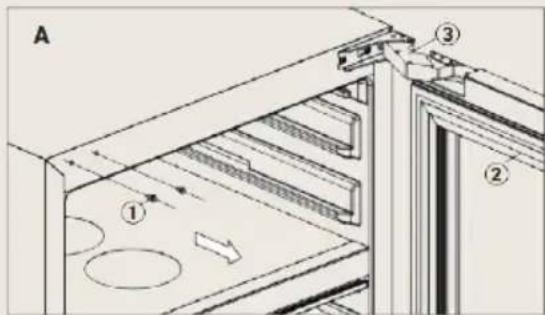
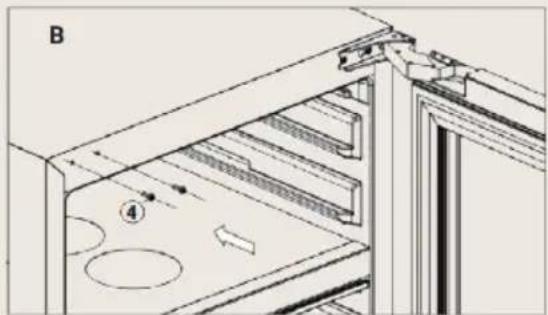
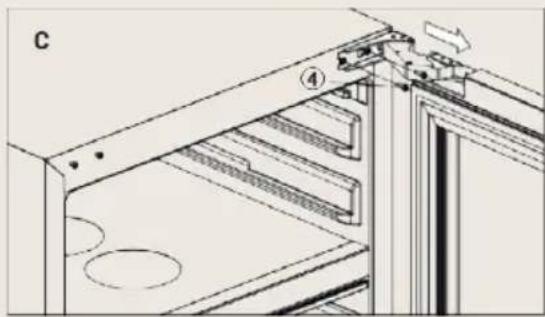
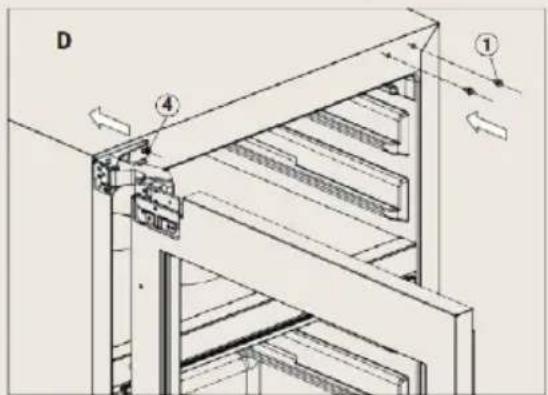
- Open the door and remove the decorative covers (1) on the left-hand side as shown in Fig. A.
- Fix the screws into these positions as per Fig. B, but do not fully tighten them.
- Remove all screws from both the upper and lower hinges, and then remove the door.
- Rotate the door 180 degrees, and place the hinges onto the screws fixed in Fig. B. Once slotted onto these screws, tighten the screws to secure the hinges (Fig. D).
- Place the decorative covers on the right-hand side and over the screw holes as shown in Fig. D.
2.6 Installing the appliance
Place your wine cabinet on a floor that is strong enough to support it when it is fully loaded. The kitchen unit must be aligned horizontally and vertically.
You will need to install a furniture door frame to the front of the wine cabinet once the wine cabinet has been installed.
The furniture door frame can be custom made (by the kitchen reseller) to line up with your other furniture doors in the kitchen. The door must be finished on both sides in order to prevent warping.
Note:
The door panel must not weigh more than 10 kg.
Note:
We recommend that the door thickness does not exceed 18 mm. If a thicker door is used, the door may come into contact with the adjacent furniture door when opened.
Steps
- If you need to adjust the height to over 820 mm, install the product using the foot sliders provided. These are supplied to help prevent the feet from catching on the floor when sliding the appliance into the aperture.
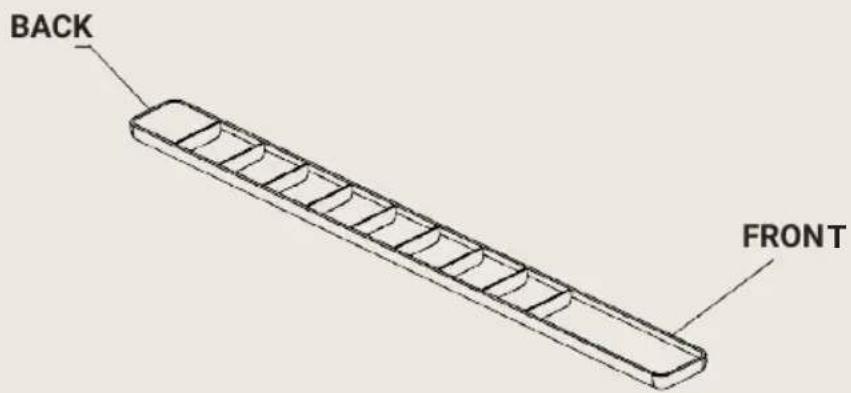
- To level your wine cabinet, adjust the front and back using the adjustable legs at the bottom of the cabinet (to 4 mm less than the recess or handlebar height). Ensure it is perfectly level, as this will minimize any vibrations and noises.
- Slide the appliance in until the front surface of the appliance door is behind the cabinet fronts. Place the furniture door frame on the cabinet to determine the correct installation depth. When sliding the appliance in, make sure the power supply cord is not damaged.
- The included bracket will keep the product secure and help prevent it from moving when in use. Align the fixing bracket with the two holes at the top of the wine cabinet. Use the screws to secure it into position. Use the screws to secure the bracket to the side of the kitchen cabinet.
5. Installing the furniture door
If a handle is required, ensure it is installed in an appropriate position before the furniture door is installed on the cabinet door.
i. Fully open the door. ii. Starting at the corner, pull the gasket away from the door. Continue to pull the gasket free from the gasket channel. iii. Upon removal, lay the gasket down on a flat surface. iv. Align the furniture door panel with the cabinet doors. Secure the furniture door to the appliance door using clamps. v. Using a 3 mm drill bit, drill 6 pilot holes into the wood panel 12 mm deep, using the holes in the door frame as a guide.
Note:
It is important to ensure that all drilled holes are drilled to the correct depth to avoid splits in the wood when hardwood is installed. You must also take care not to drill all the way through the door.
vi. Locate 6 of the M4x34 mm screws provided with your unit. vii. Using a screwdriver, place one screw into each of the 6 pilot holes and screw into the door. Be careful not to over-tighten the screws. Ensure the screws sit flush against the bottom of the channel. Remove clamps from the door.
Note:
If the panel requires additional adjustment after removing the clamps, slightly loosen each screw and adjust the panel as necessary. Tighten the screws upon completion.
viii. Starting at the corners, re-install the gasket into the gasket channel in the frame by pushing firmly into place. Make sure the gasket is fully seated into the channel.
2.7 Example inframe style door
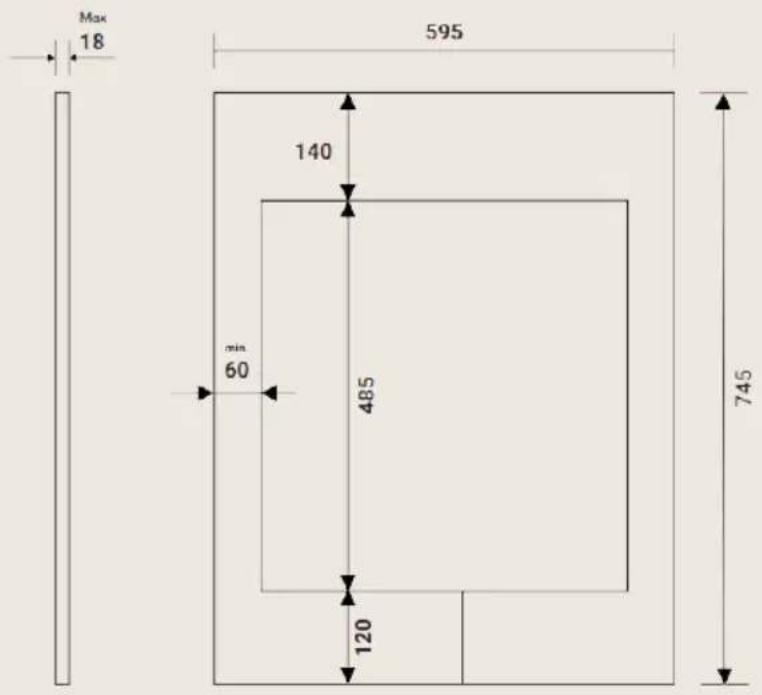
This is an example of a X13 Raster size handleless kitchen cabinet door.
The height of the furniture door will need to be adjusted to ensure it lines up with the other kitchen cabinet doors, therefore these dimensions will vary. The minimum overall height of the furniture door must be at least 715mm.
Note:
The furniture door can extend beyond the appliance door, however you must ensure a gap of at least 75mm is left between the bottom of the furniture door and the floor to allow for sufficient ventilation.
2.8 Permitted room temperature
The permitted room temperature depends on the appliance's climate class. The climate class can be found on the rating plate.
| Climate Class Permitted room temperature | |
| SN 10°C - 32°C | |
| N 16°C - 32°C | |
| ST 16°C - 38°C | |
| T 16°C - 43°C | |
| SN-ST 10°C - 38°C | |
| SN-T 10°C - 43°C | |
The appliance is fully functional within the permitted room temperature. If an appliance with climate class SN is operated at colder room temperatures, the appliance will not be damaged up to a room temperature of 5°C.
3. Usage of product
3.1 Touch control keys and symbols


To switch the wine cabinet on/off. Press and hold this button for approximately 1 second to turn the wine cabinet on. Press and hold this button for approximately 3 seconds to turn the wine cabinet off.

To turn the lock function on/off. Press and hold this button for approximately 3 seconds to activate/deactivate. When activated, the symbol will illuminate.
+/- Press this button to raise the temperature in 1 °C increments. Once the temperature reaches the highest temperature value for the upper zone or lower zone, it will revert back to its lowest temperature value.
Upper zone = 5 - 10°C
Lower zone = 10 - 18°C
Once the required temperature is selected, the LED display will temporarily flash for 5 seconds, then revert back to the normal display, and the temperature is now set.
Note
Press and hold +/- for 3 seconds to change the display from °C to °F.

This button is used to toggle between the different light functions. When selected, the relevant symbol will illuminate:

The internal light will switch on when the door is opened, and off when the door is closed.

The internal light is continuously on. However, after 3 minutes the light will dim.

The internal light will remain on for 10 minutes once the door is closed and then turn off.

This symbol indicates the brightness adjuster: Hold the light key for 3 seconds until it flashes. Then use the +/- keys to adjust the brightness of the internal light.

This button is used to toggle between the different operational functions. When selected, the relevant symbol will illuminate:

Standard Mode – Select this function to operate the wine cabinet in standard mode.

ECO Mode – An energy saving mode where both the inner light and control panel lights are off. The LED display is also switched off, until you change the temperature using the +/- keys, this will be displayed for 5 seconds and then switch off again. The compressor is also delayed 5 minutes in order to save energy.

Intelligent mode – In Intelligent mode, the wine cabinet will adjust the fan speed according to the ambient temperature. This will reduce noise levels and save money.

DEMO Mode – When Demo mode is selected, the compressor and PTC heater will be disabled, and the fan input voltage reduces to 9V. The HI/LO temperature alarm is also disabled during DEMO mode.
The cooling symbol will illuminate to show when the wine cabinet is currently cooling.
The alarm symbol will illuminate to show the alarm is on. This will activate when either the door has been left open for a long period of time, or the temperature has fluctuated too high or low (HI or LO will also show in display to confirm this).
3.2 Bottle stacking
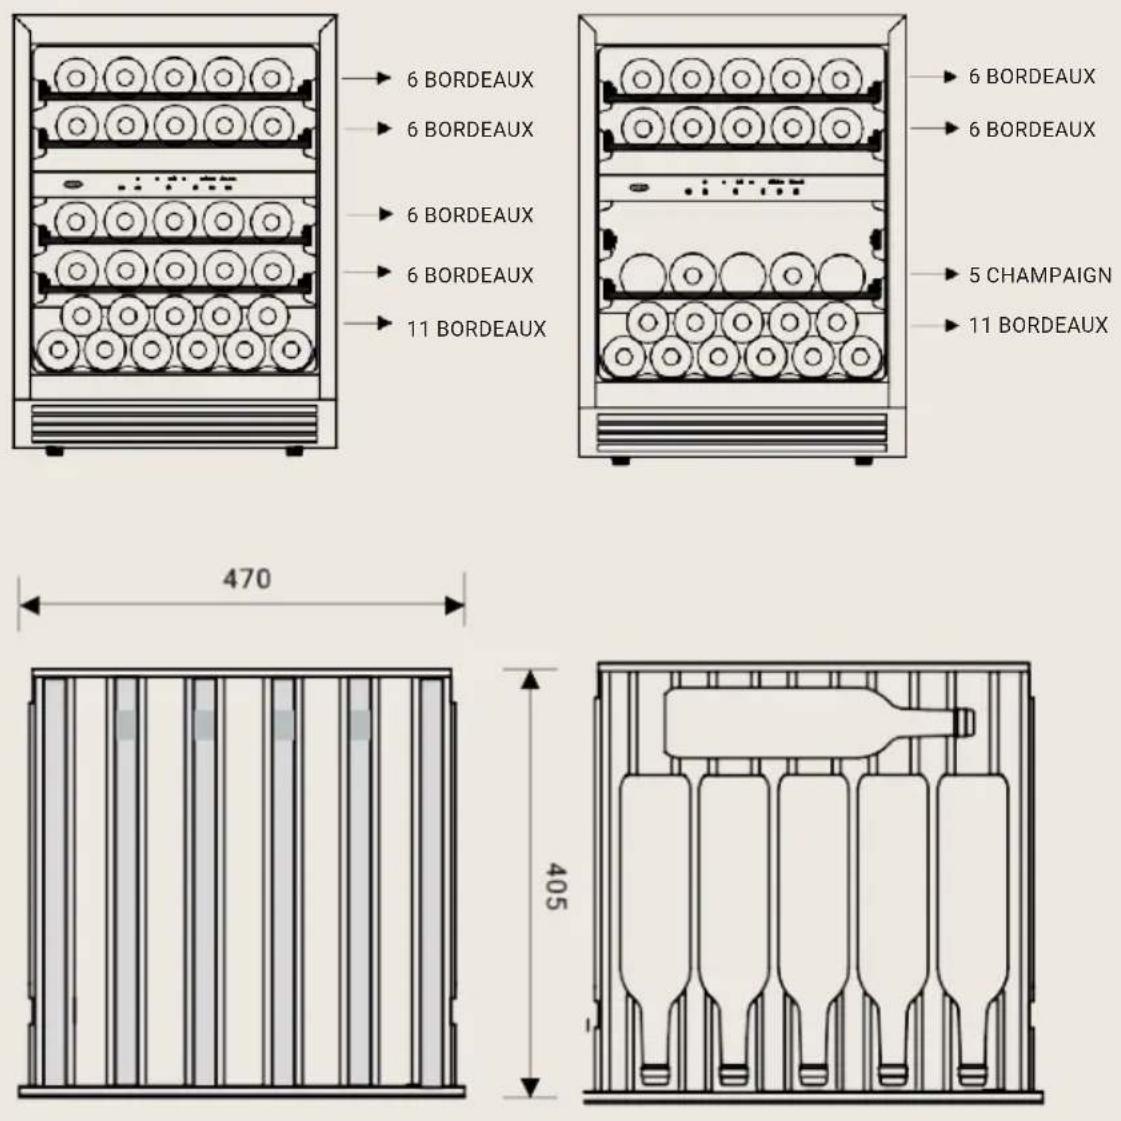
The maximum storage capacity for Bordeaux style of bottles (0.75L) is 35 bottles. It is possible to store Champagne / Magnum size bottles. To make this possible, the upper rack in the lowest zone needs to be removed. Please see section 2.4 how storage racks can be removed.
Note:
If you wish to store other type of bottles, the maximum storage capacity will be less than as shown above.
3.3 How to replace the charcoal filter
All MLWC82 models are fitted with a charcoal filter, which ensure optimum air quality within the appliance. The charcoal filter should be replaced every 6-9 months depending on the unit's exposure level to odour.
- Open the door and remove the top 2 shelves (see removing the shelves).
- Turn the filter as per Fig A.
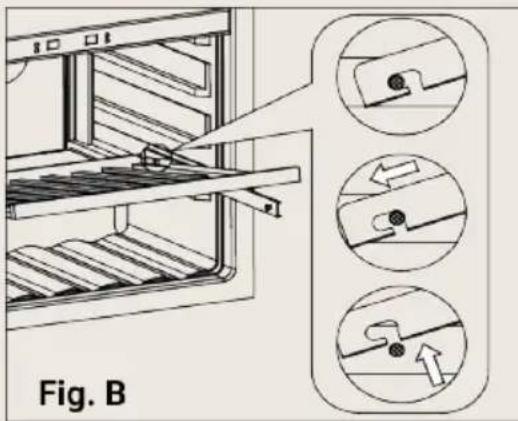
- As per Fig B, the filter should line up with the notches as shown.
- Pull filter out as per Fig. C.
- Insert replacement filter and twist as per Fig. A to lock into position.
- Re-install the shelves.
FIG. A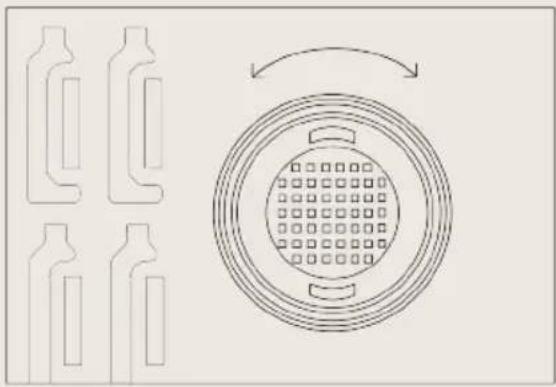
FIG. B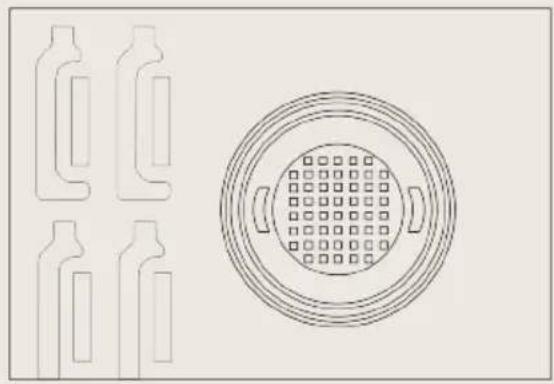
FIG. C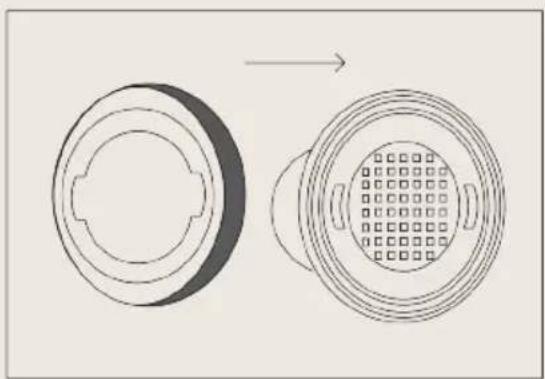
3.4 Using and removing the shelves
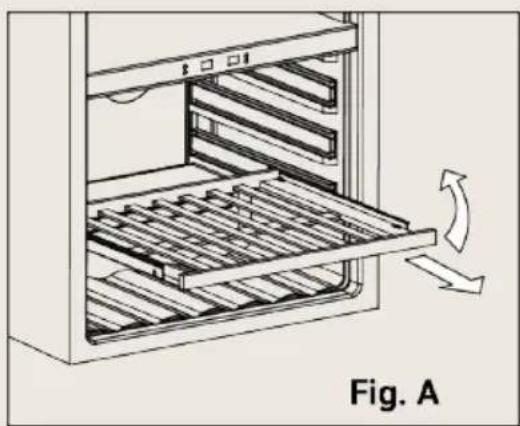
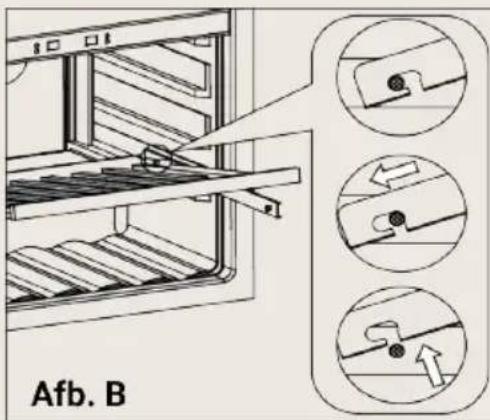
To prevent damaging the door gasket, make sure to have the door opened fully when pulling shelves out of the rail compartment. The shelves are attached to a telescopic rail system for easy stacking or pulling out bottles.
Glass shelves are available if you wish to store cans or smaller bottles in your wine cabinet. These can be purchased directly from www.boretti.com
Removing the shelf
- Fully extend the shelf you wish to remove.
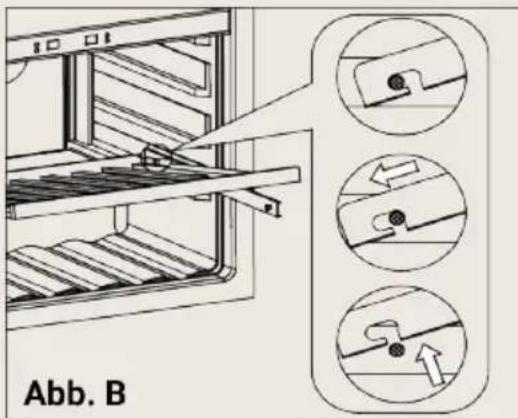
- Lift the front of the shelf up to remove it from the front clips, as shown in Fig. A.
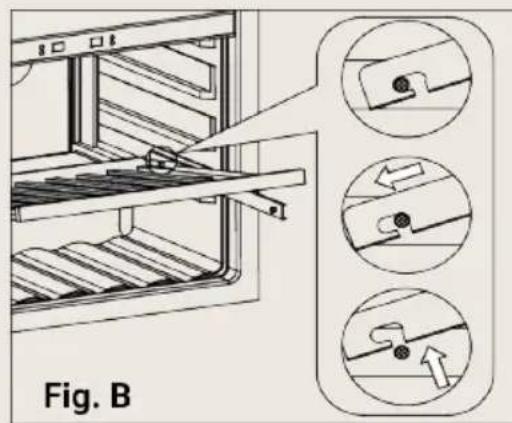
- Holding onto the shelf runner, push the shelf in and then pull up at the back to release it from the rear clips, as shown in Fig. B.
3.5 Ideal storage climate for wines
There are four points that ensure a perfect climate to preserve wines in optimal condition.
Constant Temperature
Boretti wine cabinets maintain precise temperatures between 5 °C to 18 °C. Minimizing the temperature variance is most important when it comes to long-term storage to ensure wine matures correctly.
The ideal long term storage temperature for wine is between + 10 °C and + 12 °C. It is critical that the temperature is kept as constant as possible because this is the only way that a wine's natural harmony will be preserved.
The lower zone can be used to store wine for longer terms. The upper zone has a temperature range from 5 °C till 10 °C and is ideal to keep wines on serving temperatures.
* Sparkling wines;
- Champagne (8°C) • Prosecco (7-8°C)
- Muscat (7-8°C) • Cava (5-6°C)
* White wines:
- Pinot Grigio (8°C)
- Pinot Blanc (8°C) • Sauvignon Blanc (9°C)
- Chardonnay (10°C) • Full-bodied Chardonnay (12°C)
* Light-to-medium bodied reds:
- Chianti (15°C) • Pinot Noir (16°C)
- Merlot (16°C)
- Rioja (16°C)
- Bordeaux (16°C)
* Full-bodied reds:
• Cabernet Sauvignon (17°C) • Red Burgundy (17°C) • Barolo (17°C) • Brunello (17°C) • Grand Cru Bordeaux (18°C)
Vibration Free
To prevent wine from being disturbed, all compressors are mounted on isolation blocks designed to absorb any vibration.
UV Protection
All Boretti glass door wine cabinets are tinted and double glazed to prevent harmful ultraviolet rays from causing discoloration to labels and unwanted reactions to your wine.
Perfect Air Quality
The MLWC82 wine cabinet has a charcoal filter to assist in maintaining perfect air quality, which is vital for preserving and maturing wine.
4. Care & Cleaning
4.1 Cleaning your wine cabinet
• Turn off the power, unplug the appliance, and remove all items including shelves and racks. • Wash the inside surfaces with a warm water and mild natural soap solution. • Wash the shelves with a mild detergent solution. • Wring excess water out of the sponge or cloth when cleaning the area of the controls. Do not clean electrical parts, like the fans.
4.2 Power failure
Most power failures are corrected within a few hours and should not affect the temperature of your appliance if you minimize the number of times the door is opened. If the power is going to be off for a longer period of time, you need to take the proper steps to protect your contents.
4.3 Holidays
Short Holidays: Leave the wine cabinet operating during holidays of less than three weeks.
Long Holidays: If the appliance will not be used for several months, remove all items and turn off the appliance. Clean and dry the interior thoroughly. To prevent odor and mold growth, leave the door open slightly (blocking it open if necessary).
4.4 Moving your wine cooler
* Remove all items. * Securely tape down all loose items (shelves) inside your appliance. * Turn the adjustable leg up to the base to avoid damage. * Tape the door shut. * Be sure the appliance stays secure in the upright position during transportation. Also protect the outside of the appliance with a blanket or similar item.
4.5 Defrosting/condensation
Your wine cabinet is designed with an "Auto-cycle" defrost system. When the RUN cycle is OFF, the refrigerated surface of the wine cabinet (interior rear wall) defrosts automatically. The defrosted water is channeled into a drain pan located at the back of the cabinet next to the compressor, from where it evaporates.
5. Troubleshooting
5.1 Problem solving
You can solve many common wine cabinet problems easily, saving you the cost of a possible service call. Try the suggestions below to see if you can solve the problem before calling the Boretti Service department.
| PROBLEM POSSIBLE CAUSE | |
| Wine cooler does not operate. | * Not plugged in.* The appliance is turned off.* The circuit breaker tripped or a blown fuse. |
| Wine cooler is not cold enough. | * Check the temperature control setting.* External environment may require a higher setting.* The door is opened too often.* The door is not closed completely.* The door gasket does not seal properly. |
| Turns on and off frequently. | * The room temperature is hotter than normal.* A large amount of contents has been added to the Wine cooler.* The door is opened too often.* The door is not closed completely.* The temperature control is not set correctly.* The door gasket does not seal properly. |
| The light does not work. | * Not plugged in.* The circuit breaker tripped or a blown fuse.* The bulb has burned out.* The light button is "OFF". |
| Vibrations. | * Check to assure that the Wine cooler is level. |
| The Wine cooler seems to make too much noise. | * The rattling noise may come from the flow of the refrigerant, which is normal.* As each cycle ends, you may hear gurgling sounds caused by the flow of refrigerant in your Wine cooler.* Contraction and expansion of the inside walls may cause popping and crackling noises.* The Wine cooler is not level. |
| The door will not close properly. | * The Wine cooler is not level.* The door was reversed and not properly installed.* The gasket is dirty.* The shelves are out of position. |
If the above table has not solved the problem, please contact the Boretti Service Center by phone or by email at service@boretti.com. The product model name is displayed on the side of your wine cabinet. Or see paragraph 4.2.
Humidity system
The wine cabinet is equipped with a system for maintaining the correct level of humidity. If humidity is too low, insert the small plastic reservoir onto the top shelf. Fill this reservoir 3/4 full with water. Check the water level occasionally and refill as necessary.
5.2 Rating plate
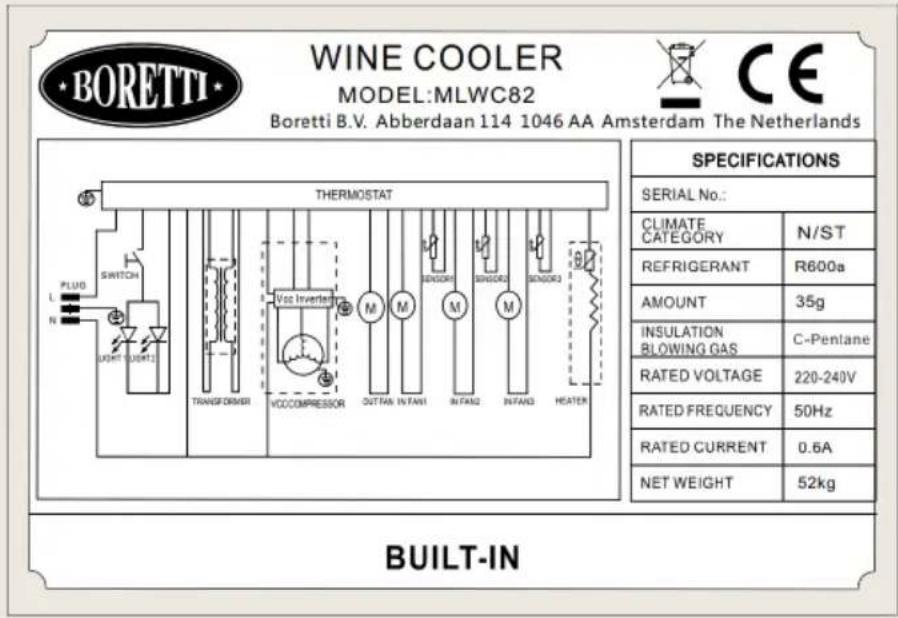
5.3 Error code list
| Code Representation Solution | ||
| E1 | Upper compartment sensor open circuit | Contact the Boretti Service Department. |
| E2 | Upper compartment sensor short circuit | Contact the Boretti Service Department. |
| E3 | Lower compartment sensor open circuit | Contact the Boretti Service Department. |
| E4 | Lower compartment sensor short circuit | Contact the Boretti Service Department. |
| E7 | Defrost sensor open circuit | Contact the Boretti Service Department. |
| E8 | Defrost sensor short circuit | Contact the Boretti Service Department. |
| HI Inner temperature too high | Shut off the Cabinet for 1 hour. If the problem repeats, please contact the Boretti Service Department. | |
| LO/CL Inner temperature too low | Shut off the Cabinet for 1 hour. If the problem repeats, please contact the Boretti Service Department. | |
2. Installation
2.1 Before use
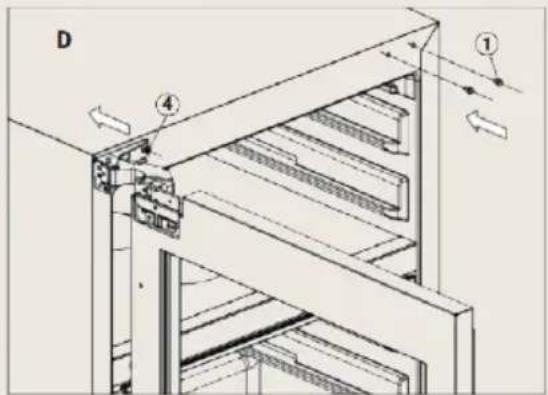
FIG. B
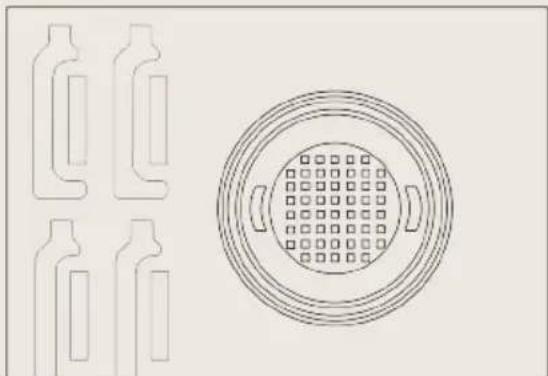
FIG. C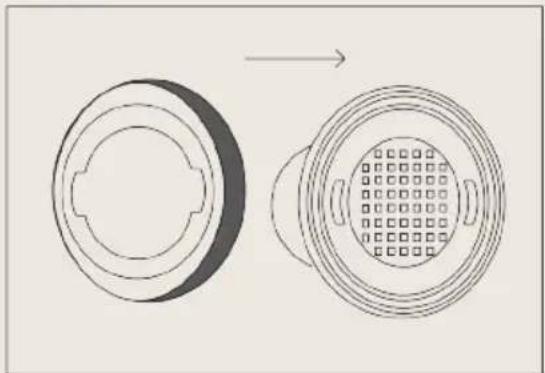
MANUAL MANUAL MLWC82MLWC82
EN | USER MANUAL
www.boretti.com
Introduction
MLWC82
2. Installation
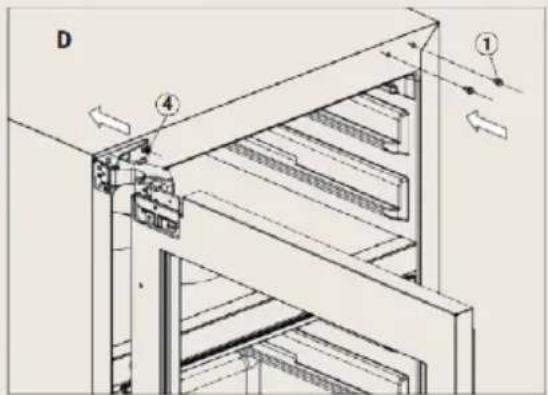
FIG. B
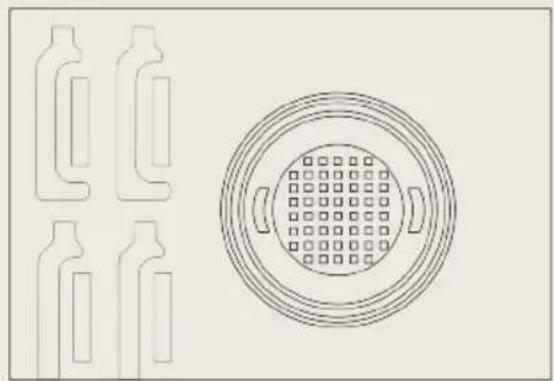
FIG. C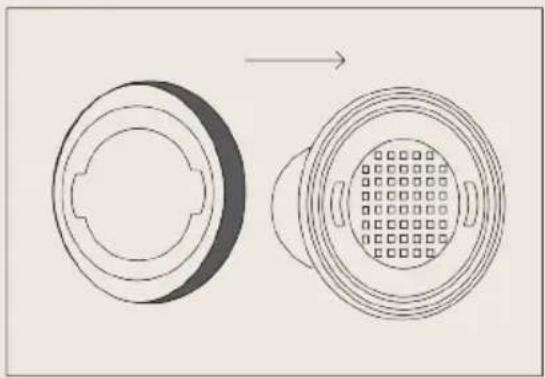
MANUAL MANUAL
MLWC82MLWC82
EN | USER MANUAL
www.boretti.com
Introduction
MLWC82
2. Installation
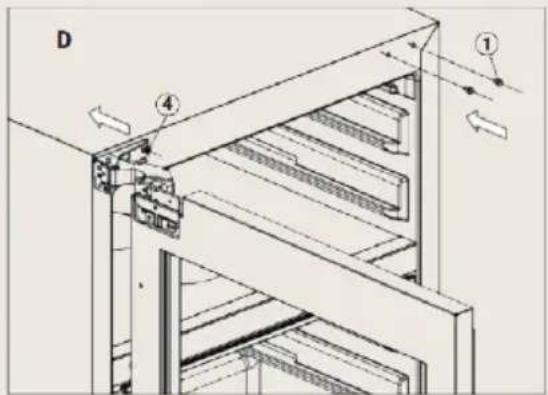
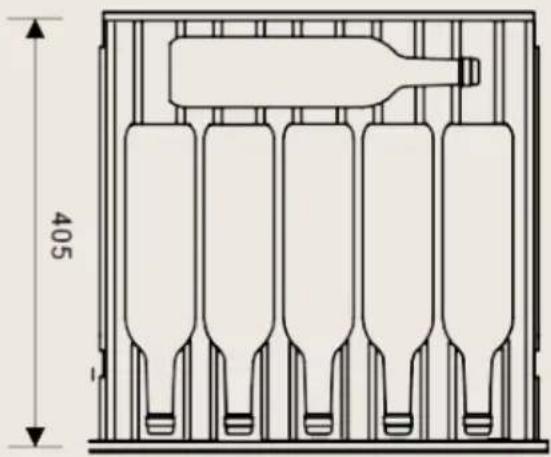
FIG. B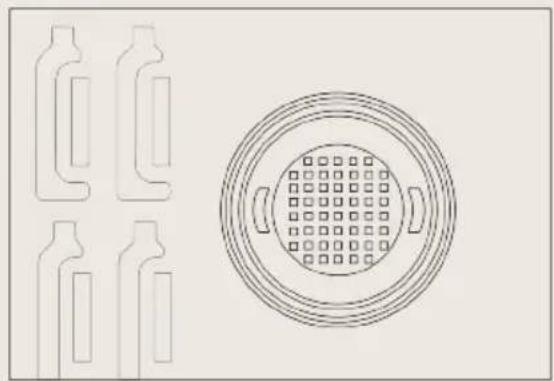
FIG. C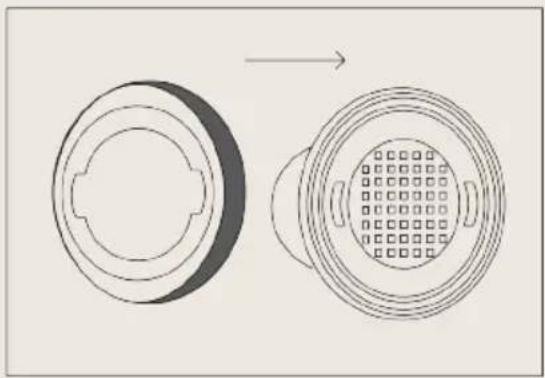
- INTRODUCTION
- BORETTI
- PRODUCT REGISTRATION
- CONTENTS
- IMPORTANT SAFETY ISSUES
- WARNING
- ENVIRONMENTAL PROTECTION
- CE DECLARATION OF CONFORMITY
- WARRANTY
- TECHNICAL FICHE
- INSTALLATION
- 2.1 BEFORE USE
- 2.2 INSTALLATION OF THE WINE CABINET
- 2.3 VENTILATION
- 2.4 APPLIANCE DIMENSIONS
- 2.5 HOW TO CHANGE THE DOOR OPENING
- 2.6 INSTALLING THE APPLIANCE
- NOTE
- STEPS
- INSTALLING THE FURNITURE DOOR
- 2.7 EXAMPLE INFRAME STYLE DOOR
- THIS IS AN EXAMPLE OF A X13 RASTER SIZE HANDLELESS KITCHEN CABINET DOOR
- 2.8 PERMITTED ROOM TEMPERATURE
- USAGE OF PRODUCT
- 3.1 TOUCH CONTROL KEYS AND SYMBOLS
- 3.2 BOTTLE STACKING
- 3.3 HOW TO REPLACE THE CHARCOAL FILTER
- 3.4 USING AND REMOVING THE SHELVES
- REMOVING THE SHELF
- 3.5 IDEAL STORAGE CLIMATE FOR WINES
- CONSTANT TEMPERATURE
- SPARKLING WINES
- WHITE WINES
- LIGHT-TO-MEDIUM BODIED REDS
- FULL-BODIED REDS
- VIBRATION FREE
- UV PROTECTION
- PERFECT AIR QUALITY
- CARE & CLEANING
- 4.1 CLEANING YOUR WINE CABINET
- 4.2 POWER FAILURE
- 4.3 HOLIDAYS
- 4.4 MOVING YOUR WINE COOLER
- 4.5 DEFROSTING/CONDENSATION
- TROUBLESHOOTING
- 5.1 PROBLEM SOLVING
- HUMIDITY SYSTEM
- 5.2 RATING PLATE
- 5.3 ERROR CODE LIST
- MANUAL MANUAL MLWC82MLWC82
Brand : BORETTI
Model : MLWC82ZGAN
Category : Wine cellar