
Perfect Cook SW500 - Saucepan Eldom - Free user manual and instructions
Find the device manual for free Perfect Cook SW500 Eldom in PDF.

| Product type | Electric pressure cooker (pot) |
| Brand | Eldom |
| Model | Perfect Cook SW500 |
| Power | 900 W |
| Voltage | 220-240 V~ 50/60 Hz |
| Container capacity | 5 L |
| Container diameter | 22 cm |
| Maximum pressure | 70 kPa |
| Temperature range | 30-160 °C |
| Keep warm | 60-80 °C |
| Cooking programs | FRY, CAKE, JAM, YOGHURT/DOUGH, CHEF, MULTICOOK, SOUP |
| Special functions | Pressure cooking, non-pressure cooking, delayed start, reheating |
| Included accessories | Steamer basket, spatula, measuring cup (160 ml) |
| Container material | Stainless steel |
| Seal type | Removable sealing gasket |
| Pressure indicator | Yes, visual indicator |
| Pressure regulator | Yes, open/closed |
| Safety | Automatic pressure locking, forced opening protection |
| Cleaning and maintenance | Non-submersible body, hand-washable removable parts |
| Repairability | Repairs exclusively by Eldom authorized service |
| Weight (estimated) | Approximately 4.5 kg |
| Dimensions (approx.) | 30 x 30 x 30 cm |
Frequently Asked Questions - Perfect Cook SW500 Eldom
User questions about Perfect Cook SW500 Eldom
0 question about this device. Answer the ones you know or ask your own.
Ask a new question about this device
Download the instructions for your Saucepan in PDF format for free! Find your manual Perfect Cook SW500 - Eldom and take your electronic device back in hand. On this page are published all the documents necessary for the use of your device. Perfect Cook SW500 by Eldom.
USER MANUAL Perfect Cook SW500 Eldom
perfect cook
三


IV
| FunctionFunkcja | Default timeCzas domyślny | Adjustable timeRegulacja czasu | LED statusLampka kontrolna | PressureWysokie ciśnienie |
| Cake/Ciasto | 40 mins/min. | 1-60 mins/1-24 hours | Cake | No/Nie |
| Fry/Smażenie | 30 mins/min. | 1-60 mins/1-24 hours | Fry | No/Nie |
| Jam/Dżem | 1 hour/godz. | 1-60 mins/1-24 hours | Jam | No/Nie |
| Steam/Gotowanie na parze | 10 mins/min. | 1-60 mins/1-24 hours | Steam Yes/Tak | |
| Soup/Zupa | 15 mins/min. | 1-60 mins/1-24 hours | Soup | Yes/Tak |
| Milk porridge/Kaszka na mleku | 5 mins/min. | 1-60 mins/1-24 hours | Milk porridge | Yes/Tak |
| Cereals/ExpressZboża/ekspres | 8 mins/min. | 1-60 mins/1-24 hours | Cereals/Express ind. | Yes/Tak |
| Galantine/Galantyna | 40 mins/min. | 1-60 mins/1-24 hours | Galantine | Yes/Tak |
| Pilaw/Pilaw | 15 mins/min. | 1-60 mins/1-24 hours | Pilaw | Yes/Tak |
| Broth/Rosół | 25 mins/min. | 1-60 mins/1-24 hours | Broth | Yes/Tak |
| Stew/Duszenie | 20 mins/min. | 1-60 mins/1-24 hours | Stew | Yes/Tak |
| Yoghurt/Jogurt | 8 hours/godz. | 1-60 mins/1-24 hours | Yoghurt-Dough | No/Nie |
| Chef/„Szef kuchni”– uniwersalnyprogram dogotowania zciśnieniem | 2 mins/min. | 1-60 mins/1-24 hours | Chef | Yes/Tak |
| Multicook–uniwersalnyprogram dogotowania bezciśnienia | 10 mins/min. | 1-60 mins/1-24 hours | Multicooker | No/Nie |
V


- Read the whole content of this instructions manual carefully before the first use.
- This appliance may be used by children of at least 8 years of age and by persons with reduced physical, mental abilities, and persons with no experience or knowledge of the equipment, if supervised or instructed on its safe use, so that the risks associated with it are understandable. Children should not play with the appliance. Unattended children should not be allowed to perform the cleaning or maintenance of the appliance.
- Special care should be taken using the appliance when children are near. Never allow children to play with the appliance. Never allow children or persons not familiar with the appliance to use it.
- The appliance is intended for household use only; when used in industry, or not for its intended use, or if incompliant with this instructions manual, the rights under the guarantee expire.
- Do not expose the appliance to weather conditions (rain, sunlight, etc.) or use in high-humidity conditions (eg. bathrooms or humid cottages).
- The appliance can be used only with the accessories enclosed.
- The power-supply cable may only be connected to a socket provided with a protection pin.
- Make sure not to connect too many receivers to a single current circuit.
- The appliance should be disconnected from the power mains by pulling out the plug and never by the cable.
- Always disconnect the appliance from the power mains if it is left unattended, or before it is assembled, disassembled or cleaned.
- Leaving the appliance switched on or its 999 power cable plugged in to the power-mains socket unattended are prohibited.
- Operating appliances should always be in sight, especially when children are nearby. Switch off the appliance on leaving the room in which it is located.
- The appliance should be placed on a flat, stable, and heat-resistant surface.
- Before starting the appliance up, make sure all its elements are assembled appropriately.
- Do not move the appliance body while it is operating.
- Do not hold the appliance with wet hands.
-
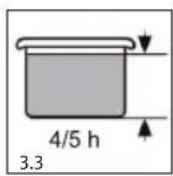
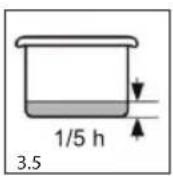
Do not fill up the inner pot above 4/5 of its volume.
-
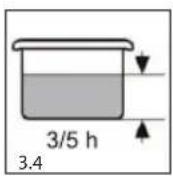
In the case of products which increase in volume when cooked (e.g. rice) do not fill up the removable bowl above 3/5 its capacity.
- Check the pressure gauge and regulator are not clogged before each use.
- The appliance is not intended for oil frying under pressure. Leave the lid open when using the frying function.
- Make sure the pressure gauge indicates a pressure drop and check if the pressure inside has dropped prior to opening the appliance when pressure cooking. Do not force the appliance open.
- The steam regulator should be opened using a kitchen mitten. Keep your face a safe distance from hot steam.
- Pay special attention when opening, as some hot- food products can sputter.
- Do not place the appliance or its power cable near heat sources.
- Place the appliance at the correct level in order to provide free and safe access to it.
- Do not switch the appliance on without its containing food products.
- Do not submerge the power cable or appliance body in water.
- Do not use either the appliance or its removable bowl for the storage of sour or salty foods prior to or after cooking them, due to the risk of damage.
- Use only wooden or plastic spoons for stirring.
- Do not use the appliance when either it or the power cable are damaged. If the power cable gets damaged it must be replaced by the manufacturer's service department to prevent any hazard.
- The appliance may be repaired by the manufacturer's service department only (the address is indicated on the Guarantee Card and website www.eldom.eu). All modernisations or the use of spare parts or appliance elements other than the original ones are prohibited, as these are hazardous to the safety of use.
- Eldom Sp. zo.o. shall not be liable for any potential losses due to the improper use of the appliance.
CAUTION! The appliance housing, bowl and metal elements heat up during appliance operation. Caution must be maintained. Use kitchen mittens. Do not lean over the appliance when opening the lid to prevent hot-steam burns.
I GENERAL DESCRIPTION
- Removable lid
- Pressure gauge
- Pressure regulator
- Handle
- Gasket
- Internal lid
- Removable bowl
- Internal bowl
- Control panel
- Transport handles
- Cable socket
- Power-supply cable
- Steam-cooking tray
- Spatula
- Measuring jug - 160 ml
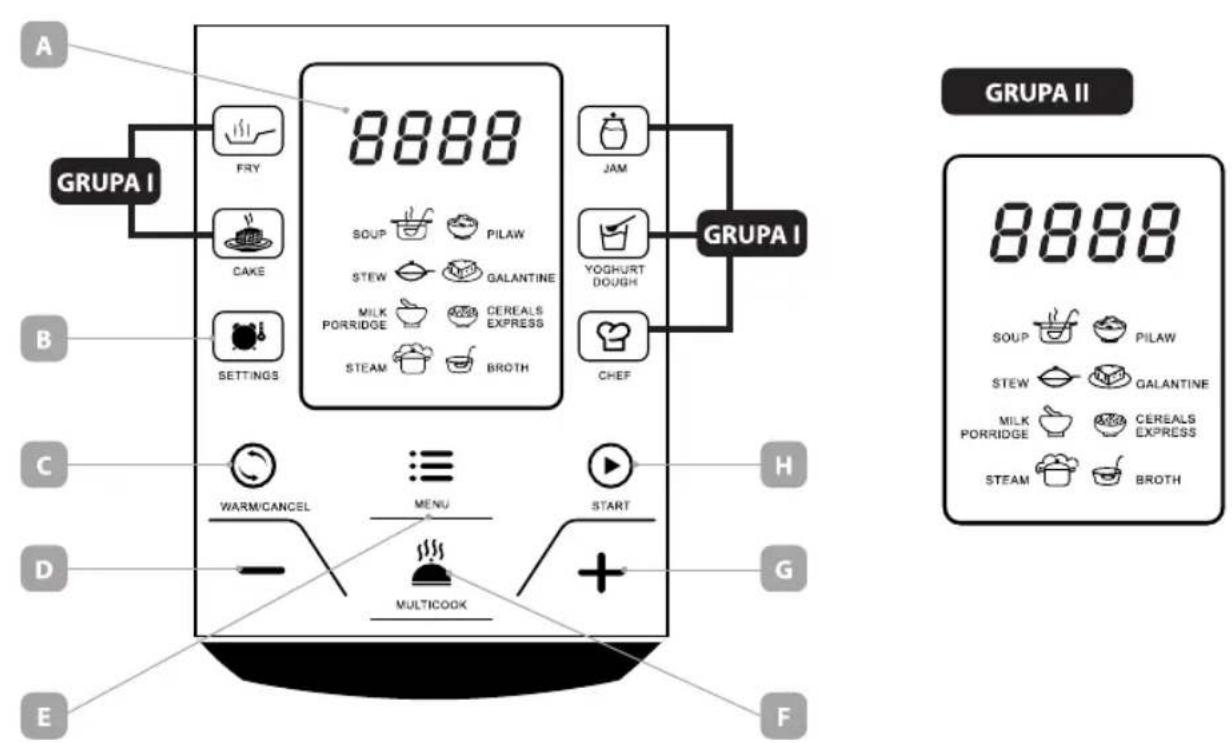
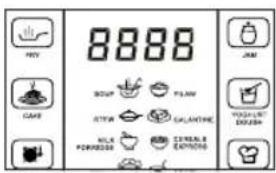
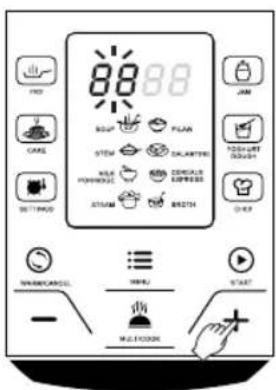
II CONTROL PANEL (9)
A. Display
B. Settings
C. Warm/Cancel
D. Auxiliary button "+"
E. MENU
F. Manual Mode
G. Auxiliary button "+"
H. START
I. Programmes stored
TECHNICAL DATA
- Poweroutput:900 W
-Voltage:220-240 V\~ 50/60 Hz - Capacity: 5 l
- Container diameter: 22 cm
- Pressure: 0-70 kPa
- Temperature range: 30-160 °C
- Temperature supporting: 60-80°C
INTENDED USE
The SW500 pressure cooker is a universal appliance for a quick, yet healthy, way of cooking meals. The steam generated during the cooking process, having no exit, circulates inside the pot and penetrates the food products. As a result, meals are ready in substantially less time than in the normal methods of cooking. Moreover, all the aromas from vegetables, meat, herbs and seasoning merge with one another, enriching the meal even more.
● APPLIANCE PREPARATION
Before starting to use the appliance make sure the appliance, power-supply cable and plug are operational, and all the packaging parts have been removed. All the parts which come into contact with food must be washed thoroughly before the first use. (see the section Cleaning and Maintenance).
Place the appliance on a flat, hard, stable, and heat-resistant surface. Connect the power-supply cable to a power socket (11) with one end, and with the other to the power-supply mains with parameters compliant with those indicated on the rating plate.
All the setting changes will be confirmed with a sound signal. The set parameters are visible on the display "A". The operation of the appliance can be stopped at any moment by pressing the "C" button; the current programme will be interrupted. Prior to restarting it is necessary to reselect a stored programme or to input the settings manually.
• USING THE COOKER
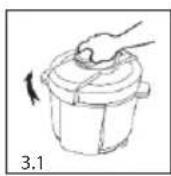
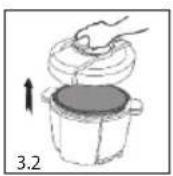
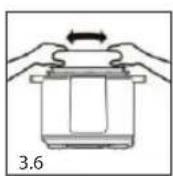
Release the lid using the handle and remove it from the body - Drawing 3.1, 3.2
Next, remove the bowl (7) from the inside of the appliance and fill it with ingredients so as not to exceed the "FULL" level on the scale. Replace the bowl (7) in the appliance after filling.
NOTE: You should take into consideration that some food products increase their volume during cooking.
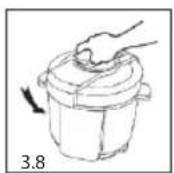
Check the internal lid is fixed correctly, and then install it on the body and lock - Drawing 3.7, 3.8. Set the time and temperature manually or select a stored programme (Table IV).
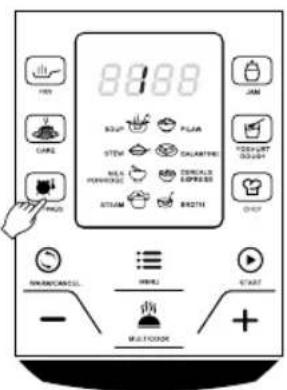
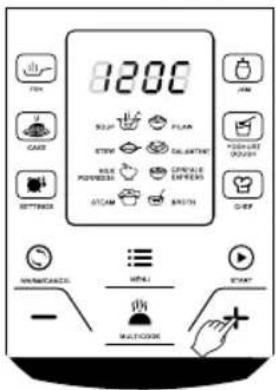
Select the programmes using the control-panel (9) buttons. Some programmes should be selected with the "MENU" (E) button by pressing it until the appropriate icon is lit up.
The selected cooking time will appear on the display (A). In order to modify the settings, press the "SETTINGS" button (B) - once for setting hours, twice for minutes, three times for temperature. The temperature can be modified in the selected programmes only.
The settings should be changed using the auxiliary buttons "+",-".
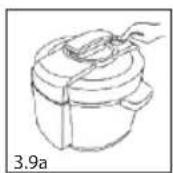
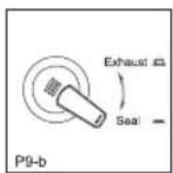
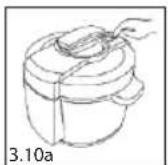
Set the pressure regulator according to the selected programme (info. in Table IV):
- COOKING WITHOUT PRESSURE: set the pressure regulator (3) in the open position (Drawing 3.10a, 3.10b).
- PRESSURE COOKING: set the pressure regulator (3) in the closed position (Drawing 3.9a, 3.9b). The pressure gauge (5) reading will rise while cooking.
NOTE: The appliance will switch off if for 20 seconds no function is selected.
Press the "START" button (H) in order to start the appliance.
For pressure cooking the appliance will start the time count when it reaches the operating temperature.
A signal will sound when the time count is over; the appliance will enter the temperature-maintaining mode. You can switch off the temperature-maintaining mode by pressing button (14).
Switch off the appliance (18) and disconnect it from the power supply when cooking is finished.
CLEANING AND MAINTENANCE
- Clean the device right after its use.
- Before cleaning, switch off the device, remove the plug from the socket.
- Do not use abrasive agents, cleaning powders, acetone, alcohol, etc., for cleaning.
- Wash the elements in warm water with addition of washdish with a brush and rinse under running water.
- Clean the body of the device with a damp cloth. Do not immerse the body in water and do not rinse it under running water.
- The parts of the appliance are not suitable for washing in a dishwasher.
ENVIRONMENTAL PROTECTION
- the appliance is made of materials which can be recovered or recycled
- the appliance should be handed over to the appropriate centre of collection and recycling of electrical and electronic equipment.
WARRANTY
- the appliance is intended for personal use at a household,
- it is not intended for professional purposes,
- in case of misuse, the warranty is rendered null and void.
SICHERHEITSHINWEISE
/EN/ The disposal of used electrical and electronic equipment (applies to European Union countries and other European countries with separate waste-collection systems).
This symbol on the product or its packaging indicates that it should not be classified as household waste. It should be handed over to an appropriate company dealing with the collection and recycling of electrical and electronic equipment. The correct disposal of the product will prevent potential negative consequences for the environment and human health resulting from hazardous substances present in the product. Electrical devices must be handed over to restrict their re-use and further treatment. If the device contains batte ries, remove them, and hand them over to a storage point separately. DO NOT THROW EQUIPMENT INTO THE MUNICIPAL WASTE BIN. Material recycling helps to preserve natural resources. For detailed information on how to recycle this product, please contact your local authority, the recycling company, or the shop where you bought it.
- perfect cook
- 三
- IV
- V
- I GENERAL DESCRIPTION
- II CONTROL PANEL (9)
- TECHNICAL DATA
- INTENDED USE
- ● APPLIANCE PREPARATION
- • USING THE COOKER
- NOTE: You should take into consideration that some food products increase their volume during cooking.
- NOTE: The appliance will switch off if for 20 seconds no function is selected.
- CLEANING AND MAINTENANCE
- ENVIRONMENTAL PROTECTION
- WARRANTY
- SICHERHEITSHINWEISE
Brand : Eldom
Model : Perfect Cook SW500
Category : Saucepan