
RT30 - Phone Yealink - Free user manual and instructions
Find the device manual for free RT30 Yealink in PDF.

User questions about RT30 Yealink
0 question about this device. Answer the ones you know or ask your own.
Ask a new question about this device
Download the instructions for your Phone in PDF format for free! Find your manual RT30 - Yealink and take your electronic device back in hand. On this page are published all the documents necessary for the use of your device. RT30 by Yealink.
USER MANUAL RT30 Yealink
natural_image
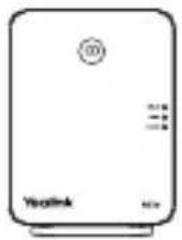
Front view of a beige electronic device labeled 'Yealink' with control buttons and ports (no readable text beyond branding)RT30
natural_image
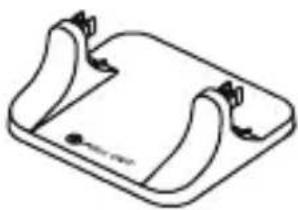
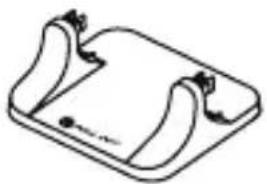
Simple line drawing of a rectangular device with curved sides and a small mark at the bottom (no text or symbols)Base Stand
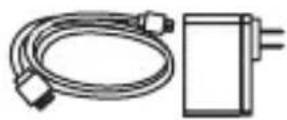
Power Adapter and Cable
User Guide
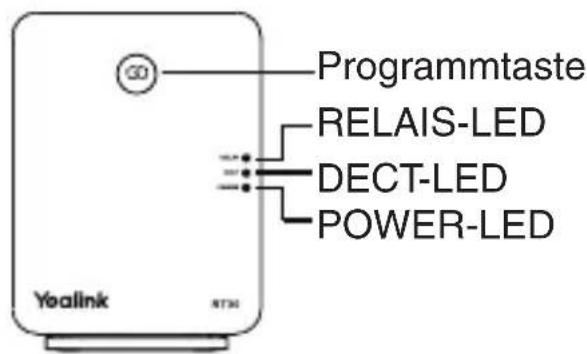
Overview
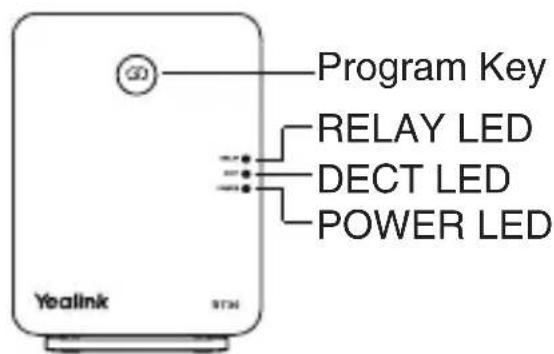
LED Status
| RT30 Status POWER | DECT RELAY | ||
| Search for base station Green Flashing red Off | |||
| Registering to base station Green Flashing orange Off | |||
| Registered to base station, ready for use Green Green/Orange Off | |||
| Registered to base station, in a call Green Green/Orange Green | |||
| Registered to base station, in calls (reach the maximum number of calls) Green Green/Orange Red | |||
| Error: Repeater ID conflict Green Alternately flashing red and green | Off | ||
| Repeater ID confirmation | Green | Red | Flashing green^[1] |
| Repeater ID modification | Red | Red Off | |
| Auto cascade registration Orange Flashing green | Off | ||
| Manual cascade registration | Orange | Green | Flashing red^[1] |
| De-register the repeater | Red | Red | Red |
[1]The number of flashes indicates the current ID repeater. When it flashes once, the ID is 1.
| Radio Link Status DECT LED | |
| Excellent to good Green | |
| Poor Orange | |
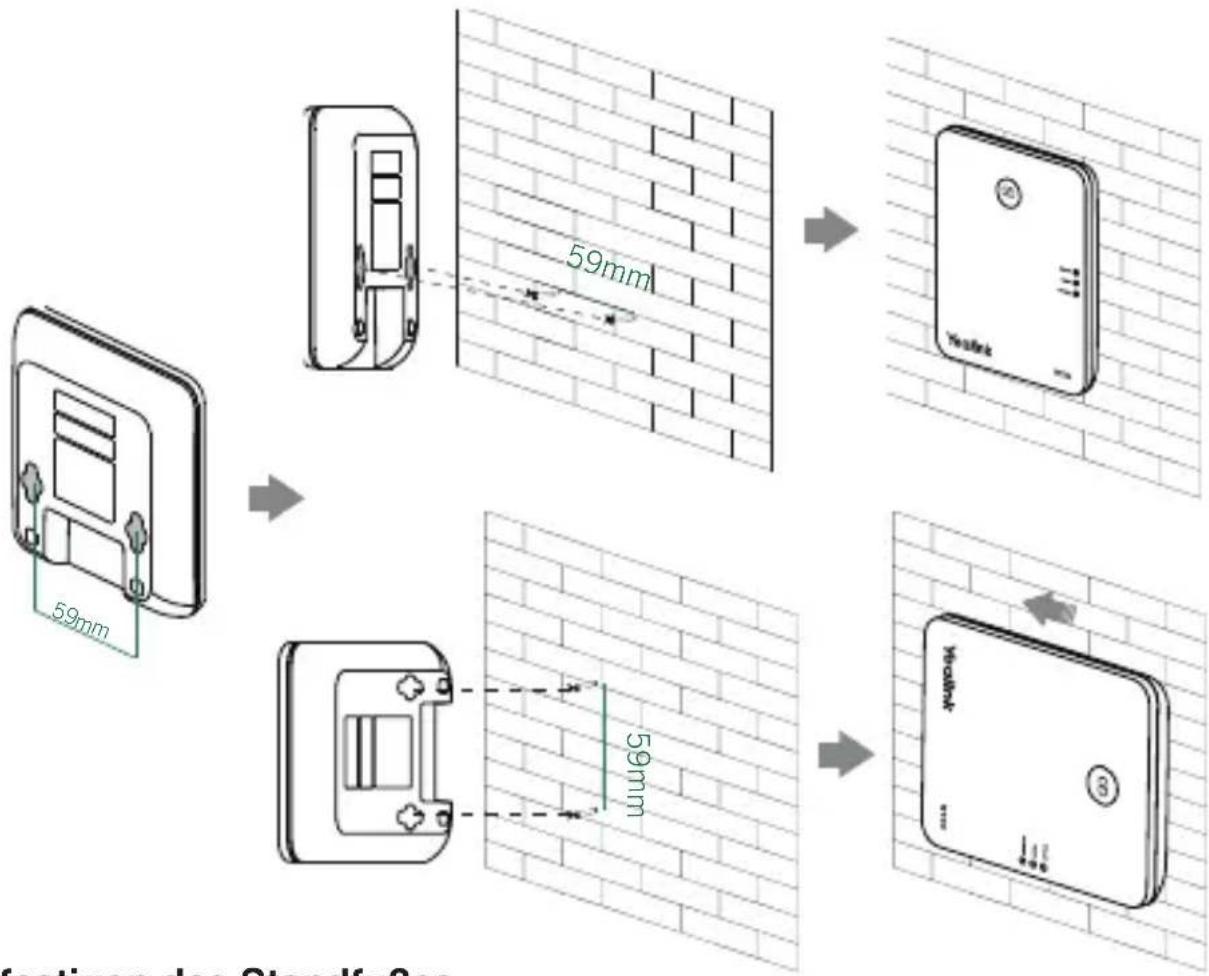
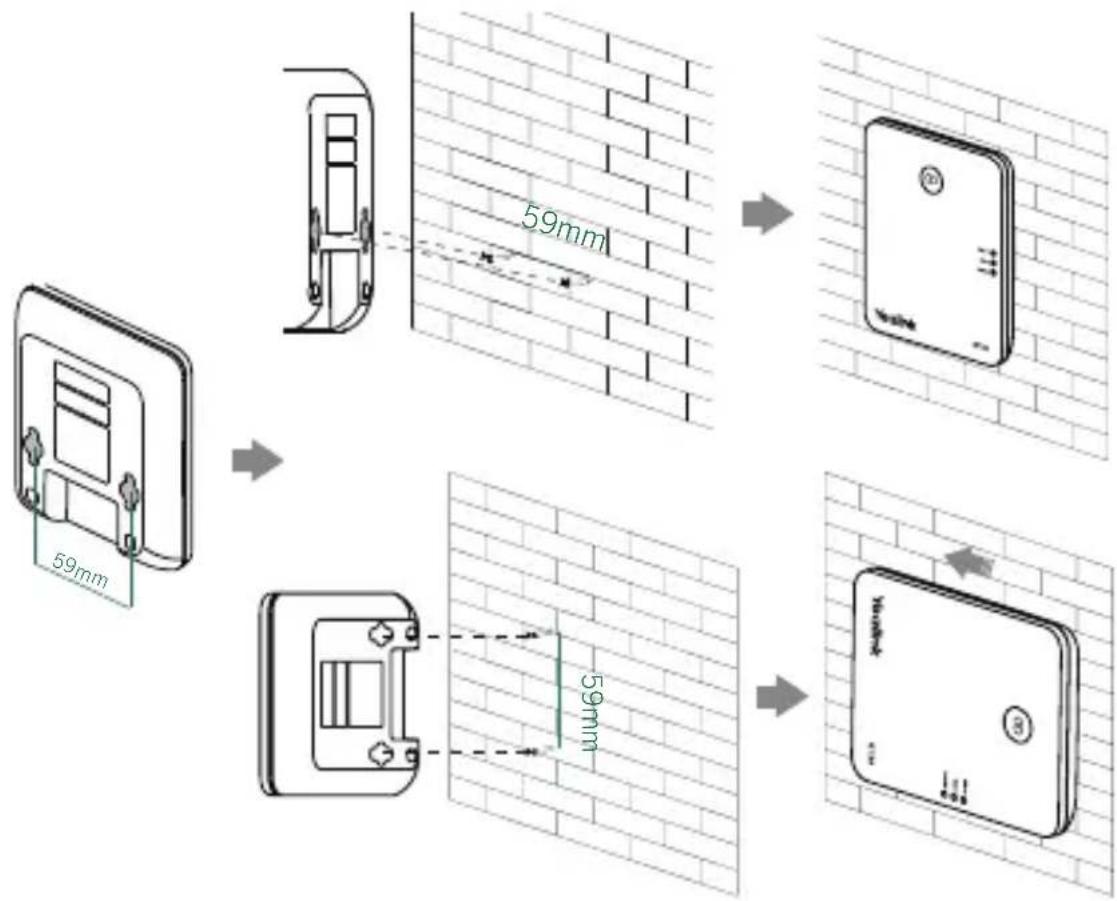
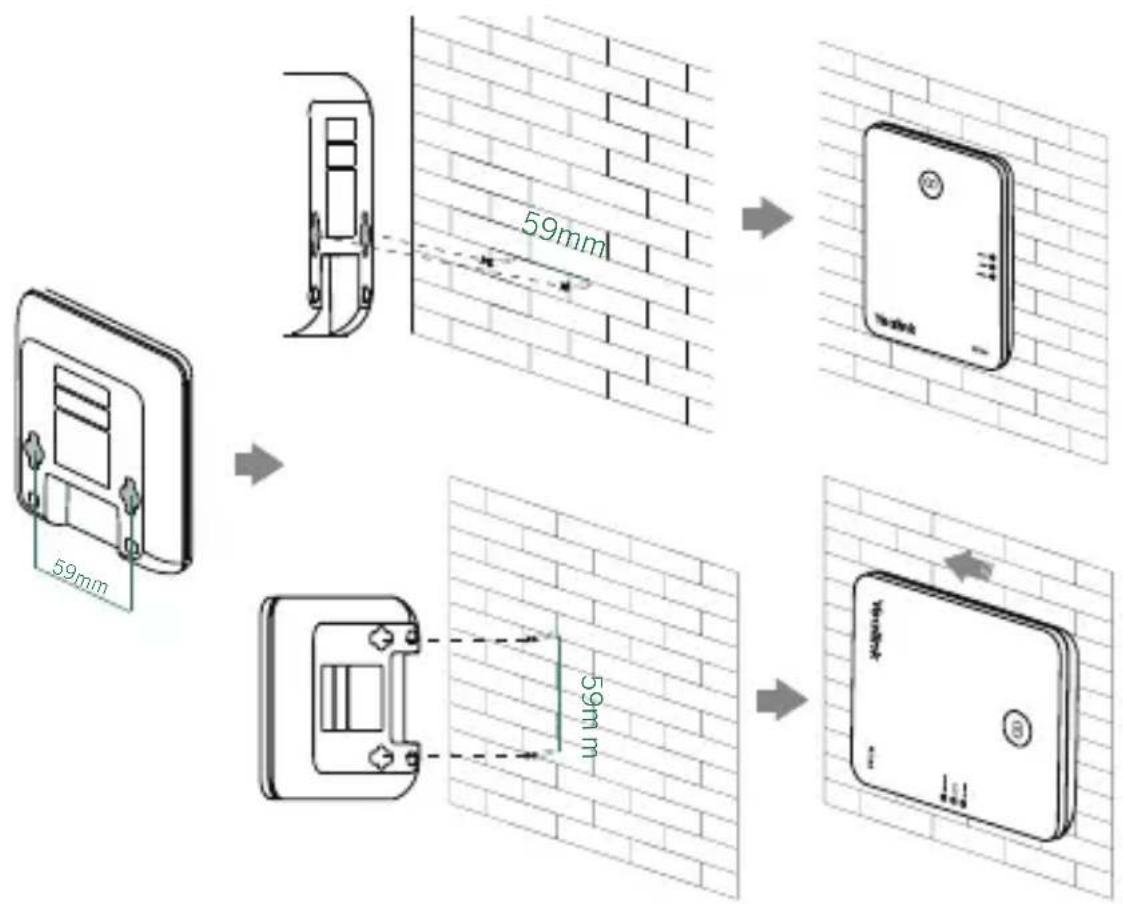
Installation
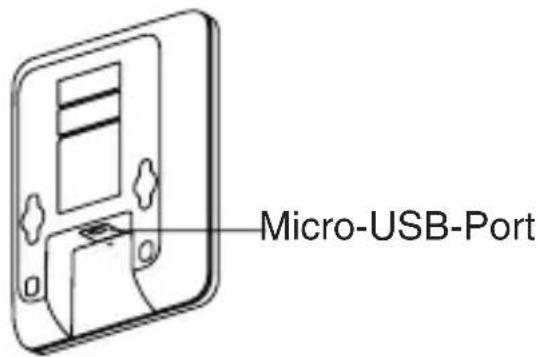
Connect the power for the repeater:
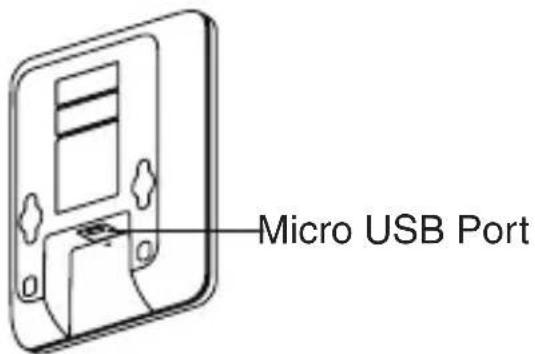
- Connect RT30 to a power outlet using the provided cable and USB power adapter.

natural_image
Line drawing of a plug inserted into a device with a cable, showing wiring and components (no text or symbols)Wall mount:
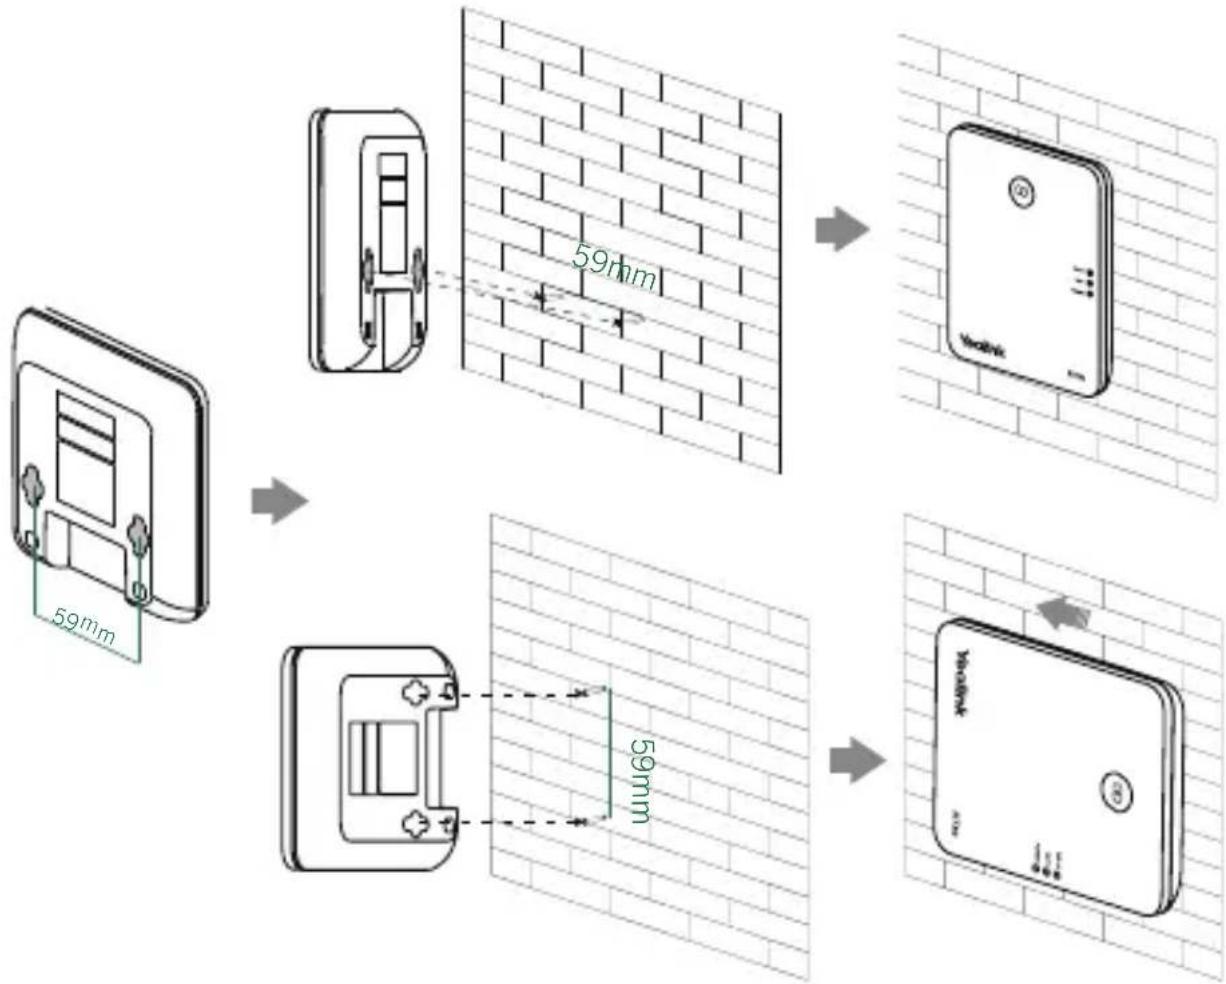
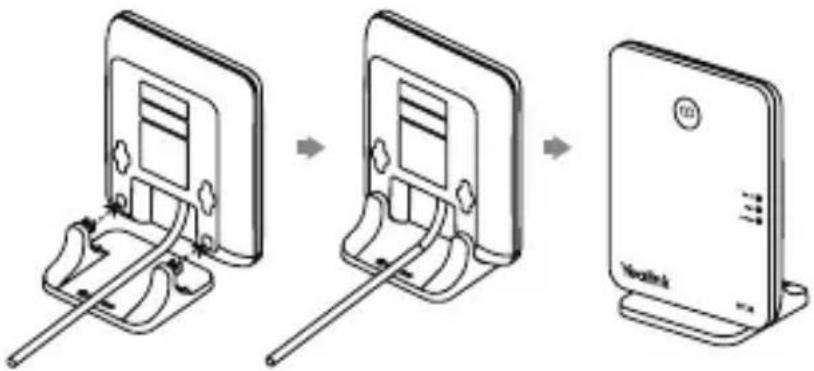
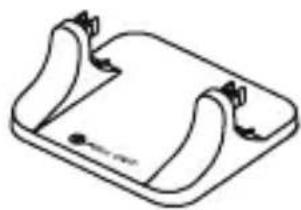
Attach the base stand:
- Align the snap-fits with the corresponding holes and push forward, snapping them into the holes.
Introduction
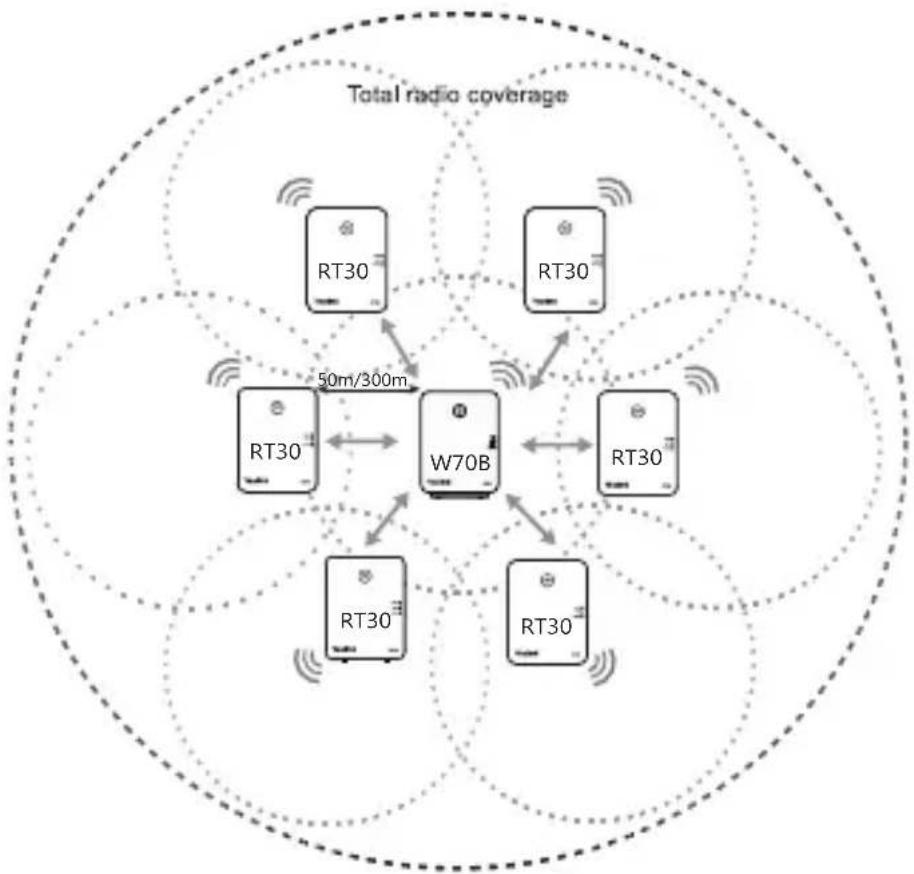
Yealink DECT repeater RT30 is designed in accordance with Digital Enhanced Cordless Telecommunication (DECT) standard. It can be deployed to extend the range of the Yealink DECT IP phone (for example, W70B).
Radio frequency range: 1880 MHz to 1900 MHz (EU), 1920 MHz to 1930 MHz (US).
Transmission power: Average 10mW.
Multiple Repeaters
If the radio link level of RT30 is excellent to good, each repeater can have up to two calls (external and internal calls) at any time.
The repeater can be used to extend the range (up to 300m in unobstructed outdoor areas and up to 50m inside buildings) in a single direction or in all directions. The automatic handover process is seamless. If the repeater is placed properly (overlapping the coverage of the base station), the handsets can move freely within the total coverage while on a call.
Cascade setup:
RT30 supports a sequential or "daisy chain" layout to extend the range in a single direction. Up to 2 repeaters can be installed in this layout.

flowchart
graph TD
    A["W70B"] -->|50m/300m| B["RT30RT30"]
    B --> C["Total radio coverage"]
    C --> D["Return to RT30RT30"]
    D --> E["Return to W70B"]
Star setup:
Up to 6 repeaters can be registered to one base station to extend the range in a star layout. All repeaters must be installed within the base station coverage, as shown in the figure below.
flowchart
graph TD
    A["RT30"] --> B["W70B"]
    C["RT30"] --> B
    D["RT30"] --> B
    E["RT30"] --> B
    F["RT30"] --> B
    G["RT30"] --> B
    H["RT30"] --> B
    I["RT30"] --> B
    J["RT30"] --> B
    K["50m/300m"] --> B
    style A fill:#f9f,stroke:#333
    style C fill:#f9f,stroke:#333
    style D fill:#f9f,stroke:#333
    style E fill:#f9f,stroke:#333
    style F fill:#f9f,stroke:#333
    style G fill:#f9f,stroke:#333
    style H fill:#f9f,stroke:#333
    style I fill:#f9f,stroke:#333
    style J fill:#f9f,stroke:#333
    style K fill:#f9f,stroke:#333
    style L fill:#f9f,stroke:#333
Registering the Repeater
Registration
If you want to register more than one repeater, in order to avoid ID conflict, we recommend that you put the repeaters closer to the base station and register the repeaters one by one.
- Plug the repeater into an AC outlet.
POWER LED turns green and DECT LED flashes red. - Set the handset in RT30 repeater mode at the path: Settings->System Settings->Repeater Mode.
- Set the base station in registration mode (Long press the paging key on the base station till the first LED flashes green).
If base station is found, DECT LED will flash orange.
When DECT LED turns green/orange, the registration to base station is successful.
Cascade Registration
Up to 2 repeaters can be registered to the base station in a cascade setup.
Before the cascade registration, you should first register the two repeaters to the base station. For cascade registration, we recommend that you put the two cascaded repeaters closer to each other. One repeater attempts to register to the other repeater (destination repeater). If the destination repeater de-registers, the repeater does as well. Conversely, it does not.
The repeater supports automatic or manual cascade registration.
Auto Cascade Registration
- Long press the program key on one repeater for about 3 seconds. The repeater starts searching for the other repeater, POWER LED turns orange and DECT LED flashes green.
Wait until POWER LED turns green and DECT LED turns green/orange, auto cascade registration is successful.
Manual Cascade Registration
- On one repeater:
a. Confirm the ID: Press the program key. The number of times that RELAY LED flashes indicates the ID. Press the program key again to return to the operation mode.
- On the other repeater:
a. Long press the program key for about 3 seconds.
b. Press the program key as soon as POWER LED turns orange and DECT LED flashes green, to enter the repeater's ID to be cascaded. Pressing once indicates that the ID is 1.
POWER LED turns orange and DECT LED turns green.
c. Press the program key for about 3 seconds to confirm the ID.
The repeater starts searching for the repeater to be cascaded, POWER LED turns green and DECT LED flashes orange.
Wait until POWER LED turns green and DECT LED turns green/orange, manual cascade registration is successful.
ID Modification
After registering to the base station, every repeater has its own ID, it uses ID to distinguish with each other. If the IDs of two repeaters conflict, you need to modify the ID manually.
- Press the program key to confirm the ID.
-
Long press the program key for about 7 seconds to enter the ID modification mode.
Both POWER LED and DECT LED turns red. -
Press the program key to enter the new ID. Pressing once indicates that the ID is 1.
The number of times that the RELAY LED flashes indicates the entered ID.
- Long press the program key for about 3 seconds to confirm the ID.
The repeater will re-register.
De-registration
- Power off the repeater.
- Long press the program key and reconnect the power adapter.
- Hold the program key until the three LEDs turn red.
When the DECT LED flashes red, and the de-registration is successful.
Placement
To achieve optimum performance for the repeater, it is important to find a appropriate location.
- Hold the handset and stand near the base.
- Make a call, and carry the handset away from the base.
- Make a note where you start to hear noise on the line, which indicates the signal strength is getting weaker.
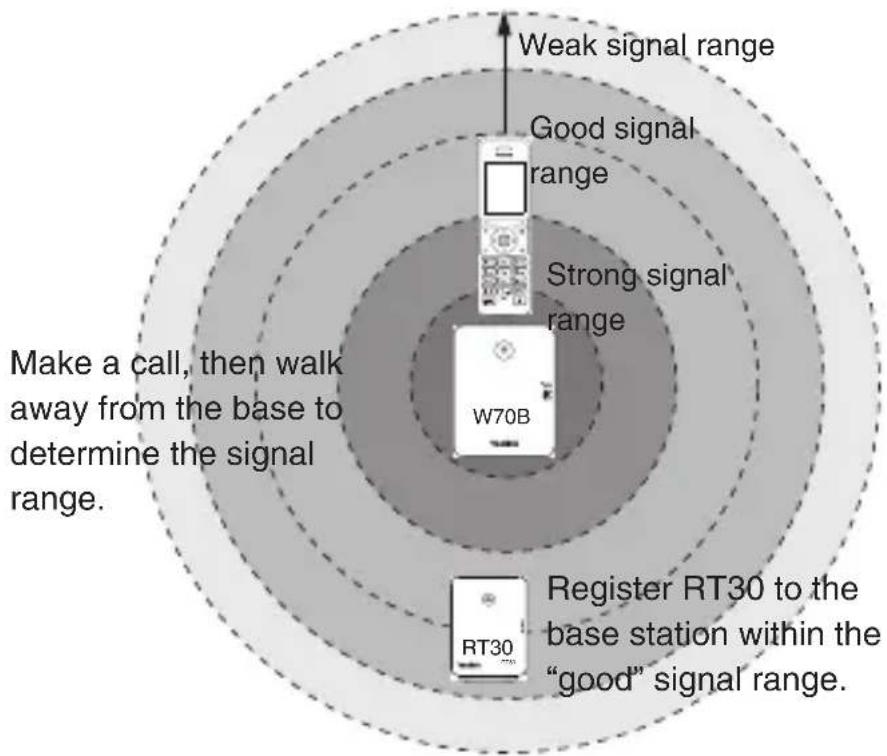
The optimum location for the repeater is as far from the base as possible while still maintaining a good signal, or just inside the location where the noise became noticeable.
Here are a few tips for placing repeaters:
- Choose a raised position for both the base station and repeater wherever possible.
- When positioning the repeater, avoid obstacles that can interfere with radio transmission, such as thick wall and metal structures.
- Place the repeater away from other electrical appliances, such as microwave ovens, Wi-Fi equipment and computers.
- Keep a minimum of 10 meters between multiple repeaters to avoid coverage overlapping.
Regulatory Notices
Operating Ambient Temperatures
- Operating temperature: +32 to 104^ (0 to 40^ )
• Relative humidity: 5% to 90%, noncondensing
• Storage temperature: -22 to +160°F (-30 to +70°C)
Warranty
Our product warranty is limited only to the unit itself, when used normally in accordance with the operating instructions and the system environment. We are not liable for damage or loss resulting from the use of this product, or for any claim from a third party. We are not liable for problems with Yealink device arising from the use of this product; we are not liable for financial damages, lost profits, claims from third parties, etc., arising from the use of this product.
DC symbol

is the DC voltage symbol.
Restriction of Hazardous Substances Directive (RoHS)
This device complies with the requirements of the EU RoHS Directive. Statements of compliance can be obtained by contacting support@yealink.com.
Safety Instructions
Save these instructions. Read these safety instructions before use!
The following basic safety precautions should always be followed to reduce risk of fire, electrical shock, and other personal injury.

General Requirements
- Before you install and use the device, read the safety instructions carefully and observe the situation during operation.
- During the process of storage, transportation, and operation, please always keep the device dry and clean.
- During the process of storage, transportation, and operation, please avoid collision and crash of the device.
- Please attempt not to dismantle the device by yourself. In case of any discrepancy, please contact the appointed maintenance center for repair.
- Without prior written consent, no organization or individual is permitted to make any change to the structure or the safety design of the device. Yealink is under no circumstance liable to consequences or legal issues caused by such changes.
- Please refer to the relevant laws and statutes while using the device. Legal rights of others should be respected as well.

Environmental Requirements
- Place the device at a well-ventilated place. Do not expose the device under direct sunlight.
- Keep the device dry and free of dusts.
- Place the device on a stable and level platform.
- Please place no heavy objects on the device in case of damage and deformation caused by the heavy load.
- Keep at least 10 cm between the device and the closest object for heat dissipation.
- Do not place the device on or near any inflammable or fire-vulnerable object, such as rubber-made materials.
- Keep the device away from any heat source or bare fire, such as a candle or an electric heater.
- Keep the device away from any household appliance with strong magnetic field or electromagnetic field, such as a microwave oven or a refrigerator.

Operating Requirements
- Do not let a child operate the device without guidance.
- Do not let a child play with the device or any accessory in case of accidental swallowing.
- Please use the accessories provided or authorized by the manufacturer only.
- The power supply of the device shall meet the requirements of the input voltage of the device. Please usethe provided surge protection power socket only.
- Before plugging or unplugging any cable, make sure that your hands are completely dry.
- Do not spill liquid of any kind on the product or use the equipment near water, for example, near a
bathtub, washbowl, kitchen sink, wet basement or near a swimming pool.
- Do not tread on, pull, or over-bend any cable in case of malfunction of the device.
- During a thunderstorm, stop using the device and disconnect it from the power supply. Unplug the power plug and the Asymmetric Digital Subscriber Line (ADSL) twisted pair (the radio frequency cable) to avoid lightning strike.
- If the device is left unused for a rather long time, disconnect it from the power supply and unplug the power plug.
- When there is smoke emitted from the device, or some abnormal noise or smell, disconnect the device from the power supply, and unplug the power plug immediately. Contact the specified maintenance center for repair.
- Do not insert any object into equipment slots that is not part of the product or auxiliary product.
- Before connecting a cable, connect the grounding cable of the device first. Do not disconnect the grounding cable until you disconnect all other cables.

Cleaning Requirements
- Before cleaning the device, stop using it and disconnect it from the power supply.
- Use a piece of soft, dry and anti-static cloth to clean the device.
- Keep the power plug clean and dry. Using a dirty or wet power plug may lead to electric shock or other perils.

ENVIRONMENTAL RECYCLING
natural_image
Symbol of a trash bin crossed with no text or labelsNever dispose of the device with domestic waste
Ask your Town Council about how to dispose of it in an environmentally friendly way. The cardboard box, plastic packaging and player components may be recycled in accordance with prevailing recycling regulations in your country.
Always adhere to prevailing regulations
Those who fail to do so may be fined or prosecuted in accordance with the law. The crossed out garbage can that appears on the device means that when it has reached the end of its useful life, it should be taken to a special waste disposal centre and treated
separately to general urban waste.
Troubleshooting
The unit cannot supply power to Yealink device.
There is a bad connection with the plug.
-
Clean the plug with a dry cloth.
-
Connect it to another wall outlet.
The usage environment is out of operating temperature range.
- Use in the operating temperature range.
The cable between the unit and the Yealink device is connected incorrectly.
- Connect the cable correctly.
You cannot connect the cable properly.
-
You may have connected a wrong Yealink device.
-
Use the correct power supply.
Some dust, etc., may be in the port.
- Clean the port.
Contact your dealer or authorized service facility for any further questions.
Contact Information
YEALINK NETWORK TECHNOLOGY CO.,LTD.
309, 3rd Floor, No.16, Yun Ding North Road, Huli District, Xiamen City, Fujian, P.R.C
YEALINK (EUROPE) NETWORK TECHNOLOGY B.V.
Strawinskylaan 3127, Atrium Building, 8th floor, 1077ZX Amsterdam, The Netherlands
YEALINK (USA) NETWORK TECHNOLOGY CO., LTD.
999 Peachtree Street Suite 2300, Fulton, Atlanta, GA, 30309, USA
Made in China
Verpackungsinhalt

natural_image
Front view of a beige electronic device labeled 'Yealink' with no visible text or symbols on the body (excluding the label)RT30
natural_image
Simple line drawing of a rectangular device with curved edges and a small circular mark at the bottom (no text or symbols)Standfuß

Netzteil und Kabel

Bedienungsanleitung
Übersicht
LED-Status
natural_image
Simple line drawing of an electrical outlet connected to a wall-mounted device (no text or symbols)Wandmontage:
Einleitung
natural_image
Simple line drawing of a trash bin with two crossed lines indicating no waste or restriction (no text or symbols)309, 3rd Floor, No. 16, Yun Ding North Road, Huli District, Xiamen City, Fujian, VR China
YEALINK (EUROPE) NETWORK TECHNOLOGY B.V.
Strawinskylaan 3127, Atrium Building, 8th floor, 1077ZX Amsterdam, Niederlande
YEALINK (USA) NETWORK TECHNOLOGY CO., LTD.
999 Peachtree Street Suite 2300, Fulton, Atlanta, GA, 30309, USA
natural_image
Simple line drawing of a rectangular electronic device with curved edges and a small circular mark at the bottom (no text or symbols)Soporte base
natural_image
Simple line drawing of a plug inserted into a wall-mounted device (no text or symbols)Montaje en pared:
Introducción
natural_image
Symbol of a trash bin crossed with no text or numbers, representing waste sorting or disposal (no text present)309, 3rd Floor, No.16, Yun Ding North Road, Huli District, Xiamen City, Fujian, P.R.C
YEALINK (EUROPE) NETWORK TECHNOLOGY B.V.
Strawinskylaan 3127, Atrium Building, 8th floor, 1077ZX Amsterdam, The Netherlands YEALINK (USA) NETWORK TECHNOLOGY CO., LTD.
999 Peachtree Street Suite 2300, Fulton, Atlanta, GA, 30309, USA
Made in China
Contenu de la boîte
natural_image
Front view of a white wireless router device with ports and indicator lights (no readable text or symbols)RT30
natural_image
Simple line drawing of a curved mechanical component with no text or symbolsSupport de la base
État de la LED
natural_image
Simple line drawing of an electrical outlet connected to a wall-mounted device (no text or symbols)Montage mural :
Introduction
natural_image
Symbol of a trash bin crossed with no text or numbers, representing waste sorting or disposal (no text present)309, 3rd Floor, No.16, Yun Ding North Road, Huli District, Xiamen City, Fujian, Chine
YEALINK (EUROPE) NETWORK TECHNOLOGY B.V.
Strawinskylaan 3127, Atrium Building, 8th floor, 1077ZX Amsterdam, Pays-Bas
YEALINK (USA) NETWORK TECHNOLOGY CO., LTD.
Declaration of Conformity
We,
YEALINK(XIAMEN) NETWORK TECHNOLOGY CO.,LTD
Address: 309, 3th Floor, No.16, Yun Ding North Road,
Huli District, Xiamen City, Fujian, P.R. China
CE DATE: 20th/March/2018
declare that the product
Type: DECT Reapter
Model: RT30
meets the essential requirements and other relevant provisions according to the following EC directive
Directive: 2014/30/EU, 2014/35/EU, RED 2014/53/EU;
The presumption of conformity with the essential requirement is ensure according to :
Article 3.1 a :(protection of the health &the safety of the user)
Safety: EN 60950-1:2006+A11:2009+A1:2010+A12:2011+A2:2013
SAR: ETSI EN 62311:2008
Article 3.1 b :(protection requirement with respect to electromagnetic compatibility)
EMC: EN55032:2012/AC:2013, EN55024:2010.
EN301489-6 V2.1.1, EN301489-1 V2.1.1
Article 3.2 (effective use of the radio spectrum)
Radio: ETSI EN 301406 V2.2.2
Directive 2011/65/EU of the European Parliament and of the Council of 8 June 2011 on the restriction of the use of certain hazardous substances in electrical and electronic equipment(RoHS)
Directive 2012/19/EU of the European Parliament and of the Council of 24 July 2012 on Waste electrical and electronic equipment (WEEE)
Regulation (EC) No.1907/2006 of the European Parliament and of the Council of 18.December:2006 on Registration, Evaluation, Authorization, and Restriction of Chemicals (REACH)

About Yealink
Yealink (Stock Code: 300628) is a global brand that specializes in video conferencing, voice communications and collaboration solutions with best-in-class quality, innovative technology and user-friendly experience. As one of the best providers in more than 140 countries and regions, Yealink ranks No.1 in the global market share of SIP phone shipments (Global IP Desktop Phone Growth Excellence Leadership Award Report, Frost & Sullivan, 2019).
Technical Support
Visit Yealink WIKI (http://support.yealink.com/) for the latest firmware, guides, FAQ, Product documents, and more. For better service, we sincerely recommend you to use Yealink Ticketing system (https://ticket.yealink.com) to submit all your technical issues.