
10 4G 2S - Tablet Trevi - Free user manual and instructions
Find the device manual for free 10 4G 2S Trevi in PDF.
| Product Type | Tablet |
| Brand | Trevi |
| Model | 10 4G 2S |
| Screen Size | 10.1 inches |
| Screen Resolution | 1280 x 800 pixels |
| Processor | 1.3 GHz |
| Operating System | Android 10.0 Go |
| Battery Capacity | 5000 mAh (Lithium 3.7 V) |
| Power Supply | 5V 2A |
| Mobile Network | GSM 850/900/1800/1900 MHz, 4G LTE |
| Wi-Fi | IEEE 802.11 b/g/n |
| Bluetooth | Yes |
| Front Camera | 0.3 MP |
| Rear Camera | 2 MP |
| Ports | Micro USB, 3.5mm headphone jack, micro SD slot, micro SIM slot |
| Main Functions | Phone, SMS, MMS, camera, camcorder, Bluetooth, Wi-Fi |
| Care and Cleaning | Do not use chemical products, keep dry |
| Safety | Avoid moisture, do not use non-compatible accessories |
| Included Accessories | Power adapter, USB cable |
Frequently Asked Questions - 10 4G 2S Trevi
User questions about 10 4G 2S Trevi
0 question about this device. Answer the ones you know or ask your own.
Ask a new question about this device
Download the instructions for your Tablet in PDF format for free! Find your manual 10 4G 2S - Trevi and take your electronic device back in hand. On this page are published all the documents necessary for the use of your device. 10 4G 2S by Trevi.
USER MANUAL 10 4G 2S Trevi
EN If you will not find your language on the instruction manual, please go on our website: www.trevi.it to find it
GB TO SET YOUR LANGUAGE DEVICE
- Swicth on the appliance
- Go to the page with all applications
- Select the "IMPOSTAZIONI" icon
- Scroll through the list and select the icon - "Sistema"
-
Select "Lingue e immissione", "Lingue" and find their own language from those available.
-
For information and updates of this product: www.trevi.it
F POUR CONFIGURER LANGUE DE VOTRE APPAREIL:
DISPLAY 10.1-inch LCD IPS
RESOLUTION 1280x800
CPU Quad Core, SC9832E, 1,3GHz, 64bit
RAM 2GB
MEMORIA INTERNA 16GB
SISTEMA OPERativo Android 10.0 Go
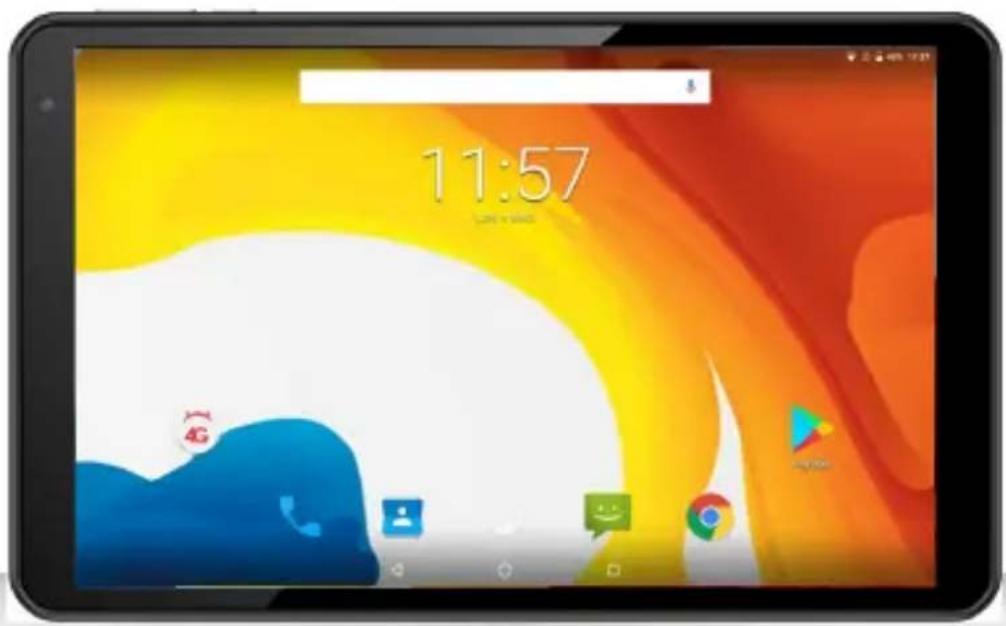
Thank you for purchasing this tablet. It brings you much convenience for your business and entertainment. Running on Android 10.0 Go, with a 1.3GHz processor, it brings you wonderful user experience. Before beginning, please refer to this user manual carefully.
IMPORTANTNOTICES
- Keep this device away from strong magnetic field to avoid any damages.
- Do not rub this device with any hard objects and never clean this device with any chemicals or detergents or acids or it could cause damages on surfaces.
- Humidity or liquid may enter this device and causes permanent damages to the hardware inside. Do not place this device in any humid environment or under the rain.
- It is recommended that volume level of the earphones should be adjusted to an appropriate level to avoid damages to your hearings due to high volume.
- Do not cut off the power abruptly during software update, software download, or during this device is under any kind of operation or it may cause data lost and system error.
- Over-voltage, power cable strain, bending or squeezing by heavy objects must be avoided to prevent this device from overheating or fire disaster.
- To eliminate the risk of electric shock, do not connect the power plug with wet hands.
- Some movies, music and pictures are under protections of copyrights, any unauthorized usages are deemed as infringements to the laws of copyrights.
- The performance of the WIFI reception of this device could be influenced by the wireless equipments and networks in the surrounding areas.
- Any wireless equipment will influence the flight of an airplane, please consult the airline company if you want to use this device on the airplane.
- Do not use this device anywhere near any blasting operations.
- Only qualified maintenance personnel is allowed to dismantle this device.
- Please comply with any related restrictions and rules when using this device.
- Only use this device with its original accessories and battery.
- Do not use any incompatible accessories on this device.
- This device is not waterproof, please keep it dry all the time.
- For the sake of data safety, please back up the important data anytime on a timely basis.
- When connecting this device with other equipments, please follow instructions on this user's manual.
- Please consult the after-sales service in your area for any technical problems.
- Android is a trademark of Google LLC.

With earphones or headphones use:
To prevent possible hearing damage, limit the amount of time listening at high volumes.
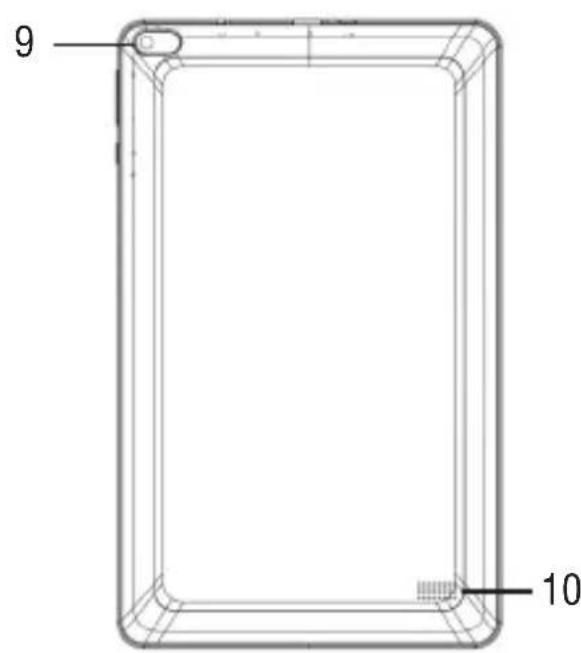
PRODUCT APPEARANCE
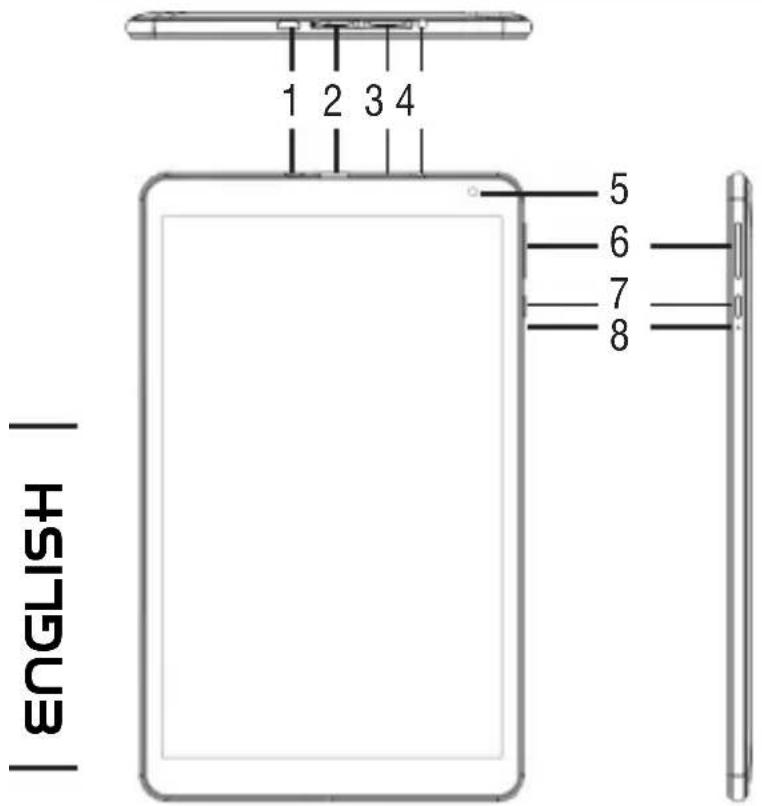
- Micro USB: to connect your device to PC. Connect the adapter 5V .
- TF Card Slot.
- MICRO SIM Card Slot.
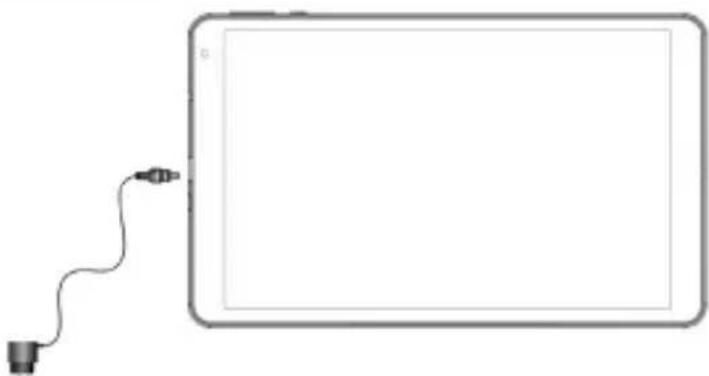
- 3.5mm headphone jack.
-
Frontal Camera.
-
Volume + / - adjustment buttons.
- On/Off button and lock/unlock Display.
- Reset.
- Rear Camera.
- Speakers.
WARNING ABOUT SIM CARDS
Note on the use of micro/ nano SIM with adapter on TREVI products. The use of micro or nano SIM with its adapter is not recommended as they can cause breakage to the device and to the micro / nano SIM itself. TREVI is not liable for damage caused by the use of adapters to micro / nano SIMs. TREVI reserves the right not to provide free warranty assistance on products with defects in the SIM module caused by the use of adapters for micro / nano SIM.
BATTERY MANAGEMENT AND RECHARGING
- With unit turned off, connect the Micro USB power socket (1) to the mains adapter included in the package;
- The device will remain off, to view the charge status, lightly press the On/Off button (7) and the battery icon will appear with the charge status;
- When the battery icon is no longer moving or the charge percentage will indicate 100% , disconnect the device from the power supply.
Note
- Use only the supplied power supply, different power supplies could damage the battery.
- The device is charged even when it is connected to the computer via USB cable.
- When using the device for the first time, it is recommended to fully charge the battery.
- You can use the device even when it is being charged, but, for a longer battery life, its use is not recommended; moreover, using the device, the charging times are extended.
- While recharging the battery, the controls on the Touch Screen may not work properly, this is due to the unstable power supply, just unplug the power supply to make the device work properly.
- During recharging, the device may increase in temperature, this does not affect the performance and life of the device.
- Before the complete exhaustion of the battery, the device will warn to connect the device to the power supply. When the battery is completely exhausted, the device will automatically turn off.
WARNING FOR CORRECT USE OF THE RECHARGEABLE BATTERY
- Recharge the battery at a temperature between 5^ and 35^ .
- Do not extend the recharge beyond the normal times, to avoid the risk of overheating and bursting.
- Charging the battery beyond normal times or a prolonged period of inactivity can shorten its life.
- The rechargeable battery is subject to wear and its capacity gradually decreases.
To extend the life of the battery, use it when it is fully charged until it is completely exhausted, then recharge it again before using the device again. By charging a battery that is not completely exhausted, its duration will be reduced, in this case, repeat the complete charging/discharging cycle several times.
BASIC OPERATIONS
Power On/Power Off
To turn on the device, press and hold the On/Off button (7) for 3 seconds. When the Home page appears:
- Select a point on the screen and swipe up to unlock the Tablet.
To turn off the device, press and hold the On/Off button (7) for 2 seconds, until the "Turn off" command appears, at this point touch it and confirm by selecting the "OK" icon.
Stand-by and Lock screen
To extend the battery life, you can put the device in sleep mode by deactivating the LCD display. To do this, press the On/Off button (7) and release it immediately. Repeat the operation to reactivate the display and bring up the screen lock mode.
Network Connection
The notification bar displays icons indicating:

Warns you that an unsecured Wi-Fi network is available.

Connected to a Wi-Fi network (waves indicate signal strength).
[no icon] There are no Wi-Fi networks available or the Wi-Fi circuit is off.
Wi-Fi
The Wi-Fi connection can be used with a Wi-Fi Access Point (AP) connection or with a connection without Wi-Fi hotspot security. Selecting this item accesses the wireless and networks settings. To access the Internet, first of all, you need to configure a Wireless network; to do this, you need to be in a Wi-Fi zone. Each time you are in a Wi-Fi zone that you have previously configured, the device will try to connect automatically (if the Wi-Fi function is active).
Warning: When you activate the Wi-Fi connection, the 4G data connection is disabled, while the telephone function remains enabled.
Wi-Fi activation/deactivation:
- On the Applications page, select the "Settings" - "Network and internet" icon and then move the selector to the right side of the word Wi-Fi (activated green, deactivated gray);
- To deactivate the WiFi connection, move the selector back to the left.
Note: To increase the battery life, it is recommended to turn off the WiFi connection when not in use.
Search for and connect to a Wi-Fi network:
- As soon as the ON command is selected, the Tablet will automatically activate a search
for available Wi-Fi networks. Select the word Wi-Fi to view the complete list of networks found;
- Select the desired network and, if protected, enter the password by touching the flashing part and using the virtual keyboard;
-
Touch the "Connect" key and wait for the symbol to appear on the status bar.
-
It is also possible to manually configure a network if you know the network SSID by simply tapping, selecting the "Add network" item and entering and entering the SSID address using the virtual keyboard.
- It is also possible to make connections through VPN networks or use the device as a portable Tethering/Hotspot simply by configuring/activating these connections.
4G (LTE) network:
The 4G (LTE) network is the fourth generation mobile network that allows access to data at high speed thanks to the capacity of advanced networks. Compared to previous 2G / 3G networks this is equipped with a wider range of services and advanced network capabilities. To activate the 4G function, contact your service provider.
The TAB 10 4G S2 is able to internally support a Voice and Data SIM Card or a Data SIM and to connect to the 4G network thus allowing you to surf at high speed with your device even outside the areas covered by the WiFi network. and to be able to receive and make calls. If your SIM is not enabled to surf in 4G (LTE), the device is still able to surf in 3G. Insert the Micro Sim Card only with the device turned off.
Caution:
- If the Tablet has been turned off with the Wi-Fi connection activated, the Tablet will keep this connection when you turn it back on and therefore will not activate the 4G data connection.
- Each time the Wi-Fi connection is activated, the Tablet will automatically deactivate the 4G data connection.
COMMUNICATION
PHONE
Make calls
- Touch the icon to start the phone interface;
- Select the icon to enter your address book and search for the name/number to call, or enter the number using the numeric keypad. To delete a number press ;
- Touch the icon to start the call;
- Touch the icon to end the call.
Note: To enter "+" and make international calls, touch and hold [0+].
Accept a call
- When you receive a call, a window will appear with the name or number of the person calling and two buttons "Reject" and "Answer";
- Select "Answer" to start the conversation;
- Touch the icon to end the call.
Reject a call
When you receive a call, select the "Reject" key
Volume adjustment during the call
To adjust the volume during a call, use the Volume keys (6) up and down.
View your call history
By selecting the icon you can view missed calls, outgoing calls and received calls. The calling time of each phone call is displayed on each record.
Note:
- In the Telephone function it is recommended to use earphones (not supplied) as the audio of the hands-free, in very noisy environments, may not be sufficient.
MESSAGE
TAB 10 4G S2 allows you to send text messages (SMS) and multimedia messages (MMS) to anyone of your contacts. Multimedia messages include photos, video clips, information, contacts, and voice memos. Also you can send messages to multiple contacts at the same time.
Note:
- The sending and receiving of roaming messages could result in additional costs. For information, contact your telephone company.
- Check with your manager the costs for sending SMS and MMS.
Send an SMS message:
- On the Home screen, touch the icon

- Select the icon

-
Select the recipients of the message;
-
Enter telephone numbers manually, separating them with a semicolon or a comma.
- Select the phone numbers from the Address Book by selecting the icon.
4 Write the text message using the virtual keyboard;
To insert emoticons, select the icon on the text bar.
- Select the icon to send the message.
INTERNET
Before connecting to the network, make sure that the Wi-Fi connection is active or that the 4G network is available.
- On the main page, touch the Google ^TM search bar,the Android virtual keyboard will appear,where you can type the website address or search using the search engine.

- or tap the icon to open the browser.
FUNCTIONS
Camera/Camcorder
Select the "Camera" icon to activate it. The TAB 10 4G S2 has a 0.3Mpxl front camera and a 2Mpxl rear camera, with these you can take pictures or shoot videos.
Turn off the Camera/Camcorder
To exit the Camera/Camcorder function, select the return to previous page" command.
Bluetooth:
Bluetooth is a short-range wireless communication technology that can exchange data over distances of approximately 10 meters without requiring a wired connection.
There is no need to align devices to transmit data via Bluetooth. If the devices are paired, you can exchange data with each other even if they are in different rooms.
Note:
- Always make sure you are sharing and receiving data from reliable and properly protected devices.
- If there are obstacles between the devices, the operating distance may decrease.
- Some devices may be incompatible with your device.
Activating the Bluetooth function:
- Select the "Settings" icon;
- Select the item "Connected devices";
- Select the item "Pair new device".
Search and pair with Bluetooth devices:
- Once the "Pair new device" item has been selected, the list of available Bluetooth devices will be displayed;
- Select the device from the list and enter the Bluetooth PIN of the external device if requested;
- Select "OK" to start pairing.
Note:
- If the pairing is successful, the device will automatically search for available services.
- Some devices, especially headsets or hands-free car kits, may have a fixed Bluetooth PIN code, for example "0000". If the other device has a PIN, you must enter it.
Information Note on the Removal and Disposal of Batteries
Warning: Only high-qualified personnel should perform this operation! Battery Removal
The appliance should not be plugged to the mains socket when performing this operation!
- Remove the rear part of the appliance;
- Select the battery;
- Disconnect and remove the battery.
Used batteries should not be disposed of with household waste or thrown into fire or water. Used batteries should be recycled or disposed of in separate waste collection centres.
INFORMATION TO USERS
pursuant to Legislative Decree No. 49 of March 14, 2014
"Implementation of Directive 2012/19/EU on Waste Electrical and Electronic Equipment (WEEE)"
This wheeled bin symbol on the product indicates that at the end of its life must be collected separately from other waste. The user must, therefore, take the remote control integrates the essential components that got to its life to the appropriate differentiated collection centers for electronic and electro-technical waste, or return it to the dealer when purchasing a new appliance of equivalent type, in terms of one to one, or one to zero for equipment having longer side of less than 25~cm . Appropriate separate collection for the decommissioned equipment for recycling, processing and environmentally compatible disposal helps prevent negative impact on the environment and human health and promotes recycling of the materials making up the product. Illegal dumping of the product by the user entails the application of administrative sanctions stated in Legislative Decree n. Legislative Decree No. 49 of March 14, 2014.
TREVI pursues a policy of continuous research and development, the products may show different characteristics from those described.
TECHNICAL SPECIFICATIONS
DISPLAY 10.1-inch LCD IPS
RESOLUTION 1280x800
CPU Quad Core, SC9832E, 1,3GHz, 64bit
RAM 2GB
MEMORY 16GB
OPERATIVE SISTEM Android 10.0 Go
POWER SUPPLY 5V 2A with external adapter lithium rechargeable battery 3,7V, 5000mAh
WIRELESS NETWORK IEEE (802.11 b/g/n)
GSM BANDS 850/900/1800/1900MHz
3G BANDS 900/2100MHz
4G (LTE) BANDS 800/1800/2600MHz
BLUETOOTH PEAK TRANSMISSION POWER 1mW
BLUETOOTH MAX POWER TRANSMISSION 0,8mW
BLUETOOTH TRANSMISSION BAND 2,4GHz
DIMENSIONS 251x 153x 9,8mm
WEIGHT 485gr
BIENVENUE
CPU Quad Core, SC9832E, 1,3GHz, 64bit
RAM 2GB
MÉMOIRE 16 GB
DISPOSITIF SISTEM Android 10.0 Go
FREQUENCY 4G (LTE) 800/1800/2600MHz
DISPLAY 10.1-inch LCD IPS
RESOLUTIE 1280x800
CPU Quad Core, SC9832E, 1,3GHz, 64bit
RAM 2GB
ERINNERUNG 16 GB
OPERATIVE SISTEM Android 10.0 Go
4G-FREQUENZ 800/1800/2600MHz
-forking is possible.
- Alternatively, the red is used to indicate a direction in the direction of the red.
- Alternatively, the red is used to indicate a direction in the direction of the red.
- Alternatively, the red is used to indicate a direction in the direction of the red.
- Alternatively, the red is used to indicate a direction in the direction of the red.
- Alternatively, the red is used to indicate a direction in the direction of the red.
- Alternatively, the red is used to indicate a direction in the direction of the red.
- Alternatively the red is used to indicate a direction in the direction of the red.
- Alternatively, the red is used to indicate a direction in the direction of the red.
- Alternatively, the red is used to indicate a direction in the direction of the red.
- Alternatively, the red is used to indicate a direction in the direction of the red.
- Alternatively, the red is used to indicate a direction in the direction of the red.
- Alternatively, the red is used as a reference point in the direction of the red.
- Alternatively, the red is used as a reference point in the direction of the red.
- Internacional es possible realizar conexiones a性和 de redes VPN o usar el dispositivo como un Tethering/Hotspot portátil simplement configurando/activando estas conexiones.
Red 4G (LTE):
CPU Quad Core, SC9832E, 1,3GHz, 64bit
RAM 2GB
MEMORIA 16GB
OPERATIVA SISTEM Android 10.0 Go
4G (LTE) 800/1800/2600MHz
PICO DE POTENCIA DE TRANSMISION BLUETOOTH 1mW
POTENCIA DE TRANSMISION MAX BLUETOOTH 0,8mW
BANDA DE RADIODIFUSION BLUETOOTH 2,4GHz
DIMENSIONES 251x 153x 9,8mm
PESO 485gr
https://www.trevi.it/dms/zidi/TREVI/DOCTAB104GS2.pdf
Simplified EU Declaration Of Conformity
Hereby TREVI S.p.a declares the model TAB 10 4G S2 is in compliance with Directive 2014/53/EU.
The full text of the EU declaration of conformity is available at the following internet address https://www.trevi.it/dms/zidi/TREVI/DOCTAB104GS2.pdf

Trevi S.p.A.
Strada Consolare Rimini-San Marino, 62
47924 RIMINI (RN) Italy
Tel. 0541/756420 - Fax 0541/756430
www.trevi.it - E-mail: info@trevi.it


- GB TO SET YOUR LANGUAGE DEVICE
- F POUR CONFIGURER LANGUE DE VOTRE APPAREIL:
- IMPORTANTNOTICES
- PRODUCT APPEARANCE
- WARNING ABOUT SIM CARDS
- BATTERY MANAGEMENT AND RECHARGING
- Note
- WARNING FOR CORRECT USE OF THE RECHARGEABLE BATTERY
- BASIC OPERATIONS
- Power On/Power Off
- Stand-by and Lock screen
- Network Connection
- Wi-Fi
- Wi-Fi activation/deactivation:
- Search for and connect to a Wi-Fi network:
- 4G (LTE) network:
- Caution:
- COMMUNICATION
- PHONE
- Make calls
- Accept a call
- Reject a call
- Volume adjustment during the call
- View your call history
- Note:
- MESSAGE
- Send an SMS message:
- INTERNET
- FUNCTIONS
- Camera/Camcorder
- Turn off the Camera/Camcorder
- Bluetooth:
- Activating the Bluetooth function:
- Search and pair with Bluetooth devices:
- Information Note on the Removal and Disposal of Batteries
- Warning: Only high-qualified personnel should perform this operation! Battery Removal
- INFORMATION TO USERS
- "Implementation of Directive 2012/19/EU on Waste Electrical and Electronic Equipment (WEEE)"
- TECHNICAL SPECIFICATIONS
- BIENVENUE
- Red 4G (LTE):
- Simplified EU Declaration Of Conformity
Brand : Trevi
Model : 10 4G 2S
Category : Tablet