
Rhino Pro 3000 - Label printer DYMO - Free user manual and instructions
Find the device manual for free Rhino Pro 3000 DYMO in PDF.

| Product Type | Portable Label Printer |
| Brand and Model | Dymo Rhino Pro 3000 |
| Accepted Cartridge Widths | 6 mm (1/4"), 9 mm (3/8"), 12 mm (1/2") |
| Power Supply | 6 AA alkaline batteries 1.5 V or optional AC adapter |
| Display | 13-character LCD with adjustable backlight |
| Memory | 25 savable labels |
| Font Size | Small, Medium, Large, Extra Large |
| Font Style | Normal, Italic, Outline |
| Frame and Underline | Twenty styles available (non-exclusive) |
| Max Number of Lines | 2 lines for 9 mm and 12 mm cartridges, 1 line for 6 mm |
| Special Print Modes | Flag, Horizontal/Vertical Wrapping, Fixed Length, Distribution Panel, Vertical |
| Serialization | Numeric (1-99) and Alphabetic (A-Z) with adjustable increment |
| Multiple Copies | Up to 50 copies per print |
| Fixed Label Length | From 40 mm to 650 mm in 2 mm steps |
| International Characters | Support for extended Latin characters (RACE) with language selection |
| Symbols | Extended symbol set (see manual) |
| Predefined Text | Keys for location, audio/video, voice/data, security |
| Maintenance and Cleaning | Cutting blade and print head cleaning (with included tool or optional pen) |
| Safety and Standards | CE, FCC Class B, EN 60950, EN 61000 |
| Environment | Auto power-off after 5 minutes of inactivity |
Frequently Asked Questions - Rhino Pro 3000 DYMO
User questions about Rhino Pro 3000 DYMO
0 question about this device. Answer the ones you know or ask your own.
Ask a new question about this device
Download the instructions for your Label printer in PDF format for free! Find your manual Rhino Pro 3000 - DYMO and take your electronic device back in hand. On this page are published all the documents necessary for the use of your device. Rhino Pro 3000 by DYMO.
USER MANUAL Rhino Pro 3000 DYMO
text_image
AC Power Connector Tape Exit LCD Display Cutter Lever RhinoPRO 3000 Power Print Multiple Copies PRINT Navigation Thumb Latch for Tape Compartment Escape/Backlighting Backspace/Clear All Clear LANG SIZE UNITS STYLE FEED BOX/UL SAVE RECALL CAPS SERIAL ESC NORMALWRAP FUNCTION Function Hot Keys Numeric Keys Enter/OK 1 2 3 4 5 + - 6 7 8 9 0 A B C D E F G H I J H M N O P Q R S T U V W X SYMBOLS SPACE Space Bar/ Symbols DYM0® Thumb Latch for Battery CompartmentFigure 1 RhinoPRO 3000 Printer
About Your New Printer
With your new DYMO RhinoPRO™ 3000 label printer, you can create a wide variety of high-quality, self-adhesive labels. You can choose to print your labels in many different sizes and styles. The printer uses DYMO RhinoPRO Industrial label cassettes in widths of 1/4" (6 mm), 3/8" (9 mm), or 1/2" (12 mm). RhinoPRO label cassettes are available in a wide range of materials.
Visit www.dymo.com for information on obtaining tapes and accessories for your printer.
Warranty Registration
Please complete the warranty registration card and return it to the appropriate customer service address, or you can register online at www.dymo.com.
Getting Started
Follow the instructions in this section to print your first label.
Power Supply
The printer can operate on AC or battery power. To save power, the printer will automatically turn off after five minutes of inactivity.
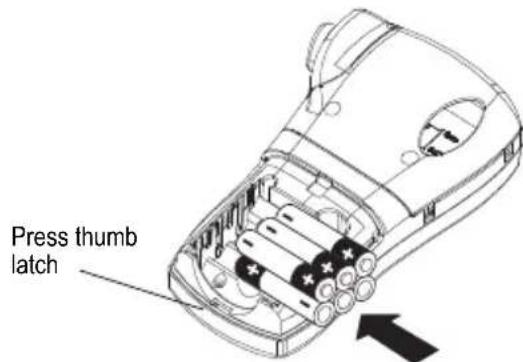
Inserting the Batteries
The printer uses six 1.5 volt AA alkaline batteries.
To insert the batteries
- Press the thumb latch on the bottom of the printer to open the battery compartment door. See Figure 2.
text_image
Press thumb latchFigure 2
- Insert the batteries following the polarity markings (+ and -).
- Close the battery compartment door.
Remove the batteries if the printer will not be used for a long period of time.
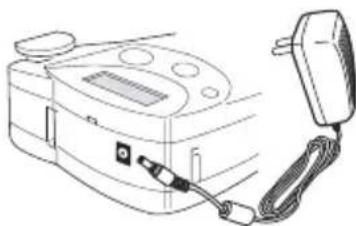
Connecting the AC Adapter
You can also use an optional AC power adapter to power the printer. Connecting the AC adapter disconnects the batteries as a power source.
To connect the AC adapter
- Plug the power adapter into the power connector on the top of the printer.
natural_image
Line drawing of a portable electronic device with attached cable and power plug (no text or symbols)Figure 3
- Plug the other end of the power adapter into a power outlet.
Inserting the Tape Cassette
Your printer comes with one label tape cassette. Visit www.dymo.com for information about purchasing additional label cassettes.
To insert the tape cassette
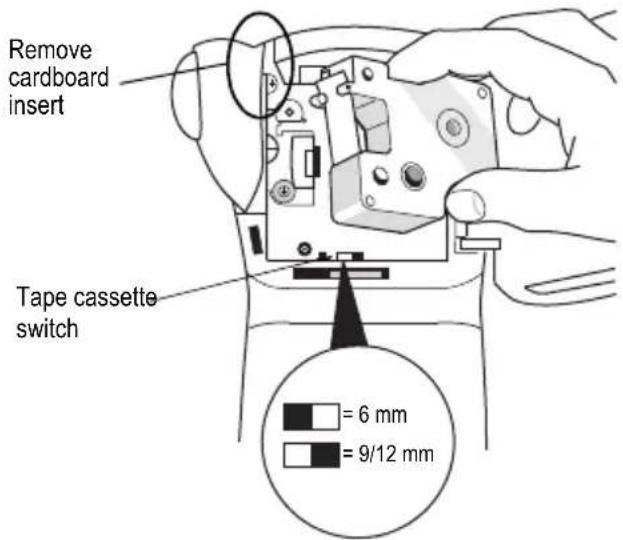
- Press the thumb catch on the right side of the printer to open the tape cassette door.
- Make sure that the tape cassette switch is set to 9/12 mm. See Figure 4. A notch in the cassette fits over the switch when the cassette is in the correct position.
The first time you use the printer, remove the protective cardboard insert from between the print head and pinch roller. See Figure 4.
text_image
Remove cardboard insert Tape cassette switch = 6 mm = 9/12 mmFigure 4
-
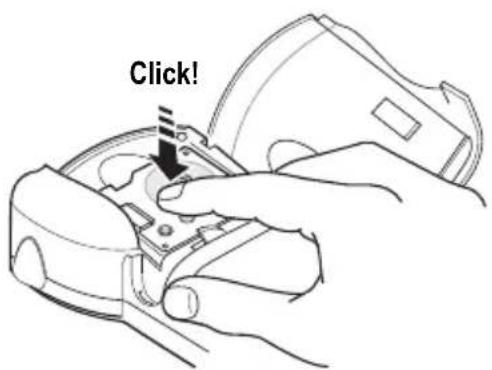
Make sure the tape and ribbon are taut across the mouth of the cassette and that the tape passes between the guideposts.
-
Insert the cassette with the tape and ribbon positioned between the print head and pinch roller. See Figure 5.
text_image
Click!Figure 5
- Press firmly until cassette clicks into place. Make sure tape and ribbon are positioned correctly.
- Close the tape cassette door and press ⏻ to turn on the power.
Settings
You can select the language and corresponding units of measure you want the printer to use.
Selecting a Language
Several language-related features are determined by the language setting, such as availability of special characters. Three languages are available: English (default), Spanish, and French.
See Using International Characters on page 6 for information about international characters.
To select a language
- Press
SIZE. - Use the arrow keys to select the language.
- Press to set the language.
Selecting Units of Measure
You can set the units of measure to display as inches (default) or millimeters.
To set the units of measure
- Press
STYLE. - Use the arrow keys to select inches or mm.
- Press to set the units of measure.
Printing Your First Label
You are now ready to print your first label.
To print a label
- Enter text to create a simple label.
- Press
- Cut the label by pressing the cutting lever towards the back of the printer. See Figure 6.

text_image
RhinePRO 3000 Multiple Capsules PRINT CLAMP LABUANCE UNIT RED EAT GENI SHEM SHEM SHEM SHEMFigure 6
- Remove the label.
Congratulations! You have printed your first label. Continue reading to learn more about the options available for creating labels.
Getting to Know Your Printer
Become familiar with the location of the feature and function keys on your printer. See Figure 1 on the inside front cover of this manual. The following sections describe each feature in detail.
Power
The ⏻ button turns the power on and off. If no keys are pressed after five minutes, the power is switched off automatically.
LCD Display
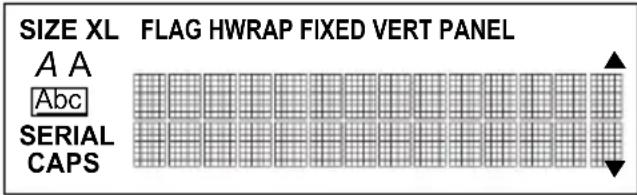
The printer's LCD display typically shows a row of thirteen characters. However, you can enter up to 99 characters and/or spaces. Feature and function indicators appear on the top, side, and bottom of the display to indicate that a feature or function is selected. See Figure 7.
text_image
SIZE XL FLAG HWRAP FIXED VERT PANEL A A Abc SERIAL CAPSFigure 7
Backlighting
When the printer is used in a low-light environment, the display may become difficult to read. The backlighting feature lights the display.
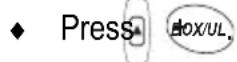
◆ Press + return backlighting on and off.
Caps Key
The Caps key toggles capitalization on and off. When Caps mode is turned on, the Caps indicator is shown on the display and all letters that you enter will be capitalized. The default setting is Caps mode on. When Caps mode is off, all letters entered appear in lower case.
◆ Press + to turn CAPS mode on and off.
Function Key
The Function key is used to select the function or symbol printed above a key. For example, when you press the Font size menu appears in the display; however, if you press + together, the Language menu appears.
Backspace Key
The Backspace key ← removes the character to the left of the cursor. Pressing + clears the current label text. Text size and other settings remain unchanged.
Escape Key
The Escape key returns you to the starting point from within any function.
Navigation Key

You review and edit your label using the arrows on the Navigation key. You can also view menu choices, and then press to make a selection.
Designing Your Label
You can choose from a number of formatting options to enhance the appearance of your labels.
Changing the Font Size
You can print the text on your label in four font sizes: small, medium, large, and extra-large.
SMLXL
The font size you can use depends on the size of label tape installed and the printing option you have selected.
To set the font size
- Press
- Select a font size and press .↓
Changing the Font Style
You can print the text on your label in three styles: normal (default), italic, or outline. The selected font style applies to all characters on the label.
To set the font style
-
Press .
-
Use the arrow keys to select a font style.
-
Press
Adding a Box or Underline
You can further highlight your text by choosing a box or underline style. See Figure 8.
| DYMO | Normal |
| DYMO | Square Box |
| DYMO | Underline |
Figure 8
A label can be underlined or enclosed in a box, but not both together. When you apply the underline style to a two-line label, both lines are underlined. When you apply a box to a two-line label, the entire label text is enclosed in a single box.
To add a box or underline
-
Press
-
Select box or underline style and then press

Creating Multi-Line Labels
You can create multi-line labels depending upon the size of the label tape, as follows:
| Tape Size | 1/4" (6 mm) | 3/8" (9 mm) | 1/2" (12 mm) |
| Number of Lines 1 | 2 | 2 |
To create a multi-line label
- Type the text for the first line, and press

- Type the text for the next line.
Using International Characters
The printer supports the extended Latin character set using RACE technology. Similar to using a mobile phone keypad, typing a letter multiple times quickly will scroll through variations of that letter.
For example, if French is selected as the language and you repeatedly press the letter a, you will see a à â æ and so on through all the variations available. The character variations and the order in which the variations appear depend on the language you have selected to use.
Adding Symbols
The printer supports the extended symbol set as shown in Figure 9.
| A! | i | ? | ¿ | ||
| B, | ' | # | % | & | |
| C; | " | + | = | * | |
| D- | : | / | ( ) | ||
| E | ~ | \ | @ | ± | 1/2 |
| F | £ | ¢ | 1/4 | ||
| G | ↓ | ↑ | → | ← | - |
| H | |||||
| I | |||||
| J | |||||
| K | |||||
| L | |||||
| M | |||||
| N | |||||
| O |
Figure 9
To add a symbol
-
Press ☐. The first row of symbols shown in Figure 9 is displayed.
-
Use the arrow keys to move to the desired symbol. You can move horizontally and vertically through the rows of symbols.
-
When you locate the symbol, press to add the symbol to your label.
Saving your Label
You can save up to 25 labels in memory.
To save a label
-
Type your label text.
-
Press RECALL to display the memory locations.
Each memory location is identified by a number (01, 02 ... 25). If a memory location contains a saved label, the label content is displayed next to the number.
-
Use the arrow keys to select an empty location.
-
Press to save the label.
Recalling from Memory
Once a label is saved to memory, you can recall the label to print or edit.
To recall a label from memory
-
Press The memory locations are displayed.
-
Use the arrow keys to find the memory location for the label you want and then press .
Deleting a Label from Memory
When you no longer need a stored label, you can delete it from memory.
To delete a label from memory
- Press The memory locations are displayed.
- Use the arrow keys to move to the memory location that contains the label you want.
- Press + and then press to clear the memory location.
Using the Hot Key Functions
Your printer includes several Hot Key ^™ functions that allow you to print specific types of labels. Hot Keys are available for printing flag, wrap, fixed-length, distribution panel, and vertical labels.

When you select flag, wrap, fixed, or vertical print modes, the labelmaker remains in that print mode until you either select another hot key or select normal mode.
To select normal mode
◆ Press ▲ +FLAG.
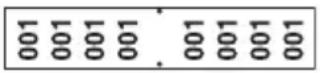
Printing in Flag Mode
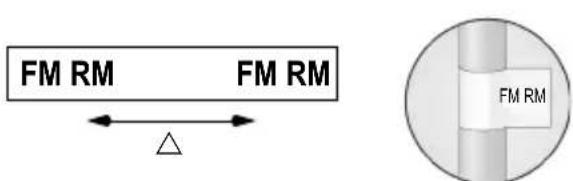
Flag labels wrap around a wire or cable leaving the text part of the label extending out from the cable. See Figure 10.
text_image
FM RM FM RM △ FM RMFigure 10
The default diameter is 3/8" (9 mm). The length of the label tape between the label text (△) is approximately 1.1" (28.27 mm).
The text on flag labels is automatically printed on both ends of the label leaving a blank space in the middle that wraps around the cable. When the label is applied to the cable, both ends of the label are applied back to back leaving a tail or flag. The result is a label that can be read from both sides.
To print a flag label
-
Press
-
Enter the text for the label and press

Printing Wrap Labels
You can create labels that wrap around a cable or wire. A line of text is placed horizontally or vertically along the width of the cable, and repeated so that you can read the label from any angle.
Horizontal Wrap Labels
Horizontal wrap labels can contain letters, numbers, or symbols.
To print horizontal wire wraps
-
Press
-
Enter the label text and press PRINT.
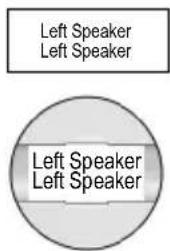
Vertical Wrap Labels
Vertical wrap labels are printed in a fixed length of 1.5" (40 mm) and can contain up to five letters or numbers; but no symbols.
text_image
Left Speaker Left Speaker Left Speaker Left SpeakerTo print vertical wrap labels
-
Press HWRAP.
-
Enter the label text and press .PRINT
Printing Fixed-Length Labels
Normally, the length of the label is determined by the length of the text entered. However, you may wish to make a label for a specific purpose that is a fixed length regardless of the length of the text.
You can specify a fixed length for a label in 0.1" (2 mm) increments between 1.5" (40 mm) and 25.0" (650 mm). The preset fixed length is 1.5" (40 mm). Any change you make to the fixed length setting remains in effect until you change it.
To set the label length
- Press
- Use the arrow keys to select the label length and press 🔊.
- Enter the text for the label and press . PRINT
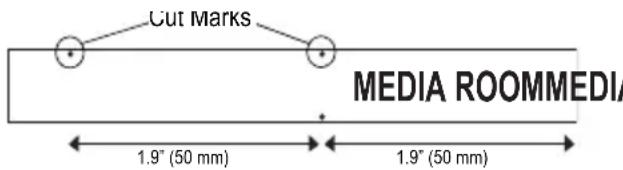
If multiple copies of a fixed-length label are printed, cut marks are printed between each label.
text_image
Cut Marks MEDIA ROOMMEDIA 1.9" (50 mm) 1.9" (50 mm)Figure 11
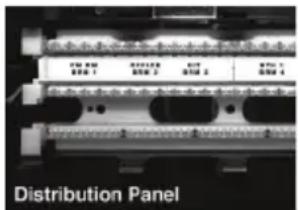
Printing Distribution Panel Labels
Distribution panel mode allows you to create a label that contains boxes of information for labeling multiple items in one location; for example, a number of ports on a distribution panel. You define the number of boxes to label, set the length and enter the text for each box, and then print. The result is a long label with correctly spaced boxes of text for each port.
text_image
FM 1 B200 1 B200 2 B200 3 B200 4 Distribution PanelTo print a distribution panel label
- Press .
- Enter the number of boxes and press
- Select the length of the boxes and press. The default length is 1.5" (40 mm).
- Select 1 or 2 lines of text, and press

- Enter the text for the first box and press . ↓ If you selected two lines of text, the display shows TextBox01Row2 indicating row 2 of box 1.
- Enter the text for the second line and press The text for this box automatically prints and you are ready to enter text for the next box.
- Repeat steps 5 and 6 until all boxes are printed.
Printing Vertical Labels
Labels can be printed with the text running vertically. For two-line labels, the second line prints directly below the first line, separated by a space.
To print vertically
Press
P A N E L 1
- Enter the text for your label and press
Using the Pre-defined Text Keys
Your printer includes four Hot Keys that allow you to access pre-defined text. These Hot Keys include Location, Audio/Video, Voice/Data, and Security.
To add text to a label
- Press one of the text Hot Keys.
- Select the label text using one of the following methods:
- Use the arrow keys to scroll through the list.
- Press the first letter of the text label you wish to use. The cursor jumps to the first label that begins with that letter.
- Press to insert the text on the label.
The pre-defined text available on each Hot Key is shown on the next page.
Location Hot Key
| Attic | Laundry Room |
| Back | Left |
| Basement | Library |
| Bath | Living Room |
| Bedroom | Lobby |
| Billiards Room | Lower |
| Center | Main Floor |
| Closet | Master Bath |
| Deck | Master Bedroom |
| Demarc | Media Room |
| Den | Office |
| Dining Room | Outside |
| Dressing Room | Patio |
| Floor | Play Room |
| Foyer | Pool |
| Front | Porch |
| Garage | Right |
| Gate | Sitting Room |
| Guest Bath | Spa |
| Guest House | Study |
| Guest Room | Sunroom |
| Gym | Theater |
| Hot Tub | Upper |
| Inside | Utility Room |
| Kitchen |
Audio/Video Hot Key AUDIO VIDEO
| Analog | Projector |
| CATV | Remote |
| CD | RF |
| Center Back Speaker | RGB |
| Center Front Speaker | Right Back Speaker |
| Component | Right Front Speaker |
| Composite | Right Outdoor Speaker |
| Digital | Right Side Speaker |
| DVD | Right Surround Speaker |
| DVI | RS-232 |
| DVR | SAT |
| HDMI | Speaker |
| HDTV | Subwoofer |
| IR | Surround |
| Keypad | S-Video |
| Left Back Speaker | Tape |
| Left Front Speaker | Touch Screen |
| Left Outdoor Speaker | TV |
| Left Side Speaker | VCR |
| Left Surround Speaker | VESA |
| Monitor | Video Game |
| Optical | Volume Control |
| Phono | Zone |
Voice/Data Hot Key
VOICE DATA
| Cable Modem | LAN |
| CO | Laptop |
| Demarc | Network |
| Desktop | Phone |
| DSL | Phone System |
| DSLAM | USB |
| Fax | VoIP |
| Internet | Wireless |
Security Hot Key SEC
| Back Door | High Water |
| Camera | Horn |
| Carbon Monoxide | Keypad |
| CCTV | Low Temp |
| Cell | Motion Sensor |
| Contact | Phone |
| Controller | PIR |
| Door | Pool |
| Door Contact | Power |
| Driveway | Remote |
| Dual Tech | Sensor |
| Duct | Shock Sensor |
| Fan Cutoff | Siren |
| Front Door | Sliders |
| Garage Door | Smoke Detector |
| Gas | Spare |
| Gate | Strobe |
| Glass Break | Water Detector |
| Ground | Window |
| Heat Detector | Window Sensor |
These pre-defined text keys can be very powerful when used with flag and wrap mode. The following example shows how to quickly print a flag label for a speaker wire in your home-entertainment system.
- Press to turn on Flag mode.
- Press the first audio/video text, Analog, appears in the display.
- Press the letter L. Left Back Speaker appears in the display.
- Press to add the text to the label.
- Press .The flag label prints.
Left Back Speaker
Printing Options
You can choose to print multiple copies of the same label, print serialized labels, or print a combination of both.
Printing Multiple Copies
You can print up to 50 copies of the same label at one time. When printing multiple copies, a dotted cut-line is printed between each label.
To print multiple copies
- Press

- Press the ▲ arrow to increase the number of copies to print. The default is 2 copies.
- Press the ▼ arrow to decrease the number of copies (maximum is 50).
- Press to begin printing.
You may notice a brief pause in printing between each label for more complex formats.
When printing is finished, the number of copies to print returns to 2.
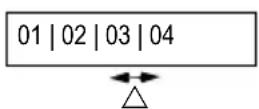
Serializing Your Labels
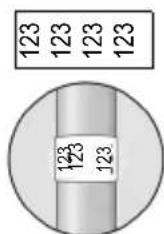
You can print serialized labels numerically or alphabetically. Numbers can be incremented from 1-99 and letters from A-Z.
You can serialize any number or letter by placing the cursor (|) behind the position to be incremented, such as the number 2 in 12|3 or the letter B in AB|C. For example, with the cursor behind the 2 in 12|3 and the increment #=3, the resulting labels would print as 123, 133, and 143.

text_image
123 133 143Figure 12
When the letter Z or the number 9 is reached during serialization, a letter or number is added to increase the increment. For example, Z increments to AA and 9 increments to 10.
When a space is present in a string to be serialized, only the numbers or letters after the space are serialized.
To serialize your labels

- Enter the text for your label.
- Use the arrow keys to move the cursor behind the letter or number to serialize.
- Press
- Select the increment and press Printing begins automatically.
Advancing the Label Tape
The default leader space for all labels is approximately 7/16" (11.5 mm). To add additional blank space to the beginning or end of your label, you can feed the tape in 0.25" (6 mm) increments.
To feed the label tape
Adjusting Print Quality (Advanced)
Depending on the label material you choose, you may need to lighten or darken the print on the label. Adjusting the print head temperature allows you to control the print quality ( ±20 ).
To set the print head temperature
- Press VERT.
- Use the arrow keys to select the print head temperature and press
- Repeat as necessary until you are satisfied with the print quality.
Cleaning Your Printer
Your printer is designed to give you long and trouble-free service, while requiring very little maintenance.
Clean your printer from time to time to keep it working properly. Clean the cutter blade each time you replace the label cassette.
To clean the cutter blade
- Remove the label cassette.
- Place the tip of a ball-point pen or pencil on the L-shaped piece as shown in Figure 13, and press the piece down.
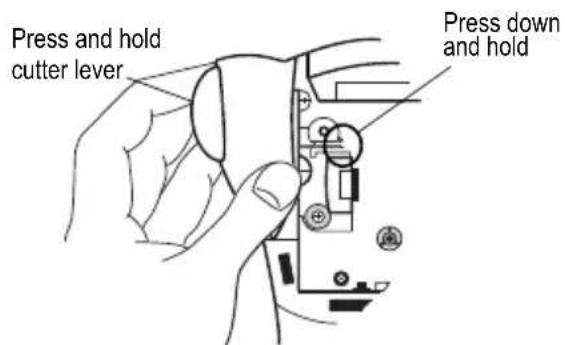
text_image
Press and hold cutter lever Press down and holdFigure 13
- While holding the L-shaped piece down, press and hold the cutter lever to expose the cutter blade.
- Use a cotton ball and alcohol to clean both sides of the blade.
- Release the cutter lever.
To clean the print head
- Clean the print head using the cleaning tool located inside the tape compartment lid.
You can also use the optional cleaning pen to clean the cutter blade and print head.
Troubleshooting
Review the following possible solutions if you encounter a problem while using your printer.
| Error Message/Problem Solution | |
| No display • Ensure the printer is turned on. | • Replace discharged batteries. |
| Poor Print Quality • Replace discharged batteries. | • Ensure tape cassette is installed properly.• Clean the print head.• Replace the tape cassette. |
| Poor Cutter Performance | Clean the cutter blade. See Cleaning Your Printer. |
| L= n.nn” (or nnnn.n mm)Fixed length setting is too small for text. | • Set the fixed length to a size longer than the text, or• Decrease the amount of text. |
| Text Too LongExceeded maximum number of characters in buffer. | Delete some or all of the buffer text. |
| Too many linesExceeded maximum number of lines allowed. | Select another format. |
| Print ErrorUndetermined printer error. | Check for label jam, empty label cassette, discharged batteries, or other problems. |
| Tape Too SmallTape size is too small for label content entered. | • Insert a larger size label cassette, or• Decrease the size of the label content. |
| No TapeLabel cassette missing or empty. | Insert a new label cassette. |
| Battery lowBatteries almost discharged. | Replace batteries or connect AC power adapter. |
| Tape JamMotor is stalled due to label jam. | • Remove jammed tape and replace label cassette.• Clean cutter blade. |
If you still need assistance, contact DYMO Customer Support for your country. A list of contact numbers for each country is included on the inside back cover of this manual.
Documentation Feedback
We are constantly working to produce the highest quality documentation for our products. We welcome your feedback. Send us your comments or suggestions about our documentation. Please include the following information with your feedback:
- Product name, version number, and page number
- Brief description of content (instructions that are inaccurate or unclear, areas where more detail is needed, and so on) We also welcome your suggestions about additional topics you would like to see covered in the documentation.
Send email messages to: documentation@dymo.com
Please keep in mind that this email address is only for documentation feedback. If you have a technical question, please contact Customer Support.
natural_image
Line drawing of a medical device with attached cable and connector (no text or symbols)Figure 2
text_image
SIZE XL FLAG HWRAP FIXED VERT PANEL A A Abc SERIAL CAPSFigure 6
Rétroéclairage
| DYMO | Normal |
| DYMO | Cadre carré |
| DYMO | Soulignage |
Figure 7
text_image
FM RM FM RM FM RMFigure 9
| Attic | Laundry Room |
| Back | Left |
| Basement | Library |
| Bath | Living Room |
| Bedroom | Lobby |
| Billiards Room | Lower |
| Center | Main Floor |
| Closet | Master Bath |
| Deck | Master Bedroom |
| Demarc | Media Room |
| Den | Office |
| Dining Room | Outside |
| Dressing Room | Patio |
| Floor | Play Room |
| Foyer | Pool |
| Front | Porch |
| Garage | Right |
| Gate | Sitting Room |
| Guest Bath | Spa |
| Guest House | Study |
| Guest Room | Sunroom |
| Gym | Theater |
| Hot Tub | Upper |
| Inside | Utility Room |
| Kitchen |
| Analog | Projector |
| CATV | Remote |
| CD | RF |
| Center Back Speaker | RGB |
| Center Front Speaker | Right Back Speaker |
| Component | Right Front Speaker |
| Composite | Right Outdoor Speaker |
| Digital | Right Side Speaker |
| DVD | Right Surround Speaker |
| DVI | RS-232 |
| DVR | SAT |
| HDMI | Speaker |
| HDTV | Subwoofer |
| IR | Surround |
| Keypad | S-Video |
| Left Back Speaker | Tape |
| Left Front Speaker | Touch Screen |
| Left Outdoor Speaker | TV |
| Left Side Speaker | VCR |
| Left Surround Speaker | VESA |
| Monitor | Video Game |
| Optical | Volume Control |
| Phono | Zone |
This product is CE marked in accordance with the EMC directive and the low voltage directive and is designed to conform with the following international standards:
US FCC Class B Compatibility
Safety - EN 60950, IEC 950, UL 1950
EMC Compatibility EN 61000 3-2/3; EN 61000 4-2/3/4/5/6/8/11; ENV 50204;
EU Immunity – EN 55024 & addendums A1, A2 Electromagnetic Compatibility (EMC) - Information Technology equipment, Immunity Characteristics
Emissions – EN 61000-6-3: Electromagnetic Compatibility (EMC) - Part 6: Generic Standards - Section 3: Emission standard for residential, commercial and light industrial environments.
Contacting Customer Support
The following table provides a list of telephone numbers to reach DYMO Sales and Support departments. You can also reach DYMO at www.dymo.com.
| Country Telephone Support Fax Support | ||
| Australia 1800/ 633 868 1800/ 817 558 | ||
| Austria 01/ 599 14 20 12 02/627-400-160 | ||
| Belgium 02/ 713 38 08 +31/ 20/ 581 93 80 | ||
| Canada (800) 263-6105 | ||
| Czech Republic 02/619 12 720 +02/619 12 730 | ||
| Denmark 35 25 65 08 +31/ 20/ 581 93 80 | ||
| Finland 09 229 07 04 +31/ 20/ 581 93 80 | ||
| France 01/69 32 49 32 | +31/ 20/ 581 93 80 | |
| Germany | 069/ 66 56 85 29 +31/ 20/ 581 93 80 | |
| Hong Kong | +852 2527 1928 | |
| Hungary | 1 424 6600 | 1 424 6601 |
| Ireland | (+35)3 14118934 | |
| Italy | 02/ 45 28 13 08 | +31/ 20/ 581 93 80 |
| Mexico +01 5368 2066 | ||
| The Netherlands | 020/581 93 86 020/ 581 93 80 | |
| New Zealand | 0800 803 966 0800 737 212 | |
| Norway | 22 97 17 10 +31/ 20/ 581 93 80 | |
| Poland 00800/311 12 50 | +31/ 20/ 581 93 80 | |
| Slovakia | (+420) 2/619 12 720 | (+420) 2/619 12 730 |
| Spain/Portugal | 91/662 31 49 +31/ 20/ 581 93 80 | |
| Sweden 08/ 632 00 57 +31/ 20/ 581 93 80 | ||
| Switzerland | 01/342 04 66 +31/ 20/ 581 93 80 | |
| Turkey | 212/ 286 26 30 PBX | 212/ 286 26 28 |
| United Kingdom | (+44) 020/ 7341 55 29 | +31/ 20/ 581 93 80 |
| United States | (203) 588-2500 | |
DYMO®
A Newell Rubbermaid Company
DYMO, Stamford, CT 06902 ©2009 Sanford, L.P. www.sanfordbrands.com
A Newell Rubbermaid Company/Une compagnie Newell Rubbermaid/Una empresa de Newell Rubbermaid
Imported into Canada by/Importé au Canada par Sanford Canada L.P., Oakville, ON L6H 5R6
Sanford Australia, 1 - 11 Keysborough Avenue, Keysborough, VIC 3173 - Australia
Sanford New Zealand, 1 Verissimo Drive, Mangere, Auckland 2202 - New Zealand