LabelManager 280 - Label printer DYMO - Free user manual and instructions
Find the device manual for free LabelManager 280 DYMO in PDF.

User questions about LabelManager 280 DYMO
0 question about this device. Answer the ones you know or ask your own.
Ask a new question about this device
Download the instructions for your Label printer in PDF format for free! Find your manual LabelManager 280 - DYMO and take your electronic device back in hand. On this page are published all the documents necessary for the use of your device. LabelManager 280 by DYMO.
USER MANUAL LabelManager 280 DYMO
text_image
DYSMO LabelManager 280 ABC abc AM Basic MiniPen Pt: 1234567890 Q W E R T Y U I O P A S D F G H J K L ,# A e n Z X C V B N M A←a BCUser Guide
LabelManager®
280
Copyright
© 2018 Sanford, L.P. All rights reserved. Rev. 3/18
No part of this document or the software may be reproduced or transmitted in any form or by any means or translated into another language without the prior written consent of Sanford, L.P.
Trademarks
DYMO, DYMO Label, and LabelManager are registered marks in the US and other countries. All other trademarks are the property of their respective holders.
FCC Statement
Caution: The user is cautioned that changes or modifications not expressly approved by the party responsible for compliance could void the user's authority to operate the equipment.
Note: This equipment has been tested and found to comply with the limits for a Class B digital device, pursuant to part 15 of the FCC Rules. These limits are designed to provide reasonable protection against harmful interference in a residential installation. This equipment generates, uses and can radiate radio frequency energy and, if not installed and used in accordance with the instructions, may cause harmful interference to radio communications. However, there is no guarantee that interference will not occur in a particular installation. If this equipment does cause harmful interference to radio or television reception, which can be determined by turning the equipment off and on, the user is encouraged to try to correct the interference by one or more of the following measures:
■ Reorient or relocate the receiving antenna.
■ Increase the separation between the equipment and receiver.
■ Connect the equipment into an outlet on a circuit different from that to which the receiver is connected.
- Consult the dealer or an experienced radio/TV technician for help.
Contents
About Your New Label Maker 5
Product Registration 5
Getting Started 5
Connecting the Power 5
Inserting the Battery Pack 5
Recharging the Battery Pack 5
Removing the Battery 5
Inserting the Label Cassette 6
Using the Label Maker for the First Time 6
Getting to Know the Label Maker 6
Power 6
LCD Display 7
Navigation Keys 7
Cancel 7
Backspace 7
Caps Mode 7
New Label/Clear 7
Text Size 7
Format Keys 7
Vertical Text 7
Menu 7
Formatting Your Label 7
Changing the Font Type 7
Changing the Text Size 8
Changing the Text Style 8
Adding Borders 8
Using Mirror Text 8
Creating Vertical Labels 8
Creating Fixed-Length Labels 9
Aligning the Text 9
Creating Two-Line Labels 9
Using Clip Art, Symbols, and Special Characters 9
Adding Symbols 9
Adding Clip Art 10
Adding Accented Characters 10
Inserting the Date and Time 10
Using Auto-Numbering 11
Deleting Auto-Numbering 11
Changing the Settings 11
Changing the Language 11
Setting the Label Width 11
Printing Options 11
Previewing Your Label Layout 11
Printing Multiple Labels 11
Using the Label Maker Memory 11
Saving a Label 11
Opening Saved Labels 12
Inserting Saved Text 12
Caring for Your Label Maker 12
Using the Label Maker with Your Computer 13
Installing DYMO Label Software 13
Connecting the Label Maker to your Computer 13
Using DYMO Label Software 14
Viewing the Label Maker Status 14
Troubleshooting 15
Documentation Feedback 16
Environmental Information 16
Safety Precautions for Lithium-Ion Rechargeable Battery Pack 17

text_image
DYSMO 1 2 24 23 22 21 20 19 18 1 2 3 4 5 6 7 8 9 0 Q W E R T Y U I O P A S D F G H J K L ,# 17 16 A↔a 15 3 4 5 6 7 8 9 10 11 12 13 14Figure 1 LabelManager 280 Label Maker
1 USB port
2 Power port
3 LCD display
4 Cutter
5 Italics
6 Underline
7 Vertical text
8 Print/Copies
9 Back
10 Save/Open
11 Numeric keys
12 Symbols
13 Backspace
14 Return
15 Space bar
16 Caps
17 Accented characters
18 Navigation
19 OK
20 New label/Clear
21 Menu
22 On/Off
23 Text size
24 Bold
About Your New Label Maker
With the DYMO® LabelManager® 280 electronic label maker, you can create a wide variety of high-quality, self-adhesive labels. You can choose to print your labels in several different fonts, text sizes, and text styles. The label maker uses DYMO D1 label cassettes in widths of 1/4", 3/8", or 1/2". These label cassettes are available in a wide range of colors.
Visit www.dymo.com for information on obtaining labels and accessories for your label maker.
Product Registration
Visit www.dymo.com/register to register your label maker online. During the registration process, you will need the serial number, which is located inside the back cover of the label maker.
Register your label maker to receive these benefits:
■ Notification of software upgrades by email
■ Special offers and new product announcements
Getting Started
Follow the steps in this section to print your first label.
Connecting the Power
The label maker is powered by a rechargeable, lithium-ion (Li-ion) battery pack. To save power, the label maker automatically turns off after two minutes of inactivity.
Remove the battery pack if the label maker will not be used for a long period of time.
Inserting the Battery Pack
The battery pack included with your label maker comes partially charged. For best performance, fully charge the battery as soon as possible.
⚠️ Make sure the charging adapter is disconnected before handling the Li-ion battery pack.
To insert the battery pack
1 Slide the battery compartment cover away from the label maker. See Figure 2.
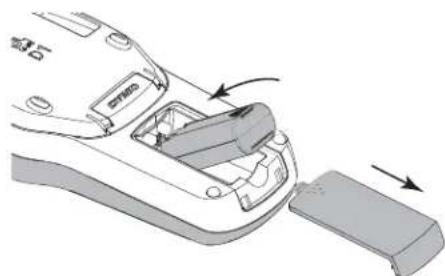
natural_image
Diagram of a car interior showing the door, handle, and side panel with arrows indicating movement (no text or symbols)Figure 2
2 Insert the battery pack into the battery compartment.
3 Replace the battery compartment cover.
Make sure to read the Li-ion Safety Precautions found on page 17.
Recharging the Battery Pack
A charging adapter is included with your label maker for recharging the battery pack. Charging the battery pack will take approximately three hours; however, after charging for about 10 minutes, the label maker can be used to print labels.
The charging adapter is only used for recharging the battery pack; the charging adapter cannot be used to power the label maker.
Use only the charging adapter that came with the label maker.
To recharge the battery pack
1 Plug the charging adapter into the power connector on the top of the label maker.
2 Plug the other end of the charging adapter into a power outlet. See Figure 3.

natural_image
Illustration of a DWO device with a plug inserted into a socket, showing wiring and power connection (no text or symbols)Figure 3
Make sure to read the Li-ion Safety Precautions found on page 17.
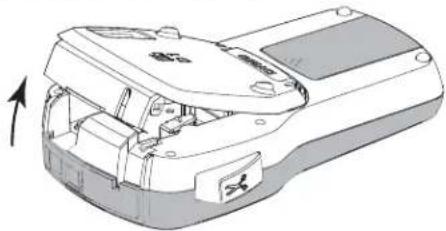
Removing the Battery
Remove the battery pack if the label maker will not be used for a long period of time.
Make sure the charging adapter is disconnected before handling the Li-ion battery pack.
To remove the battery
1 Unplug the charging adapter.
2 Slide the battery compartment cover away from the label maker. See Figure 2.
3 Remove the battery from the battery compartment.
Make sure to read the Li-ion Safety Precautions found on page 17.
Inserting the Label Cassette
Your label maker comes with a starter label cassette. The label maker uses DYMO D1 label cassettes in widths of 1/4", 3/8", or 1/2". Visit www.dymo.com for information about purchasing additional label cassettes.
To insert the label cassette
1 Lift the label cassette cover to open the label compartment. See Figure 4.
natural_image
Technical line drawing of a mechanical device with internal components and an arrow indicating rotation (no text or symbols)Figure 4
2 Make sure the tape and ribbon are taut across the mouth of the cassette and that the tape passes between the label guides. See Figure 5.
If necessary, turn the ribbon rewind spool clockwise to tighten the ribbon.

text_image
Ribbon rewind spool Label guidesFigure 5
3 Insert the cassette and press firmly until cassette clicks into place. See Figure 6.
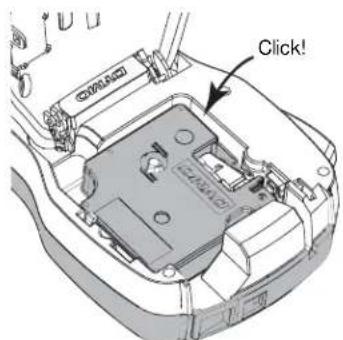
text_image
Click!Figure 6
4 Close the label cassette cover.
Using the Label Maker for the First Time
The first time you turn on the power, you are asked to select the language and label width. These selections remain set until you change them.
You can change these selections by pressing then selecting.

To set up the label maker
1 Press to turn on the power.
2 Select the language and press .OK
3 Select the width of the label cassette currently in the label maker and press OK
Each time you insert a label cassette into the label maker, you are prompted to set the label width so the label maker knows what size label you are currently using.
You are now ready to print your first label.
To print a label
1 Using the keyboard, enter text to create a simple label.
2 Press . [the label prints.
3 Press the cutter button to cut the label.
4 Remove the backing from the label to expose the adhesive, and then attach the label.
Congratulations! You have printed your first label. Continue reading to learn more about the features available for creating labels.
Getting to Know the Label Maker
Become familiar with the location of the feature and function keys on your label maker. Refer to Figure 1 on page 4. The following sections describe each feature in detail.
Power
The button turns the power on and off. After two minutes of inactivity, the power is switched off automatically.
When the power is switched off either manually or automatically, the label text and style settings for the last label are remembered and displayed when the power is turned back on.
LCD Display
With DYMO's exclusive graphical display, most of the formatting you add is visible instantly.
Feature indicators along the top and side of the LCD display appear in black to indicate when a feature is selected.
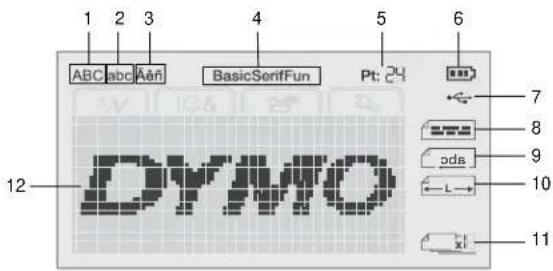
text_image
1 2 3 4 5 6 ABC abc Aen BasicSerifFun Pt: 24 7 8 9 10 11 12 DYMO1 Uppercase
7 USB connected
2 Lowercase
8 Text alignment
3 Accented character
9 Mirror text
4 Font
10 Fixed-length label
5 Text size
11 Auto-numbering
6 Battery indicator
12 Edit area
Navigation Keys
You can navigate through menu selections using the navigation keys: <, >and . You then press to OK make a selection. You can also review and edit your label using the navigation keys.
Cancel
Pressing exits a menu without making a selection.
Backspace
Pressing ◆ X moves the character to the left of the cursor.
Caps Mode
Pressing Aoggles capitalization on or off. When Caps mode is on, all letters that you enter are capitalized. The default setting is Caps mode on. When Caps mode is off, all letters appear in lowercase.
New Label/Clear
The key gives you the option to clear the label text and keep the formatting, or to clear both the text and the formatting.
Text Size
Pressing AChanges the size of the label text, the current text size is displayed on the LCD display.
Format Keys
Pressing B, or toggles bold, italic, and underline on or off.
Vertical Text
Pressing ABC
toggles
vertical text on or off.
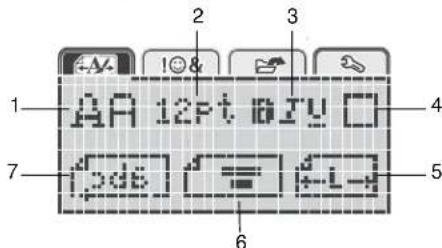
Menu
Pressing displays the Format, Insert, Open, and Settings tabs. Use the options on these tabs to change the label appearance, insert clip art and symbols, open saved text and labels, and change the printer settings.

text_image
1 2 3 4 ABC Basic Pt: 24 1 Format tab 3 Open tab 2 Insert tab 4 Settings tabFormatting Your Label
You can choose from several format options to enhance the appearance of your labels.
text_image
1 2 3 4 5 6 7 8 9 10 11 12 13 14 15 16 17 18 19 20 21 22 23 24 25 26 27 28 29 30 31 32 33 34 35 36 37 38 39 40 41 42 43 44 45 46 47 48 49 501 Font type
5 Label length
2 Text size
6 Text alignment
3 Text style
7 Mirror text
4 Borders
Changing the Font Type
Three font types are available for your labels:
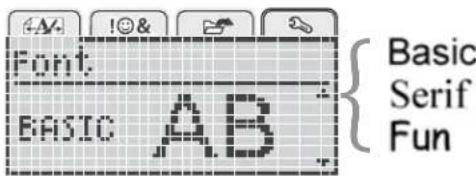
text_image
Font EASIC AB Basic Serif FunTo change the font type
1 Press [Menu], select [ ], and then press OK.
2 Select AA, and then press OK
3 Press /or tv select the font type, and then press OK.
Changing the Text Size
Six text sizes are available for your labels:
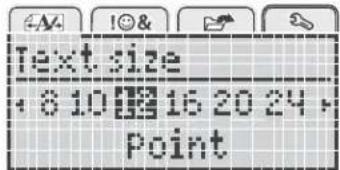
text_image
Text size 6 10 16 20 24 PointThe text sizes available depend on the label width you have selected.
For single-line labels:
Label Width
Text Size Available
1/4"
8, 10, 12 point
3/8"
8, 10, 12, 16, 20 point
1/2"
8, 10, 12, 16, 20, 24 point
For two-line labels:
Label Width
Text Size Available
3/8"
8, 10 point
1/2"
8, 10, 12 point
The text size applies to all characters on a label.
To change the text size
1 Press , select , and then press .
OK
2 Select the current text size, and then press .OK
3 Press or to select the text size, and then press OK
You can also quickly change the text size using the text size key, AAA
Changing the Text Style
You can choose from six text styles:
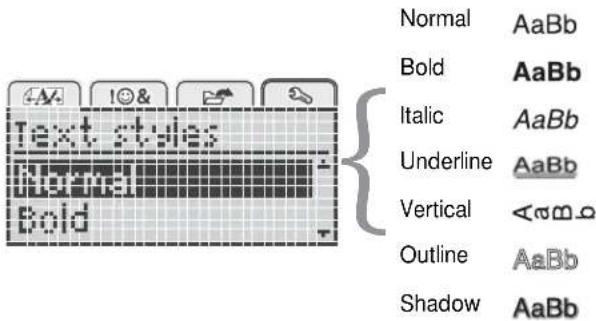
text_image
Text styles Normal Bold Normal Bold Normal Bold Bold Italic Underline Vertical Outline Shadow AaBb AaBb AaBb AaBb AaBb AaBbTo change the text style
1 Press , select , and then press .
OK
2 Select , and then press .
OK
3 Press ∅ to select the text style, and then press OK
You can also quickly apply a text style using the formatting keys, B, br. U
Some text styles can be combined. Use the formatting keys to combine styles.
When using underline on multi-line labels, each line is underlined.
Adding Borders
You can highlight the text by adding a border style.

text_image
Border ABC 123ABC 123
ABC 123
ABC 123
ABC 123
ABC 123
ABC 123
ABC 123
ABC 123
To add a border
1 Press, select, and then press. OK
2 Select , and then press . OK
3 Press OK to select the border style, and then press OK.
When using borders on two-line labels, both lines are enclosed in one border.
Using Mirror Text
The mirror format allows you to print text which reads from right to left, as you would see the text in a mirror.

text_image
Mirror text [abc] [a+b]To apply mirror text
1 Press , select , and then press . OK
2 Select , and then press . OK
3 Press to select, and then press. OK
Creating Vertical Labels
You can print text with the text oriented so that you can read the label vertically.
To create a vertical label
1 Press ABC
2 Enter text.
3 Press to print.
The underline style will not print on a vertical label.
Creating Fixed-Length Labels
Normally, the length of the label is automatically determined by the length of the text. However, you can choose to set the length of the label for a specific application.
When you choose a fixed label length, the size of the label text is automatically adjusted to fit the label. If the text cannot be adjusted to fit within the fixed label length, a message is displayed and you are prompted to print a variable length label. You can choose a fixed length label between 1.5" and 15" long.
To set a fixed length
1 Press , select , and then press . OK
2 Select , and then press . OK
3 Press < or > to select Fixed.

text_image
Label length • 18:05 B:124 Press or to select the label length, or use the numeric keys to enter the label length.
5 Press OK
The fixed-length setting remains on until you change back to variable length.
Aligning the Text
You can align the text to print left or right justified on the label. The default alignment is centered.
Text alignment settings are only valid for fixed-length labels. Variable-length labels are always center aligned.

text_image
Text alignmentTo change the text alignment
1 Press , select , and then press . OK
2 Select , an then press . OK
3 Press or to select the text alignment, and then press OK.
Creating Two-Line Labels
You can print a maximum of two lines on a label. Only one line of text can be printed on 1/4" (6 mm) labels.
When printing a two-line vertical label, the second line of text will print to the right side of the first line.
To create a two-line label
1 Type the text for the first line and press .
2 Type the text for the second line.
3 Press 📄 to print.
Using Clip Art, Symbols, and Special Characters
Clip art, symbols, punctuation, and other special characters can be added to your labels.
Adding Symbols
The label maker supports the extended symbol set shown below.
| ? | ! | - | - | : |
| ' | " | , | . | ; |
| ' | i | ¿ | / | \ |
| & | @ | # | % | ‰ |
| | | ( | ) | { | } |
| [ | ] | ° | • | * |
| + | - | x | ÷ | √ |
| ^ | ~ | ≈ | = | ≠ |
| ± | < | > | ≤ | ≥ |
| € | £ | ∅ | ¥ | |
| © | ® | CE | TM | § |
| \frac{1}{3} | \frac{2}{3} | \frac{1}{8} | \frac{5}{8} | \frac{7}{8} |
| \frac{1}{4} | \frac{1}{2} | \frac{3}{4} | \frac{3}{8}$ | |
| 0 | 1 | 2 | 3 | 4 |
| 5 | 6 | 7 | 8 | 9 |
| 0 | 1 | 2 | 3 | 4 |
| 5 | 6 | 7 | 8 | 9 |
| α | β | γ | δ | ε |
| ζ | η | θ | ι | κ |
| λ | μ | ν | ξ | ο |
| π | ρ | σ | τ | υ |
| φ | χ | ψ | ω | |
| A | B | Γ | Δ | E |
| Z | H | Θ | Ι | K |
| Λ | M | N | ≡ | Ο |
| Π | P | Σ | Τ | Υ |
| Φ | X | Ψ | Ω |
To insert a symbol
1 Press select , and then press . OK
2 Select Symbols, and then press OK
3 Press the navigation keys to select a symbol.
4 Press to add the symbol to your label.
You can quickly add a symbol by pressing the .key.
Adding Clip Art
The label maker includes the clip art shown below.
 | ||||
| 10 | ||||
To insert clip art
1 Press [Menu], select [IO&], and then press OK.
2 Select Clip Art, and then press OK.
3 Press the navigation keys to select an image.
4 Press to add the image to your label.
Adding Accented Characters
The label maker supports the extended Latin character set. You can add accented characters in two ways:
■ Press and then the alpha character.
■ Press and hold the alpha character.
After pressing the alpha character, all of the available variations of that letter are displayed.
For example, if you press and hold the letter a, you will see a à â æ and so on through all the variations available.
To add accented characters
1 Press and hold an alpha character.
The accent variations for that character are displayed.
2 Press OK to select the character you want, and then press OK
Inserting the Date and Time
You can insert the current date and time on your label. The date and time format depends on the format you have selected in the label maker settings.
To set the date and time format
1 Press, select, and then press. OK
2 Select , and then press . OK
3 Select Notation, and then press OK.
4 Select the date or date and time format to use, and then press OK
To set the date
1 Press, select, and then press. OK
2 Select , and then press . OK
3 Select Set date, and then press OK.
4 Use the navigation keys to select the current day, month, and year.
5 Press, and then press twice to return to the edit area.
To set the time
1 Press, select, and then press. OK
2 Select , and then press . OK
3 Select Set time, and then press OK.
4 Use the navigation keys to select the current hour and minutes.
5 Press, and then press twice to return to the edit area.
To insert the date and time
1 Press Menu, select 1, and then press OK.
2 Select Date and Time, and then press OK.
The date and time are inserted on the label.
Using Auto-Numbering
You can print a series of up to 10 labels at a time using auto-numbering.
You can add numeric (0,1, 2...9), uppercase (A, B, C...Z), or lowercase (a, b, c...z) auto-numbering to your label.
Optionally, you can add text before and after the auto-numbering.
To auto-number your labels
1 Press Menu, select 10&, and then press OK.
2 Select Auto-numbering, and then press OK.
3 Select the auto-numbering type to use, and then press OK.
4 Use the navigation keys to select a start and end value, and then press OK
Auto-numbering is added to your label and the number of labels in the series is shown on the LCD display.

Deleting Auto-Numbering
Auto-numbering is entered on the label as one character.
To delete auto-numbering
1 Place the cursor at the end of the auto-numbering text on the display.
2 Press

Changing the Settings
Several options are available for customizing your label maker. You can choose the display language and set the width of the label.
Changing the Language
You can change the display language for the label maker so that you can work in a language that is most familiar to you.
To change the language
1 Press Menu, select 📋, and then press OK.
2 Select the current language, and then press .OK
3 Press OK to select the desired language, and then press OK
Setting the Label Width
Each time you insert a label cassette into the label maker, you are prompted to set the label width so the label maker knows what size label you are currently using.
Some of the features available for designing labels depend on the width of the label. You can change the label width setting at any time, regardless of what label cassette is actually inserted in the label maker.
To change the label width setting
1 Press Menu, select 📋, and then press OK.
2 Select the current label width, and then press .OK
3 Press to select the desired label width, and then press OK
Printing Options
You can preview your label layout or print multiple copies.
Previewing Your Label Layout
You can preview the size and layout of your label prior to printing.
To preview your label layout
▶ Press and hold for a few seconds.
The label length, width, and layout information are displayed.
Printing Multiple Labels
You can print up to ten copies of a label.
To print multiple labels
1 Press and hold for a few seconds.
2 Press OK to select the number of copies to print, and press OK
When printing is finished, the number of copies to print returns to the default value of 1.
Using the Label Maker Memory
The label maker has a powerful memory feature that allows you to save the text of up to nine frequently used labels. You can recall saved labels, and you can also insert saved text into the current label.
Saving a Label
You can save up to nine frequently used labels. When you save a label, the text and any formatting are saved.
To save the current label
1 Press The first available memory location is displayed.
2 Use the navigation keys to move through the locations.
You can store a new label in any of the memory locations.
3 Select a memory location, and then press .OK
Your label is saved and you are returned to the label.
Opening Saved Labels
You can easily open labels that are saved in memory.
To open saved labels
1 Do one of the following:
- Press and hold for a few seconds.
- Press and then select .
The first memory location is displayed.
2 Press OK to select a label, and then press . OK
The selected label is opened in the edit area.
Inserting Saved Text
You can insert the text of a saved label into the current label. Only the saved text is inserted, not the formatting.
To insert saved text
1 Position the cursor at the location in the label where you want to insert the text.
2 Press , select , and then press . OK
3 Press or V to select Saved text, and then press OK.
The first memory location is displayed.
4 Press ok to select the text to insert, and then press OK.
The text is inserted in the current label.
Caring for Your Label Maker
Your label maker is designed to give you long and trouble-free service, while requiring very little maintenance.
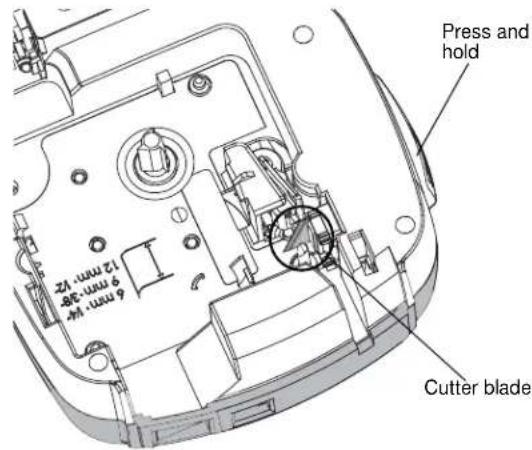
Clean your label maker from time to time to keep it working properly. Clean the cutter blade each time you replace the label cassette.
To clean the cutter blade
1 Remove the label cassette.
2 Press and hold the cutter button to expose the cutter blade. See Figure 7.
text_image
Press and hold 6 mm x 4 9 mm x 28 12 mm x 2 Cutter bladeFigure 7
3 Use a cotton swab and alcohol to clean both sides of the blade.
The cutter blade is extremely sharp. Use caution when cleaning.
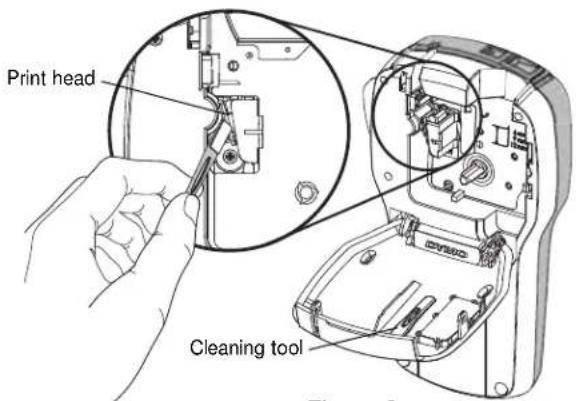
To clean the print head
1 Remove the label cassette.
2 Remove the cleaning tool from inside the label compartment cover. See Figure 8.
If you do not have a cleaning tool, contact DYMO Customer Care (http://support.dymo.com).
3 Gently wipe the padded side of the tool across the print head. See Figure 8.
text_image
Print head Cleaning toolFigure 8
Using the Label Maker with Your Computer
The label maker can be used as a standalone label printer or you can print labels directly from your computer using the latest version of DYMO Label™ software.
Installing DYMO Label Software
Do not connect the label maker to your computer until prompted by the software installer.
To install the software on a Windows® system
1 Download the latest version of DYMO Label software from LM280.dymo.com.
2 Close all open Microsoft Office applications.
3 Double-click the Installer icon.
After a few seconds, the installation screen appears.
4 Click Install and follow the instructions in the installer.
To install the software on a Mac OS® system
1 Download the latest version of DYMO Label software from LM280.dymo.com.
2 Double-click the Installer icon and follow the on-screen instructions.
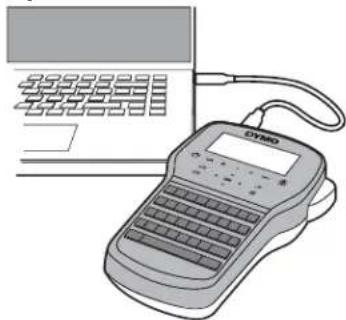
Connecting the Label Maker to your Computer The label maker connects to your computer using the USB connection located on the top of the label maker.
Do not connect the label maker to your computer until prompted by the software installer.
natural_image
Illustration of a digital payment terminal with a keyboard and connected tubing (no text or symbols visible)Figure 9
To connect the label maker to your computer
1 Plug the USB cable into the USB port on the top of the label maker. See Figure 9.
2 Plug the other end of the USB cable into an available USB port on your computer.
3 Press to turn on the label maker.
4 If you have more than one DYMO label printer installed, do the following:
a Click the printer image in the DYMO Label software Print area.
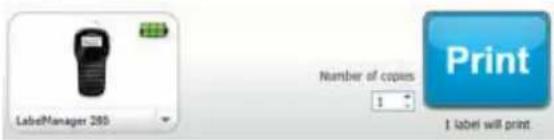
text_image
LabelManager 260 Number of copies 1 Print $ label will print.All of the label printers that are installed on your computer are displayed.
b Select the LabelManager 280 label maker.
You are now ready to print labels from DYMO Label software.
For more information, see Using DYMO Label Software on the next page.
Using DYMO Label Software
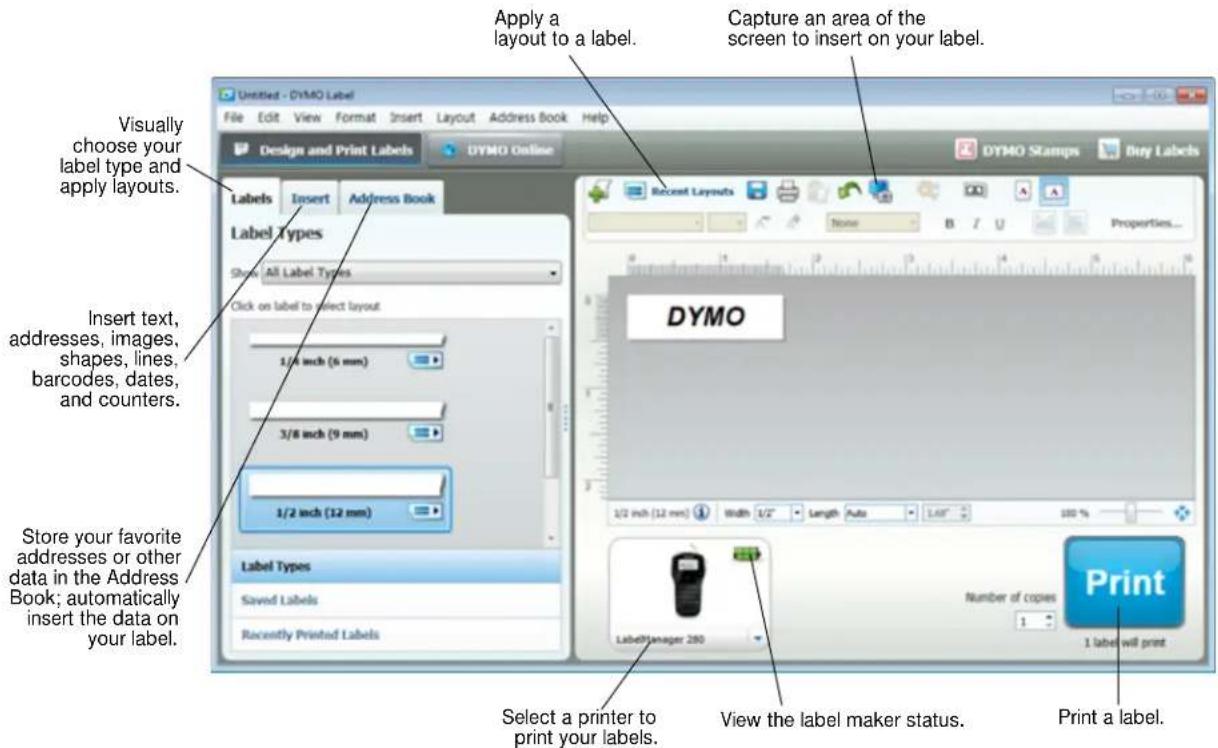
The following figure shows some of the major features available in DYMO Label software.
text_image
Apply a layout to a label. Capture an area of the screen to insert on your label. Visually choose your label type and apply layouts. Label Types Show: All Label Types Click on label to select layout 1/4 inch (6 mm) 3/8 inch (9 mm) 1/2 inch (12 mm) Store your favorite addresses or other data in the Address Book; automatically insert the data on your label. Select a printer to print your labels. View the label maker status. Print a label. DYSMO 1/2 inch (12 mm) Width 1/2" Length Auto 1.50" 100 % LabelManager 200 Number of copies 1 label will printFor complete details on using the software, refer to the online Help.
From the Help menu, you can view the following:
■ DYMO Label Help
■ DYMO Label User Guide
■ LabelManager 280 User Guide
Viewing the Label Maker Status
The label maker status is displayed in the DYMO Label software Print area. The following table describes the possible states of the label maker.
| Label maker is connected and battery pack is charging | |
| Label maker is connected and battery pack is charging; printing is not possible | |
| Label maker is connected and battery pack is not charging | |
| Label maker is connected and battery pack is not charging; printing is not possible | |
| Label maker is not connected or is turned off | |
| Label maker is connected and there is a problem with the battery pack |
Troubleshooting
Review the following possible solutions if you encounter a problem while using your label maker.
| Problem/Error Message Solution | |
| No display | ■ Ensure the label maker is turned on.■ Attach the charging adapter to the label maker to recharge the battery pack.See Recharging the Battery Pack. |
| Poor print quality | ■ Attach the charging adapter to the label maker to recharge the battery pack.See Recharging the Battery Pack.■ Clean the print head. See Caring for Your Label Maker.■ Ensure the label cassette is installed properly.■ Replace the label cassette. |
| Auto-numbering already inserted | ■ Auto-numbering already appears on the label and cannot be added more than once to the same label. |
| Battery Failure!Battery pack not inserted properly or damaged. | ■ Ensure the battery pack is inserted correctly. See Inserting the Battery Pack.■ Replace the battery pack. |
| Wait n minutesBattery Charging | ■ Allow the battery pack to recharge before unplugging the label maker. See Recharging the Battery Pack. |
| Too Many Characters!Exceeded maximum number of characters in the buffer. | ■ Delete some or all of the buffer text.■ Decrease the text size.■ Delete lines to fit on the label width.■ Insert a wider label cassette. |
| No label found.Insert label cartridge. | ■ Open the cassette compartment and insert a label cassette. See Inserting the Label Cassette. |
| Label jam!Motor is stalled due to label jam. | ■ Open the label cassette compartment and remove the cassette.■ Remove jammed label, clearing the jam.■ Clean the cutter blade. See Caring for Your Label Maker.■ Make sure the label passes smoothly through the label guides on the label cassette and that the label and ribbon are taut across the mouth of the cassette. See Inserting the Label Cassette. |
| Printing... | ■ No action required. Message disappears when printing is finished. |
| Print label with variable length?Label length exceeds fixed length. | ■ PresOKto print a variable length label.■ Delete some or all of the buffer text.■ Decrease the text size.■ Delete lines to fit on the label width.■ Insert a wider label cassette. |
| Too many lines for selected label width | ■ Delete some or all of the buffer text.■ Decrease the text size.■ Delete lines to fit on the label width.■ Insert a wider label cassette.■ Change to a variable length label. |
| Label Length Exceeds Fixed Length! | ■ Delete some text.■ Print the label using variable length. |
| Charge Battery! | ■ Attach the charging adapter to the label maker to recharge the battery pack.See Recharging the Battery Pack.■ Ensure the battery pack is inserted correctly. See Inserting the Battery Pack.■ Replace the battery pack. |
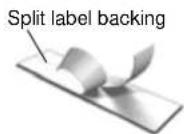
How do I remove the backing from the label? DYMO labels have an easy-to-peel split back.1 Locate the split on the label backing.2 Gently pinch the label lengthwise, folding toward the printed side of the label. The label backing will separate.3 Carefully peel away the backing from the label. 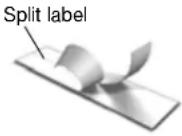 | |
If you need further assistance, visit the DYMO Web site at www.dymo.com.
Documentation Feedback
We are constantly working to produce the highest quality documentation for our products. We welcome your feedback.
Send us your comments or suggestions about our user guides. Please include the following information with your feedback:
■ Product name, model number, and User Guide page number
■ Brief description of instructions that are inaccurate or unclear, areas where more detail is needed, and so on We also welcome your suggestions about additional topics you would like to see covered in the documentation.
Send email messages to: documentation@dymo.com
Please keep in mind that this email address is only for documentation feedback. If you have a technical question, please contact Customer Support.
Environmental Information
The equipment that you have bought requires the extraction and use of natural resources for its production. It may contain substances that are hazardous to health and the environment.
In order to avoid the dissemination of those substances in our environment, and to diminish the pressure on natural resources, we encourage you to use the appropriate take-back systems. These systems will reuse or recycle most of the materials of your end-of-life equipment in an environmentally sound way.
The crossed-bin symbol marked on your device indicates you should use these systems.

If you need more information on the collection, reuse, and recycling of this product, please contact your local or regional waste administration.
You can also contact DYMO for more information on the environmental performance of our products.
Safety Precautions for Lithium-Ion Rechargeable Battery Pack
Inaccurate handling of a Lithium-ion rechargeable battery may cause leakage, heat, smoke, an explosion, or fire. This could cause deterioration of performance or failure. This may also damage the protection device installed in the battery pack. This could damage equipment or injure users. Thoroughly follow the instructions below.
While Charging the Battery Pack

DANGER
To reduce the risks associated with fire and explosion, which if not avoided, could result in serious injury or death:
■ Danger of explosion if a battery is incorrectly handled, charged, disposed or replaced. Replace only with the same or equivalent type recommended by DYMO.
■ When charging the battery, use dedicated chargers and follow the specified conditions.
■ Do not connect directly to an electric outlet or cigarette lighter charger.
■ Do not store the battery close to fire or at extremely high temperatures over 60^ C (for example, a vehicle, strong direct sunlight).
■ Do not short-circuit the batteries under any circumstances.
■ Never charge batteries near highly flammable objects.

WARNING
To reduce the risks associated with fire and explosion, which if not avoided, could result in serious injury or death and/or property damage:
■ Stop charging the battery if charging is not completed within the specified time.
■ Never leave the batteries unattended during charging. Do not attempt to charge a cell that is damaged.
- Immediately remove the battery from the device or battery charger and stop use if the battery gives off an odor, generates heat, becomes discolored or deformed, or in any way appears abnormal during use.

CAUTION
To reduce the risks associated with various hazards, which if not avoided, may result in minor or moderate injury and/or property damage:
■ Thoroughly read this document before charging the battery.
■ Lithium cells must be completely discharged before disposal.
■ Always dispose the batteries in a manner consistent with local, regional and national regulation.
■ Battery can only be charged within a temperature range of 0^ C\~ 45^ C.
While Discharging the Battery Pack

WARNING
To reduce the risks associated with fire and explosion, which if not avoided, could result in serious injury or death and/or property damage:
■ Use the battery only in the specified equipment.
- Do not discharge the battery close to fire or at extremely high temperatures over 60°C (for example, a vehicle, strong direct sunlight).

CAUTION
To reduce the risks associated with various hazards, which if not avoided, may result in minor or moderate injury and/or property damage:
■ Battery can only be used within a temperature rage of -20^ 60^ .