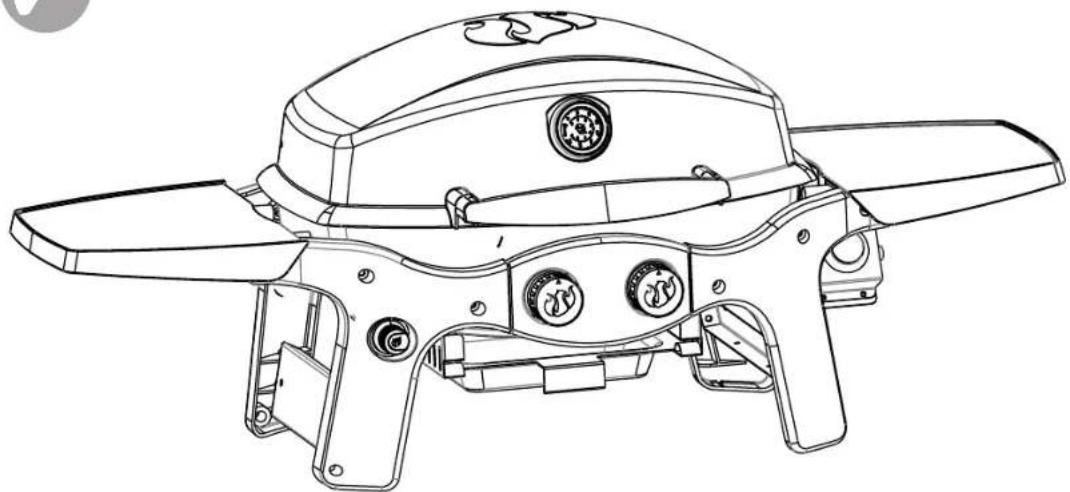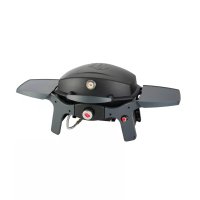
Pantera 42262 - Grill plate LANDMANN - Free user manual and instructions
Find the device manual for free Pantera 42262 LANDMANN in PDF.


User questions about Pantera 42262 LANDMANN
0 question about this device. Answer the ones you know or ask your own.
Ask a new question about this device
Download the instructions for your Grill plate in PDF format for free! Find your manual Pantera 42262 - LANDMANN and take your electronic device back in hand. On this page are published all the documents necessary for the use of your device. Pantera 42262 by LANDMANN.
USER MANUAL Pantera 42262 LANDMANN
natural_image
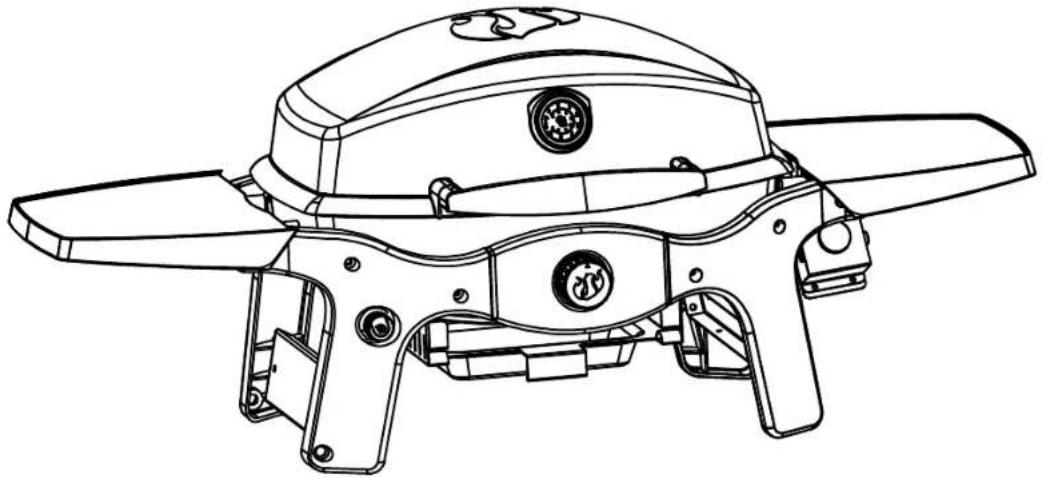
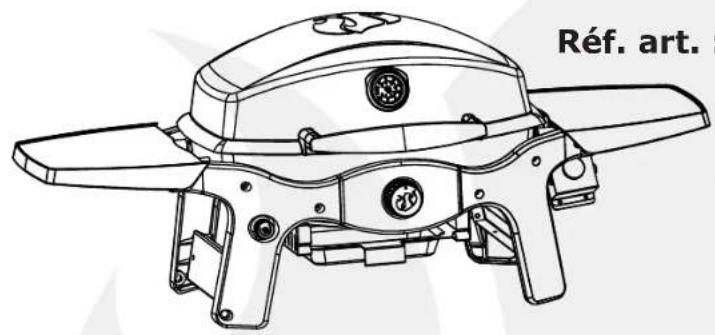
Line drawing of a mechanical device with no visible text or symbols on the component itself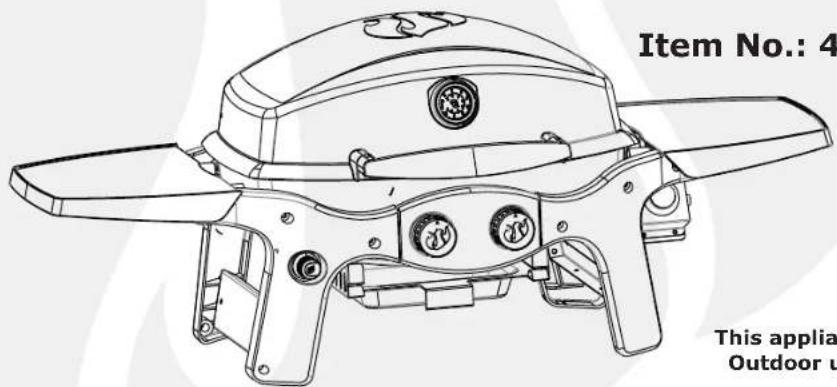
text_image
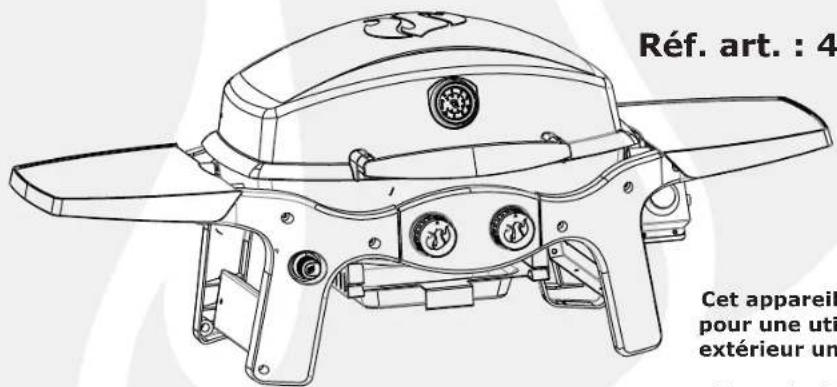
Item No.: 4 This applia Outdoor uThis appliance is for Outdoor use only.
This is not a commercial appliance.
ASSEMBLY, CARE AND USE INSTRUCTIONS READ CAREFULLY
IMPORTANT: RETAIN THESE INSTRUCTIONS FOR FUTURE REFERENCE

Pantera 1.0/2.0
MODEL 42262/ 42263
Questions, problems, missing parts? Before returning to your retailer, call our customer service department at: 1-800-321-3473 8:00 AM - 5:00 PM (EST) English Only, or Email CustomerService@landmann-usa.com
Table of Contents
Important Safety Information ....3-4
Liquid Propane (LP) Safety Information ....5
Package Contents....6-7
Preparation....8
Assembly Instructions....8-13
Connecting Gas Cylinder....14
Operation....14-15
Care and Maintenance....16
Cooking Methods and Grilling Tips....17
Troubleshooting and Replacement Parts.....18-22
Warranty 23
Technical Characteristics
42262 Heat Input: 12000BTU/H
42263 Heat Input: 6500BTU/H X 2
Category: Pressure regulated propane
Fuel: 16.4 OZ. disposable propane cylinders
Regulator: Landmann part #PT0068
Assembler/Installer
This instruction manual contains important information necessary for the proper assembly and safe use of this appliance. Read and follow all warnings and instructions before assembling and using this appliance.
Leave these instructions with the consumer.
Consumer/User
Follow all warnings and instructions when using this appliance.
Keep these instructions for future reference.

DANGER
If you smell gas:
- Shut off gas to the appliance.
- Extinguish any open flame.
- Open lid.
- If odor continues, keep away from the appliance and immediately call your gas supplier or your fire department.
- Failure to follow these instructions could result in explosion, or burn hazard which could cause property damage, personal injury or death.

WARNING
- DO NOT store or use gasoline or other flammable liquids or vapour in the vicinity of this or any other appliance.
- An LP (liquid propane) gas cylinder not connected for use should not be stored in the vicinity of this or any other appliance.
- This grill is FOR OUTDOOR USE only and shall not be used in a building, garage, under overhangs or any other enclosed area.
- DO NOT leave a lit grill unattended. Keep children and pets away from the grill at all times.
- This appliance is for Outdoor use only. This is not a commercial appliance.
Important Safety Information

Warnings and Cautions contained in this instruction manual may result in serious bodily injury or death, or may result in a fire or explosion causing damage to property.
- Make sure to follow all assembly instructions carefully. Improper assembly of this grill may be dangerous.
- NEVER use charcoal, lighter fluid, gasoline, kerosene or alcohol to ignite this grill.
- NEVER use charcoal briquettes or lighter fluid in a gas grill.
• DO NOT move grill while it is lit. - When igniting the grill or cooking, DO NOT lean over the open grill.
- Always open the grill lid slowly and carefully as heat trapped inside the grill can cause severe burns.
- DO NOT place hands or fingers at edge of the firebox and the lid when the lid is open or the grill is hot.
- Keep children and pets away from the grill when in use. Accessible parts may be very hot.
- DO NOT attempt to disconnect the gas regulator and hose assembly or any gas fitting while your grill is operating.
- Thisgrill SHOULD NOT be located under any overhead unprotected combustible construction. Always allow at least 24" from the top, bottom, back and 24" from the sides of the grill (see below).
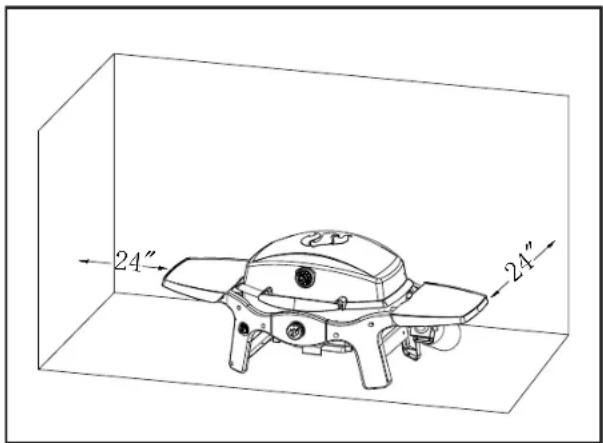
text_image
24" 24"- This grill is an outside appliance and SHOULD NOT be operated in a building, garage, or any other enclosed area.
- DO NOT obstruct the flow of combustion and
ventilation air. Keep the ventilation openings of the cylinder enclosure free and clear of debris.
- Should the burners go out while the grill is in operation, turn all gas valves off. Open the lid and wait five minutes before attempting to relight the grill, using the lighting instructions.
- Keep this grill clear and free from combustible material, gasoline and other flammable vapors and liquids.
- NEVER store an extra or disconnected liquid propane cylinder under or near this grill.
- Always use heat-resistant barbecue mitts or gloves when operating the grill.
- DO NOT leave a hot grill unattended or move it during operation.
- This grill is not intended to be used in or installed on recreational vehicles, boats, portable trailers, or in any moving location.
- DO NOT put a grill cover or anything flammable on the grill while the grill is in operation or is hot.
- Storage of an outdoor cooking gas appliance indoors is permissible only if the cylinder is disconnected and removed from the outdoor cooking gas appliance.
- When the grill is not in use, make sure the gas is turned • OFF at the supply cylinder.
- Cylinders must be stored outdoors and out of the reach of children. Cylinder must not be stored in a building, garage or other enclosed areas.
- Always inspect the gas supply metal hose before every use. If the metal hose shows any signs of abrasions or cuts, DO NOT use the grill. The metal hose must be replaced before using again.
- Always check the burners and venturi tubes for insects and insect nests. A clogged tube can lead to a fire beneath the grill.
- Always check the connections for leaks each time you connect and disconnect the LP gas supply cylinder.

The pressure regulator and metal hose assembly supplied with this grill must be used. Any requirements for a replacement regulator and metal hose assembly must be made through the manufacturer, LANDMANN-USA.
- DO NOT enlarge the valve orifices or burner ports when cleaning the valves or burners.
Important Safety Information
- If you see, smell or hear hissing of gas escaping from the LP gas cylinder, move away from the LP gas cylinder. DO NOT attempt to correct the problem yourself and call the fire department.
- If a grease fire occurs, turn • OFF the burner and leave the lid closed until the fire is out.
- DO NOT alter this grill in any manner. Any alteration automatically voids the warranty.
- DO NOT use the grill in high wind situations.
The LP gas supply cylinder to be used must be constructed and marked in accordance with the Specification for LP Gas Cylinders of the U.S. Department of Transportation (DOT) or the National Standard of Canada, CAN/CSB-b339 (Cylinders, Spheres, and Tubes for transportation of Dangerous Goods).

A fire causing death or serious injury may occur if the following is not followed exactly:
NEVER store or use gasoline or other volatile substances in the vicinity of this grill. NEVER store a spare propane cylinder in the vicinity of this grill, or in the vicinity of another potential heat source.

DO NOT store spare gas cylinder in or near grill.
Place dust cap on cylinder valve outlet whenever the cylinder is not in use. Install only the type of dust cap on cylinder valve outlet that is provided with the cylinder valve. Other types of caps or plugs may result in leakage of propane.
Portable LP gas grills require a fuel delivery system which is comprised of a regulator and an L.P. gas supply cylinder.
To avoid the possibility of tipping over the grill, NEVER place more than 5 pounds on the side table.
Be sure to tighten all hardware (screws, nuts, bolts, etc.) several times a year and before each grilling season
NEVER leave cooking food unattended. Continually observing the food will help in maintaining an even temperature, conserve fuel, improve the food's flavor and lessen flare-ups.
Set up for Grilling
- Release lid by undoing Velcro strap
- Install grease cup
- Attached propane cylinder
- Ready for grilling
Prepare for transporting
- Make sure grill is cool
- Remove propane cylinder
- Remove & clean grease cup
- Secure lid with Velcro strap
- Ready for transport
Caution: If transporting in a vehicle make sure to use plastic or a tarp underneath the grill in case of any grease or oil leaks.
State of California Proposition 65 Warnings

This product contains chemicals known to the State of California to cause cancer and birth defects or other reproductive harm.
Liquid Propane (LP) Safety Information
Please review the below guidelines and safety information when using Liquid Propane (LP) gas.
General Information
- This grill is design certified by ETL for use with 16.4 ounce disposable propane cylinders.
- This grill CANNOT be converted to natural gas. DO NOT attempt to convert this grill to a different gas type.
Safety Information
• LP gas has an odor similar to natural gas.
- LP gas is heavier than air and leaking gas may collect in low areas and resist dispersion.
- LP gas cylinders should not be dropped or handled roughly.
- DONOT use a damaged LP gas cylinder. A dented or rusty LP gas cylinder or an LP gas cylinder with a damaged valve which may be hazardous and should be replaced with a new cylinder immediately.
• ALWAYS close the cylinder valve after use.
- ALWAYS close the cylinder valve when disconnecting the regulator.
- ALWAYS treat possible empty LP gas cylinders with the same care as a full LP gas cylinder. There may still be gas pressure inside a possible empty LP gas cylinder.
- NEVER store or transport an LP gas cylinder where the temperature can reach 125° F (52° C).
- Keep LP gas cylinders away from children and pets.
- DO NOT store disconnected LP gas cylinders in a building, garage or other enclosed areas.
- If the LP gas cylinder is kept in the grill between uses, make sure to keep both the grill and the cylinder in an outdoor area with good ventilation.
- ALWAYS leak test the LP gas cylinder connection to the regulator when ever changing LP gas cylinders.
Important
The United States LP gas appliance installation must conform with local codes and ordinances. In the absence of local codes, appliance installation must conform with either the National Fuel Gas Code, ANSI Z223.1/NFPA54, Natural Gas and Propane Appliance code, CSA B149.1, or Propane Storage and Handling Code, B149.2, as applicable. For Canada, installation of this grill must comply with local codes and/or Standard CSA-B149.2 (Propane Storage and Handling Code).
42262 Package Contens
| Part Description Quantity | ||
| 1 Handle 1 | ||
| 2 Cooking | Grate 2 | |
| 3 Grill 1 | ||
| 4 Side Shelf 2 | ||
| 5 Control | Knob 1 | |
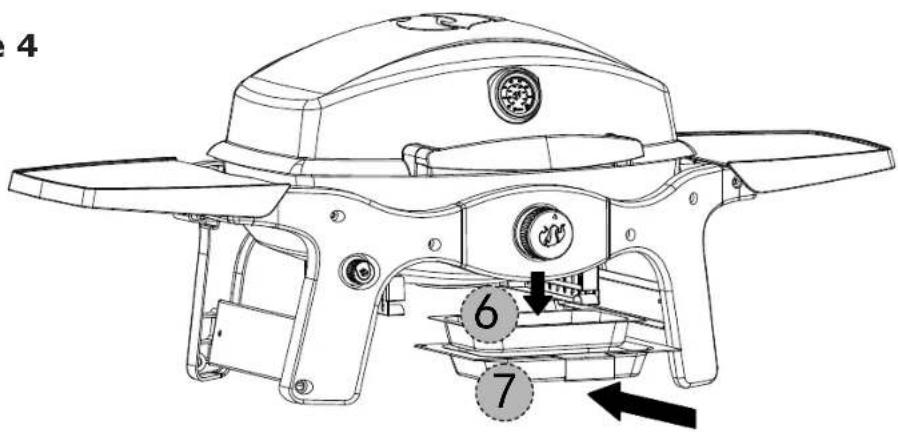
| 6 Aluminum Grease Tray Liner | 1 | |
| 7 | Grease Tray | 1 |
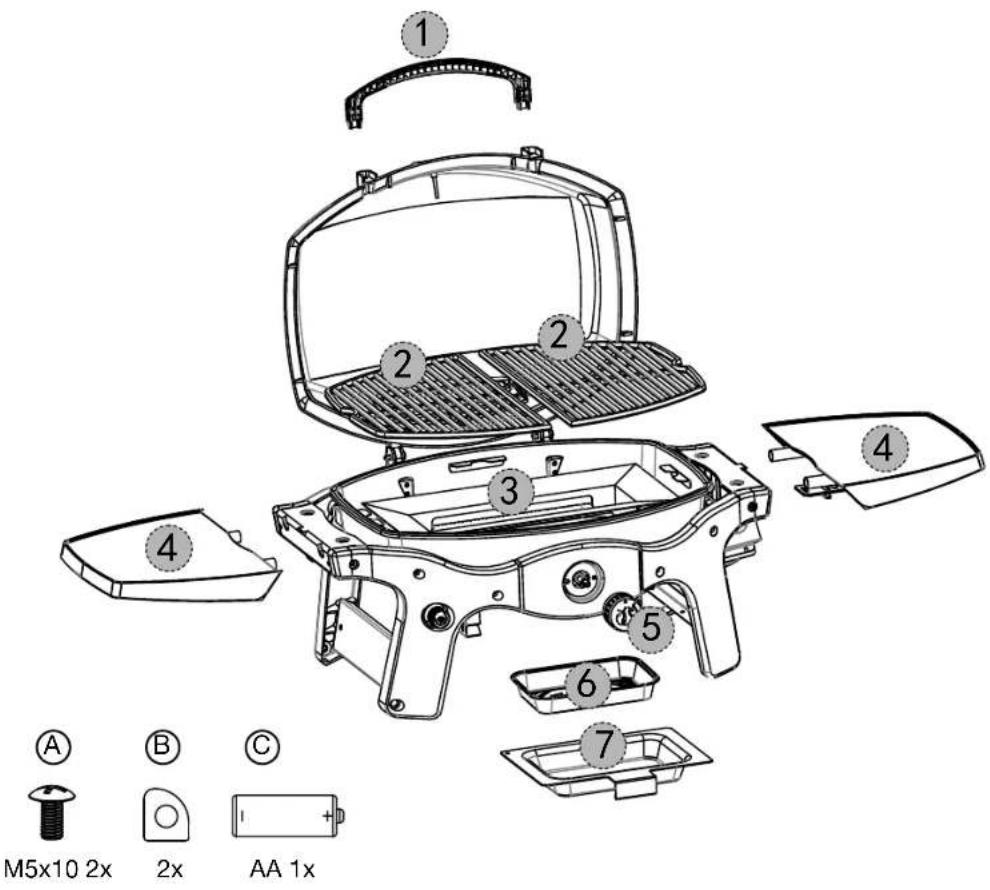
text_image
① ② ③ ④ ⑤ ⑥ ⑦ A B C M5x10 2x 2x AA 1x42263 Package Contens
| Part Description Quantity | ||
| 1 Handle 1 | ||
| 2 Warming rack 1 | ||
| 3 Cooking Grate 2 | ||
| 4 Grill 1 | ||
| 5 Side Shelf 2 | ||
| 6 Control Knob 2 | ||
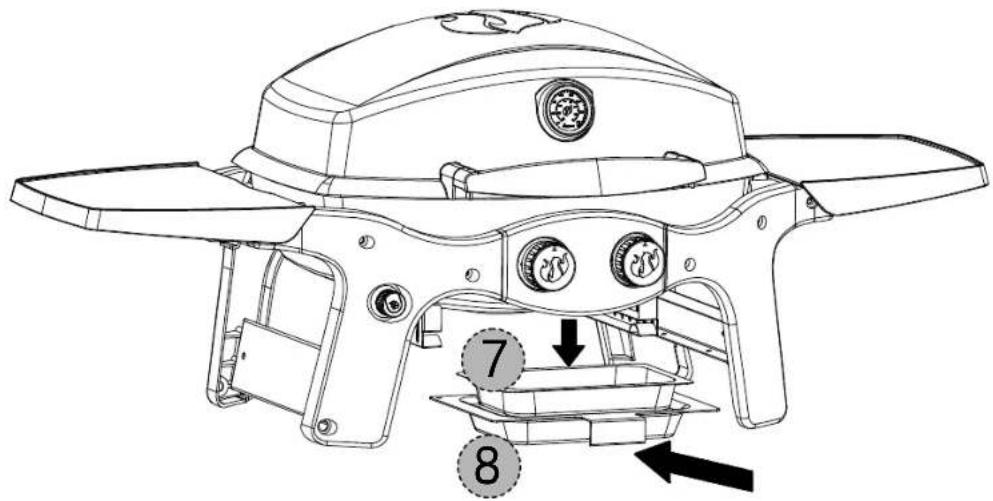
| 7 | Aluminum Grease Tray Liner | 1 |
| 8 | Grease Tray | 1 |
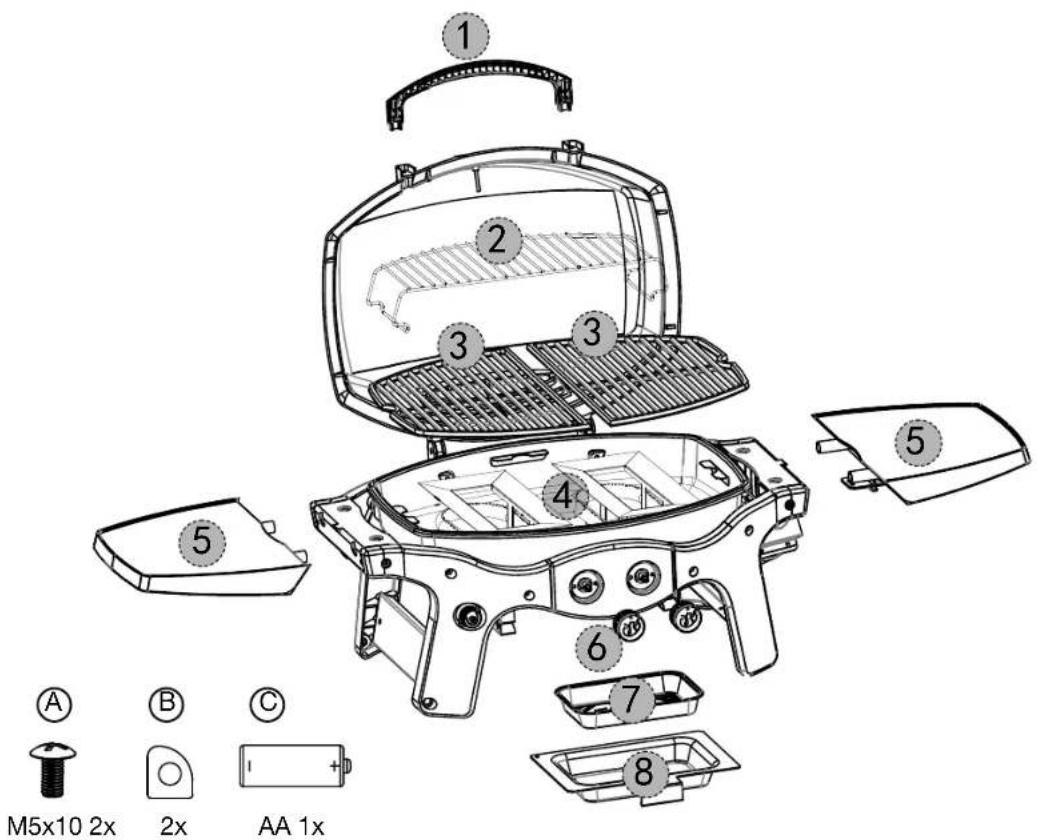
text_image
① ② ③ ④ ⑤ ⑥ ⑦ ⑧ ⑤ ① M5x10 2x ② 2x AA 1xPreparation
Before beginning assembly of this grill, please remove all packing material and verify that all of the assembly parts are included (see Package Contents on pages 6 and 7). If any part is missing or damaged, DO NOT attempt to assemble the product.
Estimated assembly time: A couple minutes.
Tools Needed: Phillips Head screw driver.
42262 Assembly Instructions
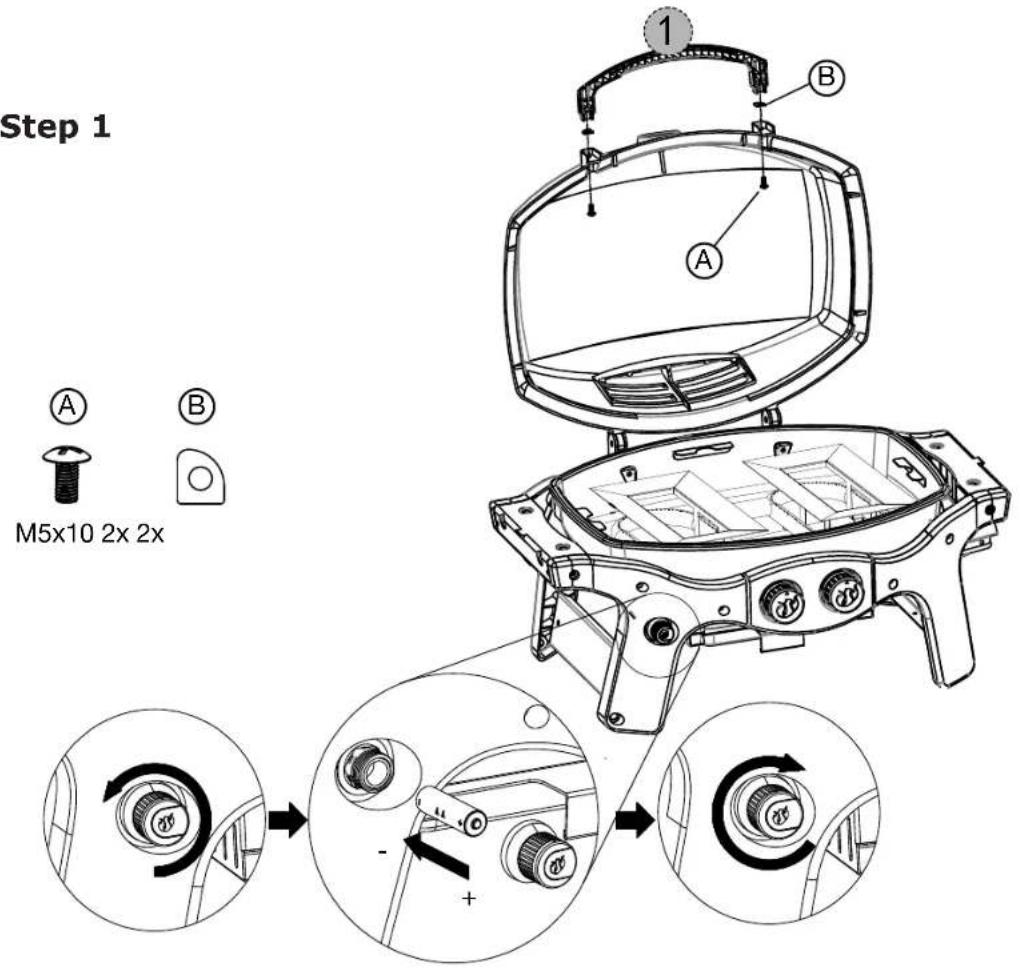
Step 1
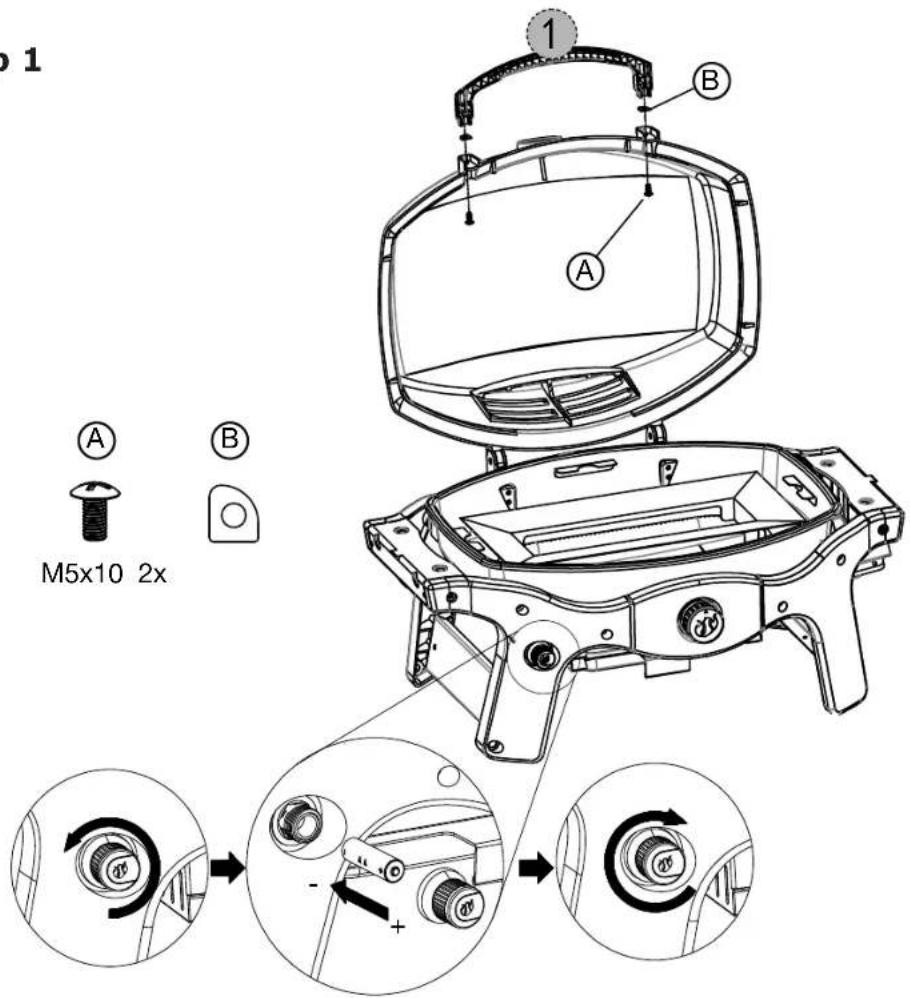
text_image
1 A B M5x10 2x42262 Assembly Instructions
Step 2
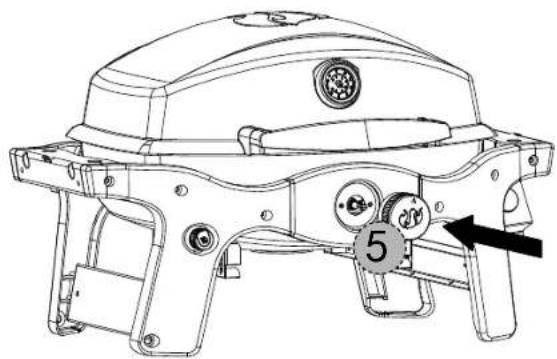
natural_image
Technical line drawing of a mechanical device with no visible text or symbolsStep 3
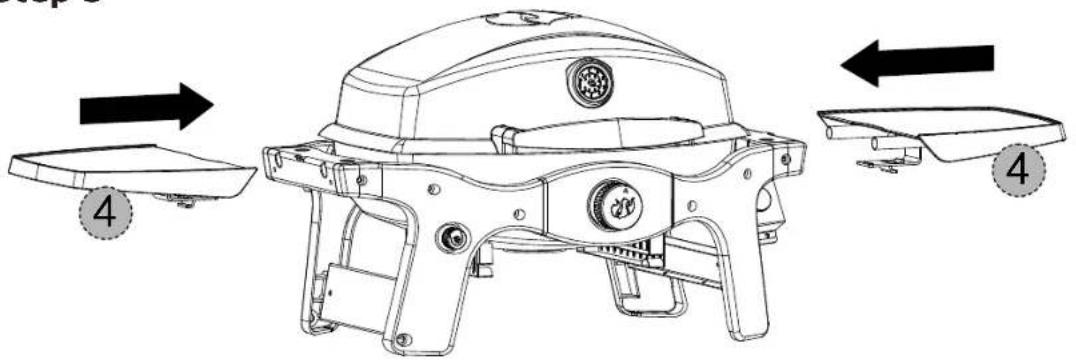
text_image
Technical diagram of a portable air purifier with labeled parts and directional arrows indicating assembly steps.Step 4
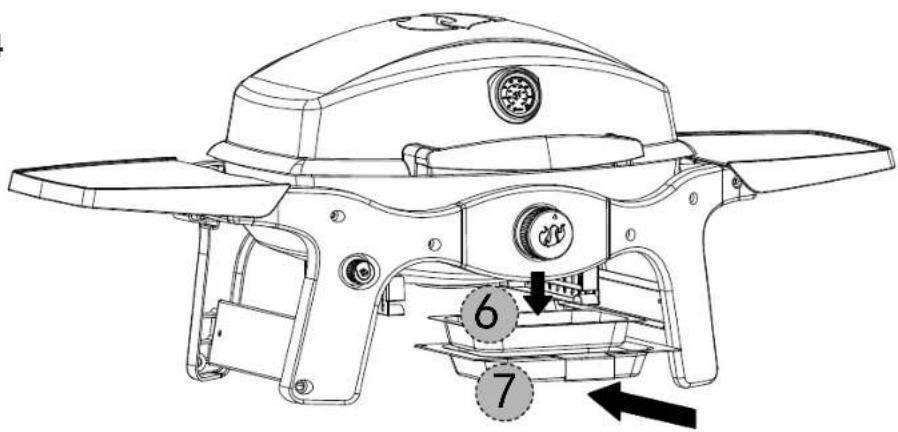
text_image
Technical diagram of a portable air purifier with labeled parts and directional arrows indicating components42262 Assembly Instructions
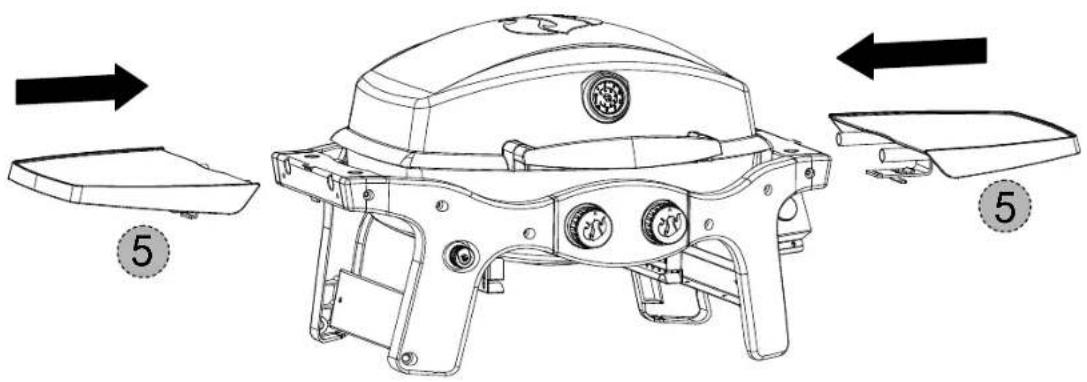
Step 5

text_image
5 2 2
natural_image
Line drawing of a mechanical device with multiple blades and mounting brackets (no text or symbols)42263 Assembly Instructions
text_image
Step 1 A B M5x10 2x 2x 1 B AStep 2
natural_image
Technical line drawing of a turbocharger housing with labeled components (no text or symbols beyond basic diagram)42263 Assembly Instructions
Step 3
text_image
Technical diagram of a portable electric vehicle with labeled parts and directional arrows indicating assembly or movement.Step 4
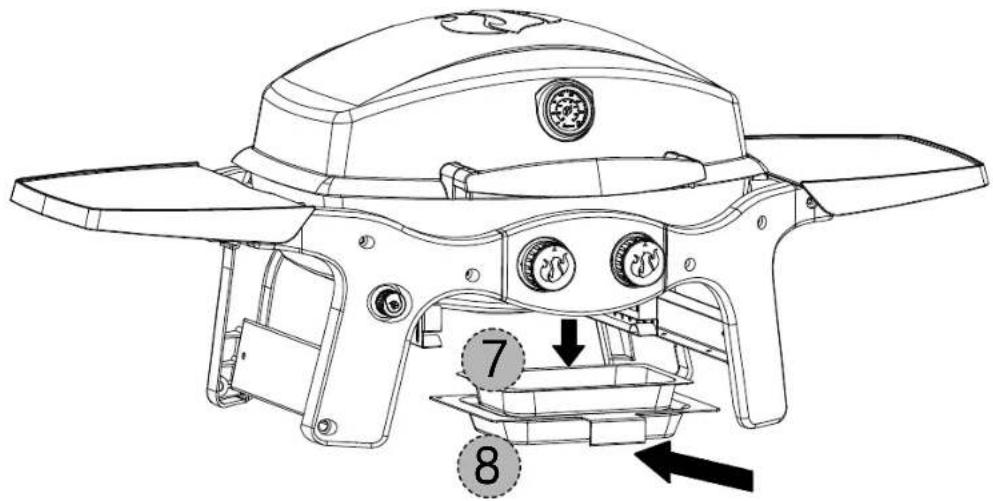
text_image
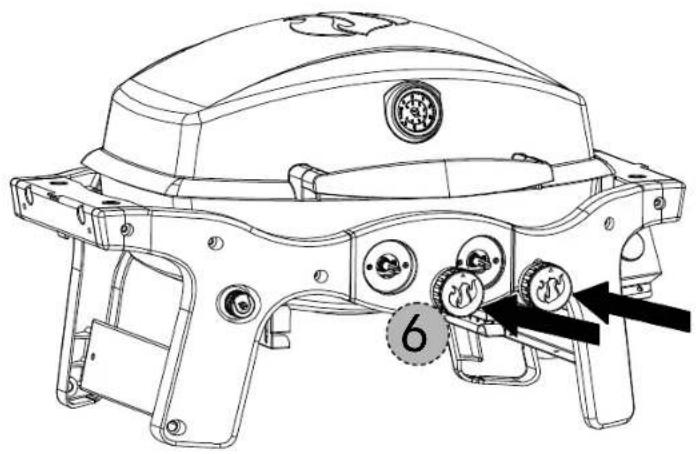
Technical diagram of a mechanical device with numbered components and directional arrows indicating assembly or movement.42263 Assembly Instructions
Step 5
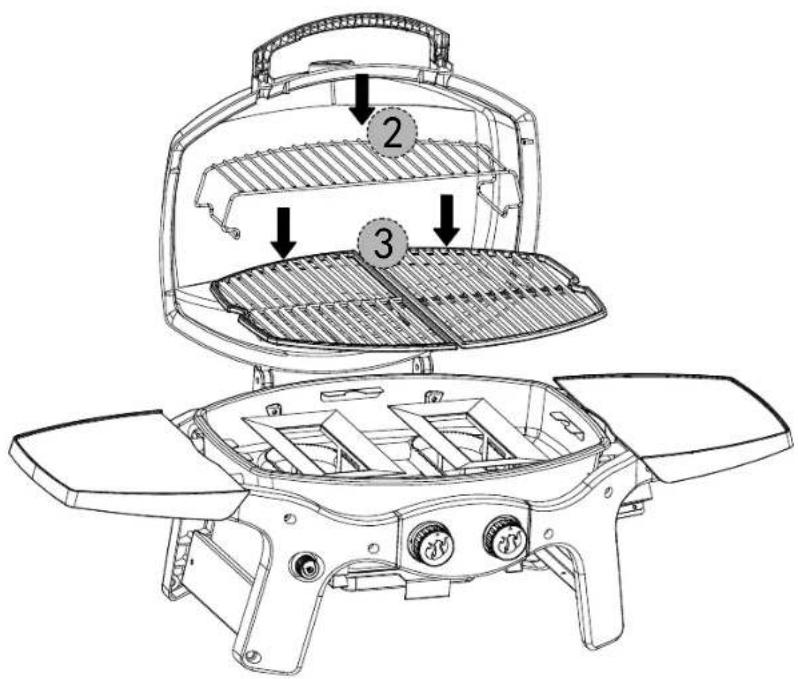
text_image
Technical diagram of a portable gas stove with labeled components and airflow arrows
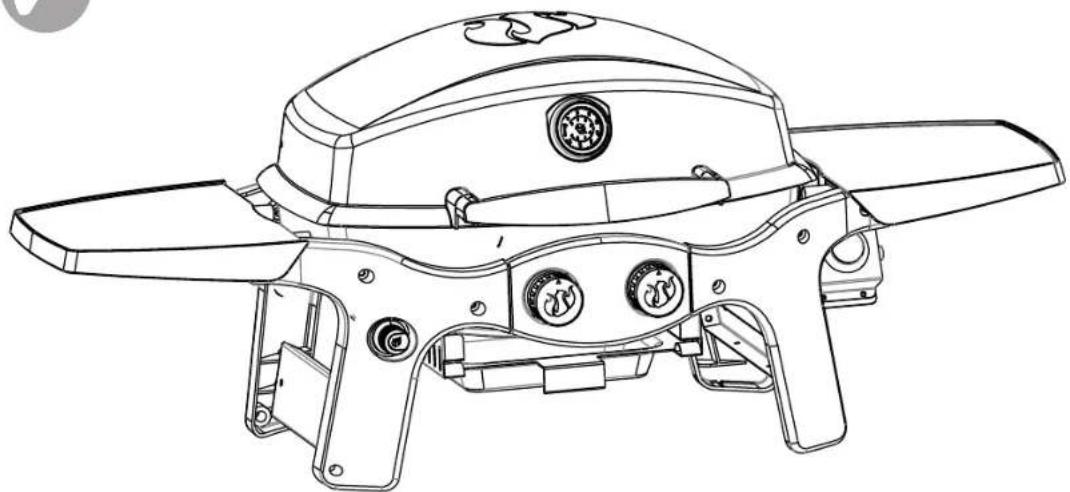
natural_image
Line drawing of a portable gas stove with control panel and fan (no text or symbols)Connecting Gas Cylinder Operation
Installing 16.4 ounce disposable propane cylinder
NOTE: Your portable Pantera is set up from factory to use a 16.4 ounce disposable propane cylinder.
Before attaching propane cylinder make sure the control knob is in the OFF position.
Remove plastic cap from top of propane cylinder and screw cylinder into regulator hand tight.
- Disconnect the propane cylinder from the regulator valve when the grill is not in use.
- DO NOT obstruct the flow of combustion air and ventilation air to the grill.
Use only the gas specified.
Keep the grill on a level surface.
Keep the grease cup empty at start up.

text_image
DANGERTo prevent fire or explosion hazard when testing for a leak:
- ALWAYS perform the 'leak test' before lighting the grill and each time the cylinder is connected for use.
- DO NOT smoke or allow other sources of ignition in the area while conducting a leak test.
- Conduct the leak test outdoors in a well-ventilated area.
- DO NOT use matches, lighters or a flame to check for leaks.
- DO NOT use grill until all leaks have been stopped. If you are unable to stop a leak, disconnect the propane supply, call for gas appliance service or your local propane gas supplier.
Checking for Leaks
- Make 2-3 oz. of leak solution by mixing one part liquid dishwashing soap with three parts water.
- Make sure the control knob is in the OFF position.
- Spray some solution on the tank valve up to the valve connection.
- Inspect the solution at the connections for bubbles. If no bubbles appear, the connection is secure.
- If bubbles appear, you have a leak. Go to step 6.
- Disconnect the regulator from the tank and reconnect. Make sure the connection is tight and secured.
- Retest with solution.
- If "growing" bubbles appear do not use or move the LP cylinder. Contact an LP gas supplier or your fire department!
Prior to the first use, it is important to clean your grill with heat. This will clean the internal parts by burning off any residue and odor from the manufacturing process. To perform this cleaning, operate the grill for approximately 15-20 minutes at the highest heat setting with the cooking lid closed.
IMPORTANT
Please read these instructions before attempting to light the grill.
| WARNING | Failure to follow the five-minute waiting period may result in an explosive flare-up, which can cause serious bodily injury or death. |
| WARNING | DO NOT lean over the open grill when lighting. |
lighting instruction
- Read all instruction before lighting.
- Open lid during lighting.
- Push in and turn the desired control knob to the HIGH position, then press and hold the electronic igniter button until the flame ignites.
- If ignition does not occur in 5 seconds, turn the burner control off, wait 5 minutes, and repeat the lighting procedure.
- To extinguish the burner, push in the control knob and turn clockwise to the OFF position.
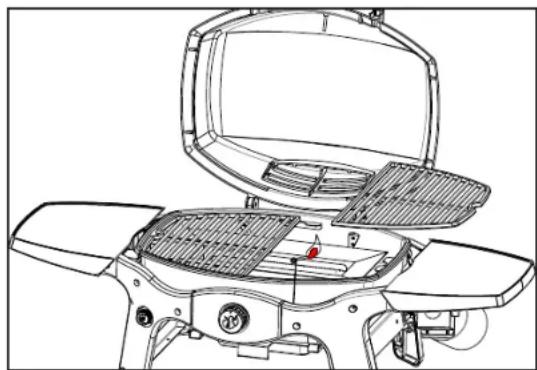
natural_image
Technical line drawing of a portable gas stove or grill with open lid and internal compartments (no text or symbols)Always remove gas cylinder and grease cup before transporting or storing grill.
Operation
WARNING
Failure to open the lid before igniting may result in an explosive flare-up, which can cause serious bodily injury or death.
Match Lighting
- Strike and place a long wooden match or use a long butane lighter and pass through the spaces in the cooking grates near the ports on the burner.
- Push and turn the control knob counterclockwise to the "Max" position.
- If ignition does not occur in 5 seconds, turn the burner control off, wait 5 minutes, and repeat the lighting procedure.
- To extinguish the burner, push in the control knob and turn clockwise to the OFF position.
Moving and Storage
Caution: A collision with the grill, as with any metal object, could cause injury. Use care when moving a portable gas grill.
Moving the grill:
DO NOT move the grill while it is lit or hot, or with objects on the cooking surface or side tables.
Remove propane cylinder.
Secure lid with velcro strap.
Clean and remove the grease tray before moving the grill to prevent spills.
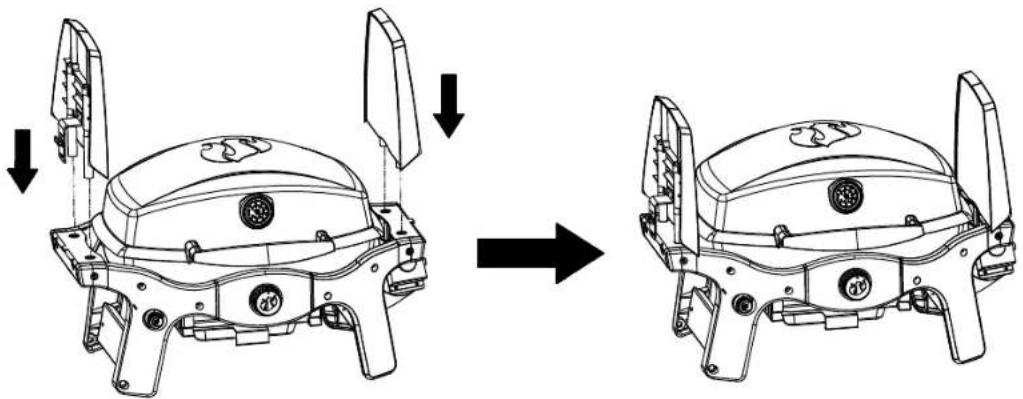
Move the side shelves to the upright position.
Move with the grill slowly, DO NOT run while moving the grill.
natural_image
Technical line drawing of a mechanical device before and after assembly, showing structural changes (no text or symbols)After moving the grill:
Check all gas connections for leaks that could occur from the movement. Check the venturi tube to be sure it is still over the orifice.
Steps to follow before storing grill:
Clean the grill, including the grease tray. For outdoor use only. If the grill is stored indoors, detach the cylinder outdoors. If left outdoors, remove the cylinder and cover the grill for protection from the weather. Grill covers may be purchased from a grill dealer or manufacturer.
Shutting Off the Grill
Caution: DO NOT touch hot grill parts with your bare hands! You must use protective gloves. Be certain the disposable cylinder is disconnected when the grill is placed in storage. Turn the control knob to OFF position.
Care and Maintenance
Please use the following guidelines to keep your grill clean and looking new. Before any cleaning, make sure the control knob is in the OFF position and grill is cool to the touch.
Cleaning the Outside of the Grill
Use a mild detergent and hot water solution to clean the outside of the grill. Clean thoroughly with the hot soapy water solution. Rinse with water and allow to completely dry.
Cleaning the Inside of the Grill
For safety and efficiency, it is important to remove any debris or excess grease that may accumulate inside the grill.

If using a bristle brush to clean cooking surfaces make sure no loose bristles remain on the cooking surface as they may attach to food.

Do not allow drippings or food residue to remain on the heat tents or grease tray. Clean regularly to ensure proper cooking performance.
- Wipe off the inner lid with a paper towel to prevent grease build up.
- For the stainless steel heat tents, clean residue off with wire brush or a flat scraper.
- Remove the grease cup and empty into a suitable container. Then wipe with a paper towel to remove excess grease.

DO NOT line firebowl or grease tray with aluminum foil.
Grease cup
The grease cup is located below the grill. Throw away the aluminum grease cup liner after each use and then replace it with a new one (Landmann item #42278).
Note: Allow the grease cup to cool before attempting to clean.
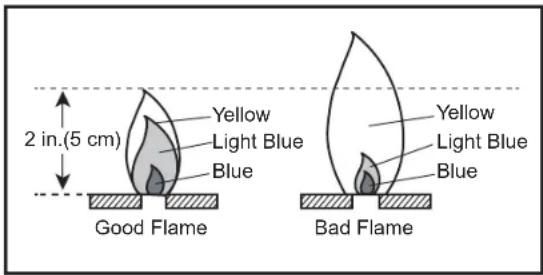
Checking the Flame
The flame coming out of the burner should be a blue /yellow combination and between one to two inches tall (see diagram above).
text_image
2 in.(5 cm) Yellow Light Blue Blue Good Flame Yellow Light Blue Blue Bad FlameTo Remove Burner
Make sure the control knob is in the OFF position.
- Remove the igniter wire from the igniter.
- Open grill lid and remove cooking grates.
- Using a 2 pt Phillips screwdriver, loosen the screws holding the burner in place. Note: This is a screw/ nut combination so make sure to hold the nut while removing the screw.
- Slide the burner out of the firebox.
To clean burner
- Make sure all burner ports are clear of any clogs. Tip: Use a pin or paper clip to unclog.
- Make sure the burner is free of any damage. If damage is found, replace the burner.
- Make sure the end of the burner and primary air screen are clear from insect nests, dirt, or debris.
Important: Do not leave the grill outside during inclement weather unless it is covered (cover sold separately). Rain water can collect inside of the grill, or in the drip tray if left uncovered. If the drip tray is not cleaned after use and the grill is left uncovered, the drip tray will fill with water causing grease and water to spill. We recommend cleaning and storing the drip tray after ever use.
Cooking Grates:
The cooking grates can be cleaned immediately after cooking is completed and after turning off the grill. Wear a barbecue mitt and scrub the cooking grates with a damp cloth. If the grill is allowed to cool down, cleaning the grates will be easier if removed from the grill and cleaned with a mild detergent.
Caution: All cleaning and maintenance should be done only when the grill is cool & with the fuel supply turned off at the cylinder. Disposable propane cylinders should be detached from the grill during cleaning.
Cooking Methods And Grilling Tips
Before Grilling
• Make sure that the food items are completely thawed before grilling.
- With the grill lid closed, heat the grill on high for 5-10 minutes.
• DO NOT lift the lid during the preheating process.
- The preheating process with high heat is necessary to brown and seal juices of the food.
- For high-fat meat and poultry, trim excess fat from meats and shorten the preheat time. Both will help reduce flare-ups from dripping grease.
- Lightly oil the cooking grates when cooking low-fat meat, fish or poultry. Beware that using too much oil can cause a gray ash to deposit on the food.
During Grilling
- The temperature gauge on the lid indicates the cooking temperature inside the grill.
- Turn foods only once if possible. Juices are lost when meat is turned several times.
- Turn meat just when the juices begin to appear on the surface.
- Avoid puncturing or cutting the meat to test doneness. This allows the juices to escape.
- Add sauces only during the last 10 minutes of cooking to avoid burning the sauce.
- The doneness of the meat will be controlled by the type of meat, the size, shape and thickness of the meat, the heat setting or method, and the length of time on the grill.
- Cooking time will be longer with an open grill hood.
- Allow for more cooking time on cold and windy days, or at higher altitudes. In reverse, allow for less cooking time in extremely hot weather.
- Grilling conditions may require adjustments of the burners to obtain and maintain the correct cooking temperatures.
- Use tongs for turning and handling meat instead of a fork, to avoid losing the meat juices.
- If a flare up occurs, turn the control knob to the OFF position and move the food to another area of the cooking grate. After flames subside, relight the burners using the lighting instruction in this manual.
• NEVER use water to extinguish flame on a gas grill.
Troubleshooting
| Problem Cause Solution | ||
| Grill will not light. | Propane cylinder gas level is low.Igniter battery is not properly installed or battery needs to be replaced.Spider webs or insect nest in venturi.Burner ports, orifices have blockage.“Match lighting” may be necessary.Connections to the igniter are loose.No spark shows at igniter tip. | Replace propane cylinder.Properly install or replace igniter bat-tery.Clean venturi.Clean the components.“Match lighting” light grill per this manu-al’s instructions.Reconnect or replace wiring to igniter.Replace igniter. |
| Flame will not stay lit. | Propane cylinder gas level is low.Burner is not properly installed or dirty. | Replace Propane cylinder.Reinstall burner properly and clean out any debris. |
| Flame is low, irregu-lar or noisy. | Propane cylinder gas level is low.Burner ports may be clogged.Grill may be in an area that is too windy.There are obstructions such as grease debris, or insects in air inlets. | Replace propane cylinder.Check and clean the burner ports.Wait until wind subsides to continue.Clean burner air inlets of obstructions. |
Excessive flare-ups DO NOT spray water on the gas flames- this could damage the grill DO NOT spray water on the gas flames- this could damage the grill | Flare-up are normally caused by ex- cessive fat from meat being grilled.Grill is dirty.The cooking temperature may be too high.Lid is closed.Food is overcooked or burnt.Firebox and grease cup are full of grease | Trim fat from meat being grilled.Make sure grill is clean.Keep flame on low.Keep the lid up when grilling to avoid excessive flare-ups.Move food to another area of the grill until flames subside.Clean firebox and grease cup. |
| Grill does not get hot enough. | Propane cylinder gas level is low. 1. Replace propane cylinder. | |
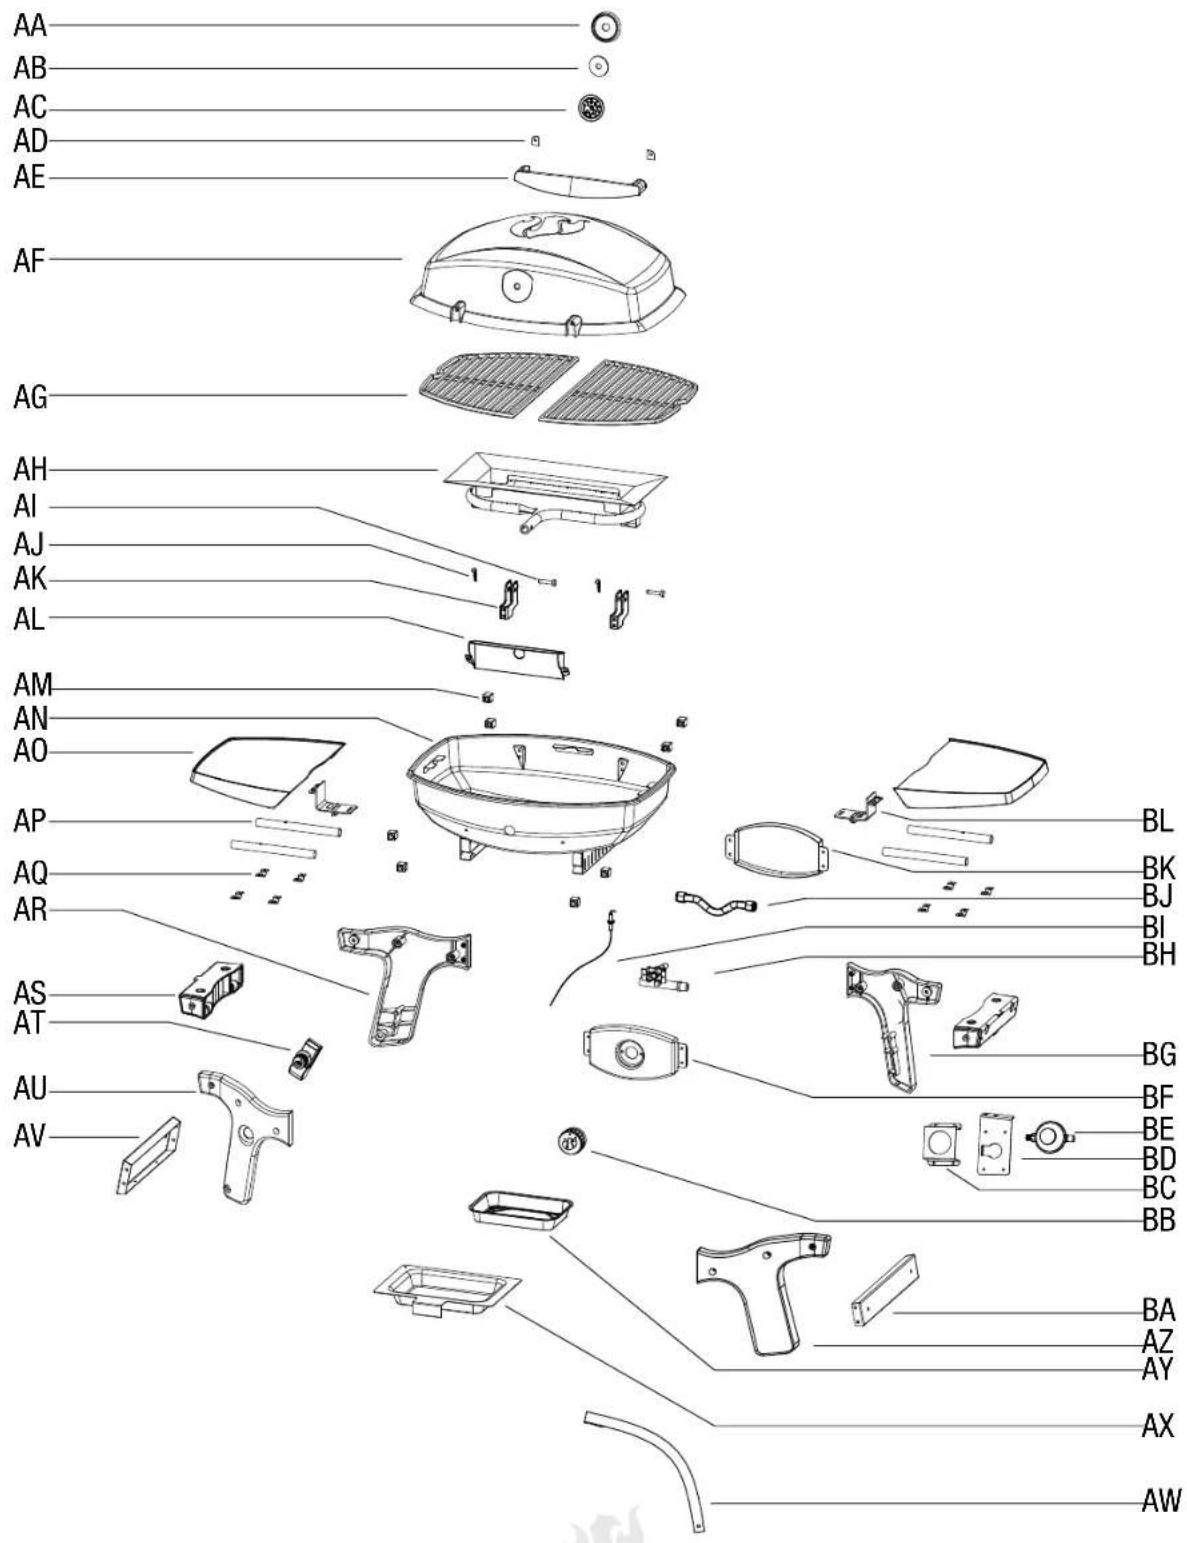
42262 Replacement Parts
text_image
AA AB AC AD AE AF AG AH AI AJ AK AL AM AN AO AP AQ AR AS AT AU AV BL BK BJ BI BH BG BF BE BD BC BB BA AZ AY AX AW42262 Replacement Part List
| Part | Description QTY Part # | ||
| AA T | Temperature Gauge Bezel | 1 PT0129 | |
| AB Insulating Spacer 1 PT0124 | |||
| AC T | Temperature Gauge 1 PT0046 | ||
| AD Lid Handle Spacer 2 PT0023 | |||
| AE Lid Handle 1 PT0003 | |||
| AF Grill Lid 1 PT0005 | |||
| AG Cooking Grate 2 PT0047 | |||
| AH Burner & Heat Tent Assy | 1 PT0048 | ||
| AI Lid Hinge Pin | 2 PT0130 | ||
| AJ Locking “R” Pin | 2 PT0131 | ||
| AK Lid Hinge Bracket | 2 PT0049 | ||
| AL Heat Shield 1 | PT0050 | ||
| AM Heat Insulated Pad | 8 PT0051 | ||
| AN Grill Firebowl 1 | PT0102 | ||
| AO Side Shelf | 2 PT0053 | ||
| AP Side Shelf Rod 4 | PT0054 | ||
| AQ Side Shelf Rod Bracket | 8 PT0055 | ||
| AR Left Rear Leg 1 | PT0056 | ||
| AS Top Brace 2 | PT0057 | ||
| AT Ignitor | 1 PT0058 | ||
| AU Left Front Leg 1 | PT0059 | ||
| AV Bottom Left Brace 1 | PT0060 | ||
| AW Grill Strap | 1 PT0061 | ||
| AX Grease Tray | 1 PT0062 | ||
| AY Aluminum Grease Tray Liner | 1 PT0063 | ||
| AZ Right Front Leg 1 | PT0064 | ||
| BA Bottom Right Brace 1 | PT0065 | ||
| BB Control Knob 1 | PC0145 | ||
| BC Regulator Bracket A 1 | PT0066 | ||
| BD Regulator Bracket B 1 PT0067 | |||
| Part | Description QTY Part # | ||
| BE | Regulator | 1 PT0068 | |
| BF | Control Panel | 1 PT0069 | |
| BG Right Rear Leg | 1 | PT0070 | |
| BH Manifold & Valve Assy | 1 | PT0071 | |
| BI | Electrode & Wire | 1 PT0100 | |
| BJ | Flex Tube | 1 PT0101 | |
| BK Back Panel 1 PT0072 | |||
| BL | Side Shelf Lock | 2 PT0073 | |
| Parts not shown | |||
| Instruction Manual | 1 PT0074 | ||
| Hardware Pack | 1 PT0075 | ||
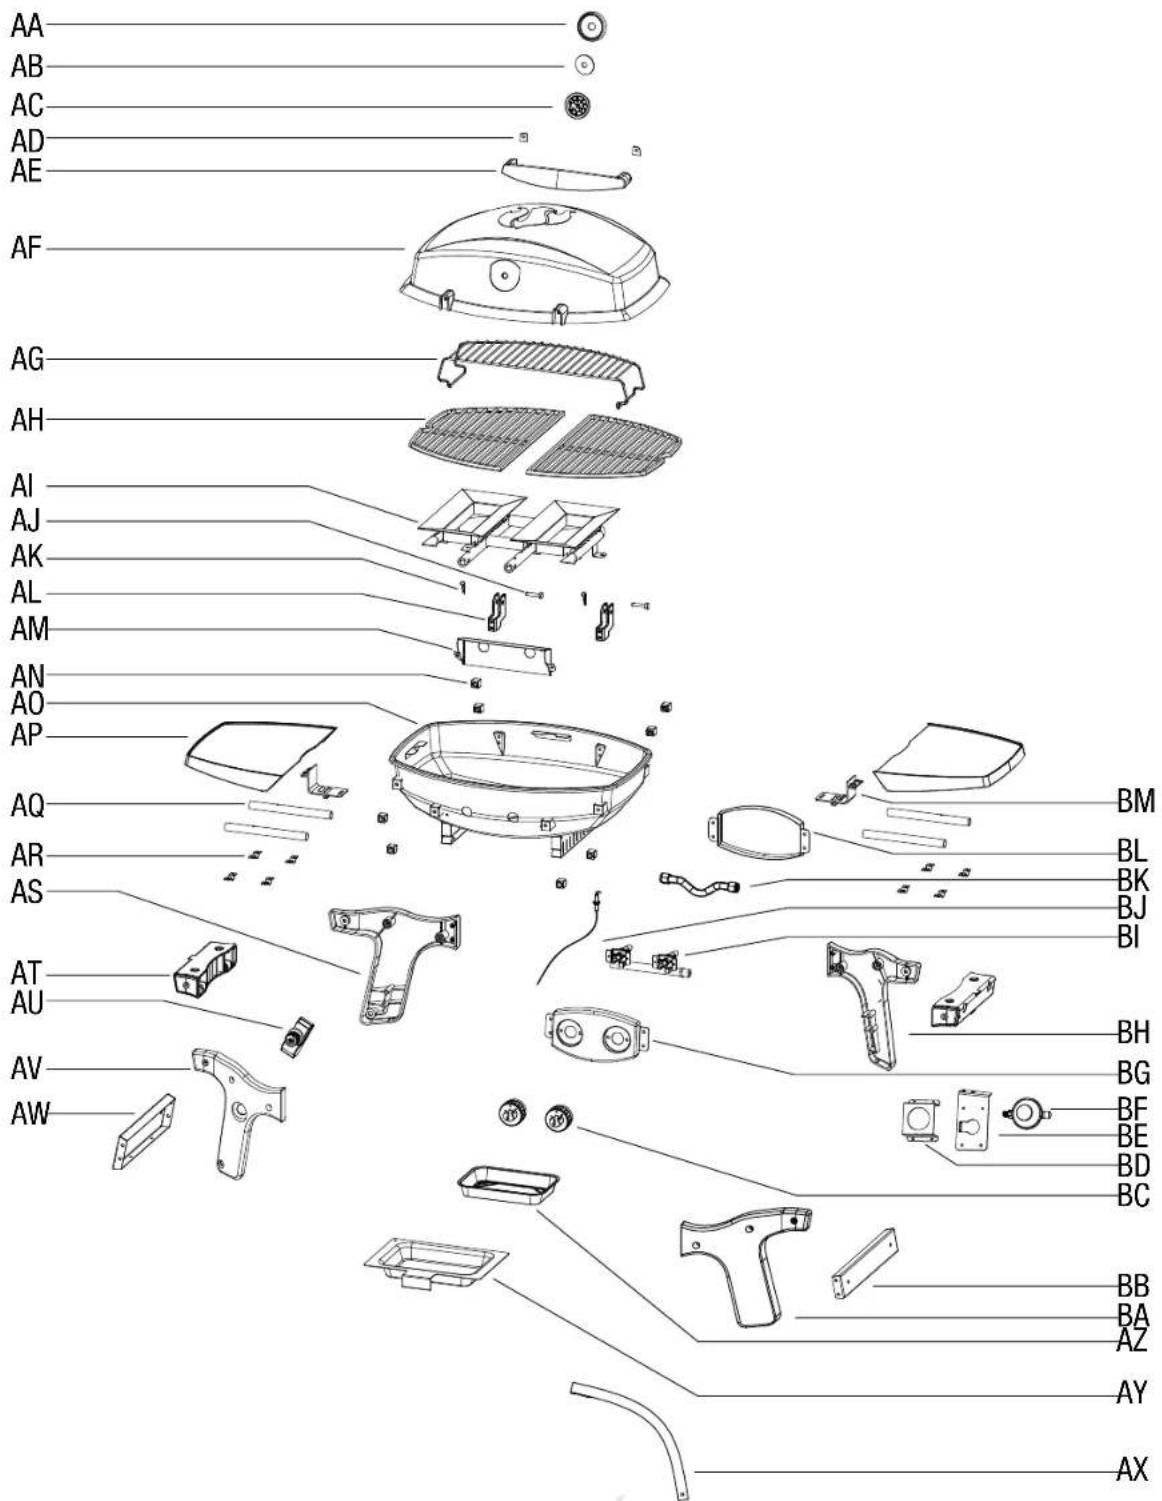
42263 Replacement Parts
text_image
AA AB AC AD AE AF AG AH AI AJ AK AL AM AN AO AP AQ AR AS AT AU AV AW BM BL BK BJ BI BH BG BF BE BD BC BB BA AZ AY AX42263 Replacement Part List
| Part | Description QTY Part # | ||
| AA T | Temperature Gauge Bezel | 1 PT0129 | |
| AB Insulating Spacer 1 PT0124 | |||
| AC T | Temperature Gauge 1 PT0046 | ||
| AD Lid Handle Spacer 2 PT0023 | |||
| AE Lid Handle 1 PT0003 | |||
| AF Grill Lid 1 PT0005 | |||
| AG W | Warming rack 1 PT0076 | ||
| AH Cooking Grate 2 | PT0047 | ||
| AI | Burner & Heat Tent Assy | 1 PT0125 | |
| AJ | Lid Hinge Pin | 2 PT0130 | |
| AK | Locking “R” Pin | 2 PT0131 | |
| AL Lid Hinge Bracket 2 | PT0049 | ||
| AM | Heat Shield | 1 PT0126 | |
| AN Heat Insulated Pad 8 | PT0051 | ||
| AO | Grill Firebowl | 1 PT0099 | |
| AP Side Shelf 2 | PT0053 | ||
| AQ | Side Shelf Rod | 4 PT0054 | |
| AR Side Shelf Rod Bracket 8 | PT0055 | ||
| AS Left Rear Leg 1 | PT0056 | ||
| AT | Top Brace | 2 PT0057 | |
| AU Ignitor 1 | PT0058 | ||
| AV Left Front Leg 1 | PT0059 | ||
| AW | Bottom Left Brace | 1 PT0060 | |
| AX | Grill Strap | 1 PT0061 | |
| AY Grease Tray 1 | PT0062 | ||
| AZ Aluminum Grease Tray Liner | 1 PT0063 | ||
| BA Right Front Leg 1 | PT0064 | ||
| BB Bottom Right Brace 1 | PT0065 | ||
| BC Control Knob 2 | PC0145 | ||
| BD Regulator Bracket A 1 | PT0066 | ||
| Part | Description QTY Part # | ||
| BE | Regulator Bracket B 1 | PT0067 | |
| BF | Regulator | 1 PT0068 | |
| BG Control Panel | 1 PT0127 | ||
| BH Right Rear Leg 1 PT0070 | |||
| BI | Manifold & Valve Assy | 1 PT0128 | |
| BJ | Electrode & Wire | 1 PT0100 | |
| BK Flex Tube | 1 PT0101 | ||
| BL | Back Panel 1 PT0072 | ||
| BM | Side Shelf Lock | 2 PT0073 | |
| Parts not shown | |||
| Instruction Manual | 1 PT0074 | ||
| Hardware Pack | 1 PT0075 | ||
Warranty
This Propane Gas Grill is warranted to be free of defects in material and workmanship when properly assembled, used in a normal outdoor setting and cared for as directed in these instructions for the below time periods from the date of the original retail purchase.
10 years - Lid
5 years - Cooking grates
2 years - All other parts
This warranty does not cover rust, fading, peeling damage or issues related to neglect, abuse, accident, misuse, misapplication, improper assembly, transportation damages, commercial use or ANY modifications made to this product.
Repair labor is not covered. This warranty is the only warranty offered and is in lieu of all other warranties, whether expressed or implied, which includes implied warranty, merchandising or use for a particular purpose.
All replacement parts that meet the warranty requirements will be shipped at no charge via the discretion of the manufacturer (ground shipments, US Mail, UPS or FedEx). Any special handling charges (i.e. Second Day, overnight, etc.) will be the responsibility of the consumer.
All warranty claims apply only to the original purchaser and require a proof of purchase verifying the purchase date. Do not return parts without first obtaining a return authorization number from our customer service department.
Our customer service department can be reached at 1-800-321-3473 8:00 AM - 5:00 PM (EST) English Only, or Email CustomerService@landmann-usa.com
Please note for the United States, that some state states do not allow the exclusion or limitation of incident or consequential damages or limitations on how long an implied warranty lasts, so the above limitations or exclusions may not apply to you. This warranty gives you specific legal rights and you may also have other legal rights which may vary from state to state.

LANDMANN®
Landmann USA, Inc.
7405 Graham Rd
Fairburn, Ga 302130
www.landmann-usa.com
LANDMANN®
natural_image
Line drawing of a mechanical device with no visible text or symbolsRéf. art. : 42262
natural_image
Line drawing of a futuristic vehicle inside a transparent enclosure, showing angular dimensions (24") with no text or symbols on the device itself.natural_image
Technical line drawing of a mechanical device with no visible text or symbolsÉtape 3

text_image
Technical diagram of a portable air purifier with labeled parts and directional arrows indicating assembly steps.Étape 4
text_image
4 6 7natural_image
Line drawing of a mechanical device with multiple blades and mounting brackets (no text or symbols)text_image
Technical diagram of a portable air purifier with labeled components and directional arrows indicating motion or movement.text_image
Technical diagram of a portable electric vehicle with labeled parts and directional arrows indicating assembly or maintenance.Étape 4
text_image
Technical diagram of a mechanical device with numbered components and directional arrows indicating assembly or movement.natural_image
Line drawing of a portable gas stove with control panel and fan (no text or symbols)natural_image
Technical line drawing of a portable electric guitar with open lid and internal compartments (no text or symbols)natural_image
Technical line drawing of a mechanical device before and after assembly, showing structural changes (no text or symbols)text_image
2 in.(5 cm) Yellow Light Blue Blue Good Flame Bad Flame Yellow Light Blue BlueRetirer le brûleur
text_image
AA AB AC AD AE AF AG AH AI AJ AK AL AM AN AO AP AQ AR AS AT AU AV BL BK BJ BI BH BG BF BE BD BC BB BA AZ AY AX AWnatural_image
Line drawing of a mechanical device with no visible text or symbolsN° de art.: 42262
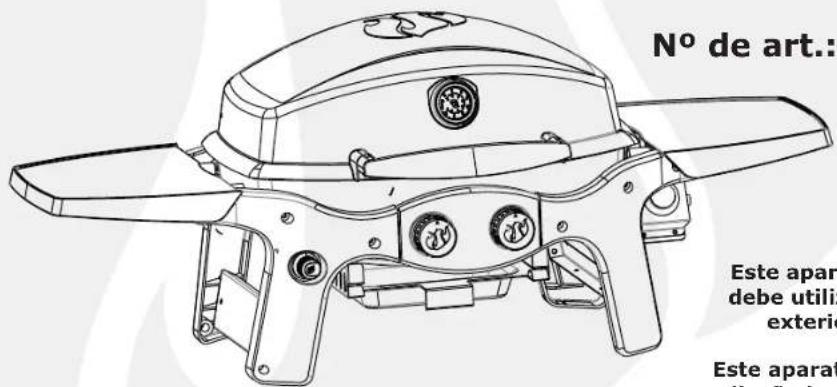
natural_image
Technical line drawing of a mechanical device with no visible text or symbolsPaso 3
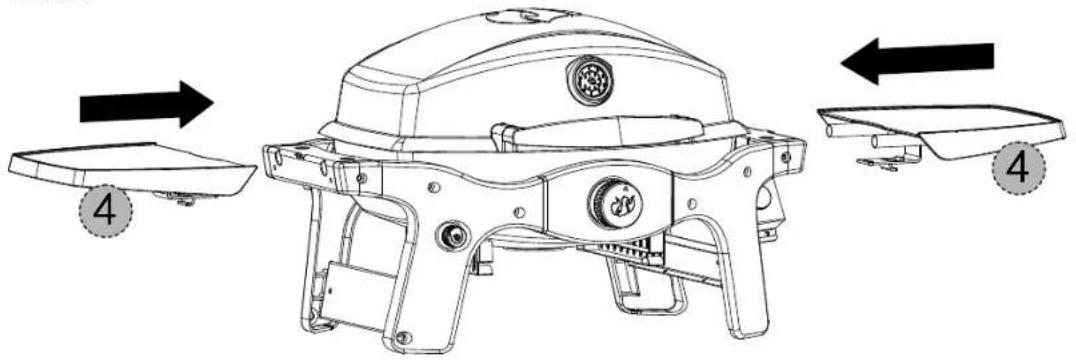
text_image
Technical diagram of a portable air purifier with labeled parts and directional arrows indicating assembly steps.Paso 4
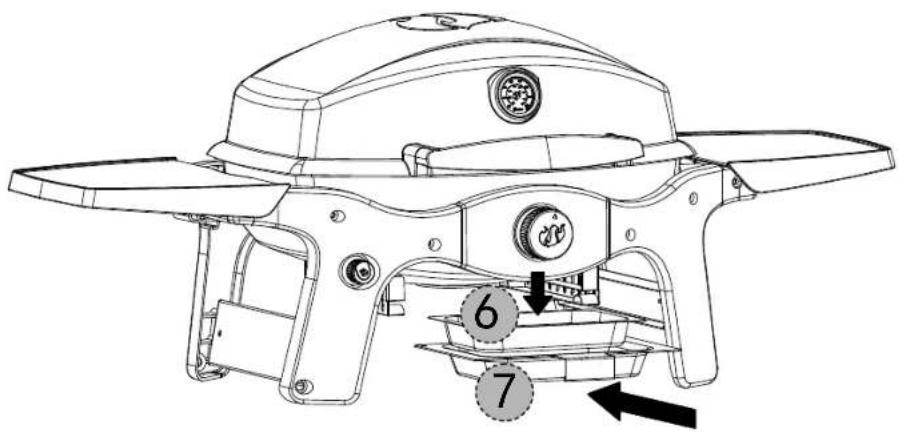
text_image
Technical diagram of a portable air purifier with labeled parts and directional arrows indicating componentsnatural_image
Line drawing of a mechanical device with multiple blades and mounting brackets (no text or symbols)natural_image
Technical line drawing of a turbocharger housing with labeled components (no text or symbols beyond basic labels)text_image
Technical diagram of a portable electric vehicle with labeled parts and directional arrows indicating assembly or movement.Paso 4
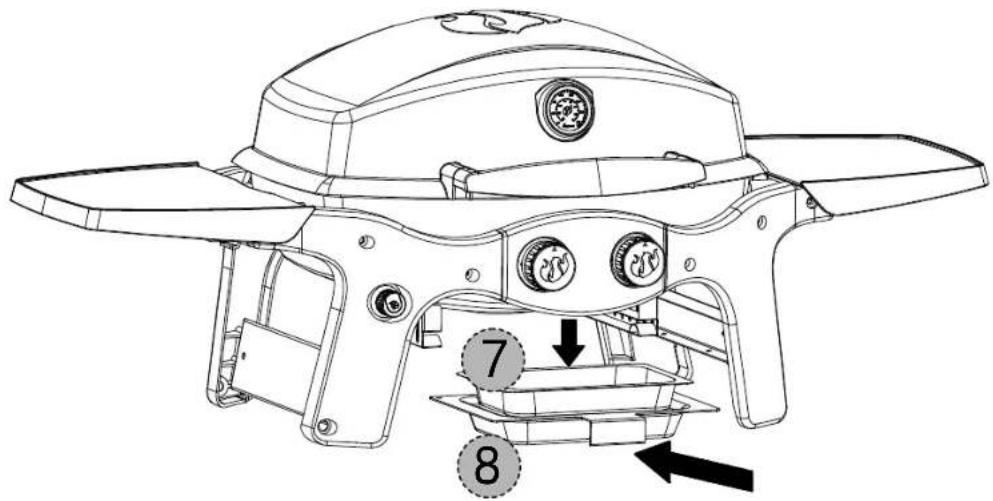
text_image
Technical diagram of a mechanical device with numbered components and directional arrows indicating assembly or movement.text_image
Technical diagram of a portable electric guitar with labeled parts including tray, grille, and fan base