Drone VR - Drone ARCHOS - Free user manual and instructions
Find the device manual for free Drone VR ARCHOS in PDF.

| Product type | Quadcopter drone with camera and VR goggles |
| Brand | ARCHOS |
| Model | Drone VR |
| Drone power supply | Rechargeable Li-Po battery (charges via USB, 5V 2A adapter recommended) |
| Remote control power supply | 3 alkaline 1.5V batteries (not included) |
| Camera | Integrated, with front and rear LED diodes |
| Flight functions | Altitude hold, heading hold, 3 speeds (slow, medium, fast), automatic takeoff/landing, emergency stop |
| Mobile app | ARCHOS Drone Remote (iOS and Android) |
| VR goggles | Included, adjustable focal distance and interpupillary distance, smartphone holder |
| Memory | Micro-SD card slot (not included) |
| Propellers | 4 propellers (2 type A, 2 type B) |
| Safety | Use only the provided charger; do not expose battery to fire; adult supervision; respect polarity |
| Maintenance | Clean with a dry cloth; regularly check condition; do not use in humid environments |
| Spare parts | Propellers, motor mounts, battery, camera, motors available |
| Repairability | Replace defective parts; contact ARCHOS customer service |
| General information | Manufacturer: ARCHOS SA, 12 Rue Ampère, 91430 Igny, France; compliant with Directive 2014/53/EU |
| Drone battery type | Lithium-polymer (Li-Po) |
| Recommended charger | USB 5V 2A adapter (not included) or computer USB port |
| Indicator lights | LED for charging (red/green), flight LED (flashing/steady) |
| Alarms | Low battery (continuous beep) and out of range (intermittent beep) |
Frequently Asked Questions - Drone VR ARCHOS
User questions about Drone VR ARCHOS
0 question about this device. Answer the ones you know or ask your own.
Ask a new question about this device
Download the instructions for your Drone in PDF format for free! Find your manual Drone VR - ARCHOS and take your electronic device back in hand. On this page are published all the documents necessary for the use of your device. Drone VR by ARCHOS.
USER MANUAL Drone VR ARCHOS
Safety Notice for Battery
Please read the user handbook carefully and then keep it in a safe place for future reference and maintenance.
- Only use the provided charger.
- When you install the battery, you must follow the electrode instructions. It is not allowed to reverse the batteries, which can cause short circuits.
- Non-rechargeable battery can't be used, and the rechargeable battery can only be charged under adult supervision.
- Different types of batteries (new and old) can't be mixed
- Please contact your environmental government bureau to know how to dispose and recycle Lipo batteries
- Please don't overcharge the battery or leave the battery charging alone.
- Don't throw the battery into fire or put it in a high temperature location, this may cause battery explosion
- The charger and battery are not toys.
- This product contains electronic components. Under water immersion and humid environments are forbidden.
- Use dry cloth to wipe the surface
- Check the product regularly to see if there is any damage to the components, if so please stop using until it has been repaired.
Do not put the battery in high temperature place, such as in the fire or on a heating device to avoid damage or explosion.
Do not slam the battery on a hard surface.
Do not put the battery in water and keep it in dry place.
Do not open the battery.
Do not leave the battery without supervision when charging.
Make sure that there is no short circuit of the power wire.
Please use the recommended charger only.
Check the charger's wire, plug, surface regularly. Do not use any broken charger.
If you do not fly the drone at least once a week, maintain the drone battery with about 50% power to keep its performance.
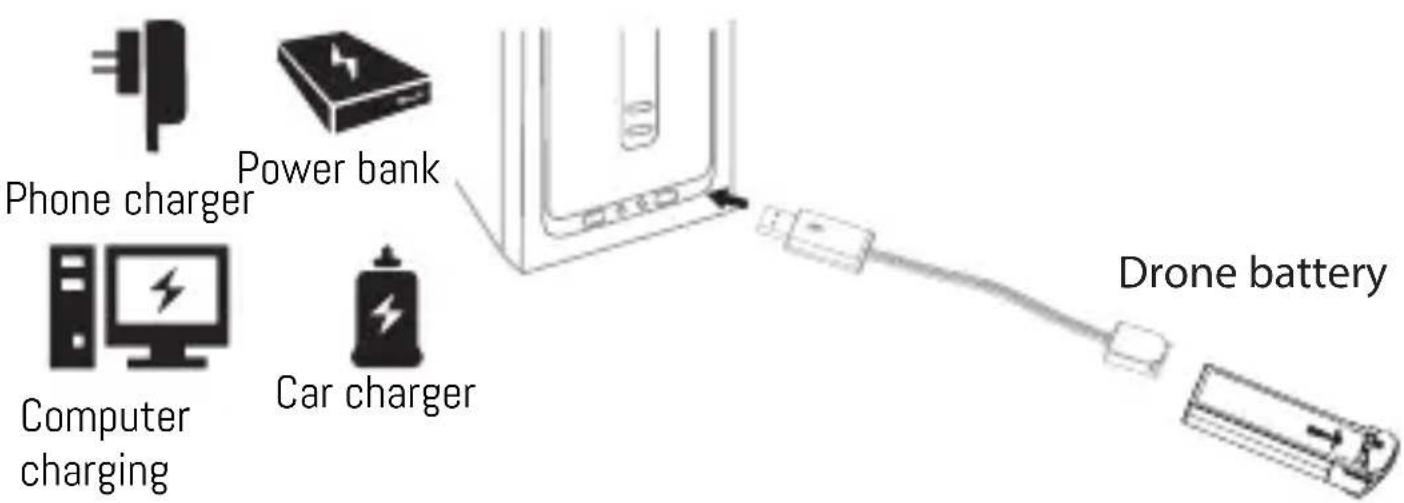
Charging Instructions for the Battery
-
Connect the drone battery with USB cable first then choose one of the methods as on the picture below to connect with USB plug.
-
The red USB indicator light is on when charging and the light turns green when fully charged( The switch must be powered off when charging).
* For faster charging, it is recommended to use an adapter with 5V 2A output current (not included) to charge the battery
Li-Po Battery Disposal & Recycling
Wasted Lithium-Polymer batteries must not be placed with household trash. Please contact local environmental or waste agency or the supplier of your model or your nearest Li-Po battery recycling center.

Check List Before Your Flight
- Make sure the drone's battery and transmitter's battery are fully charged.
- Make sure the left lever of the transmitter is in the middle position.
- Please strictly follow the instructions to turn on and turn off before operation. Turn on the transmitter power first and then turn on the drone power before flying; turn off the drone power first and then turn off the transmitter power when you are finishing flying. Improper turn on and turn off order may cause the drone to lose control and threaten people's safety. Please make sure you correctly turn on and turn off.
- Make sure the connection is strong between battery and motor etc. The ongoing vibration may cause bad connection of power terminal and make the drone lose control.
- Improper use may cause drone to crash, which may lead to motor defects and noise, and then affect the flying status or even stop flying. Please go to the local distributor to buy new replacement parts in case of damage.
Instructions for Drone and Transmitter
Drone

Transmitter
Phone holder
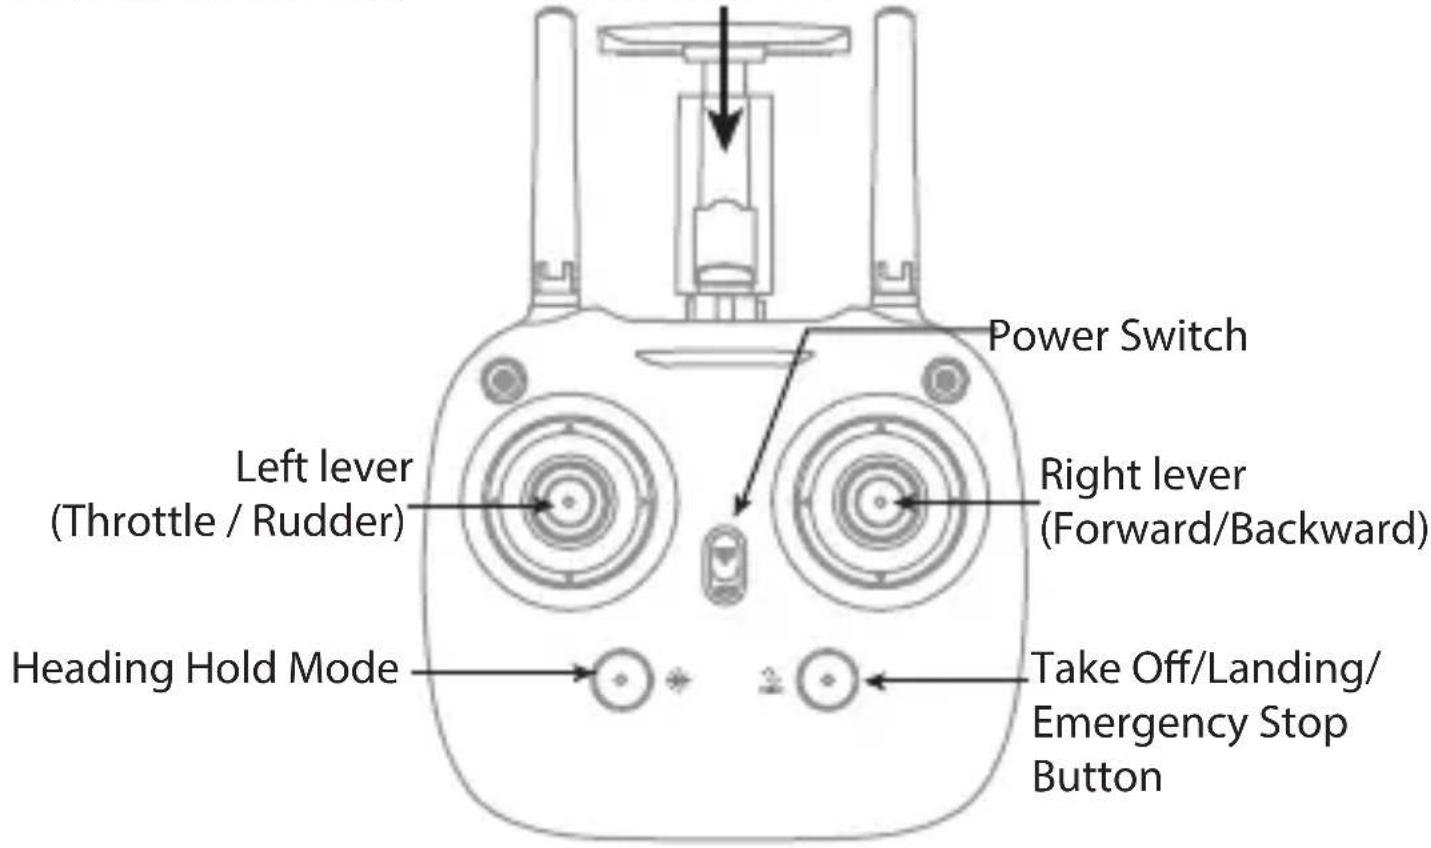
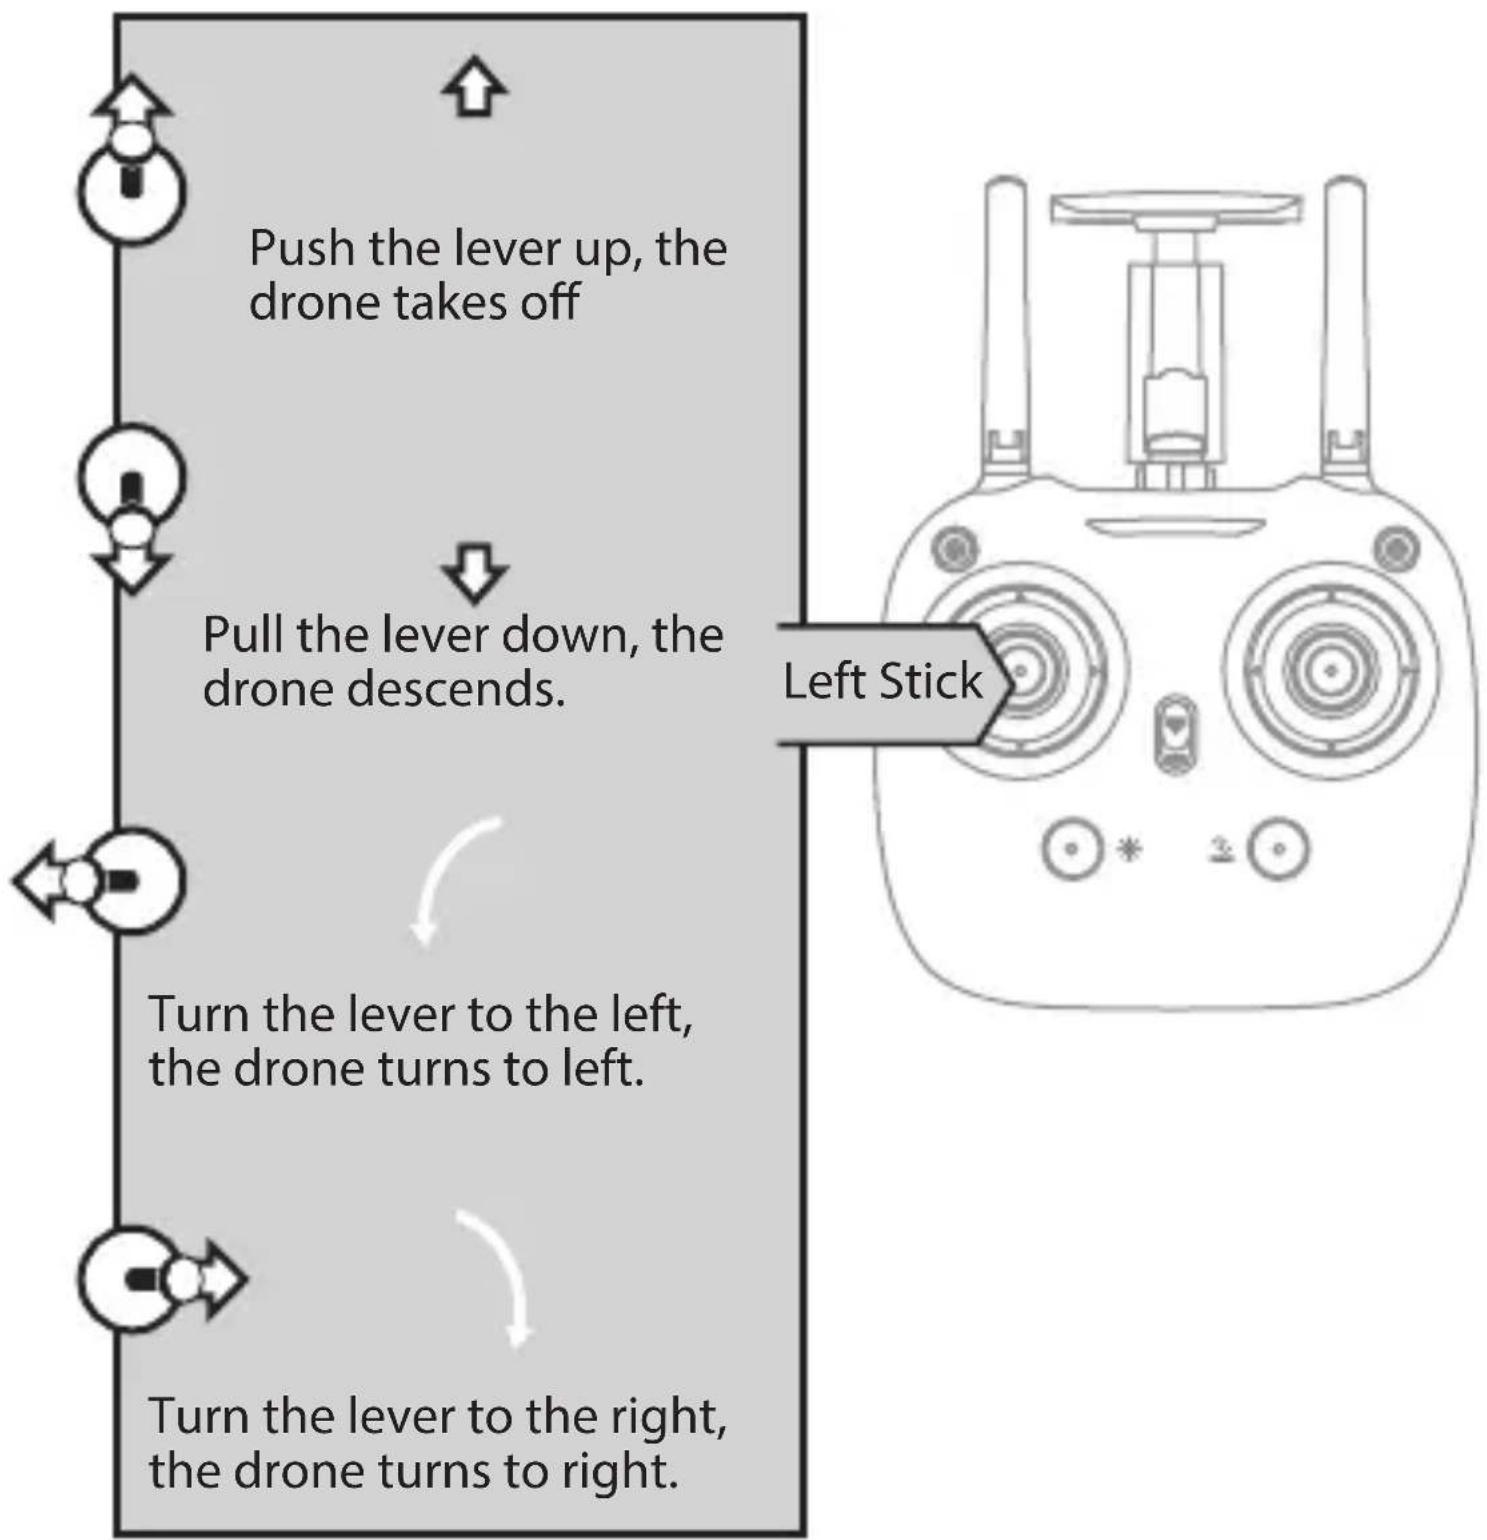
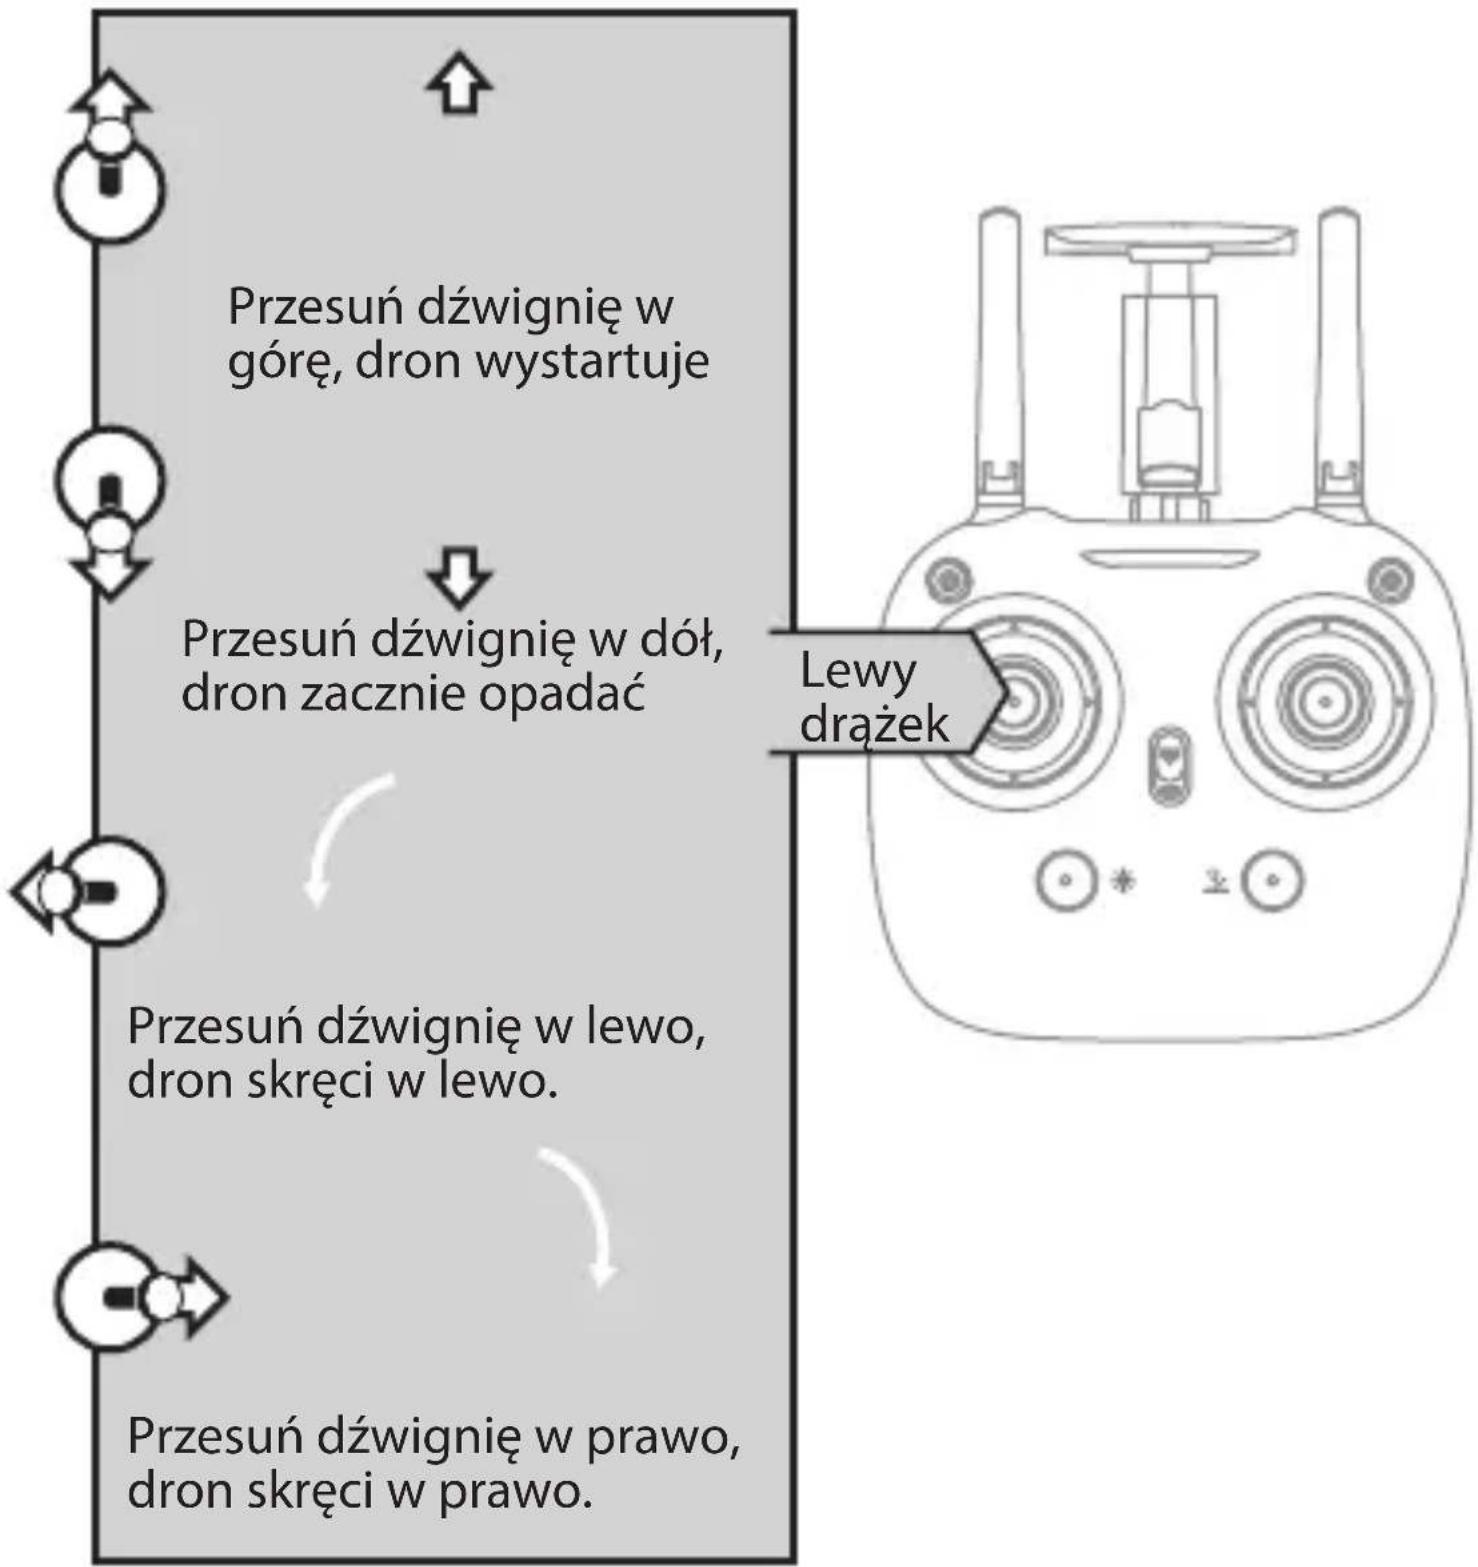
| Left lever Move the lever forward / backward / left / right to fly the drone up / down / turn left / turn right. | |
| Right lever Move the lever forward / backward / left / right to fly the drone forward / backward / left / right. | |
| Power Switch Push up the power switch to turn on the transmitter, and pull down to turn off. | |
| Heading Hold Mode | Press the button to enter heading hold mode, and press again to exit from heading hold mode. |
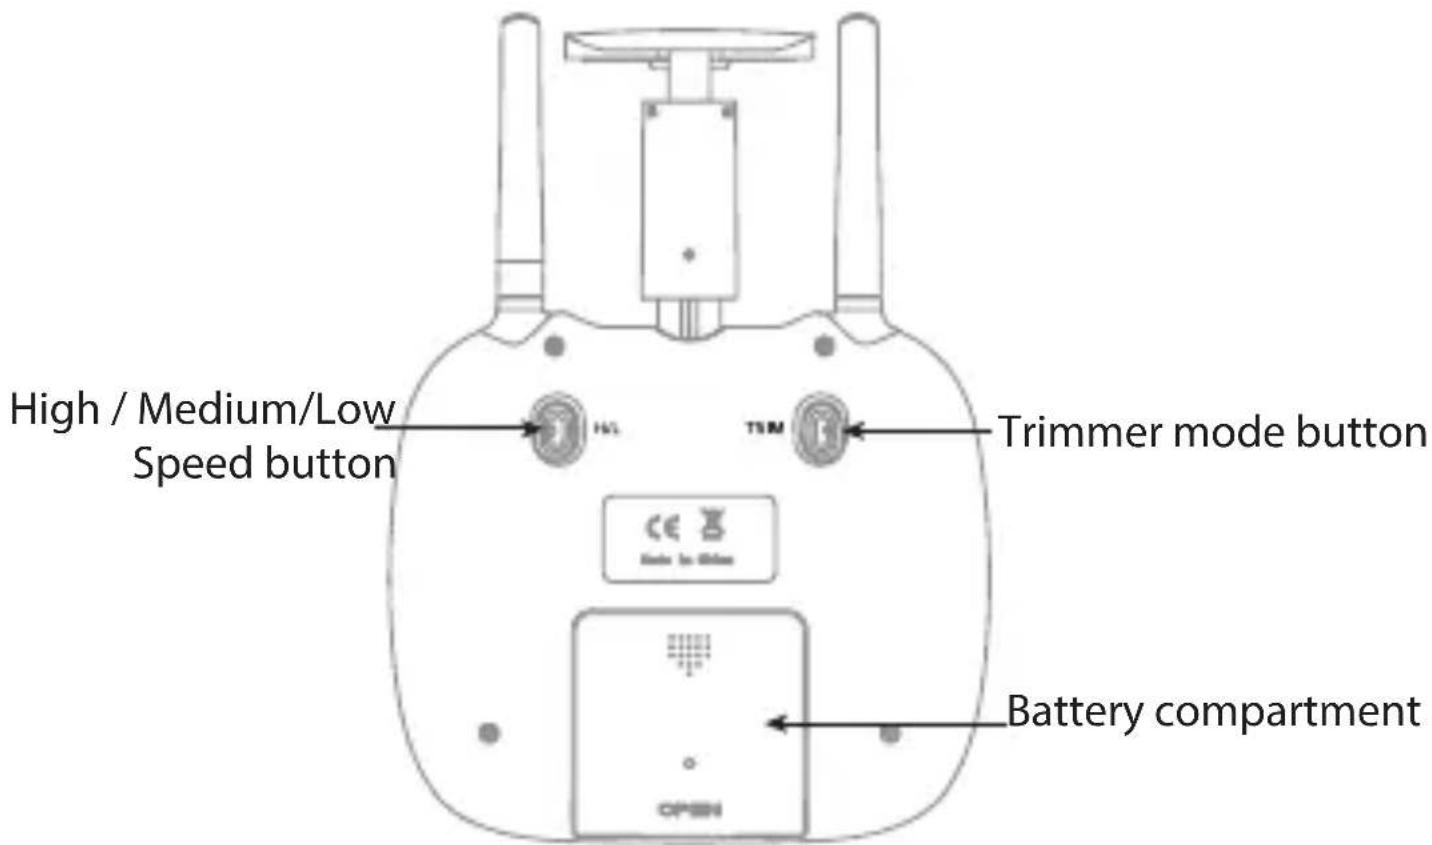
| High / Medium/ Low Speed Mode | Press down the Left lever to switch to High / Medium/ Low Speed |
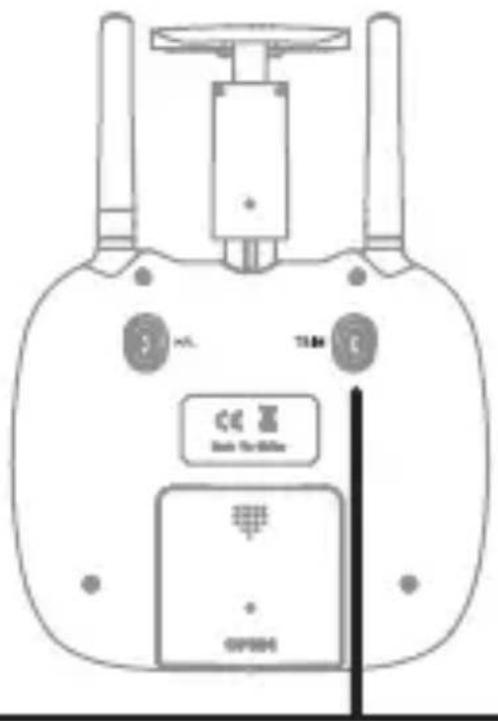
| Take Off / Landing / Emergency Stop Button | Press the button and the drone will fly up automatically. Press the button again and the drone will land on the ground automatically. Press and hold the button more than 1s, the drone propellers will stop and fall down immediately. |
| Trimmer mode Button | Press down this button, move the right lever to the required trimmer direction, then it will adjust the direction accordingly, when loose the lever, then ESC from the trimmer mode. |
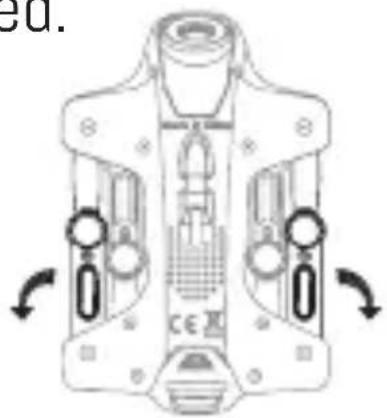
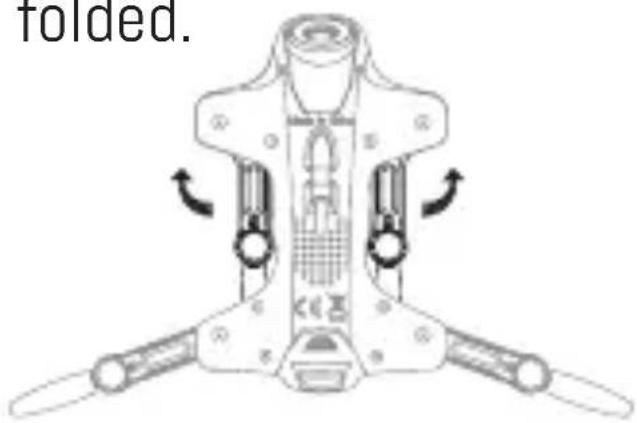
Unfold the drone
Pull out the arm bracket as per the below arrow shows (picture 1), it will make a click sound, then it means fully opened(picture 2). On the contrary, then it's folded.
natural_image
Technical line drawing of a mechanical device with no visible text or symbols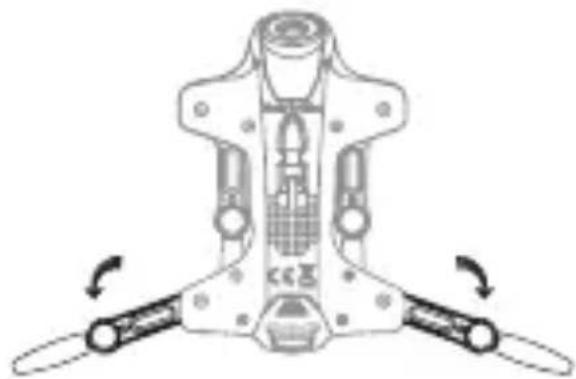
natural_image
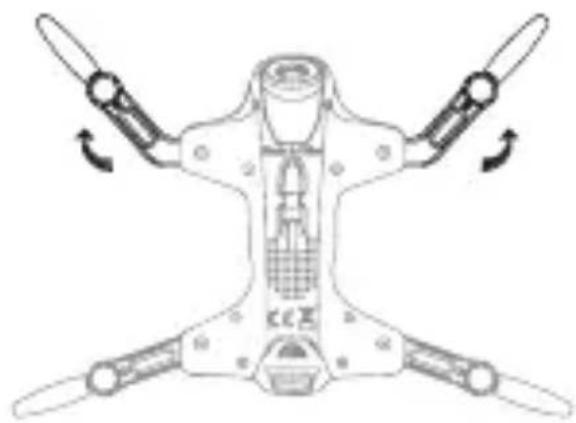
Mechanical device diagram showing a central body with two side arms and directional arrows indicating rotation (no text or symbols)Pull out the arm bracket as per the below arrow shows (picture 3), it will make a click sound, then it means fully opened(picture 4). On the contrary, then it's folded.
natural_image
Diagram of a drone with four propellers and directional arrows indicating rotation (no text or symbols)Notice: Improperly operation may cause damage to the bracket part.
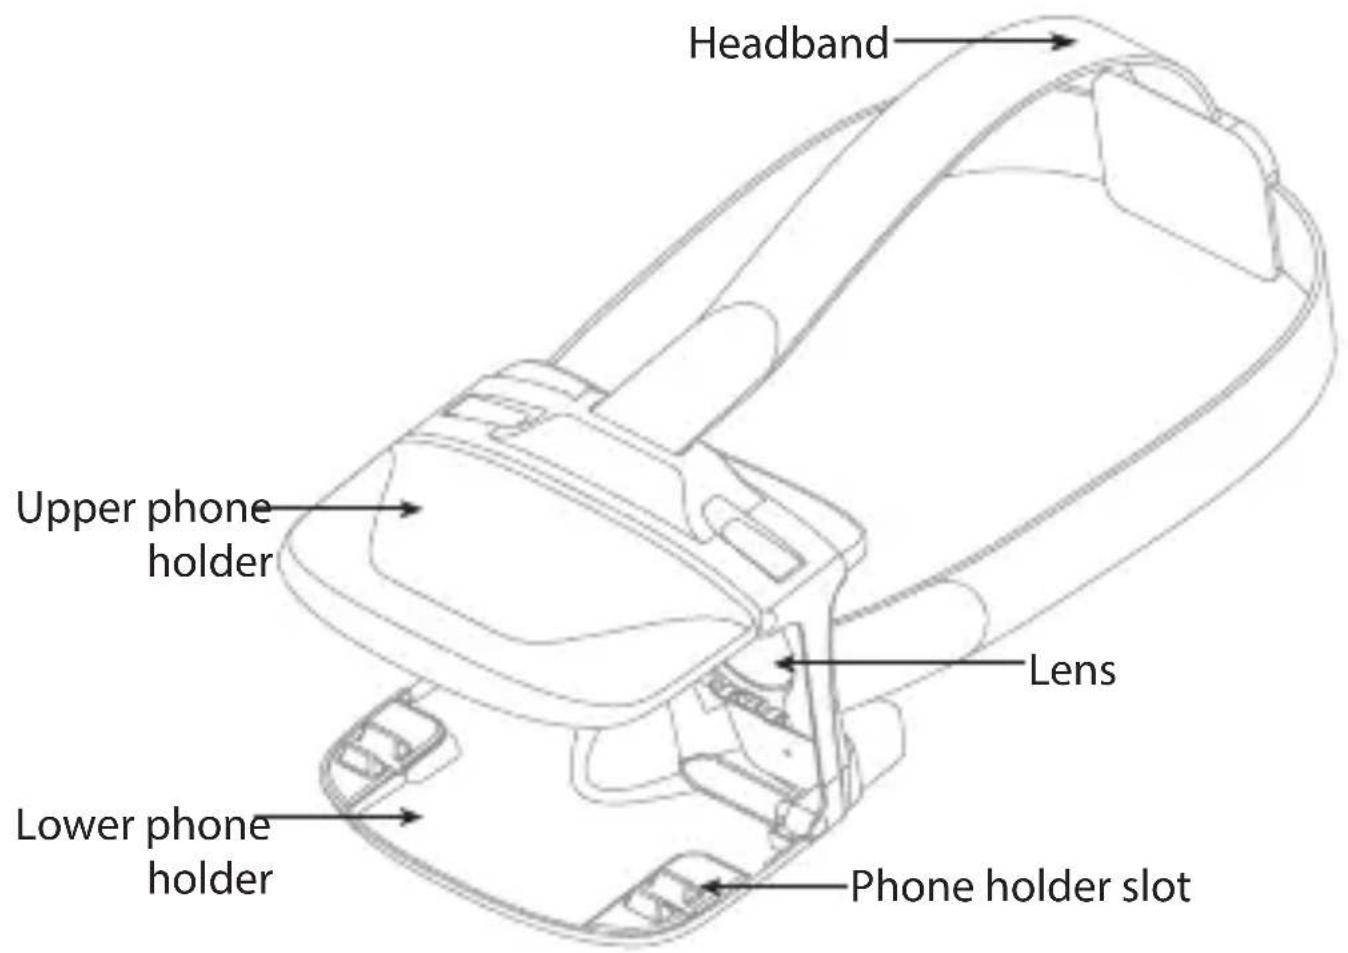
VR Glasses

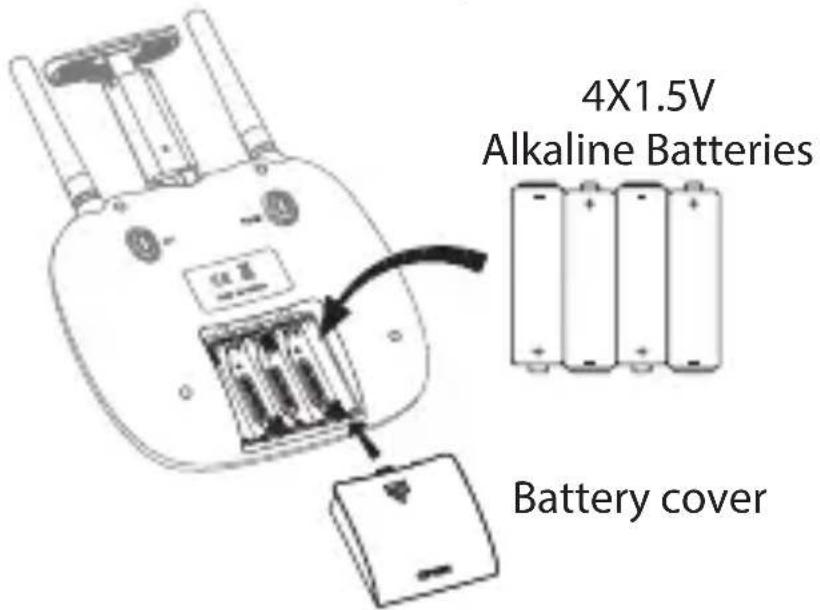
Installing the batteries:
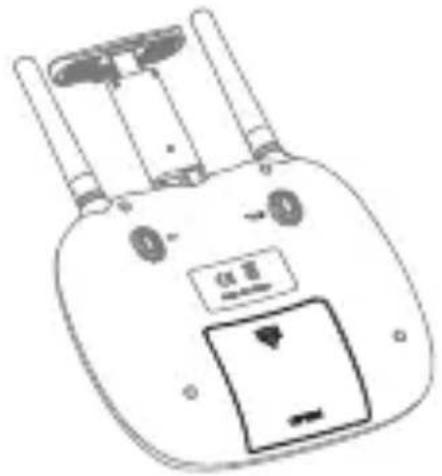
Open the battery cover on the back side of the transmitter and put 4 alkaline batteries (AAA, not included) into the box in accordance with electrode instructions, as picture shown.
natural_image
Line drawing of a handheld electronic device with ports and control panel (no text or symbols)Notice:
- Make sure the electrodes match.
- Do not mix new with old batteries.
- Do not mix different kinds of batteries.
- Do not charge non rechargeable batteries.
Pre-flight Operation Instructions
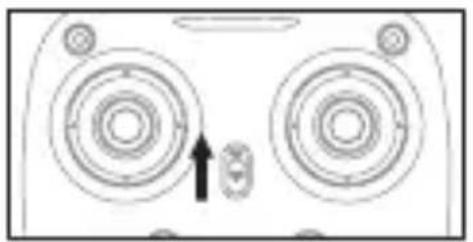
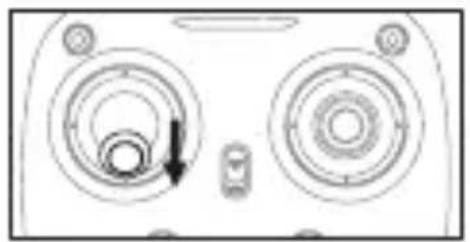
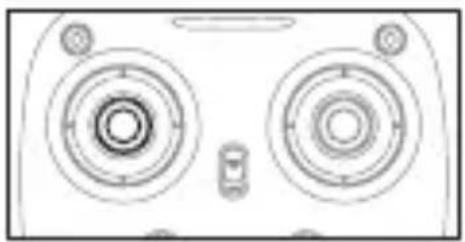
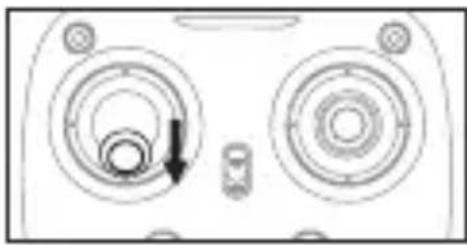
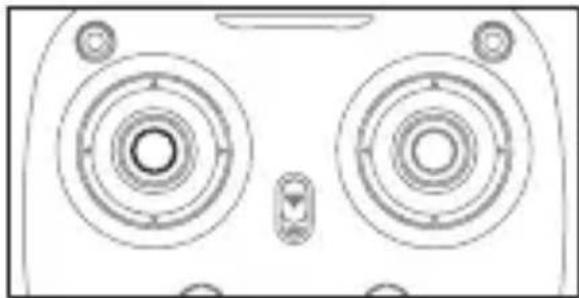
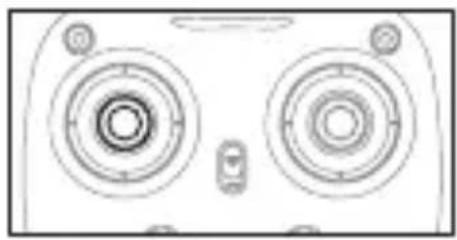
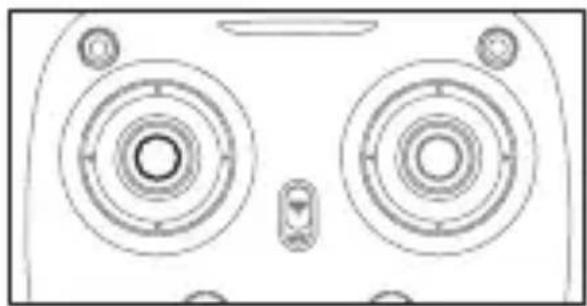
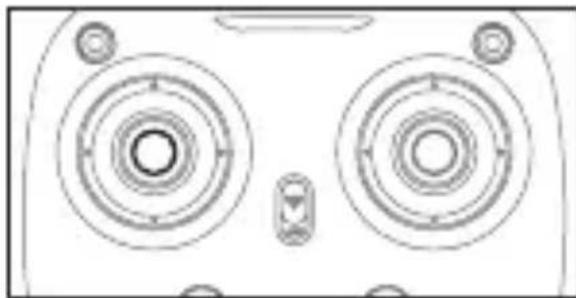
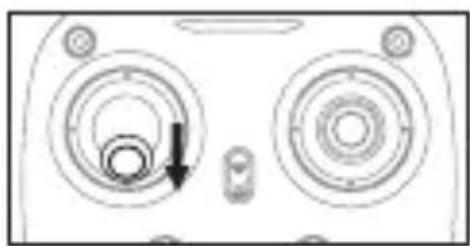
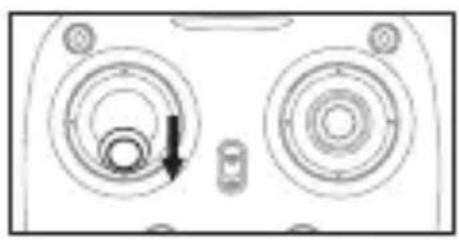
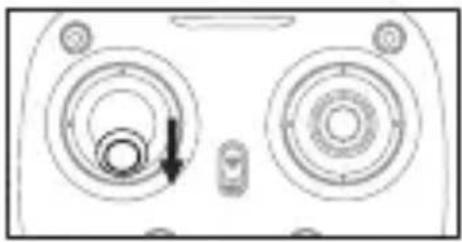
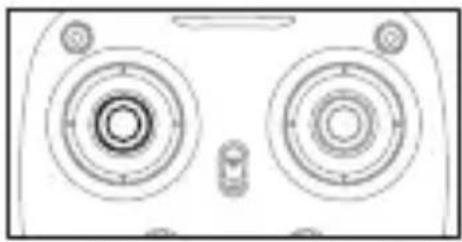
Frequency Pairing
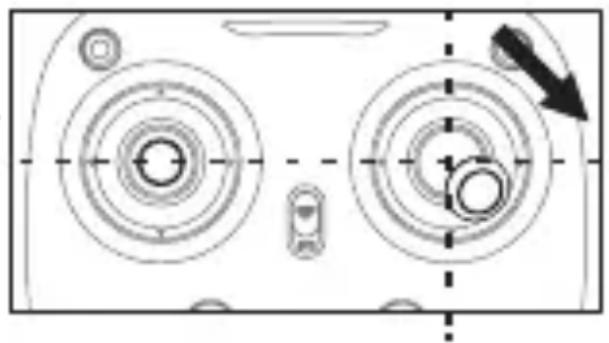
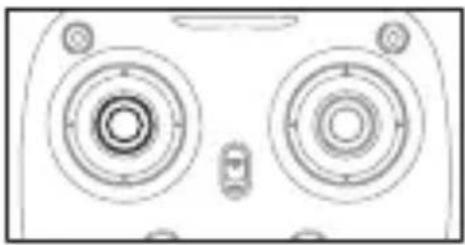
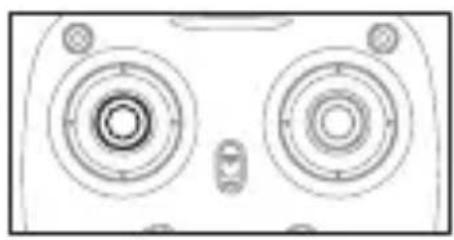
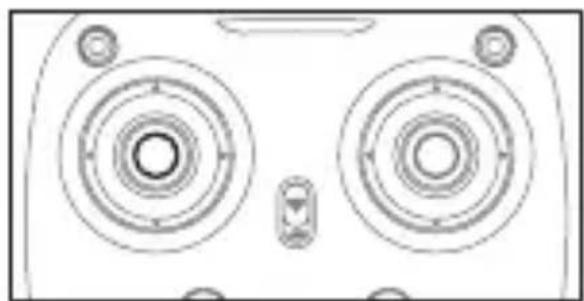
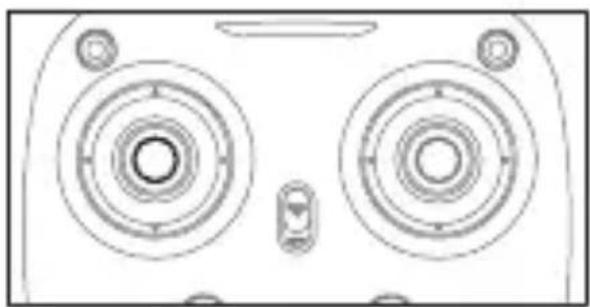
- Turn on the transmitter switch (Picture 1) and the power indicator light flashes rapidly. Push the Left lever all the way down to the lowest position and then release. The Left lever moves back to the middle position automatically. (Picture 2 / 3) The power indicator light flashes slowly, indicating the transmitter is ready for frequency pairing.
natural_image
Diagram of two circular speaker units with a black arrow pointing to one (no text or symbols)Picture 1
natural_image
Diagram of two circular gauges with a directional arrow indicating rotation or movement (no text or symbols)Picture 2
natural_image
Top-down schematic of a device with two circular components and a central hub (no text or symbols)Picture 3
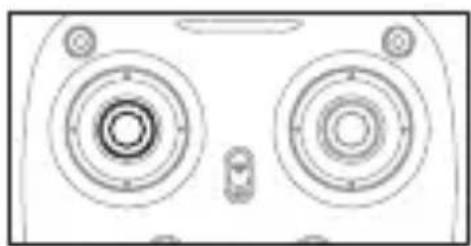
- Install the Lipo battery into the drone, power on the drone. (Press for about 2 seconds).
natural_image
Diagram of a drone with propellers and a rectangular device, showing no text or symbols on the diagram itself.
natural_image
Pure technical line drawing of a mechanical component with no text or symbolsPicture 4
- Put the drone on the flat surface, the drone body lights turn from flashing to solid bright, which indicates successful frequency pairing. Important Notice: Please make sure the drone is placed on the horizontal position after powering on the drone, so that the drone can work well.
Checklist before Flight
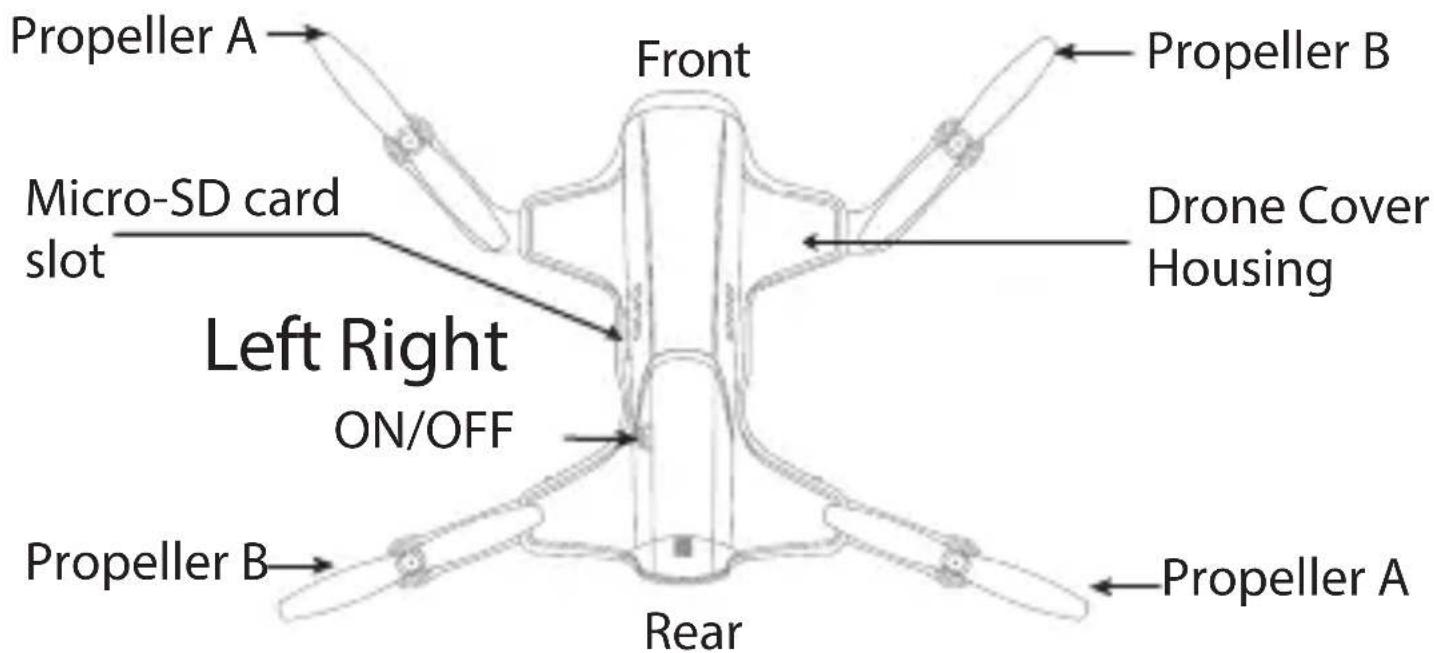
- The camera is in front of the drone. Keep the drone front away from you.
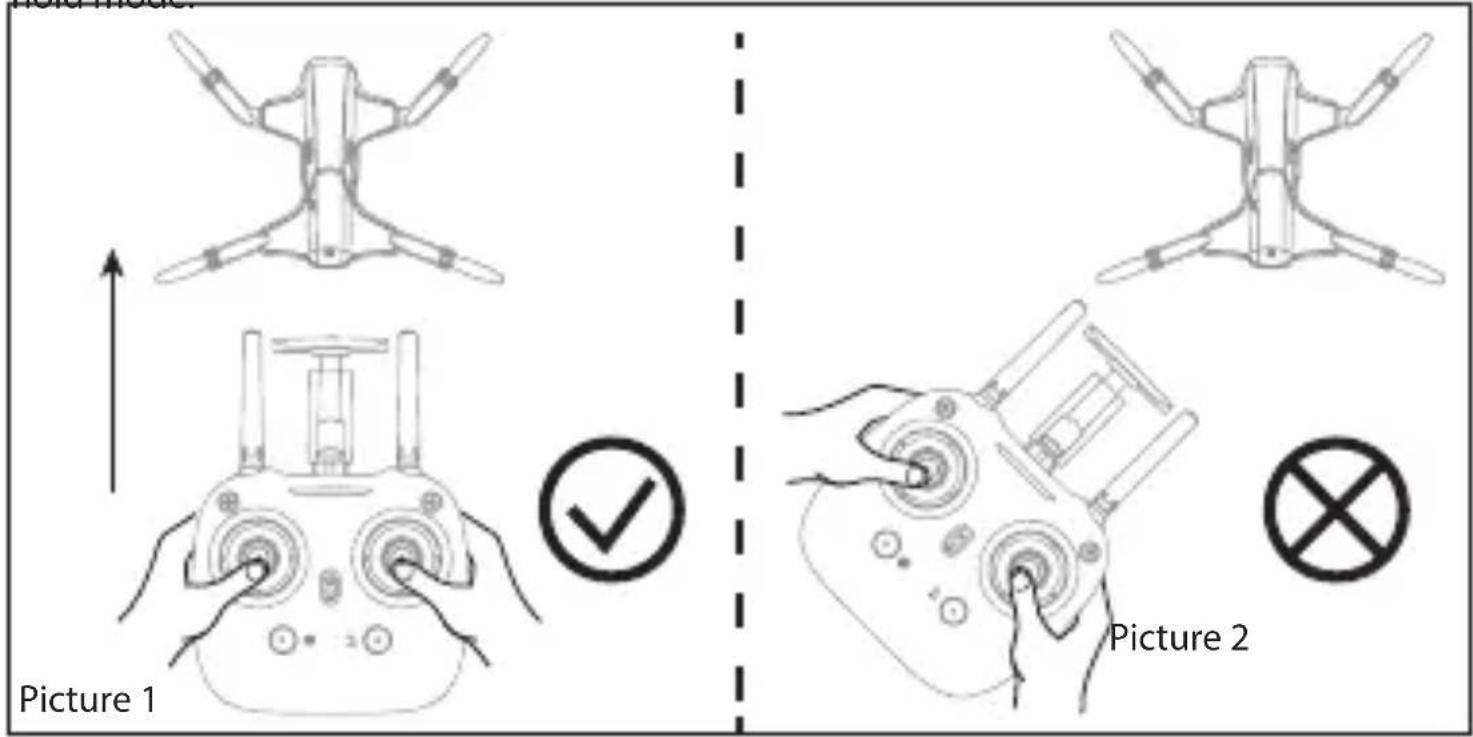
- Power on the drone and check the direction of the rotating propellers. The left front and right rear A propellers rotating clockwise while the right front and left rear B propellers rotating counterclockwise.
- Move the Left Stick and Right Stick at the same time as Picture 5 shown(45 degree inward) to start the motors and repeat previous step again to lock the
motors.
natural_image
Line drawing of a device front panel with two circular gauges and adjustment knobs (no text or symbols)Picture 5
- After starting the motors, push up the left lever to fly the drone slowly, and then pull down the left lever to the lowest position slowly, then the drone lands on the ground.
- It's recommended to repeat above Steps 4 to practice.
- Adjust relative transmitter Trimmer button to adjust the rudder if the drone tilts to one side when flying.
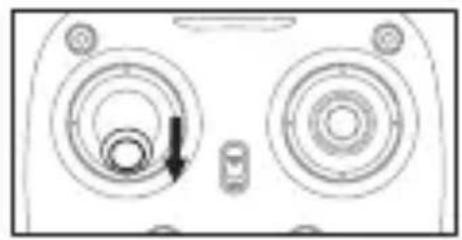
Calibration Instructions
Please follow below steps to calibrate the drone if the drone becomes imbalanced after crashing during the flight, and can not be adjusted by trimmer button and causes flight difficulties.
- Turn off the drone, then turn off the transmitter switch.
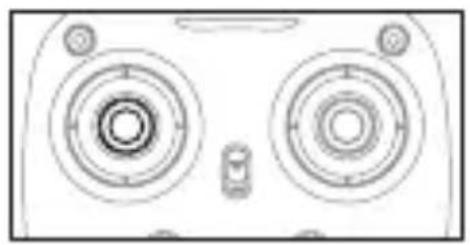
- Turn on the transmitter switch, push the left lever all the way down to the lowest position (Picture 6) and then release. The left lever goes back to the middle position automatically (Picture 7). The transmitter is ready for frequency pairing mode.
natural_image
Technical line drawing of a device front panel with circular components and adjustment knobs (no text or symbols)Picture 6
natural_image
Top-down schematic of a device with two circular components and a central knob (no text or symbols)Picture 7
-
Turn on the drone and put it on a flat surface in a horizontal position. The drone's body lights change from flashing to solid bright, which indicates successful frequency pairing.
-
Do not move the left lever before successful calibration. Push the right lever as Picture 8 shown and then release. The drone's body
lights flash, which indicates that the drone is calibrating. When the drone's body lights become solid, the calibration is complete.
Notice: If the drone crashes, the gyroscope can be affected causing flight issues. If so, turn the power off and on again to calibrate.
natural_image
Technical diagram of a mechanical component with circular features and directional arrows (no text or symbols)Flying Control
Notice: Every time before the drone takes off, move the left lever and right lever at the same time as shown on Picture 5(inward 45 degree) to start the motors. Push up the left lever slowly to fly the drone or press down the one button take off.
flowchart
graph TD
    A["Push the lever up, the drone takes off"] --> B["Pull the lever down, the drone descends."]
    B --> C["Turn the lever to the left, the drone turns to left."]
    C --> D["Turn the lever to the right, the drone turns to right."]
    D --> E["Left Stick"]
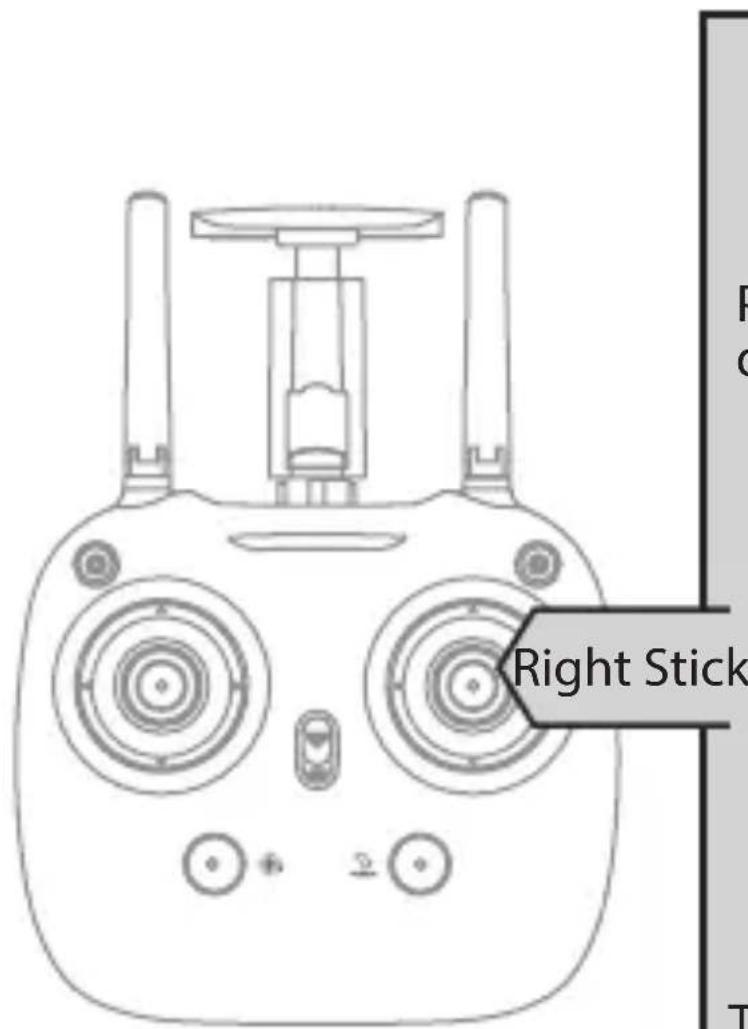
Push the lever up, the drone goes forward.
Pull the lever down, the drone goes backward.

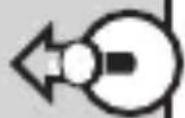
Turn the lever to the left, the drone turns to left

Turn the lever to the right, the drone turns to right
natural_image
Top-down schematic of a mechanical device with labeled ports and components (no readable text or symbols)Forward and backward trimmer
During take off, if the drone tilts forward, press down the left lever in the center, and push the right lever backwards.
Otherwise push forwards.
Left and right turning trimmer
During take off, if the drone head rotates to left, then press down the left lever in the center and push left lever to right.
Otherwise push left.
Left and right side flying trimmer
During take off, if the drone tilts to left, then press down the left lever in the center and push the right lever to right side. Otherwise push left.
Functions Introduction
Two Take Off Methods
-
Method 1 (Take off): After successful frequency pairing, move the Left and Right levers at the same time as shown Picture 5 (inward 45 degree) to start the motors. Push up the Left lever to fly the drone to a certain altitude and then release the lever.
-
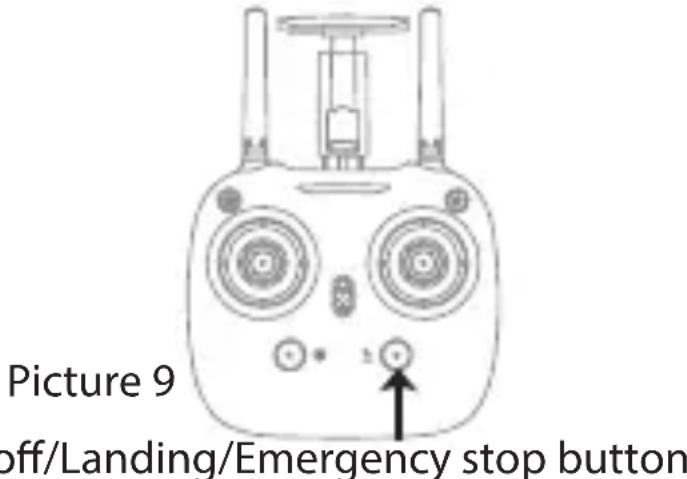
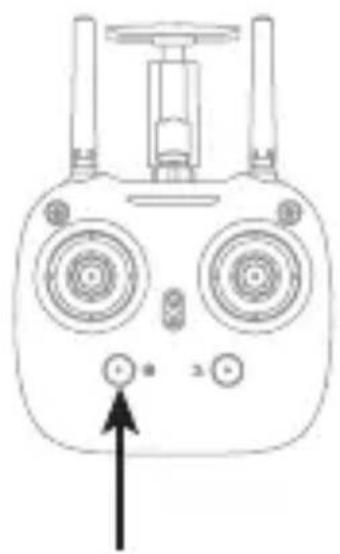
Method 2 (One Button Take Off): Press the Take Off / Landing / Emergency Stop Button (Picture 9), the drone flies up automatically and keep flying at an altitude of approximately 1.2 meters.
Landing Methods
- Method 1 (Landing): Push the Left lever all the way down to the lowest position(Picture 2/6) and hold it till the motors stop and the drone will land on the ground.
- Method 2 (One Button Landing): Press the Take Off / Landing / Emergency Stop Button once shortly(picture 9), and the drone will land on the ground automatically.
(When using this function, you can not touch the left lever, if not, then the function will fail)
Emergency Stop: When the drone in emergency situation and going to hit people or an obstacle etc., press the Take Off / Landing / Emergency Stop Button immediately and hold it for more than 1s. The propellers will stop immediately.
Tip: Do not use the emergency stop function unless in emergency situation. The drone will fall down suddenly after all propellers stop.
Altitude Hold Mode
Altitude hold mode indicates that the drone maintains a consistent altitude while allowing roll, pitch, and yaw to be controlled normally. It makes easier to control the drone for beginner and more stable for aerial photography.
Push the Left lever up (down) to fly the drone at a certain altitude and then release the lever. The lever will go back to the center position (Altitude Hold Center) as Picture 10 shown. And the drone will keep flying at current altitude. Repeat above steps if you want to change the drone altitude (Default mode).
Picture 10
natural_image
Pure technical diagram of a mechanical component with no text or symbolsAltitude Hold Center
High / Medium/Low Speed Mode Switch
Press down this button, then it will sound “di”, it means low speed mode “L”; when it sounds “di.di”, means medium speed “M”; and sounds “di.di.di” means high speed mode “H”.
Low Speed Mode(Mode 1)
- Low Speed Mode is suitable for beginner. Medium speed Mode(Mode 2)
- Medium Speed Mode is suitable for skillful pilots to play in the gentle breeze.
High Speed Mode(Mode 3) - High Speed Mode is suitable for expert to experience aerial stunt in outdoor.
High/Medium/Low Speed Mode Switch
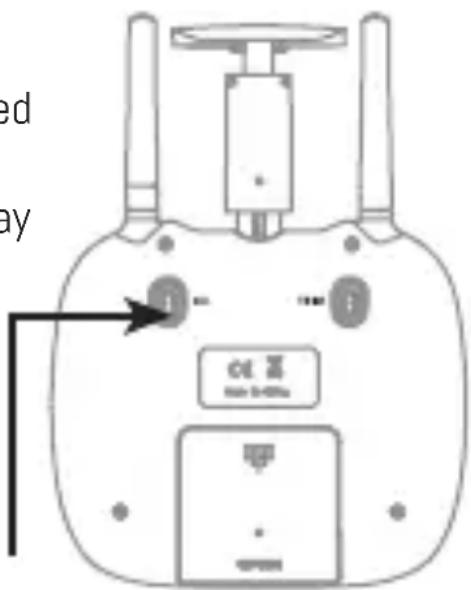
Heading Hold Mode
* Drones generally have a front and rear indicated by LED lights or colored propellers. By default, users are required to tell the front and the rear of the drone when flying. Under heading hold mode, users can operate the drone without worrying about the orientation (left is left and right is right all the time, regardless of where your drone is pointing at).
Heading Hold Mode is designed for beginners and users who fly the drone in daylight or at a far distance.
When the drone is in heading hold mode, push the Right lever forward / backward / left / right, and the drone will fly forward / backward / left _20 / right accordingly.
Prerequisite: Position the drone in such a way that its front is your front (see Picture 1). Tip: Do not change the orientation of the transmitter (see Picture 2) after entering heading hold mode.
To turn on Heading Hold Mode, press Heading Hold Mode button and the drone LED lights flash, which indicates the drone enters heading hold mode. To turn off Heading Hold Mode, press Heading Hold Mode button again and the drone LED lights turn solid, which indicates the heading hold mode is off.
natural_image
Front view of a drone's head panel with control buttons and antenna (no text or symbols)Heading Hold Mode Button
Low Battery Alarm
When the transmitter has low battery, the transmitter will beep Di-di-di... to remind the user to land the drone in order to replace the batteries as soon as possible. Or the drone may lose control.
When the drone has low battery, the transmitter will beep Di.di.di... constantly to remind the user to land the drone as soon as possible.
Out of Range Alarm
When the drone is going to fly out of the max remote control distance, the transmitter will beep Didi..didi.. didi... to warn the user to fly back immediately. Or the drone may lose control and fly away.
Download the ARCHOS application to control the drone
The APP is suitable for mobile phone with iOS or Android system, please download from the mobile phone software store:
- For mobile phone with iOS system, please search ARCHOS Drone Remote.
- For mobile phone with Android system, please search ARCHOS Drone Remote.
- Scan the QR code on the packaging.


VR Operation Instruction
Turn on App and enter the control interface. Click on to enter split screen mode.
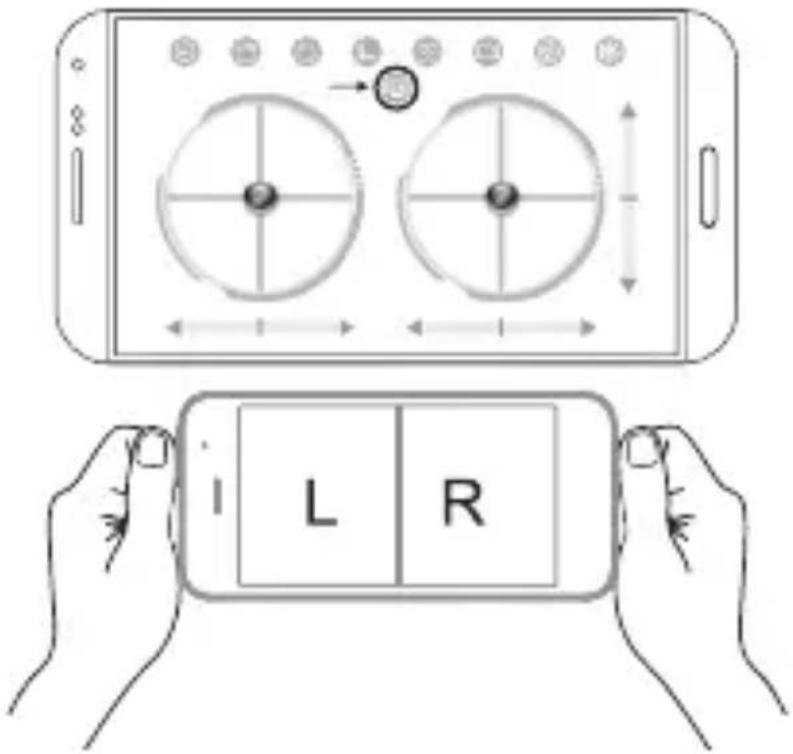
Tear off the protection film of the lens. Open the mobile phone holder and holding it.(Phone screen should face to the lens), ens), adjust the mobile phone to the best viewing position and then release the upper holder.
natural_image
Technical line drawing of a mechanical component with a vertical arrow indicating direction (no text or symbols)Make sure the VR center line overlapping Adjust the headband: Take out the headband and put into VR, adjust the tightness of the three headbands to the most comfortable position. (In order to facilitate adjustment, the magic tape of three headbands should face outwards.)
natural_image
Side-by-side line drawings of a medical device and a human head profile, both without any text or symbols.Adjust the focal length: After putting in the phone, if there is double image, move the lens to the proper position till the image is clear.
For short-sighted user, please move the lens by left or right until proper pupil distance.
natural_image
Line drawing of a car front view with two circular ventricles and directional arrows indicating left and right motion (no text or symbols)Shade cloth: When the light is too strong to view the video clearly, hitched the VR glasses by the shade cloth to protect the screen from strong lights.
To exit from split screen mode: Click on the screen and icon appears. Click on this icon to exit from split screen mode and return to operation interface.

natural_image
Side profile of a person wearing a VR headset (no text or symbols visible)
| N° Problem | Problem cause | Solution | |
| 1 The | transmitter's light is off | 1. Low battery2. The battery positive pole and negative pole are in reverse order.3. Poor contact.4. Indicator light is off. | 1. Replace the transmitter battery.2. Install the battery in accordance with the user manual.3. Clean the dirt between the battery and the battery slice. |
| 2 Fail to pair the drone with transmitter | 1. Indicator light is off.2. There is interferences signal nearby.3. Misoperation4. The electronic component is damaged because of frequent crash. | 1. The same as above 1,2,3.2. Restart the drone and turn on the transmitter.3. Operate the drone step by step in accordance with the user manual4. Buy spare parts from local seller and replace damaged parts. | |
| 3 The | drone is under-powered or can not fly. | 1. The propeller deformed seriously.2. Low battery3. Incorrect installation of propeller. | 1. Replace the propeller.2. Recharge the drone battery.3. Install the propeller in accordance with the user manual. |
| 4 The drone could not hover and tilts to one side. | 1. The propeller is deformed seriously.2. The motor holder is deformed.3. The gyro did not reset after violent crash.4. The motor is damaged. | 1. Replace propeller.2. Replace the motor holder.3. Put the drone on the flat ground for about 10 s or restart the drone to calibrate again.4. Replace the motor. |
| 5 The drone's light is off | 1. Low battery2. The battery is expired or over discharge protection3.Poor contact | 1. Recharge the drone battery.2. Buy a new battery from local seller to replace the battery.3. Disconnect the battery and then connect it with the plug again. |
| 6 Could not see the picture. | 1. Did not connect the wire of camera box or poor contact.2. There is interferences signal nearby.3. Damaged camera | 1. Check the wire and connect well.2. Disconnect the wire and re-connect.3. Buy a new camera box from local seller to replace. |
| 7 Hard to control by cellphone | 1. Not experienced enough. | 1. Practice and read the cellphone controlling instruction carefully. |
natural_image
Technical diagram of a mechanical device with directional arrows indicating rotation or movement (no text or symbols present)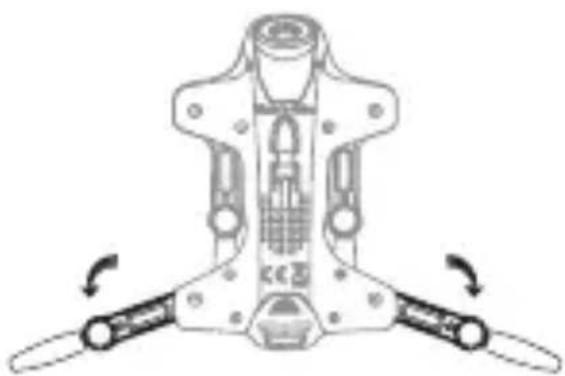
natural_image
Mechanical device diagram showing a central shaft with two side arms and directional arrows indicating rotation (no text or symbols)natural_image
Technical line drawing of a mechanical device with three arms and internal components, showing rotational arrows (no text or symbols)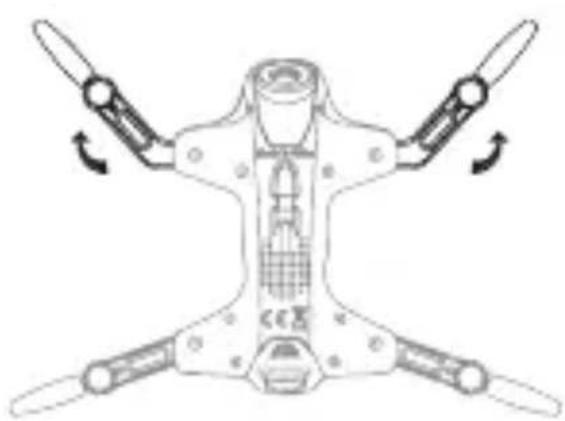
natural_image
Diagram of a drone with four propellers and directional arrows indicating rotation (no text or symbols)natural_image
Line drawing of a handheld electronic device with ports and buttons (no readable text or symbols)Remarque :
natural_image
Diagram of a two-port device with circular ports and an arrow pointing to a small electronic component (no text or symbols)Image 1
natural_image
Diagram of a device front panel with two circular gauges and a directional arrow indicating rotation (no text or symbols)Image 2
natural_image
Top-down schematic of a device with two circular components and mounting holes (no text or symbols)Image 3
natural_image
Diagram of a drone with four propellers and a rectangular device, showing a close-up view of the device's internal structure (no text or symbols present)natural_image
Technical line drawing of a device front panel with circular gauges and adjustment knobs (no text or symbols)natural_image
Technical line drawing of a speaker grille with two circular fans and a central button (no text or symbols)Image 6 Image 7
natural_image
Top-down schematic of a device with two circular components and a central knob (no text or symbols)natural_image
Diagram of two circular components with a directional arrow and label 'Image 8' (no readable text or symbols)natural_image
Line drawing of a handheld device with control buttons and a central display (no text or symbols)natural_image
Front view of a drone's head panel with dual motors and control buttons (no text or symbols)Figure 9
natural_image
Simple line drawing of a dome-shaped object with a flat top, no text or symbols presentnatural_image
Line drawing of a drone's front panel with two speakers and control buttons (no text or symbols)
natural_image
Line drawing of a mechanical device with a vertical arrow indicating direction (no text or symbols)natural_image
Side profile illustration of a human head with a medical device in use, labeled '50' at the bottom (no text or symbols on the diagram itself)
natural_image
Line drawing of a vehicle dashboard with two circular ventricles and directional arrows indicating left and right motion (no text or symbols)natural_image
Side profile of a person wearing a VR headset (no text or symbols visible)
natural_image
Technical line drawing of a mechanical device with no visible text or symbols
natural_image
Mechanical device diagram showing a central component with two arms and directional arrows indicating rotation (no text or symbols)natural_image
Diagram of a drone with four blades and central body, showing rotational motion arrows (no text or symbols)natural_image
Line drawing of a handheld electronic device with ports and buttons (no text or symbols)Hinweis:
natural_image
Diagram of two circular speaker units with a small device inside, no text or symbols presentAbb. 1
natural_image
Diagram of two circular gauges with a black arrow indicating a component, no text or symbols presentAbb. 2
natural_image
Front view of a vintage electronic device with two circular fans and a speaker grille (no text or symbols)Abb. 3
natural_image
Diagram of a drone with propellers and a rectangular device, showing mechanical components and directional arrows (no text or symbols)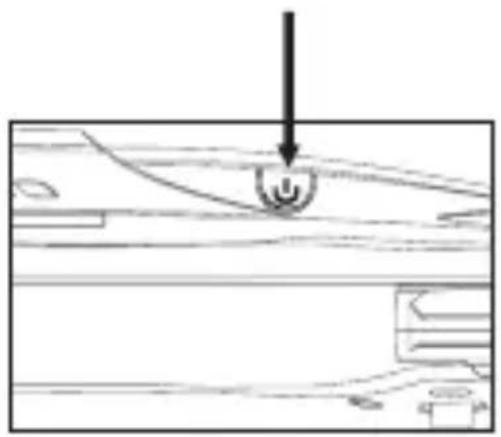
natural_image
Pure mechanical component diagram without any text, numbers, or symbolsAbb. 4
natural_image
Line drawing of a device front panel with two circular gauges and adjustment knobs (no text or symbols)Abbildung 5
natural_image
Technical line drawing of a device with two circular components and mounting holes (no text or symbols)Abb. 6 Abb. 7
natural_image
Line drawing of a two-port device with circular ports and a central hub (no text or symbols)natural_image
Pure technical diagram of a device casing with circular components and alignment lines (no text or symbols)Abb. 8
natural_image
Line drawing of a mechanical device with no visible text or symbolsnatural_image
Front view of a Djog� (Drones Turkey) controller with dual motors and control buttons (no text or symbols)natural_image
Pure technical diagram of a mechanical component with no text or symbolsHöhenhaltungs-Modus
natural_image
Front view of a drone's head panel with two motors and a control knob (no text or symbols)
natural_image
Line drawing of a mechanical device with a vertical arrow indicating direction (no text or symbols)natural_image
Side-by-side line drawings of a medical device and a human head profile, both without any text or symbols.natural_image
Diagram of a car front view showing two circular gauges with bidirectional arrows indicating left and right motion (no text or symbols)natural_image
Side profile of a person wearing a VR headset (no text or symbols visible)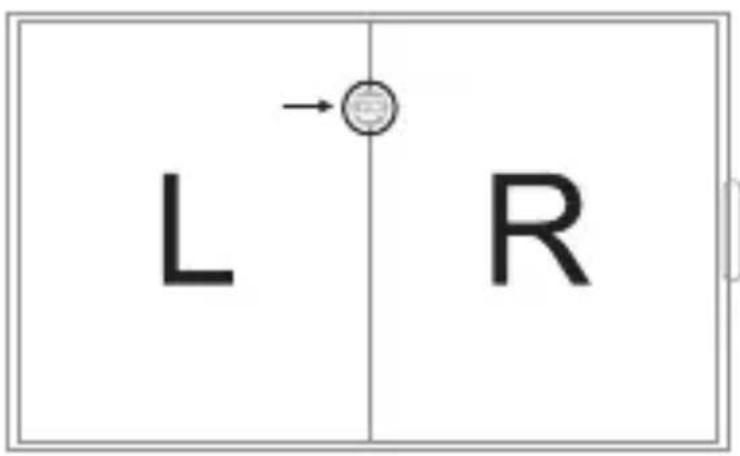
natural_image
Four identical cylindrical batteries with positive charge markings, arranged side by side (no text or symbols visible)natural_image
Line drawing of a handheld electronic device with ports and control buttons (no text or symbols)Notas importantes:
natural_image
Diagram of two circular speaker units with a small device inside, no text or symbols presentFoto 1

natural_image
Diagram of two circular gauges with a directional arrow indicating rotation or movement (no text or symbols)Foto 2
natural_image
Top-down schematic of a two-part electronic device with circular and rectangular components (no text or symbols)Foto 3
natural_image
Line drawing of a device front panel with circular gauges and a central knob (no text or symbols)Foto 5
natural_image
Technical line drawing of a device front panel with circular components and a central knob (no text or symbols)Foto 6 Foto 7
natural_image
Line drawing of a device front panel with two circular gauges and a central button (no text or symbols)natural_image
Diagram of a device with circular components and directional arrows, labeled 'Foto 8' (no readable text or symbols beyond label)natural_image
Line drawing of a mechanical device with no visible text or symbolsnatural_image
Front view of a D-sub helicopter with dual motors and control buttons (no text or symbols)Take off/Landing/Emergency stop button
natural_image
Pure technical diagram of a mechanical component with no text or symbols
natural_image
Line drawing of a mechanical device with a vertical arrow indicating direction (no text or symbols)natural_image
Technical line drawing of a mechanical assembly with no visible text or symbols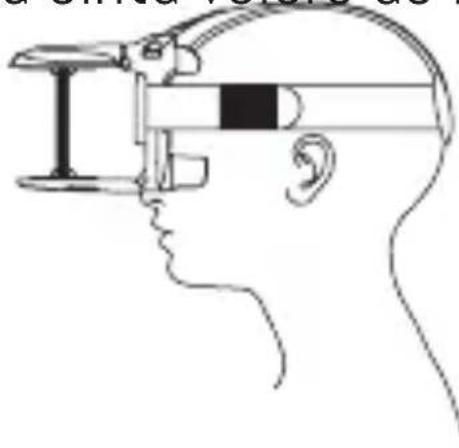
natural_image
Side profile illustration of a human head with a medical or CT scanner device, no text or symbols presentnatural_image
Diagram of a smartphone showing two circular components with centerlines and measurement arrows, no readable text or symbols present.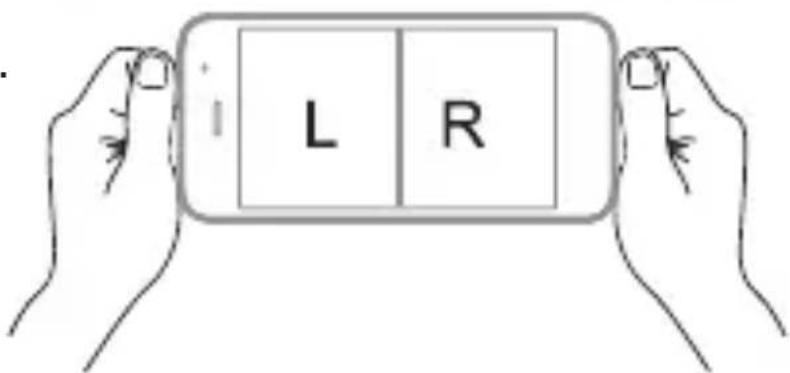
natural_image
Side profile of a person wearing a black VR headset on a mannequin head (no text or symbols visible)natural_image
Technical line drawing of a mechanical device with directional arrows indicating movement (no text or symbols)
natural_image
Mechanical device diagram showing a central body with two side arms and directional arrows indicating rotation (no text or symbols)natural_image
Diagram of a mechanical device with three arms and directional arrows indicating motion (no text or symbols)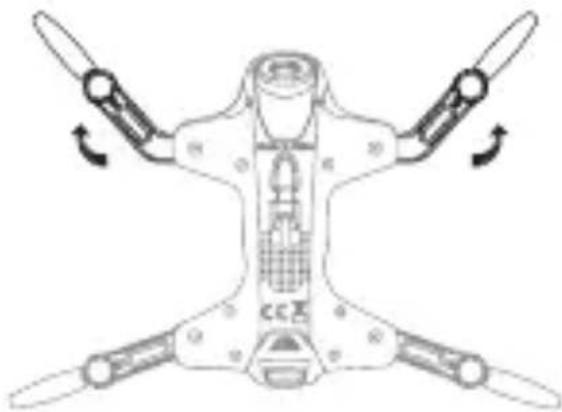
natural_image
Diagram of a drone with four blades and central body, showing rotational motion arrows (no text or symbols)natural_image
Line drawing of a handheld electronic device with ports and buttons (no readable text or symbols)Note:
1.Orientare le batterie correttamente.
2.Non mischiare batterie nuove e vecchie.
3.Non mischiare batterie di tipo diverso.
4.Non ricaricare le batterie non ricaricabili.
Operazioni pre-volo
natural_image
Diagram of two circular speaker units with a small device inside, no text or symbols presentImmagine 1
natural_image
Diagram of two circular components with a black arrow pointing to one, no text or symbols presentImmagine 2
natural_image
Top-down schematic of a device with two circular components and a central button (no text or symbols)Immagine 3
natural_image
Line drawing of a two-cylinder fan with circular control knobs and a central knob (no text or symbols)Immagine 5
natural_image
Technical line drawing of a mechanical component with two circular features and mounting holes (no text or symbols)natural_image
Technical line drawing of a device with two circular components and a central knob (no text or symbols)natural_image
Pure technical diagram of a device with circular components and directional arrows, no text or symbols presentImmagine 8
Controllo del volo
natural_image
Top-down schematic of a Drones hover with control knobs and display screen (no text or symbols)natural_image
Line drawing of a drone's front panel with dual motors and control buttons (no text or symbols)Immagine 9
natural_image
Pure technical diagram of a mechanical component with no text or symbolsModalità Headless
natural_image
Front view of a D-sub helicopter with dual motors and control knobs (no text or symbols)
natural_image
Line drawing of a mechanical device with a vertical arrow indicating direction (no text or symbols)natural_image
Side-by-side line drawing of a medical device and head profile, showing anatomical structures without any text or symbols.natural_image
Side profile of a person wearing a VR headset (no text or symbols visible)natural_image
Technical line drawing of a mechanical device with directional arrows indicating rotation or movement (no text or symbols)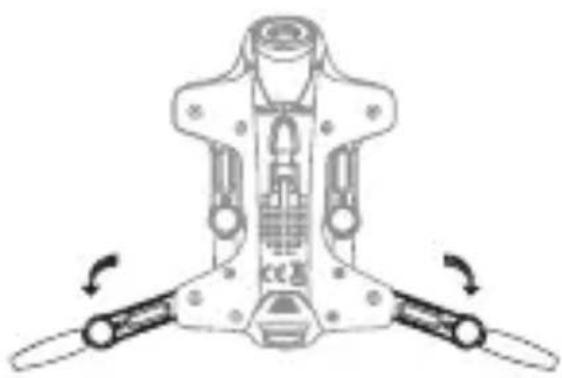
natural_image
Technical line drawing of a mechanical device with two arms and directional arrows indicating rotation (no text or symbols)natural_image
Technical line drawing of a mechanical device with three arms and internal components, no visible text or symbols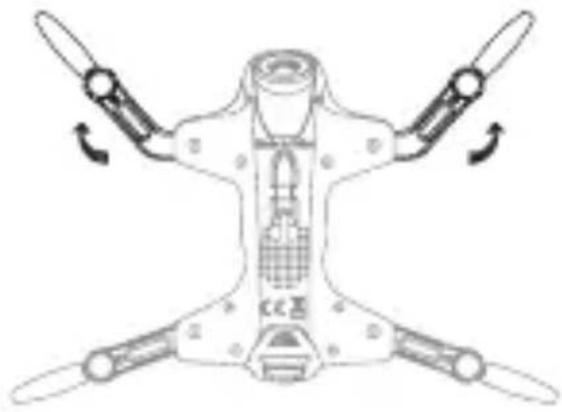
natural_image
Diagram of a drone with four blades and central body, showing rotational motion arrows (no text or symbols)natural_image
Line drawing of a handheld electronic device with ports and buttons (no text or symbols)Uwaga:
natural_image
Diagram of two circular devices with a small device inside, no text or symbols presentRysunek 1
natural_image
Diagram of a device front panel with two circular gauges and a small indicator box (no text or symbols)Rysunek 2
natural_image
Top-down schematic of a device with two circular components and a central hub (no text or symbols)Rysunek 3
natural_image
Line drawing of a two-cylinder fan with circular control knobs and a handle (no text or symbols)Rysunek 5
natural_image
Technical line drawing of a mechanical device with two circular components and mounting holes (no text or symbols)Rysunek 6 Rysunek 7
natural_image
Top-down schematic of a device with two circular components and a central knob (no text or symbols)natural_image
Technical diagram of a mechanical component with concentric circles and a directional arrow (no text or symbols)Rysunek 8
natural_image
Line drawing of a mechanical device with no visible text or symbolsnatural_image
Front view of a Drones hover with dual motors and control knobs (no text or symbols)natural_image
Pure technical diagram of a mechanical component with no text or symbolsnatural_image
Front view of a Drones hover with dual motors and control buttons (no text or symbols)
natural_image
Technical line drawing of a mechanical component with a vertical arrow indicating direction (no text or symbols)natural_image
Side-by-side line drawings of a medical device and a human head profile, both without any text or symbols.natural_image
Diagram of a car front view showing two circular ventricles with bidirectional arrows indicating left and right motion (no text or symbols)natural_image
Side profile of a person wearing a VR headset (no text or symbols visible)natural_image
Technical line drawing of a mechanical device with no visible text or symbols
natural_image
Technical line drawing of a mechanical device with two arms and internal components, showing rotational arrows (no text or symbols)natural_image
Technical line drawing of a mechanical device with three arms and directional arrows indicating rotation (no text or symbols)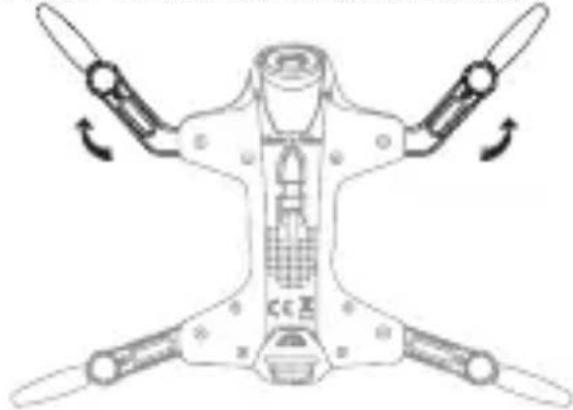
natural_image
Diagram of a drone with four propellers and directional arrows indicating rotation (no text or symbols)natural_image
Line drawing of a handheld electronic device with ports and buttons (no readable text or symbols)Figyelmeztetés:
natural_image
Diagram of two speakers with circular headsets and a small device inside, no text or symbols present1 ábra
natural_image
Diagram of two circular gauges with a black arrow pointing to one (no text or symbols)2 ábra
natural_image
Top-down schematic of a two-part electronic device with circular and rectangular components (no text or symbols)3 ábra
natural_image
Diagram of a drone with propellers and a rectangular device, showing no text or symbols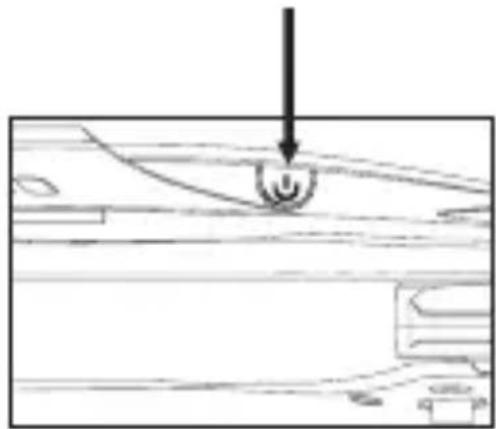
natural_image
Pure technical line drawing of a mechanical component with no text or symbols4 ábra
natural_image
Line drawing of a device front panel with two circular gauges and a central knob (no text or symbols)5.ábra
natural_image
Technical line drawing of a device front panel with circular components and mounting holes (no text or symbols)Picture 6 Picture 7
natural_image
Line drawing of a two-cylinder electronic device with circular and rectangular components (no text or symbols)natural_image
Technical diagram of a mechanical component with concentric circles and directional arrows (no text or labels)natural_image
Line drawing of a remote control device with no visible text or symbolsnatural_image
Front view of a drone's head panel with dual motors and control buttons (no text or symbols)natural_image
Pure technical diagram of a mechanical component with no text or symbolsMagasságtartás gomb
natural_image
Front view of a Drones hover with dual motors and control buttons (no text or symbols)
natural_image
Technical line drawing of a mechanical component with a vertical arrow indicating direction (no text or symbols)natural_image
Side-by-side line drawings of a medical device and a human head profile, no text or symbols presentnatural_image
Side profile of a person wearing a VR headset (no text or symbols visible)
Archos company (Contact address : ARCHOS SA 12 Rue Ampère 91430 Igny France) declares that this device ARCHOS Drone VR is in compliance with the essential requirements and other relevant provisions of Directive 2014/53/EU:
https://www.archos.com/products/conformity.html
https://www.archos.com/products/conformity.html