ATS80R - Receiver Monacor - Free user manual and instructions
Find the device manual for free ATS80R Monacor in PDF.
| Product type | Receiver for wireless speech transmission system |
| Power supply | 2 R6 (AA) 1.5 V batteries or rechargeable batteries |
| Radio frequency | 823-832 MHz and 863-865 MHz (depending on channel) |
| Transmission power (EIRP) | ≤ 10 mW (Low) / ≤ 20 mW (Hi) depending on band |
| Range | Up to 150 m in open field (Hi setting) |
| Transmission type | Digital |
| Audio frequency range | 300 - 4500 Hz |
| Operating temperature | 0 - 40 °C |
| Built-in microphone | Yes, for participants to speak |
| Headphone | Provided earpiece (3.5 mm jack) |
| Antenna | Integrated |
| Volume control | Side dial |
| Main functions | Talk (PTB/PTT/PTM), channel selection, lock, out-of-range alarm, call, group formation |
| Operating modes | Guiding, Teaching, Discussing |
| Key lock | Yes, can be enabled/disabled |
| Auto power off | Yes (20 min without signal) |
| Out-of-range alarm | Yes, audible and vibration alert |
| Headphone output | Standard level or HAC (for hearing aids) |
| Charger compatibility | ATS-85PS, ATS-825C, ATS-850PS (for NiMH rechargeable batteries) |
| Included accessories | Earpiece, neck strap, 2 batteries |
| Dimensions | Approximately 100 x 60 x 20 mm (estimated) |
| Weight | Approximately 100 g (with batteries) |
Frequently Asked Questions - ATS80R Monacor
User questions about ATS80R Monacor
0 question about this device. Answer the ones you know or ask your own.
Ask a new question about this device
Download the instructions for your Receiver in PDF format for free! Find your manual ATS80R - Monacor and take your electronic device back in hand. On this page are published all the documents necessary for the use of your device. ATS80R by Monacor.
USER MANUAL ATS80R Monacor
Voice Transmission System
These instructions are intended for users without any specific technical knowledge. Please read the instructions carefully prior to operation and keep them for later reference.
1 Applications
Combined with one or multiple receivers ATS-80R, the transmitter ATS-80T creates a mobile wireless voice transmission system, e. g. for guided tours, lectures and wireless command transmission. The transmission range depends on local conditions and may reach 150m as a maximum in the open.
1.1 Conformity and approval
Herewith, MONACOR INTERNATIONAL declare that the units ATS-80R and ATS-80T comply with the directive 2014 / 53 / EU. The EU declarations of conformity are available on the Internet: www.monacor.com
Frequency range 863-865 MHz*:
Licence-free and no registration required in EU and EFTA countries
Frequency range 823-832 MHz*:
Restrictions or requirements apply in the following countries:
| B | AT CZ FR LT PL SE UK |
- The corresponding channels are listed in the table which can be found in chapter 3 "Specifications".
2 Safety Notes
The transmitter / receiver corresponds to all relevant directives of the EU and is therefore marked with
The transmitter / receiver is suitable for indoor use only. Protect it against dripping water, splash water and high air humidity. The admissible ambient temperature range is 0 - 40^
- For cleaning only use a dry, soft cloth; never use water or chemicals.
- No guarantee claims for the transmitter / receiver and no liability for any resulting personal damage or material damage will
be accepted if the transmitter / receiver is used for other purposes than originally intended, if it is not correctly operated, or if it is not repaired in an expert way.

If the transmitter / receiver is to be put out of operation definitively, dispose of the transmitter / receiver in accordance with local regulations.
3 Overview
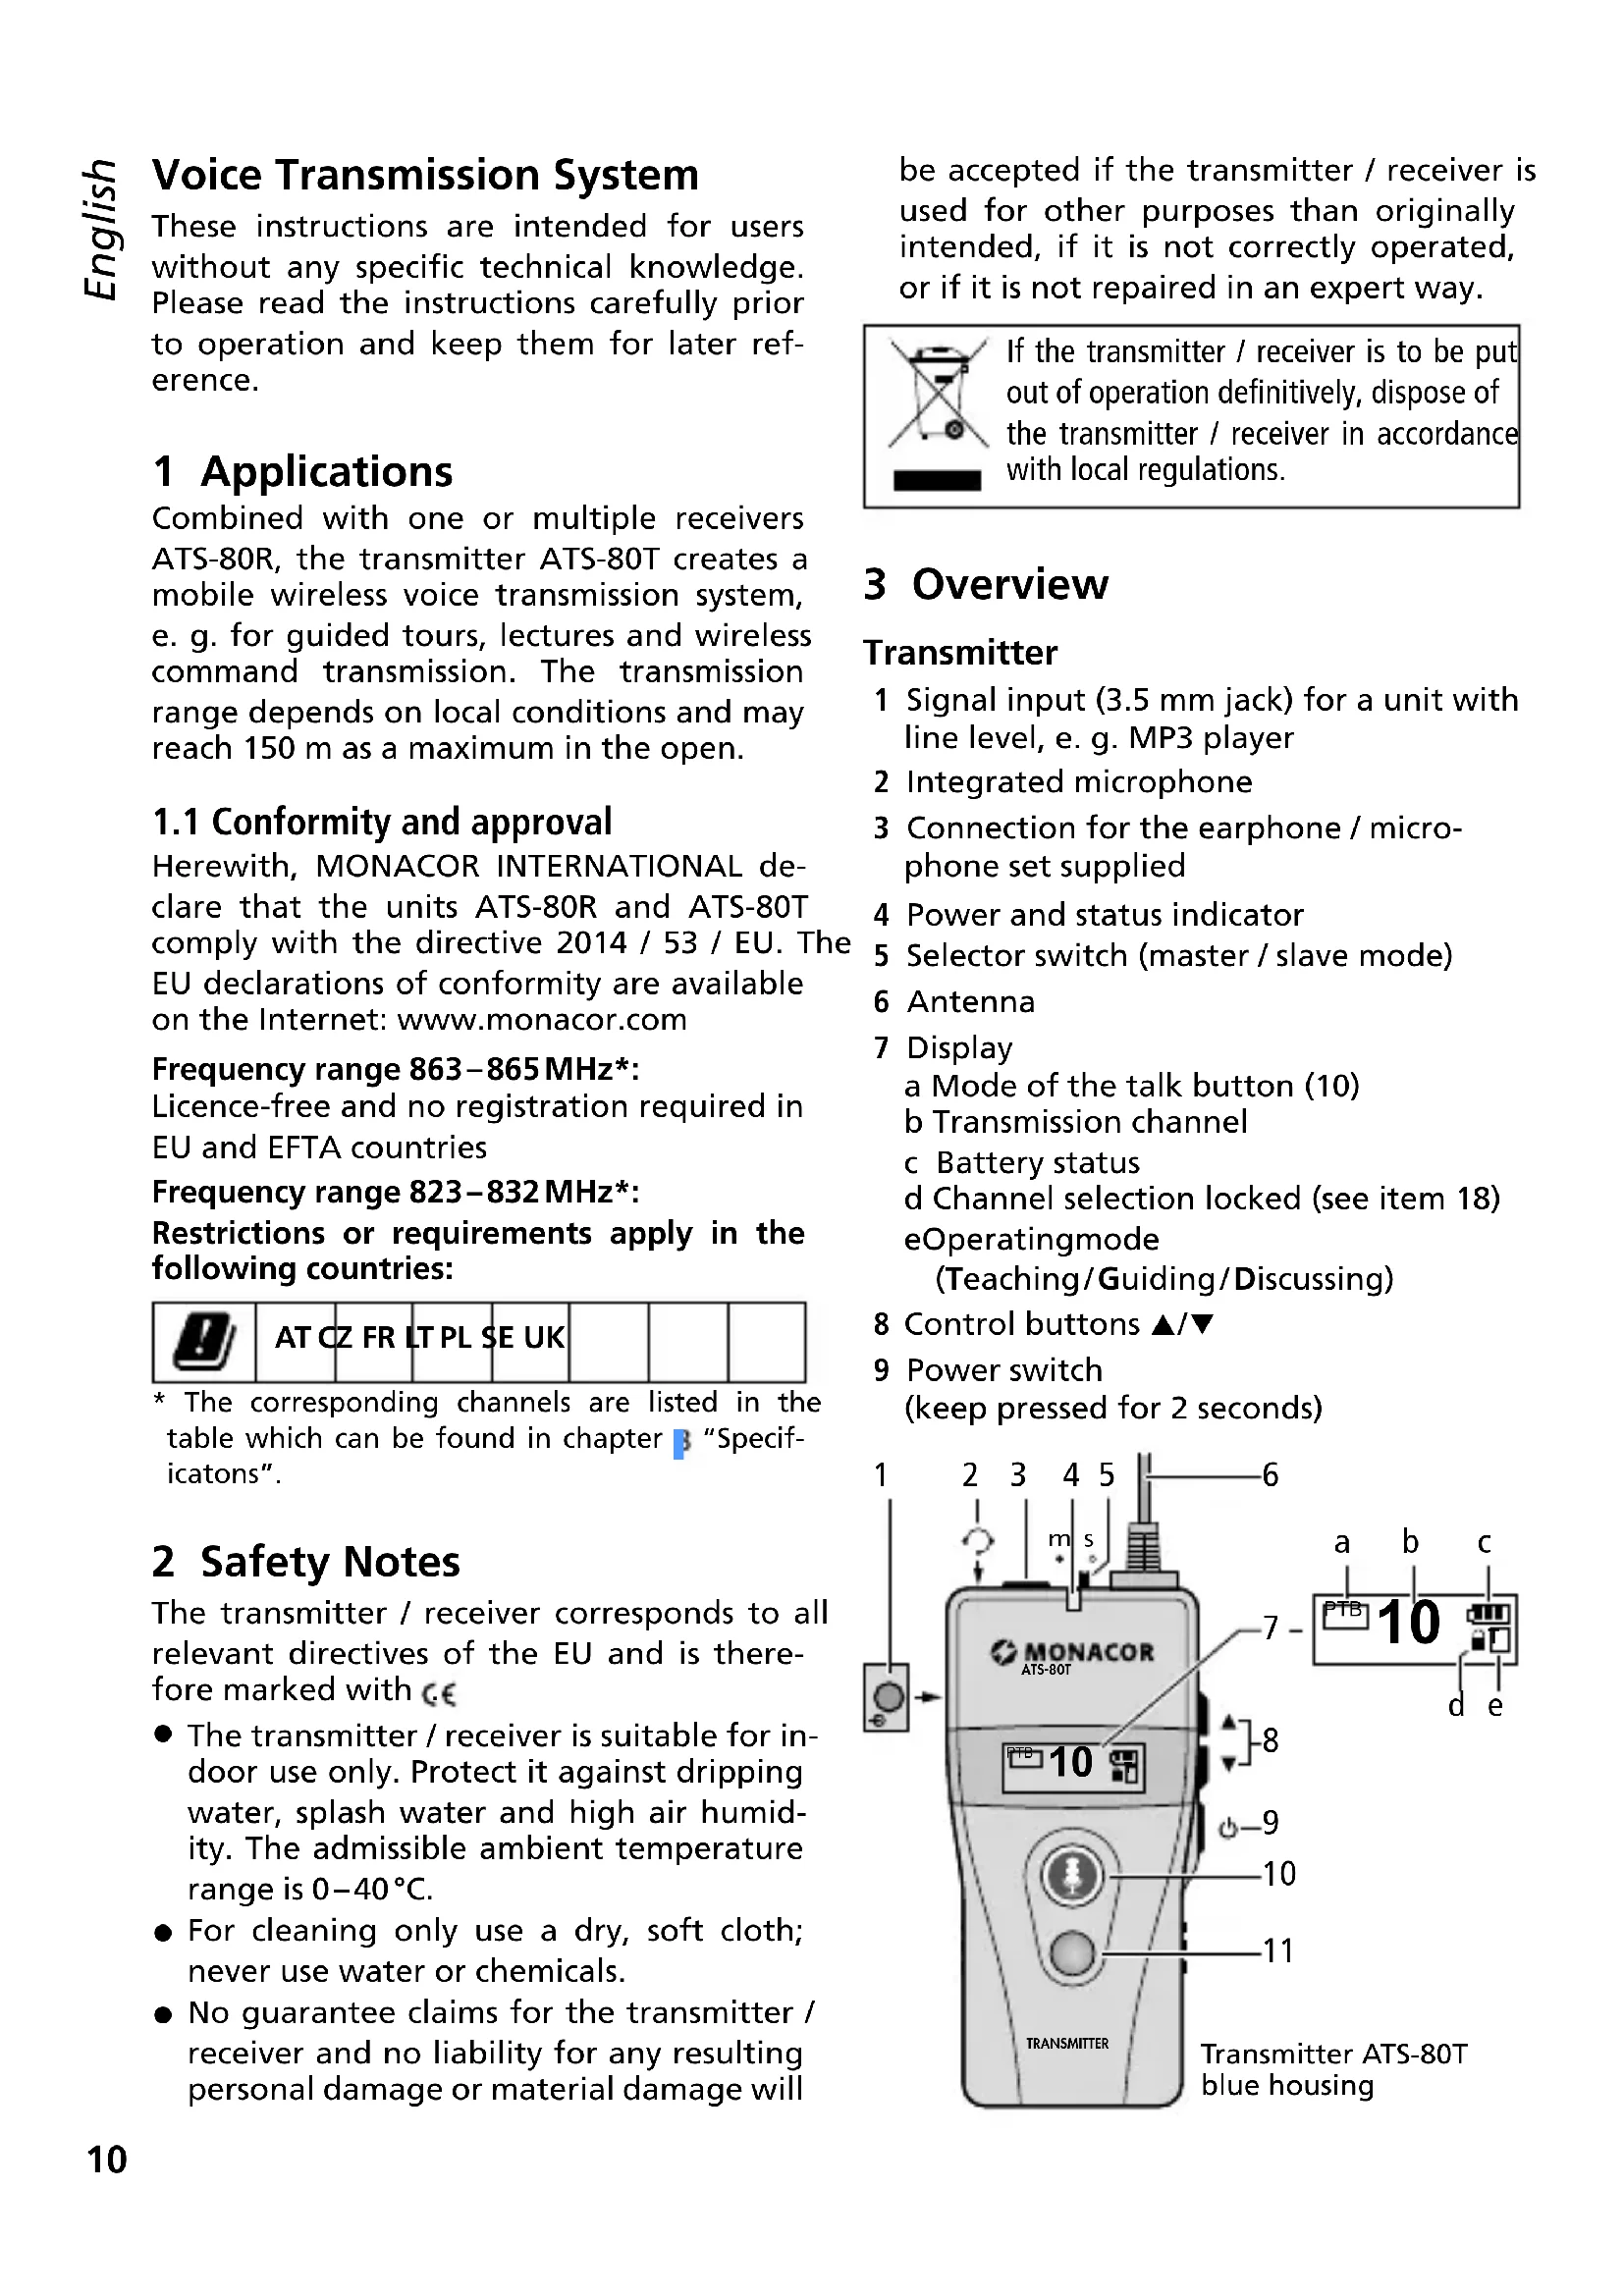
Transmitter
1 Signal input (3.5 mm jack) for a unit with line level, e.g. MP3 player
2 Integrated microphone
3 Connection for the earphone / microphone set supplied
4 Power and status indicator
5 Selector switch (master / slave mode)
6 Antenna
7 Display a Mode of the talk button (10) b Transmission channel Battery status d Channel selection locked (see eOperatingmode (Teaching/Guiding/Discussin
8 Control buttons /
9 Power switch (keep pressed for 2 seconds)

10 Talk button lights up in green = microphone switched on lights up in red = microphone switched off
11 Call button
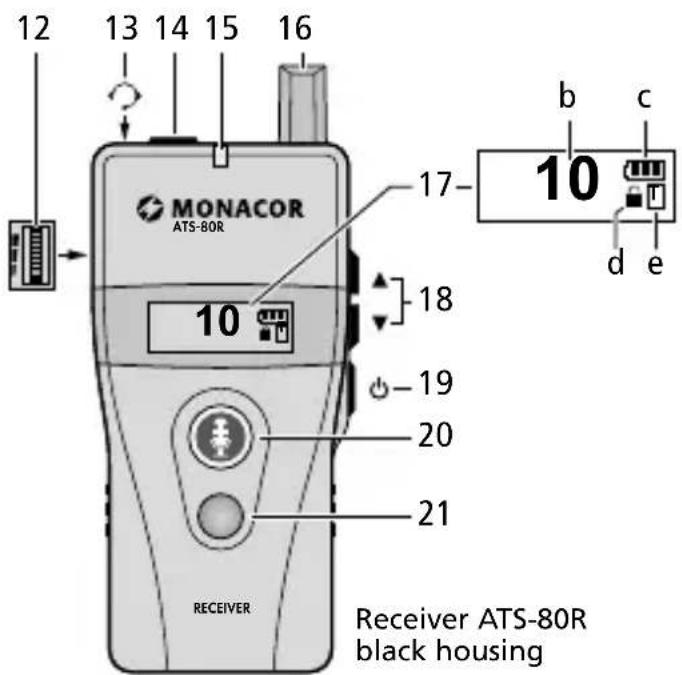
Receiver
12 Volume control
13 Integrated microphone
14 Connection for the earphone supplied
15 Power and status indicator
16 Antenna
17 Display (see item 7 of the transmitter)
18 Buttons / for channel selection To deactivate the key lock, keep both buttons pressed until (d) goes out.
19 Power switch (keep pressed for 2 s)
20 Talk button (keep pressed to talk)
21 Reset button for warning signal and call signal
4 Setting into Operation
4.1 Power supply
For power supply, two 1.5V batteries of size AA are required. When the status indicator (4, 15) lights up or starts flashing in red, the batteries are discharged and must be replaced.
- Only insert batteries of the same type and always replace both of them.
- If the transmitter / receiver is not used for a longer period of time, always remove the batteries so that the transmitter / receiver will not be damaged in case the batteries should leak.
1) To open the battery compartment, slide down the cover on the rear side.
2) Insert the batteries with the positive and negative poles as indicated in the battery compartment.
3) Close the battery compartment.
Instead of non-rechargeable batteries, it is also possible to insert two rechargeable NiMH batteries of size AA. To charge these batteries, the chargers ATS-85PS, ATS-825C and ATS-850PS are ideally suited: Leave the batteries in the unit and insert the unit into a charging slot. Power is supplied via the contacts at the lower end of the unit.

Never put batteries in the household waste. Always dispose of the batteries in accordance with local regulations.
4.2 Selecting the operating mode
Three operating modes are available.
Guiding: The leader of the group uses the transmitter and can talk freely to the group members who are supplied with a receiver each. One member of the group [the one who presses the talk button (20) first] can also talk and ask a question, for example.
Teaching (factory setting): In addition to the leader of the group, an assistant supplied with a transmitter can talk to all members of the group or a member of the group can talk and ask a question, for example.
Discussing: Two members of the group (each of them supplied with a transmitter) can talk freely; all other members (supplied with a receiver) can only listen.
1) All units must be switched off: Keep the button (9, 19) pressed until OFF is shown on the display.
2) On the transmitter, keep the buttons (8) and (9) pressed until the transmitter is switched on. The display will show "Mode" and the operating mode set.
Select the mode desired by means of the buttons /
3) Press the button to confirm the mode selected. The selection mode will be exited; the rectangle (e) on the right side of the display will show the first character of the mode selected.
The receivers will automatically change to the operating mode as soon as they are set to the same transmission channel as the transmitter (chapters 4.3 and 4.4).
4.3 Setting the transmission channel
Always observe chapter 1.1 when selecting the transmission channel.
As long as the symbol (d) is shown on the display, the channel selection is locked. To unlock, press the buttons and 8,18 at the same time until the symbol goes out. Then immediately select the channel by means of the buttons / . The channel selection will be locked 1 second after the channel has been selected.
Automatic transfer of the transmission channel to all receivers
1) Switch off the transmitter and set the selector switch "s/m" (5) to the position "m".
2) Keep the talk button (10) and the button (9) pressed to switch the transmitter on again. The channel number will flash on the display.
3) Use the buttons / (8) to select the transmission channel and then press the button to confirm your selection or wait for 5 seconds. The status indicator (4) will flash rapidly and the talk button will light up in green; the transfer of the transmission channel to the receivers has been activated.
4) All receivers must have been switched off. When the receivers are switched on again, they will automatically be set to the operating mode and transmission channel of the transmitter.
5) Exit the transfer mode on the transmitter: Either use the talk button (10) to go to the normal mode or use the button to switch off the transmitter.
4.4 Creating a group of a transmitter and receivers
When a group consisting of a transmitter and all receivers is created, the following additional features will be available:
- Presence check: By the press of a button, the group leader can check how many receivers are switched on and thus if all members of the group are present.
- Call signal: By the press of a button, the leader of the group can send a signal to all members (e.g. to ask the group members to gather).
- When a group member leaves the reception range, a warning signal will sound at the corresponding receiver.
To create a group:
1) Switch off the transmitter and all receivers.
2) Set the selector switch "s / m" (5) on the transmitter to the position "m".
3) Keep the red call button (11) and the button 9 pressed to switch on the transmitter. On the left side of the display, a chain symbol will be shown; on the right side, the channel number will start flashing.
4) Use the buttons / (8) to select the transmission channel and then press the button to confirm your selection or wait for 5 seconds. The status indicator (4) will flash rapidly; the group creation function has been activated.
5) Switch on all receivers of the group.
6) The display will show the number of receivers switched on. If the number is correct, exit the group creation mode on the transmitter: Either use the red call button (11) to go to the normal mode or use the button to switch off the transmitter.
4.5 Connecting microphone/earphone Putting the unit around your neck
1) Connect the earphone / microphone set supplied to the jack (3) of the transmitter. Put the microphone on your ear and align the microphone in such a way that it is close to your mouth.
2) Connect the earphone supplied to the jack (14) of the receiver and put it on your ear.
3) To put the transmitter / receiver around your neck, attach the neckband supplied to the clip on the rear side of the transmitter / receiver. As an alternative, use the clip to directly attach the transmitter / receiver to your belt or waistband.
5 Operation
1) To switch on the units, keep the button (9, 19) pressed until the display is illuminated; to switch off, keep the button pressed until OFF is shown on the display.
The LED status indicator (4, 15) on the transmitter flashes continuously. The LED status indicator on the receiver will only flash when the transmission channel of the receiver does not match the transmission channel of the transmitter or when the transmitter has been switched off. When the LED indicator lights up or flashes in red, the batteries are discharged and must be replaced (chapter 4).
2) According to the factory settings, the talk button (10) will light up in green and PTB will be shown on the left side of the display (a) when the transmitter is switched on. It is possible to talk. For a break, switch off the microphone by means of the talk button the button will light up in red. To continue talking, press the talk button again; the button will light up in green. It is also possible to set the transmitter in such a way that the button must be kept pressed for talking or that the microphone will be switched off as long as the button is pressed (chapter 1).
3) On the receiver, use the small wheel (12) on the left to adjust the volume for the arophone.
4) To allow questions or comments by the group members, set the selector switch "s / m" (5) on the transmitter to the position "s". In the position "m", the talk buttons (20) of the receivers will not have any function.
The member who is the first to keep the talk button (20) pressed will be able to talk; the button will light up in green. The talk buttons of the other receivers will be locked and will not light up when
pressed. While talking, keep the integrated microphone (13) close to your mouth.
5) On the transmitter, use the buttons / (8) to adjust the volume for the earphone (indication: VOL 01-11).
Notes concerning the operating mode "Teaching"
- The group leader and the assistant are provided with a transmitter each. Set the selector switch "s / m" (5) on the transmitter of the group leader to the position "m" (master) and on the transmitter of the assistant to the position "s" (slave).
- All transmitters and receivers must be set to the mode "Teaching" (chapter 4.) so that the rectangle (e) on the right side of the displays shows "T".
- The group leader and the assistant can talk alternately as long as their talk buttons 10) light up in green.A member of the group can only talk when the assistant switches off his / her microphone by means of the talk button and the talk button lights up in red.
Notes concerning the operating mode "Discussing"
- Each of the two members who are to talk freely is supplied with a transmitter.
- All transmitters and receivers must be set to the mode "Discussing" (chapter 4.2) so that the rectangle (e) on the right side of the displays shows "D".
- In contrast to the mode "Teaching", the members supplied with a receiver can only listen and are not able to ask questions.
5.1 Additional functions
When a group consisting of a transmitter and receivers has been created (chapter 4.4), additional functions are available.
Presence check
1) On the transmitter, briefly press the red call button (11): two numbers will be shown on the display; the large number indicates the number of the people present, the small number indicates the number of the group members. When both numbers
are the same, all members of the group are present with their receivers switched on.
2) To go back to the previous display indication, press the red button again.
Call signal, e. g. to ask the group to gather
1) On the transmitter, keep the red call button (11) pressed until CALLING... is shown on the display. To go back to the previous display indication, press the button again.
2) A call signal will sound at the corresponding receivers, the display will show GATHER, the talk button (20) will flash in red and the receiver will vibrate for 30 seconds. To terminate the call signal, press the red reset button (21). If the call signal is not terminated, the receiver will automatically switch off after 20 minutes.
Warning signal on leaving
the reception range
When a member of the group leaves the reception range, a warning signal will sound at the corresponding receiver, the talk button (20) will flash in red and the display will show OUT OF RANGE. The warning will be terminated as soon as the member returns to the reception range or the red reset button (21) is pressed.
6 Additional Setting Options
The basic settings of the transmitter and the receiver can be changed as required. The units can also be easily reset to their factory settings.
1) Switch off the transmitter / receiver and then keep the button (8, 18) and the button (9, 19) pressed to switch it on again. On the display, the setting menu with the first menu item "Channel Lock" will be shown.
2) Use the button or change the setting and then use the button to confirm: The setting selected will be underlined. If the setting is not to be changed, only press the button The next menu item will be shown on the display.
3) When the final menu item is shown and the button is pressed, the setting menu will be exited.
Setting options for the transmitter
| Menu item Setting | |
| Channel Lock ON, OFF | |
| Talk: function of the talk button (10) | PTB (push to bolt) To switch between "Talk" and "Micro- phone off" PTT (push to talk) To talk, keep the button pressed PTM (push to mute) To mute, keep the button pressed |
| Mic. Gain: gain of the microphone signal | 1, 2, 3, 4, 5 |
| RF Power: transmission power | Low (10 mW), Hi (20 mW) |
| Audio Priority: priority of the signal at the jack | OFF The signals of the microphone and at the jack will be transmitted. ON Only the signal at the jack will be transmitted (microphone off). |
underlined = factory setting
Setting options for the receiver
| Menu item Setting | |
| Channel Lock ON, OFF | |
| Auto Power Off: The receiver will automatically switch off after 20 minutes if it does not receive any signal from the transmitter. | ON, OFF |
| Auto Power On: The receiver will automatically switch on as soon as it is removed from the charger. | ON, OFF |
| Alarm: there will be a warning when the receiver is outside the reception range. | ON, OFF |
| Earphone Output: earphone level | Regular standard setting HAC level for hearing aids |
underlined = factory setting
Reset to factory settings
The factory settings are underlined in the two previous tables. A reset to the factory settings will also set the transmission channel to 01 (823.5 MHz) and the operating mode to "Teaching".
1) Use the button (9, 19) to switch off the transmitter/receiver.
2) Keep the buttons and (8, 18) and the button pressed until the unit is switched on again: The settings have been reset to their factory settings.
3) Set the transmission channel and the operating mode as desired.
7 Troubleshooting
No sound at the receiver
- Has the volume control (12) been turned up?
- Has the receiver been set to the transmission channel of the transmitter (chapter 4.3)?
Is the mode shown on the receiver the same as the mode shown in the rectangle (e) on the right side of the display of the transmitter? Switch the receiver off and on again.
Talking via the receiver not possible
In the mode "Guiding", the selector switch "s / m" (5) of the transmitter must be in the position "s".
- As long as a member of the group keeps the talk button (20) pressed, the talk buttons of the other receivers are locked.
- In the mode "Teaching", a member can only talk when the assistant has switched off his / her microphone by means of the talk button.
In the mode "Discussing", it is generally not possible to talk via a receiver.
Error messages on the transmitter
NO DATA - No group has been created yet (chapter 4.4).
NOT APPLICABLE - This function cannot be used. Set the selector switch "s/m" (5) to the position "m", if required.
8 Specifications
Radio frequency range
Transmission power (EIRP) 823-832 MHz: . . . . . . ≤10/20 mW (Low/Hi) 863-865 MHz: . . . . . . ≤10 mW
Channels: see table below
Transmission range: ... with the setting "Hi", up to 150 m in the open
Transmission type: . . . digital
Audio frequency range: 300-4500 Hz
Power supply: 2 rechargeable or non-rechargeable batteries, size AA
Ambient temperature: 0 - 40^
Dimensions (W× H× D)
w/o antenna: 47 × 97 × 35 mm
Weight: 53g
Connections: 3.5 mm jack
Channel configuration
| CH | MHz | CH | MHz | CH | MHz | CH | MHz |
| 01 | 823.500 | 11 | 863.500 | 21 | 823.250 | 31 | 828.250 |
| 02 | 864.500 | 12 | 824.000 | 22 | 823.750 | 32 | 828.750 |
| 03 | 831.500 | 13 | 825.000 | 23 | 824.250 | 33 | 829.250 |
| 04 | 824.500 | 14 | 826.000 | 24 | 824.750 | 34 | 829.750 |
| 05 | 825.500 | 15 | 827.000 | 25 | 825.250 | 35 | 830.250 |
| 06 | 826.500 | 16 | 828.000 | 26 | 825.750 | 36 | 830.750 |
| 07 | 827.500 | 17 | 829.000 | 27 | 826.250 | 37 | 831.250 |
| 08 | 828.500 | 18 | 830.000 | 28 | 826.750 | 38 | 831.750 |
| 09 | 829.500 | 19 | 831.000 | 29 | 827.250 | 39 | 863.250 |
| 10 | 830.500 | 20 | 864.000 | 30 | 827.750 | 40 | 863.750 |
| 41 | 864.250 | ||||||
| 42 | 864.750 | ||||||
Note: The channels printed in bold 02, 11, 20, 39 - 42 require no registration in EU and EFTA countries. Always observe chapter 1 when using the other channels.
Subject to technical modification.
All rights reserved by MONACOR® INTERNATIONAL GmbH & Co. KG. No part of this instruction manual may be reproduced in any form or by any means for any commercial use.