
TD 1902 - Kitchen timer ADE - Free user manual and instructions
Find the device manual for free TD 1902 ADE in PDF.

| Brand | ADE |
| Model | TD 1902 |
| Product Type | Digital Kitchen Timer |
| Power Supply | 2 LR03 (AAA) 1.5 V batteries |
| Main Functions | Timer (adjustable up to 99 min 59 sec), quick timer (1, 3, 5 min), stopwatch, alarm, 12/24 hour clock |
| Alarm Type | Selectable: beep, vibration, screen light, or combinations |
| Display | Backlit digital screen |
| Care and Cleaning | Clean with a soft dry cloth. Do not immerse in water |
| Safety | Use by children aged 8 and above under supervision. Keep batteries out of reach of children |
| Warranty | 2 years (repair or replacement) |
| Distributor | Waagen-Schmitt GmbH, Hammer Steindamm 27-29, 22089 Hamburg, Germany |
| Material | ABS plastic |
| Color | White |
| Dimensions (approx.) | 8 x 7 x 2 cm |
| Weight (with batteries) | 80 g |
| Spare parts | Not available (device not user-serviceable) |
Frequently Asked Questions - TD 1902 ADE
User questions about TD 1902 ADE
0 question about this device. Answer the ones you know or ask your own.
Ask a new question about this device
Download the instructions for your Kitchen timer in PDF format for free! Find your manual TD 1902 - ADE and take your electronic device back in hand. On this page are published all the documents necessary for the use of your device. TD 1902 by ADE.
USER MANUAL TD 1902 ADE
22089 Hamburg, Germany
You have chosen to purchase a high-quality ADE brand product, which combines intelligent functions with an exceptional design. This timer is a practical companion for the kitchen, bathroom, household, or hobby. The wealth of experience of the ADE brand ensures a high technical standard and proven quality.
We wish you a lot of success with perfect time management!
Your ADE Team
General information
About this operating manual

This operating manual describes how to operate and maintain your product safely.
Keep this operating manual in a safe place for future reference. If you pass this product on to someone else, pass on this operating manual as well. Failure to observe this operating manual may result in injuries or damage to your product.

Pull the protective film off the display.
Explanation of symbols

This symbol combined with the word DANGER warns of serious injuries.

This symbol combined with the word WARNING warns of moderate and mild injuries.

This symbol combined with the word NOTE warns of material damage.

This symbol indicates additional information and general notes.
Table of Contents
General information 27
Intended use 30
Safety. 30
Scope of delivery. 33
Overview 34
Start-up 36
Basic functions 37
Using the timer 38
Using the stopwatch function 40
Using the alarm function 41
Selecting the alarm type. 43
Cleaning. 44
Fault and remedy 44
Technical data 45
Declaration of Conformity 46
Warranty 46
Disposal 47
Intended use
The digital timer is designed as a clock and timer for private use.
Safety
-
This product may be used by children aged 8 and above, as well as by persons with reduced physical, sensory, or mental capacities or lacking experience and knowledge if they are supervised or have been instructed in the safe use of the product and understand the risks that may arise.
-
Children must not play with the product.
-
Cleaning and user maintenance must not be carried out by children, unless they are 8 years of age or older and are being supervised.
-
Batteries, when swallowed, can be life-threatening. Keep the product and batteries out of reach of small children. If batteries have been swallowed, seek medical help immediately.
DANGER for children
- Keep children away from packaging material. There is a risk of choking if swallowed.
RISK of fire/burning and/or explosion
- There is a risk of explosion if the battery is replaced improperly. Replace batteries only with the same or equivalent battery type. Observe the "Technical data".
-
Batteries must not be recharged, reactivated by other means, dismantled, thrown into fire, or short-circuited. Otherwise, there is an increased risk of explosion and leakage; furthermore, gases may escape!
-
Avoid contact of the battery fluid with skin, eyes, and mucosa. In case of contact, immediately rinse the affected areas with plenty of clean water and consult a doctor.
BEWARE of material damage
- Protect the timer from strong shocks, vibrations, and moisture.
- Remove the battery from the product if it is depleted or if you are not going to use the timer for a long time. This prevents damage that may be caused by leakage.
- When inserting and changing batteries, pay attention to the correct polarity (+/-) .
- Do not expose batteries to extreme conditions, for example, by storing them on radiators or under direct sunlight. Increased risk of leakage!
-
Clean the battery and device contacts, as needed, before inserting the battery.
-
Do not make any changes to the product. Only allow repairs to be carried out by a specialist workshop. Repairs carried out improperly can considerably endanger the user.
Scope of delivery
- Digital kitchen timer
- 2x LR03 (AAA) batteries, 1.5 V, 3 V
- Operating Manual
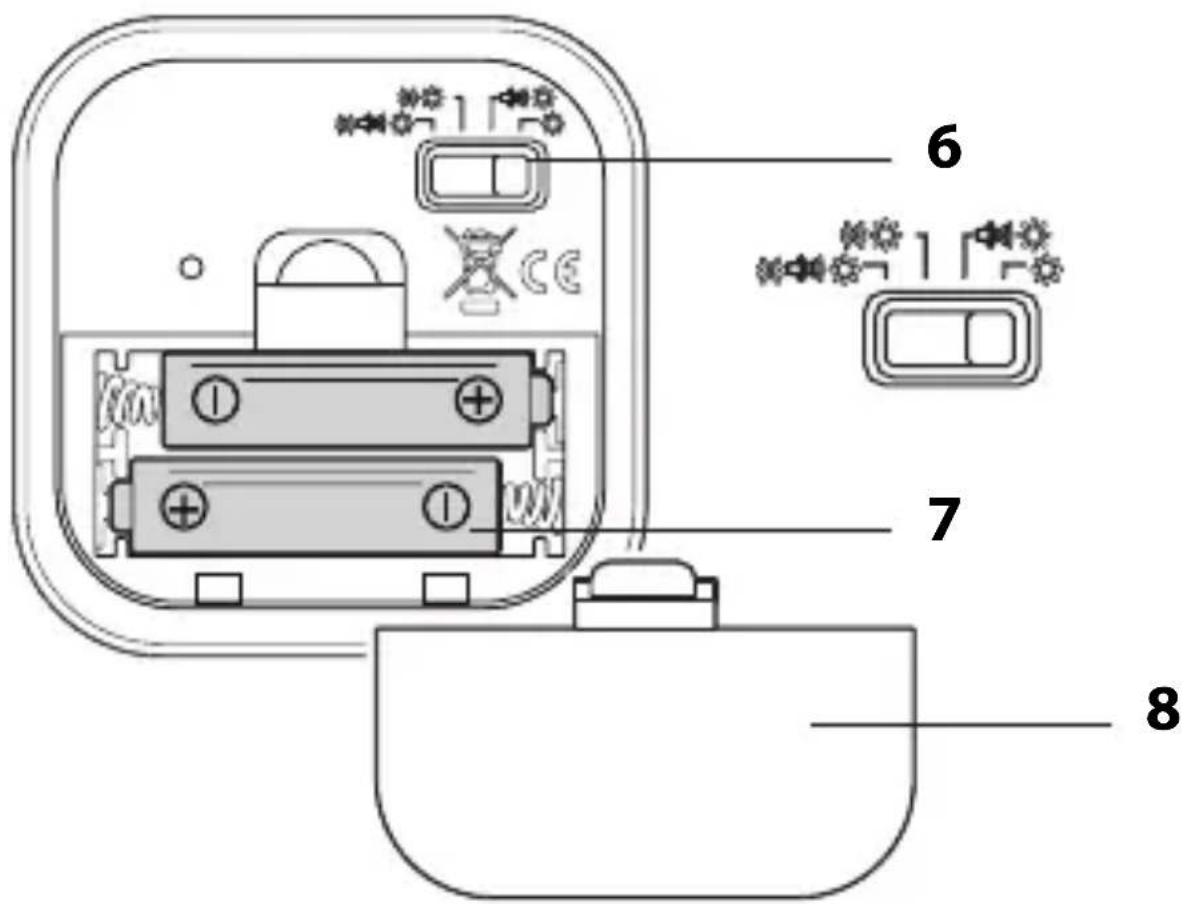
Overview
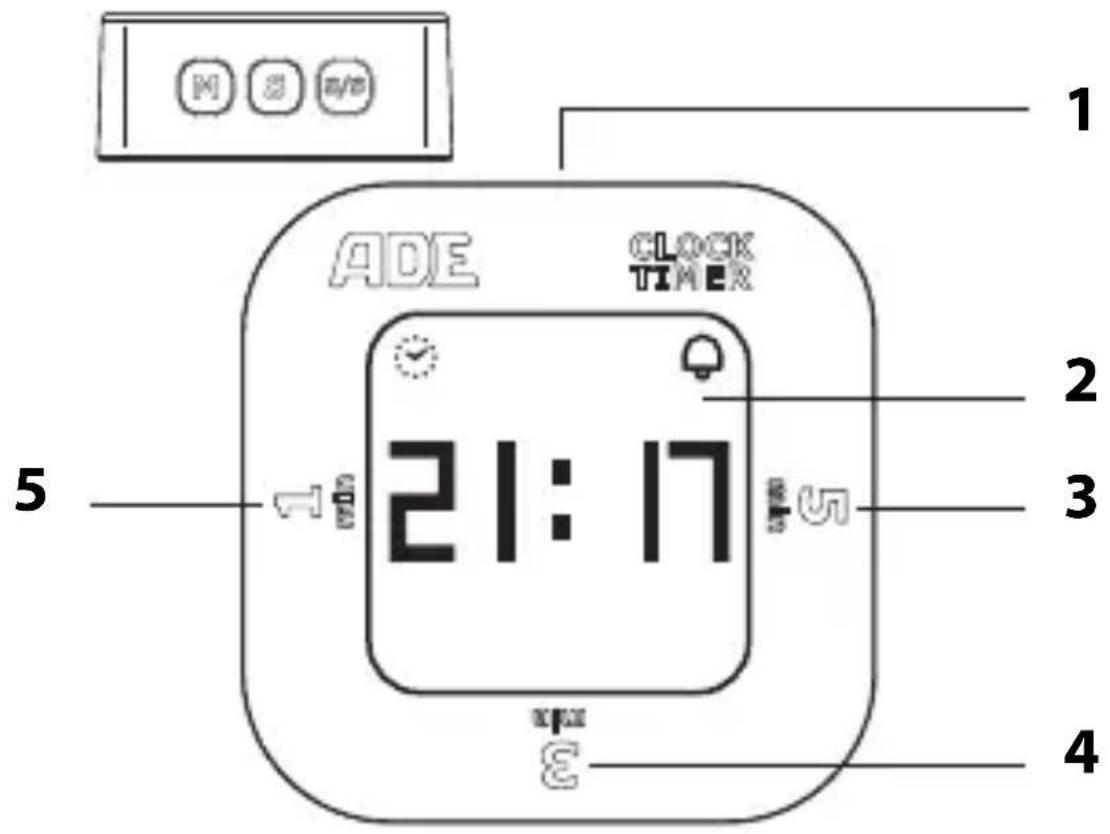
1 Control keys M, S and S/S
2 Display
3 5-minute timer
4 3-minute timer
5 1-minute timer
6 Function switch for alarm type
7 Battery compartment for 2x LR03 (AAA), 1.5 V
8 Battery compartment cover
Start-up
For use, you need two 1.5 V LR03 (AAA) batteries.
Remove the battery compartment cover and remove the old battery.
- Press the locking tab of the battery compartment cover down and remove the battery compartment cover.
- Insert the batteries as shown on the bottom of the battery compartment. Pay attention to the correct polarity (+/-) .
- Replace the battery compartment cover. The locking tab must snap audibly into place.
Notes on changing the battery:
- The batteries must be changed when nothing is shown on the display.
-
Only use the battery type specified in the "Technical Data".
-
Dispose of old batteries in an environmentally friendly manner, see "Disposal".
Basic functions
Setting the time
As soon as the timer is supplied with power, "0:00" flashes on the display.

If you hold down the S or S/S key, the displayed values progress in increasing or decreasing order faster.
If there are more than 20 seconds between two key presses, the process is cancelled and you have to repeat it.
- Hold down the M key until the hour digit flashes.
Set the hour by pressing the S (forward) or S/S (reverse) key.
- Press the M key.
The minute digit flashes on the display
- Set the minute by pressing the S (forward) or S/S (reverse) key.
- Press the M key; the time setting is complete.
Selecting the time format
- Hold down the S key until "12 H" or "24 H" appears on the display.
In the 12-hour format, afternoon hours are indicated as "PM".
Using the timer
Starting the preset countdown
For a short-term measurement, start one of the three preset countdowns. You have to choose among one, three and five minutes.
- Turn the timer so that the desired time period points upwards.
The countdown starts automatically. An alarm sounds after the countdown has elapsed.
- Press the S/S key to stop the alarm or turn the timer so that the time is displayed again.

To interrupt the running timer and continue again, press the S/S key.
Pay attention to the following:
- If you do nothing after the countdown has elapsed, the alarm will automatically turn off after approx. 30 seconds. "00:00" flashes on the display. If you press S/S, the timer is reset to its original value, e.g. "01:00". Press S/S again to restart the timer.
- The type of alarm depends on the position of the function switch, see "Selecting the alarm type".
Starting the individual countdown
- Hold down the S/S key until "00:00" appears on the display.
- Set the minutes with M
- Set the seconds with S.
- Press S/S to start the countdown, interrupt if necessary and start again.

To reset the display to "00:00", press and hold down the M and S/S keys simultaneously.
- To display the time again, hold down the S/S key.
Using the stopwatch function
- Hold down the S/S key until "00:00" appears on the display.
- Press S/S to start the time measurement, interrupt if necessary and start again.

To reset the display to "00:00", press and hold down the M and S/S keys simultaneously.
- To display the time again, hold down the S/S key.
Using the alarm function
Setting the alarm time
- Press the M key briefly to enter the setting mode for the alarm time (default "6:30").
- Hold down the M key until the hour digits flash on the display.
- Set the alarm hour by pressing the S or S/S key.
- Press the M key. The minute digit flashes on the display.
-
Set the alarm minute by pressing the S or S/S key.
-
Press the M key.
- Use the S or S/S key to set the snooze time (time between two alarm calls). Adjustable time: between 5 and 60 minutes.
- Press the M key. Time/snreeze time setting is completed.
- Briefly press the S/S key, a bell symbol Q appears in the upper right corner of the display. The alarm function is activated.
Stopping the alarm
At the set alarm time, you will be woken by beeping:
If no key is pressed, the alarm automatically turns off after 1 minute. You will be woken again the next day.
- Press any key to interrupt the alarm for 24 hours. You will be woken at the same time the next day.
If you press S/S once briefly, the bell symbol on the display goes out: The alarm function is disabled. Pressing S/S again activates the alarm function (note the display).
Selecting the alarm type
Set the function switch (rear) to select the alarm type of the timer:
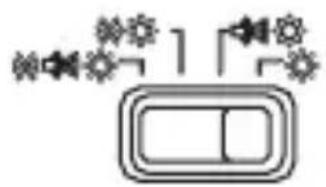
From left to right:
- Display lighting, beeps, vibration
- Display lighting, vibration
- Beeps
- Display lighting, beeps
Cleaning

NOTE on material damage
Do not immerse the timer in water or other liquids. Do not use rough, scratching or abrasive cleaning agents.
-If necessary, remove dust with a soft, dry cloth, or wipe with a slightly damp cloth.
Fault and remedy
No function.
- Are the batteries empty or inserted the wrong way around?
Technical data
Model: Digital kitchen timer TD 1902
Battery: 2x LR03 (AAA), 1.5 V Rated current: max. 82-85 mA
Distributor (no service address):
22089 Hamburg, Germany
Our products are constantly being developed and improved. For this reason, design and technical modifications are possible at any time.
Declaration of Conformity
Waagen-Schmitt GmbH hereby declares that the TD 1902 digital kitchen timer complies with the 2014/30/EU and 2011/65/EU directives.
The declaration will lose its validity if any modification is made to the device without our consent.
Hamburg, January 2020
Waagen-Schmitt GmbH

Warranty
Waagen-Schmitt GmbH warrants for 2 years from the purchase date the cost-free rectification of defects in material and workmanship through repair or exchange. In the event of a warranty claim, please return the product with the proof of purchase (specifying the reason for claim) to your dealer.
Disposing of the packaging

Dispose of the packaging with similar materials. Dispose of cardboard with waste paper and of films with recyclable materials.
Disposing of the product
Dispose of the product in accordance with the regulations that apply in your country.
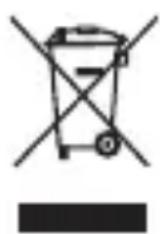
Devices must not be disposed of in normal household waste.
At the end of its life, the product must be disposed of in an appropriate way.
In this way, valuable materials contained in the device will be recycled and the burden on the environment avoided. Bring the old device to a collection point for electronic waste or to a recycling depot.
For more information, contact your local waste disposal firm or your local administrative body.

Standard and rechargeable batteries should not be disposed of along with household waste
All batteries and rechargeable batteries must be brought to a local or district collection point or to the retailer. Such batteries and rechargeable batteries can thus be disposed of in an environmentally friendly way.
Piles: 2x LR03 (AAA), 1,5 V
- General information
- About this operating manual
- Explanation of symbols
- Table of Contents
- Intended use
- Safety
- DANGER for children
- RISK of fire/burning and/or explosion
- BEWARE of material damage
- Scope of delivery
- Overview
- Start-up
- Basic functions
- Setting the time
- Selecting the time format
- Using the timer
- Starting the preset countdown
- Starting the individual countdown
- Using the stopwatch function
- Using the alarm function
- Setting the alarm time
- Stopping the alarm
- Selecting the alarm type
- Cleaning
- NOTE on material damage
- Fault and remedy
- Technical data
- Declaration of Conformity
- Warranty
- Disposing of the packaging
- Disposing of the product
- Devices must not be disposed of in normal household waste.
- Standard and rechargeable batteries should not be disposed of along with household waste
Brand : ADE
Model : TD 1902
Category : Kitchen timer