
SmartSleep SN3710 - Medical device PHILIPS - Free user manual and instructions
Find the device manual for free SmartSleep SN3710 PHILIPS in PDF.
| Product Type | Anti-snoring band with position sensor and vibrations |
| Brand | Philips |
| Model | SmartSleep SN3710 |
| Category | Medical device (non-invasive anti-snoring device) |
| Sensor Dimensions (H x W x D) | 79 x 43 x 13 mm |
| Sensor Weight | Approx. 29 g |
| Strap Weight | Approx. 33 g |
| Strap Composition | 42% polyester, 40% nylon, 18% elastane |
| Power Supply | Lithium polymer battery 3.7 V 300 mAh (non-replaceable); power adapter WA1001 (input 100-240 V AC, output 5 V DC 500 mA) |
| Battery Life | Up to 8 sleep sessions; quick charge 1 hour for one session |
| Full Charge Time | Up to 8 hours |
| Main Functions | Supine position detection, adaptive vibrations, 7-night adaptation phase, machine learning algorithm, reaction rate display, hours in bed and hours on back |
| Sensor Protection Rating | IP51 (protected against dust and dripping water) |
| Adapter Protection Rating | IPX4 (protected against splashes) |
| Cleaning and Maintenance | Sensor: soft cloth; strap: machine washable at 30 °C (delicate cycle), air dry, do not iron, do not use bleach |
| Accessories and Spare Parts | Strap (CP0943), adapter (CP0945), USB cable (CP0944) |
| Warranty | 2 years against defects in materials and workmanship |
| Safety Standards | UL/CSA 62368, FCC Part 15 Class B, ICES-003, EMC compliance |
| Operating Conditions | Temperature 5-40 °C, humidity 15-95% non-condensing |
| Storage Conditions | Temperature -20 to 60 °C (less than 1 month), 45 °C (less than 3 months), 30 °C (less than 12 months) |
| Country of Manufacture | United States |
Frequently Asked Questions - SmartSleep SN3710 PHILIPS
User questions about SmartSleep SN3710 PHILIPS
0 question about this device. Answer the ones you know or ask your own.
Ask a new question about this device
Download the instructions for your Medical device in PDF format for free! Find your manual SmartSleep SN3710 - PHILIPS and take your electronic device back in hand. On this page are published all the documents necessary for the use of your device. SmartSleep SN3710 by PHILIPS.
USER MANUAL SmartSleep SN3710 PHILIPS
Instructions for use
text_image
PHILIPS 1 2 3 4 5 6 7 8 9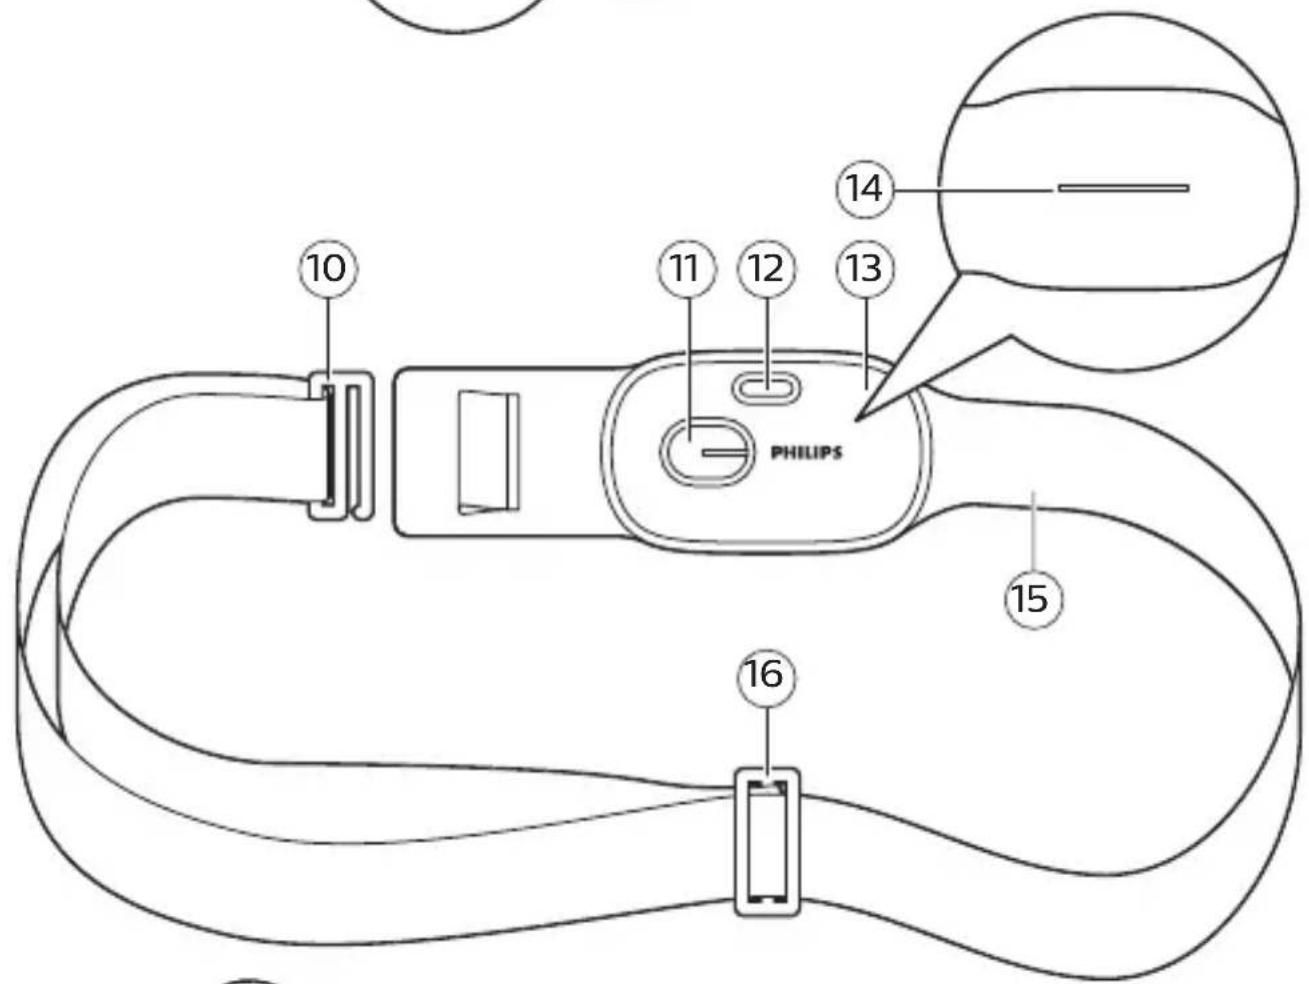
text_image
10 11 12 13 14 PHILIPS 15 16
text_image
SAP114a 17 18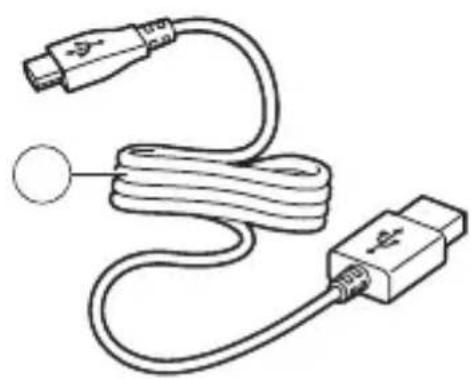
natural_image
Line drawing of a USB cable with connector and connector port (no text or symbols)English 6
Español 36
Français (Canada) 68
Introduction
Congratulations on your purchase and welcome to Philips! To fully benefit from the support that Philips offers, register your product at www.philips.com/welcome.
The first Philips solution designed to alert you before your snoring starts. Using clinically-proven ^2 technology the positional monitor detects when you’re moving onto your back and delivers adaptive vibrations that prompt you to sleep on your side – leading to quieter nights for you and your partner ^1 .
^1 This product is for position-dependent back snorers where snoring ceases when sleeping on their side.
^2 Clinically proven. Philips Snoring Relief Band's design is based on clinical research. Five clinical studies have shown a reduction in supine sleep time when study participants use a sleep position solution. (van Maanen 2014, Deiltjens 2015, Eijsvogel 2015, Benoist 2018, Ruiter 2018).
Tip: Watch the how-to video of the Snoring Relief Band at
www.usa.philips.com/c-p/SN3710_60/smartsleep-snoring-relief-band
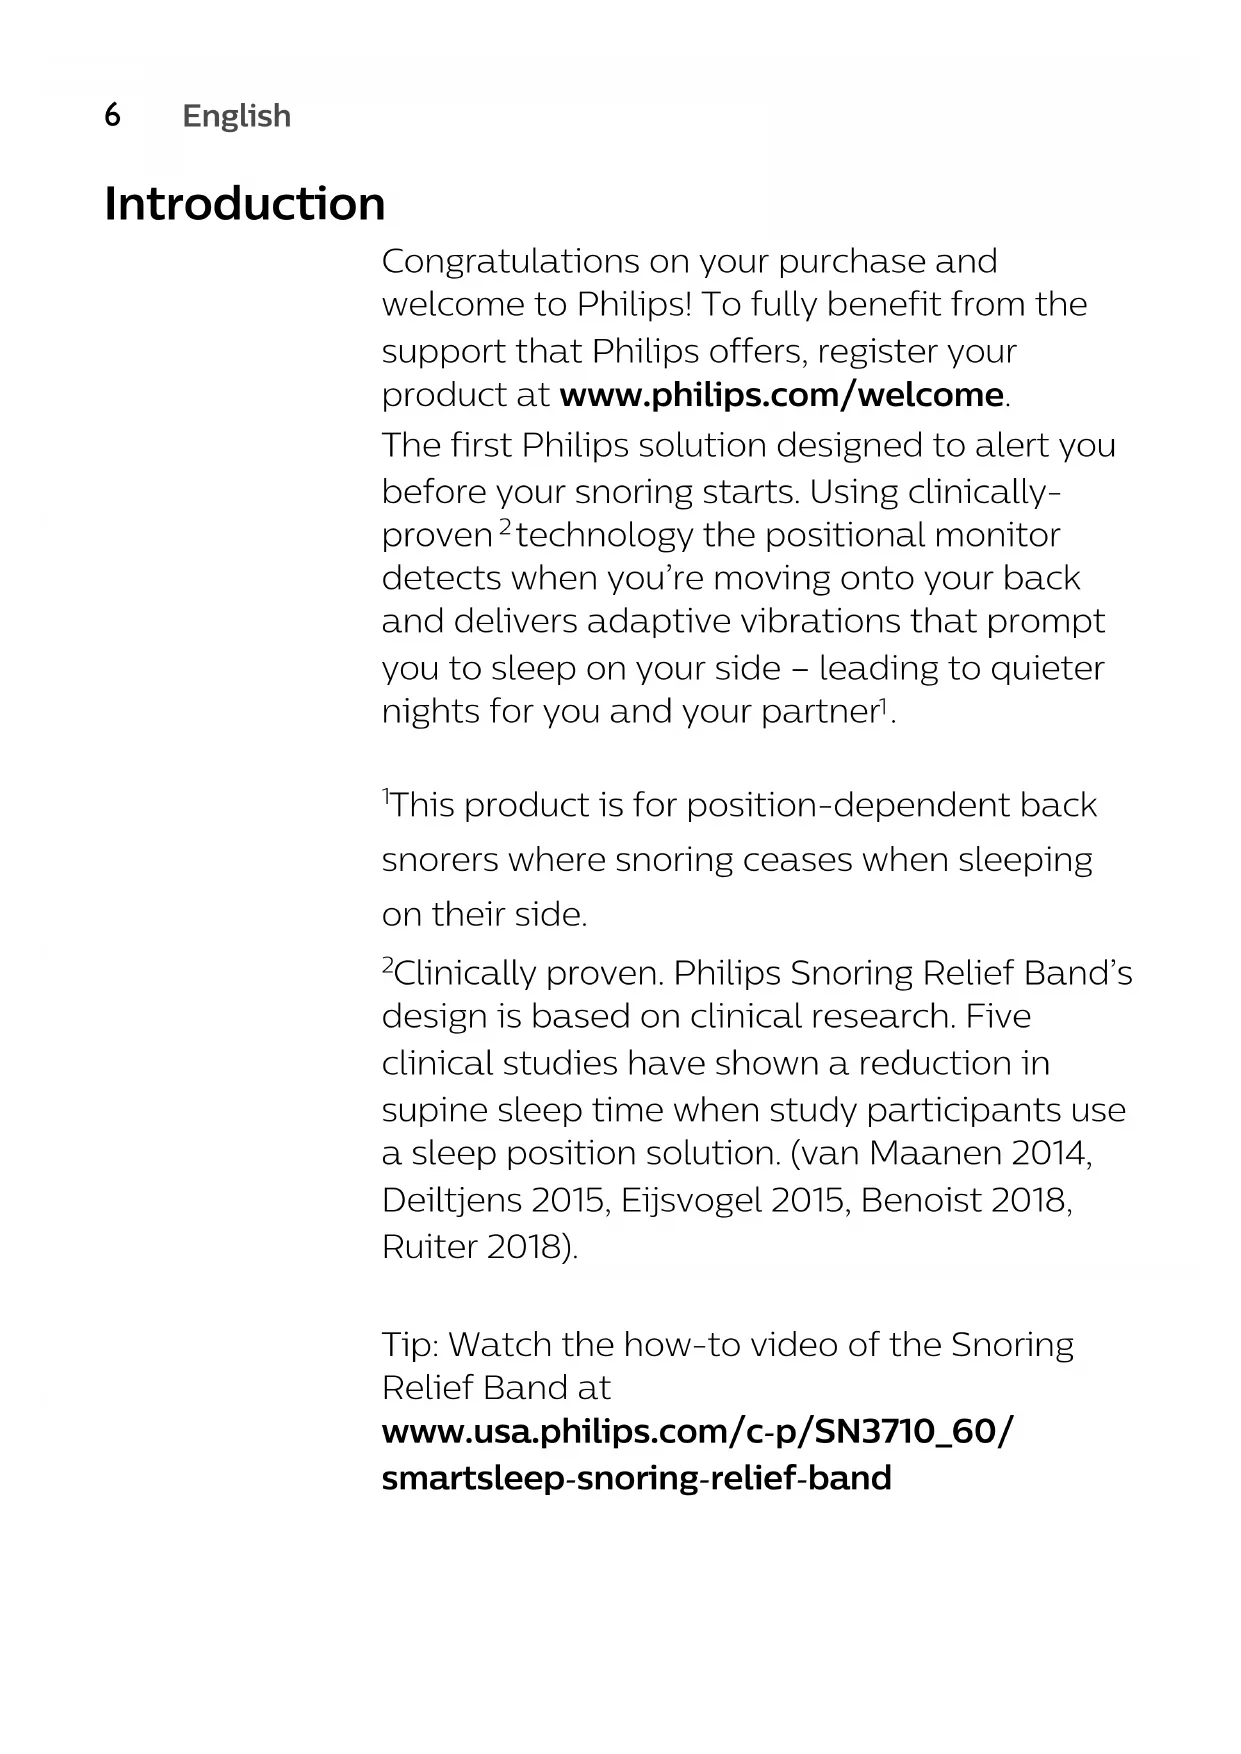
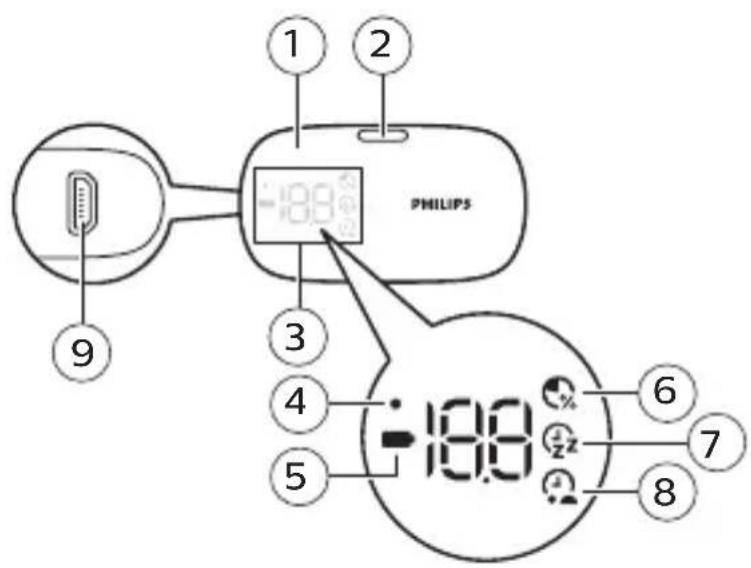
General description
1 Sensor
10 Clip
2 Activation button
11 Window for
display
3 Display
4 Adaptation phase
indicator
12 Window for
activation button
5 Battery status
indicator
13 Pouch for sensor
6 Response rate
14 Insertion slit for
sensor
7 Hours in bed
15 Strap
8 Hours on your
back
16 Strap adjuster
9 Socket for small
plug
17 Adapter
18 USB cable
Intended use
The Philips SmartSleep Snoring Relief Band is intended to reduce snoring disruptions, leading to an improved sleep experience. This product is not a medical device and is not intended for use in the mitigation and treatment of disease or conditions including POSA (Positional Obstructive Sleep Apnea).
When not to use
- The Snoring Relief Band must not be used if your breathing repeatedly stops and starts during sleep while snoring. You might have obstructive sleep apnea which is potentially a serious sleep disorder. Consult a doctor for diagnosis.
-
Do not use the Snoring Relief Band if you are younger than 18 year.
-
The Snoring Relief Band should not be used by a person who has a medical implant (e.g. pacemaker, insulin pump) that can be affected by mild vibrational stimuli on the chest, without consulting a doctor first.
- During pregnancy, consult a doctor before use.
- The Snoring Relief Band is not recommended for persons who are supposed to sleep on their back due to a physical condition (e.g. because of shoulder of back problems).
- The Snoring Relief Band cannot be used by persons who sleep in an upright position or require more than 2 pillows during sleep.
- Do not use the Snoring Relief Band if you are not able to switch sleeping positions independently due to physical limitations.
- Do not use the Snoring Relief Band in case of existing allergies to Polyester, Nylon or Spandex.
Important safety information
Read this important information carefully before you use the product and save it for future reference.
DANGER
To reduce the risk of electric shock:
- The Snoring Relief Band is for indoor use only.
- Keep the adapter and the sensor dry and away from liquids and moisture (running tap, bathroom etc.).
- Never immerse the adapter and sensor in water nor rinse it under the tap.
WARNING
To reduce the risk of burns, fire, electric shock, or injury to persons:
- Only use this product for its intended purpose as shown in this user manual.
- Do not place the strap on damaged skin.
- This device is not intended for use by persons (including children) with reduced physical, sensory or mental capabilities, or lack of experience and knowledge, unless they have been given supervision or instruction concerning use of the device by a person responsible for their safety.
- Do not let children play with the Snoring Relief Band, the strap, the adapter or the USB cable as these may present a strangulation hazard.
- Always check the Snoring Relief Band before you use it. Do not use the Snoring Relief Band or adapter if it is damaged, became wet or hot as this may cause injury.
- Be aware of the kinetic energy stored in elastic strap when stretched and released suddenly, it may cause bruises.
- Only use the adapter WA1001 which is provided with the Snoring Relief Band for charging the battery. Using another adapter may jeopardize system safety.
- If the adapter and/or USB cord is damaged or defective, always seek a replacement from Philips in order to avoid a hazard (see 'Accessories').
- The sensor contains a non-replaceable Lithium battery.
- Do not open the sensor, there are no serviceable parts inside. It will void warranty and may induce a battery related hazard.
- Do not dispose of batteries in fire or extreme heat. Batteries may explode or leak.
CAUTION
- The sensor is not washable. Never immerse the sensor in water or rinse it under the tap.
- Never use compressed air, scouring pads, abrasive cleaning agents or aggressive liquids such as petrol or acetone to clean the Snoring Relief Band.
- Check if the voltage indicated on the adapter corresponds to the local mains voltage before you connect the adapter.
- Do not use the adapter in or near wall sockets that contain or have contained an electric air freshener to prevent irreparable damage to the adapter.
- Use and store the product under the right environmental conditions as indicated in this user manual (see 'Specifications'). If not, this could affect the performance and lifetime of the product.
- The strap should feel snug but comfortable below your chest.
- Reset the sensor if you intend to change the user as the sensor has a self-learning algorithm which is optimized to your personal sleep behavior.
General
- For hygienic reasons, the strap can be washed and air-dried. Tumble dry and/or excessive washing will deteriorate the aesthetic appearance of the strap.
- For optimal battery performance of the product life time, charge the battery when the battery low indicator blinks orange.
- Do not store the sensor when the battery is empty. Charge the sensor for two hours and then store it at room temperature to ensure optimal optimal battery performance over the product life time.
- After charging, remove the adapter from the wall socket to preserve energy.
- After the product has reached end-of-life, dispose the sensor battery as described in chapter ‘recycling’ to preserve our environment.
SAVE THESE INSTRUCTIONS
Electromagnetic fields (EMF)
This Philips product complies with all applicable standards and regulations regarding exposure to electromagnetic fields.
Preparing for use
natural_image
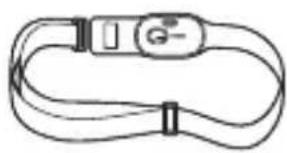
Simple line drawing of a flexible cable with a G button and straps (no text or symbols)The Snoring Relief Band consists of a sensor and a strap.
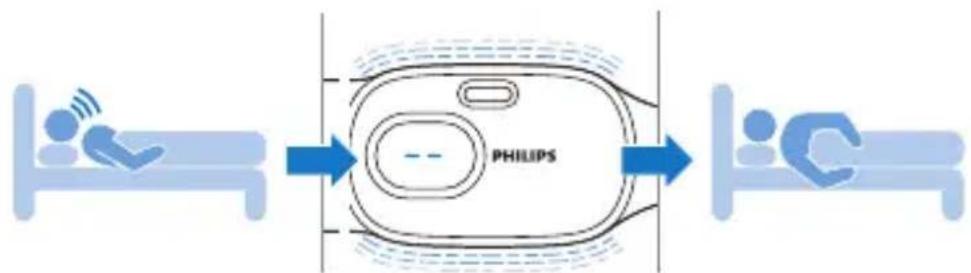
Wear the Snoring Relief Band when you sleep to reduce snoring caused by sleeping on your back. The sensor will gently vibrate to encourage you to turn from your back to your side.
flowchart
graph LR
    A["Patient 1"] --> B["PHILIPS Device"]
    B --> C["Patient C-"]
Charging
text_image
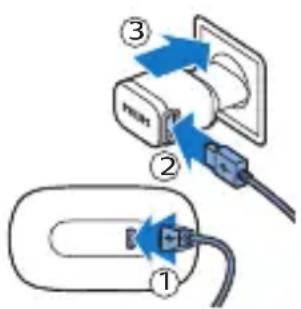
Diagram showing two connected devices with labeled components: one with a switch and cable, the other with a plug and cable.Charge the sensor before you use it for the first time and when the battery low indicator blinks orange.
Charging takes up to 8 hours. A fully charged sensor has an operating time of up to 8 sleep sessions.
Charging with the adapter
Tip: Charge the sensor when it is in the pouch of the strap.
1 Insert the small plug of the USB cable into the socket on the back of the sensor.
2 Insert the large plug of the USB cable into the socket of the adapter.
3 Insert the adapter into the wall socket.
Note: You cannot use the sensor while charging.
Note: Put the sensor on a flat surface while charging.
Note: The USB socket on the sensor can only be used for charging.
Note: During charging, the battery indicator blinks slowly white.
Battery fully charged
When the battery is fully charged, the battery indicator lights up white continuously and switches off automatically after 30 minutes.
Quick charge
When the battery is low or empty, you can quickly charge the sensor for 1 hour. This allows you to use the sensor during one sleeping session.
Battery low
When the battery is almost empty, the battery indicator blinks orange. Charge the sensor when the battery low indication lights up before using it.
Battery empty
When the battery is empty, the battery indicator blinks orange quickly.
Inserting the sensor into the pouch

natural_image
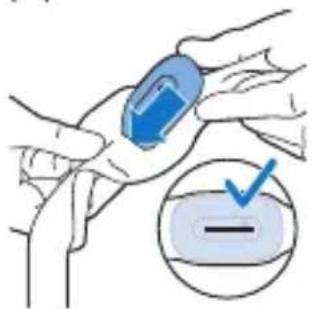
Illustration of a hand holding a blue rectangular object, possibly a medical or laboratory device (no text or symbols visible)1 Push open the slit on the back of the pouch.
text_image
Diagram showing a hand holding a blue object with a checkmark and a circular icon below indicating a negative value.2 Insert the sensor into the pouch.
Note: Make sure that the sensor is completely inserted into the pouch.
natural_image
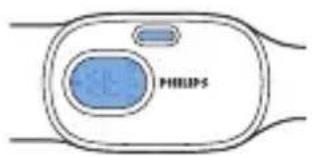
Diagram of a Siemens logo device with blue circular and rectangular elements, no readable text or symbols beyond the brand name.3 The display and the activation button of the sensor should be visible through the pouch windows.
Wearing the Snoring Relief Band during the night
text_image
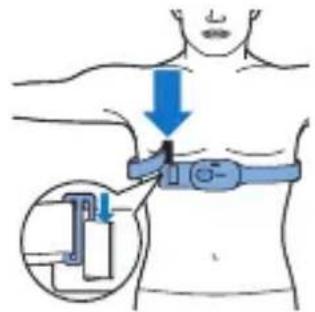
Diagram illustrating a medical or therapeutic device on human torso, showing force application and insertion mechanism with labeled arrows.1 Center the pouch with the sensor in front of your torso, just below the chest.
text_image
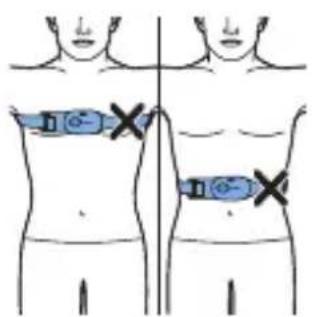
Diagram showing two human body positions with blue bandages and 'X' marks indicating areas of interest or pressure points.2 Do not wear the strap too high or too low.

natural_image
Pure diagram of a T-shaped component with a blue checkmark, no text or symbols present3 Fully push the clip into the loop to securely fasten the strap.
natural_image
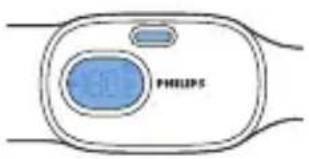
Diagram of a Philips device with two circular components and a small blue component, no text or symbols present.Note: Make sure that the activation button is pointing towards your chin and the display is visible through the window of the pouch.
Note: For best results, wear the Snoring Relief Band on bare skin. In case you use body lotions make sure that these are absorbed by the skin before assembling the strap.
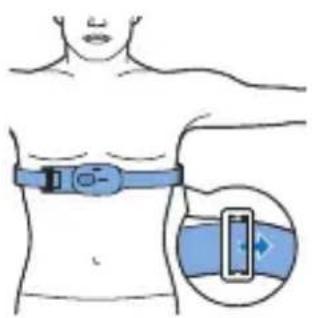
natural_image
Illustration of a human torso with a blue ECG device attached, showing a magnified view of the chest (no text or symbols present)4 Adjust the length of the strap with the strap adjuster. The strap should feel snug but comfortable below your chest.
The Snoring Relief Band should stay in the same position during the night.
Sensor data
The display shows three types of sensor data.

Response rate:
How many times (in percentage) you turned from your back to your side after the sensor vibrates.

Hours in bed:
How many hours you spent in bed.

Hours on your back:
How many hours you spent on your back.
Display
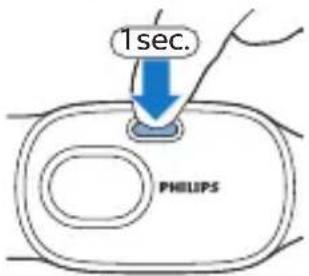
text_image
1sec. PHILIPS1 Press the activation button briefly to switch on the sensor.
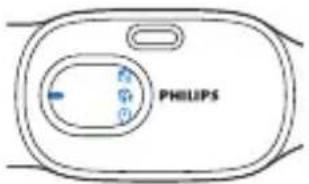
text_image
PHILIPS2 The sensor switches on and quickly shows an animation of the sensor data and battery indicator.

text_image
1 sec. 85° PHILIPS3 The display first shows the response rate. This indicates how many times (in percentage) you turned from your back to your side after the sensor vibrates. Press the activation button briefly again to see the number of hours spent in bed.

text_image
1sec. 75° PHILIPS4 The display shows how many number of hours you spent in bed. Press the activation button briefly again to see the hours spent on your back.
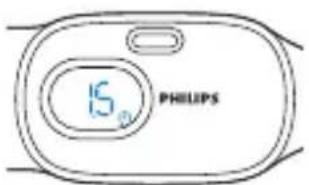
text_image
15 PHILIPS5 The display shows the number of hours you have spent on your back.
Note: The sensor will only save the data of your last sleep session. If you use the sensor for the first time the display shows '-.' to indicate that there is no data available yet.
Note: When the sensor shows one of the data screens, the sensor switches off automatically after eight seconds of inactivity.
Using the product
Starting a sleep session
When you are ready to go to sleep, put the strap with the sensor around your chest (see 'Wearing the Snoring Relief Band during the night').
Start a sleep session by pressing the activation button for two seconds when the sensor is off or when it shows one of the sensor data screens.
The sensor will vibrate briefly and show '-' to indicate that the sleep session has started.
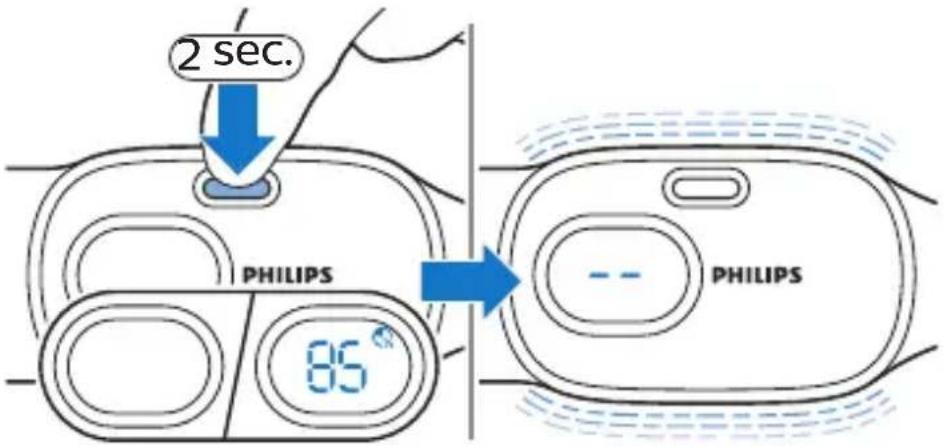
text_image
2 sec. PHILIPS 85° PHILIPSNote: The sensor allows you to fall asleep in any position. 30 minutes after a sleep session has started, the vibrations will start when you are sleeping on your back.
Pause mode
In case you need to get up during the night (e.g. going to the toilet), the sensor will pause automatically until you are in a sleeping position again. The vibrations will start after 5 minutes to give you some time to fall asleep again.
Note: If you wake up during the night and want to check if the sensor is still active, press the activation button briefly. The display lights up and shows '-' to indicate that the sensor is still active. The display will fade out automatically.
Note: A sleep session can last up to 12 hours, after which the sensor automatically stops the sleep session and switches off.
Note: If a sleep session has been stopped and started again within 2 hours, both sessions are counted as 1 full sleep session.
Stopping a sleep session
You need to manually stop the sleep session when you wake up and get out of bed.
Press and hold the button for two seconds to stop the sleep session. If you do not stop the sleep session, the sensor keeps vibrating when the Snoring Relief Band is taken off and the sensor is placed on a horizontal surface.
After the sleep session has ended, the sensor will vibrate briefly and show the data of your last sleep session.

text_image
2 sec. PHILIPS 85° PHILIPSLearning more about your Snoring Relief Band
Adaptation phase
The Snoring Relief Band may take time to get used to. To help you to ease into the vibration experience, an adaptation phase of 7 sessions will start during which the number of vibrations per night will increase in percentage over time. From the 8th session onwards, the sensor vibrates every time you sleep on your back.
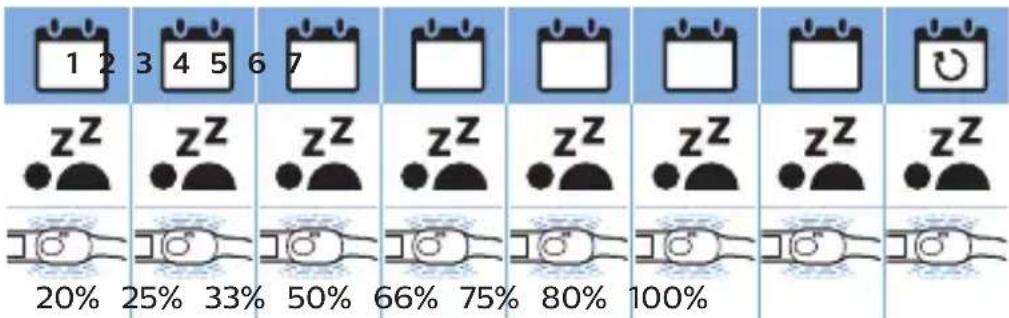
text_image
1 2 3 4 5 6 7 zz zz zz zz zz zz zz zz zz 20% 25% 33% 50% 66% 75% 80% 100%
text_image
PHILIPS 85° 80°The sensor shows a small dot on the left side of the display to indicate that the adaptation phase is active.
Vibration level
The sensor is smart and has a self-learning algorithm. The sensor optimizes the vibration level based on your reaction time (response rate).
Vibration patterns
Every five days the vibration pattern changes to make sure that you do not get used to the vibrations and you will keep responding to them.
Resetting the sensor

text_image
5 sec. 65° PHILIPSReset the sensor if you want to remove your data and reset the adaptation phase (e.g. other user, a long period of disuse.
To reset the sensor, press and hold the activation button for five seconds when the sensor shows one of the data screens.
The sensor vibrates after two seconds, but hold down the button until the sensor has counted down from three to one and you feel another vibration.
The final vibration indicates that the reset was successful and that the data has been removed.
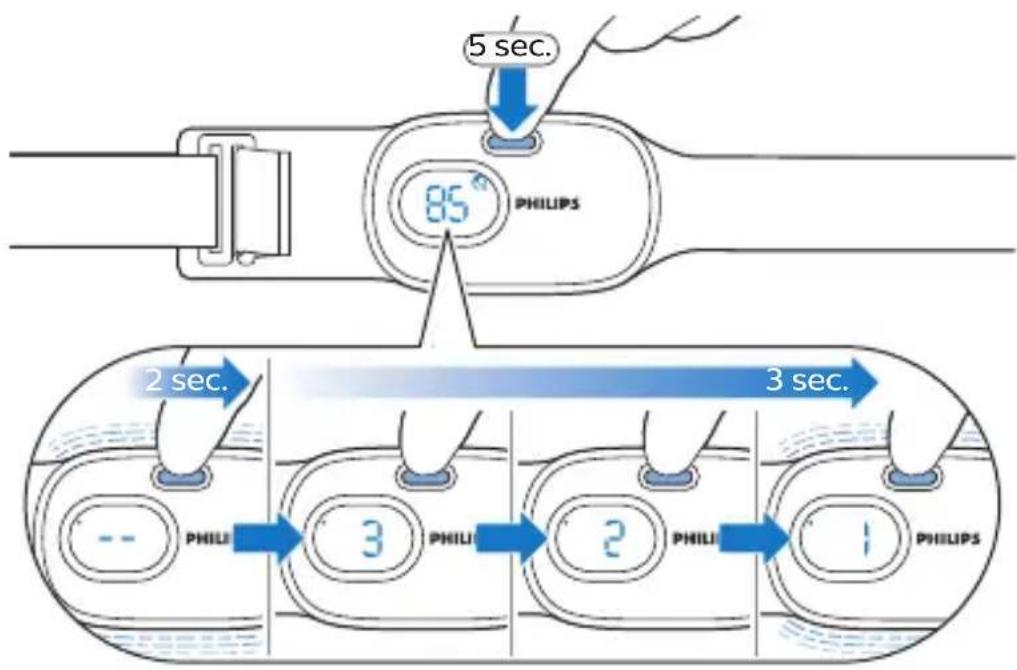
text_image
5 sec. 85° PHILIPS 2 sec. 3 sec. PHILI 3 PHILI 2 PHILI 1 PHILIPS
text_image
PHILIPS 85° 90°After the reset, the adaptation phase is also active again (see 'Adaptation phase'), as indicated by the small dot on the display of the sensor.
Cleaning
Cleaning the sensor
Warning: Do not immerse the sensor in water and do not rinse it under the tap.
Warning: Never clean the sensor with abrasive cleansing products or (aggressive) liquids.
1 Clean the sensor with a dry cloth after use, if needed.
Cleaning the strap
Warning: Always remove the sensor from the strap before you put the strap in the washing machine.
1 You can wash the strap in the washing machine according to the washing instructions.
Caution: To prevent damage to the strap and other clothes in the washing machine, put the strap in a fine-mesh washing bag or zippered/tied pillowcase.
Note: Select a gentle wash cycle and a maximum temperature of 30 °C ( 86 °F ).
2 Let the strap air-dry.
- Do not tumble dry the strap
- Do not iron the strap.
- Do not stretch the strap excessively.
Storage
Store the sensor and strap in a clean, dry place at room temperature.
Accessories
Replacement parts and accessories may be purchased at a store near you or on our website www.philips.com/store.
You can order the following items:
Strap : CP0943
Adapter: CP0945
USB cable: CP0944
Assistance
For assistance, visit our website: www.philips.com/support or call toll free 1-866-832-4361 (in US only) or 1-866-800-9311 (in Canada only).
Troubleshooting
This chapter summarizes the most common problems you could encounter with the product. If you are unable to solve the problem with the information below, visit www.philips.com/support, or call 1-866-832-4361 (US only) or 1-886-800-9311 (Canada only) for assistance.
Problem Possible cause Solution
| The Snoring Relief Band doesn't work for me. | Probably you do not only snore when you are sleeping on your back, but also when you sleep on your side and/or stomach.The sensor is most effective for people who snore when sleeping on their back. | Use the Snoring Relief Band for at least 4 weeks to determine if it is effective for you. |
Problem Possible cause Solution
| I'm lying in on my back, but the sensor does not vibrate. | The sensor is in the adaptation phase (session 1-7 and after reset). The sensor slowly builds up the number of vibrations each night. During this phase the sensor will not vibrate every time you sleep on your back (see 'Adaptation phase'). | Check if a dot is shown on the display of the sensor. The dot indicates that the adaptation phase is active (see 'Adaptation phase').From session 8 onwards, the sensor always vibrates when you lie on your back. |
| The sleep session is not active. | Press and hold the the activation button for two seconds to start a sleep session.The sensor vibrates briefly and shows '-' on the display to indicate that the sleep session has started (see 'Starting a sleep session'). |
Problem Possible cause Solution
| I'm lying in on my back, but the sensor does not vibrate. | After you start a session, the sensor starts vibrating 30 minutes after a sleep position is detected. This gives you the opportunity to fall asleep. | Try to fall asleep on your side, so the sensor doesn't prevent you to fall asleep due to the vibrations. |
| The sensor vibrates when I'm lying on my back awake, but I am not snoring. | The sensor doesn't record your snoring, but it measures your position. This is to prevent sleeping on your back which may cause you to snore. | Try to fall asleep on your side, so the sensor doesn't prevent you to fall asleep due to the vibrations. |
Problem Possible cause Solution
| I don't feel the vibrations | The sensor is wrongly positioned (e.g. on your back or too high on your chest) (see 'Wearing the Snoring Relief Band during the night'). | Make sure that the sensor is completely inserted into the pouch. Center the pouch with the sensor in front of your torso, just below the chest. Close the strap with the clip. |
| The sensor is not positioned correctly in the pouch (backwards or upside down) (see 'Inserting the sensor into the pouch'). | Make sure that the sensor is fully inserted into the pouch, with the activation button pointing towards your chin. |
Problem Possible cause Solution
| The sensor data shown on the display is not correct. | The battery was almost empty when you started the sleep session. If the battery runs out during a sleep session, the sensor switches off and stops collecting data. Therefore not all data of the sleep session has been stored. | Make sure that the battery is fully charged before you start a sleep session to prevent the battery from running out during a sleep session. |
| Within two hours of stopping a sleep session, you started another sleep session. | If you start another sleep session within two hours after switching off the previous session, the sensor will register these two sessions as one single session. | |
| The sleep session lasted more than 12 hours. | The sleep session was not stopped properly or exceeded the maximum of 12 hours. The session is stopped automatically after 12 hours. |
Problem Possible cause Solution
| The reset does not work. | The long press was too short. | Press and hold the activation button for 5 seconds, until you see the countdown (3-2-1) on the display and feel a vibration. Keep pressing even when you see '- - 'on the display (after 2 seconds of long pressing). The final vibration indicates that the reset was successful. The adaptation phase is now active again (see 'Resetting the sensor'). |
| The sensor is off. | The long press (five seconds) only works when the display is active and shows one of the sensor data screens (see 'Sensor data'). | |
| The sensor is in a sleep session '-''. |
Full Two-Year Warranty
Philips North America LLC (USA) and Philips Electronics Ltd (Canada) warrant this new product against defects in materials or workmanship for a period of two years from the date of purchase, and agree to repair or replace any defective product without charge.
IMPORTANT: This warranty does not cover damage resulting from accident, misuse or
abuse, lack of reasonable care, or the affixing of any attachment not provided with the product or loss of parts or subjecting the product to any but the specified voltage or bateries.*
NO RESPONSIBILITY IS ASSUMED FOR ANY SPECIAL, INCIDENTAL OR CONSEQUENTIAL DAMAGES.
In order to obtain warranty service, go to www.philips.com/support for assistance. It is suggested that for your protection you return shipments of product by insured mail, insurance prepaid. Damage occurring during shipment is not covered by this warranty.
NOTE: No other warranty, written or oral, is authorized by Philips North America LLC.
This warranty gives you specific legal rights, and you may also have other rights which vary from state to state, province to province or country to country. Some states do not allow the exclusion or limitation of incidental or consequential damages, so the above exclusion and limitations may not apply to you.
* Read enclosed instructions carefully. In US manufactured for: Philips Personal Health, a division of Philips North America LLC, P.O. Box 10313, Stamford, CT 06904.
In Canada imported by: Philips Electronics LTD, 281 Hillmount Road, Markham, Ontario L6C 2S3.
PHILIPS and Philips shield are registered trademarks of Koninklijke Philips N.V.

©2019 Philips North America LLC. All rights reserved.
Disposal

text_image
RECYCLE RBRC 7.800.822.8837- This product contains a rechargeable lithium-ion battery which must be disposed of properly.
- Contact your local town or city officials for battery disposal information. In the US, you can also call 1-800-822-8837 or visit www.call2recycle.org for battery drop-off locations. In Canada, you can also call 888-224-9764 or visit www.call2recycle.ca for battery drop-off locations.
- For assistance, visit our website www.philips.com/support or call 1-866-832-4361 toll free.
- Your product is designed and manufactured with high quality materials and components, which can be recycled and reused. For recycling information, please contact your local waste management facilities or visit www.recycle.philips.com.
Safety and compliance
The Snoring Relief Band meets the safety requirements in the USA and Canada:
- UL/CSA 62368: Audio/video, information and communication technology equipment
- UL1642: Batteries
- UL 1310, CAN/CSA C22.2 No 223-M91: Adapters
FCC Information
- This equipment has been tested and found to comply with the limits for a Class B digital device, pursuant to part 15 of the FCC rules. These limits are designed to provide reasonable protection against harmful interference in a residential installation. This equipment generates uses and can radiate radio frequency energy and, if not installed and used in accordance with the instructions, may cause harmful interference to radio communications. However, there is no guarantee that interference will not occur in a particular installation. If this equipment does cause harmful interference to radio or television reception, which can be determined by turning the equipment off and on, the user is encouraged to try to correct the interference by one or more of the following measures:
- Reorient or relocate the receiving antenna.
- Increase the separation between the equipment and the receiver.
- Connect the equipment into an outlet on a circuit different from that to which the receiver is connected.
- Consult the dealer or an experienced radio/TV technician for help.
- This device complies with Part 15 of the FCC Rules. Operation is subject to the following two conditions: (1) This device may not cause harmful interference, and (2) this device must accept any interference received, including interference that may cause undesired operation.
- This Class B digital apparatus complies with Canadian ICES-003.
Specifications
Adapter Philips WA1001
Safety classification
Class II power supply
Mode of operation Continuous
Ingress Protection marking IPX4 (protection against splashing water)
Input characteristics
100-240 Vac, 50/60 Hz, 3.5 W
No-load power consumption
<0.1 W
Output characteristics 5 Vdc, 2.5 W, 500 mA
Weight (EU / US)
39 gr (1.38 oz.) / 41 gr (1.44 oz.)
Length of detachable USB 60 cm (23.6 in.) cord
Temperature ≤40 °C (104 °F) while operating
Sensor
| Safety classification Class III device (sensor battery is charged by a Class II adapter) | |
| Dimensions Sensor (height x width x Depth) | Approx. 79 x 43 x 13 mm (3.1 x 1.7 x 0.5 in.) |
| Weight Sensor Approx. 29 gr (1oz.) | |
| Ingress Protection marking IP 51 | |
| Internal non-replaceable battery | Lithium Polymer 3.7 V, 300 mAh, UL1642 |
| Strap | |
| Material strap | 42 % Polyester, 40 % Nylon, 18 % Spandex |
| Material hook / slider Coated steel | |
| Length (min - max) | Approx. (72 cm - 130 cm) / (28 in. - 51 in.) |
| Weight Approx. 33 gr (1.16 oz.) | |
| Operating conditions | |
| Temperature | +5 °C to +40 °C (41 °F to 104 °F) |
| Relative humidity 15 % to 95 % (no condensation) | |
| Atmospheric pressure 86 - 106 kPa | |
Storage conditions
| Temperature <1 month | -20 °C to +60 °C (-4 °F to |
| Temperature <3 months | <+140 °F) |
| Temperature <12 months | +45 °C (+113 °F) |
| +30 °C (+86 °F) |
Relative humidity ≤ 85% (no condensation)
Atmospheric pressure 86 - 106 kPa
Explanation of symbols
Symbol Explanation
| PHILIPS | Manufacturer logo. |
| cULUS LISTED | UL listing mark for Canada and the United States. |
| Do not dispose of the product with normal household waste. | |
| IP51 | Protected against dust and falling drops of water. |
| Refers to the user manual. Read the user manual before you use the product. | |
| DC power. |
SN3710 Model number.
 | Serial number. |
 | For indoor use only. |
 | Detachable supply unit |
 | Stand-by. |
 | Do not bleach. |
 | Do not dry clean. |
 | Do not tumble dry. |
 | Do not iron. |
 | Machine wash in water not exceeding 30 °C / 86 °F, at delicate/gentle setting. |
Introducción
natural_image
Line drawing of a flexible cable with a button and connector (no text or symbols)text_image
Diagram showing two connected devices with labeled parts, including a battery and plug, with numbered arrows indicating connection directions.natural_image
Line drawing of a hand holding a blue object, possibly a medical or laboratory device (no text or symbols present)text_image
Diagram showing a hand holding a blue object with a checkmark inside, indicating a procedure or step in a procedure.natural_image
Diagram of a Philips device with blue circular button and small port, no text or symbols presenttext_image
Medical diagram showing a person performing a medical or therapeutic device with blue arrows indicating direction and magnified view of the device.text_image
Diagram showing two human body positions with marked band positions and X marks indicating specific regions of interest.natural_image
Pure mechanical assembly diagram without any text, numbers, or symbolsnatural_image
Simple line drawing of a medical device with a blue circular component labeled 'PHILIPS' and two horizontal lines (no text or symbols beyond the label)natural_image
Illustration of a person wearing a blue ECG device on the chest, with an inset showing a close-up of the belt (no text or symbols)text_image
1sec. PHILIPStext_image
1sec. 65° PHILIPStext_image
1sec. 75° PHILIPStext_image
1 2 3 4 5 6 7 zz zz zz zz zz zz zz zz zz zz 20% 25% 33% 50% 66% 75% 80% 100%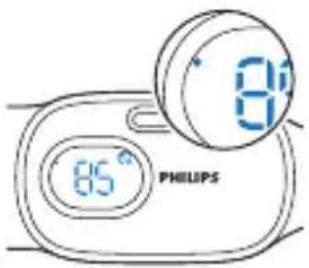
text_image
65° PHILIPS 80°text_image
5 sec. 65° PHILIPStext_image
5 sec. 85° PHILIPS 2 sec. 3 sec. PHILI 3 PHILI 2 PHILI 1 PHILIPStext_image
RECYCLE RBRC 1.800.822.8837natural_image
Line drawing of a flexible electronic device with a G button and connector (no text or symbols)text_image
Diagram showing two connected devices with numbered components, likely illustrating a cable or connector assembly.natural_image
Line drawing of a hand holding a blue object, possibly a medical or laboratory device (no text or symbols present)natural_image
Illustration of a hand holding a blue object with a checkmark inside, next to a circular diagram showing a horizontal line (no text or symbols)natural_image
Diagram of a Philips device with two circular components and connecting wires (no text or symbols)text_image
Diagram illustrating a medical or health procedure with a person using a device to adjust the chest area, showing a blue arrow and magnified view.text_image
Diagram showing two human body states with medical or electrocardiogram bands, marked with X symbols indicating specific regions.natural_image
Pure mechanical cross-section diagram without any text, numbers, or symbolsnatural_image
Illustration of a person wearing a blue ECG device on a human torso, with an inset showing the same device (no text or symbols present)text_image
1sec. PHILIPStext_image
1sec. 65° PHILIPStext_image
1sec. 75° PHILIPStext_image
1 2 3 4 5 6 7 zz zz zz zz zz zz zz zz zz 20% 25% 33% 50% 66% 75% 80% 100%
text_image
85° PHILIPS 80°text_image
5 sec. 85° PHILIPStext_image
5 sec. 85° PHILIPS 2 sec. 3 sec. PHILI 3 PHILI 2 PHILI 1 PHILIPS
text_image
PHILIPS 85° 90°www.philips.com/store.
text_image
RECYCLE RBRC 7.800.822.8837Manufactured for: Philips Personal Health
a division of Philips North America LLC
P.O. Box 10313, Stamford, CT 06904, USA
