
HJ604CRED - Hedge trimmers Sun Joe - Free user manual and instructions
Find the device manual for free HJ604CRED Sun Joe in PDF.
| Product Type | Cordless Grass Shears / Hedge Trimmer |
| Brand | Sun Joe |
| Model | HJ604CRED |
| Battery Voltage | 7.2 V (nominal 7.2 V, no-load 8.4 V) |
| Battery Capacity | 1.5 Ah |
| Battery Type | Built-in Lithium-ion |
| Charger Adapter | Input 120 V AC 60 Hz, Output 9 V – 0.4 A |
| Charge Time | 3 to 5 hours |
| Hedge Trimmer Blade | 15.2 cm |
| Grass Shears Blade | 10.2 cm |
| Max Cutting Diameter (Hedge Trimmer) | 0.8 cm |
| No Load Speed | 1,250 rpm ± 10% |
| Net Weight | 1.14 kg |
| Power Source | Built-in rechargeable lithium-ion battery |
| Switch | Safety push button + trigger switch on/off |
| Charge Indicator | LED indicators (red = charging, green = full, yellow = low) |
| Included Accessories | Hedge trimmer blade, grass shears blade, blade cover, charger adapter, manual |
| Warranty | 2 years (residential use) |
| Customer Service | 1-866-225-9723 (All Season Power) |
| FCC Certification | Class B, Part 15 |
| Usage Type | Small hedge, bush, and lawn edge trimming |
| Maintenance | Clean and lubricate blades after each use |
| Storage | In a dry place, temperature between 5 °C and 40 °C |
Frequently Asked Questions - HJ604CRED Sun Joe
User questions about HJ604CRED Sun Joe
0 question about this device. Answer the ones you know or ask your own.
Ask a new question about this device
Download the instructions for your Hedge trimmers in PDF format for free! Find your manual HJ604CRED - Sun Joe and take your electronic device back in hand. On this page are published all the documents necessary for the use of your device. HJ604CRED by Sun Joe.
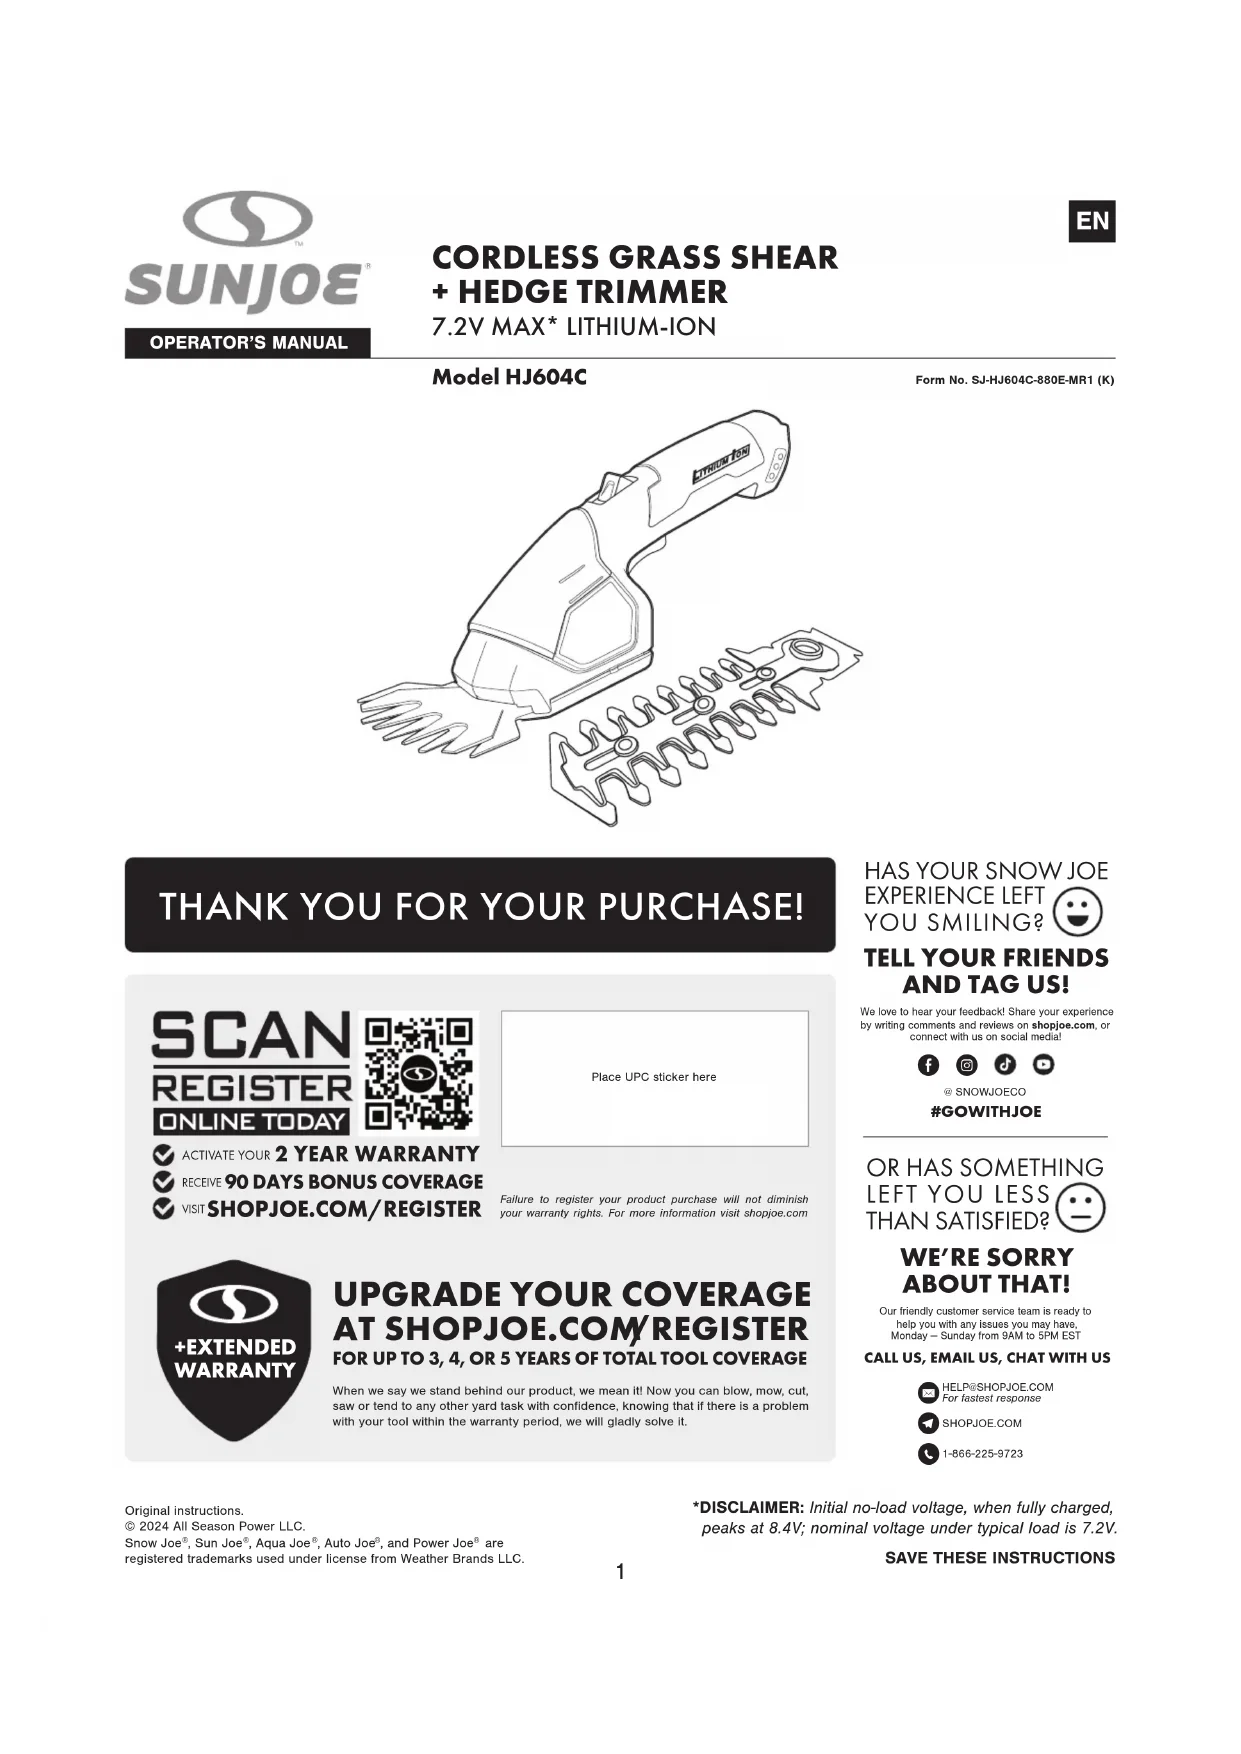
USER MANUAL HJ604CRED Sun Joe
Form No. SJ-HJ604C-880E-MR1 (K)

Model HJ604C
THANK YOU FOR YOUR PURCHASE!
SCAN
REGISTER
ONLINE TODAY


ATE YOUR 2 YEAR WARRANTY
90 DAYS BONUS COVERAGE
SHOPJOE.COM/REGISTER

UPGRADE YOUR COVERAGE AT SHOPJOE.COM/REGISTER
FOR UP TO 3, 4, OR 5 YEARS OF TOTAL TOOL COVERAGE
When we say we stand behind our product, we mean it! Now you can blow, mow, cut, saw or tend to any other yard task with confidence, knowing that if there is a problem with your tool within the warranty period, we will gladly solve it.
We love to hear your feedback! Share your experience by writing comments and reviews on shopjoe.com, or connect with us on social media!


SNOWJOECO
GOWITHJOE
OR HAS SOMETHING LEFT YOU LESS THAN SATISFIED?
WE'RE SORRY ABOUT THAT!
Our friendly customer service team is ready tohelp you with any issues you may have,Monday - Sunday from 9AM to 5PM EST
CALL US, EMAIL US, CHAT WITH US

HELP@SHOPJOE.COM
For fastest response

SHOPJOE.COM

1-866-225-9723
IMPORTANT!
Safety Instructions
All Operators Must Read These Instructions Before Use
Always follow these safety guidelines. Failure to do so may result in serious bodily injury or death.
General Safety WARNINGS!
Notice the personal safety alert symbol used in this manual to draw your attention to a WARNING given along with the particular operating instruction. This means that the operation requires special ATTENTION, CAUTION, and AWARENESS.
When using this power tool, basic safety precautions, including the following, should always be followed to reduce the risk of fire, electric shock, personal injury and material damage.
WARNING! This unit can be dangerous! Careless or improper use can cause serious injury.
WARNING! The rotating blades can cut you. Keep hands and feet away from the blades and the cutting area.
Retain this manual for future reference and reread it at the start of each trimming season.
WARNING! This battery-operated power tool must be recharged only with the specific charging unit for the battery. A charging unit that may be suitable for one type of battery may create a risk of fire when used with another battery type.
- Avoid accidental starting.
- When the tool is not in use, keep it away from other metal objects.
- Before operating the tool, read the entire manual carefully and make sure you know how to switch the tool OFF in an emergency.
Work Area Safety
- Keep work area clean and well lit. Cluttered and dark areas invite accidents.
- Do not operate power tools in explosive atmospheres, such as in the presence of flammable liquids, gases or dust. Power tools create sparks that may ignite the dust or fumes.
- Keep bystanders and children away. All bystanders, including children and pets, should be kept a safe distance away from the work area.
Electrical Safety
- If the battery charger cable is damaged, please call the All Season Power customer service center at 1-866-225-9723.
- If charging the power tool in a damp location is unavoidable, use a residual current device (RCD) protected power supply. The using of an RCD reduces the risk of electric shock.
- Power tool plugs must match the outlet. Never modify the plug in any way. Do not use any earthed (grounded) power tools or battery chargers. Unmodified plugs and matching outlets will reduce risk of electric shock.
- Avoid body contact with earthed or grounded surfaces such as pipes, radiators, ranges and refrigerators. There is an increased risk of electric shock if your body is earthed or grounded.
- Do not expose power tools to rain or wet conditions. Water entering a power tool will increase the risk of electric shock.
- Do not abuse the charging cord. Never use the cord for carrying, pulling or unplugging the power tool. Keep cord away from heat, oil, sharp edges or moving parts. Damaged or entangled cords increase the risk of electric shock.
- Battery charger is for indoor use only. Only charge this battery-powered tool indoors.
Personal Safety
- Stay alert. Watch what you are doing and use common sense when operating a power tool. Do not use the power tool while you are tired or under the influence of drugs, alcohol or medication. A moment of inattention while operating power tool may result in serious personal injury.
- Use personal protective equipment. Always wear eye protection. Protective equipment such as safety glasses, a dusk mask, non-skid safety shoes, a hard hat, and hearing protection, when used for appropriate conditions, will reduce the possibility of personal injuries.
- Avoid unintentional starting. Ensure the switch is in the OFF position before connecting to the power source/battery charger, or before picking up or carrying the tool. Carrying power tools with your finger on the switch or charging power tools with the switch ON can lead to accidents.
- Remove any adjusting key or wrench before starting the power tool. A wrench or a key left attached to a rotating part of the power tool may result in personal injury.
- Do not overreach. Keep proper footing and balance at all times. This enables better control of the power tool in unexpected situations.
- Dress properly. Do not wear loose clothing or jewelry. Dangling articles such as these can become caught in moving parts. Using work gloves and substantial footwear is recommended when working outdoors. Wear a protective hair covering to contain long hair.
- Use dust-reducing equipment (e.g. dust masks) when available. Using these devices can greatly reduce dust-related hazards.
Power Tool Use and Care
- Do not force the appliance. It will do the job better with less likelihood of injury if it is used at the rate for which it was designed.
- Do not use the power tool if the switch does not turn it on and off. Any power tool that cannot be controlled by the switch is dangerous and must be repaired.
- Disconnect the battery pack from the power tool before making any adjustments, changing accessories or storing the power tool. Such preventative safety measures reduce the risk of starting the power tool accidentally.
- Store idle appliances indoors. When not in use, appliances should be stored indoors in a dry and high or locked-up place out of the reach of children.
- Maintain appliance with care. Check for misalignment or binding of moving parts, breakage of parts and any other condition that may affect the power tool's operation. If damaged, have the power tool repaired before use. Many accidents are caused by poorly maintained power tools.
-
Keep cutting blades sharp and clean. Properly maintained cutting blades with sharp edges are less likely to bind and are easier to control.
-
Use the power tool and accessories in accordance with these instructions and in the manner intended for the particular use of the power tool, taking into account the working conditions and the work to be performed. Using the power tool for operations different from those intended could result in a hazardous situation.
- Keep all parts of the body away from the cutter blade. Do not remove cut material or hold material to be cut when blades are moving. Make sure the switch is off when clearing jammed material. A moment of inattention while operating the product may result in serious personal injury.
- Carry the product by the handle with the cutter blade stopped. When transporting or storing the product, always fit the cutting device cover. Proper handling of the product will reduce possible personal injury from the cutter blades.
- Hold the power tool by insulated gripping surfaces only, because the cutter blade may contact hidden wiring. Cutter blades contacting a "live" wire may make exposed metal parts of the power tool "live" and could give the operator an electric shock.
- Check the hedge for foreign objects before operation, e.g. wire fences. Take care that the cutting device does not come into contact with wire or other metal objects.
- Hold the product properly, e.g. with both hands if two handles are provided. Loss of control can cause personal injury.
Service
- If your power tool requires service, contact an authorized Snow Joe ^+ Sun Joe dealer or call the All Season Power customer service center at 1-866-225-9723. Only identical replacement parts should be utilized for repairs. This will ensure that the safety of the power tool is maintained.
- If the battery charger cable is damaged, it must be immediately replaced to avoid a hazard. Contact the All Season Power customer service center at 1-866-225-9723 for assistance.
Battery SafetyWarnings
This manual contains important safety and operating instructions for your battery and charger.
- Before using the charger, thoroughly read all instructions and cautionary markings on the charger, the telescoping pole, and the cordless grass shear + hedge trimmer.
WARNING! If the grass shear + hedge trimmer housing is cracked or damaged, do not insert the charging adaptor into the power tool or plug the power tool into the mains outlet. There is a danger of electric shock or electrocution. - This charger is ONLY intended to charge this rechargeable battery. Any other use poses a risk of fire, electric shock or electrocution.
- Do not place any object on top of the charger or place the charger on a soft surface that may result in excessive internal heat. Keep the charger away from any heat source.
- To reduce the risk of damaging the electric plug and cord, pull the plug, not the cord, when disconnecting the charger from the electric outlet.
- Make sure the battery charging cable is located in a safe place so that it will not be stepped on, tripped over or otherwise subjected to damage or stress.
- An extension cord should not be used unless absolutely necessary. Using an improper extension cord poses a risk of fire, electric shock or electrocution.
- Do not operate the charger if it has received a sharp blow or has become damaged in any way. Contact the All Season Power customer service center at 1-866-225-9723 before continuing use.
- Do not disassemble the charger. If the charger requires service or repair, contact an authorized Snow Joe ^®+ Sun Joe dealer or call the All Season Power customer service center at 1-866-225-9723. Incorrect reassembly poses a risk of electric shock, electrocution or fire.
- To reduce the risk of electric shock, unplug the charger from the outlet before cleaning the unit.
- Never attempt to connect two (2) chargers together.
- DO NOT store or use the tool and battery pack in locations where the temperature may reach or exceed 104^ (40^) . Dangerous storing locations include outdoor sheds or metal buildings in the summer.
- The charger is designed to operate on standard household electrical power (120 V). Do not attempt to use it with any other voltage!
NOTE: The integrated battery is not fully charged out of the carton. Read the safety instructions and then follow the charging notes and procedures.
- The longest life and best performance can be obtained if the integrated battery is charged when the air temperature is between 64.4^ - 75.2^ (18^ - 24^) . Do not charge the battery pack when the air temperature falls below 50^ (10^) or above 104^ (40^) . Following these safety measures will prevent damage to the battery pack.
- Do not incinerate the integrated battery even if it is seriously damaged or completely worn out. The battery can explode in a fire.
- Battery chemicals cause serious burns - never let a damaged battery pack contact the skin, eyes or mouth. Under abusive conditions, liquid may be ejected from the battery; avoid contact. Liquid ejected from the battery may cause irritation or burns. If a damaged battery pack leaks battery chemicals, use rubber or neoprene gloves to safely dispose of it. If skin is exposed to battery fluids, wash the affected area with soap and water and rinse with vinegar. If eyes are exposed to battery chemicals, immediately flush with water for 20 minutes and seek medical attention. Remove and dispose of contaminated clothing.
Grass Shear + Hedge Trimmer SafetyWarnings
This appliance is not intended for use by persons (including children) with reduced physical, sensory or mental capabilities, or lack of experience and knowledge, unless they have been given supervision or instruction concerning use of the appliance by a person responsible for their safety.
Safety Symbols
The following table depicts and describes safety symbols that may appear on this product. Read, understand and follow all instructions on this tool before attempting to assemble and operate.
| Symbols SymbolsDescriptions Descriptions | |||
| READ THE OPERATOR'S MANUAL(S) - Read, understand and follow all instructions in the user manual(s) before attempting to assemble and operate. | SAFETY ALERT - Indicates a precaution, a warning or a danger. | ||
| WARNING! Do not expose the unit to rain or wet conditions. Keep dry. | Battery charger contains a safety transformer. | ||
| Wear protective gloves and non-slip footwear when using the machine and handling debris. | Wear protective, slip-resistant footwear during operation to protect feet. | ||
| Only use battery charger indoors. | Wear eye protection. | ||
| DANGER! Keep sufficient distance away from electrical power lines. | Wear head protection. | ||
| Thrown objects and rotating blade can cause severe injury. | Keep bystanders a safe distance away from the work area. | ||
| DANGER! Keep hands away from blade. | WARNING! The cutting attachment continues to move after the motor is switched OFF. | ||
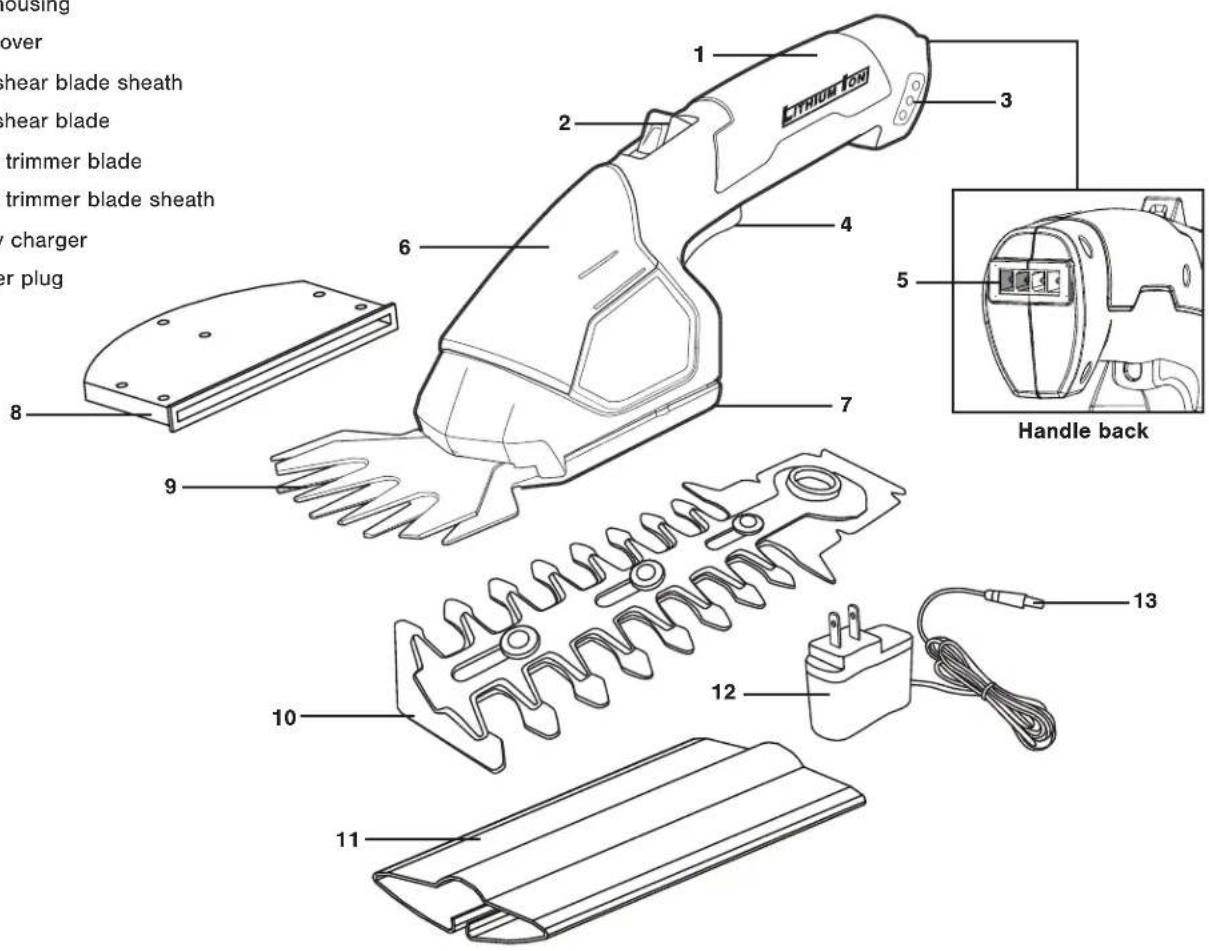
Know Your Cordless Grass Shear + Hedge Trimmer
- Grass shear + hedge trimmer handle
- Safety lock-off button
- Charge level indicator
- Power ON/OFF trigger switch
- Charging socket
- Motor housing
7.Blade cover - Grass shear blade sheath
- Grass shear blade
- Hedge trimmer blade
- Hedge trimmer blade sheath
- Battery charger
- Charger plug
Technical Data
Battery Voltage* 7.2V
Battery Capacity. 1.5 Ah
Battery Type. Lithium-ion
Charger.. Included
Charger Input 120V AC 60 Hz
Charger Output .9V-0.4A
Charge Time Max 5 hours
Grass Shear Blade. 4 in. (10.2 cm)
Hedge Trimmer Blade. 6 in. (15.2 cm)
Hedge Trimmer Cutting Diameter. 0.3 in. (0.8 cm)
No Load Speed. 1250 ± 10% rpm
Net Weight. 2.5 lbs (1.14 kg)
*DISCLAIMER: Initial no-load voltage, when fully charged, peaks at 8.4V; nominal voltage under typical load is 7.2V.
Unpacking
Carton Contents
- Cordless grass shear + hedge trimmer
Hedge trimmer blade
Hedge trimmer blade sheath - Grass shear blade
- Grass shear blade sheath
- Charger
-
Manual with registration card
-
Carefully remove the cordless grass shear + hedger trimmer and check to see that all of the above items are supplied.
- Inspect the product carefully to make sure no breakage or damage occurred during shipping. If you find damaged or missing parts, DO NOT return the unit to the store. Please call the All Season Power customer service center at 1-866-225-9723.
NOTE: Do not discard the shipping carton and packaging material until you are ready to use your new cordless grass shear + hedge trimmer. The packaging is made of recyclable materials. Properly dispose of these materials in accordance with local regulations.
IMPORTANT! The equipment and packaging material are not toys. Do not let children play with plastic bags, foils or small parts. These items can be swallowed and pose a suffocation risk!
Assembly
This cordless grass shear + hedge trimmer comes completely assembled with the grass shear blade pre-installed.
CAUTION! Wear protective gloves before handling the blades.
WARNING! Make sure the unit is powered off before handling the blades.
Fitting and Changing the Blades
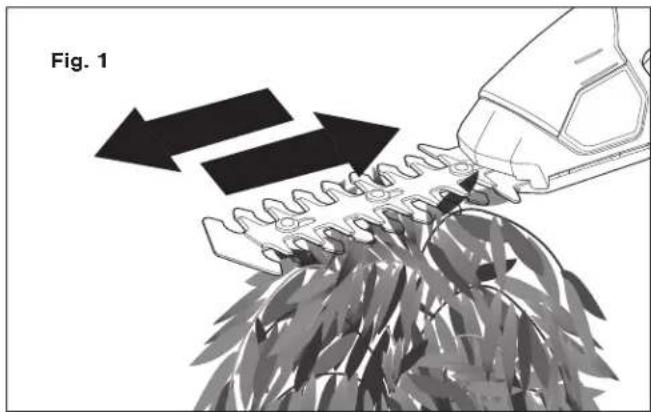
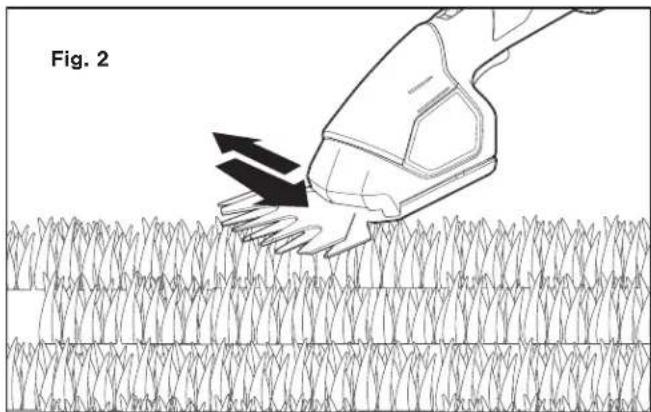
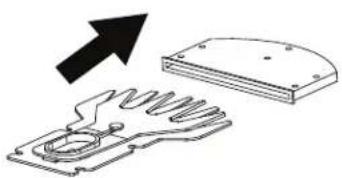
The grass shear + hedge trimmer is equipped with two interchangeable blades that are designed for do-it-yourself grooming projects around your garden. The hedge trimmer blade is used to cut hedges and shrubs (Fig. 1) while the grass shear blade is used to cut grass and hedges where finer detail is required (Fig. 2).
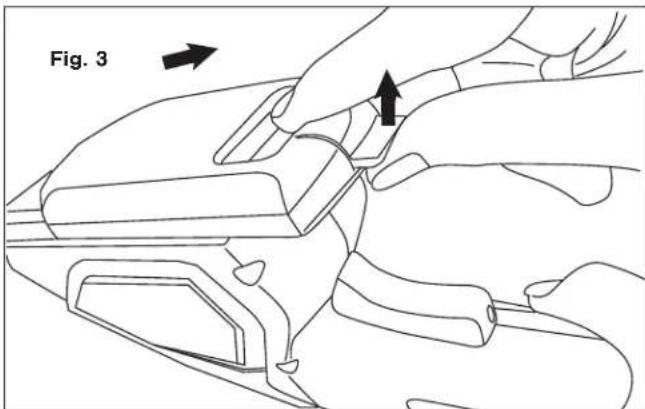
1. To fit or change the blade, place the grass shear + hedge trimmer on a hard surface. Turn the unit upside down in one hand and use the other hand to gently lift the tab of the blade cover. Slide the tab back until the cover can be removed (Fig. 3).
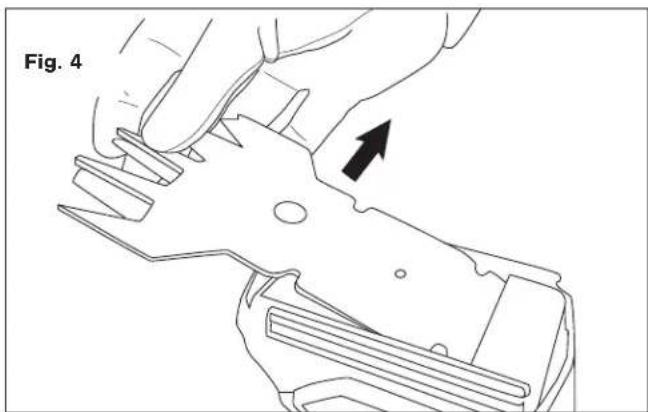
- Gently remove the blade by lifting the end tip of the blade off of the grass shear + hedge trimmer unit (Fig. 4).
- Insert the desired blade into the base of the motor housing (Fig. 5).
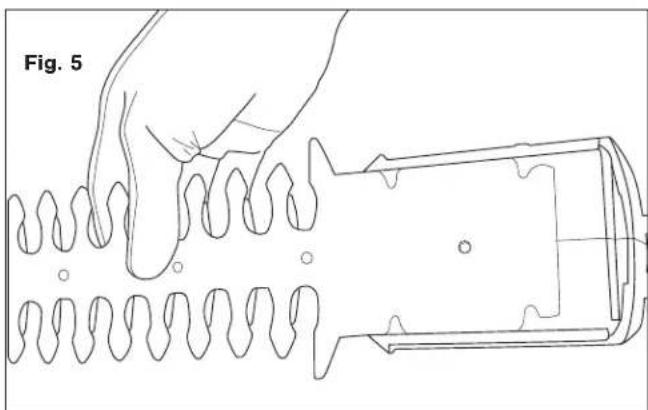
NOTE: You may need to manually move the blade or gear shaft in order to align the gear shaft with the gear in the center of the unit.
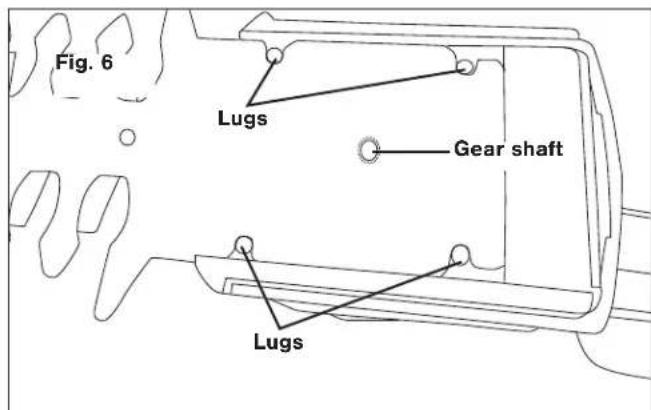
- Align the gear shaft in the middle of the blade with the gear in the middle of the unit. Align the four (4) lugs so that the blade lays flat against the housing for a secure fit (Fig. 6).
- Once the blade is in position, replace the blade cover by aligning the cover with the slots on the base of the motor housing (Fig. 7).
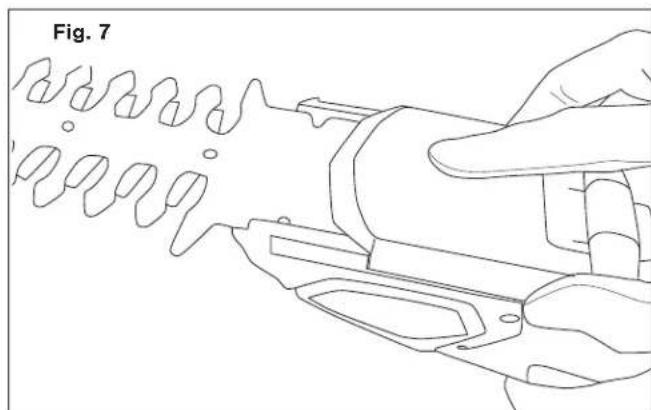
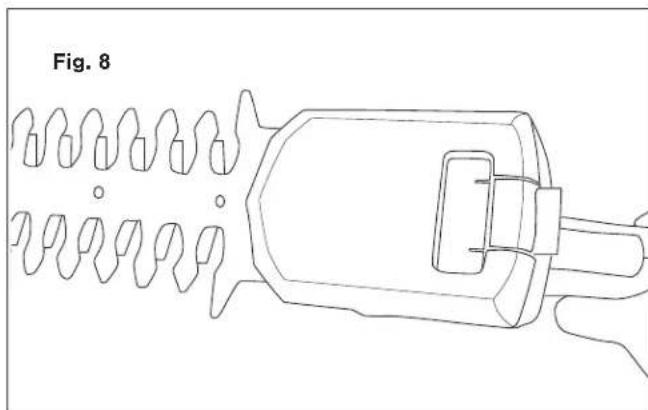
- Push forward on the blade cover until it slides and clicks into place (Fig. 8). The grass shear + hedge trimmer is now ready for use.
NOTE: If you have any questions, please call the All Season Power customer service department at 1-866-225-9723 for assistance.
Before Using
Charging Procedure
The battery charger supplied matches the lithium-ion battery installed in the tool. Do not use other battery chargers.
The lithium-ion battery is protected against deep discharging. When the battery is empty, a protective circuit will automatically switch OFF the machine. The blade will no longer move and a slight whistling sound will be heard.
Charge the battery for 5 to 7 hours, then use it until it runs down (i.e. the tool starts to operate slowly). Recharge for 5 to 7 hours again before resuming operation.
WARNING! Continued and excessive overuse of the ON/OFF trigger switch can permanently damage the lithium-ion battery.
CAUTION! This charger does not automatically turn off when the battery is fully charged. Please take care not to leave the grass shear + hedge trimmer plugged into the charger. Switch off or unplug the charger at the mains when charging is complete.
NOTE: The charge level indicator LED light will illuminate red when the charger is plugged in and is charging the grass shear + hedge trimmer. The middle LED light will turn green when the grass shear + hedge trimmer is fully charged.
The charging process starts as soon as the charger is plugged into both the proper electrical outlet and the tool.
- During the charging procedure, the handle of the tool will feel slightly warm to the touch. This is normal.
- When no further use is planned for an extended period of time, disconnect the battery charger from the outlet and the unit.
- Do not use the tool during the charging procedure.
Battery Charging
The length of service between each charging varies depending on the type of work you are doing. The battery in this grass shear + hedge trimmer has been designed to provide maximum trouble-free life. However, like all batteries, it will eventually wear out. To obtain the longest possible battery life, we suggest the following:
- Store and charge your grass shear + hedge trimmer in a cool area. Temperatures above or below normal room temperature will shorten battery life.
- Never store the grass shear + hedge trimmer with the battery in a discharged condition. Recharge the unit immediately after it is discharged.
- All batteries gradually lose their charge. The higher the temperature is, the faster they lose their charge. If you store your grass shear + hedge trimmer for long periods of time without using it, recharge the battery every 6 months. This will extend battery life.
NOTE: The grass shear + hedge trimmer has been shipped in a low charge condition and should be fully charged before use.
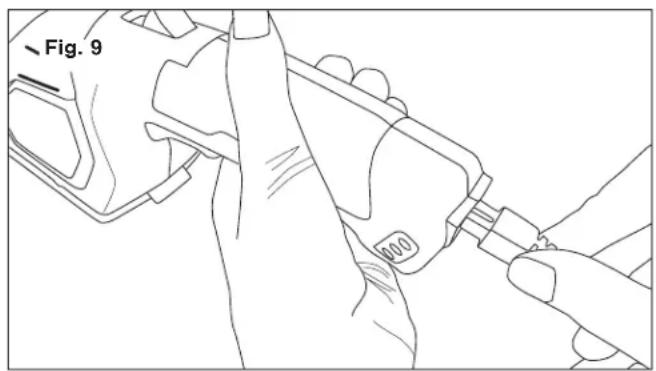
- Plug the charger adaptor into an appropriate AC power outlet. Connect the AC adaptor charger plug into the charging socket of the grass shear + hedge trimmer to start charging (Fig. 9).
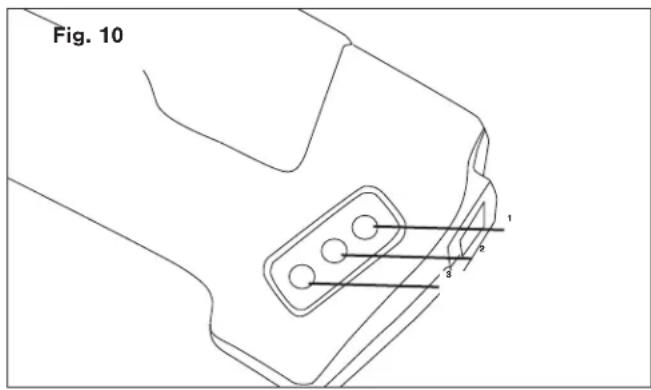
- LED no.1 will illuminate red when charging. LED's 2 and 3 will not illuminate when charging (Fig. 10).
- The battery will take approximately 3 hours to charge. Charging may take up to 5 hours due to the level of charge left in the battery and the ambient temperature.
NOTE: A charge level indicator LED light will always be illuminated when the charger is plugged in and the mains power is turned on. The charge indicator indicates the charge status of the grass shear + hedge trimmer as shown below:
| Condition | Color of LED's | LED's Illuminated |
| Charging | Red | 1- Red, 2- Not illuminated, 3- Not illuminated |
| Fully Charged | Green | 1- Not illuminated, 2- Green, 3- Not illuminated |
| Low Charge | Yellow | 1- Not illuminated, 2- Not illuminated, 3- Yellow |
Operation
IMPORTANT! The product is intended for light-duty trimming of shrubs and lawn edges for residential properties.
NOTE: Charge the battery for 3 to 5 hours, then use it until it runs down (i.e. the tool will only slowly operate and the yellow charger indicator will be illuminated). Recharge for 3 to 5 hours again before resuming operation.
WARNING! The blades continue to move for a few seconds after the tool is switched OFF. Turn OFF the tool and wait until the blades come to a complete stop before adjusting or cleaning.
CAUTION! Never touch the blade or blade rail while the tool is in operation and be aware of the sharp edges even when the grass shear + hedge trimmer is not in use.
Starting + Stopping
- To power ON, push and hold the safety lock-off button with your thumb, while pressing the ON/OFF trigger switch with your forefinger. Once the trigger switch engages, you can release the safety lock-off button and proceed with operation (Fig. 11).
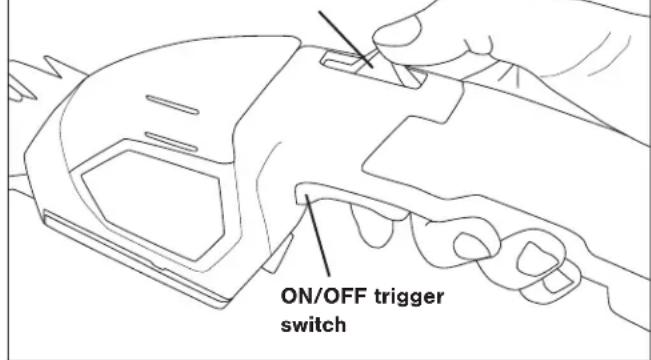
Fig. 11 Safety lock-off button
NOTE: The safety lock-off button reduces the risk of accidental starting.
2. To power OFF, simply release the ON/OFF trigger switch (Fig. 11).
CAUTION! Do not force the blades through dense growth. If the blades slow down, then reduce your cutting pace. Should the blades jam, release the trigger immediately. Do not use your fingers to free up jammed blades. Jammed blades can release, suddenly causing serious injury.
CAUTION! Always ensure proper footing and balance in a clean and clear work environment before switching on the grass shear + hedge trimmer.
NOTE: The yellow charge indicator LED light will illuminate when the battery is running low and requires charging.
Trimming Tips
WARNING! Only use the hedge trimmer blade for this operation. Never use the telescoping pole with the hedge trimmer for trimming hedges.
NOTE: Try to keep the cutting device angled at approximately 15^ to the cutting surface (Fig. 12).
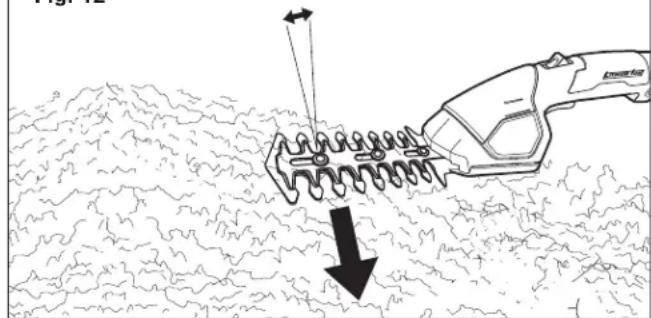
Fig. 12
15°
- Shaping - A hedge should be trimmed to achieve a trapezoidal form; it should widen toward the bottom on both sides. Shaping a hedge in this manner improves the penetration of light to the lower extremities. A general guideline is to slant the hedge approximately 4 in. (10 cm) for each 39 in. (1 m) of hedge height.
- Cutting Sequence - First cut both sides; start at the bottom and work towards the top. This prevents cuttings from falling into an area that you have yet to trim.
- Trimming the Top - Where the branches have grown extremely long, cut back the hedge in several stages. The shorter cuttings obtained are best suited for composting.
- Pruning Thick Branches - When older hedges are to be cut a substantial amount, use pruning shears or some other device to trim thicker branches (greater than 0.3 in. [8 mm] in diameter) to the desired length before starting work with the hedge trimmer.
To shape precisely, run a taught line between the extreme edges of the hedge and then trim along the length of the line.
Ensure that the blade does not come into contact with any object made of hard material that could damage it, such as fencing wire or metallic plant supports.
Maintenance
WARNING! Always switch the product off and let the product cool down before performing inspection, maintenance and cleaning work.
- Keep the ventilation vents of the tool clean at all times. If possible, prevent foreign matter from entering the vents.
- If the enclosure of the trimmer requires cleaning, do not use solvents to clean it. Only use a moistened soft cloth. Never let any liquid get inside the tool; and never immerse any part of the tool into a liquid.
- The blade rail should be cleaned and treated with light machine oil or spray lubricant (such as WD40, CRC 5.56 or RP7) after each use. When a job lasts for a long period of time, it is recommended that the blade rail also be treated with spray lubricant at regular intervals during operation.
- Inspect the product before each use for worn and damaged parts. Do not operate it if you find broken and worn parts.
Blade Maintenance
To ensure years of efficient and trouble-free operation, blade cleaning should be performed if sap and debris have built-up, or if you live in an area where the soil is sandy. Cleaning unusually heavy deposits may require removal of the blades.
NOTE: All Season Power will not be held responsible for any damage or injuries caused by repair of the trimmer by an unauthorized person or by mishandling of the trimmer.
-
Keep the cutting blades clean and free of debris. Remove trimmings.
-
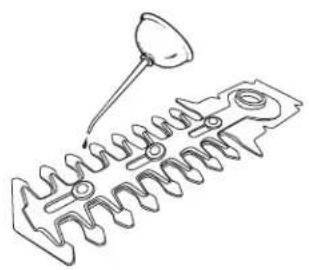
Apply a small amount of suitable lubricant on the blades to retain a good cutting performance (Fig. 13).
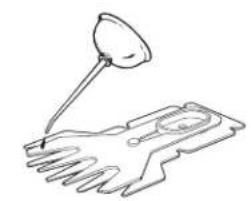
Fig. 13
- Keep the blades sharp. Have a worn or damaged cutting device replaced with a new one of the same type by a qualified specialist. Spare parts may be ordered online at shopjoe.com or via phone by contacting the All Season Power customer service center at 1-866-225-9723.
Storage
When the tool will not be used for several months, it is ideal to leave the battery connected to the charger. For optimal storage, proceed as follows:
- Fully charge the battery.
- Clean the product as described above.
- Assemble the blade covers over the blades (Fig. 14).
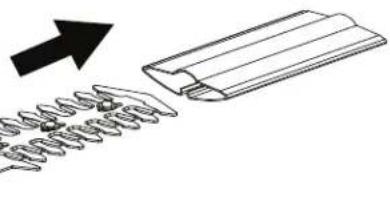
Fig. 14
- Store the tool in a secure and dry location. The storage temperature must always remain in the range of 41^ (5^) to 104^ (40^) .
- Before using the tool after prolonged storage, fully recharge the battery.
Battery Caution + Disposal
Always dispose of your battery pack according to federal, state, and local regulations. Contact a recycling agency in your area for recycling locations.
CAUTION! Even discharged battery packs contain some energy. Before disposing, use electrical tape to cover the terminals to prevent the battery pack from shorting, which could cause a fire or explosion.
WARNING! To reduce the risk of injury or explosion, never burn or incinerate a battery pack even if it is damaged, dead, or completely discharged. When burned, toxic fumes and materials are emitted into the surrounding atmosphere.
- Batteries vary according to device. Consult your manual for specific information.
- Install only new batteries of the same type in your product (where applicable).
- Failure to insert batteries in the correct polarity, as indicated in the battery compartment or manual, may shorten the life of the batteries or cause batteries to leak.
- Do not mix old and new batteries.
- Do not mix Alkaline, Standard (Carbon-Zinc), or Rechargeable (Nickel Cadmium, Nickel Metal Hydride, or Lithium-lon) batteries.
- Do not dispose of batteries in fire.
- Batteries should be recycled or disposed of as per state and local guidelines.
Service + Support
If your Sun Joe® cordless grass shear + hedge trimmer requires service or maintenance, please call the All Season Power customer service center at 1-866-225-9723.
Model + Serial Numbers
When contacting the company or reordering parts, you will need to provide the model and serial numbers of your product. These are found on the decal affixed to the housing or handle of your cordless grass shear + hedge trimmer. Copy these numbers into the space provided below.
Record the following numbers from the housing or handle of your new product:
HJ604C1
Serial
HJ604C Charger
Federal Communications Commission (FCC)
WARNING! Any changes or modifications to this unit not expressly approved by the party responsible for compliance could void the user's authority to operate the equipment.
Class B device:
NOTE: This equipment has been tested and found to comply with the limits for a Class B digital device, pursuant to part 15 of the FCC Rules.
These limits are designed to provide reasonable protection against harmful interference in a residential installation.
This equipment generates, uses and can radiate radio frequency energy and, if not installed and used in accordance with the instructions, may cause harmful interference to radio communications.
However, there is no guarantee that interference will not occur in a particular installation.
If this equipment does cause harmful interference to radio or television reception, which can be determined by turning the equipment off and on, the user is encouraged to try to correct the interference by one or more of the following measures:
- Reorient or relocate the receiving antenna.
- Increase the separation between the equipment and receiver.
- Connect the equipment to an outlet on a circuit different than the one the receiver is connected to.
- Consult the dealer or an experienced radio/TV technician for help.
Optional Accessories
WARNING! ALWAYS use only authorized Snow Joe ^念 + Sun Joe ^念 replacement parts and accessories. NEVER use replacement parts or accessories that are not intended for use with this cordless grass shear + hedge trimmer. Contact All Season Power if you are unsure whether it is safe to use a particular replacement part or accessory with your cordless grass shear + hedge trimmer. The use of any other attachment or accessory can be dangerous and could cause injury or mechanical damage.
| ModelAccessor | ||
| 1 | Grass Shear Blade | HJ604C-1.10 |
| 2 | Hedge Trimmer Blade | HJ604C-1.11 |
NOTE: Accessories are subject to change without any obligation on the part of All Season Power to provide notice of such changes. Accessories can be ordered online at shopjoe.com or via phone by contacting the All Season Power customer service center at 1-866-225-9723.
ALL SEASON POWER CUSTOMER PROMISE
ABOVE ALL ELSE, All Season Power LLC ("All Season Power") is dedicated to you, our customer. We strive to make your experience as pleasant as possible. Unfortunately, there are times when a Snow Joe®, Sun Joe®, Aqua Joe®, or Auto Joe® product ("Product") does not work or breaks under normal operating conditions. We think it's important that you know what you can expect from us. That's why we have a Limited Warranty ("Warranty") for our Products.
OUR WARRANTY:
All Season Power warrants new, genuine, powered and non-powered Products to be free from defects in material or workmanship when used for ordinary household use for a period of two years from the date of delivery of the Product to the original, end-user purchaser when purchased from All Season Power or from one of All Season Power's authorized sellers with proof of purchase. Because All Season Power is unable to control the quality of its Products sold by unauthorized sellers, unless otherwise prohibited by law, this Warranty does not cover Products purchased from unauthorized sellers. If your Product does not work or there's an issue with a specific part that is covered by the terms of this Warranty, All Season Power will elect to either (1) send you a free replacement part, (2) replace the Product with a new or comparable product at no charge, or (3) repair the Product. How cool is that!
This Warranty gives you specific legal rights, and you may also have other rights which vary from State to State.
PRODUCT REGISTRATION:
All Season Power strongly encourages you to register your Product. You can register online at shopjoe.com/register, or by printing and mailing in a registration card available online from our website, or by calling our Customer Service Department at 1-866-225-9723, or by e-mailing us at help@allseasonpower.com. Failure to register your Product will not diminish your warranty rights. However, registering your Product will allow All Season Power to better serve you with any of your customer service needs.
WHO CAN SEEK LIMITED WARRANTY COVERAGE:
This Warranty is extended by All Season Power to the original purchaser and original owner of the Product.
WHAT IS NOT COVERED?
This Warranty does not apply if the Product has been used commercially or for non-household or rental applications. This Warranty also does not apply if the Product was purchased from an unauthorized seller. This Warranty also does not cover cosmetic changes that do not affect performance. Wearing parts like belts, augers, chains and tines are not covered under this Warranty, and can be purchased at shopjoe.com/support or by calling 1-866-225-9723.

CERTIFIED AUTHENTIC
Keep your warranty intact. Only use CERTIFIED AUTHENTIC Snow Joe, Sun Joe, Aqua Joe + Auto Joe replacement parts + accessories. Use of any other parts + accessories will void the warranty. Genuine parts + accessories can be found and purchased online at shopjoe.com/support by entering the model number of your product.

Modelo HJ604C
Formula No. SJ-HJ604C-880S-MR1 (K)

jGRACIAS PORTU COMPRA!
ESCANEA
REGISTA
EN LINEA HOY

ACTIVATU GARANTIA DE 2 ANOS
RECIBE 90 DIAS DE COBERTURA ADICIONAL
VISITA SHOPJOE.COM/REGISTER
m = 311
GOWITHJOE
O ALGO TE HA DEJADO MENOS SATISFECHO?

!LO SENTIMOS POR ESO!


- THANK YOU FOR YOUR PURCHASE!
- SCAN
- REGISTER
- ONLINE TODAY
- UPGRADE YOUR COVERAGE AT SHOPJOE.COM/REGISTER
- WE'RE SORRY ABOUT THAT!
- IMPORTANT!
- Safety Instructions
- All Operators Must Read These Instructions Before Use
- General Safety WARNINGS!
- Work Area Safety
- Electrical Safety
- Personal Safety
- Power Tool Use and Care
- Service
- Battery SafetyWarnings
- Grass Shear + Hedge Trimmer SafetyWarnings
- Safety Symbols
- Know Your Cordless Grass Shear + Hedge Trimmer
- Technical Data
- Unpacking
- Carton Contents
- Assembly
- Fitting and Changing the Blades
- Before Using
- Charging Procedure
- Battery Charging
- Operation
- Starting + Stopping
- Trimming Tips
- Maintenance
- Blade Maintenance
- Storage
- Battery Caution + Disposal
- Service + Support
- Model + Serial Numbers
- HJ604C Charger
- Federal Communications Commission (FCC)
- Class B device:
- Optional Accessories
- ALL SEASON POWER CUSTOMER PROMISE
- OUR WARRANTY:
- PRODUCT REGISTRATION:
- WHO CAN SEEK LIMITED WARRANTY COVERAGE:
- WHAT IS NOT COVERED?
- CERTIFIED AUTHENTIC
Brand : Sun Joe
Model : HJ604CRED
Category : Hedge trimmers