
IAN 306775 - Motorcycle helmet CRIVIT - Free user manual and instructions
Find the device manual for free IAN 306775 CRIVIT in PDF.

| Product Type | Flip-Up modular motorcycle helmet |
| Brand | Crivit |
| Model | IAN 306775 |
| Available Sizes | M (57-58 cm), L (59-60 cm), XL (61 cm) |
| Certification | ECE-R 22.05 |
| Shell Material | High-resistance ABS (HCM - High Density Copolymer Matrix) |
| Visor | Clear visor with anti-scratch coating, pre-equipped for Pinlock® 30 lens |
| Integrated Sun Visor | Yes, with safety lock |
| Ventilation | Front ventilation (slider) and top ventilation (push button) |
| Inner Lining | Removable and washable, Coolmax® (moisture wicking) and HeiQ® Fresh Tech antibacterial treatment (silver) |
| Cheek Pads | Two thicknesses provided for custom fit |
| Acoustic Pad | Included, to reduce noise at high speed |
| Closure | Ratchet closure (chin strap) with movable buckle for strap |
| Winter Collar | Removable large collar provided in addition to standard collar |
| Glasses Compatibility | Yes, suitable for glasses wearers |
| Reflectors | Yes, present on the helmet |
| Included Accessories | Extra pair of cheek pads, Pinlock® lens, acoustic pad, winter collar, helmet bag |
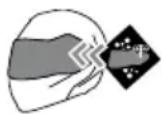
| Maintenance | Outer cleaning with pH-neutral detergent and soft cloth; inner washable by hand at max 30°C, air dry |
| Warranty | 3 years (excluding normal wear), 1 year for Pinlock® lens |
| Customer Service | France: 0800 919270, Belgium: 070 270 171 |
Frequently Asked Questions - IAN 306775 CRIVIT
User questions about IAN 306775 CRIVIT
0 question about this device. Answer the ones you know or ask your own.
Ask a new question about this device
Download the instructions for your Motorcycle helmet in PDF format for free! Find your manual IAN 306775 - CRIVIT and take your electronic device back in hand. On this page are published all the documents necessary for the use of your device. IAN 306775 by CRIVIT.
USER MANUAL IAN 306775 CRIVIT
Instructions for use
NL BE
SYSTEEMHELM
Gebruiksaanwijzing
CL
ODKLÁPĚCÍ PŘILBA
Návod k obsluze

DE AI CH
Before reading, fold out the illustration page and gets to know all of the functions of your work.
R H
natural_image
Diagram showing a car helmet being adjusted to form a circular component, with an arrow indicating the motion (no text or symbols present)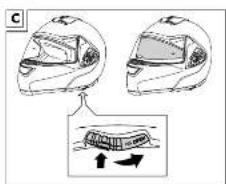

natural_image
Diagram of a curved mechanical component with directional arrows indicating motion (no text or symbols)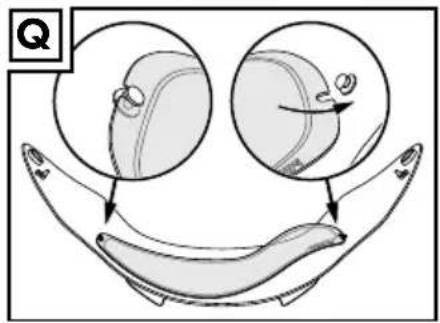
DE AT CH
Gebrauchsanleitung
Teilebezeichnung 7
Lieferumfang 7
Wichtige Information 7
Gebrauchsanleitung
natural_image
Five abstract geometric symbols: crown, star, square, cross, and X (no text or labels)Lagerung
Instructions for use
Parts Overview 14
Scope of Delivery 14
Important Information 14
Instructions for Use
Safety Advice 14-15
Product Characteristics 15-16
Use and Installation Instructions
Sun Shield 16
Inner Lining 16
Snap-Fastener System 16
Chin-Wind Deflector 16
Cheek Pads 16-17
Acoustic Damping 17
Front Vent 17
Top Vent 17
Winter Collar 17
Visor Replacement 17
Installing the Pinlock® lens 17
Adjusting the Pinlock® lens tension 17
Selecting the Correct Helmet Size 17-18
Maintenance and Care 18
Storage 18
Disposal 18
Notes on the guarantee and service handling 18-19

Congratulations!
With your purchase you have decided on a high-quality product. Get to know the product before you start to use it. Carefully read the following operating instructions. Use the product only as described and only for the given areas of application. Keep these instructions safe. When passing the product on to a third party, always make sure that the documentation is included.
Parts Overview
1 Top vent
2 Air exhaust
3 Reflector
4 Visor mechanism
5 Slider for sun shield with safety latch
6 Front vent
7 Breath deflector
8 Visor
9 Pinlock® lens
10 Sun shield
11 Pivoted release
12 Chin-wind deflector
13 Acoustic damping
14 Cheek pads
15 Inner Lining
16 Standard collar
17 Winter collar
18 Chin straps with snap fastener
Scope of Delivery
The scope of delivery for your helmet consists of the following:
• Additional pair of cheek pads for individual size adjustment
- Pinlock® lens
- Acoustic damping
- Winter collar
- Helmet bag
- Instructions for use
Important Information
Our helmets are manufactured in accordance with the latest technology and are specifically designed for motorcycling. Whether the owner deems them to be suitable for any other use, is up to him. Wearing a helmet does not exclude the possibility of injury should an accident occur. To guarantee adequate protection this helmet must be well fitting and securely fastened. Every helmet that is exposed to a hard blow must be replaced.
We guarantee that this item is free of production and material defects. The guarantee does not apply to normal wear and tear and in case of improper use.
Instructions for Use
Safety Advice
- Warning!
When riding, the helmet may only be used if the chin piece and visor are closed.
- The helmet is equipped with a hinged sun shield, which may only be used in conjunction with a closed visor.
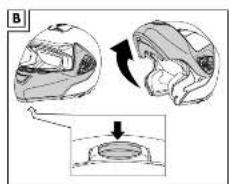
- To open the chin piece, press the release (11) and lift the chin piece up (Fig. B).
- To close the chin part, pull the chin section down until it audibly locks into place.
- The helmet must fit tightly and the chin strap be closed.
- Always ensure that there is no airflow restriction inside the helmet.
- Ensure that your visor is clean and scratch-free at all times. Exchange damaged visors for a genuine replacement immediately. Never use smoked visors at night or when visibility is poor.
You are able to obtain replacement visors from the stipulated service address for a period of 5 years from the purchase date. Visor type: DS-MULTIX400.
- Never modify the helmet, its structure or the individual components.
- The helmet may not be painted or have stickers or labels.
- The helmet is designed to absorb the energy of a blow or a collision by destroying some of its components. In case of a further blow it wouldn't protect you any longer. After an accident, the helmet must be replaced even though it doesn't show external damages.
- Refrain from transporting your helmet by hanging it onto any part of your motorcycle. Keep it away from exhaust pipes and other sources of heat.
- Never clean the helmet with solvents containing petroleum or scouring agents, neither the outside nor the inside.
Always use pH-neutral detergent dissolved in clean water. Careful rub with a soft cloth.
Then wipe dry with a lint-free cloth.
The pad may be cleaned with a little soap using a soft brush.
- Only use genuine spare parts for your helmet.
- Only use the sun shield in daylight! Never use at twilight or at night.
Product Characteristics
ECE-R 22.05 Homologation

This helmet is in compliance with ECE-R 22.05 standards and is homologised accordingly. The ECE-R 22.05 standard consists of uniform conditions for the approval of protective helmets and its visors for drivers and passengers of motorcycles and mopeds. The basic principles for these tests are the so called ECE-Regulations of the Economic Commission for Europe.
Significant Tests of the ECE-Regulation 22.05
- Shock absorbance
• Dynamic test of wear features - Field of vision test
- Design strength
• Sustainability test (Strip-off test) - Chin straps and lock test
• Shear test for outside edges
- Friction performance test of the outer shell
- Visor test (mechanical and visual characteristics)
- Chin bar, chin part damping test
Voluntary product testing Emission certificate
The TÜV Rheinland emission certificate indicates products tested for contaminants and according to current knowledge pose no risks to the health.
Inside Padding with Coolmax® Inserts

Coolmax® by INVISTA is a high-performance fabric fibre
that supports its wearers during sport activities. Based on the patented DuPont-fibre technology, Coolmax ^® transports moisture from the body to the fabric surface where it dries quicker than with any other fabric.
The specially developed fibres of INVISTA that are used for Coolmax ^® -fabrics transport the moisture away from the body to the surface of the fabric where it has the opportunity to evaporate quickly. At the same time, the uniquely formed fibres offer maximum breathing activity, even in wet conditions. In addition, the breathing activity improves the heat regulating effect.
Cheeks, forehead and neck pads of this article are equipped with Coolmax ^® .
HeiQ® Fresh Tech

HeiQ® Textile freshness
Experience the feeling of lasting freshness through the power of silver, keeping you odour-free all day long.
The helmet liner contains a biocide agent (HeiQ ^® Fresh Tech) for an anti-bacterial, odour-inhibiting lining treatment. Active ingredient: silver adsorbed to silicon dioxide (nano).
Breath deflector and visor ventilation
The breath deflector (7) decreases fogging of the visor due to exhaled air. Additionally, the air circulation in the visor area is improved.
Pinlock® 30

The plastic lens in the Pinlock® visor absorbs moisture. The air
pocket between the lens and visor reduce the difference between the temperature inside the helmet and the outdoor temperature.
Integrated sun shield
High-strength HCM outer shell
High Density Copolymer Matrix: High quality ABS plastic is formed under extreme heat and pressure to make a robust and impact-resistant outer shell.
Anti-scratch coated visor
Separate winter comfort collar
Removable, washable liner
Toolless visor changes
With an additional set of cheek pads for a custom fit

Suitable for eyeglass wearers
Safety lock closure

Date of manufacture (month/year): 11/2018
Use and Installation Instructions
Sun Shield (Fig. C)
The integrated sun shield (10) will enable you to quickly and easily react to changed light conditions with the aid of the patent mechanism. To pull out and retract the sun shield, press the safety latch to operate the slider (5).
Note:
- Please take care that the edge of the sun shield does not block your field of vision.
- The sun shield may only be used when the visor is closed and may only be used during the day.
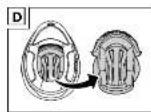
Inner Lining (Fig. D)
The inner lining (15) can be completely removed and cleaned separately (see care instructions). To remove the inner lining, firstly remove the helmet collar and the cheek pads. Then undo the back press-studs of the inner lining and pull the clips of the inner lining from the front side of the helmet.
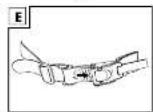
Snap-Fastener System (Fig. E)
The snap-fastener enables an individual and quick vernier adjustment of the chin strap. Press the snap-fastener together until the helmet is sitting comfortably but firm. The movable buckle may be used to fasten or secure excess chin strap.
Chin-Wind Deflector (Fig. F)
The chin-wind deflector (12) can be removed or fixed as needed. To fix, slide the chin-wind deflector into the chin bar.
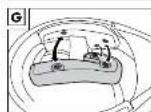
Cheek Pads (Fig. G)
You will receive two different pairs of cheek pads (14) for individual size adjustment. The thinner cheek-pads are already pre-mounted as standard. The thicker cheek pad is enclosed with the helmet separately. If the helmet is too loose and therefore is not sitting firmly on your head, you can replace the thin cheek pad with the thicker ones.
The cheek pads are affixed via three press-studs respectively in the helmet. You can easily remove the pads. The thicker cheek pads can now also be affixed in the helmet with three press-studs. You need to be able to hear that each press-stud locks-in.
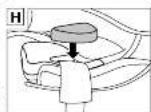
Acoustic Damping (Fig. H)
The acoustic damping (13) is for noise reduction, in particular when driving at high speeds.
Press the acoustic damping into the cavity of the cheek pads. The acoustic side pad equipped with Velcro faces towards the helmet shell.
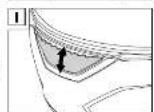
Front Vent (Fig. I)
The front vent (6) can be opened and closed via toggle.
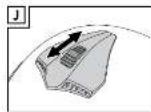
Top Vent (Fig. J)
The top vent (1) can be opened and closed by means of a slider.
Winter Collar
To reduce the wind inlet at the bottom of the helmet during periods with very cold temperatures, the pre-installed standard collar (16) can be replaced with the supplied winter collar (17).
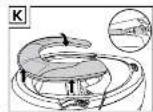
Removing the standard collar (Fig. K)
Pull the one-piece standard collar towards the inside of the helmet at the middle of one side.
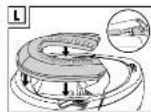
Inserting the Winter Collar (Fig. L)
Insert the rod of the winter neck roll into the opening on one side of the helmet. Fix the neck roll almost completely. Insert the second rod into the opening in the helmet and push in the remainder of the neck roll.
Visor Replacement
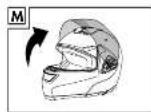
A damaged or severely scratched visor (8) can be replaced with a replacement visor.
Removal of the Visor
- Slide the visor into the highest position (fully opened) (Fig. M).
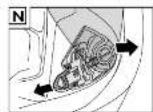
- Pull the visor-locking lever and remove the visor (Fig. N).
Inserting the Visor
- Place the replacement visor on the hold-down device and observe the correct positioning in the process (fully opened) (Fig. M).
- Pull the visor-locking lever and place the visor appropriately (Fig. O).
- Allow the replacement visor to snap in and close the visor.
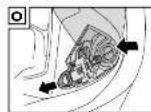
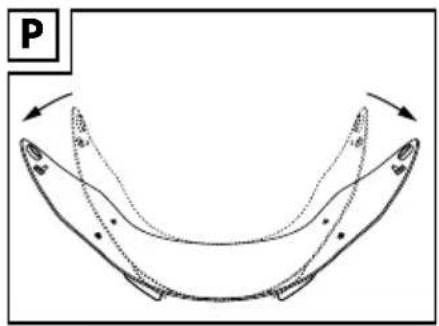
Installing the Pinlock® lens
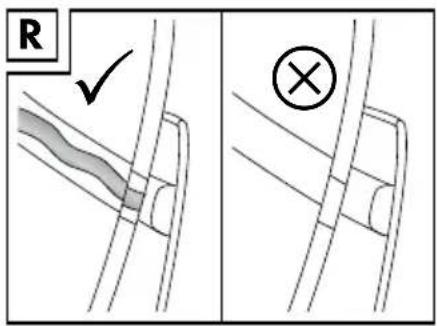
Remove the helmet visor. Bend the visor and place the Pinlock ^® lens between the two pins on the helmet visor (Fig. P-Q). Allow the helmet visor to return to its original shape. The silicone seal on the Pinlock ^® lens must make full contact with the helmet visor to prevent condensation (Fig. R). Remove the protective film from the Pinlock ^® lens. Reattach the helmet visor to the helmet.
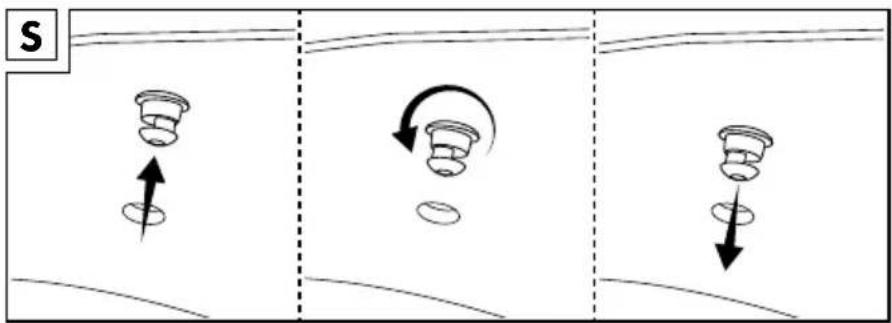
Adjusting the Pinlock® lens tension
Remove the Pinlock ^® lens. To adjust the pins, push the pins outward, turn with your fingers and push back in (Fig. S).
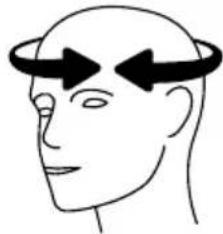
Selecting the Correct Helmet Size
- Measure the circumference of your head and select the helmet size based on this measurement. Try out several helmets before deciding. Ideally, the skin on your temples will move along when wearing the helmet.
- Ensure that even without the chin strap secured, the helmet does not move much on your head.
- The chin strap must be closed firmly for a secure fit. It is fitted correctly if it is difficult to slide your fingers under the chin strap. However, you must still be able to comfortably breathe, swallow and turn your head.
- Verify the helmet was tested according to the latest ECE standard.
Size table
 | |
| Size Head circumference | |
| M 57 - 58cm | |
| L 59 - 60cm | |
| XL 61cm | |
Maintenance and Care
Regular maintenance and care contributes to safety and maintaining the helmet.
Cleaning of the Helmet
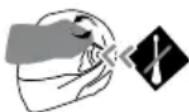
- Never use solvents, petrol or other detergents when cleaning the shell and interior of your helmet.
• Always use pH-neutral detergent dissolved in clean water. Careful rub with a soft cloth. Then wipe dry with a lint-free cloth.
Visor care and cleaning
• After using the helmet, lightly wipe off any grime (e.g. dead insects, dirt, sand, dust etc.) from the visor with a soft cloth and then fully wipe it clean using a dry soft cloth.
- When the visor gets wet (e.g. rainwater) it should always be wiped with a soft cloth.
- When cleaning the visor, never use any petroleum-based solvents or detergents containing abrasives.
- Remove the Pinlock® lens and clean with a soft, damp cloth and mild detergent. Let the Pinlock® lens air dry. Do not use harsh detergents or fluids containing ammonia or alcohol.
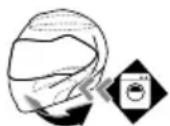
Cleaning of the Cheek Pads, Acoustic Pads and Inside Pads
• Hand wash below 30 °C.
- Allow to dry at room temperature.
- Avoid sources of heat.
- When not in use, store in a dry, well ventilated place.

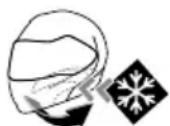
Storage
When not in use, store the helmet in a dry and well ventilated place at room temperature. Avoid sources of heat. Do not needlessly expose the item to heat, e.g. in the car in hot outside temperatures.
Disposal
Dispose of the article and the packaging materials in accordance with current local regulations. Packaging materials such as foil bags are not suitable to be given to children. Keep the packaging materials out of the reach of children.
Notes on the guarantee and service handling
The helmet was manufactured with great care and continuous inspection. This helmet includes a three year warranty from the date of purchase. Please keep your receipt.
The warranty covers materials and defects in manufacture only; misuse or improper handling will void the warranty.
They warranty further does not apply to the included Pinlock® visor lens, which is covered by separate warranty terms specified below.
This warranty does not limit your legal rights, particularly your warranty rights.
With regard to complaints, please contact the following service hotline or contact us by e-mail. Our service employees will advise as to the subsequent procedure as quickly as possible. We will be personally available to discuss the situation with you.
Any repairs under the warranty, statutory guarantees or through goodwill do not extend the warranty period. This also applies to replaced and repaired parts.
Repairs after the warranty are subject to a charge.
1 Year Warranty on Pinlock® visor lens
The Pinlock ^® visor lens is covered by a one year manufacturer durability warranty subject to the following terms: LIMITED LIABILITY
Pinlock ^® guarantees the original owner the visor insert to be free from defects in material and manufacture for a period of one (1) year from the date originally purchased. Pinlock ^® will at its discretion repair, replace or refund the purchase price of a defective visor insert. The Pinlock ^® warranty does not apply to damages due to misuse, negligences, modifications, normal wear, incorrect installation or cleaning, or accidents (also including races, stunts or similar activities). The Pinlock ^® warranty does not apply to the Pinlock ^® ready helmet visor or the location of the holes in the helmet made for the Pinlock ^® helmet visor. This warranty and legal means are exclusive and replace all other warranties and legal means, verbal or written, express or implied. Pinlock ^® resellers, retailers, agents or employees are not authorised to modify or extend this warranty or legal means. To exercise a warranty claim, the original owner must present the visor insert and purchase invoice or dated receipt to an authorised Pinlock ^® retailer.
Pinlock ^® excludes any implied warranty, which also includes the guarantee of marketability and suitability for a specific purpose. In the event Pinlock ^® is unable to legitimately exclude implied warranty under applicable law, these shall be excluded as permitted by law. All claims for implied warranty are void upon expiration of the above warranty period. Pinlock ^® is not liable for direct, indirect, specific, collateral or consequential damages due to violation of the warranty terms or other principle of law.
IAN: 306775 (Size M)
IAN: 306776 (Size L)
IAN: 306777 (Size XL)
GB Service Great Britain
Tel.: 0800 404 7657
E-Mail: deltasport@lidl.co.uk
IE Service Ireland
Tel.: 1890 930 034
(0,08 EUR/Min., (peak))
(0,06 EUR/Min., (off peak))
E-Mail: deltasport@lidl.ie
FR BE
Zonnevizier (afb. C)
Przechowywanie
natural_image
Pure electrical circuit symbols without any text or labelsSkladování
natural_image
Pure electrical circuit symbols without any text or labelsSkladovanie


- SYSTEEMHELM
- ODKLÁPĚCÍ PŘILBA
- DE AT CH
- Gebrauchsanleitung
- Lagerung
- Instructions for use
- Congratulations!
- Parts Overview
- Scope of Delivery
- Important Information
- Safety Advice
- - Warning!
- Product Characteristics
- ECE-R 22.05 Homologation
- Significant Tests of the ECE-Regulation 22.05
- Voluntary product testing Emission certificate
- Inside Padding with Coolmax® Inserts
- HeiQ® Fresh Tech
- Breath deflector and visor ventilation
- Pinlock® 30
- Integrated sun shield
- High-strength HCM outer shell
- Anti-scratch coated visor
- Separate winter comfort collar
- Removable, washable liner
- Toolless visor changes
- With an additional set of cheek pads for a custom fit
- Suitable for eyeglass wearers
- Safety lock closure
- Date of manufacture (month/year): 11/2018
- Use and Installation Instructions
- Sun Shield (Fig. C)
- Note:
- Inner Lining (Fig. D)
- Snap-Fastener System (Fig. E)
- Chin-Wind Deflector (Fig. F)
- Cheek Pads (Fig. G)
- Acoustic Damping (Fig. H)
- Front Vent (Fig. I)
- Top Vent (Fig. J)
- Winter Collar
- Removing the standard collar (Fig. K)
- Inserting the Winter Collar (Fig. L)
- Visor Replacement
- Removal of the Visor
- Inserting the Visor
- Installing the Pinlock® lens
- Adjusting the Pinlock® lens tension
- Selecting the Correct Helmet Size
- Size table
- Maintenance and Care
- Cleaning of the Helmet
- Visor care and cleaning
- Cleaning of the Cheek Pads, Acoustic Pads and Inside Pads
- Storage
- Disposal
- Notes on the guarantee and service handling
- Year Warranty on Pinlock® visor lens
- FR BE
- Zonnevizier (afb. C)
- Przechowywanie
- Skladování
- Skladovanie
Brand : CRIVIT
Model : IAN 306775
Category : Motorcycle helmet