M228 - Mobile Phone SWITEL - Free user manual and instructions
Find the device manual for free M228 SWITEL in PDF.
| Product type | Mobile phone |
| Brand | Switel |
| Model | M228 |
| Dimensions | 112 x 58 x 17 mm |
| Weight | 121.8 g (with battery) |
| Battery | Lithium-ion 1000 mAh |
| Talk time | Up to 4-5 hours |
| Standby time | Up to 380 hours |
| Display | 2.8 inches, 240 x 320 pixels |
| 2G Network | 900/1800 MHz |
| 3G Network | 900/2100 MHz |
| SAR value (head) | GSM 900: 0.069 W/kg |
| SAR value (body) | GSM 900: 0.690 W/kg |
| SOS function | Yes, with dedicated button and emergency SMS sending |
| Camera | Yes, rear camera lens |
| FM Radio | Yes, requires headset |
| Bluetooth | Yes |
| Expandable memory | Micro SD up to 16 GB |
| Charger connector | Micro USB, mains charger 5 V / 500 mA |
| Headphone jack | 3.5 mm jack |
| Cleaning | Soft dry cloth, avoid chemicals |
| Operating temperature | Avoid excessive heat, humidity, direct sunlight |
| Warranty | 24 months from the date of purchase |
Frequently Asked Questions - M228 SWITEL
User questions about M228 SWITEL
0 question about this device. Answer the ones you know or ask your own.
Ask a new question about this device
Download the instructions for your Mobile Phone in PDF format for free! Find your manual M228 - SWITEL and take your electronic device back in hand. On this page are published all the documents necessary for the use of your device. M228 by SWITEL.
USER MANUAL M228 SWITEL
natural_image
Diagram of a device with an open lid and internal components, showing a curved arrow indicating rotation (no text or symbols present)natural_image
Technical line drawing of a device casing with internal components (no text or symbols)natural_image
Technical line drawing of a device casing with internal components (no text or symbols)natural_image
Exploded view diagram of a device showing internal components and a folded paper sheet (no text or symbols)Display-Statussymbole

Signalstärke
Akkuladezustand
SD-Karte eingesetzt
Verpasste Anrufe
Telgo AG, Route d'Agy 16, 1763 Granges-Paccot, Switzerland
Technische Daten
Band 2G: 900/1800 MHz 3G: 900/2100 MHz
1 Earpiece/loudspeaker
2 Display
3 End call button / On/Off button (long press)
4 Navigation key

- Scroll up and down in menus and lists
- Open the menu
5 Call button / Select / OK
6 Navigation key

- Scroll up and down in menus and lists
- Open the phonebook
7 Camera button
8 Numeric/letters keys
- long keystroke on 1: calling the voice mail box (the phone number must be stored)
- long keystroke on 2...9 dials speed dial numbers (phone numbers must be stored)
*-key
- longpress to enter + or P / W (may be necessary for call-through numbers or remote accessing an answering machine)
- when entering text: enter symbol
-key
- in standby mode: change silent mode/normal mode (long press)
- when entering text: change input method
9 Direct call keys M1/M2/M3
10 Headset jack 3.5 mm
11 Lanyard hole
12 Volume control (+/-)
13 Camera lens
14 LED "SMS"
15 LED "Missed calls"
16 LED "Charging"
17 USB port (Charging/data transfer)
18 SOS button
19 Loudspeaker
Scope of delivery
1 mobile phone 1 rechargeable battery
1 USB cable 1 desktop charger
1 user guide
Installation
Installing SIM card, memory card and battery
To increase the storage space for photos or music (audio files) on your phone, you can insert a microSD card (up to 16 GB). If the microSD card is not FAT formatted, you can format it as you insert it.
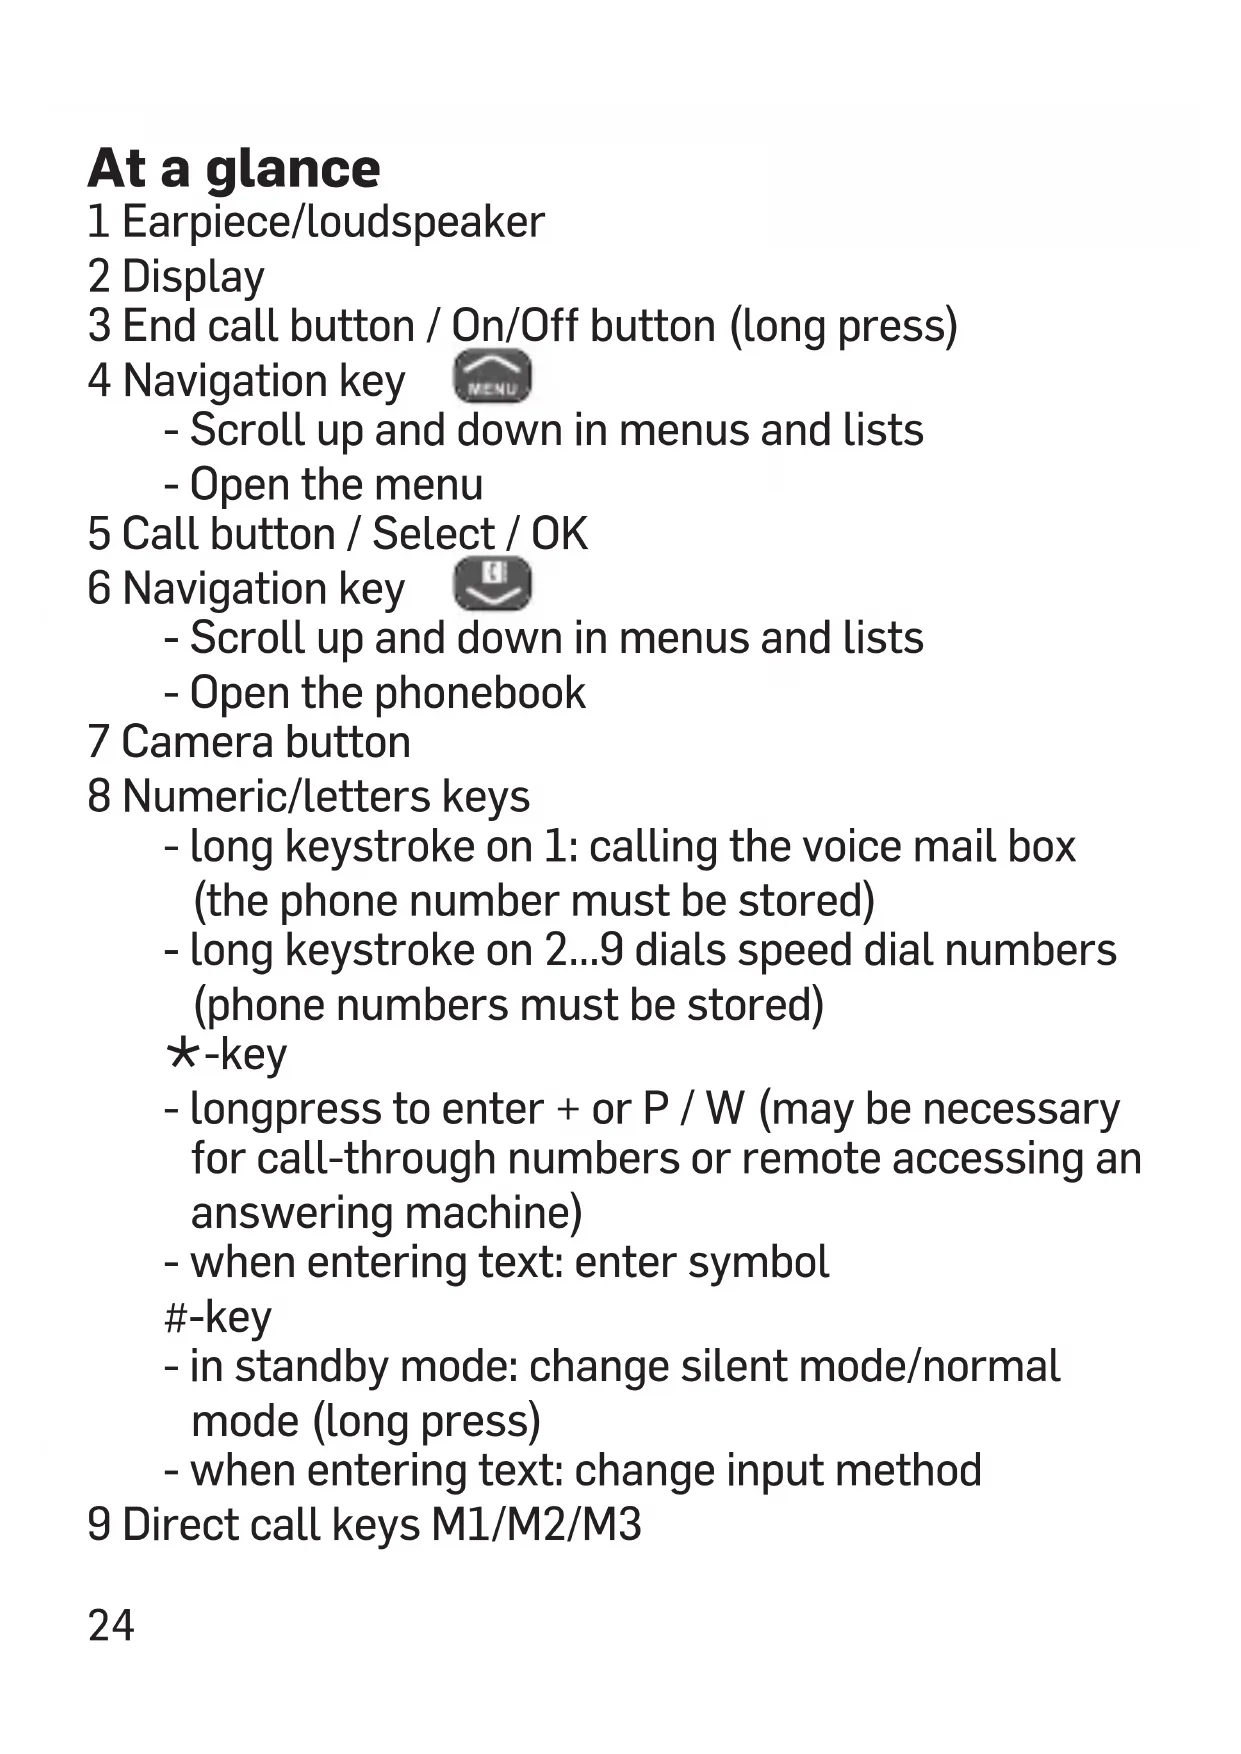
1 Remove the battery cover.
natural_image
Technical line drawing of a device with an open lid and internal components, showing a curved arrow indicating rotation (no text or symbols present)2 Slide the SIM card holder to the left to unlock it and open it. Insert the micro SIM card in a form-fitting manner (note the bevelled corner/contacts downwards), fold down the card holder and slide it to the right for locking.
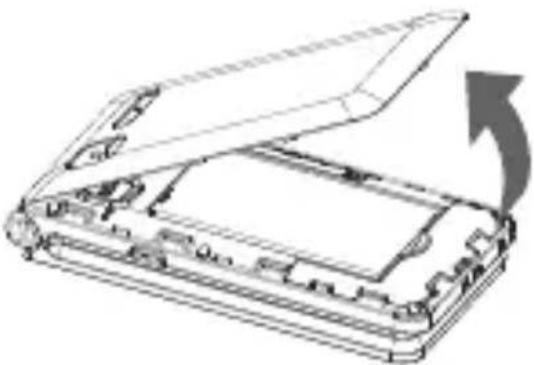
3 Slide the micro SD card holder to the left to unlock it and open it. Insert the micro SD card (not supplied) in a form-fitting manner (contacts downwards), fold down the card holder and slide it to the right for locking.
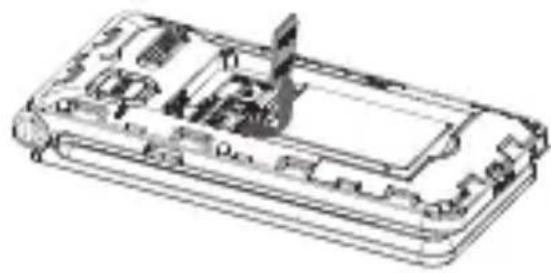
4 Insert the battery (contacts up on the left).
5 Replace the battery cover and press it all the way round.
natural_image
Technical line drawing of a device casing with internal components (no text or symbols)
natural_image
Technical line drawing of a device casing with internal components (no text or symbols)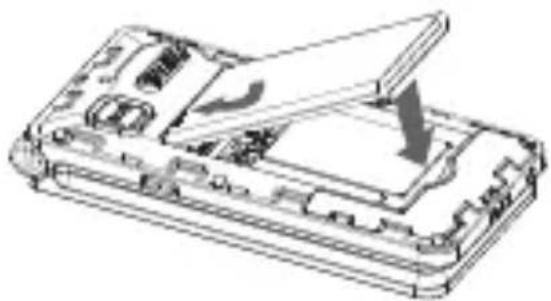
natural_image
Technical line drawing of a device casing with internal components and an open lid (no text or symbols)Display status symbols
Signal strength
Battery charging status
Memory card inserted
Missed calls
An alarm time is set
Headset connected
Ring only
Vibration only
Sound and vibration
Ringer off
Unread SMS
Unread MMS
Bluetooth activated
Call forwarding
SOS button pressed.
Activating the phone
1 Hold the red button on the telephone for approx. 3 seconds to turn it on/off. If the SIM card is valid but protected with a PIN code (Personal Identification Number), Input PIN is displayed.
2 Enter the SIM PIN code and press OK (green call key). Delete with Delete (red end call key).
Setting the language
The default language of the telephone menu, messages and so on is determined by the SIM card used (setting: Automatic). You can always switch between the languages supported by the telephone.
1 Press, scroll to Settings and press OK.
2 Select Phone settings and press OK.
3 Select Language and press OK.
4 Select a language from the list and press OK.
Setting date and time
1 Press, scroll to Settings and press OK.
2 Select Phone settings and press OK.
3 Select Time and date and press OK.
4 Select Set time/date and press OK.
5 Enter the time and press .
6 Enter the date (month/day/year) and press Save.
Note: In this menu, you can also select a home city as well as the date format and the time format.
Making a call/taking a call Making a call
1 In standby mode, input phone number including the area code.
2 Press .
3 Press to end the call.
Taking a call
1 Press Call .
Handsfree
1 Whilst in a call: Options -> Handsfree -> Select.
2 Deactivating: Options -> Handsfree -> Select.
Redial
1 In standby: press .
2 Select an entry, Options -> Call -> Select.
Phonebook Add new contact
1 In standby:
Press

or
press

select
Phonebook and press OK.
2 Select Add contact and press Options/Add/Select.
3 Select the location (phone or SIM) and press OK.
4 Enter name and telephone number (if you store the contact in the telephone, you can also select an individual caller ring tone).
5 Press Options, select Save and press Select.
6 Press to return to standby.
Tip: Always save the telephone numbers in international format with a + (long press on the * key) in front of the country code.
Example for UK:
Phone number 0123456 → +44 123456.
Calling from the phonebook
1 In standby: press .

2 Select an entry, Options -> Call -> Select.
Setting speed dial numbers
1 In standby: press .

2 Press Options, select Phonebook settings and press Select.
3 Select Speed dial and press OK.
4 Select Status/OK and activate the function if necessary.
5 Select Set numbers and press OK.
6 Select a digit key and press Edit.
7 Select an entry and press OK.
To dial with speed dialing, press and hold the respective button in idle status.
Messages
Writing and sending SMS
1 In standby: press, select Messages and press OK.
2 Select Write message and press OK.
3 Select Text message (SMS) or Multimedia message (MMS) and press OK.
4 Enter the text.
Press the -key to display symbols, use the navigation key to select a symbol and press OK. Press the # -key to change the input method.
5 Press Options, select Send to, enter the telephone number or select an entry from the phonebook and press OK.
6 Press Options, select Send and press Select.
Note: with an MMS, you can use Options to attach, for example, a picture, a sound, or a movie.
Viewing a SMS/MMS
1 In standby: press, select Messages and press OK.
2 Select Received and press OK.
3 Select an entry and press Options -> View.
Further options:
- Reply by SMS/by MMS: enter your message and send to the sender.
-
Call sender: to call the sender.
-
Forward: to forward message to other recipients.
- Delete: delete the message.
- Delete all: delete all messages.
- Mark several: Select multiple messages for shared processing.
- Mark as unread: The message is displayed as unread (new).
- Advanced:
- Use number: dial the number, save it in the phonebook or send a SMS/MMS to this number.
- Use URL/Email: if the SMS contains an URL or an Email address, you can use it (depending on your provider/data account etc.).
- Copy/Move to phone/to SIM: You can copy or move the message from the phone to the SIM card (or vice versa, depending on the storing location).
Message settings
1 In standby: press, select Messages and press OK.
2 Select Message settings and press OK.
3 Select Text message (SMS) or Multimedia message (MMS) and press OK.
- SMS settings
- SIM: Among other things, settings for the phone number of the SMS center (is taken from the SIM card and should only be changed after consultation with your provider) as well as changing / entering the phone number for the voicemail server.
- Memory status: number of stored SMS.
- Save sent messages: turn the function on / off.
- Preferred storage: select the location for storing SMS.
- MMS settings
- Data account: management of the data account.
- Common settings: basic settings for MMS.
Call history
1 In standby: press, select Call history and press OK.
2 Select the desired list and press OK to check the calls (press Options for select calling back, sending a SMS/MMS to the caller or view details etc.)
or
Select Delete call logs to delete all entries or select Call timers to check the duration of the calls made.
Multimedia
1 In standby: press, select Multimedia and press OK.
2 To choose from:
- Camera: press the camera key to take a picture. The following functions can be accessed directly via buttons:
1 - image size
2 - image quality
4 - white balance
5 - flash on / off
6 - delay timer (self-timer)
7 - continuous shots
0 - switch to the VCR
Options allow you to access further setting options.
- Image viewer: with Options you can, for example, view photos, transfer an image via Bluetooth or send via MMS, use as wallpaper, rename, delete or view image information.
- Video recorder: Press the camera key to start and stop recording.
The following functions can be accessed directly via buttons:
2 - video quality
4 - white balance
6 - sound recording on / off
Options allow you to access further setting options.
- Video player: playback of video files. Press the # button to start and the ✦ button to stop. Full screen display with button 1, volume adjustment with the side volume buttons.
- Audio player: playback of audio files. Press the # button to start and to stop.
Create a music playlist with different settings, volume adjustment with the side volume buttons.
- Sound recorder: You can record sounds using the phone's microphone. Start and stop recording with the ✦ button, playback with the # button. Options allow you to access further setting options.
- FM radio: For a better reception, the use of a headset is recommended as the cable acts as an antenna.
Press the # button to switch on/off. Channel change with the keys and .
If the magnifying glass symbol is activated (*button) the next station is set.
Press Options e.g. to start an automatic channel search run or to enter channel frequencies manually. Volume adjustment with the side volume buttons.
Extras
1 In standby: press MENU, select Tools and press OK.
2 To choose from:
- Calendar: today is marked. Use the navigation key to select a day (or press Options and use "Jump to Date"). You can enter and edit events (appointments).
- Calculator: enter the first number (decimal point with the # key), select the calculation operation with the navigation key, press OK and enter the next number.
- Alarm: you can enter up to 5 different alarm times.
- Notes: You can take notes. Under Options you have different editing options.
- File manager: manage files on the memory card.
- Internet service: scope and offer depending on the SIM card used (provider / network operator).
Settings
1 In standby: press MENU, select Settings and press OK.
2 To choose from:
- Profiles: Select one of the displayed profiles (ring tone, ringer volume, alert tones, etc.) and use Options to activate, adjust or reset to the factory settings.
- SOS setting (see also on page 38):
- Owner info: Input of information about the user for emergencies (name, diseases, allergies, blood type).
- SOS contacts: Enter up to 5 emergency numbers that are dialed when the emergency button is pressed.
- SOS key: turn the SOS function on / off.
- SOS message: turn on / off the emergency SMS and/or edit the text.
- Emergency alarm: If this function is activated, a siren sound will be given on the mobile phone when the SOS function is triggered.
- Phone settings: settings for time and date, language, preferred input method, display (LCD backlight, wallpaper, keypad light), font size, flight mode.
- Bluetooth: switch on or off the Bluetooth function and use the search function for pairing other Bluetooth devices.
- Voice settings: switch on or off number announcement when dialing or announcing of the number of incoming calls.
Note: In the case of incoming calls, the number will be announced as transmitted by the network operator.
- Call settings: settings for caller ID, call
waiting, call divert, call barring, auto redial, call time reminder (signal), answer mode etc.
- Network settings: network selection automatically or manually and settings for GPRS (data connection).
- Family number: Editing the direct dialing keys (red = M1 / green = M2 / blue = M3).
- Connectivity: Edit the data accounts and the data service. Scope and offer depend on the SIM card used (provider / network operator).
- Security settings: settings for SIM security (PIN lock / PIN change) and phone security (phone lock / lock code available on request from your network operator).
- Restore to factory settings: reset the device to factory settings (lock code 0000).
The SOS function IMPORTANT!
Always inform recipients in the emergency number list that they are listed as your emergency contacts.
CAUTION: When an emergency call is activated the phone is pre-set to handsfree mode. Do not hold the device near your ear when the handsfree mode is in use, because the volume may be extremely loud.
Using the emergency call button, you can easily call preset numbers.
The emergency call function must be activated in the "SOS setting -> SOS key" menu if you want to use it.
1 Press the emergency call button on the back of the telephone and hold it down for 3 seconds. A loud signal will sound (if "Emergency alarm" in the menu "Emergency call settings" is switched on) and the emergency message (SMS) is sent to all emergency numbers in the list (if "status" = on).
2 The signal sounds again and the first emergency number from the list is dialed. The phone switches to handsfree mode.
3 If the call is not answered within 30 seconds, the signal sounds again and the next emergency number is dialed.
If the call is answered, you can talk to the person called for 30 seconds before the connection is automatically disconnected.
4 All emergency numbers from the list are called consecutively one after the other until either the battery of your telephone is empty or the emergency call button is pressed and hold down again for approx. 5 s.
Note: Pressing the end call key skips to the next emergency number.
Appendix
Safety Information
- Prevent exposure to smoke, dust, vibration, chemicals, moisture, heat and direct sunlight. The phone is not waterproof; therefore, keep it dry.
- Only use original accessories and batteries. Never attempt to connect other products.
- If you want to connect the phone to another device, read the manual supplied with that device with regard to any detailed safety information.
- Never attempt to connect incompatible products.
- Repairs to this device may only be completed by qualified service personnel.
- All mobile communication equipment is subject to interference which may impair its performance.
- Keep the phone and accessories out of the reach of children.
- The SIM card can be removed. Caution! Small children can swallow them.
- The ringing tone is issued via the loudspeaker. Take an incoming call first and then hold the phone to your ear. This prevents any possible hearing damage.
- Only use the phone while driving or riding a transport vehicle in road traffic when using the approved handsfree equipment and appropriately positioned holders. Ensure that no safety-related functions are interfered with when operating the phone. It is essential to observe the applicable national laws and regulations.
- Always maintain a distance of at least 15 cm to implanted heart pacemakers to prevent any possible interference. If you have had a pacemaker implanted, do not carry the phone in a breast pocket when switched on. Always hold the phone to the ear furthest away from the pacemaker during calls.
Switch the phone off immediately if you notice or suspect any adverse effects.
- Do not rely on the mobile phone as a safeguard for emergencies. For a variety of technical reasons, it is not possible to guarantee a reliable connection under all circumstances.
- Ensure access to the power adapter plug is not obstructed by furniture or such.
Intended use
This mobile phone is designed for use when connected to a mobile phone network. Any other use is considered unintended use. Unauthorised modification or reconstruction is not permitted. Under no circumstances open the device or complete any repair work yourself.
Areas of use
- Do not use the phone in prohibited areas.
- Switch the phone off in the vicinity of medical equipment (e.g. in hospitals).
- Do not use the phone in petrol stations or near fuels and chemicals.
- Check with the airline whether mobile phones may be used on board.
Tips on the battery
- Only use batteries, cables and charging unit approved by the manufacturer, otherwise the battery could be damaged.
- Never throw batteries into the fire or water.
- Do not short circuit the battery
• Always leave the battery in the phone to avoid accidentally short circuiting the battery contacts. - Keep the battery contacts clean and free of dirt.
- The battery can be charged/discharged hundreds of times but its service life is limited.
- Replace the battery when the battery power has decreased noticeably.
Disposal
In order to dispose of your device, take it to a collection point provided by your local public waste authorities (e.g. recycling centre). According to laws on the disposal of electronic and electrical devices, owners are obliged to dispose of old electronic and electrical devices in a separate waste container. The symbol indicates that the device must not be disposed of in normal domestic waste!
Batteries represent a hazard to health and the environment!
Never open, damage or swallow batteries or allow them to pollute the environment. They may contain toxic, ecologically hazardous heavy metals. You are legally obliged to dispose of power packs and batteries at the point of sale or in the corresponding containers

provided at collection points by local public waste authorities.
Disposal is free of charge. The symbols indicate that the batteries must not be disposed of in normal domestic waste and that they must be brought to collection points provided by local public waste authorities.
Packaging materials must be disposed of according to local regulations.
Declaration of Conformity

This device fulfils the requirements stipulated in the EU directive: 2014/53/EU. Conformity with the above mentioned directive is confirmed by the CE mark on the device. To view the complete Declaration of Conformity, please refer to the free download available on our web site www.switel.com.
Telgo AG, Route d'Agy 16, 1763 Granges-Paccot, Switzerland
Technical data
Band 2G: 900/1800 MHz 3G: 900/2100 MHz
Additional functions emergency call function
Battery Li-Ion, 3.7 V, 1000 mAh
Display 2.8", 240 x 320 px
Talk time up to 4-5 hrs
Standby time up to 380 hrs
Dimensions 112 x 58 x 17 mm
Weight 121.8 g (incl. battery)
Power supply Plug-in power supply
USB connection USB type C
SAR values
GSM 900 Head 0.069 W/kg / Body 0.690 W/kg
DCS 1800 Head 0.048 W/kg / Body 0.583 W/kg
WCDMA Band 8 Head 0.059 W/kg / Body 0.386 W/kg
WCDMA Band 1 Head 0.125 W/kg / Body 1.194 W/kg
Guarantee
SWITEL equipment is produced and tested according to the latest production methods. The implementation of carefully chosen materials and highly developed technologies ensure trouble-free functioning and a long service life. The terms of guarantee do not apply when a device malfunction was caused by the mobile telecommunications network operator/provider. The terms of guarantee do not apply to the batteries or power packs used in the products. The period of guarantee is 24 months from the date of purchase. All deficiencies related to
material or manufacturing errors within the period of guarantee will be redressed free of charge.
Rights to claims under the terms of guarantee are annulled following tampering by the purchaser or third parties. Damage caused as a result of improper handling or operation, normal wear and tear, incorrect positioning or storage, improper connection or installation or Acts of Gods and other external influences are excluded from the terms of guarantee. In the case of complaints, we reserve the right to repair defective parts, replace them or replace the entire device. Replaced parts or devices become our property. Rights to compensation in the case of damage are excluded where there is no evidence of intent or gross negligence by the manufacturer. If your device shows signs of defect during the period of guarantee, please return it to the sales outlet in which you purchased the SWITEL device together with the purchase receipt.
All claims under the terms of guarantee in accordance with this agreement can only be asserted at the sales outlet.
No claims under the terms of guarantee can be asserted after a period of two years from the date of purchase and hand-over of the product.
Notice succincte
1 Ecouteur
2 Ecran
3 Touche raccrocher / Touche ON/OFF (appui long)
4 Touche de navigation

natural_image
Diagram of a device with an open lid and internal components, showing a curved arrow indicating rotation (no text or symbols present)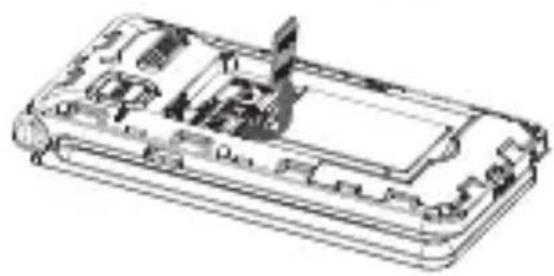
natural_image
Technical line drawing of a device casing with internal components (no text or symbols)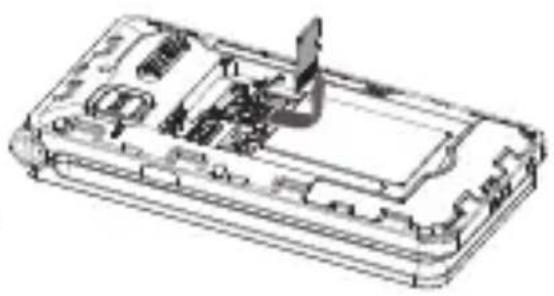
natural_image
Technical line drawing of a device casing with internal components and a directional arrow indicating movement (no text or symbols)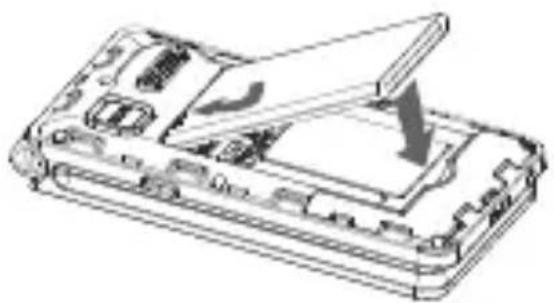
natural_image
Exploded view diagram of a smartphone showing internal components and a downward arrow indicating a component (no text or symbols present)Telgo AG, Route d'Agy 16, 1763 Granges-Paccot, Switzerland
natural_image
Diagram of a device with an open lid and internal components, showing a curved arrow indicating rotation (no text or symbols present)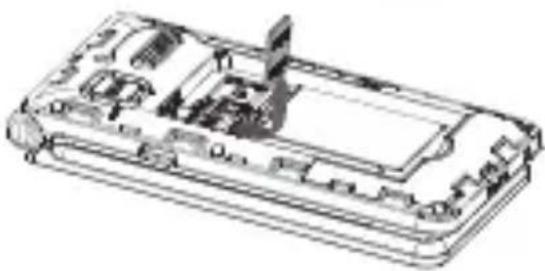
natural_image
Technical line drawing of a device casing with internal components (no text or symbols)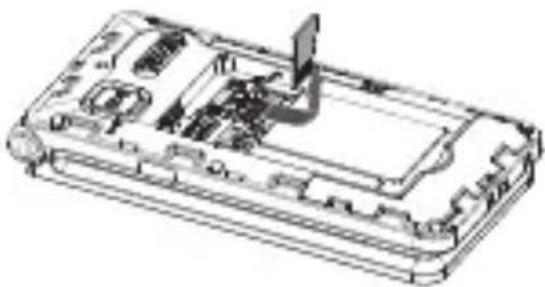
natural_image
Technical line drawing of a device casing with internal components (no text or symbols)
natural_image
Technical line drawing of a device casing with internal components and an open lid (no text or symbols)Telgo AG, Route d'Agy 16, 1763 Granges-Paccot, Switzerland
Dati tecnici
GSM 2G: 900/1800 MHz 3G: 900/2100 MHz
natural_image
Diagram of a device with an open lid and internal components, showing a curved arrow indicating rotation (no text or symbols present)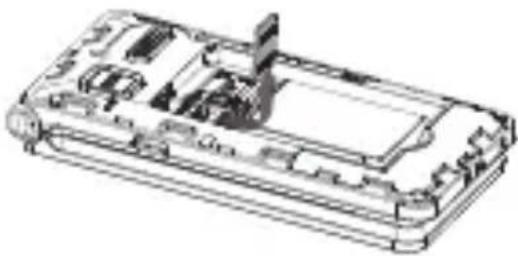
natural_image
Technical line drawing of a device casing with internal components (no text or symbols)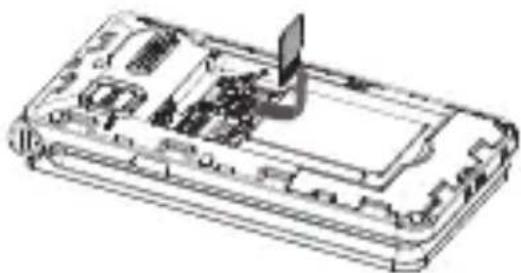
natural_image
Technical line drawing of a device casing with internal components and a laptop on top (no text or symbols)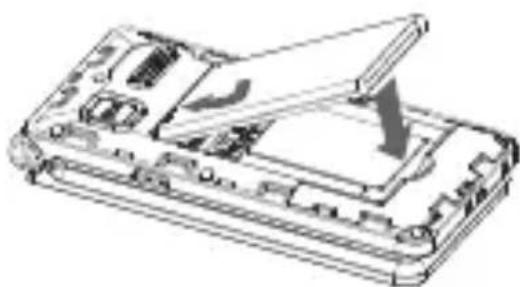
natural_image
Technical line drawing of a device casing with an open lid and internal components (no text or symbols)Telgo AG, Route d'Agy 16, 1763 Granges-Paccot, Switzerland
Datos técnicos
Band 2G: 900/1800 MHz 3G: 900/2100 MHz
natural_image
Diagram of an open electronic device with internal components and a curved arrow indicating rotation (no text or symbols)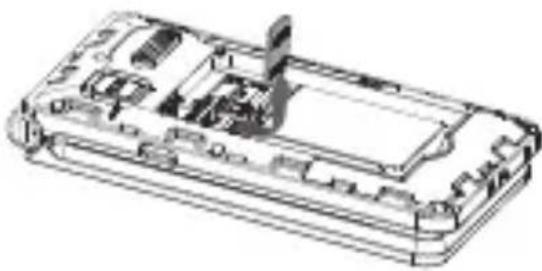
natural_image
Technical line drawing of a device casing with internal components (no text or symbols)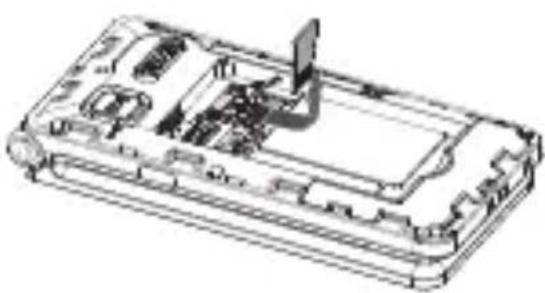
natural_image
Technical line drawing of a device casing with internal components (no text or symbols)
natural_image
Technical line drawing of a device casing with internal components and an open lid (no text or symbols)Display statussymbolen

text_image
SOSSignaalsterkte
Oplaadstatus batterij
SD-kaart aanwezig
Gemiste oproep
Alarm is ingesteld
Telgo AG, Route d'Agy 16, 1763 Granges-Paccot, Switzerland
Technische gegevens
Band 2G: 900/1800 MHz 3G: 900/2100 MHz
In the case of technical questions, please use the service form on our website: http://www.switel.com/en/product-information-technical-support/