USER MANUAL TV55Z80BEZ PANASONIC
Safety Information 3
Assembling / Removing the pedestal 5
Introduction. 6
Accessories Included.. 6
Features 6
Antenna Connection 7
Turning On/Off the TV 7
TV Control & Operation 7
Remote Control 8
Initial Setup Wizard. 9
Main Screen 9
Live TV 9
Using Parental Controls. 9
Remotes & Bluetooth Devices. 9
Connecting to the Internet 10
Specification 12
Licences 13
Disposal of Old Equipment and Batteries. 14
Declaration of Conformity (DoC) 14
More Information 14

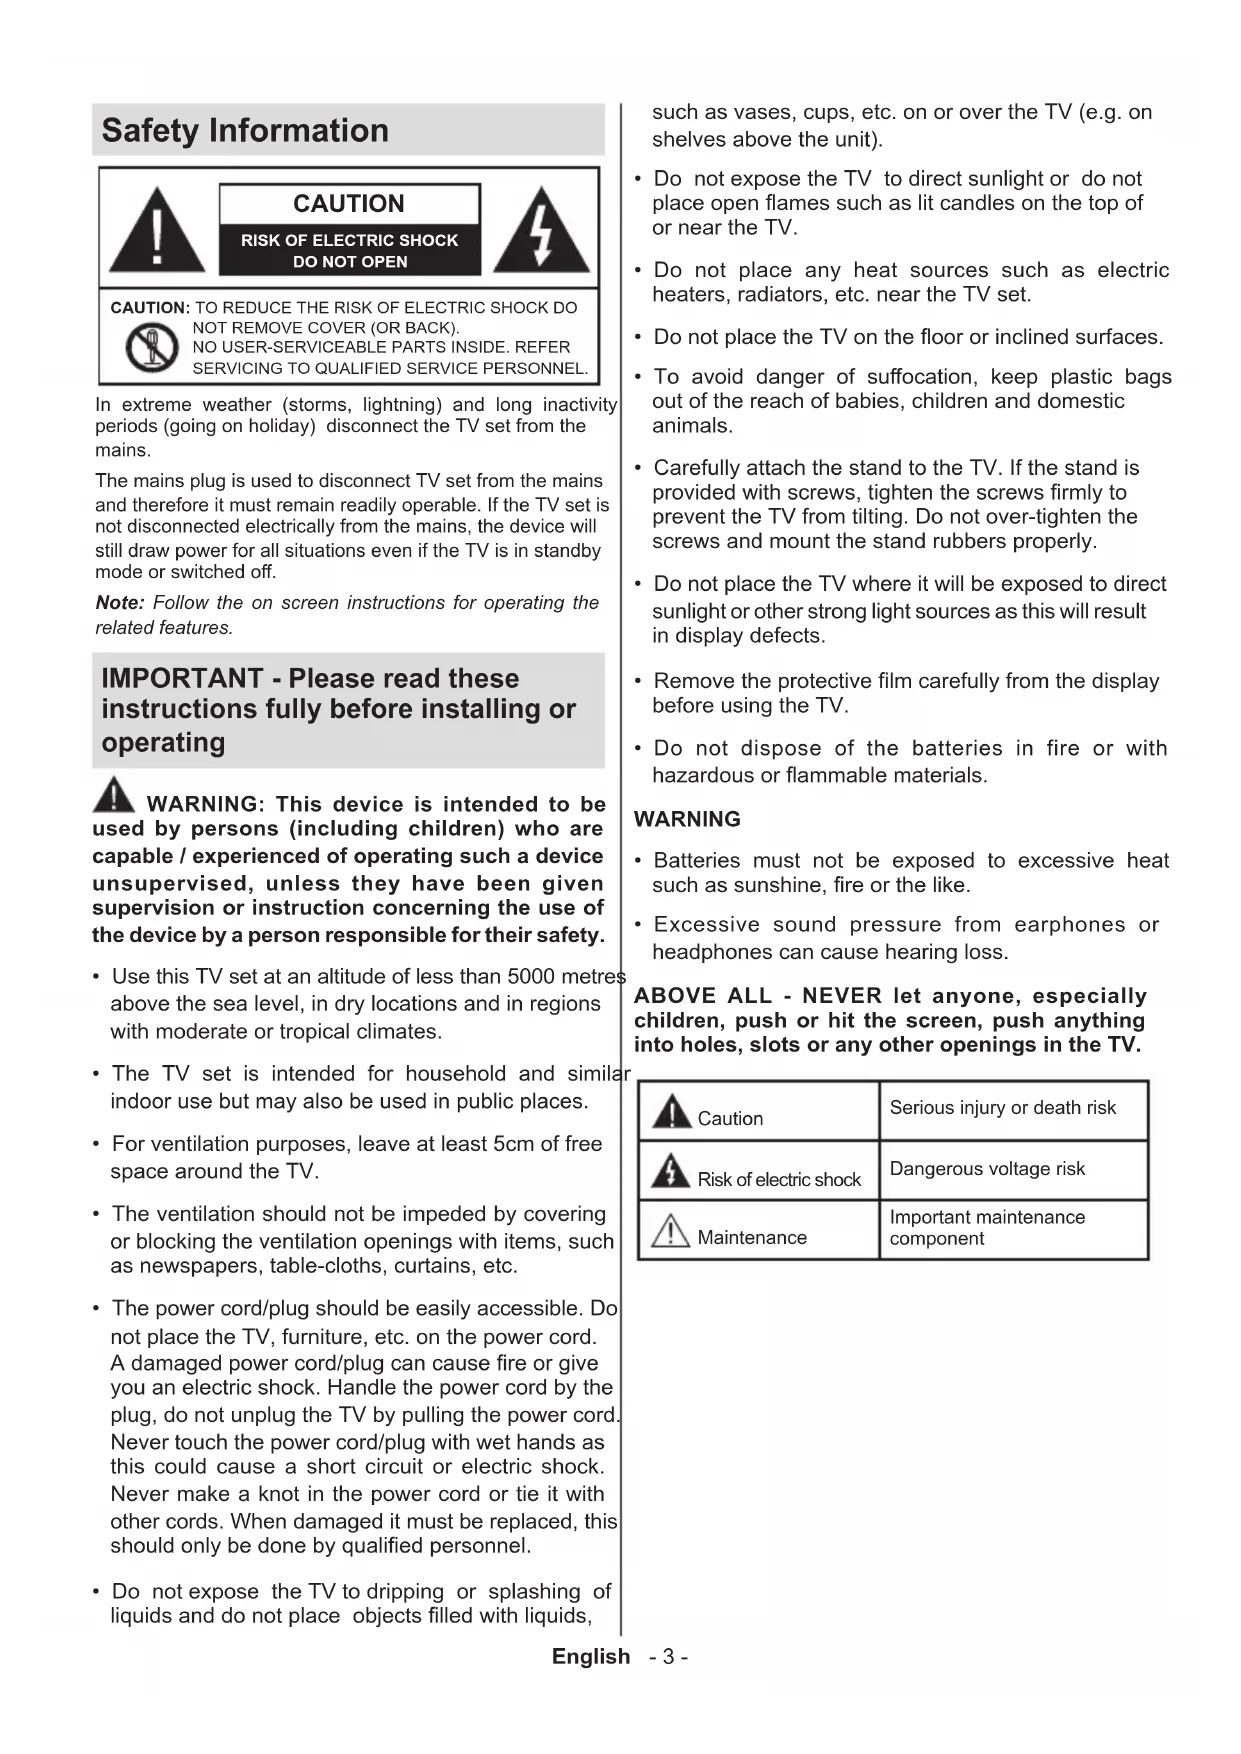
CAUTION
RISK OF ELECTRIC SHOCK DO NOT OPEN
CAUTION: TO REDUCE THE RISK OF ELECTRIC SHOCK DO

NOT REMOVE COVER (OR BACK).
NO USER-SERVICEABLE PARTS INSIDE. REFER SERVICING TO QUALIFIED SERVICE PERSONNEL.
In extreme weather (storms, lightning) and long inactivity periods (going on holiday) disconnect the TV set from the mains.
The mains plug is used to disconnect TV set from the mains and therefore it must remain readily operable. If the TV set is not disconnected electrically from the mains, the device will still draw power for all situations even if the TV is in standby mode or switched off.
Note: Follow the on screen instructions for operating the related features.
IMPORTANT - Please read these instructions fully before installing or operating

WARNING: This device is intended to be used by persons (including children) who are unable / experienced of operating such a device. Supervised, unless they have been given a provision or instruction concerning the use of this device by a person responsible for their safety.
- Use this TV set at an altitude of less than 5000 metres above the sea level, in dry locations and in regions with moderate or tropical climates.
The TV set is intended for household and similar indoor use but may also be used in public places.
- For ventilation purposes, leave at least 5cm of free space around the TV.
- The ventilation should not be impeded by covering or blocking the ventilation openings with items, such as newspapers, table-cloths, curtains, etc.
- The power cord/plug should be easily accessible. Do not place the TV, furniture, etc. on the power cord. A damaged power cord/plug can cause fire or give you an electric shock. Handle the power cord by the plug, do not unplug the TV by pulling the power cord. Never touch the power cord/plug with wet hands as this could cause a short circuit or electric shock. Never make a knot in the power cord or tie it with other cords. When damaged it must be replaced, this should only be done by qualified personnel.
- Do not expose the TV to dripping or splashing of liquids and do not place objects filled with liquids,
such as vases, cups, etc. on or over the TV (e.g. on shelves above the unit).
- Do not expose the TV to direct sunlight or do not place open flames such as lit candles on the top of or near the TV.
- Do not place any heat sources such as electric heaters, radiators, etc. near the TV set.
- Do not place the TV on the floor or inclined surfaces.
- To avoid danger of suffocation, keep plastic bags out of the reach of babies, children and domestic animals.
- Carefully attach the stand to the TV. If the stand is provided with screws, tighten the screws firmly to prevent the TV from tilting. Do not over-tighten the screws and mount the stand rubbers properly.
- Do not place the TV where it will be exposed to direct sunlight or other strong light sources as this will result in display defects.
- Remove the protective film carefully from the display before using the TV.
- Do not dispose of the batteries in fire or with hazardous or flammable materials.
WARNING
- Batteries must not be exposed to excessive heat such as sunshine, fire or the like.
- Excessive sound pressure from earphones or headphones can cause hearing loss.
ABOVE ALL - NEVER let anyone, especially children, push or hit the screen, push anything into holes, slots or any other openings in the TV.
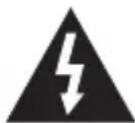
| Caution | Serious injury or death risk |
| Risk of electric shock | Dangerous voltage risk |
| Maintenance | Important maintenance component |
Markings on the Product
The following symbols are used on the product as a marker for restrictions and precautions and safety instructions. Each explanation shall be considered where the product bears related marking only. Note such information for security reasons.

Class II Equipment: This appliance is designed in such a way that it does not require a safety connection to electrical earth.

Hazardous Live Terminal: The marked terminal(s) is/are hazardous live under normal operating conditions.

Caution, See Operating Instructions: The marked area(s) contain(s) user replaceable coin or button cell batteries.

Class 1 Laser Product: This product contains Class 1 laser source that is safe under reasonably foreseeable conditions of operation.
WARNING
- Do not ingest the battery, Chemical Burn Hazard.
- This product or the accessories supplied with the product may contain a coin/button cell battery. If the coin/button cell battery is swallowed, it can cause severe internal burns in just 2 hours and can lead to death.
- Keep new and used batteries away from children.
- If the battery compartment does not close securely, stop using the product and keep it away from children.
If you think batteries might have been swallowed or placed inside any part of the body, seek immediate medical attention.
A television may fall, causing serious personal injury or death. Many injuries, particularly to children, can be avoided by taking simple precautions such as:
- ALWAYS use cabinets or stands or mounting methods recommended by the manufacturer of the television set.
- ALWAYS use furniture that can safely support the television set.
- ALWAYS ensure the television set is not overhanging the edge of the supporting furniture.
- ALWAYS educate children about the dangers of climbing on furniture to reach the television set or its controls.
-
ALWAYS route cords and cables connected to your television so they cannot be tripped over, pulled or grabbed.
-
NEVER place a television set in an unstable location.
- NEVER place the television set on tall furniture (for example, cupboards or bookcases) without anchoring both the furniture and the television set to a suitable support.
- NEVER place the television set on cloth or other materials that may be located between the television set and supporting furniture.
- NEVER place items that might tempt children to climb, such as toys and remote controls, on the top of the television or furniture on which the television is placed.
- The equipment is only suitable for mounting at heights ≤ 2m .
If the existing television set is going to be retained and relocated, the same considerations as above should be applied.
Apparatus connected to the protective earthing of the building installation through the MAINS connection or through other apparatus with a connection to protective earthing – and to a television distribution system using coaxial cable, may in some circumstances create a fire hazard. Connection to a television distribution system has therefore to be provided through a device providing electrical isolation below a certain frequency range (galvanic isolator).
WALL MOUNTING WARNINGS
- Read the instructions before mounting your TV on the wall.
- The wall mount kit is optional. You can obtain from your local dealer, if not supplied with your TV.
- Do not install the TV on a ceiling or on an inclined wall.
- Use the specified wall mounting screws and other accessories.
-
Tighten the wall mounting screws firmly to prevent the TV from falling. Do not over-tighten the screws.
-
Using other wall-hanging brackets, or installing a wall-hanging bracket by yourself have the risk of personal injury and product damage. In order to maintain the unit's performance and safety, be absolutely sure to ask your dealer or a licensed contractor to secure the wall-hanging brackets. Any damage caused by installing without a qualified installer will void your warranty.
- Carefully read the instructions accompanying optional accessories, and be absolutely sure to take steps to prevent the TV from falling off.
- Handle the TV carefully during installation since subjecting it to impact or other forces may cause product damage.
Take care when fixing wall brackets to the wall. Always ensure that there are no electrical cables or pipes in the wall before hanging bracket.
- To prevent fall and injury, remove the TV from its fixed wall position when it is no longer in use.
DAMAGES
- Excepting cases where responsibility is recognised by local regulations, Panasonic accepts no responsibility for malfunctions caused by misuse or use of the product, and other problems or damages caused by use of this product.
- Panasonic accepts no responsibility for loss, etc., of data caused by disasters.
- External devices separately prepared by the customer are not covered by the warranty. Care for the data stored in such devices is the responsibility of the customer. Panasonic accepts no responsibility for abuse of this data.
Figures and illustrations in these operating instructions are provided for reference only and may differ from the actual product appearance. Product design and specifications may be changed without notice.
Because the Fire TV operating system is periodically updated, the images, navigation instructions, titles and location of menu options shown in this manual may be different from what you see on the screen.
Assembling / Removing the pedestal
Preparations
Take out the pedestal(s) and the TV from the packing case and put the TV onto a work table with the screen panel down on the clean and soft cloth (blanket, etc.)
- Use a flat and firm table bigger than the TV.
- Do not hold the screen panel part.
Make sure not to scratch or break the TV.
CAUTION: Please refrain from inserting pictured screws to the TV body when not using the TV stand e.g. wall hanging. Inserting screws without pedestal may cause a damage of the TV.
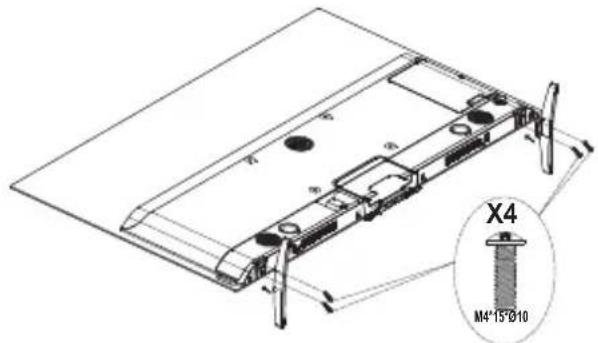
Assembling the pedestal
- Place the stand(s) on the stand mounting pattern(s) on the rear side of the TV.
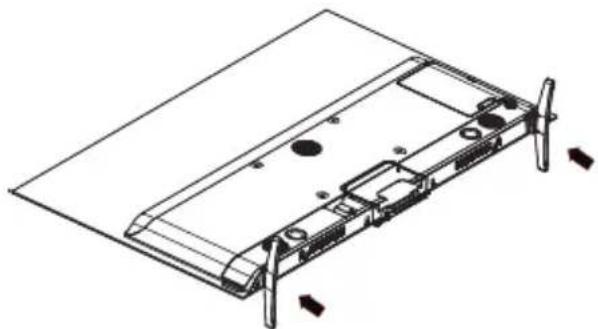
- Insert the screws (M4 x 15) provided and tighten them gently until the stand is properly fitted.
Removing the pedestal from the TV
Be sure to remove the pedestal in the following way when using the wall-hanging bracket or repacking the TV.
- Put the TV onto a work table with the screen panel down on the clean and soft cloth. Leave the stand(s) protruding over the edge of the surface.
- Unscrew the screws that fixing the stand(s).
- Remove the stand(s).
When using the wall-hanging bracket
Please contact your local Panasonic dealer to purchase the recommended wall-hanging bracket.
Holes for wall-hanging bracket installation;
Rear of the TV

| 48" 55" | 65" | |
| a (mm) | 300 300 | 300 | |
| b (mm) | 200 200 | 200 | |
View from the side
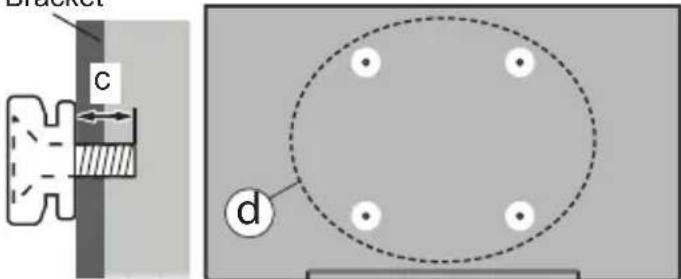
VESA Bracket
| (d) | | 48” 55” | 65” | |
| Depth of screw (c) | min. 10 | mm 8 m | mm 15 mm | |
| max. 13 | mm 12 | mm 20 mm | |
| Diameter M6 M6 M6 | | | |
Note: The screws for fixing the TV onto the wall-hanging bracket are not supplied with the TV.
Introduction
Thank you for choosing our product. You'll soon be enjoying your new TV. Please read these instructions carefully. They contain important information which will help you get the best from your TV and ensure safe and correct installation and operation.
Accessories Included
Remote Control
- Batteries: 2 x AAA
- Operating Instructions
Power Cord
- Detachable stand
- Stand mounting screws (M4 x 15)
Features
Ultra HD (UHD)
TV supports Ultra HD (Ultra High Definition - also known as 4K) which provides resolution of 3840 × 2160 (4K:2K). It equals 4 times the resolution of Full HD TV by doubling the pixel count of the Full HD TV both horizontally and vertically. Ultra HD content is supported from HDMI, USB input(s) and over DVB-T2 and DVB-S2 broadcasts.
High Dynamic Range (HDR) / Hybrid Log-Gamma (HLG)
Using this feature the TV can reproduce greater dynamic range of luminosity by capturing and then combining several different exposures. HDR/HLG promises better picture quality thanks to brighter, more realistic highlights, more realistic colour and other improvements.
Antenna Connection
Connect the aerial or cable TV plug to the aerial input (ANT) socket or satellite plug to the satellite input (LNB) socket located on the left side of the TV.
Left side of the TV
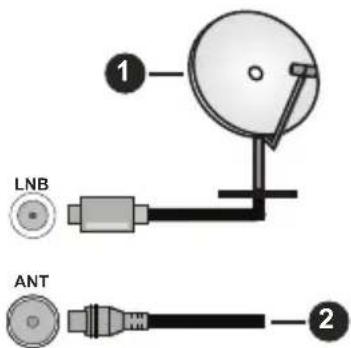
1. Satellite
2. Aerial or cable

If you want to connect a device to the TV, make sure that both the TV and the device are turned off before making any connection. After the connection is done, you can turn on the units and use them.
Turning On/Off the TV
Connect power
IMPORTANT: The TV set is designed to operate on 220-240V AC, 50 Hz socket.
After unpacking, allow the TV set to reach the ambient room temperature before you connect the set to the mains.
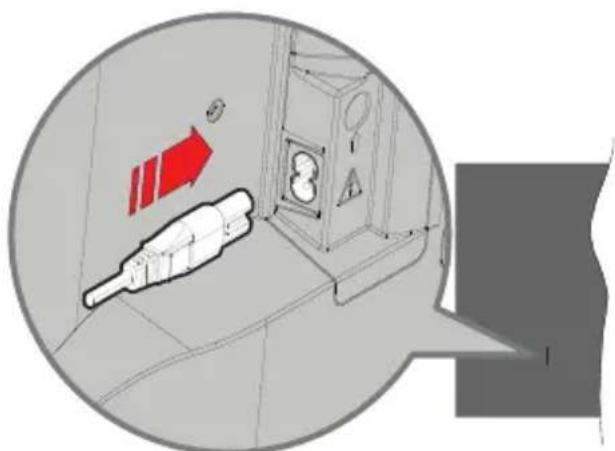
Plug one end (the two-hole plug) of the supplied detachable power cord into the power cord inlet on the rear side of the TV as shown above. Then plug the other end of the power cord into the mains socket outlet. The TV will switch to standby mode.
Note: The position of the power cord inlet may differ depending on the model.
To switch on the TV from standby
If the TV is in standby mode the standby LED lights up. To switch on the TV from standby mode either:
- Press the Standby button on the remote control.
- Press the control button on the TV.
The TV will then switch on.
To switch the TV into standby
- Press the Standby button on the remote control.
- Press the control button on the TV, the function options menu will be displayed. The focus will be on the Inputs option. Press the button consecutively until the Power Off option is highlighted. Press and hold the button for about 2 seconds, the TV will switch into standby mode.
To switch off the TV
To power down the TV completely, unplug the power cord from the mains socket.
TV Control & Operation
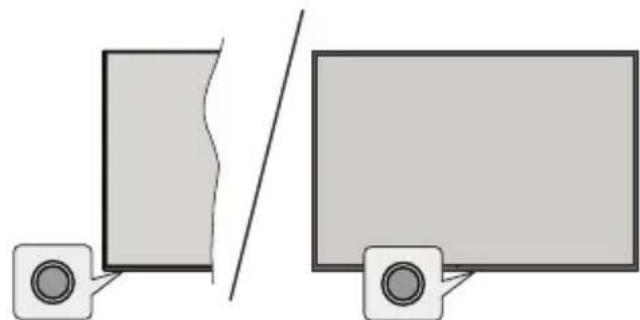
Your TV has a single control button. This button allows you to control the Inputs / Volume Up-Down / Channel Up-Down / Power On-Off / Exit functions of the TV.
Note: The position of the control button may differ depending on the model.
Remote Control
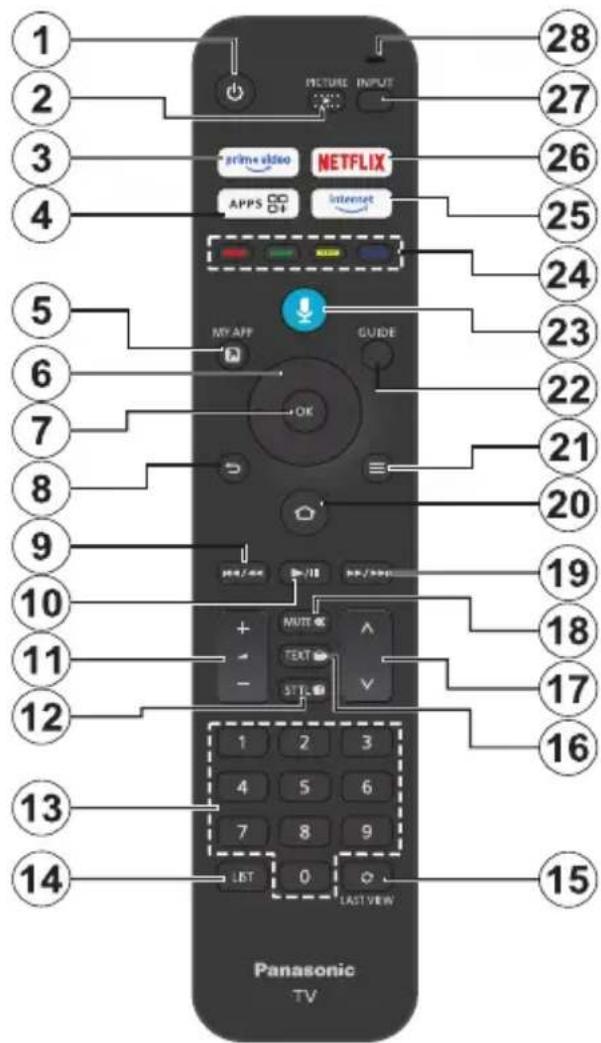
Inserting the Batteries into the Remote
Remove the back cover to reveal the battery compartment on the back side of the remote control first. Insert two 1.5V - size AAA batteries. Make sure the (+) and (-) signs match (observe correct polarity). Do not mix old and new batteries. Replace only with same or equivalent type. Place the cover back on.
To pair remote with the TV
When TV is turned on for the first time, a pairing process for your remote will be performed during the initial setup. Follow the on screen instructions to pair it. If you experience difficulties pairing your remote with your TV you can turn off other wireless devices and try again. Refer to the Remotes & Bluetooth Devices section for detailed information on pairing new devices with your TV.
- Standby: Standby / On
- Picture: Opens the viewing mode menu
- Prime Video: Opens Prime Video screen
- Apps: Displays your apps & games
- My App (*)
- Directional button: Helps navigate menus, content, etc. and displays the subpages in TXT mode when pressed Up or Down
- Select: Confirms selections, enters sub-menus
- Back/Return: Returns to previous menu screen, goes one step back, closes open windows, returns to main screen or Home tab
- Rewind: Moves frames backwards in media such as movies, scrolls back a day in the channel guide
- Play/Pause
Play: Starts to play selected media
Pause: Pauses the media being played
- Volume +f· : Increases/decreases the volume level
- Sttl: Displays audio and subtitle options, where you can change the language preference and turn subtitles on or off (where available)
- Numeric buttons: Switches the channel in Live TV mode, enters a number in the text box on the screen
- List: Opens the channel list
- Last View: Quickly cycles between previous and current channels and switches to Live TV mode
- Text: Opens and closes teletext or interactive services (where available in Live TV mode)
- Programme +/-: Increases/Decreases channel number in Live TV mode
- Mute: Completely turns off the volume of the TV
- Fast forward: Moves frames forward in media such as movies, scrolls forward a day in the channel guide
- Home: Opens the Home screen. Press and hold to display quick settings menu
- Options: Displays setting options (where available)
- Guide: Displays the channel guide
- Voice button: Activates the microphone on the remote
- Coloured Buttons: Follow the on-screen instructions for coloured button functions
- Internet: Opens the Amazon Silk browser
- Netflix: Launches the Netflix application
- Input: Shows available broadcast and content sources
- Alexa LED: Illuminates when the Voice button is pressed and during pairing process Microphone opening: Speak into the microphone when using Alexa or voice search
(*) MY APP:
You can assign a shortcut to the My App button at any time by pressing and holding this button to quickly access apps, Alexa voice commands, and more. Follow the on-screen instructions.
Initial Setup Wizard
Follow the on-screen instructions to complete the initial setup process. Use the directional buttons and the Select button on the remote to select, set, confirm and proceed.
Sign In with Your Amazon Account
You can sign in to your Amazon account during the initial setup process. You need to be signed in to an Amazon account in order to use Amazon services. The related step will be skipped if no internet connection has been established previously. If you don't already have an Amazon account you can set up an account by choosing New to Amazon? Create a free account option.
Once the account has been registered, you will be asked whether you want to use the account you signed in. You can choose to change the account, read the terms and conditions, which will be accepted if you continue, at this point. Highlight the symbol with three dots next to the texts at the bottom side of the screen and press Select to read and learn more about the related subject. Highlight Continue and press Select button to proceed without changing the account.
Main Screen
To enjoy the benefits of your Amazon Fire TV, your TV must be connected to the Internet. Connect the TV to a home network with a high-speed Internet connection. You can connect your TV wirelessly or wired to your modem/rodter. Refer to the Network and Connecting to the Internet sections for further information on how to connect your TV to the internet.
The main screen is the centre of your TV. Press the Home button on your remote to display the main screen. From the main screen you can start any application, switch to a TV channel, watch a movie or switch to a connected device, manage the settings. Depending on your TV setup and your country selection in the initial setup the main screen may contain different items.
Live TV
Live TV refers to channels that have been tuned in via an aerial, cable and satellite connection. There are several ways to watch Live TV channels. You can press the Live button on the remote (availability depends on the model of the remote) to switch to Live TV mode and watch TV channels. You can also select a channel from the On Now row in the Home tab or Live tab, or select the Cable/Antenna or Satellite input option from the Inputs menu or the Inputs row in the Inputs tab on the Home screen and press Select to start watching. Press the Input button to open the Inputs menu (availability depends on the model of the remote).
If the channel installation is not completed the On Now row will not be available.
Using Parental Controls
Your TV has some default protections which when enabled will require a PIN code to be entered for purchases, app launches and it will also restrict viewing of content rated Teen and above. Parental controls are set to OFF as default.
Press the Home button and scroll across to Settings. Highlight Parental Controls in the Preferences or Live TV menu and press Select to enter. Highlight Parental Controls and press Select to switch parental controls on.
Note: You will be asked to enter a PIN to turn the parental controls on or off. This is the Prime Video PIN and it is related to your Amazon account. If you have forgotten your PIN follow the link shown on the screen to reset your PIN.
Remotes & Bluetooth Devices
You can add extra voice remote to your TV, or you may also need to replace one if your old one broke. Other bluetooth devices like speakers, games controllers, mice and keyboards can also be connected via bluetooth.
Voice Remotes with Alexa
Check the status of your current voice remote with Alexa or add a new one.
Highlight Voice Remotes with Alexa and press Select.
Remote Status
To see the status of your current voice remote highlight the remote option and look at the right hand side of the screen. You will see the type of remote control, the battery status, the version number and its serial number.
To unpair the remote press the Options button while the remote option is highlighted then press Select to
confirm. The Options button will have no function if only one remote is paired.
Add New Remote
Highlight Add New Remote and press Select.
You'll see the word 'Searching' appear, press and hold the Home button on the new remote control for 10 seconds. When the remote has been discovered it will appear in the list.
Connecting to the Internet
You can access the Internet via your TV, by connecting it to a broadband system. It is necessary to configure the network settings in order to enjoy a variety of streaming content and internet applications. These settings can be configured from Settings>Network menu.
Wired Connection
Connect your TV to your modem/rodter via an Ethernet cable. There is a LAN port on the left side of your TV. Your TV will automatically connect to the network. If it doesn't, you will need to enable the network connection manually using the Enable Network option in the Network menu. Highlight this option and press Select to enable.
You can check the status of the connection using the Ethernet Configuration option in the Network menu. Highlight this option and press Play/Pause button on the remote to see the network status.
To configure your wired connection settings manually highlight Ethernet Configuration and press the Select button. Follow the on-screen dialogues to proceed and enter the required values respectively.
If the Ethernet cable is not connected, depending on the current connection status, Configure Ethernet Connection or Configure Network option will be available instead of Ethernet Configuration option.
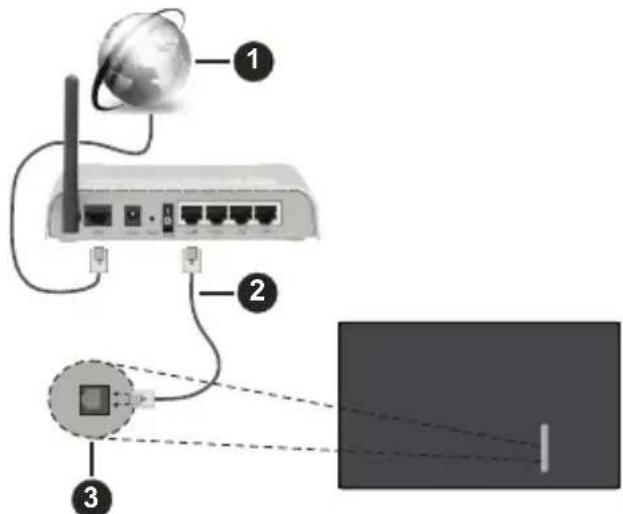
- Broadband ISP connection
- LAN (Ethernet) cable
- LAN input on the left side of the TV
You might be able to connect your TV to a network wall socket depending on your network's configuration. In that case, you can connect your TV directly to the network using an Ethernet cable.

- Network wall socket
- LAN input on the left side of the TV
Wireless Connection
A wireless LAN modem/router is required to connect the TV to the Internet via wireless LAN.
Highlight Enable Network option in the Network menu and press Select to enable wireless connection. Then disconnect the Ethernet cable, if connected priorly. Some of the available networks will be listed. Highlight See All Networks and press Select to see the complete list.
If you prefer to connect your TV to your network via WLAN, highlight one of the listed available wireless networks and press Select. Then enter the password if the network is password protected.
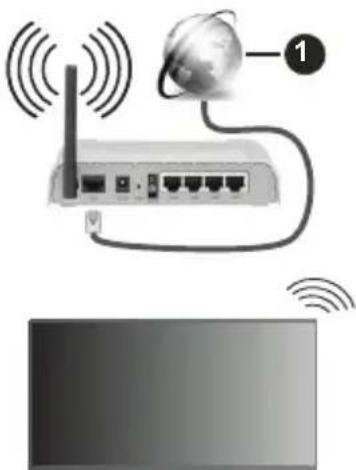
- Broadband ISP connection
A network with hidden SSID can not be detected by other devices. If you want to connect to a network with hidden SSID, highlight the Join Other Network option under the Network menu and press Select. Add the network by entering its name, security type and password manually. If you want to configure additional settings of the network manually, highlight
Advanced when prompted and press Select. Follow the on-screen instructions to proceed and enter the required values respectively.
If you want to save the wireless network passwords to Amazon you can use the Save Wi-Fi Passwords to Amazon option. To delete saved passwords turn this option off.
A Wireless-N router (IEEE 802.11a/b/g/n/ac) with 2.4 and 5 GHz bands is designed to increase bandwidth. These are optimised for smoother and faster HD video streaming, file transfers and wireless gaming.
Use a LAN connection for quicker data transfer between other devices like computers.
The transmission speed differs depending on the distance and number of obstructions between the transmission products, the configuration of these products, the radio wave conditions, the line traffic and the products that you use. The transmission may also be cut off or may get disconnected depending on the radio wave conditions, DECT phones or any other WLAN 11b appliances. The standard values of the transmission speed are the theoretical maximum values for the wireless standards. They are not the actual speeds of data transmission.
The location where the transmission is most effective differs depending on the usage environment.
The Wireless feature of the TV supports 802.11 a,b,g,n & ac type modems. It is highly recommended that you should use the IEEE 802.11ac communication protocol in order to avoid any possible problems while watching videos.
You must change your modem's SSID when there are any other modems around with the same SSID. You can encounter connection problems otherwise. Use a wired connection if you experience problems with a wireless connection.
A stable connection speed is required to play back streaming content. Use an Ethernet connection if the wireless LAN speed is unstable.
Specification
| Digital Reception | Fully integrated digital terrestrial-cable-satellite TV (DVB-T-C-S) (DVB-T2, DVB-S2 compliant) |
| Channel Indicator On Screen Display |
| RF Aerial Input 75 Ohm (unbalanced) |
| Operating Voltage 220-240V AC, 50Hz. |
| Audio Dolby Atmos | |
| Headphone 3.5 mm mini stereo jack |
| Networked Standby Power Consumption (W) | <2 |
| TV-48Z80BEZ TV-55Z8 | OBEZ TV-65Z80BEZ | |
| Audio Output Power (WRMS.) (10% THD) | 2 x 12 W | 2 x 12 W 2 x 12 W | |
| Power Consumption (W) 200 W | 260 W 320 W | | |
| Weight (Kg) 15 Kg 22 Kg 28,5 Kg | | | |
| TV Dimensions DxLxH (with foot) (mm) | 249 x 1070 x 653 249 x | 1225 x 741 249 x 1444 x | 864 |
| TV Dimensions DxLxH (without foot) (mm) | 47 x 1070 x 614 47 x 12 | 25 x 701 47 x 1444 x 824 | |
| Display 16/9 48" | 16/9 55" | 16/9 65" | |
| Operation temperature and operation humidity | 0°C up to 40°C, 85% humidity max |
For more product information, please visit EPREL: https://eprel.ec.europa.eu.
EPREL registration number is available on https://eprel.panasonic.eu/product.
Wireless LAN Transmitter Specifications
| Frequency Ranges | Max Output Power |
| 2400 - 2483,5 MHz (CH1 - CH13) < 100 | mW |
| 5150 - 5250 MHz (CH36 - CH48) < 200 | mW |
| 5250 - 5350 MHz (CH52 - CH64) < 200 | mW |
| 5470 - 5725 MHz (CH100 - CH140) < 200 mW | |
Country Restrictions
The Wireless LAN equipment is intended for home and office use in all EU countries, the UK and Northern Ireland (and other countries following the relevant EU and/or UK directive). The 5.15 - 5.35 GHz band is restricted to indoor operations only in the EU countries, in the UK and Northern Ireland (and other countries following the relevant EU and/or UK directive). Public use is subject to general authorisation by the respective service provider.
| Country Restriction | |
| Russian Federation | Indoor use only |
The requirements for any country may change at any time. It's recommended that user checks with local authorities for the current status of their national regulations for both 2.4 GHz and 5 GHz wireless LAN's.
Standard
IEEE 802.11.a/b/g/n
Host Interface
USB 2.0
Security
WEP 64/128, WPA, WPA2, TKIP, AES, WAPI
Licences
The terms HDMI, HDMI High-Definition Multimedia Interface, HDMI trade dress and the HDMI Logos are trademarks or registered trademarks of HDMI Licensing Administrator, Inc.

Dolby, Dolby Vision, Dolby Atmos and the double-D symbol are registered trademarks of Dolby Laboratories Licensing Corporation. Manufactured under licence from Dolby Laboratories. Confidential unpublished works. Copyright © 2012-2023 Dolby Laboratories. All rights reserved.
Dolby Vision·Atmos
The Bluetooth® word mark and logos are registered trademarks owned by the Bluetooth SIG, Inc. and any use of such marks by Vestel Elektronik Sanayi ve Ticaret A.S. is under licence. Other trademarks and trade names are those of their respective owners.
This product contains technology subject to certain intellectual property rights of Microsoft. Use or distribution of this technology outside of this product is prohibited without the appropriate licence(s) from Microsoft.
Content owners use Microsoft PlayReady™ content access technology to protect their intellectual property, including copyrighted content. This device uses PlayReady technology to access PlayReady-protected content and/or WMDRM-protected content. If the device fails to properly enforce restrictions on content usage, content owners may require Microsoft to revoke the device's ability to consume PlayReady-protected content. Revocation should not affect unprotected content or content protected by other content access technologies. Content owners may require you to upgrade PlayReady to access their content. If you decline an upgrade, you will not be able to access content that requires the upgrade.
The "CI Plus" Logo is a trademark of CI Plus LLP.
This product is protected by certain intellectual property rights of Microsoft Corporation. Use or distribution of such technology outside of this product is prohibited without a licence from Microsoft or an authorised Microsoft subsidiary.
Amazon, Alexa, Fire, Prime Video and all related logos are trademarks of Amazon.com, Inc. or its affiliates.

Advance
Covered by patiens at patienl,accessadvancemc
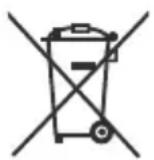
Disposal of Old Equipment and Batteries
Only for European Union and countries with recycling systems
These symbols on the products, packaging, and/or accompanying documents mean that used electrical and electronic products and batteries must not be mixed with general household waste.
For proper treatment, recovery and recycling of old products and batteries, please take them to applicable collection points in accordance with your national legislation.
By disposing of them correctly, you will help to save valuable resources and prevent any potential negative effects on human health and the environment. For more information about collection and recycling, please contact your local municipality.
Penalties may be applicable for incorrect disposal of this waste, in accordance with national legislation.
Note for the battery symbol (bottom symbol):
This symbol might be used in combination with a chemical symbol. In this case it complies with the requirement set by the Directive for the chemical involved.
Hereby, Panasonic Entertainment & Communication Co., Ltd., declares that this TV is in compliance with the essential requirements and other relevant provisions of the Directive 2014/53/EU.
If you want to get a copy of the original DoC of this TV, please visit the following website:
http://www.ptc.panasonic.eu/compliance-documents
Panasonic Entertainment & Communication Co., Ltd.
1-10-12 Yagumo-higashi-machi, Moriguchi City, Osaka
570-0021, Japan
Authorized Representative in the EU:
Panasonic Marketing Europe GmbH
Panasonic Testing Centre
Winsberging 15, 22525 Hamburg, Germany
Web Site: http://www.panasonic.com
For more information, please visit the Support page on Panasonic website, where you can find the full manual instruction.
Inhaltsverzeichnis
WEP 64/128, WPA, WPA2, TKIP, AES, WAPI.
Lizenzen
Panasonic Testing Centre
Winsberging 15, 22525 Hamburg, Germany
Website: http://www.panasonic.com
WEP 64/128, WPA, WPA2, TKIP, AES, WAPI
Licences
Covered by patents at patentist.accessadvancemc
Winsberging 15, 22525 Hamburg, Germany
Site Internet: http://www.panasonic.com
WEP 64/128, WPA, WPA2, TKIP, AES, WAPI
Licencias
Los TERMINOS HDMI, HDMI High-Definition Multimedia Interface, laImagen comercial de HDMI y los logotipos de HDMI son MARCAS commerciales o MARCAS registra-das de HDMI Licensing Administrator, Inc.

G
Panasonic Testing Centre
Winsberging 15, 22525 Hamburg, Germany
Sizio Web: http://www.panasonic.com
in state telecomando
WEP 64/128, WPA, WPA2, TKIP, AES, WAPI
Licenze
I termini HDMI, HDMI High-Definition Multimedia Interface, HDMI trade dress e i loghi HDMI sono marchi commerciali o marchi registrati di HDMI Licensing Administrator, Inc.

Panasonic Testing Centre
Winsberging 15, 22525 Hamburg, Germany
Sito web: http://www.panasonic.com
For at slukke for TV'et.
WEP 64/128, WPA, WPA2, TKIP, AES, WAPI
Licenseer
Ordene HDMI og HDMI High-Definition Multimedia
Panasonic Testing Centre
Winsberging 15, 22525 Hamburg, Germany
Website: http://www.panasonic.com
WEP 64/128, WPA, WPA2, TKIP, AES, WAPI
Lisensssit
Panasonic Testing Centre
Winsberging 15, 22525 Hamburg, Germany
WEP 64/128, WPA, WPA2, TKIP, AES, WAPI
Licens
ratt satt Panasonic Marketing Europe GmbH
Panasonic Testing Centre
Winsberging 15, 22525 Hamburg, Germany
Webbsida: http://www.panasonic.com
WEP 64/128, WPA, WPA2, TKIP, AES, WAPI
Lisenser
Winsberging 15, 22525 Hamburg, Germany
Nettsted: http://www.panasonic.com