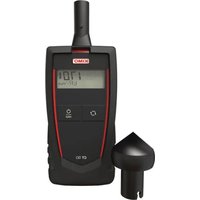
CO 50 - Measuring equipment Sauermann - Free user manual and instructions
Find the device manual for free CO 50 Sauermann in PDF.
| Product type | Portable carbon monoxide detector |
| Brand | Sauermann |
| Model | CO 50 |
| Category | Measuring equipment |
| Main function | Measurement of CO concentration in air |
| Sensor | Electrochemical with 5-second preheating |
| CO measurement range | Not specified in the manual |
| Power supply | 2 AAA LR03 1.5 V batteries |
| Protection rating | IP54 |
| Operating temperature | 0 to +50 °C |
| Storage temperature | -20 to +80 °C |
| Operating humidity | Non-condensing |
| Maximum altitude | 2000 m |
| Display | LCD screen |
| Buttons | Selection, On/Off/Hold |
| Hold function | Freeze measurement |
| Unit change | Possible by long press on Selection |
| Auto power-off | After 20 minutes of inactivity |
| Battery replacement | Battery compartment at the back |
| Safety | Risk of explosion if incorrect batteries |
| Recycling | Device, accessories and batteries recyclable |
| Included accessories | Not specified |
| Warranty | Not specified |
Frequently Asked Questions - CO 50 Sauermann
User questions about CO 50 Sauermann
0 question about this device. Answer the ones you know or ask your own.
Ask a new question about this device
Download the instructions for your Measuring equipment in PDF format for free! Find your manual CO 50 - Sauermann and take your electronic device back in hand. On this page are published all the documents necessary for the use of your device. CO 50 by Sauermann.
USER MANUAL CO 50 Sauermann
natural_image
Abstract geometric network diagram with interconnected nodes and lines (no text or symbols)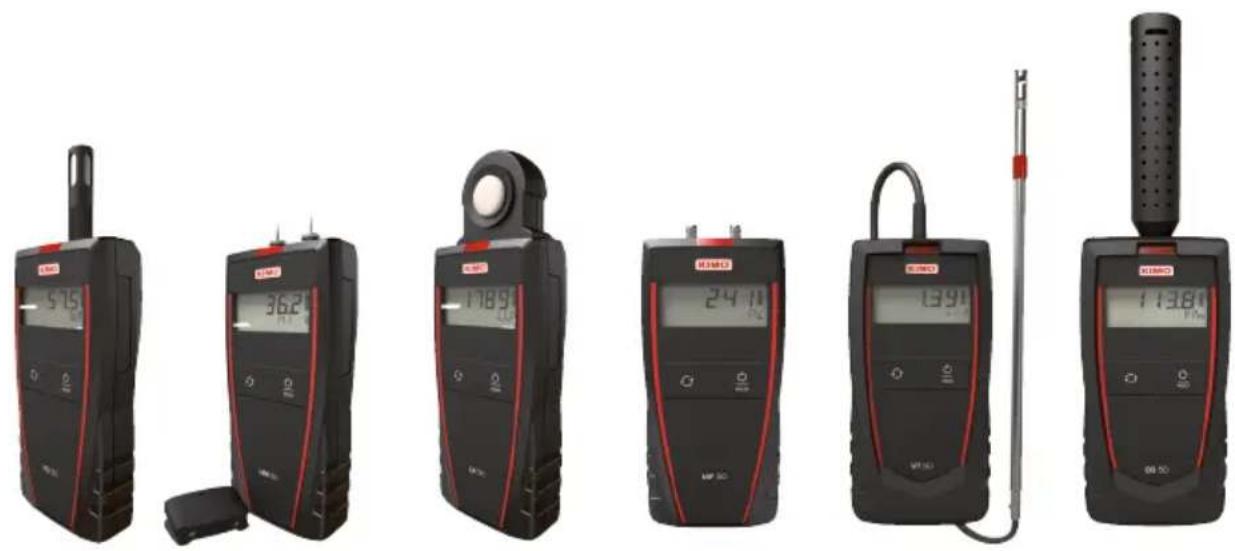
text_image
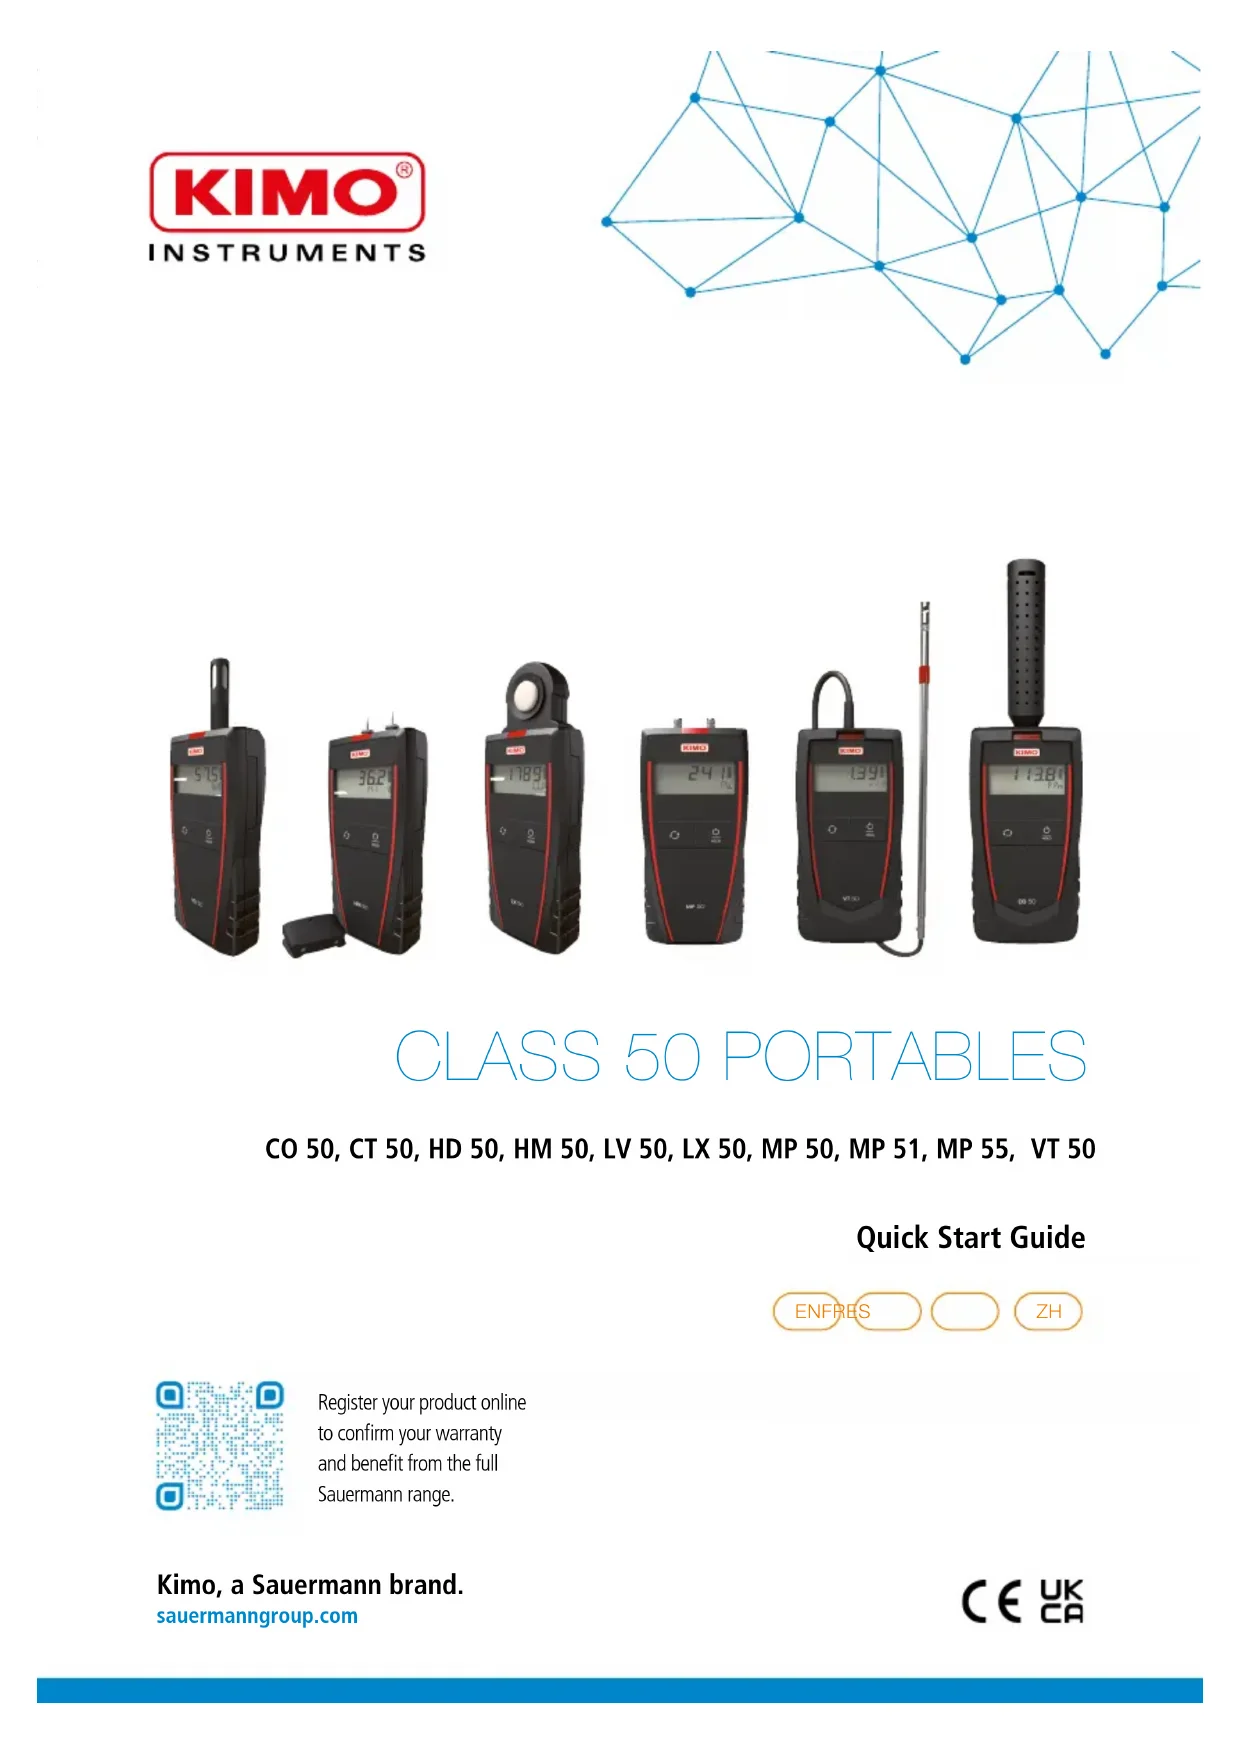
515 362 1789 24:11 1390 11380 00:50CLASS 50 PORTABLES
CO 50, CT 50, HD 50, HM 50, LV 50, LX 50, MP 50, MP 51, MP 55, VT 50
Quick Start Guide
ENFRES
ZH

Register your product online to confirm your warranty and benefit from the full Sauermann range.
Quick Start Guide
Class 50 portables
These portable instruments are used to measure the following parameters: temperature, relative humidity, CO, pressure, air velocity and light.
1. Operating temperature, protection of the instruments and information about storage
Conditions of use (°C/%RH/m): from 0 to +50 °C. In non-condensing conditions. From 0 to 2000 m.
Protection: IP54
Storage temperature: HD 50, LX 50: from -20 to +70 °C. CT 50, CO 50, HM 50, LV 50, MP 50, MP 51, MP 55, VT 50: from -20 to +80 °C. If the instrument is stored outside the operating temperature (for example in a van, a warehouse...), please wait for 10 minutes in its operating temperature before start using it.
1. Keys

Select

On/Off/Hold
2. Take a measurement

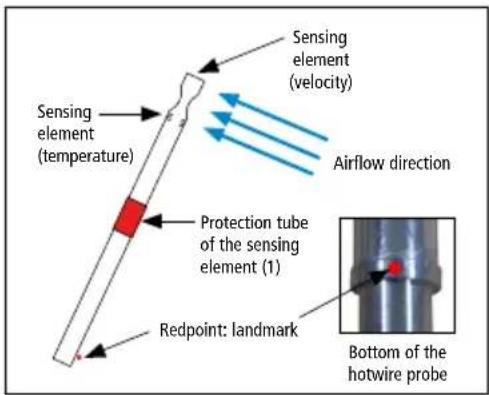
VT 50: before using the instrument with the hotwire probe, please lower the protection tube (1) of the sensing element.

VT 50: always use the hotwire probe with the red point in front of flow.
Switch on the instrument by pressing briefly on "On/Off/Hold".
The instrument displays its name then the measurement.
text_image
Sensing element (temperature) Sensing element (velocity) Airflow direction Protection tube of the sensing element (1) Redpoint: landmark Bottom of the hotwire probeCO 50: the instrument displays its name then a 5 second countdown. This count corresponds to the preheating time of the sensor. At the end of the countdown, the measured value of CO is displayed.
MP 50, MP 51: the instrument displays its name then an autozero is performed. At the end of the autozero, the measured value displays.
Press briefly on "Select" to switch measurement parameter display.
MP 50, MP 51, MP 55: press briefly and successively on "Select" to change the unit.
• Available units for MP 50: Pa, mmH 2 O, inWg, daPa.
• Available units for MP 51: mmH 2 O, kPa, in Wg, mbar, mmHg, daPa.
• Available units for MP 55: mbar, mmHg, hPa.
HM 50: press briefly on "Select" to select a type of material.
Press the spikes in the material to be measured.
When a measurement is over-range, above the maximum range, the value flashes.
Below the minimum range, the value is no more measurable and the device indicates "---", it means that for:
• Wood type 1: the measurement is < than 10%
• Wood type 2: the measurement is < than 9%
- Plaster, brick and concrete: the measurement is < than 0.1%
3. Carry out a manual autozero (MP 50, MP 51)
During measurement:
Remove pressure tubes. Carry out a long press on "Select".
The instrument makes an autozero then returns to the measurement display.
4. Hold the measurement
During measurement, press briefly on "On/Off/Hold" to hold measurement: "Hold" appears on the screen and measurements are fixed.
CO 50, HD 50, HM 50, LX 50, MP 55, VT 50: press briefly on "Select" to move from one parameter to the other.
Press again briefly on "On/Off/Hold" to exit the Hold function.
6. Change the unit
The instrument is on.
CO 50, CT 50, HD 50, LX 50:
Carry out a long press on "Select" to change the unit.
Press briefly on "Select" to select the required unit of measurement.
Carry out a long press on "Select" to confirm the unit and return to the normal measuring mode.
VT 50:
Change the air velocity unit:
Press briefly on "Select" up to display the air velocity.
Carry out a long press on "Select" to change the air velocity unit.
Press briefly on "Select" to select the required unit of measurement.
Carry out a long press on "Select" to confirm the unit and return to the normal measuring mode.
Change the temperature unit:
Press briefly on "Select" up to display the temperature.
Carry out a long press on "Select" to change the temperature unit.
Press briefly on "Select" to select the required unit of measurement.
Carry out a long press on "Select" to confirm the unit and return to the normal measuring mode.
7. Select the velocity type: contact or optical (CT 50)
The instrument is on.
Carry out a long press on "Select": "Cont" or "Optic" flashes.
Press briefly on "Select" to select contact velocity ("Cont") or optical velocity ("Optic").
Carry out a long press on "Select" to confirm.
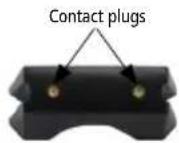
8. Perform a self-test (HM 50)
Turn the instrument on. Remove the cap and turn the cap.
Press "Select" to select the type of material to verify.
Press the 2 pins of the instrument into the contact plugs of the cap.
Read the value indicated by the instrument:
- If the indicated value matches with the given value in the table below, the instrument runs properly.
- If the indicated value does not match with the given value in the table below, clean the tips and carry out a new self-test. If the value is still wrong, change the pins. If it does not work, please contact the after sales service.
| Resistance | Material |
| Wood type 1 Wood type 2 Plaster Brick and concrete | |
| 1 MΩ 30.8% ±1% 27.5% ±1% 4.6% ±1% 5.2% ±1% | |
Materials humidity
Wood
| Moisture content | State of the wood |
| < 15% Dry | |
| From 15 to 30% Moist | |
| > 30% High moisture | |
Plaster
| Moisture content | State of the plaster |
| < 2% Dry | |
| From 2 to 4% Moist | |
| > 4% High moisture | |
Brick and concrete
| Moisture content | State of the brick/concrete |
| < 2% Dry | |
| From 2 to 4% Moist | |
| > 4% High moisture | |
text_image
HMI 501 4.5 Hz H39. Batteries replacement
The instrument is OFF.
Remove the front part at the back of the instrument.
Replace used batteries by new batteries AAA LR03 1.5 V.
Replace the front.

To ensure safety, replace batteries with the same type.
Not doing so might lead to explosion. Dispose of used batteries according to instructions.
10. Auto shut-off
The instrument switches off if it is not used during 20 minutes.
Guide rapide
Portables classe 50
text_image
HMI 4.5 Hz H3 HMI 50text_image
HMI 501 4.5 Hz H39. 更换电池
更换电池前, 先关闭设备。
拆除背部的电池盖板。
1200 Veterans Memorial Hwy,
Suite 100,
Hauppauge, NY 11788
USA
T. +1 631-234-7600
Sauermann GmbH
Leibnizstraße 6
D - 74211 Leingarten
T. +49 (0)7131/399990
F. +49 (0)7131/399992
Sauermann UK
Units 7-9, Trident Business Park
Amy Johnson Way
Blackpool - FY4 2RP
T. +44 (0) 870 950 6378
F. +44 (0) 870 950 6379
Sauermann Italia srl S.U
Via Golini 61/10
40024 Castel S. Pietro Terme (BO)
T. (+39)-051-6951033
F. (+39)-051-942254
Sauermann Ibérica
C/Albert Einstein 33.
Planta 3. P. I. Santa Margarida II-
08223 Terrassa (Spain)
T.+34 931 016 975
Sauermann Australia
Unit 1/36 Campbell Ave,
Cromer, NSW, 2099
T. (+612) 8880 4631
Sauermann China
General Equipment Manufacturing' CO LTD
1 Changxu Road' Building 1
Jiading Shanghai 201808
CHINA
T. +86 (0)21-61001877
Customer service portal / Portail service clients Portal de servicio al cliente
Use our Customer service portal to contact us
text_image
Screenshot of a laptop displaying a web page with navigation menu and search bar interface
text_image
QR code image containing encoded data, no visible human-readable textDownload the data sheet