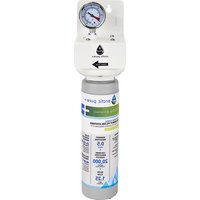
AR10000P - Water filter Manitowoc - Free user manual and instructions
Find the device manual for free AR10000P Manitowoc in PDF.

| Product Type | Water Filter |
| Brand | Manitowoc |
| Model | AR10000P |
| Capacity | 15,000 US gal (56,800 liters) |
| Flow Rate | 0.75 US gal/min (2.84 L/min) |
| Water Pressure | 35 to 125 psi (207 to 862 kPa) |
| Water Temperature | 35 to 100 °F (1.6 to 38 °C) |
| Connections | 3/8" Parker quick connection |
| Micron Rating | 0.5 micron |
| Main Functions | Reduction of chlorine taste and odor, scale reduction, cyst reduction (Class I) and particulate reduction |
| Replacement Cartridge | K00493 (box of 12) |
| Replacement Frequency | Every 6 months or when water pressure drops below 20 psi (138 kPa) |
| Materials | Plastic housing, rubber O-rings |
| Installation | Wall mount, on cold water line (max 100°F) |
| Safety | Do not use on microbiologically unsafe water without disinfection; protect from freezing; do not reverse inlet/outlet |
| Certifications | IAPMO R&T per CSA B483.1, NSF/ANSI 42, 53, 372 (low lead content) |
| Usage | For ice machines from 0 to 600 lb (0 to 272 kg) |
| Optional Prefilter | AR-Pre-P (model K00496) for sediment |
| Warranty | Limited warranty, consumable parts not covered |
| Maintenance | Cartridge replacement; lubricate O-rings with food-grade lubricant |
Frequently Asked Questions - AR10000P Manitowoc
User questions about AR10000P Manitowoc
0 question about this device. Answer the ones you know or ask your own.
Ask a new question about this device
Download the instructions for your Water filter in PDF format for free! Find your manual AR10000P - Manitowoc and take your electronic device back in hand. On this page are published all the documents necessary for the use of your device. AR10000P by Manitowoc.
USER MANUAL AR10000P Manitowoc
Installation, Operation and Maintenance Manual
Caution
Original Document
Read this instruction before operating this equipment.
Table of Contents
Section 1 General Information
Model Numbers 5
Specifications 5
Warranty Information.. 5
Warranty Registration & Claim Procedures. 5
Authorized Warranty Service 5
Exclusions. 6
Safety Notices 6
Definitions 6
Section 2 Installation
General 7
Safety. 7
Location 8
Water Service. 8 Assembly - AR-10000-P/AR-20000-P/AR-40000-P .8
Installation - AR-Pre-P 9
Installation - AR-10000-P/AR-20000-P/AR-40000-P 10
Installation Checklist 10
Start-Up Procedure. 10
Changing Cartridges 11
Section 3 Troubleshooting
Troubleshooting Chart 13
Repairing Inlet/Outlet Connections 13
Replacement Filter Part Numbers 13
Table of Contents
THIS PAGE INTENTIONALLY LEFT BLANK
Section 1
General Information
Model Numbers
This manual covers the following models:
| Model # Range Claims | Replacement Cartridge | ||
| AR-10000-P 15,000 gal (56,800 liter) capacity | For ice machines 0 - 600 lbs (0 - 272 kg) | Chlorine taste and odor reduction, scale inhibition, Cyst & Particulate Class I claims | Case of 12 K00493 |
| AR-20000-P 20,000 gal (75,700 liter) capacity | For ice machines 601 - 1,000 lbs (273 - 453 kg) | Chlorine taste and odor reduction, scale inhibition, Cyst & Particulate Class I claims | Case of 12 K00494 |
| AR-40000-P 40,000 gal (151,400 liter) capacity | For ice machines 1,001 - 2,500 lbs (454 - 1134 kg) | Chlorine taste and odor reduction, scale inhibition, Cyst & Particulate Class I claims | Case of 12 K00495 |
| AR-Pre-P | For use in conjunction with AR-10000-P AR-20000-P AR-40000-P | Sediment reduction, Particulate Class III claim | Case of 12 K00496 |
Specifications
| Model # Specifications Flow Rate | ||
| AR-10000-P | Pressure: 35 - 125 psi (207 - 862 kPa)Temperature: 35 - 100°F (1.6 - 38°C)Connections: 3/8"Parker Quick ConnectMicron Rating: 0.5 | .75 gpm(2.84 lpm) |
| AR-20000-P | Pressure: 35 - 125 psi (207 - 862 kPa)Temperature: 35 - 100°F (1.6 - 38°C)Connections: 3/8"Parker Quick ConnectMicron Rating: 0.5 | 1.25 gpm(4.73 lpm) |
| AR-40000-P | Pressure: 35 - 125 psi (207 - 862 kPa)Temperature: 35 - 100°F (1.6 - 38°C)Connections: 3/8"Parker Quick ConnectMicron Rating: 0.5 | 2.0 gpm(7.57 lpm) |
| AR-Pre-P | Pressure: 35 - 125 psi (207 - 862 kPa)Temperature: 35 - 100°F (1.6 - 38°C)Connections: 3/8"Parker Quick ConnectMicron Rating: 5.0 | 1.5 gpm(5.6 lpm) |
Warranty Information
For warranty information visit: www.manitowocice.com/ Service/Warranty
Warranty Coverage Information
Warranty Registration
Warranty Verification
Warranty coverage begins the day the ice machine is installed.
WARRANTY REGISTRATION &CLAIM PROCEDURES
Scan the QR code with your smart device or enter the link in a web browser to access:
Warranty information
Warranty labor claim form

WWW.MANITOWOCICE.COM/SERVICE/WARRANTY
Authorized Warranty Service
To comply with the provisions of this warranty, a refrigeration service company, qualified and authorized by your Manitowoc distributor, or a Contracted Service Representative must perform the warranty repair. If the dealer you purchased the ArcticPure Plus system from is not authorized to perform warranty service, contact your Manitowoc distributor or Manitowoc Ice for the name of the nearest authorized service representative.
EXCLUSIONS
The following items are not included in the ArcticPure® Plus system(s) warranty coverage:
- Wear items such as filter cartridges or o-rings.
- Normal maintenance or adjustments as outlined in this manual.
- Repairs due to unauthorized modifications to the filter system or use of non-standard parts without prior written approval from Manitowoc Ice.
- Damage caused by improper installation of the filter system or the ice machine, electrical supply, water supply or drainage, or damage caused by floods, storms or other acts of God.
- Premium labor rates due to holidays, overtime, etc.; travel time; flat rate service call charges; mileage and miscellaneous tools and material charges not listed on the payment schedule. Additional labor charges resulting from the inaccessibility of equipment are also excluded.
- Parts or assemblies subjected to misuse, abuse, neglect or accidents.
- Damage or problems caused by installation, and/or maintenance procedures inconsistent with the technical instructions provided in this manual.
Safety Notices
DEFINITIONS
DANGER
Indicates a hazardous situation that, if not avoided, will result in death or serious injury. This applies to the most extreme situations.
Warning
Indicates a hazardous situation that, if not avoided, could result in death or serious injury.

Caution
Indicates a hazardous situation that, if not avoided, could result in minor or moderate injury.
Notice
Indicates information considered important, but not hazard-related (e.g. messages relating to property damage).
NOTE: Indicates useful, extra information about the procedure you are performing.
Section 2
Installation
General
These instructions are provided to assist the qualified installer. Check your local Yellow Pages for the name of the nearest Manitowoc distributor, or call Manitowoc Ice for information.
The ArcticPure Plus water filtration systems are designed to reduce coarse and fine particulate matter from the incoming potable water supply. Chlorine will be reduced in the water so as not to adversely affect the ice produced or the equipment components. Scale inhibitor is automatically fed into the water to inhibit the formation of scale on water solenoids and evaporator plates. The IAPMO R&T mark indicates that these products have met certification requirements under the NSF/ANSI & CSA standards listed in the Performance Data Sheet. The UPC mark indicates that these products have met the applicable U.S. and Canadian requirements for plumbing products.
- DO NOT install on line pressure above 125 psi (862 kPa).
DO NOT install on hot water line. Maximum temperature allowed is 100^ (38^) - DO NOT install in direct sunlight.
- DO NOT reverse connections. The system must be installed with the inlet and outlet as labeled.
- DO NOT install ArcticPure Plus filter systems in locations where they can be damaged by other free-standing equipment.
PROTECT from freezing. - INSTALLATION must comply with existing state or local plumbing codes.
This piece of equipment has American sizes on hardware. All metric conversions are approximate and vary in size.
Safety
Always follow these safety precautions when installing and operating the water filter system.
Warning
DO NOT use with water that is microbiologically unsafe or of unknown quality without adequate disinfection before or after the system.
Notice
DO NOT use a torch or other high temperature sources near filter or cartridge.


https://www.iapmort.org/media/5271/rt_markguidelines.pdf
AR-Pre-P, AR-10000-P, AR-20000-P and AR-40000-P systems are certified by IAPMO R&T against CSA B483.1; NSF/ANSI 372 for Low Lead Content; NSF/ANSI 42 and/or *NSF/ANSI 53 for the reduction of claims listed in the Performance Data Sheet.
*NSF/ANSI 53 Cyst reduction claims are valid only when system flow is restricted at or below the specified range and/or as specified in the ice machine capacity ranges on page 5. System flow rates should be verified after installation to ensure filterable cyst reduction per the above.
Please see ice machine manufacturer's technical publications for internal flow controller maximum operating flow rate specifications.
Location
ArcticPure Plus water filtration systems must be located on the incoming cold water line and preferably away from heavy traffic areas. The system must be mounted on a wall or structure that will support the weight of the system when filled with water.
Notice
This product is designed for cold water use only (less than 100^ [38^] ). Passing hot water through this product may seriously damage filter housings and/or cartridges and affect warranty coverage.
Important
Do not disassemble manifold head. No user serviceable parts are available. The entire manifold head is the only available replacement part.
ArcticPure Plus systems may be used with metal or nonmetallic piping systems.
NOTE: Any non-metallic fittings used in the installation must be of adequate rating for the line pressure.
Water Service
All ArcticPure Plus systems come with 3/8'' Parker connections on the inlet and outlet ports.
Parker connections are suitable for use with the following tubing:
Polyethylene
- Nylon
Polyurethane
- Seamless Brass (soft)
- Seamless Copper (soft)
- Seamless Mild Steel (soft)
Notice
DO NOT use with hard metal tubing such as:
- Stainless steel
- Chrome plated copper
- Hard metal polished tubing
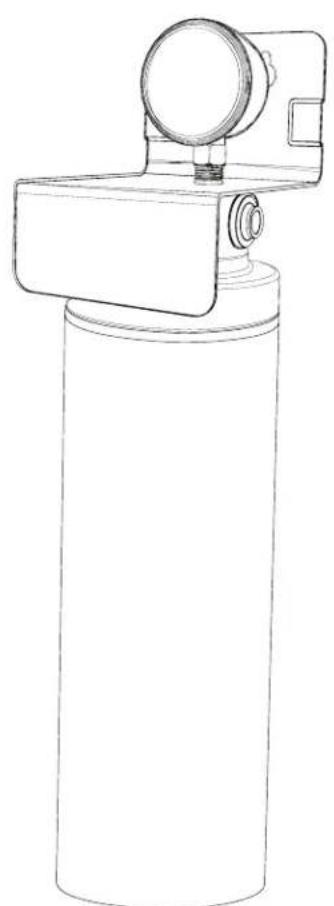
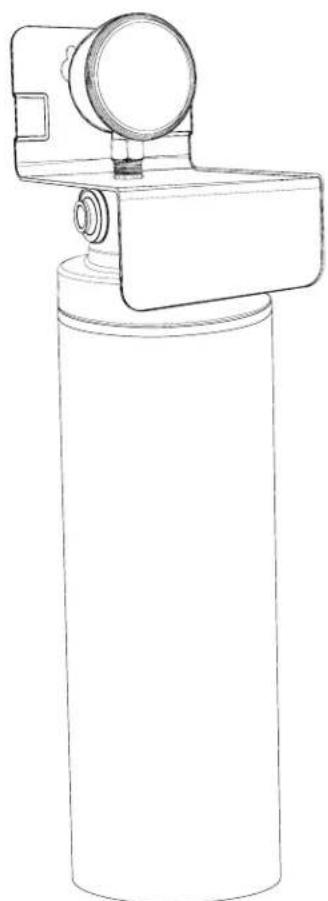
ASSEMBLY - AR-10000-P/AR-20000-P/AR-40000-P
NOTE: The head/bracket will be packed separately from the filter cartridge in the product box.
- Locate position to mount the filter system. Be sure to leave enough clearance (a minimum of 2^ [5 cm] beneath the filter cartridge length is recommended) to allow for cartridge change out.
- Mark and drill mounting holes.
- Mount filter head, using key hole slots in the mounting bracket.
- Remove the protective cap from the cartridge.
- Inspect the cartridge and o-rings for damage. See Recommended Replacement Parts List in Replacement Filter Part Numbers if replacement is required.

Caution
Do not use petroleum jelly to lubricate o-rings.
- Lubricate o-rings with food grade lubricant - Do not use petroleum jelly.
- With the product label facing to the left, insert the cartridge into the filter head. Rotate 1/4 turn to the right to secure. Product label will face forward.
Installation - AR-Pre-P
NOTE: If the AR-Pre-P is being retrofitted to an existing ArcticPure Plus system, shut off the incoming water supply, relieve the filter pressure by removing the existing filter cartridge(s), and disengage the water inlet line. A small quantity of water will be vented from the cartridge body.
- Mark and drill the mounting holes for the AR-Pre-P.
- Insert the precut tubing into the outlet fitting of the AR-Pre-P head.
- Insert opposite end of the tubing into the inlet fitting of the primary filter assembly.
Notice
The fitting will grip before it seals. Tubing must be pushed into the tube stop to prevent leaks.
- Pull on the tubing to be sure it is secure. If the tubing releases, refer to the Troubleshooting section of this manual to reinstall.
- Align the prefilter mounting keyhole slots with the predrilled holes.
- Install mounting screws and tighten.
-
Insert incoming water line into the inlet port of the AR-Pre-P. Follow notes and steps 1-3 under "Installation - AR-10000-P/AR-20000-P/AR-40000-P".
-
Remove the protective cap from the cartridge.
- Inspect the cartridge and o-rings for damage. See Recommended Replacement Parts List if replacement is required.
Caution
Do not use petroleum jelly to lubricate o-rings.
- Lubricate o-rings with food grade lubricant - Do not use petroleum jelly.
- With the product label facing to the left, insert the cartridge into the filter head. Rotate 1/4 turn to the right to secure. Product label will face forward.
Installation - AR-10000-P/AR-20000-P/AR-40000-P
Shut off the incoming water supply.
For Parker Fitting Installation:
NOTE: Please review the following recommendations before installing the water lines.
- Tubing must be 3/8 O.D., (.371 - .376).
- Cut the tube square. The outside diameter must be free of score marks.
- Burrs and sharp edges must be removed prior to installation.
NOTE: Use a tube insert for thin-walled plastic tubing.
To install water lines into the inlet/outlet ports:
- Insert water line tubing into the inlet port fitting.
Notice
The fitting will grip before it seals. Tubing must be pushed into the tube stop to prevent leaks.
- Pull on the tubing to be sure it is secure. If the tubing releases, refer to the Troubleshooting section of this manual to reinstall.
- Repeat for the outlet port fitting. Connect outlet water line to the potable water connection on the ice machine.
NOTE: For water-cooled machines, be sure that the filter system only feeds the potable water connection.
Installation Checklist
Have the min.-max. water temperature and pressure been checked? (Refer to "Installation" on page 7)
Has the filter system been installed away from heavy traffic areas?
Is the system installed securely to the mounting surface?
Has the water supply line been checked for suitability? (Refer to "Water Service")
Have the water supply lines been securely installed into the inlet/outlet ports? (Refer to "Installation - AR-10000-P/AR-20000-P & AR-40000-P")
Start-Up Procedure
- Turn on the incoming water supply.
- Check for leaks. If the connections are leaking, refer to the Troubleshooting section of this manual to reinstall.
NOTE: System should be flushed for 10 minutes to remove trapped air and carbon fines.
NOTE: The filter pressure will decrease as the cartridge life decreases.
AR-Pre-P, AR-10000-P, AR-20000-P and AR-40000-P systems are certified by IAPMO R&T against CSA B483.1; NSF/ANSI 372 for Low Lead Content; NSF/ANSI 42 and/or *NSF/ANSI 53 for the reduction of claims listed in the Performance Data Sheet.
*NSF/ANSI 53 Cyst reduction claims are valid only when system flow is restricted at or below the specified range and/or as specified in the ice machine capacity ranges on page 5. System flow rates should be verified after installation to ensure filterable cyst reduction per the above.
Please see ice machine manufacturer's technical publications for internal flow controller maximum operating flow rate specifications.
| Model Flow Rate | |
| AR-10000-P At or below 0.75 gpm (2.84 lpm) | |
| AR-20000-P At or below 1.25 gpm (5.68 lpm) | |
| AR-40000-P At or below 2.0 gpm (7.57 lpm) | |
Changing Cartridges
ArcticPure Plus cartridges will need to be changed for one or more of the following reasons:
- The filter has trapped water-borne sediment and the water flow has stopped or water pressure through the filter has dropped below 20 psi (138 kPa).
- The maximum life of the carbon filter has been reached and the filter will no longer reduce chlorine to acceptable levels.
The scale inhibitor has been completely dissolved and hard scale build-up may accelerate.
It is recommended that ArcticPure Plus filter cartridges be changed out:
- Every 6 months or when water pressure through the system drops below 20 psi (138 kPa), whichever occurs first.
To change the filter:
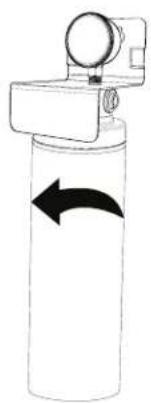
- Rotate the cartridge 1/4 turn to the left and pull down. The cartridge should easily release. Dispose of used cartridge.
Important
ArcticPure Plus systems are equipped with internal shutoff valves. It is not necessary to shut off the incoming water supply during cartridge change out.
- Remove the protective cap from the cartridge.
- Inspect the cartridge and o-rings for damage. See Replacement Parts list if replacement is required. Lubricate o-rings with food grade lubricant.
Caution
Do not use petroleum jelly to lubricate o-rings.
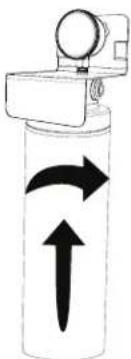
- With the product label facing to the left, insert the cartridge into the filter head and push up. Rotate 1/4 turn to the right to secure. Product label will face forward.
Caution
Should the cartridge drop from a height of greater than 3 feet, inspect the outer casing. If there is any evidence of the case cracking do not use.
THIS PAGE INTENTIONALLY LEFT BLANK
Section 3 Troubleshooting
Important
Please use the Troubleshooting Chart to repair the system. If system still does not work properly, contact Manitowoc Service for assistance.
Troubleshooting Chart
| Problem Cause To Correct | ||
| No water through filter system | Water to filter system shut off Turn on water supply | |
| Filter cartridges plugged Replace filter cartridges — See “Changing Cartridges” | ||
| Low water flow through filter | System below 25 psi | Restore system pressure |
| Repair water supply to filter | ||
| Filter cartridges plugged Replace filter cartridges — See “Changing Cartridges” | ||
| Water leak on water inlet/outlet | Water line ends are damaged | Trim water line to remove damaged area — See “Repairing Inlet/Outlet Connections” |
| O-ring in filter head is damaged Replace o-ring — See “Changing Cartridges” | ||
| Water leak between head and filter cartridge | Damaged o-ring on filter cartridge | Replace o-ring — See “Changing Cartridges” |
Repairing Inlet/Outlet Connections
A leak may occur at the inlet/outlet connections because of defective tubing. To repair:
- Turn off incoming water supply and depressurize system by removing the filter cartridge(s).
- Disconnect the water line by pushing the collet squarely against the face of the fitting.
- Pull the tubing to release.
- To repair the connection, cut off at least 3/8'' (6.4 mm) from the end of the tubing. Tubing ends must be cut square to ensure a positive seal.
- Refer to notes and instructions under "Installation - AR-10000-P/AR-20000-P/AR-40000-P" to reconnect the water line.
Replacement Filter Part Numbers
| Part Number Case | Description |
| K00496 AR-Pre-P Cartridge | |
| K00493 AR-10000-P Cartridge | |
| K00494 AR-20000-P Cartridge | |
| K00495 AR-40000-P Cartridge | |
THIS PAGE INTENTIONALLY LEFT BLANK

WELBILT
Welbilt offers fully-integrated kitchen systems and our products are backed by KitchenCare® aftermarket parts and service. Welbilt's portfolio of award-winning brands includes Cleveland™, Convotherm®, Crem®, Delfield®, fitkitchen®, Frymaster®, Garland®, Kolpak®, Lincoln®, Manitowoc®, Merco®, Merrychef® and Multiplex®.
Bringing innovation to the table - wellbilt.com
Bringing innovation to the table - welbilt.com
Section 2 Installation
Installation - AR-Pre-P
Bringing innovation to the table - welbilt.com
ArcticPure® Plus
oal
a
4 1
A 1
y
Jgall
1
aale clogdo
1 puiill aale clogke
Jiaai jia ciao
www.manitowocice.com/Service/Warranty
Jauaall Jaaill
aill aaii i 1
gss
Jyll yll ciaia aal jll Jy 1
Juaal Jg Cogj
jai jai jai jai

WWW.MANITOWOCICE.COM/SERVICE/WARRANTY
aiaai (jaiai)
aagall 1yglll cldas 4s jle yjaial lss Jy
aia Jaa g aai Manitowoc e jao jia jyauo,
pbi iia ci jaii jilg jgsal jls 1jaiai jc Jai! jaii
e jay Jaiaia Jaiaiia oJya Jya ArcticPure Plus
Jaa bai jai Jaiai Manitowoc Ice J Manitowoc
ji jia jia j
aaii i jiljlll 1
Cllslall ally aolll jiljll
a aaa aaa aaa aaa aaa aaa aaa aaa aaa
.Minitowoc Ice
·
.
S OBC = S COD + S_ BOC
aallll 1 1 1 1 1 1 1 1
a
a 1
jg jg aai gge gaggl gagg g
dalll llll 100000000000000000000000000000
liang jie
J
( x + 1) ( y - 1) = 0
a
120 8
a
a aaiy gaaal yaii 1000000000000000000000000000000000000000000000
#
jaiy jaiy jaiy jaiy jaiy jaiy jaiy jaiy jaiy jaiy jaiy jaiy jaiy jaiy jaiy jaiy jaiy jaiy jaiy jaiy jaiy jaiy jaiy jaiy jaiy jaiy jaiy jaiy jaiy jaiy jaiy jaiy jaiy jaiy jali y


https://www.iapmort.org/media/5271/rt_markguidelines.pdf
J 1 J 1 1 1 1 1 1 1 1 1 1 1 1 1 1 1 1 1 1 1 1 1 1 1 1 1 1 1 1 1 1 1 1 1 1 1 1 1
aee ie ie ie ee aiinall oia
P