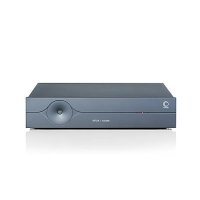
A2700 - Receiver ELIPSON - Free user manual and instructions
Find the device manual for free A2700 ELIPSON in PDF.


| Product type | Stereo/mono bridged power amplifier, Class D |
| Brand | Elipson |
| Model | A2700 |
| Dimensions (W x H x D) | 430 x 95 x 302 mm (333 mm with connectors) |
| Weight | 6.9 kg |
| Mains power supply | 230 V / 120 Vac, fuse T10A/250V |
| Power consumption in operation | 250 W (PF=0.96 at Pmax/8 at 4 Ω, 2 channels) |
| Standby power consumption | < 0.5 W |
| Output power (stereo, 8 Ω) | 400 W RMS per channel (THD=1%) |
| Output power (stereo, 4 Ω) | 710 W RMS per channel (THD=1%, 2×750 W peak) |
| Peak power (2 Ω) | 2×900 W peak (CF=12 dB) |
| Bridged power (mono, 8 Ω) | 1400 W RMS / 2500 W peak |
| Harmonic distortion (THD) | < 0.005% @ 100 W/8 Ω, < 0.003% @ 1 W/8 Ω (1 kHz) |
| Intermodulation distortion (IMD) | < 0.01% @ 100 W |
| Frequency response | 2 Hz – 60 kHz (-3 dB at 4 Ω) |
| Damping factor | 1000 at 8 Ω (20 Hz – 2 kHz) |
| Signal-to-noise ratio | 119 dB (balanced input, at maximum power in stereo) |
| Input impedance | 1 MΩ |
| Audio inputs | 1× unbalanced stereo RCA, 1× balanced stereo XLR |
| Speaker outputs | 2× binding posts (stereo) or 1× binding post (mono bridged) |
| Special functions | Stereo/mono (bridged) selector, clipping and protection LED, 5-12 V trigger input/output |
| Maintenance and cleaning | Unplug before cleaning; use a soft, slightly damp cloth, no solvents |
| Safety | Compliant with EN62368-1, class I, mandatory grounding; do not expose to water; ventilation distance 50 mm |
| Spare parts and repairability | Mains fuse (T10A/250V); no user-serviceable parts; 2-year warranty on parts and labor |
Frequently Asked Questions - A2700 ELIPSON
User questions about A2700 ELIPSON
0 question about this device. Answer the ones you know or ask your own.
Ask a new question about this device
Download the instructions for your Receiver in PDF format for free! Find your manual A2700 - ELIPSON and take your electronic device back in hand. On this page are published all the documents necessary for the use of your device. A2700 by ELIPSON.
USER MANUAL A2700 ELIPSON
natural_image
Technical line drawing of an electronic device with a circular component and labeled terminals (no readable text or symbols)MANUEL D'UTILISATION
USER MANUAL
www.elipson.com

ATTENTION
ASSUREZ-VOUS DE LIRE CE MANUEL D'UTILISATION AVANT DE METTRE SOUS TENSION OU DE BRANCHER CET AMPLIFICATEUR DE PUISSANCE.
Cher client,
natural_image
Pure diagram of a rectangular object with internal curved lines and circular features, no text or symbols present.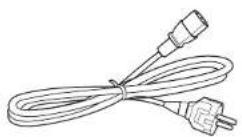
natural_image
Mechanical assembly diagram showing two cylindrical components with directional arrows and cross symbols (no readable text or labels)natural_image
Mechanical assembly diagram showing two cylindrical components with directional arrows indicating motion (no text or labels)natural_image
Pure technical diagram of a mechanical component with no text, numbers, or symbolsnatural_image
Technical line drawing of a mechanical or electronic component with multiple circular ports and mounting feet (no text or symbols)
natural_image
Technical line drawing of a rectangular electronic component with mounting flanges and a central circular component (no text or symbols)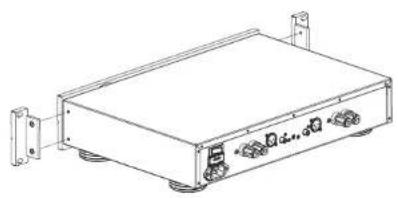
natural_image
Line drawing of a rectangular electronic device with ports and connectors (no text or symbols)EN CAS DE PANNES
DYSFONCTIONNEMENT POSSIBLE ET PROCÉDURES DE TEST :
Dimensions (mm) H x L x P
2.4g and 5g Statements
This device complies with Part 15 of the FCC Rules.
Operation is subject to the following two conditions:
- This device may not cause harmful interference, and
- This device must accept any interference received, including interference that may cause undesired operation.
Note: This product has been tested and found to comply with the limits for a Class B digital device, pursuant to Part 15 of the FCC Rules. These limits are designed to provide reasonable protection against harmful interference in a residential installation. This product generates, uses, and can radiate radio frequency energy and, if not installed and used in accordance with the instructions, may cause harmful interference to radio communications. However, there is no guarantee that interference will not occur in a particular installation. If this product does cause harmful interference to radio or television reception,
which can be determined by turning the equipment off and on, the user is encouraged to try to correct the interference by one or more of the following measures:
- Reorient or relocate the receiving antenna.
- Increase the separation between the equipment and receiver.
- Connect the equipment into an outlet on a circuit different from that to which the receiver is connected.
- Consult the dealer or an experienced radio/TV technician for help.
Please take attention that changes or modification not expressly approved by the party responsible for compliance could void the user's authority to operate the equipment.
This equipment should be installed and operated with a minimum distance 20cm between the radiator and your body.
This device complies with Industry Canada licence-exempt RSS standard(s). Operation is subject to the following two conditions:
- this device may not cause interference, and
- this device must accept any interference, including interference that may cause undesired operation of the device.
Under Industry Canada regulations, this radio transmitter may only operate using an antenna of a type and maximum (or lesser) gain approved for the transmitter by Industry Canada. To reduce potential radio interference to other users, the antenna type and its gain should be so chosen that the equivalent isotropically radiated power (e.i.r.p.) is not more than that necessary for successful communication.
P1, P1F, A2700, I2130, MDACI & MPH II
natural_image
Technical line drawing of an electronic device with a circular component and labeled terminals (no readable text or symbols beyond labels)USER MANUAL
ENGLISH VERSION
www.elipson.com

WARNING
PLEASE READ CAREFULLY THIS USER MANUAL BEFORE TURNING ON OR CONNECTING THIS POWER AMPLIFIER.
Dear customer,
Congratulations on your purchase. The A2700 power amplifier is the perfect complement to the P1 preamplifier. It amplifies with disconcerting ease any signal in its entirety thanks to its high amplification capacity: 400 W RMS under 8 Ohms, 700 W RMS under 4 Ohms and especially 900W in impulse mode under 2 Ohms. Modular, it can be bridged in mono and offer 1400 W RMS (2500 W peak) under 8 Ohms and this without thermal runaway.
Beyond its power and its modularity, it is also the techniques used that impress: oriented towards the minimization of background noise and distortion because they are essential elements of the respect of the intensity of the notes in the service of musicality.
An iron fist in a velvet glove is really what characterizes our amplifier, allowing you to rediscover the live experience of a concert in all its complexity and finesse.
SUMMARY
I. GENERAL INFORMATION : 29
- Unpacking and repacking 30
- Use, front panel 32
- Back panel connections
- Precaution before connecting 34
III. ADDITIONAL INFORMATIONS : 39
- Live - Main phase 39
- Operational time 39
3Racking your amplifier 39 - In case of malfunctions 40
- Warranty 41
- Connect Power 35
- Connect the preamplifier 35
- Connect the loudspeakers 36
- Trigger 38
IV. SPECIFICATIONS 4 2
V.SAFETY REQUIREMENTS 4 4
I. GENERAL INFORMATION
YOU WILL FIND ENCLOSED :
natural_image
Pure diagram of a rectangular object with a central circular element and radial lines, no text or symbols present.Elipson A2700 amplifier A power supply cable
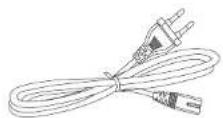
An user manual A pair of gloves

We strongly recommend that you keep this packaging and the user's manual for future use.
UNPACKING - REPACKING
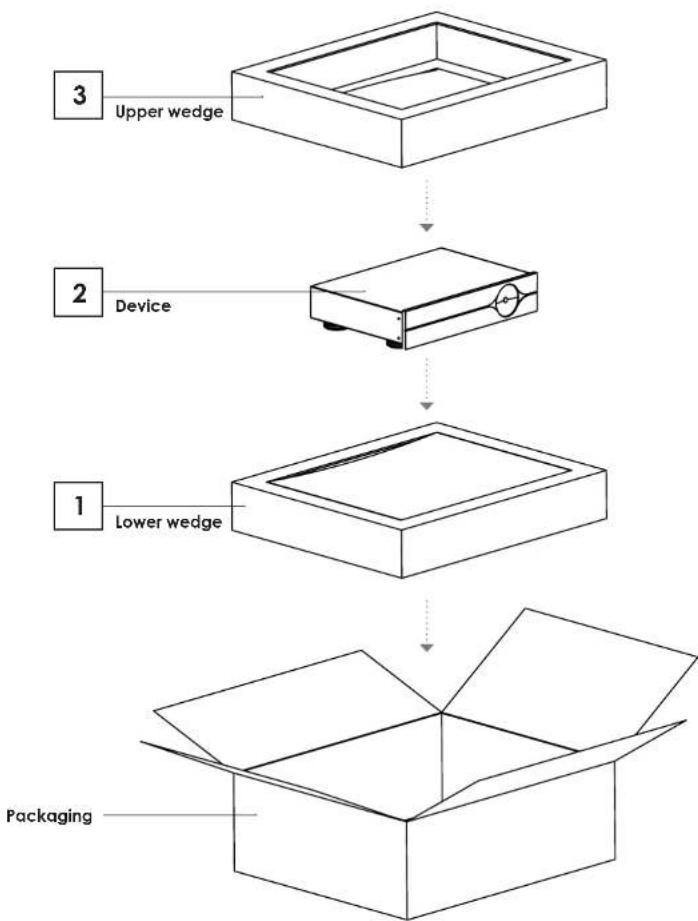
Your device is packaged between two suspension films to ensure that it is held securely during transport. The packaging consists of two wedges, upper and lower parts, which should be placed in the direction suggested by the text on them:

Position the lower wedge in the box so that the following inscription is visible:

CALE SUSPENSION BASSE CÔTÉ INFÉRIEUR APPARENT LOWER SUSPENSION WEDGE VISIBLE LOWER SIDE

Place the device, well centered, on the suspension film on this first wedge.

Position the upper wedge in the box so that the following inscription is visible:

CALE SUSPENSION HAUTE CÔTÉ SUPÉRIEUR APPARENT UPPER SUSPENSION WEDGE VISIBLE UPPER SIDE
The device is then clamped between the two plastic suspension films to ensure a perfect hold.

Make sure to respect the order of the wedges otherwise the device will not be protected during its transport.
flowchart
graph TD
    A["1 Lower wedge"] --> B["2 Device"]
    B --> C["3 Upper wedge"]
    C --> D["Packaging"]
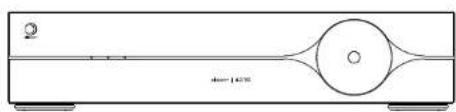
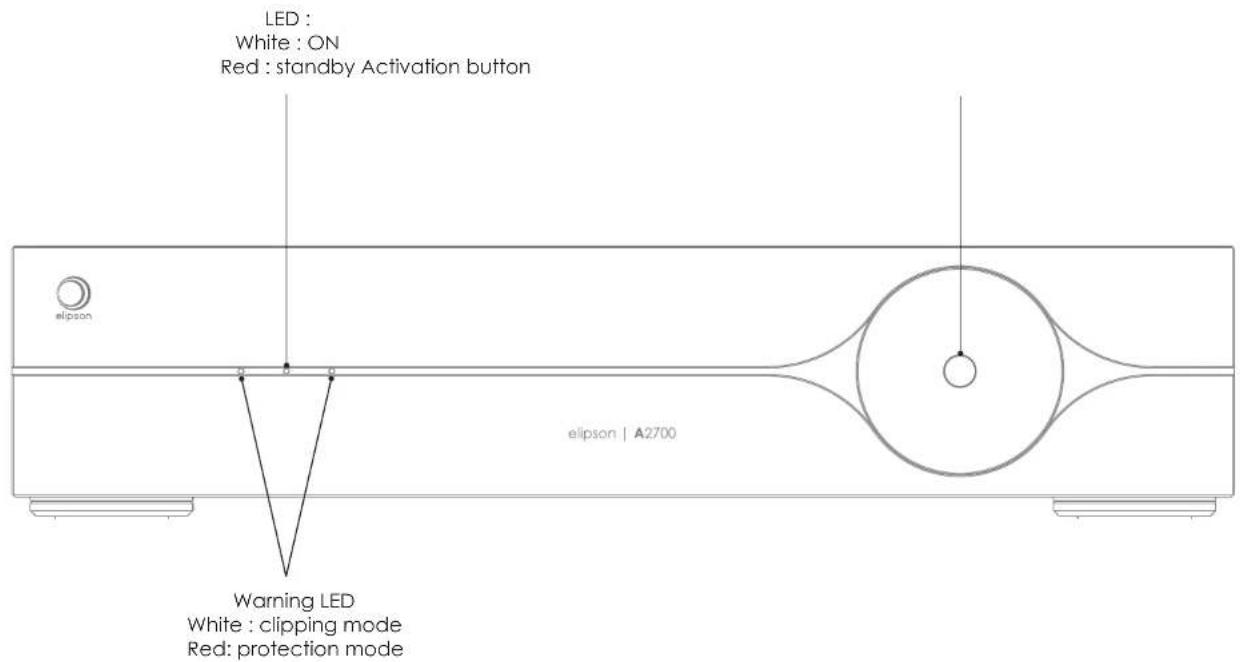
USE, FRONT PANEL
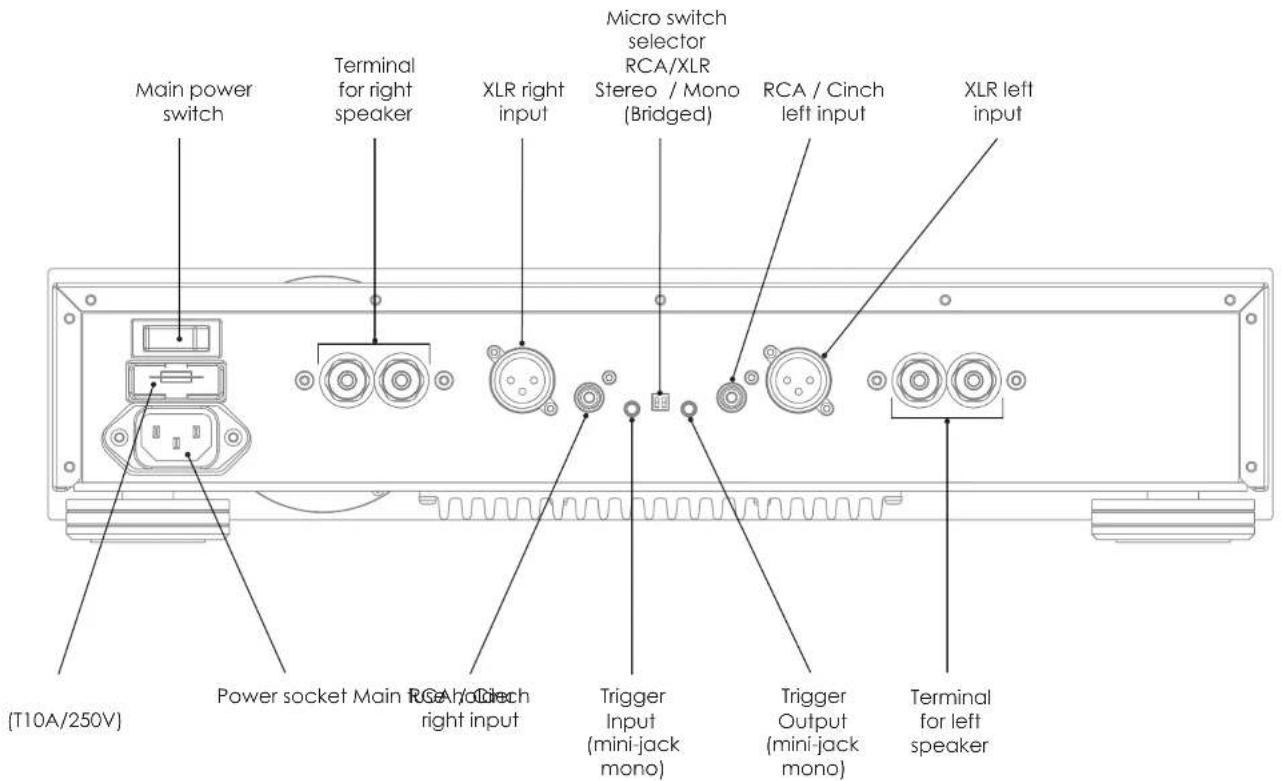
LES ENTRÉES, PANNEAU ARRIÈRE

PRECAUTIONS BEFORE CONNECTING
Always turn off the power to your amplifier and preamplifier before making any connections. Before turning on your amplifier and preamplifier, make sure that the volume of your preamplifier is at a minimum and that there are no short-circuits in the wiring.
Don't forget about cooling issues as poor airflow will shorten the life of the amplifier (leave 50 mm on the sides and above the unit). When deciding on the final location, keep in mind that there should be enough space behind the amplifier to accommodate speaker and interconnect cables.
II. CONNECTION
POWER SUPPLY
Plug the female end of the supplied power cable into the power socket on the rear panel, and connect the other end to a wall outlet. If this cable does not fit your electrical outlets, please contact your retailer.
CONNECT THE PREAMPLIFIER
RCA/CINCH or XLR link:
Connect the A2700 to the preamplifier using either the unbalanced left and right RCA/CINCH inputs or the balanced left and right XLR inputs depending on your equipment.
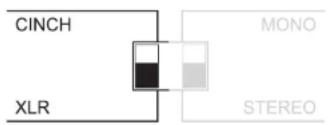
Use in Stereo mode:
In the stereo configuration, move the micro-switch to the "STEREO" position.
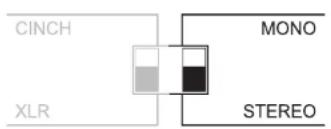
Use in Mono / Bridged mode:
In this mono configuration, set the micro-switch to the "MONO" position, then connect the A2700 to one of the outputs of your preamplifier using either the left unbalanced RCA/CINCH input (LEFT/MONO), or the left balanced XLR input (LEFT/MONO).
Be sure to respect the right and left channels between your preamplifier, your amplifiers and your loudspeakers to guarantee a faithful stereo image.
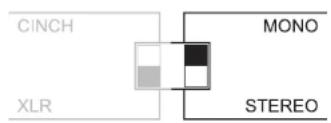
When your Hi-Fi system allows it, we recommend that you use a balanced XLR connection rather than an unbalanced RCA connection. In the case of a balanced connection, the signal will be transmitted in duplicate, in phase and in reserve phase simultaneously. This connection will thus provide immunity to common mode interference at the amplifier and avoid any ground looping phenomenon. In all cases, it is strongly recommended to use a quality cable to get the best performance from our electronics.
The A2700 amplifier is designed to drive a pair of loudspeaker with 4 or 8 Ω impedance.
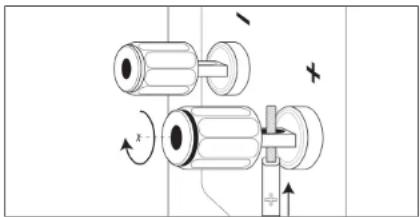
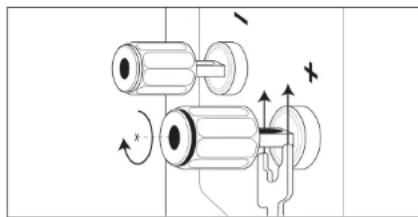
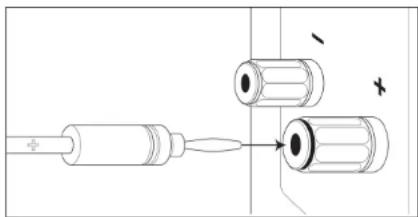
The amplifier terminals can accept bare cables, cables with forks, or with male banana plugs:
natural_image
Mechanical assembly diagram showing two cylindrical components with directional arrows and a plus symbol (no text or labels)Bare cables: strip approximately 10 mm of the cable and carefully twist the conductor strands. Unscrew the terminal block until the hole appears, insert the stripped part of the cable. Screw the terminal block back on firmly by hand.
natural_image
Mechanical assembly diagram showing two cylindrical components with directional arrows indicating motion (no text or labels)Forks: unscrew the terminal block until each fork can be inserted. Check that they are well parallel and screw the terminal block firmly by hand.
natural_image
Technical line drawing of a mechanical component with no visible text or symbolsBanana plugs: insert the male banana plug in the center of the terminal block to its maximum.

Always make sure to respect the polarity + (red) & - (black) between your loudspeakers and the device and that these two polarities are not in contact to avoid causing any short-circuit.
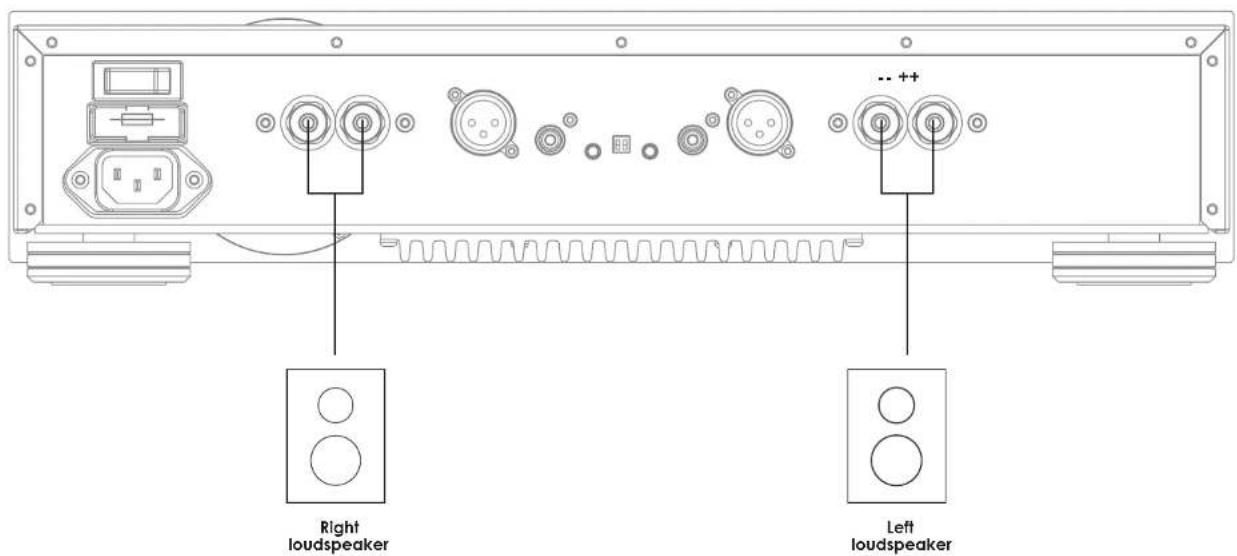
Use in Mono/Bridged mode:
If you wish to use your A2700 amplifier in Mono/Bridged mode to drive your loudspeaker, follow the connection markings annotated «MONO» close to the binding post on the rear panel.
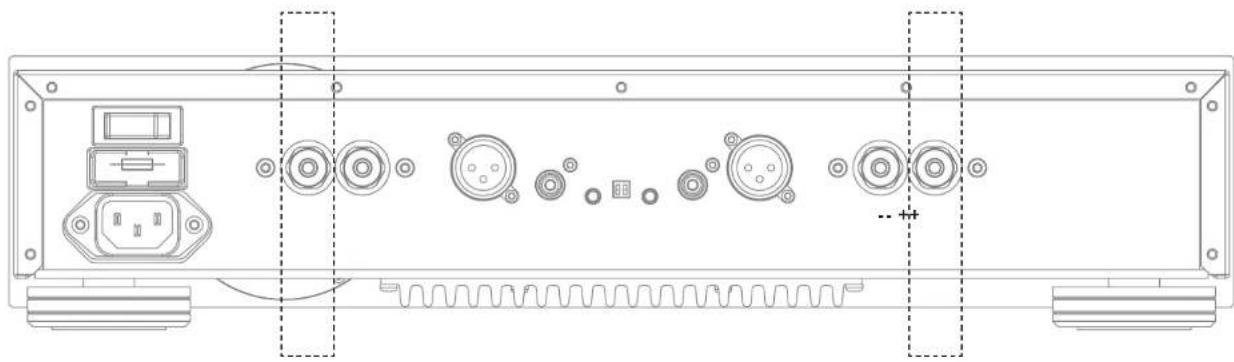
natural_image
Technical line drawing of a mechanical or electronic device casing with multiple ports and connectors (no text or symbols)
Always make sure to respect the polarity + (red) & - (black) between your loudspeaker and the device.
TRIGGER
To synchronize the amplifier power activation with the other devices in your system, you can connect it via a mini-jack 3.5mm mono connector to the trigger In (input).
To synchronize the power activation of your other devices with your amplifier, you can connect it through a 3.5mm mono mini-jack connector to the trigger Out (Output).

Use 3.5mm mono mini-jack sockets
III. ADDITIONAL INFORMATIONS
LIVE - MAIN PHASE
The phase of the AC power supply can make a significant difference to the soundstage in terms of spatialization and timbre accuracy.
Use a phase tester screwdriver (not included) to check which Live/Phase pin is on your power cable.
Make sure that this Live/Phase pin on the power cable is connected to the right (Live) pin on the power connector, as seen from the rear panel:
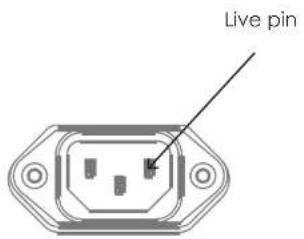
OPERATIONAL TIME
The device is immediately functional when first put into operation. Just set the rear power switch to On and press the front button, so the center LED turns white. However, this device will offer an optimal listening quality 30 minutes after it is turned on, the time for the power and input stages to reach their optimal functional temperature.
RACKING YOUR AMPLIFIER
If you wish to place your amplifier in a rack, you will find optional brackets (2U) specifically designed for this device.
To mount a bracket, first loosen the two BTR screws on the edge of the device. Let place the bracket so that it is flush with the front panel. Screw the two BTR screws back into place, securing the bracket to the device. Proceed in the same way for the opposite bracket.
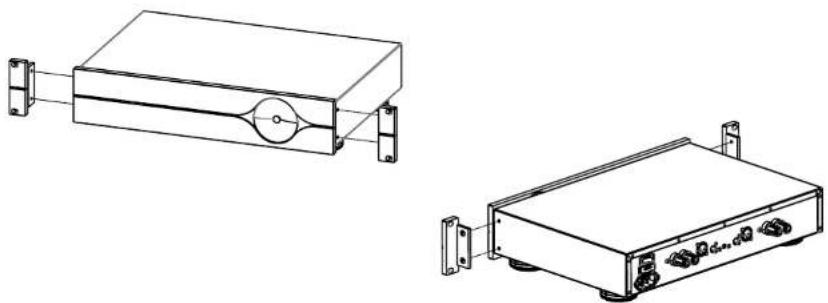
natural_image
Technical line drawings of two electronic devices with connectors and ports (no text or symbols)IN CASE OF MALFUNCTIONS
POSSIBLE CAUSES AND TEST PROCEDURES :
- Very low signal or no signal at all on one or both channels.
- Check that the gain/volume is not at minimum on the preamplifier or that the «mute» function is not activated.
- Check that the micro-switch on the back of your amplifier is in the correct position (CINCH or XLR).
- The interconnect audio cable may be defective or of poor quality. Replace it with a known and trusted brand.
- Check that the micro switch on the back of your amplifier: STEREO or MONO is in the desired position.
- No signal, both protection LED are reds
Check that the connections to the loudspeakers are secure and that the positive conductor strands are not in contact with the negative conductor strands at the back of the amplifier and/or at the speakers. (You may want to test with a multimeter to make sure there is no short circuit)
• Humming noise in the loudspeakers
- The humming noise may be caused by a potential problem or a different ground between the connected devices.
- Check the condition of the cables (loudspeakers / preamplifier), the source used, and the grounding in the case of the phono PCB.
- Reverse the outlet of the devices if you own a F-Shunko strip or outlet.
- The sound is saturated/ both protection LED are white (clipping mode).
Make sure that the gain on your preamplifier is not too high to avoid saturation at the amplifier input stages.
- The low frequencies level is weak and the sound image is blurred.
-
Check the STEREO/MONO micro-switch. If both channels (right and left) are connected to speakers but the STEREO/MONO micro-switch is set to the MONO position, the two loudspeakers will be out of phase.
-
The two loudspeakers may be out of phase. Check again the polarity and reverse the connections on the back of the speakers or amplifier if needed.
WARRANTY
Elipson electronic devices have a limited 2 year warranty. This warranty includes 2 year parts and repair labor on all components. The warranty extends only to the original purchaser of the product and not to any subsequent owner.
Elipson's obligation under these warranties is limited to repairing or replacing any component found defective in material or workmanship under normal conditions of use with an equal and/or current product. These warranties shall not apply to products which have been abused, modified, or disassembled.
Products to be repaired or returned under this warranty must be returned to the factory through an authorized Elipson dealer with all transportation and insurance charges prepaid.
To claim repair under warranty
To claim repair or service under warranty you simply have to contact your local Elipson dealer, from whom your equipment has been purchased. To ensure that you will be able to ship your damaged product in correct manner, always retain the original packaging of your Elipson equipment. When shipping your defective product, it is imperative to use the original packaging, respecting the positioning of the upper and lower wedge. (cf page 27)
If you cannot contact your original dealer, or if you are using your Elipson product outside the purchase country, you should contact Elipson national distributor in the residence country, who will advise where the equipment can be serviced.
You can also visit our web site to check our contact information: www.elipson.com To validate your warranty, you need to produce, as a proof of purchase, your original purchase invoice specifying the date of purchase and stamped by your dealer.
IV. SPECIFICATIONS
TECHNICAL
Nominal power Wrms / channel / 8Ω Class D
400 W @ THD=1 % (clipping) for 2 channels
Harmonic distortion (THD) at 100 W into 8Ω
< 0,005 % @ 1kHz
Harmonic distortion (THD) at 1 W into 8Ω
< 0,003 % @ 1kHz
Intermodulation distortion (IMD SMPTE) at 100 W
< 0,01 %
Nominal power Wrms / channel into 4Ω
710 W @ THD=1 % (2 x 750 W peak with CF*=12 dB)
Nominal power Wrms / bridge mode into 8Ω
1400 W / 2500 W peak with CF=12 dB
Impulse power
2 x 900 W into 2 Ohms with CF=12 dB
Power consumption (230 Vac / 120 Vac)
250 W with PF* = 0,96 à Pmax/8 into 4 Ω
- 2 channels
Number of input
1 x RCA Stereo + 1 x XLR Stereo + trigger In & Out
Input impedance
1 MΩ
Sensitivity (V)
9,5 dBu (Bal.), 3,5 dBu (unbal.) (2,3 V /1,15 V)
Pulse rise time ( s)
5μs at Pmax into 8 Ohms
Bandwidth
2 Hz - 60 kHz @ -3 dB into 4 Ohms
Damping factor
1000 into 8 Ohms between 20 Hz and 2 kHz
Signal-Noise ratio (Dynamic)
119 dB (Balanced input) at Pmax in stereo mode
Max operating temperature
40^ C
Output configuration
Stereo / Bridge mono
GENERAL
Power consumption in stand-by mode
< 0,5 W
Weight (kg)
6,9 kg
Dimensions (mm) H x L x P
W x H x D : 95 x 430 x 302/333* mm
*with binding post
MISCELLANEOUS
Clipping LED and protection signalling LED (current, power, temperature) per channel.
Trigger input and output for stand-by and operation by isolated voltage (5 to 12 V).
* CF = Peak factor (10 log(P peak/P rms))
** PF = Power factor (cos phi)
V. SAFETY REQUIREMENTS
CAUTION
TO REDUCE THE RISK OF FIRE, REPLACE WITH THE SAME TYPE AND RATING OF FUSE.
Safety compliance
This product has been designed to meet the EN 62368-1 international electrical safety standard.
CAUTION
RISK OF ELECTRIC SHOCK DO NOT OPEN
The lightning flash with an arrowhead symbol within an equilateral triangle, is intended to alert the user to the presence of uninsulated 'dangerous voltage' within the product's enclosure that may be of sufficient magnitude to constitute a risk of electric shock to persons.
The exclamation point within an equilateral triangle is intended to alert the user to the presence of important operating and maintenance (servicing) instructions in the literature accompanying the product.
CAUTION: To reduce the risk of electrical shock do not remove cover (or back). No user serviceable parts inside. Refer servicing to qualified service personnel.
WARNING: To reduce the risk of fire or electrical shock, do not expose this apparatus to rain or moisture and unplug this apparatus from the main during lightning storms.
CAUTION: In Canada and the USA, to prevent electric shock, match the wide blade of the plug to the wide slot in the socket and insert the plug fully into the socket.
This product is designed and manufactured to meet strict quality and safety standards. However, you should be aware of the following installation and operation precautions.
1. Take heed of warnings & instructions
You should read all the safety and operating instructions before operating this appliance. Retain this handbook for future reference and adhere to all warnings in the handbook or on the appliance.
2. Water and moisture
The presence of electricity near water can be dangerous.
Do not use the appliance near water – for example next to a bathtub, washbowl, kitchen sink, in a wet basement or near a swimming pool, etc.
3. Object or liquid entry
Take care that objects do not fall and liquids are not spilled into the enclosure through any openings. Liquid-filled objects such as vases should not be placed on the equipment.
4. Ventilation
Do not place the equipment on a bed, sofa, rug or similar soft surface (mainly for ours amplifiers equipped with a heatsink on the base), or in an enclosed bookcase or cabinet, since ventilation may be impeded. Despite the temperature is still moderate when playing at its maximum, we recommend a minimum distance of 50 mm around the sides and top of the appliance to provide adequate ventilation.
5. Heat
Locate the appliance away from naked flames or heat producing equipment such as radiators, stoves, interior candles or other appliances that produce heat.
6. Climate
The appliance has been designed for use in moderate climates: temperature and humidity.
7. Racks and stands
Only use a rack or rigid stand that is recommended for use with audio equipment. If the equipment is on a portable rack, add our optional mounting brackets 2U.
8. Cleaning
Unplug the unit from the mains supply before cleaning.
The case should normally only require a wipe with a soft, eventually slightly damp, lint-free cloth. Do not use paint thinners or other chemical solvents for cleaning.
We do not advise the use of furniture cleaning sprays or polishes as they can cause indelible white marks.
9. Power sources
This appliance must be connected to a mains socket outlet using the supplied power cable. To disconnect this apparatus from power, you must disconnect the power cable. Make sure the power cable is always easily accessible. Only connect the appliance to a power supply of the type described in the operating instructions or as marked on the appliance. This is a Class 1 device and must be earthed. The power switch is a single-pole switch. When the switch is in the "Off or 0" position, the appliance is not completely disconnected from the main power.
10. Power cable protection
Power supply cables should be routed so that they are not likely to be walked on or pinched by items placed upon or against them, paying particular attention to cords and plugs, and the point where they exit from the appliance.
11. Grounding
Ensure that the grounding means of the appliance is not defeated.
12. Power lines
Locate any outdoor antenna/aerial away from power lines.
13. Non-use periods
If the unit has a stand-by function, a small amount of current will continue to flow into the equipment in this mode. Unplug the power cable of the appliance from the outlet if left unused for a long period of time.
14. Abnormal smell
If an abnormal smell or smoke is detected from the appliance, turn the power off immediately and unplug the unit from the wall outlet. Contact your dealer immediately.
15. Servicing
You should not attempt to service the appliance beyond that described in this handbook. All other servicing should be referred to qualified service personnel.
16. Damage requiring service
The appliance should be serviced by qualified service personnel when:
- The power-supply cord or the plug has been damaged, or
- Objects have fallen, or liquid has spilled into the appliance, or
- The appliance has been exposed to rain, or
- The appliance does not appear to operate normally or exhibits a marked change in performance, or
- The appliance has been dropped or the enclosure damaged.
2.4g and 5g Statements
This device complies with Part 15 of the FCC Rules.
Operation is subject to the following two conditions:
- This device may not cause harmful interference, and
- This device must accept any interference received, including interference that may cause undesired operation.
Note: This product has been tested and found to comply with the limits for a Class B digital device, pursuant to Part 15 of the FCC Rules. These limits are designed to provide reasonable protection against harmful interference in a residential installation. This product generates, uses, and can radiate radio frequency energy and, if not installed and used in accordance with the instructions, may cause harmful interference to radio communications. However, there is no guarantee that interference will not occur in a particular installation. If this product does cause harmful interference to radio or television reception,
which can be determined by turning the equipment off and on, the user is encouraged to try to correct the interference by one or more of the following measures:
- Reorient or relocate the receiving antenna.
- Increase the separation between the equipment and receiver.
- Connect the equipment into an outlet on a circuit different from that to which the receiver is connected.
- Consult the dealer or an experienced radio/TV technician for help.
Please take attention that changes or modification not expressly approved by the party responsible for compliance could void the user's authority to operate the equipment.
This equipment should be installed and operated with a minimum distance 20cm between the radiator and your body.
This device complies with Industry Canada licence-exempt RSS standard(s). Operation is subject to the following two conditions:
- this device may not cause interference, and
- this device must accept any interference, including interference that may cause undesired operation of the device.
Under Industry Canada regulations, this radio transmitter may only operate using an antenna of a type and maximum (or lesser) gain approved for the transmitter by Industry Canada. To reduce potential radio interference to other users, the antenna type and its gain should be so chosen that the equivalent isotropically radiated power (e.i.r.p.) is not more than that necessary for successful communication.
The CE symbol indicates that this ELIPSON product complies with the EMC (Electromagnetic Compatibility) and LVD (Low Voltage Directive) standards of the European Community. 2014/35/EU Directive
The WEEE symbol indicates this ELIPSON product complies with the European Parliament and Council Directive 2012/19/EU concerning Waste Electrical and Electronic Equipment (WEEE). This product must be appropriately recycled or processed in accordance with these directives. Consult your local waste disposal authority for guidance.
The RoHS symbol indicates that ELIPSON products are designed and manufactured to comply with the Restriction of Hazardous Substances (RoHS) as stated in the European Parliament and Council Directive 2011/65/EU.
Relevant devices:
P1, P1F, A2700, I2130, MDACI & MPH II
The information in this guide is believed to be correct as of the date of publication. However, our policy is one of continuous development and so the information is subject to change without notice, and does not represent a commitment on the part of AV-INDUSTRY.
ELIPSON is a registered trademark of AV-INDUSTRY.
AV-INDUSTRY
Copyright © 2021 AV-INDUSTRY. All rights reversed
elipson | A2700
REFERENCE SERIES
POWER AMPLIFIER

elipson
www.elipson.com
- ATTENTION
- Cher client,
- EN CAS DE PANNES
- DYSFONCTIONNEMENT POSSIBLE ET PROCÉDURES DE TEST :
- 2.4g and 5g Statements
- WARNING
- Dear customer,
- SUMMARY
- GENERAL INFORMATION : 29
- ADDITIONAL INFORMATIONS : 39
- SPECIFICATIONS 4 2
- V.SAFETY REQUIREMENTS 4 4
- GENERAL INFORMATION
- UNPACKING - REPACKING
- USE, FRONT PANEL
- PRECAUTIONS BEFORE CONNECTING
- CONNECTION
- POWER SUPPLY
- CONNECT THE PREAMPLIFIER
- RCA/CINCH or XLR link:
- Use in Stereo mode:
- Use in Mono / Bridged mode:
- Use in Mono/Bridged mode:
- TRIGGER
- ADDITIONAL INFORMATIONS
- LIVE - MAIN PHASE
- OPERATIONAL TIME
- RACKING YOUR AMPLIFIER
- IN CASE OF MALFUNCTIONS
- WARRANTY
- To claim repair under warranty
- SPECIFICATIONS
- TECHNICAL
- GENERAL
- MISCELLANEOUS
- SAFETY REQUIREMENTS
- CAUTION
- Safety compliance
- Take heed of warnings & instructions
- Water and moisture
- Object or liquid entry
- Ventilation
- Heat
- Climate
- Racks and stands
- Cleaning
- Power sources
- Power cable protection
- Grounding
- Power lines
- Non-use periods
- Abnormal smell
- Servicing
- Damage requiring service
- Relevant devices:
- AV-INDUSTRY
Brand : ELIPSON
Model : A2700
Category : Receiver