
Easy Fry & Grill XL FW4018 - Deep fryer TEFAL - Free user manual and instructions
Find the device manual for free Easy Fry & Grill XL FW4018 TEFAL in PDF.
| Product Type | Hot air fryer / Air fryer |
| Brand | Tefal |
| Model | Easy Fry & Grill XL FW4018 |
| Bowl Capacity | Approximately 4.2 L (maximum ingredient quantity: 1500 g) |
| Power | Approximately 1500 W |
| Temperature Range | 40 °C to 230 °C |
| Timer | 0 to 60 minutes (dehydration mode: 1 to 12 hours) |
| Display | Touchscreen Digital |
| Automatic Cooking Modes | Fries, Nuggets, Chicken Wings/Drumsticks, Fish, Vegetables, Cookies, Bacon, Dehydration, Frozen Pizza, Fresh/Homemade Pizza |
| Additional Functions | Interior light, automatic shut-off, keep warm |
| Bowl Coating | Non-stick |
| Cleaning | Dishwasher-safe bowl; clean exterior with a damp cloth |
| Safety | Do not immerse in water; leave 15 cm clearance around for air circulation |
| Weight | Approximately 5.5 kg |
| Dimensions (L x W x H) | Approximately 30 x 30 x 35 cm |
| Power Supply | 220-240 V, 50/60 Hz |
| Included Accessories | Bowl, rack (not specified) |
| Spare Parts and Repairability | Available on the Tefal website or through customer service |
| Warranty | Refer to the provided worldwide warranty booklet |
Frequently Asked Questions - Easy Fry & Grill XL FW4018 TEFAL
User questions about Easy Fry & Grill XL FW4018 TEFAL
0 question about this device. Answer the ones you know or ask your own.
Ask a new question about this device
Download the instructions for your Deep fryer in PDF format for free! Find your manual Easy Fry & Grill XL FW4018 - TEFAL and take your electronic device back in hand. On this page are published all the documents necessary for the use of your device. Easy Fry & Grill XL FW4018 by TEFAL.
USER MANUAL Easy Fry & Grill XL FW4018 TEFAL
natural_image
Black square electronic device with white trim and control buttons, no visible text or symbols on body
natural_image
Black square air fryer with control panel and side handles (no visible text or symbols)
text_image
QR code image containing encoded data, no visible human-readable textDigital recipe book Livre de recettes digital Livro de receitas digital Digitales Kochbuch
EASY FRY™ XL SURFARCE
text_image
Technical diagram of a portable printer with labeled parts C and D, showing internal structure and mounting base.
natural_image
Line drawing of a rectangular appliance with internal grating and labeled parts A and B (no text or symbols beyond labels)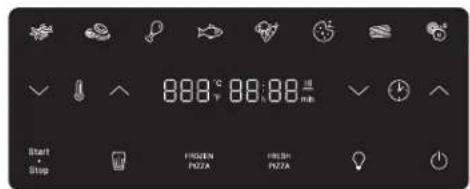
text_image
8:00 °C 8:00:00 min Start Stop FROSEN PFOZA FROSEN PFOZA2
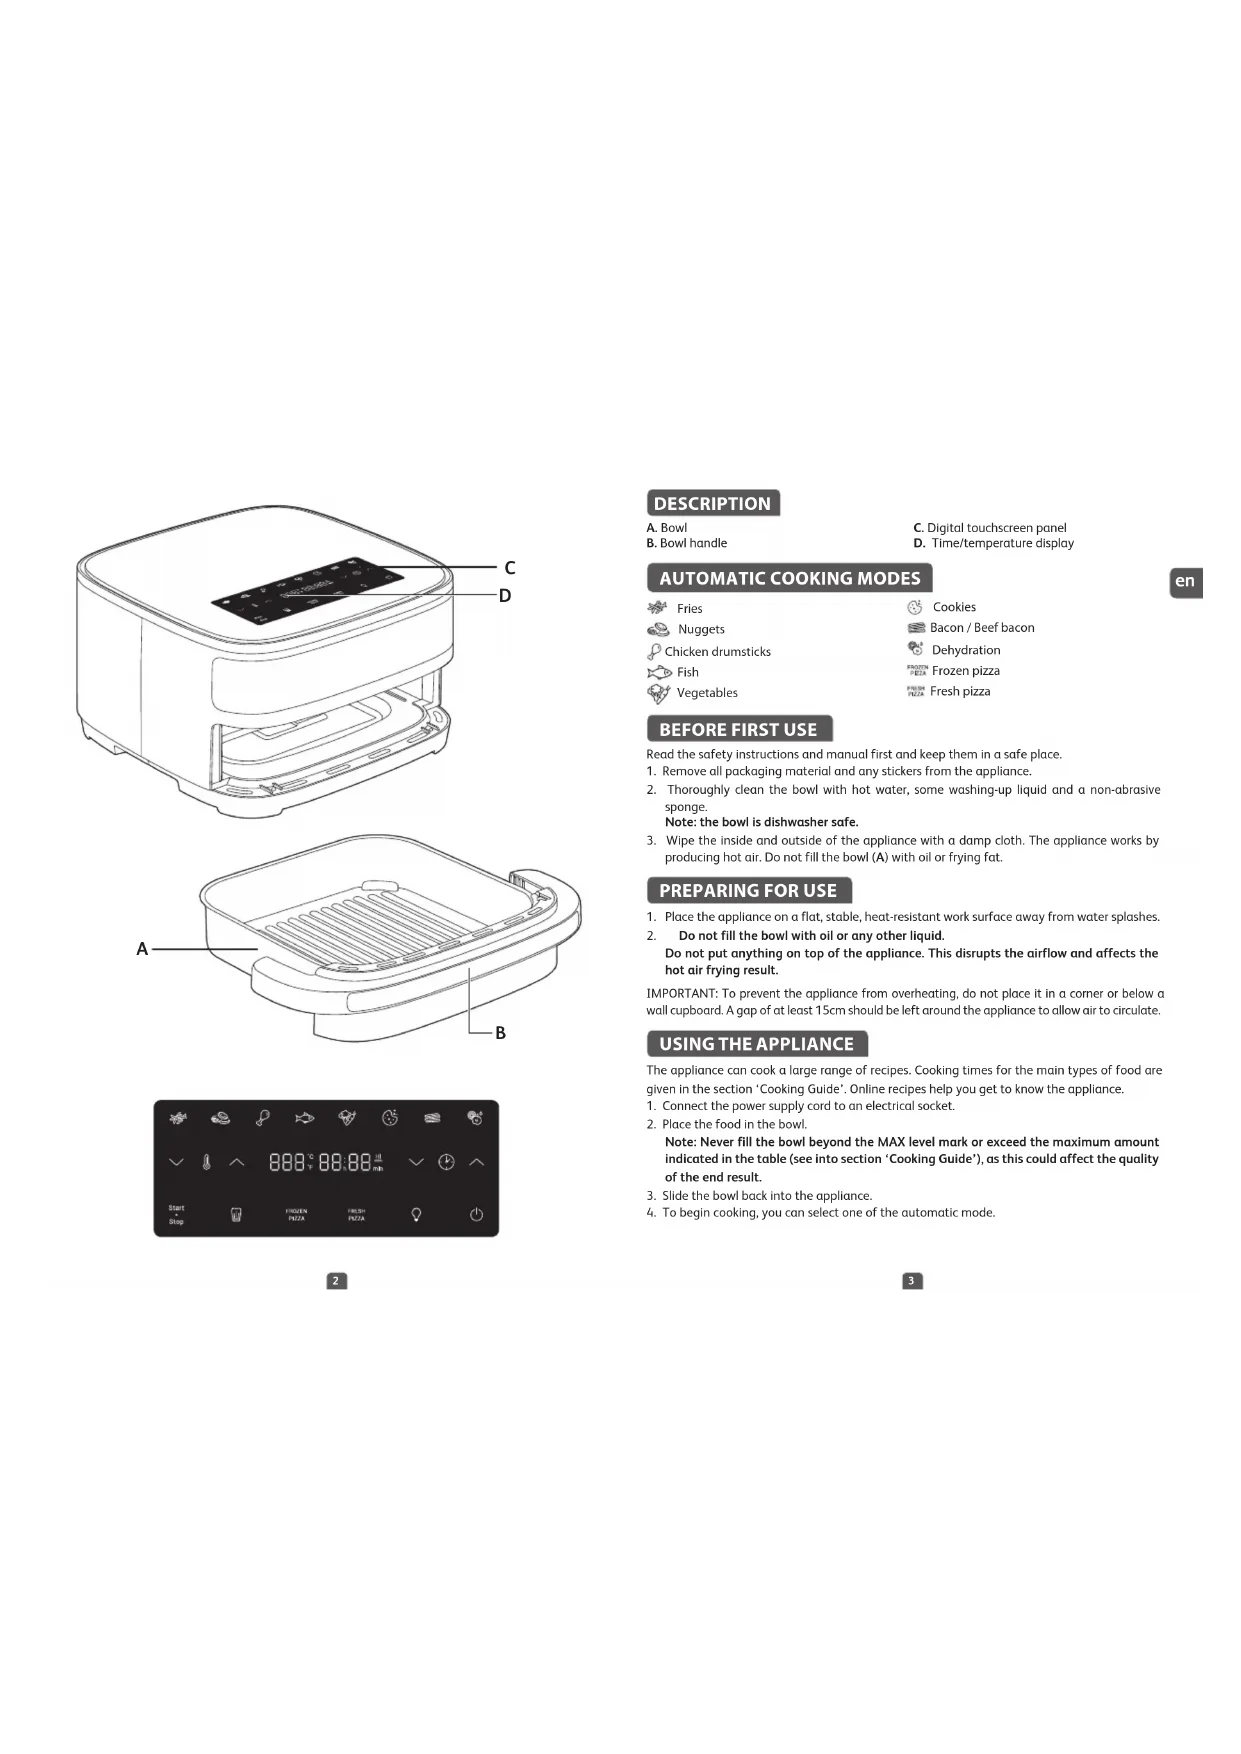
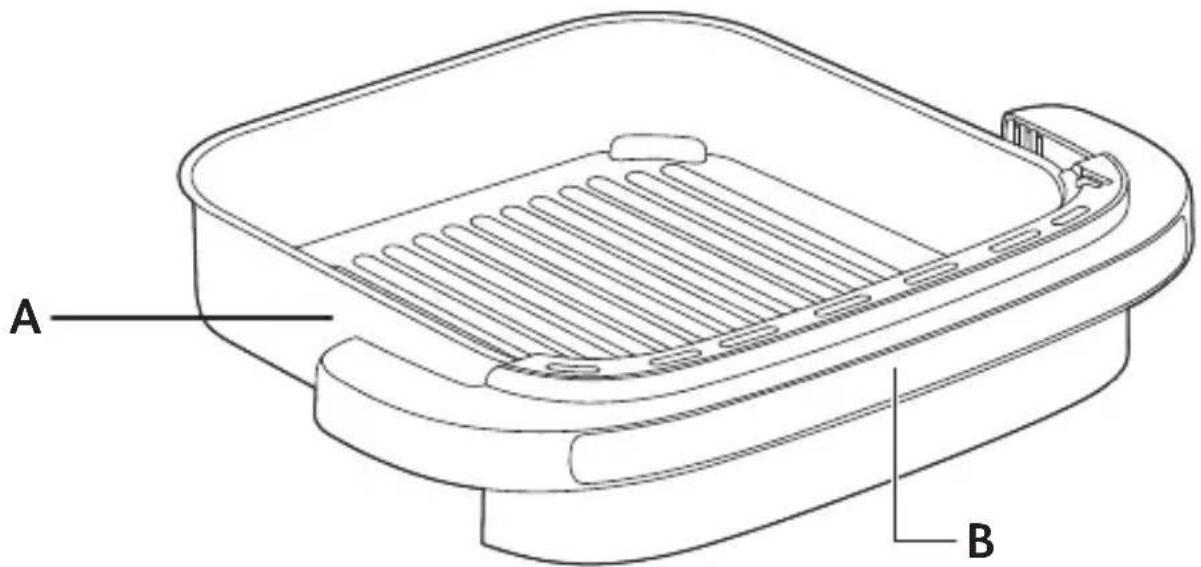
DESCRIPTION
A. Bowl
B. Bowl handle
C. Digital touchscreen panel
D. Time/temperature display
AUTOMATIC COOKING MODES

Fries

Cookies

Nuggets

Bacon / Beef bacon

nicken drumsticks

Dehydration

Fish

Frozen pizza

Vegetables

Fresh pizza
BEFORE FIRST USE
Read the safety instructions and manual first and keep them in a safe place.
-
Remove all packaging material and any stickers from the appliance.
-
Thoroughly clean the bowl with hot water, some washing-up liquid and a non-abrasive sponge.
Note: the bowl is dishwasher safe.
- Wipe the inside and outside of the appliance with a damp cloth. The appliance works by producing hot air. Do not fill the bowl (A) with oil or frying fat.
PREPARING FOR USE
-
Place the appliance on a flat, stable, heat-resistant work surface away from water splashes.
-
Do not fill the bowl with oil or any other liquid.
Do not put anything on top of the appliance. This disrupts the airflow and affects the hot air frying result.
IMPORTANT: To prevent the appliance from overheating, do not place it in a corner or below a wall cupboard. A gap of at least 15cm should be left around the appliance to allow air to circulate.
USING THE APPLIANCE
The appliance can cook a large range of recipes. Cooking times for the main types of food are given in the section 'Cooking Guide'. Online recipes help you get to know the appliance.
-
Connect the power supply cord to an electrical socket.
-
Place the food in the bowl.
Note: Never fill the bowl beyond the MAX level mark or exceed the maximum amount indicated in the table (see into section 'Cooking Guide'), as this could affect the quality of the end result.
-
Slide the bowl back into the appliance.
-
To begin cooking, you can select one of the automatic mode.

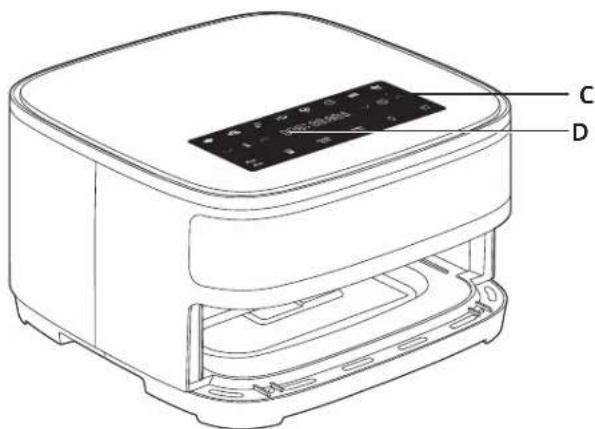
- Press 📁 button to display the cooking mode.
- Thenpress 📋 button on the screen to select the desired cooking mode (these modes are described in detail in the “Cooking guide” section).
- If needed, adjust the cooking time by pressing the and buttons. The timer can be set for between 0 and 60 minutes.
- You can aslo adjust the temperature ⚪ with and buttons on the digital screen. The thermostat varies from 40-230°C.
- Confirm the cooking mode by pressing the Start button. This will launch the cooking process.
- Cooking starts. The selected temperature and remaining cooking time appear on the on-screen display.
- During cooking, the inner light allows the checking of the cooking's process. Press 🔔 to light up. Press again to turn off.
- Some food will require shaking halfway through the cooking time (see section 'Cooking Guide'). To shake the food, pull the bowl out of the appliance by the handle and shake it. Then slide the bowl back into the appliance, the appliance restarts automatically.
- When you hear the timer sound, the cooking time set has finished. Pull the bowl out of the appliance and place it on a heat-resistant surface.
- Check if the food is ready.
If the food is not ready yet, simply slide the bowl back into the appliance and set the timer for a few extra minutes.
- When the food is cooked, take out the bowl. To remove food, use a pair of tongs to lift the food out of the bowl.
Caution: After hot air frying, the bowl, and the food are very hot. Do not touch the bowl during use and for some time after use, as it gets very hot. Only hold the bowl by the handle with both hands.
- When a batch of food is ready, the appliance is instantly ready for preparing another batch of food.
PIZZA
- Place the pizza in the bowl and slide the bowl back into the appliance.
- Press ⏻, then press FROZEN PEZZA. FRESH PIZZA
- If needed, adjust the time ⏻ by pressing and buttons on the digital screen. You can also adjust the temperature ⏻ with and buttons on the digital screen.
- Press Start to launch the cooking. The selected temperature and remaining cooking time appear on the screen display.
- When you hear the timer sound, the cooking has finished. Take the bowl out the appliance and place it on a heat-resistant surface.
- Check if the food is ready. If the food is not ready yet, put it back on the appliance and set the timer for a few extra minutes.
- When the food is cooked, take out the bowl.
Caution: After hot frying, the bowl and the food are very hot. Do not touch the bowl during use and for some time after use, as it gets very hot. Only hold the bowl by the handle with both hands.
4
DEHYDRATION
- Place the ingredients in the bowl and slide the bowl back into the appliance.
- Press ⏻ then adjust the temperature by pressing button to 70°C on the digital screen.
- Then set the desired cooking time 🏠 by pressing and button. You can set the timing from 1 hour to 12 hours.
- Press the Start button · to launch the dehydration process. The selected temperature and remaining cooking time appear on the screen display.
- When you hear the timer sound, the cooking has finished. Take the bowl out the appliance and place it on a heat-resistant surface.
- Check if the food is ready. If the food is not ready yet, put it back on the appliance and set the timer for a few extra minutes.
- When the food is cooked, take out the bowl. To remove food, use a pair of tongs to lift the food out the bowl.
Caution: After hot frying, the bowl, and the food are very hot. Do not touch the bowl during use and for some time after use, as it gets very hot. Only hold the bowl by the handle with both hands.
COOKING GUIDE
The table below helps you to select the basic settings for the food you want to prepare.
Note: The cooking times below are only a guide and may vary according to the variety and batch of potatoes used. For other food the size, shape and brand may affect results. Therefore, you may need to adjust the cooking time slightly.
NOTE for Potatoes and French fries
- Limit the frying temperature at 180°C.
• Control the cooking. Do not eat burnt food. - We advise frying to a slightly golden color instead of brown color.
- Store your fresh potatoes in a room above 8^ C
- Before cooking, soak the fresh potatoes for 20 minutes to reduce the amount of starch.
| i | ||||||
| Potatoes & fries | ||||||
| Frozen chips (10 mm x 10 mm standard thickness) | 1000 g | 35 min | 180°C | 2 shakes | ||
| Homemade Fries (8 x 8 mm) | 1000 g | 35 min | 180°C | 1 tbsp of oil + 2 shakes | ||
| Frozen potato wedges | 1000 g | 35 min | 180°C | 1 tbsp of oil + 2 shakes | ||
\$
| i | ||||||
| Meat & Poultry | ||||||
| Chicken breast fillets (boneless) | 500 - 900 g | 20 - 25 min | 180°C | Turn halfway through cooking | ||
| Chicken drumsticks | 1500 g(12 pcs) | 25 min | 200°C | |||
| Bacon / Beef bacon | 8 slices 8 m/m2 | 180°C | ||||
| Sausage | 10 pieces 25 m/m2 | 200°C | Turn halfway through cooking | |||
| Fish | ||||||
| Salmon fillet | 6 pcs(150g/piece) | 8 min | 200°C | |||
| Prawns | 12 pieces 7 m/m2 | 140°C | ||||
| Snacks | ||||||
| Frozen chicken nuggets | 700 g | 15 min | 200°C | |||
| Frozen chicken wings | 800 g 16 m/m2 | 200°C | ||||
| Frozen cheese sticks 750 g | 16 min | 200°C | ||||
| Frozen pizza | 26cm diameter | FROZENPIZZA | 10 min | 200°C | ||
| Fresh pizza | FRESHPIZZA | 6 min | 220°C | |||
| Homemade pizza | FRESHPIZZA | 10 min | 200°C | |||
| Vegetables | ||||||
| Nems | 18 pcs(900 g) | 10 min | 200°C | |||
| Cauliflower (tops) 800 g | 20 min | 180°C | ||||
| Zucchini 600 g | 10 min | 200°C | ||||
| Baking | ||||||
| Cookies | 9 pieces | 9 -11 min | 180°C | |||
| Dehydration | ||||||
| Sliced apples | 1-2 pieces | 4 h | 70°C | |||
• Shake halfway through cooking.
IMPORTANT: To avoid damaging your appliance, never exceed the maximum quantities of ingredients and liquids indicated in the instruction manual and in the recipes. When you use mixtures that rise (such as with cake, quiche or muffins) the oven dish should not be filled more than halfway.
TIPS
- Smaller food usually requires a slightly shorter cooking time than larger size foods.
- Shaking food halfway through the cooking time improves the end result and can help prevent uneven cooking.
- To make your fresh potatoes extra crispy, try adding a small amount of oil before cooking and shake to evenly cover. We recommend 14ml of oil. Do not add oil to frozen potatoes.
• Snacks that can be cooked in an oven can also be cooked in the appliance.
• The optimal recommended quantity for cooking fries is 700 grams. - Use ready made puff and shortcrust pastry to make filled snacks quickly and easily.
- Place an oven dish in the appliance's bowl if you want to bake a cake or quiche or if you want to fry delicate ingredients or filled ingredients. You can use an oven dish in silicon, stainless steel, aluminium, terracotta.
- You can also use the appliance to reheat food. To reheat food, set the temperature to 160°C for up to 10 minutes. Cooking time could be adjusted depending on food quantity in order to fully reheat the food.
MAKING HOME-MADE CHIPS
If you want to make home-made chips, follow the steps below.
- Choose a variety of potato recommended for making chips. Peel the potatoes and cut them into equal thickness chips.
- Soak the potato chips in cold water for at least 20 minutes, drain them and dry them with a clean, highly absorbent tea towel. Then pat with paper kitchen towel. The chips must be thoroughly dry before cooking.
- Pour 1 tablespoon of oil (vegetable, sunflower or olive) in a dry bowl, put the chips on top and mix until they are coated with oil.
- Remove the chips from the bowl with your fingers or a kitchen utensil so that any excess oil stays behind in the bowl. Place the chips in the bowl. Note: Do not tip the container of oil coated chips directly into the bowl in one go, otherwise excess oil will end up at the bottom of the bowl.
- Fry the chips according to the instructions in the section Cooking guide.
CLEANING
Clean the appliance after every use.
The bowl has a non-stick coating. Do not use metal kitchen utensils or abrasive cleaning materials to clean it, as this may damage the nonstick coating.
1. Remove the mains plug from the wall socket and let the appliance cool down.
Note: Remove the bowl to let the appliance cool down more quickly.
2. Wipe the outside of the appliance with a damp cloth.
3. Clean the bowl with hot water, some washing-up liquid and a non-abrasive sponge. You can use a degreasing liquid to remove any remaining dirt.
Note: the bowl is dishwasher safe.
Tip: If food debris/residue is stuck at the bottom of the bowl, fill them with hot water and some washing-up liquid. Let the bowl soak for approximately 10 minutes. Then rinse clean and dry.
- Clean the heating element with a dry, cleaning brush to remove any food residues.
- Do not immerse the appliance in water or any other liquid.
STORAGE
- Unplug the appliance and let it cool down.
- Make sure all parts are clean and dry.
GUARANTEE AND SERVICE
If you need service or information or if you have a problem, please visit the brand website or contact the brand Consumer Care Centre in your country. You can find the phone number in the worldwide guarantee leaflet. If there is no Consumer Care Centre in your country, go to your local dealer.
TROUBLESHOOTING
If you encounter problems with the appliance, visit the brand website (see cover page on this document) for a list of frequently asked questions or contact the Consumer Care Centre in your country.
text_image
Technical diagram of a device with labeled components C and D, showing internal structure and mounting points.fr
text_image
A B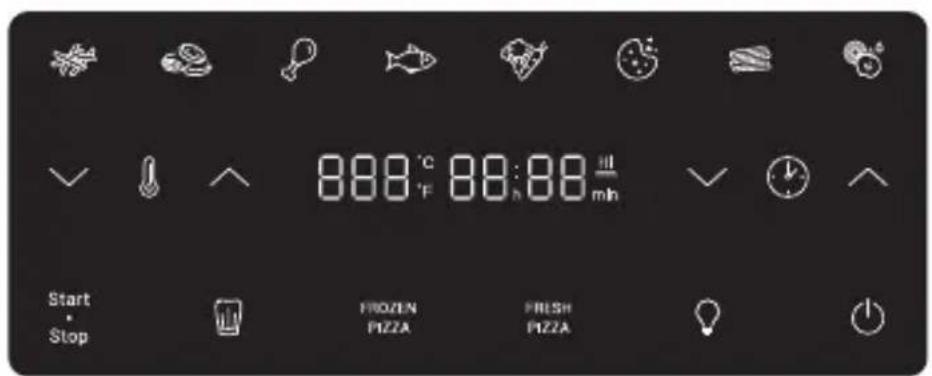
text_image
Start Stop FROZEN PIZZA FINISH PIZZA 8:00:00 8:00:00 min minDESCRIPTION
A. Cuve
text_image
Technical diagram of a digital kitchen appliance with labeled parts C and D
natural_image
Technical line drawing of a rectangular appliance with internal compartments and labeled parts A and B (no text or symbols beyond labels)
text_image
8:00 °C 8:00:00 mm Start Stop FROZEN PETA FRESH PETA16
BESCHREIBUNG
A. Schüssel
B. Schüsselgriff
C. Digitales Touchscreen-Feld
text_image
Technical diagram of a device with labeled parts C and D, showing internal components and mounting points.nl

text_image
A B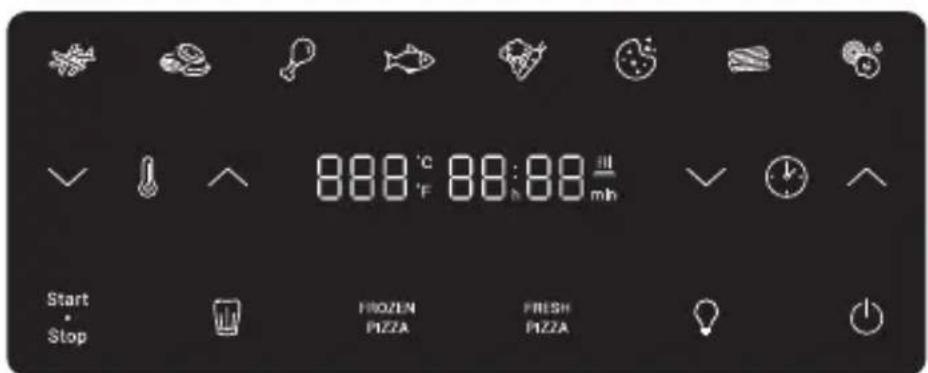
text_image
Start Stop FROZEN PIZZA FRESH PIZZA 8:00'℃ 88:00" min minBESCHRIJVING
A. Binnenpan
text_image
Technical diagram of a digital kitchen appliance with labeled parts C and D
natural_image
Technical line drawing of a rectangular appliance with internal compartments and labeled parts A and B (no text or symbols beyond labels)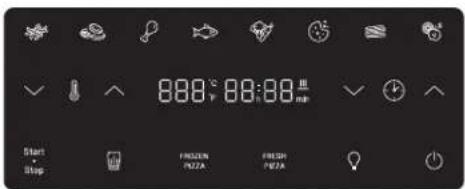
text_image
8:00 °C 8:00:00 mm Start Stop FROZEN PZZA FRESH PZZA30
DESCRIPCIÓN
A. Canasta
B. Asa de la canasta
FRESH Pizza Pizza fresca
ANTES DE USAR POR PRIMERA VEZ
text_image
Technical diagram of a device with labeled components C and D, showing internal structure and mounting points.pt

text_image
A B
text_image
Start Stop FROZEN PIZZA FRESH PIZZA 8:00'℃ 88:00" min minDESCRIÇÃO
A. Cuba
B. Alça da cuba
C. Painel digital touch screen
D. Visor de tempo/temperatura
NOTA para as batatas e as batatas fritas
text_image
Start Stop 8:00 °C 8:00:00 MP FROZEN PETA FRESH PETA44
DESCRIZIONE
A. Cestello
text_image
Technical diagram of a device with labeled parts C and D, showing internal components and mounting points.el

text_image
A B
text_image
Start Stop FROZEN PIZZA FRESH PIZZA 8:00'℃ 88:00" min minΠΕΡΓΓΡΑΦΗ
A. μπολ
B. Λαβή μπολ
text_image
Technical diagram of a microwave oven with labeled components C and D
text_image
A B
text_image
8:00 °C 8:00:00 mp Start Stop FROZEN PETA FRESH PETA58
AÇIKLAMA
A. Hazne
B. Hazne kolu
