
GK 4011 - Croque monsieur clip AMICA - Free user manual and instructions
Find the device manual for free GK 4011 AMICA in PDF.

| Brand | Amica |
| Model | GK 4011 |
| Product type | Sandwich press / Contact grill |
| Rated voltage | AC 230 V ~ 50 Hz |
| Rated power | 2000 W |
| Power cord length | 0.90 m |
| Dimensions (approx.) | Approx. 35 x 30 x 15 cm |
| Weight (approx.) | Approx. 3.5 kg |
| Plate material | Non-stick coating (Teflon) |
| Removable plates | Yes, with release clips |
| 180° opening function | Yes, for use as a cooking surface |
| Temperature control | Yes, with rotary knob |
| Timer | Yes, 5 to 30 minutes |
| Drip tray | Yes, removable for grease |
| Cool-touch handle | Yes, insulated black part |
| Indicator lights | Orange (power) and green (ready) |
| Functions | Grilling, toast, sandwiches, cooking surface |
| Plate cleaning | Dishwasher-safe |
| Body maintenance | Damp cloth, do not immerse |
| Safety | Auto shut-off not mentioned, unplug after use |
| Fire resistance class | Class I |
| Use by children | From 8 years old under supervision |
| Included accessories | Grilling plates, drip tray |
| Warranty | 2 years (according to legislation) |
Frequently Asked Questions - GK 4011 AMICA
User questions about GK 4011 AMICA
0 question about this device. Answer the ones you know or ask your own.
Ask a new question about this device
Download the instructions for your Croque monsieur clip in PDF format for free! Find your manual GK 4011 - AMICA and take your electronic device back in hand. On this page are published all the documents necessary for the use of your device. GK 4011 by AMICA.
USER MANUAL GK 4011 AMICA
natural_image
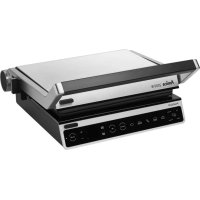
Exterior view of a modern Amica grating appliance with control knobs and a flat top (no visible text or symbols)PL INSTRUKCJA OBSŁUGI 2
EN USER MANUAL 6
CS NÁVOD K OBSLUZE 9
SK NÁVOD NA OBSLUHU 12
PRZED PIERWSZYM UŻYCIEM:
SAFETY INSTRUCTIONS FOR USE
Note! To reduce the risk of fire, electric shock or personal injury, read this manual carefully before using the appliance.
• Children do not realize the dangers that can arise when using electrical appliances; therefore keep the kettle out of reach of children.
- Do not immerse the body of the appliance in water or other liquids. Immersing in water may cause an electric shock.
- If water spills on the external components of the appliance, dry it thoroughly before switching back on. Do not touch wet surfaces in contact with the appliance connected to power supply, immediately disconnect it from the mains.
- Do not use the appliance if it shows any signs of damage to the power cord, or if the appliance has been dropped on the floor.
• After use, always pull out the plug from the socket, and also in case of any malfunction, before cleaning or before changing accessories.
- When pulling out the plug from the wall outlet, never pull by the cord, only the plug, holding the socket with your other hand. The appliance is Class I fire protection electrical equipment.
- Do not attempt to remove any parts of the housing.
• To prevent damage to the
power cord, do not place it over sharp edges or close to hot surfaces.
- Do not expose the appliance to rain or humidity, and do not use it outdoors. Do not operate the appliance with wet hands.
- If the power cord or plug is damaged, it should be replaced by a professional repair shop in order to avoid hazard.
- Never place the appliance on hot surfaces.
- Never leave the appliance plugged in to power without supervision.
- This appliance can be used by children aged 8 years and older or by persons with physical, mental or sensory handicaps, or by those who are inexperienced or unfamiliar with the appliance, provided they are supervised or have been instructed how to safely use the appliance and are familiar with risks associated with the use of the appliance. Ensure that children do not play with the appliance. Do not allow children to clean and maintain the appliance unless they are 8 years or older and are supervised by a competent person. Ensure that the appliance is used on a clean, dry and level surface.
- To turn on the appliance, connect the mains plug to an earthed mains socket. To turn off the appliance completely unplug it from the power supply. Before
use, extend and straight- en the power cord. Use the appliance on a flat, stable surface. Do not use an ex- tension cord which does not meet the applicable electrical standards and regulations. Do not place aluminium foil or other ob- jects inside the appliance, it may cause electric shock or fire. Also, do not heat food wrapped in foil or paper.
- Do not use the appliance for heating rooms.
- Do not use the appliance for purposes other than its intended use.
• Take all precautions, do not touch any hot surfaces of the appliance. Do not wash, put away or cover the appliance it until it has completely cooled down. Do not place the appliance on or near a hot gas or electric burner or in places where it could come into contact with other heat sources. - When using the appliance, allow sufficient clearance above and on all sides of the appliance for adequate air circulation. The appliance must not come into contact with curtains, wall decorations, clothes, paper towels or other flammable materials during operation. Use an insulated thermal on any surfaces that may be sensitive to high temperature.
- Be especially careful when moving an appliance containing hot oil. Note! The appliance is not intended to
be operated using external timers or a separate remote control system.
- This appliance has been designed to prepare grilled food, do not use it for any other purpose. Do not touch the surface marked with the symbol when the appliance is on or off. These surfaces are hot.
- The food is very hot immediately after being prepared. Use a wooden spatula to remove it from the appliance. Wooden utensils are the best to use as they do not damage the Teflon surface of the heating elements of the appliance. Do not use metal utensils to remove food from the heating plates. The Teflon surface may be damaged.
- Before using the appliance for the first time, wipe the inside surfaces with a damp cloth and then grease the warm heating plates. Heat the empty appliance for about 10 minutes. This will remove any unpleasant odours that may remain due to the manufacturing process. When you have placed the food to be grilled in the appliance, only touch the lid handle, both during and after the grilling. After use, leave the appliance to cool down.
- Steam and hot air will be released from the food when grilling. Be especially careful when opening and closing a hot appliance.
In accordance with European Directive 2012/19/EU and Polish legislation regarding used electrical and electronic goods, this appliance is marked with the symbol of the crossed-out waste container. This marking indicates that the appliance must not be disposed of together with other household waste after it has been used.
The user is obliged to hand it over to waste collection centre collecting used electrical and electronic goods. The collectors, including local collection points, shops and local authority departments provide recycling schemes.
Proper handling of used electrical and electronic goods helps avoid environmental and health hazards resulting from the presence of dangerous components and the inappropriate storage and processing of such goods.
SPECIFICATION:
Model - GK 4011
Rated voltage - AC 230V \~ 50Hz
Rated power - 2000 W
Power cord - \~ 0,90 m
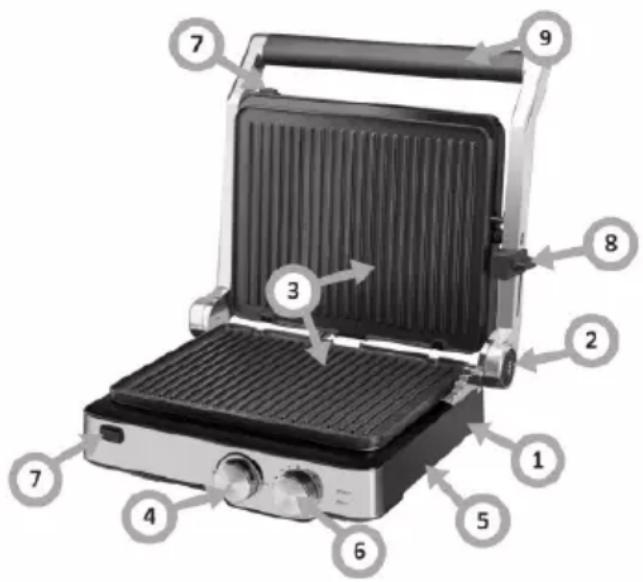
FEATURES AND COMPONENTS
- Base
- The 180° button allows you to set the lid heating plate in a horizontal position and grill on two plates at the same time
- Removable grill plates
- Temperature control knob
- Drip tray
- Frilling time control knob 5-30 min
- Heating plate release buttons
- Lid heating plate lock lever
- Handle
BEFORE FIRST USE:
- Before using the appliance for the first time wash it as described in section: Cleaning and care Remember to put the drip tray in place.
- To unlock the lid heating plate, set the lock lever to the "OPEN" position. To do this, pull the lever as far as it will go towards the handle
- Open by pulling the handle up.
- To remove the heating plates, press the release buttons and then take out the plates.
- Place the appropriate heating plate in the appliance, ensuring the hooks in the appliance align with the holes in the plate. Push the plates in until you hear a click, indicating they are securely in place.
- Attach the plates and connect the appliance to the mains socket. Set the time and temperature. When using the appliance for the first time, activate the heating function with the temperature set to maximum for a few to several minutes. Check that the power indicator light turns orange.
- After preheating for about 5 minutes, the ready indicator will change to green, signifying that the appliance is prepared for use.
-
After the set time has elapsed, turn the appliance off (the knob in the OFF position) and remove the plug from the wall socket.
-
Once the appliance has cooled down completely, clean and dry it.
USE THE APPLIANCE.
- After properly assembling and preparing the appliance, use the knob to select the function:
- turn anticlockwise to grill with timer
- turn clockwise to grill with no timer
When you select the function with the knob, the orange indicator lights up to indicate that the power is on. After you have selected the function or time, select the temperature.
-
If the appliance is to be used as a flat grill or roaster, but you do not need the entire surface, use the bottom heating plate only.
-
Depending on the set temperature, the appliance heats up to the operating temperature for about 5 minutes. Once the thermostat reaches the operating temperature, a green indicator lights up to show that the appliance is ready. When the appliance is in use, the indicator turns on and off as the temperature is maintained. You can grease the plates with butter, margarine or frying oil. Because the plates have non-stick surfaces, there's no need to use butter or oil.
-
Once the appliance reaches the desired temperature, open the lid heating plate and use wooden kitchen utensils to place the items on the grill plate.
-
Use the temperature knobs to set and maintain the temperature of the grilling surface. You can adjust the temperature using the knob at any time during appliance use, depending on the type of food being prepared.
-
Always exercise caution when using the appliance. To open the appliance, grasp the black part of the handle. This part of the handle stays cool and does not heat up during grilling.
-
The appliance becomes hot during use. The lid is made of stainless steel and heats up to a high temperature. Do not touch it during or immediately after grilling. If you need to adjust the lid, wear oven gloves to avoid burns.
-
When the set time has elapsed or when you determine that the food is done and wish to stop grilling, switch off the appliance (turn the knob to the OFF position) and disconnect it from the wall socket. If you would like to continue grilling, go back to step 1.
-
After use, leave the appliance to cool down for at least 30 minutes.
NOTE: Do not use the appliance to prepare and defrost frozen food. The food must be completely defrosted before cooking in this appliance.
CLEANING AND CARE:
Before any cleaning or maintenance, make sure that the appliance is unplugged from the power source and has cooled down completely.
- To avoid electric shock, do not immerse any part of the appliance in water or other liquid.
- Do not use corrosive or abrasive substances for cleaning. Use only clean water with a mild detergent and a soft cloth.
- Wipe the heating plates with a kitchen paper towel to remove any remaining grease and then, wipe the heating plates with a damp (not wet) cloth soaked in water and washing up liquid. You can wash the heating plates in a dishwasher.
- Afterward, wipe the heating plates once more with a damp cloth soaked in clean water, and use a kitchen paper towel to dry the appliance.
- The dripping tray can be washed in warm water with a little dish-washing liquid.
- Wipe the body of the appliance with a damp cloth. Never submerge the appliance body in water or any other liquid, and avoid directing a water jet at it. Dry the appliance thoroughly after cleaning.
- Allow all surfaces to dry completely before using the grill again.
POKYNY K BEZPEČNÉMU POUŽÍ-VÁNÍ
PŘED PRVNÍM POUŽITÍM:
PRED PRVÝM POUŽITÍM:
ELSŐ HASZNÁLAT ELŐTT
ÎNAINTE DE PRIMA FOLOSIRE
Brand : AMICA
Model : GK 4011
Category : Croque monsieur clip