USER MANUAL SST 40 A1 SILVERCREST
2-IN-1 CORDLESS VACUUM CLEANER / 2-IN-1 AKKU-STAUBSAUGER / ASPIRATEUR SANS FIL 2 EN 1 SST 40 A1
GB IE
2-IN-1 CORDLESS VACUUM CLEANER
Operating instructions
FR BE
ASPIRATEUR SANS FIL 2 EN 1
Mode d'emploi
CZ
AKU VYSAVAC 2 V 1
Návod k obsluze
SK
AKU VYSÁVAC 2 V 1
Návod na obsluhu
DK
2-I-1 STØVSUGER MED GENOPLADELIGT BATTERI
Beteningsvejledning
DE AT CH
2-IN-1 AKKU-STAUBSAUGER
Bedienungsanleitung
NL BE
2-IN-1 ACCU-STOFZUIGER
Gebruiksaanwijzing
PL
ODKURZACZ AKUMULATOROWY 2 W 1
Instrukcja obstugi
ES
ASPIRADOR 2 EN 1 CON BATERÍA
Before reading, unfold the page containing the illustrations and familiarise yourself with all functions of the device.
DE AT CH
GB/IE Operating instructions Page 1
Information about these operating instructions 2
Copyright 2
Proper use 2
Warnings and symbols 3
Safety 4
Basic safety instructions 4
Package contents 7
Operating components 8
Initial operation 9
Before first use
Assembling the appliance 9
Charging the battery 9
Battery status display 10
Operation 11
Using the appliance 11
Adjusting the suction power 11
Using the appliance with additional accessories 12
Troubleshooting 14
Cleaning and maintenance 15
Emptying the dirt container and cleaning the filter 15
Cleaning the appliance 16
Cleaning the rotary brush 16
Cleaning the hose section 17
Storage 17
Disposal 17
Disposal of the appliance. 17
Disposal of the packaging 18
Appendix 18
Technical specifications 18
Ordering replacement parts 19
Kompernass Handels GmbH warranty 20
Service 21
Imporer 21
Introduction
Congratulations on the purchase of your new appliance. You have selected a high-quality product. The operating instructions are part of this product. They contain important information about safety, usage and disposal. Before using the product, please familiarise yourself with all the operating and safety instructions. Use the product only as described and for the range of applications specified. Keep these operating instructions as a reference and store them near the product. Please pass on all documentation incl. these operating instructions to any future owner(s) if you sell this product or give it away.
Copyright
This documentation is protected by copyright. Any copying or reproduction, including in the form of extracts, or any reproduction of images (even in a modified state), is permitted only with the written authorisation of the manufacturer.
Proper use
This appliance is designed exclusively for vacuuming dry surfaces or dry residues in private households. The appliance may not be used to vacuum people or animals.
The appliance is not intended for use in commercial or industrial environments.
The manufacturer accepts no responsibility for damage caused by failure to observe these instructions, improper use or repairs, unauthorised modifications or the use of unapproved replacement parts. The risk is borne solely by the user.
Warnings and symbols
The following warnings are used in these operating instructions:
DANGER
A warning at this hazard level indicates a potentially hazardous situation.
Failure to avoid this hazardous situation could result in serious injuries or even death.
Follow the instructions on this warning label to avoid the risk of serious injuries or death.
WARNING
A warning at this hazard level indicates a potentially hazardous situation.
Failure to avoid this hazardous situation could result in injuries.
Follow the instructions in this warning notice to prevent injuries.
CAUTION
A warning at this hazard level indicates a risk of property damage.
Failure to avoid this situation could result in property damage.
Follow the instructions in this warning notice to prevent property damage.
NOTE
A note provides additional information which makes handling the appliance easier for you.
Safety
This section contains important safety instructions for handling the device. This appliance complies with the statutory safety regulations. Improper use may result in personal injury or damage to property.
Basic safety instructions
To ensure safe operation of the device, follow the safety guidelines set out below:
Check the appliance for visible external damage before use. Do not use an appliance that has been damaged or dropped.
- Do not use the appliance if the mains adapter or the connection cable are damaged.
This appliance may be used by children aged 8 years and above and by persons with limited physical, sensory or mental capabilities or lack of experience and knowledge, provided that they are under supervision or have been told how to use the appliance safely and are aware of the potential risks. Do not allow children to play with the appliance. Cleaning and user maintenance tasks may not be carried out by children unless they are supervised.
- Do not allow children to play with the packaging material! Keep all packaging materials away from children. There is a risk of suffocation!
Do not use the appliance to vacuum:
-water or other liquids;
-pointed objects or broken glass;
-
burning matches, smouldering ashes or cigarette butts;
-
chemical products, stone dust, plaster, cement or similar particles;
-
flammable and explosive substances or chemical and aggressive liquids.
Use the appliance and the mains adapter only in dry rooms.
Take special care when using the appliance on the stairs. There is a risk of falling!
- Do not change any accessories while the appliance is switched on.
The appliance should only be repaired by authorised specialists or the customer service department. Improper repairs can result in hazards for the user, and will also invalidate any warranty claim.
Defective components must always be replaced with original replacement parts. Compliance with the safety requirements can only be guaranteed if these replacement parts are used.
-
Never open the housing of the appliance. There are no parts inside the appliance which require user maintenance. The warranty will also be invalidated.
-
Do not make any unauthorised modifications or alterations to the appliance.
Use the appliance only with the supplied power adapter.
- Do not use the mains adapter with an extension cord, but connect the mains adapter directly to a power outlet.
Always unplug the mains adapter from the power outlet, do not pull on the power cord.
- Never touch the mains adapter or the appliance with wet hands.
To avoid damage caused by overheating, do not cover the mains adapter.
The mains socket being used must always be easily accessible, so that the mains adapter can be quickly disconnected from the socket in a dangerous situation.
Always unplug the mains adapter from the power outlet before cleaning and when not in use.
- Protect the appliance from moisture, spray and dripping water, and penetration by liquids. There is a risk of electric shock!
- Never immerse the appliance or the mains adapter in water or use the appliance outdoors. There is a risk of electric shock!
If you notice any unusual noises, a burning smell or smoke coming from the appliance, switch off the appliance immediately and unplug the mains adapter from the power outlet. Have the appliance and mains adapter checked by a qualified technician before using them again.
ct is equipped with a lithium-ion battery. Incorrect handling can lead to fire, explosions, leakage of dangerous substances or other hazards!
Do not throw the appliance into an open fire.
- Do not expose the appliance to direct sunlight or high temperatures. Otherwise it may overheat and be irreparably damaged.
- Do not use the mains adapter for a different product and do not attempt to charge this appliance with a different charger. Use only the mains adapter supplied with this appliance.
Never attempt to recharge non-rechargeable batteries.
The batteries in this appliance cannot be replaced.
Use the main adapter only to charge batteries of type 18650 2200 mAh 36 V containing 10 cells and a rated capacity of 2200 mAh.
Package contents
(See fold-out page for illustrations)
Remove all parts and the operating instructions from the box.
Remove all packaging material.
The following components are included in the delivery:
- Cordless vacuum cleaner motor unit
- Mains adapter
- Long handle
- Short handle
- Floor nozzle
- Upholstery nozzle
- Crevice tool
Suction hose
- Carrying strap
- Operating instructions
NOTE
Check the package for completeness and signs of visible damage.
If the delivery is incomplete or damage has occurred as a result of defective packaging or during transport, contact the service hotline (see section Service).
Operating components
(See fold-out page for illustrations)
On/Off switch, long handle ①
Long handle
3 Release button, long handle
4 Connecting socket
Strap attachment
On/Off switch, motor unit ①
Indicator lamp
Motor unit
9 Dirt container release lever
Dirt container
10 Strap attachment
12 Motor unit release button
Hose release buttons
Floor nozzle
15 Cover plate
Release switch for rotary brush
Rotary brush
18 LED light
Coarse filter
HEPA filter (H13)
Upholstery nozzle
2 Crevice tool
Suction hose
24 Suction hose adapter
25 Short handle
Release button, short handle
Carrying strap
20 Barrel plug, mains adapter
23 Mains adapter
Initial operation
Before first use
Remove all packaging materials and protective stickers from the appliance.
NOTE
The appliance battery is not charged on delivery. Charge the battery before using the appliance for the first time. This can take up to 6 hours.
Assembling the appliance
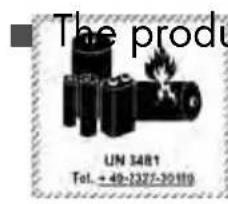
Carefully push the long handle onto the motor unit until it clicks into place (see fig. 1).
Insert the motor unit 8 into the floor nozzle 14 until you hear it click into place (see fig. 2).
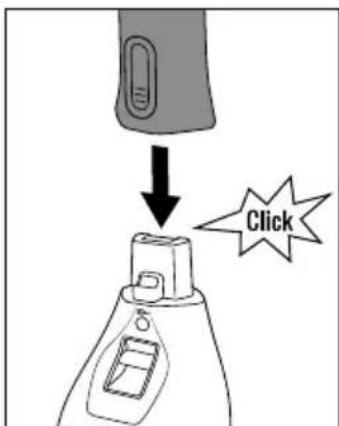
Fig. 1 Fig. 2
Charging the battery
NOTE
Ensure that the appliance is switched off before charging.
Plug the mains adapter 29 into a mains socket.
Insert the barrel plug 28 of the mains adapter 29 into the connecting socket D - 4 on the rear of the motor unit 8.
The indicator lamp ① lights up green. The charging process begins. When charging is complete, the indicator lamp ⑦ lights up green.
Battery status display
The indicator lamp 1 shows the charge status of the battery.
Charge level LED display
Battery fully charged
Medium residual charge
Low residual charge


NOTE
- When the battery is low, the last indicator lamp ⑦ starts flashing green.
When this happens, the appliance can still be operated for about 3 minutes.
- Once the battery is completely discharged, the last indicator lamp ⑦ flashes green five times, and the appliance switches off.
Operation
Using the appliance
CAUTION
The suction opening must always be open and must not be blocked. Blockages lead to overheating and damage to the motor.
- Do not vacuum shag pile carpets with the floor nozzle 14. The rotary brush 17 can become tangled in the carpet and jam.
NOTE
Make sure that the HEPA filter 20 and the coarse filter 19 are always inserted before using the appliance.
As soon as the suction power noticeably decreases and the last indicator lamp ⑦ flashes green, connect the appliance to the mains adapter ⑨.
Slide the On/Off switch ① to the required level (see section Adjusting the suction power). The indicator lamp ⑦ lights up green, the LED light ⑧ on the floor nozzle ⑩ lights up and the rotary brush ⑰ starts turning.
Move the floor nozzle 14 over the areas to be vacuumed. Hold the handle 2 so that the floor nozzle 14 slides flat over the floor.
Slide the On/Off switch ① to position 0 when you want to stop vacuuming. The rotary brush ⑦ stops, the indicator lamp ⑦ and the LED light ⑧ go off.
Adjusting the suction power
Level 1
This level is suitable for simple cleaning work. The operating noise level is low. The appliance will achieve the maximum runtime.
Level 2
This level is suitable for normal cleaning work. The appliance will achieve a medium runtime.
Level 3
This level is suitable for demanding cleaning work. The appliance will achieve the shortest runtime.
NOTE
Always vacuum at level 3 when using additional accessories in order to achieve optimum vacuuming results.
Using the appliance with additional accessories
NOTE
Always vacuum at level 3 when using additional accessories in order to achieve optimum vacuuming results.
To use the additional accessories, you must fit the short handle 25, the carrying strap 27 and the suction hose 23.
Press the release button 3 and carefully pull the long handle 2 from the motor unit 8 (see fig. 3).
Carefully push the short handle onto the motor unit until it clicks into place (see fig. 4).
Feed the carrying strap 27 through the strap attachments 5/11 on the rear of the motor unit 8 and close the Velcro fasteners (see figs. 5 and 6).
Press the release button 12 and carefully pull the floor nozzle 14 from the motor unit 8 (see fig. 7).
Push the suction hose adapter 24 into the motor unit 8 until it clicks into place (see fig. 8).
You can vacuum with either the suction hose 23, the upholstery nozzle 21 or the crevice tool 22.
Use the suction hose to suck up larger dirt particles (see fig. 9).
Push the upholstery nozzle ② onto the suction hose ③ to vacuum upholstery or curtains, for example (see fig. 10).
Push the crevice tool onto the suction hose, to vacuum areas such as corners or grouting (see fig. 11).
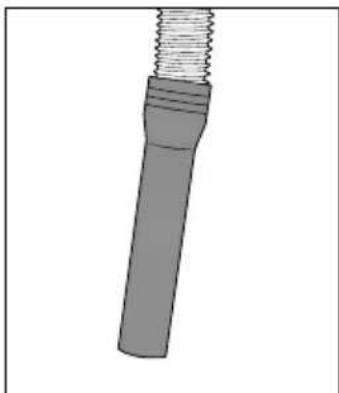
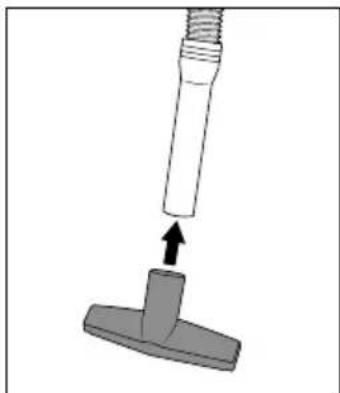

Fig. 9 Fig. 10 Fig. 11
NOTE
Recommendation for use
We recommend that you place the carrying strap over your head onto one shoulder (see fig. 12).
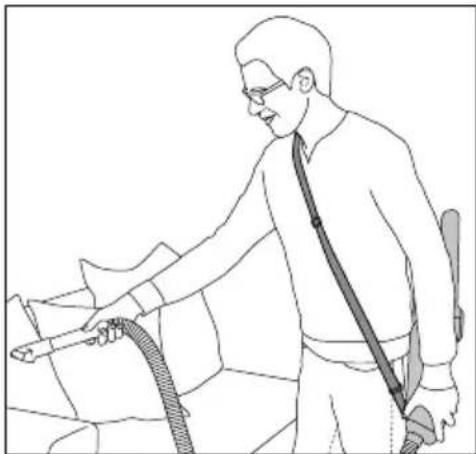
Fig. 12
Troubleshooting
The following table will help you to identify and rectify minor malfunctions:
| Fault Possible cause Remedy |
| The appliance is not working. | The battery is not charged. | Connect the appliance to the mains adapter 29. |
| The appliance is defective. | Contact the Customer Service department. |
| The appliance is sucking up hardly any dirt. | The battery is not sufficiently charged. | Connect the appliance to the mains adapter 29. |
| The dirt container 10 is full. Empty the dirt container 10. |
| The HEPA filter 20 is clogged. | Clean the HEPA filter 20. |
| The appliance will not charge. | The mains adapter 29 is not inserted correctly into the connecting socket =D- 4/ the mains socket. | Check the connections of the mains adapter 29. |
| The mains adapter 29 is defective. | Contact the Customer Service department. |
| The appliance will not charge and all indicator lamps 7 are flashing green. | The appliance has been charged too many times in quick succession. The overheat protection has been triggered. | Disconnect the mains adapter 29 from the mains socket. Pull the barrel plug 28 out of the connecting socket =D- 4 of the appliance. Wait a short while and try again. |
NOTE
If you cannot solve the problem with the above-mentioned steps, please contact the Service Hotline (see section Service).
Cleaning and maintenance

WARNING
Always disconnect the mains adapter 29 from the mains socket. Pull the barrel plug 28 out of the connecting socket D-4 of the appliance.
CAUTION
- Do not use abrasive or aggressive cleaning materials. These can damage the surface of the appliance!
NOTE
The LED light is maintenance-free. The LEDs cannot be replaced!
Emptying the dirt container and cleaning the filter
NOTE
For the best vacuuming results, empty the dirt container 10 and clean the HEPA filter 20 at regular intervals.
Lift the release lever 9 and pull the dirt container 10 forwards off the appliance (see fig. 13) at the same time.
First remove the HEPA filter 20 and then the coarse filter 19 from the dirt container 10 (see fig. 14). Tap out both parts over a waste bin or similar. If necessary, you can rinse the HEPA filter 20 in fresh water. Afterwards, let it dry out completely.
Empty the dirt container 10 over a dustbin or similar.
First insert the coarse filter 19 and then the dry HEPA filter 20 into the dirt container 10.
Push the dirt container 10 into the motor unit 8 until it clicks into place (see fig. 15).
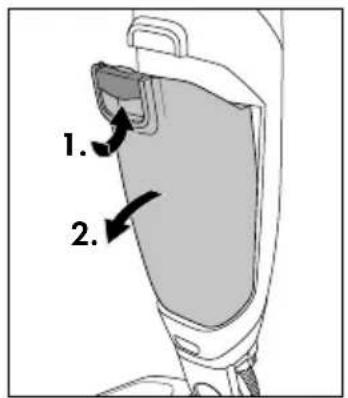
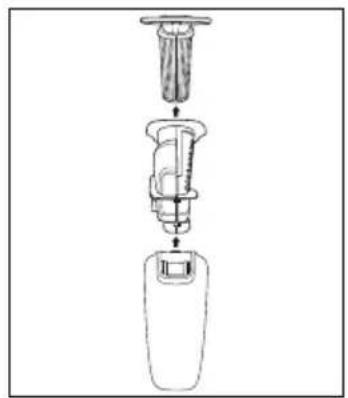
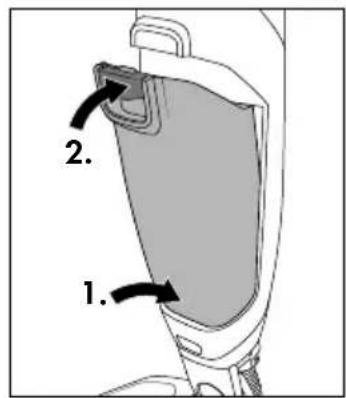
Fig. 13 Fig. 14 Fig. 15
Cleaning the appliance
Wipe the appliance with a damp cloth. For stubborn dirt, add a mild detergent to the cloth. Ensure that the appliance is completely dry before using it again.
Cleaning the rotary brush
The rotary brush 17 should be checked regularly for blockages and any hair, threads or dirt should be removed. To do this, remove the rotary brush 17 (see fig. 16):
Turn the floor nozzle 14 over.
Slide the release switch 16 of the rotary brush 17 towards the symbol so that you can remove the cover plate 15.
Lift out the rotary brush 17.
Use scissors to remove any hair and threads from the rotary brush 17.
To replace the rotary brush, push the wide end onto the drive shaft first. Then push the other end into the socket so that the rotary brush lies straight in the floor nozzle.
Replace the cover plate 15 and lock it by sliding the release switch 16 in the direction of the 品 symbol.
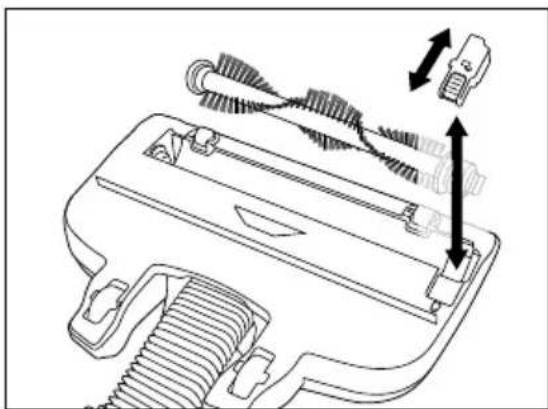
Fig. 16
Cleaning the hose section
If the short piece of hose on the floor nozzle 14 is blocked, you can unblock it as follows:
Press the two release buttons 13 on the hose section together and pull off the hose section (see fig. 17).
Remove any foreign bodies from the hose section.
Slide the hose section over the fitting so that the release buttons 13 engage (see fig. 18).
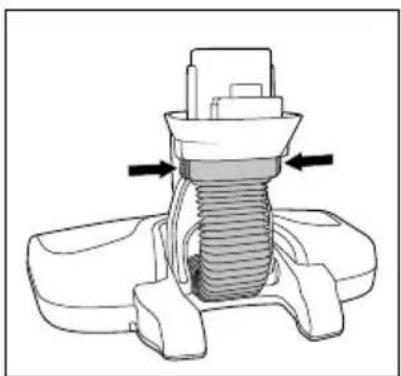
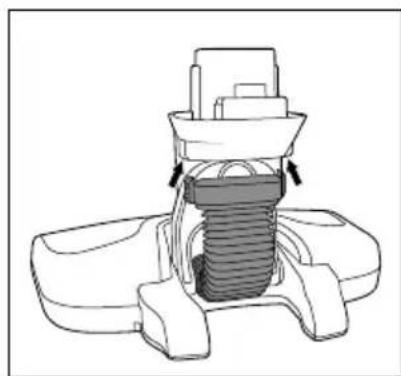
Fig. 17 Fig. 18
Storage
Store the appliance in a clean, dry location away from direct sunlight.
If the appliance is not being used for a long period, the battery charge must be topped up at regular intervals. This is necessary to prolong the life of the battery.
Disposal
Disposal of the appliance
The adjacent symbol of a crossed-out wheelie bin means that this appliance is subject to Directive 2012/19/EU. This directive states that this appliance may not be disposed of in the normal household waste at the end of its useful life, but must be taken to a specially set-up collection point, recycling depot or disposal company. The built-in battery in this appliance cannot be removed for disposal.
This disposal is free of charge for the user. Protect the environment and dispose of this appliance properly.

Your local community or municipal authorities can provide information on how to dispose of the product.

The product is recyclable, subject to extended producer responsibility and is collected separately.
Disposal of the packaging
The packaging materials have been selected for their environmental friendliness and ease of disposal and are therefore recyclable. Dispos of packaging materials that are no longer needed in accordance with the applicable local regulations.
Dispose of the packaging in an environmentally friendly manner.
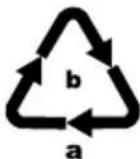
Note the labelling on the packaging materials and separate the packaging materials for disposal if necessary. The packaging materials are labelled with abbreviations (a) and numbers (b) with the following meanings:
1-7: plastics, 20-22: paper and cardboard, 80-98: composites.
Appendix
Technical specifications
| Mains adapter |
| Manufacturer | KOMPERNASS H. GMBH
BURGSTRASSE 21
44867 BOCHUM
GERMANY
Commercial register number:
HRB 4598 |
| Model SST 40 A1-1 | |
| Input voltage 100-240 V ~ (AC) | |
| Input AC frequency 50/60 Hz | |
| Output voltage 42.0 V | ---(DC) |
| Output current 0.4 A | |
| Output power 18.1 W | |
| Average operating efficiency 85.3 % | |
| Low load efficiency (10%) 83.2 % | |
| No-load power consumption 0.07 W | |
| Input current max. 0.5 A | |
| Protection class | II/□ (double insulation) |
| Polarity | (positive inside, negative outside) |
| Energy efficiency class | 6 VI |
| Short-circuit proof safety transformer | # |
| Switched-mode power supply | # |
| Motor unit |
| Input voltage 30 V | = (DC) |
| Nominal power 320 W | |
| Polarity | (positive inside, negative outside) |
| |
| Floor nozzle |
| Nominal power 10 W | |
| Polarity | (positive inside, negative outside) |
| |
| Battery |
| Lithium-ion battery 36 V | = (DC) / 2200 mAh |
| Cells 10 | |
Ordering replacement parts
You can order replacement parts for this product on the internet at www.kompernass.com.
Scan this QR code with your smartphone or tablet. You can use this QR code to navigate directly to our website (www.kompernass.com) where you can view and order the available spare parts.
NOTE
If you have problems with your online order, you can contact our customer service centre by phone or email (see section Service).
Please always quote the article number (IAN) 329834_1907. You can find it on the title page of these operating instructions.
- Please note that online ordering of replacement parts is not possible for all countries.
This appliance has a 3-year warranty valid from the date of purchase. If this product has any faults, you, the buyer, have certain statutory rights. Your statutory rights are not restricted in any way by the warranty described below.
Warranty conditions
The warranty period starts on the date of purchase. Please keep your receipt in a safe place. This will be required as proof of purchase.
If any material or manufacturing fault occurs within three years of the date of purchase of the product, we will either repair or replace the product for you or refund the purchase price (at our discretion). This warranty service requires that you present the defective appliance and the proof of purchase (receipt) within the three-year warranty period, along with a brief written description of the fault and of when it occurred.
If the defect is covered by the warranty, your product will either be repaired or replaced by us. The repair or replacement of a product does not signify the beginning of a new warranty period.
Warranty period and statutory claims for defects
The warranty period is not prolonged by repairs effected under the warranty. This also applies to replaced and repaired components. Any damage and defects present at the time of purchase must be reported immediately after unpacking. Repairs carried out after expiry of the warranty period shall be subject to a fee.
Scope of the warranty
This appliance has been manufactured in accordance with strict quality guidelines and inspected meticulously prior to delivery.
The warranty covers material faults or production faults. The warranty does not extend to product parts subject to normal wear and tear or to fragile parts which could be considered as consumable parts such as switches, batteries or parts made of glass.
The warranty does not apply if the product has been damaged, improperly used or improperly maintained. The directions in the operating instructions for the product regarding proper use of the product are to be strictly followed. Uses and actions that are discouraged in the operating instructions or which are warned against must be avoided.
This product is intended solely for private use and not for commercial purposes. The warranty shall be deemed void in cases of misuse or improper handling, use of force and modifications / repairs which have not been carried out by one of our authorised Service centres.
Warranty claim procedure
To ensure quick processing of your case, please observe the following instructions:
Please have the till receipt and the item number (IAN) 329834_1907 available as proof of purchase.
■ You will find the item number on the type plate on the product, an engraving on the product, on the front page of the operating instructions (below left) or on the sticker on the rear or bottom of the product.
If functional or other defects occur, please contact the service department listed either by telephone or by e-mail.
■ You can return a defective product to us free of charge to the service address that will be provided to you. Ensure that you enclose the proof of purchase (till receipt) and information about what the defect is and when it occurred.
You can download these instructions along with many other manuals, product videos and installation software at www.lidl-service.com.
This QR code will take you directly to the Lidl service page (www.lidl-service.com) where you can open your operating instructions by entering the item number (IAN) 329834_1907.
Service
GB Service Great Britain
Tel.: 0800 404 7657
E-Mail: kompernass@lidl.co.uk
IE Servicelreland
Tel.: 1890 930 034
(0,08 EUR/Min., (peak))
(0,06 EUR/ Min., (off peak))
E-Mail: kompernass@lidl.ie
IAN 329834 1907
Importer
Please note that the following address is not the service address. Please use the service address provided in the operating instructions.
KOMPERNASS HANDELS GMBH
BURGSTRASSE 21
44867 BOCHUM
GERMANY
www.kompernass.com
Inhaltsverzeichnis
Einführung 24
KOMPERNASS HANDELS GMBH
BURGSTRASSE 21
44867 BOCHUM
DEUTSCHLAND
www.kompernass.com
Table des matieres
Introduction 46
Chere cliente, cher client,
Chere cliente, cher client,
KOMPERNASS HANDELS GMBH
BURGSTRASSE 21
44867 BOCHUM
ALLEMAGNE
www.kompernass.com
Inhoud
Inleiding 70
KOMPERNASS HANDELS GMBH
BURGSTRASSE 21
44867 BOCHUM
DUITSLAND
www.kompernass.com
Obsah
Uvod 92
Informace k tomuto navodu k obsluze 92
Autorske pravo 92
Pouziti v souladu s urcenim 92
KOMPERNASS HANDELS GMBH
BURGSTRASSE 21
44867 BOCHUM
NEMECKO
www.kompernass.com
Spis tresci
Wstep. 114
KOMPERNASS HANDELS GMBH
BURGSTRASSE 21
44867 BOCHUM
NIEMCY
www.kompernass.com
Obsah
Uvod 136
KOMPERNASS HANDELS GMBH
BURGSTRASSE 21
44867 BOCHUM
NEMECKO
www.kompernass.com
Índice
Introduccion 158
Characteristicas techniques
KOMPERNASS HANDELS GMBH
BURGSTRASSE 21
44867 BOCHUM
ALEMANIA
www.kompernass.com
Indholdsfortegnelse
Indledning 180
KOMPERNASS HANDELS GMBH
BURGSTRASSE 21
44867 BOCHUM
TYSKLAND
www.kompernass.com

KOMPERNASS HANDELS GMBH
BURGSTRASSE 21
44867 BOCHUM
GERMANY
www.kompernass.com
Last Information Update · Stand der Informationen · Version des informations · Stand van de informatie
Stav informaci · Stan informaci · Stav informaci · Estado de las informaciones · Tilstand of information:
09/2021·Ident.-No.:SST40A1-122019-3
IAN 329834_1907