M6 - DJ Equipment NUMARK - Free user manual and instructions
Find the device manual for free M6 NUMARK in PDF.
| Product type | DJ Mixer |
| Brand | Numark |
| Model | M6 USB |
| Power supply | AC mains, 100-120 V / 220-240 V (selectable) |
| Number of channels | 4 line/phono channels + 2 microphone inputs |
| Equalization | 3 bands per channel (Treble, Mid, Bass) |
| Crossfader | Yes, with slope adjustment (CF Slope) and user-replaceable |
| Line inputs | 4 RCA pairs (CH1-4) |
| Phono inputs | 2 RCA pairs (CH1 and CH2) with ground terminal |
| Microphone inputs | 1 x XLR (MIC1) and 1 x 1/4" (MIC2) |
| Outputs | Master (balanced XLR + RCA), Booth (RCA), Record (RCA) |
| USB interface | Native USB sound card (recording and playback) |
| Headphone output | 1/4" jack with Cue Gain, Cue Mix/Split controls |
| Talkover function | Yes, automatic -12 dB reduction on channels 1-4 |
| Level indicators | LED per channel and stereo for master |
| Included accessories | Power cable, USB cable, quick start guide, safety/warranty booklet |
| Software compatibility | Audio software supporting USB devices (ASIO4ALL recommended for low latency) |
| System requirements | Windows XP/Vista/7, Mac OS X (no driver needed) |
| Maintenance | Clean with a dry, non-abrasive cloth |
| Safety | Read safety booklet before use; follow power on/off sequence |
| Spare parts | User-replaceable crossfader (contact a Numark dealer) |
Frequently Asked Questions - M6 NUMARK
User questions about M6 NUMARK
0 question about this device. Answer the ones you know or ask your own.
Ask a new question about this device
Download the instructions for your DJ Equipment in PDF format for free! Find your manual M6 - NUMARK and take your electronic device back in hand. On this page are published all the documents necessary for the use of your device. M6 by NUMARK.
USER MANUAL M6 NUMARK
Please go to http://www.numark.com to register your M6 USB. Registering your product ensures that we can keep you up-to-date with any new product developments and provide you with world-class technical support, should you run into any problems.
GROUND RULES
- Make sure all items listed in the BOX CONTENTS section are included in the box.
- READ SAFETY & WARRANTY INFORMATION BOOKLET BEFORE USING THE PRODUCT.
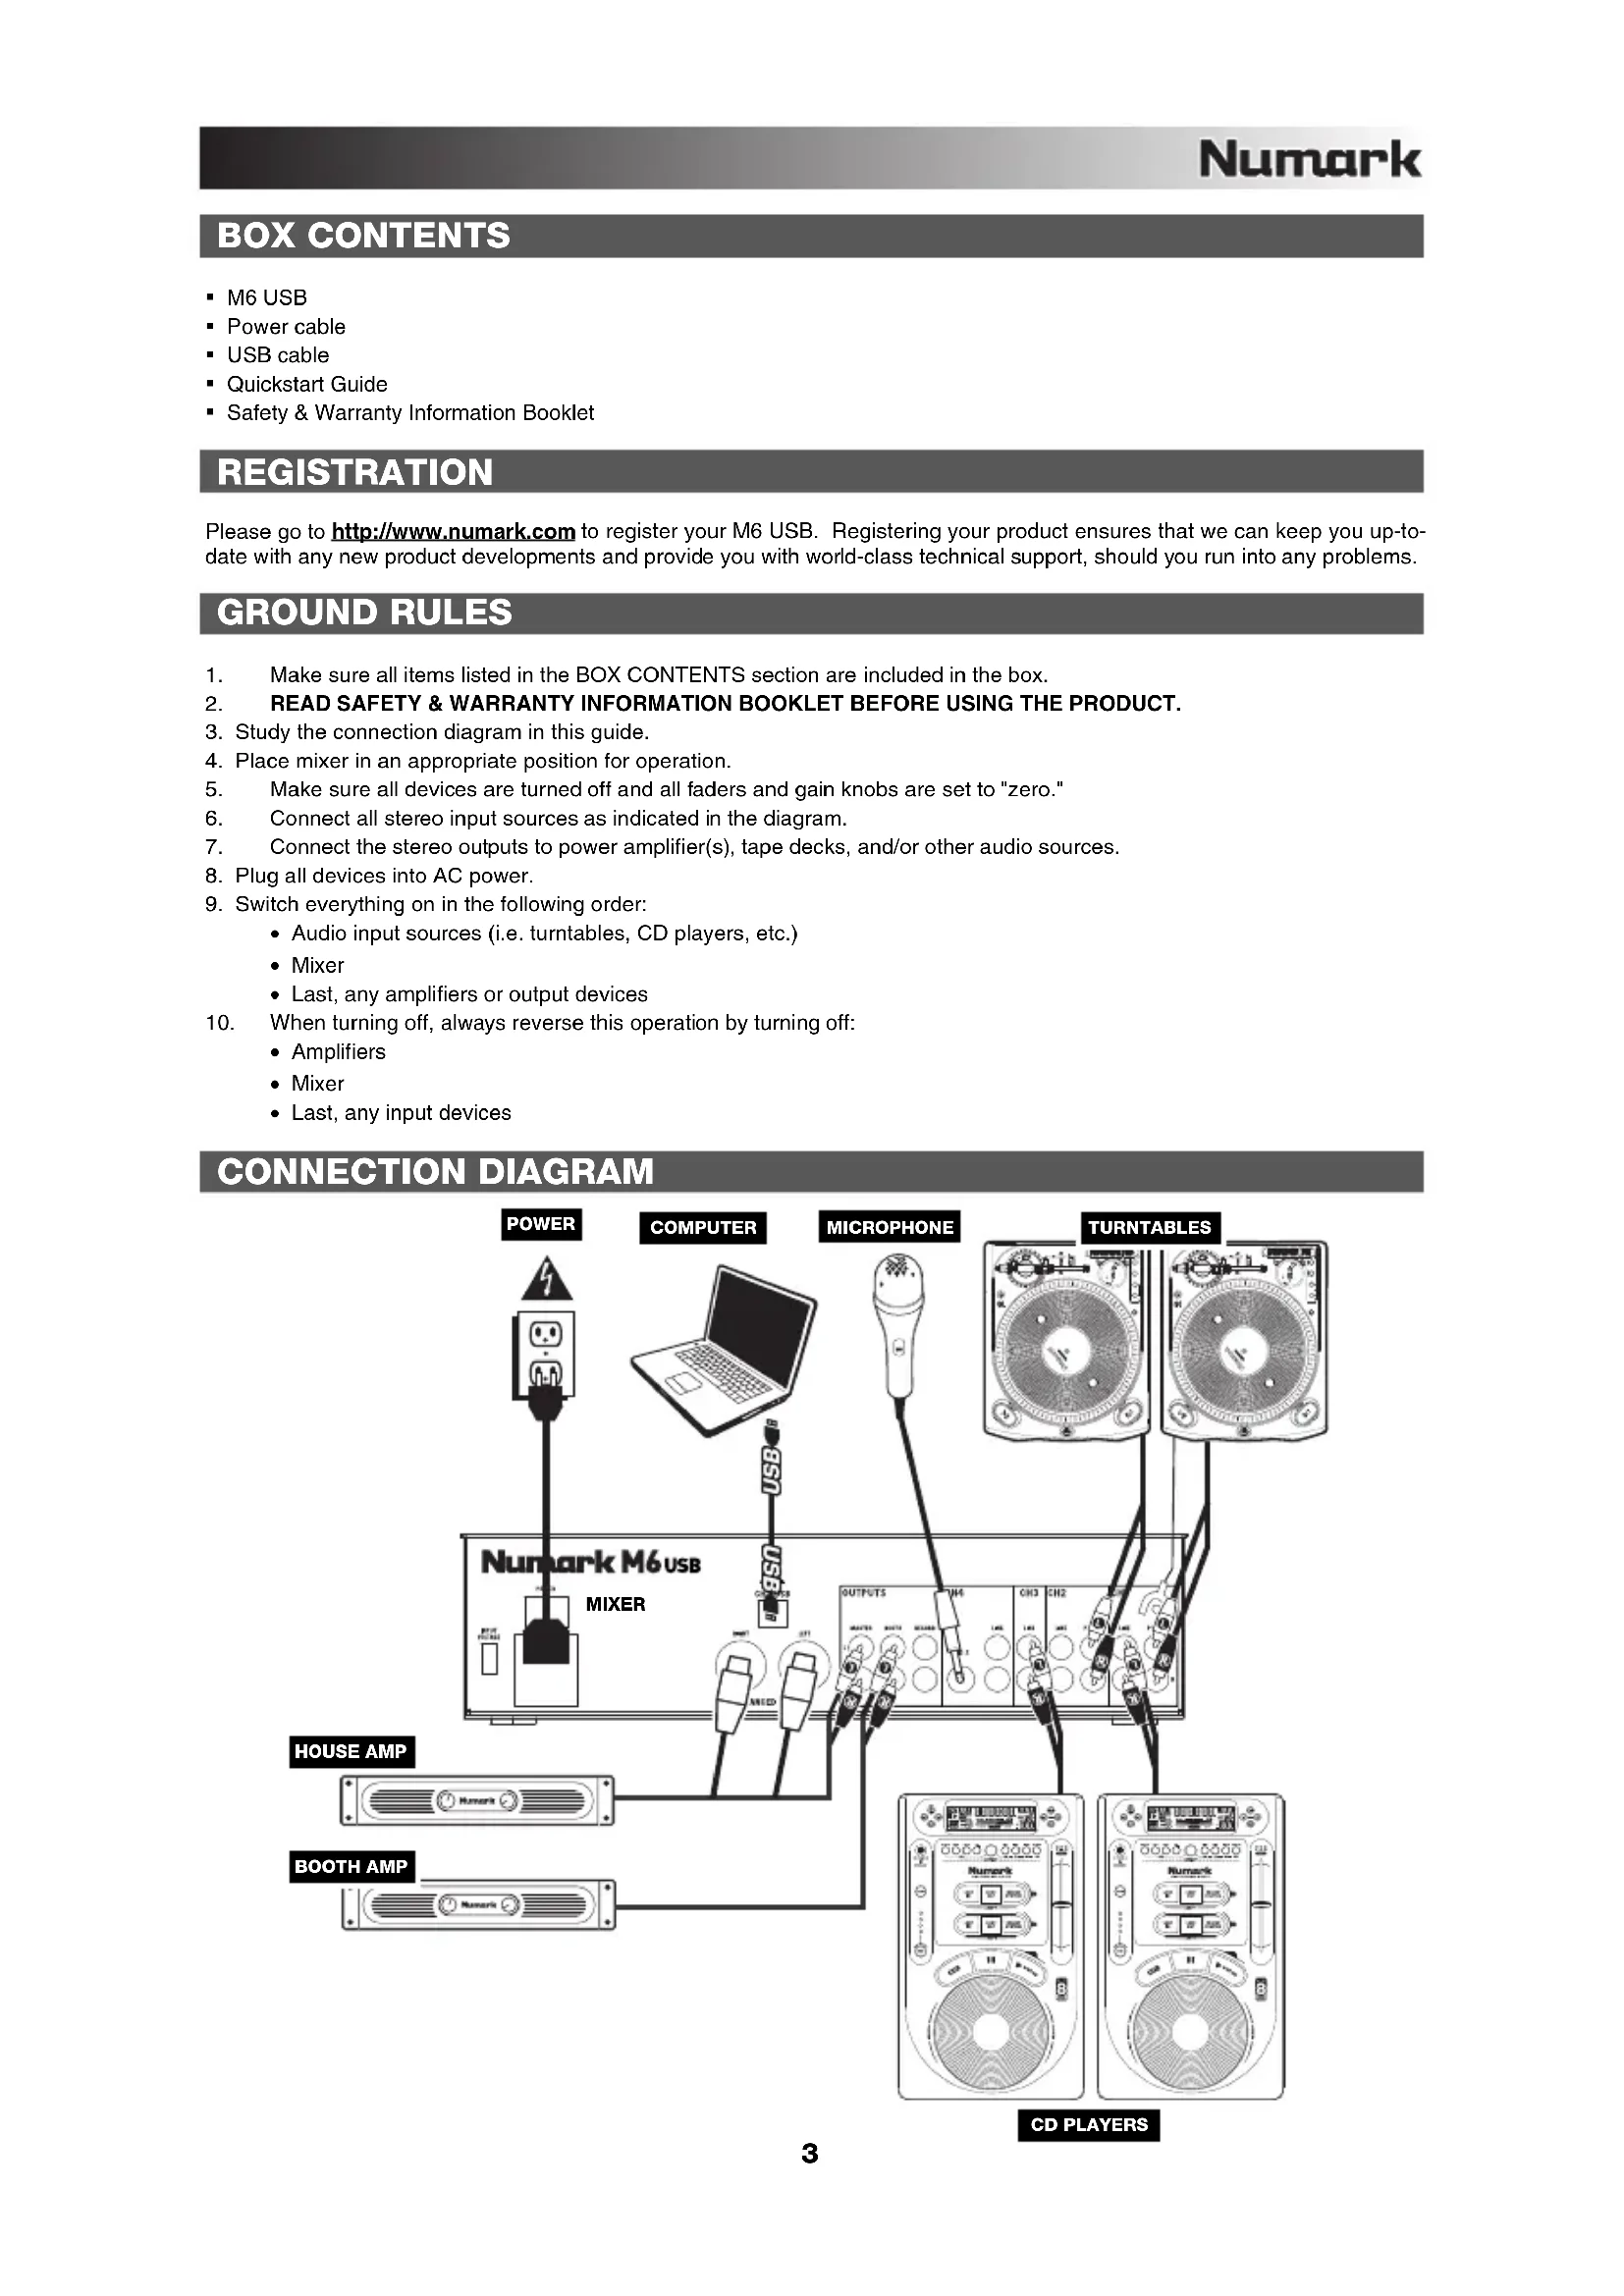
- Study the connection diagram in this guide.
- Place mixer in an appropriate position for operation.
- Make sure all devices are turned off and all faders and gain knobs are set to "zero."
- Connect all stereo input sources as indicated in the diagram.
- Connect the stereo outputs to power amplifier(s), tape decks, and/or other audio sources.
- Plug all devices into AC power.
- Switch everything on in the following order:
• Audio input sources (i.e. turntables, CD players, etc.) - Mixer
- Last, any amplifiers or output devices
- When turning off, always reverse this operation by turning off:
- Amplifiers
- Mixer
- Last, any input devices
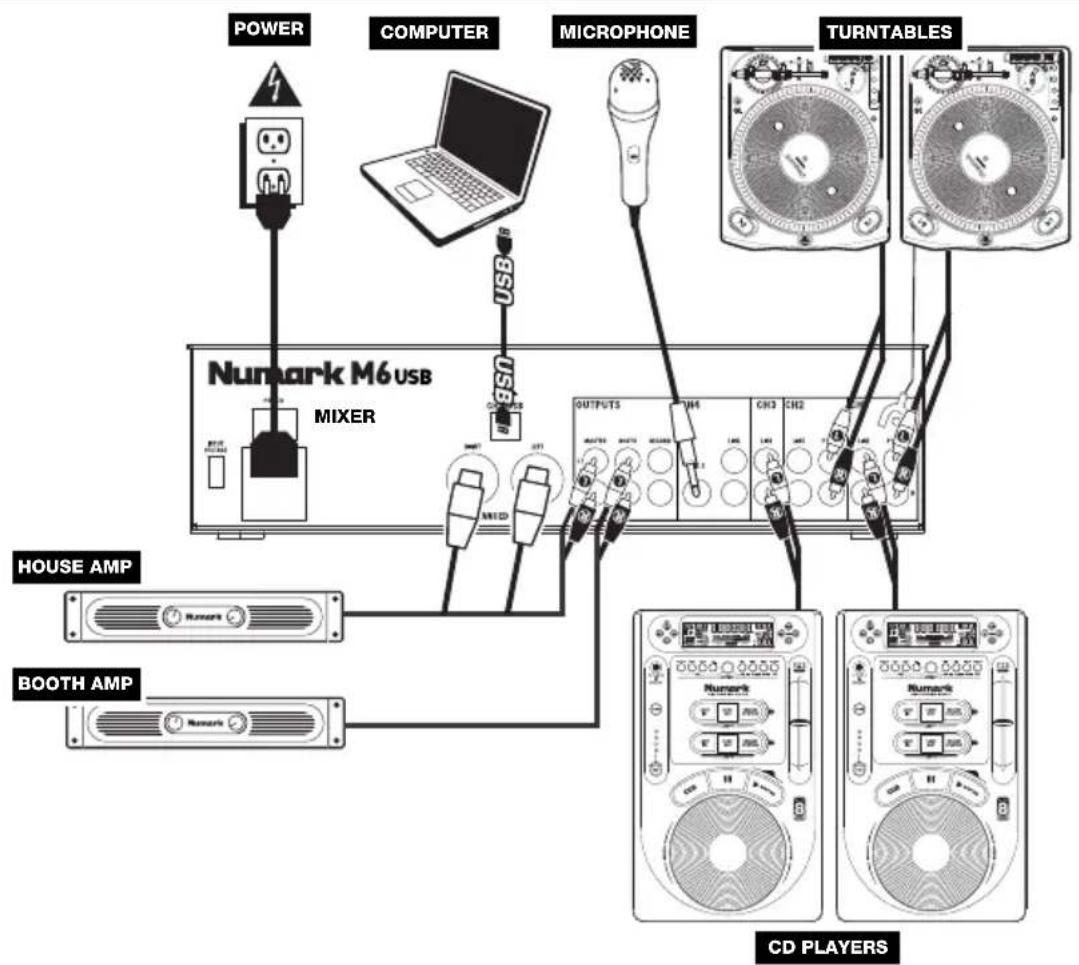
CONNECTION DIAGRAM
flowchart
graph TD
    A["Power"] --> B["MCPUER"]
    B --> C["MICROPHONE"]
    C --> D["TURNTABLES"]
    D --> E["CD PLAYERS"]
    F["HOUSE AMP"] --> G["BOOTH AMP"]
    H["NUMARK M6 USB MIXER"] --> I["OUTPUTS CH3 CH2"]
    I --> J["NUMARK RUMARK"]
    K["USB"] --> L["NUMARK RUMARK"]
    M["USB"] --> N["NUMARK RUMARK"]
REAR PANEL FEATURES

text_image
Numark M6USB POWER 3 INPUT VOLTAGE 2 1 CH3 USB 7 RIGHT 9 LEFT BALANCED OUTPUT OUTPUTS MASTER 10 11 12 R CH4 MKS 2 8 LINE 6 CH3 LINE 6 CH2 LINE 6 FUND3 5 CH1 4 LINE 6 FUND3 5 R- POWER IN – Use the included power adapter to connect the mixer to a power outlet. While the power is switched off, plug the power supply into the mixer first, then plug the power supply into a power outlet.
- VOLTAGE SELECTOR – This 2-position switch sets the AC input voltage for the speaker. U.S. users should set this switch to "100-120V" whereas U.K. and most European users will need to set this to "220-240V".
- POWER SWITCH – Turns the mixer on and off. Turn on the mixer after all input devices have been connected and before you turn on amplifiers. Turn off amplifiers before you turn off the mixer.
- GROUNDING TERMINAL – If using phono-level turntables with a grounding wire, connect the grounding wire to these terminals. If you experience a low "hum" or "buzz", this could mean that your turntables are not grounded.
Note: Some turntables have a grounding wire built into the RCA connection and, therefore, nothing needs to be connected to the grounding terminal. - PHONO INPUTS (RCA) – Connect phono-level devices, such as turntables, to these inputs.
- LINE INPUTS (RCA) – Connect line-level devices, such as CD players, samplers or audio interfaces, to these inputs.
- CH3 USB – Outputs the Record mix to your computer for recording purposes or sends incoming audio from your computer to mixer's Channel 3.
- MIC 2 INPUT – If you would like to use an additional 1/4" microphone on Channel 4, connect it to this input. To route the microphone signal to the mix, you will need to flip the Channel 4 Input Selector switch, located on the top panel, to "Mic".
- MASTER OUTPUT (BALANCED XLR) - Connect this low-impedance XLR output to a speaker or amplifier system. The level of this output is controlled with the MASTER FADER on the top panel.
- MASTER OUTPUT (RCA) – Use standard RCA cables to connect this output to a speaker or amplifier system. The level of this output is controlled by the MASTER FADER on the top panel.
- BOOTH OUTPUT (RCA) - Use standard RCA cables to connect this output to a booth monitoring system. The level of this output is controlled by the Booth knob on the top panel.
- RECORD OUTPUT (RCA) – Use standard RCA cables to connect this output to a recording device, such as a CD recorder or tape deck. The level of this output is based upon pre-master levels.
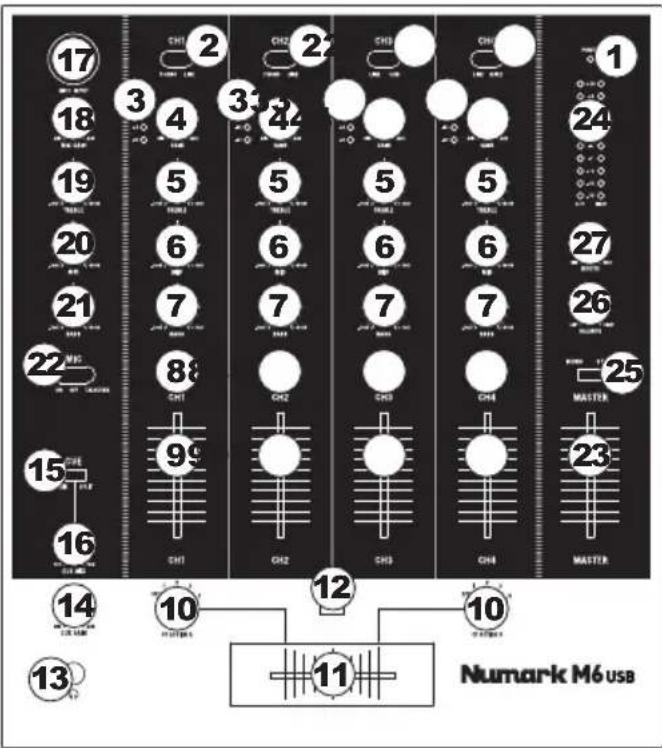
TOP PANEL FEATURES
-
POWER LED - Illuminates when the mixer is on.
-
INPUT SELECTOR - Selects the input source to be routed to the corresponding channel. Input jacks are located on the rear panel.
-
CHANNEL LEVEL INDICATOR - Displays the audio level of the corresponding channel.
-
CHANNEL GAIN – Adjusts the channel's pre-fader and pre-EQ gain level.
-
CHANNEL TREBLE - Adjusts the high (treble) frequencies of the corresponding channel.
-
CHANNEL MID – Adjusts the mid-range frequencies of the corresponding channel.
-
CHANNEL BASS - Adjusts the low (bass) frequencies of the corresponding channel.
-
CHANNEL CUE – Sends pre-fader audio to the Cue Channel for headphone monitoring.
-
CHANNEL FADER – Adjusts the audio level on the corresponding channel.
text_image
17 18 19 20 21 22 23 24 25 26 27 28 29 30 31 32 33 34 35 36 37 38 39 40 41 42 43 44 45 46 47 48 49 50 51 52 53 54 55 56 57 58 59 60 61 62 63 64 65 66 67 68 69 70 71 72 73 74 75 76 77 78 79 80 81 82 83 84 85 86 87 88 89 90 91 92 93 94 95 96 97 98 99 100 101 102 103 104 105 106 107 108 109 110 111 Numark M6 USB-
CF ASSIGN - Selects which input channel will be heard when the crossfader is moved towards this knob. All channels not assigned will remain active.
-
CROSSFADER - Blends audio between the channels assigned to the left and right side of the crossfader.
Note: The crossfader is user-replaceable if it should ever wear out. Simply remove the facepanel, then remove the screws holding it in position. Replace the fader with a quality authorized replacement from your local Numark retailer only.
-
CF SLOPE - Adjusts the slope of the crossfader curve. Flip switch to the left for a smooth fade (mixing) or to the right for a sharp cut (scratching).
-
HEADPHONES – Connect your 1/4" headphones to this output for cueing and mix monitoring.
-
CUE GAIN – Adjusts the audio level of the Cue channel.
-
CUE MIX / SPLIT – When this switch is in the SPLIT position, the headphone audio will be "split" such that all channels sent to CUE are mixed to mono and applied to the left headphone channel and the Program mix is mixed to mono and applied to the right channel. When the switch is in the MIX position, Cue and Program audio will be "blended" together.
-
CUE MIX – Turn to mix between Cue and Program in the Headphone channel. When all the way to the left, only channels routed to CUE will be heard. When all the way right, only the Program mix will be heard.
-
MIC 1 INPUT - Connect a microphone to this input with an XLR cable.
-
MIC GAIN – Adjusts the audio level of the microphone signal.
-
MIC TREBLE – Adjusts the high (treble) frequencies of the microphone channel.
Tip: If you experience feedback when using a microphone at loud levels, try turning down the high frequencies.
-
MIC MID – Adjusts the mid-range frequencies of the microphone channel.
-
MIC BASS – Adjusts the low (bass) frequencies of the microphone channel.
-
MIC ON / OFF - Turns the microphone input on or off. "TALKOVER" reduces the combined levels of Channels 1-4 to -12dB (an appropriate "talkover" level).
-
MASTER FADER – Adjusts the output volume of the Program mix.
-
STEREO LEVEL INDICATOR – Displays the audio level of the Program mix.
-
MONO / STEREO – Adjusts the Program mix for stereo or mono operation.
-
BALANCE – Adjusts the balance of right to left audio in all outputs (MASTER, RECORD, and ZONE OUTPUTS).
-
BOOTH VOLUME – Adjusts the Booth output level.
USB OPERATION
The M6 USB is equipped with a USB port which allows you to play content from your computer through the mixer, or record audio from the mixer directly into your favorite software application. The USB interface on your mixer works with your computer just like a standard USB sound card. In addition, the USB interface is class-compliant, so there are no special drivers or software to install; simply connect a USB cable from the USB port to your computer and you are ready to go!
AUDIO SETUP
The M6 USB is a class-compliant device that can be used with any digital audio workstation or recording software that supports USB audio. To enable your M6 USB to send and receive audio to and from your computer, follow the instructions below for your computer's operating system:
WINDOWS 7:
- Use the included cable to connect the M6 USB to your computer.
- Go to Start Menu ▶ Control Panel ▶ Hardware and Sound ▶ Sound.
- Click the Playback tab and select USB Audio Codec* as the default device.
- Click the Recording tab and select USB Audio Codec* as the default device.
- Click Properties in the lower right-hand corner.
- In the new window, click the Advanced tab and select 2-channel, 16-bit, 44100 Hz (CD Quality) as the default format.
- Uncheck both boxes under Exclusive Mode.
- Click the Levels tab and set the slider to "4."
- Click OK to close the Properties window.
- Click OK to close the Sound control panel.
Be sure your audio software program is set up to receive audio via the M6 USB. This can usually be done in your software's "Preferences" or "Device Setup." Please consult your software manual for more information.
* If you have other USB audio devices connected to your computer, which may have identical names, you may need to try selecting each one until the M6 USB is recognized.
If you experience too much latency after adjusting your software latency settings, we recommend the free ASIO4ALL (Audio Stream Input/Output) driver for PC at www.asio4all.com. ASIO drivers generally perform better and with lower latency since they create a more efficient communication between audio devices and software.
WINDOWS VISTA:
- Use the included cable to connect the M6 USB to your computer.
- Click Properties in the lower right-hand corner.
- Uncheck both boxes under Exclusive Mode.
- Click OK to close the Properties window.
-
Click OK to close the Sound control panel.
-
Go to Start Menu ▶ Control Panel ▶ Sound. (If you don't see Sound, select Switch to Classic View, and the Sound Control Panel should become available.)
-
Click the Playback tab and select USB Audio Codec* as the default device.
-
Click the Recording tab and select USB Audio Codec* as the default device.
-
In the new window, click the Advanced tab and select 2-channel, 16-bit, 44100 Hz (CD Quality) as the default format.
WINDOWS XP:
- Use the included cable to connect the M6 USB to your computer.
- Go to Start Menu ▶ Control Panel ▶ Sounds and Audio Devices.
- Click the Audio tab.
- Under Sound Playback and Sound Recording, select USB Audio Codec* as the default device.
- Click OK.
MAC:
- Use the included cable to connect the M6 USB to your computer.
- Go to Applications ▶ Utilities ▶ Audio MIDI Setup.
- In the Audio Devices tab under System Settings, select USB Audio Codec* as your Default Input and Default Output.
- Close the window.
CONTENIDO DE LA CAJA
Headphone: 0.5 W into 47 Ω
DISTORTION: < 0.01%
SIGNAL-TO-NOISE RATIO (maximum output, JIS-A weighted):
Line: > 96 dB
Mic: > 94 dB
Phono: > 79 dB
FREQUENCY RESPONSE:
Line: 20 Hz - 20 kHz (± 0.5 dB)
Mic: 20Hz - 15KHz (± 0.5 dB)
Phono: ±1 dB (except for controlled attenuation of -3dB @ 20Hz to reduce rumble and feedback)
MICROPHONE TALKOVER: -15 dB
CHANNEL EQUALIZER:
Bass: +12/-32 dB @ 60 Hz
Middle: +12/-32 dB @ 1.2 kHz
Treble: +10/-28 dB @ 15 kHz
DJ MIC EQUALIZER:
Bass: ±12 dB @ 100 Hz
Middle: ±10 dB @ 1.2 kHz
Treble: +12 dB @ 15 kHz
POWER CONSUMPTION: 9.1 W typical
11.6 W with full headphone output
* Specifications are subject to change
www.numark.com