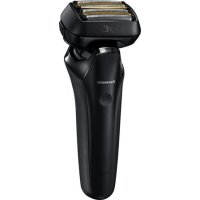
ESLS6A - Shaver PANASONIC - Free user manual and instructions
Find the device manual for free ESLS6A PANASONIC in PDF.



| Product type | Rechargeable shaver |
| Brand | Panasonic |
| Model | ES-LS6A |
| Power source | Rechargeable lithium-ion battery via AC adapter (RE7-87) |
| Motor voltage | 3.6 V |
| Charging time | Approximately 1 hour (quick charge possible in 3 minutes) |
| Runtime | Approximately 2 weeks (dry shave 3 min/day) |
| Usage | Dry or wet skin (with shaving gel), usable in the shower |
| Beard sensor | Automatically adjusts power according to beard thickness |
| Precision trimmer | Built-in, retractable |
| Pivoting head | Yes, with lock function |
| Cleaning mode | Sonic vibration mode (20 seconds) |
| Cleaning | With soapy water or with included brush |
| Lubrication | Dedicated oil (WES003P), apply after each cleaning |
| Foil replacement | Approximately every 18 months (ref. WES9600) |
| Spare parts | Protective foil (WES9600), oil (WES003P) |
| Safety | Waterproof, power button lock, automatic shut-off, overheat protection |
| Sound level | 64 dB (shaver), 65 dB (trimmer) |
| Use | Household use only |
| Included accessories | Travel case, brush, oil, AC adapter, warranty card |
Frequently Asked Questions - ESLS6A PANASONIC
User questions about ESLS6A PANASONIC
0 question about this device. Answer the ones you know or ask your own.
Ask a new question about this device
Download the instructions for your Shaver in PDF format for free! Find your manual ESLS6A - PANASONIC and take your electronic device back in hand. On this page are published all the documents necessary for the use of your device. ESLS6A by PANASONIC.
USER MANUAL ESLS6A PANASONIC
Operating Instructions
(Household use) Rechargeable Shaver
Model No. ES-LS6A
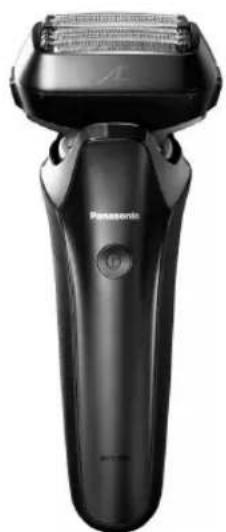
natural_image
Black Panasonic electric shaver with visible brand logo and control buttons (no text or symbols on body)CE
GB English....5 DK Dansk....125 CZ Česky....237
D Deutsch ..... 25 P Português.....143 SK Slovensky.....255
F Français....45 N Norsk .... 163 H Magyar....273
I Italiano....65 S Svenska....181 RO Română....293
NL Nederlands....85 FIN Suomi....199 TR Türkçe....313
E Español....105 PL Polski....217
A
Back
B
©

G F
Panasonic
Operating Instructions
(Household use) Rechargeable Shaver
Model No. ES-LS6A
Contents
Safety precautions...... 8
Important information....11
Parts identification....12
Preparation....13
How to use ....14
Cleaning the shaver 16
Replacing the system outer foil .....18
FAQ....18
Troubleshooting 19
Service....21
For environmental protection and recycling of materials ....22
Specifications 23
Thank you for purchasing this Panasonic product.
Before operating this unit, please read these instructions completely and save them for future use.
WARNING
- This appliance can be used by children aged from 8 years and above and persons with reduced physical, sensory or mental capabilities or lack of experience and knowledge if they have been given supervision or instruction concerning use of the appliance in a safe way and understand the hazards involved. Children shall not play with the appliance. Cleaning and user maintenance shall not be made by children without supervision.
- The supply cord cannot be replaced. If the cord is damaged, the AC adaptor should be scrapped.
- This WET/DRY shaver can be used for wet shaving using shaving lather or for dry shaving. You can use this watertight shaver in the shower and clean with water. The following symbol means suitable for use in a bath or shower.

- Do not use anything other than the supplied AC adaptor for any purpose. Also, do not use any other product with the supplied AC adaptor. (See page 12.)
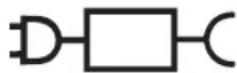
- The following symbol indicates that a specific detachable power supply unit is required for connecting the electrical appliance to the supply mains. The type reference of power supply unit is marked near the symbol.
Safety precautions
Make sure to follow these instructions.
To prevent accidents, injuries or damage to property, please follow the instructions below.
■ The following chart indicates the degree of damage caused by improper operation.
| ⚠️ DANGER | Indicates a potential hazard that will result in serious injury or death. |
| ⚠️ WARNING | Indicates a potential hazard that could result in serious injury or death. |
| ⚠️ CAUTION | Indicates a potential hazard that could result in minor injury or property damage. |
■ The symbols are classified and explained as follows.
| This symbol indicates prohibition. |
| This symbol indicates requirement that must be followed. |
WARNING
▶ This product
This product has a built-in rechargeable battery. Do not throw into fire, apply heat, or charge, use, or leave in a high temperature environment.
- Doing so may cause overheating, ignition, or explosion.

Do not modify or repair.

- Doing so may cause fire, electric shock, or injury.
Contact an authorized service centre for repair (replacement of battery etc).

Never disassemble except when disposing of the product.
- Doing so may cause fire, electric shock, or injury.
WARNING
▶ In case of an abnormality or malfunction Immediately stop using and remove the AC adaptor if there is an abnormality or malfunction.
- Failure to do so may cause fire, electric shock, or injury.
• The main unit, AC adaptor or cord is deformed or abnormally hot.
• The main unit, adaptor or cord smells of burning.
- There is an abnormal sound during use or charging of the main unit.
- Immediately request inspection or repair at an authorized service centre.
▶ Power supply

Do not connect or disconnect the adaptor to a household outlet with a wet hand.
- Doing so may cause electric shock or injury.
Do not immerse the AC adaptor in water or wash with water.
Do not place the AC adaptor over or near water filled sink or bathtub.
Never use the appliance if the AC adaptor is damaged or if the power plug fits loosely in a household outlet.

Do not damage the cord or the power plug.
- Do not deface, modify, forcefully bend or pull the cord or the power plug. Also, do not place anything heavy on, twist or pinch the cord.
- Doing so may cause electric shock or fire due to a short circuit.

Do not use in a way that would exceed the rating of the household outlet or the wiring.
- Exceeding the rating by connecting too many plugs to one household outlet may cause fire due to overheating.

Fully insert the power plug.
-Failure to do so may cause fire or electric shock.

Disconnect the AC adaptor when cleaning the main body with water.
-Failure to do so may cause electric shock or injury.

Regularly clean the power plug and the appliance plug to prevent dust from accumulating.
- Failure to do so may cause fire due to insulation failure caused by humidity.
WARNING
▶ Preventing accidents
Do not place within reach of children or infants. Do not let them use it.

- Putting parts or accessories in the mouth may cause an accident or injury.
If oil is consumed accidentally, do not induce vomiting, drink a large amount of water and contact a physician.

If oil comes into contact with eyes, wash immediately and thoroughly with running water and contact a physician.
- Failure to follow these instructions may result in physical problems.
CAUTION
▶ Protecting the skin
Do not use excessive pressure to apply the system outer foil to your lip or other part of your face.

Do not apply the system outer foil directly to blemishes or injured skin.
- Doing so may cause injury to skin.

Do not forcefully press the system outer foil. Also, do not touch the system outer foil with fingers or nails when in use.
Do not use this product for hair on head or any other part of the body.
- Doing so may cause injury to skin or reduce the life of the system outer foil.

Check the system outer foil for cracks or deformations before use.
- Failure to do so may cause injury to the skin.
▶ Note the following precautions
Do not allow metal objects or trash to adhere to the power plug or the appliance plug.
- Doing so may cause electric shock or fire due to a short circuit.

Do not share your shaver with your family or other people.
- Doing so may result in infection or inflammation.

Disconnect the adaptor from the household outlet when not charging.

- Failure to do so may cause electric shock or fire due to electrical leakage resulting from insulation deterioration.
Handling of the removed battery when disposing
⚠️DANGER
•The rechargeable battery is exclusively for use with this appliance. Do not use the battery with other products.
- Do not charge the battery after it has been removed from the product.
- Do not throw into fire or apply heat.
- Do not hit, disassemble, modify, or puncture with a nail.
- Do not let the positive and negative terminals of the battery get in contact with each other through metallic objects.
- Do not carry or store the battery together with metallic jewellery such as necklaces and hairpins.
- Do not use or leave the battery where it will be exposed to high temperatures, such as under direct sunlight or near other sources of heat.
- Never peel off the tube.
- Doing so may cause overheating, ignition, or explosion.
WARNING

After removing the rechargeable battery, do not keep it within reach of children and infants.
- The battery will harm the body if accidentally swallowed.
If this happens, consult a physician immediately.

If the battery fluid leaks out and comes in contact with the eyes, do not rub the eyes, and thoroughly rinse with clean water, such as tap water.
- Failure to do so may cause eye injury. Consult a physician immediately.
CAUTION

If the battery fluid leaks out and comes in contact with the skin or clothes, rinse off with clean water, such as tap water.
- Failure to do so may cause inflammation.
Important information
- Treat yourself to wet lather shaves for at least three weeks and notice the difference. Your Panasonic WET/DRY shaver requires a little time to get used to because your skin and beard need about a month to adjust to any new shaving method.
-
If you clean the shaver with water, do not use salt water or hot water. Do not soak the shaver in water for a long period of time.
-
Charge the appliance correctly according to these Operating Instructions. (See page 13 "Charging the shaver".)
- This appliance contains battery that is only replaceable by skilled persons. Please contact an authorized service centre for the details of repair.
Note the following precautions
▶ When using
- Do not bring the system outer foil into contact with hard objects.
Doing so may damage the system outer foil as it is very thin and deforms easily.
- Do not drop or hit against other objects.
Doing so may cause injury.
▶ When storing
- Store the shaver in a place with low humidity after use.
Failure to do so may cause malfunction due to condensation or rust.
- Be sure to place the protective cap on the shaver when carrying around or storing.
Failure to do so may cause injury to skin or reduce the life of the system outer foil.
▶ When cleaning
- Do not dry the main unit with a dryer or a fan heater. Doing so may cause malfunction or deformation of the parts.
- Do not leave the shaver exposed to direct sunlight with the foil frame detached.
Doing so may deteriorate the waterproof rubber and degrade waterproof function, which may cause to malfunction.
Parts identification
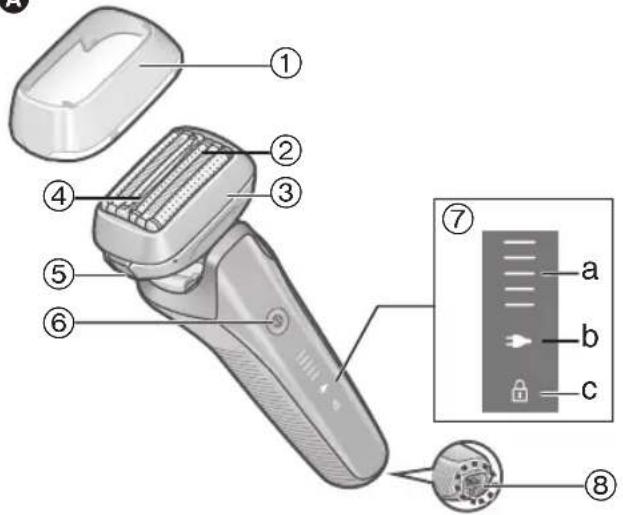
A Main body
① Protective cap
② System outer foil
③Foil frame
④ Smooth rollers
• They help to glide over the skin more easily.
⑤ Foil frame release buttons
⑥Power switch
⑦ Lamp display
a. Battery capacity lamp
b. Charge status lamp (☐)
c. Switch lock lamp (☐)
⑧Appliance socket
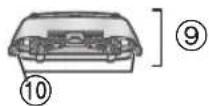
⑨ Outer foil section
⑩ System outer foil release buttons
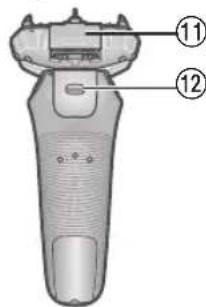
⑪ Trimmer
⑫ Trimmer handle
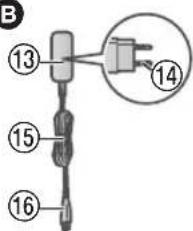
B AC adaptor (RE7-87)
⑬Adaptor
⑭ Power plug
⑮ Cord
⑯Appliance plug
Accessories
© Travel case
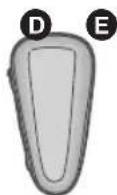
D Cleaning brush
E Oil
F Operating Instructions
© Guarantee Card
Preparation
Charging the shaver
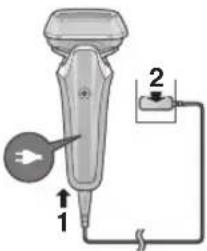
- Turn the shaver off.
- Wipe off any water droplets on the appliance socket.
1 Insert the appliance plug [B⑯] into the shaver.
2 Plug the adaptor [B⑬] into a household outlet.
- Check that the charge status lamp (☐) is glowing.
- Charging is completed after approx. 1 hour.
3 Disconnect the adaptor after charging is completed.
Note
You cannot operate the shaver while charging.
Quick charge
Even though the battery runs out, you can shave once after 3-minute charge.
(This will differ depending on usage.)
While charging
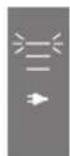
glows.
The battery capacity lamp will increase as charging progresses.
After charging is completed

All the battery capacity lamp and ▶ will glow and then turn off after 5 seconds.
Notes
- When charging the shaver for the first time or when it has not been in use for more than 6 months, the charging time may change or the charge status lamp (☐) may not glow for a few minutes. It will eventually glow if kept connected.
- Recommended ambient temperature for charging is 10^ - 35^ . It may take longer to charge, or the charge status lamp (☐) will blink quickly and the battery may fail to charge properly in extremely high or low temperatures.
- The shaver can be used for approximately 2 weeks with a full charge.
(Based on one 3-minute dry-shave usage per day in an ambient temperature range of 20^ - 30^ .)
The number of usable days varies depending on the following conditions.
- Beard thickness
- Pressure applied to the skin
-Usage frequency of the sonic vibration cleaning mode
- If there is noise from the radio or other sources while using or charging the appliance, move to a different location to use the appliance.
How to use
Shaving beard
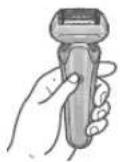
1 Press and shave.
- The “shaving sensor”, which automatically adjusts the power depending on the beard thickness, will operate.
It will shave with high power on areas where the beard is heavy, and reduce the power on areas where the beard is thin, to reduce burden on the skin.
Tips for better shaving
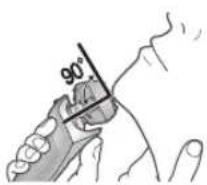
Apply the whole system outer foil perpendicularly against the skin and shave by slowly gliding the shaver over the face against the grain of the beard.
• The beard under the chin and around the throat can be shaved better by stretching the skin so the beard will stand.
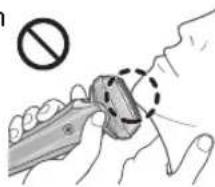
• To prevent damaging the system outer foil, do not shave with only a part of the system outer foil.
natural_image
Illustration of a hand holding a tool with a circular object and a prohibition symbol (no text or labels)2 Press when finished.
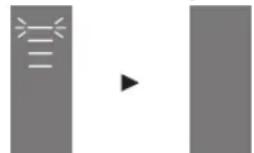
While using After use
natural_image
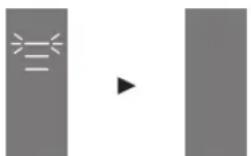
Simple gray vertical bar with three horizontal bars and a play button icon (no text or symbols)The remaining battery capacity are shown and then turn off after 5 seconds.
- Approximate amount of battery capacity is displayed.
natural_image
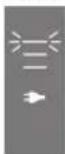
Simple diagram with two vertical bars, a horizontal arrow pointing right, and a small symbol inside (no text or labels)The remaining battery capacity blink and then turn off after 5 seconds.
When the battery capacity is low
The lowest battery capacity lamp glows when operating the shaver.
The appliance beeps twice after switched off. - You can shave 2 to 3 times. (This will differ depending on usage.)

Notes
- The appliance may not operate in an ambient temperature lower than approximately 5^ .
- The shaving sensor may not respond depending on the type and quantity of the shaving gel. This is not abnormal.
-
Depending on the beard thickness or the amount of beard trimmings in the shaver head, the shaving sensor may not react and the driving sound may not change. This is not abnormal.
-
To prevent erroneous operation, place your fingers on the finger rest while using the shaver.
- The sonic vibration cleaning mode is activated when the power switch is pressed for more than 2 seconds while the shaver is not operating. (See page 16.) You cannot shave in this mode.
Operation and display of the switch lock
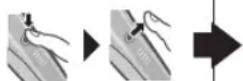
▶ Locking the power switch
- Press once and then release.
• The shaver starts operating.
- Press Ⓓ for more than 2 seconds until the switch lock lamp (☐) turns on.
• The shaver will stop operating.
- Release • The switch lock lamp (A) will light up for 5 seconds and turn off.

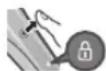
▶ Unlocking the power switch
- Press for more than 2 seconds until the switch lock lamp (☐) turns off.

- Once the shaver starts operating, release Ⓤ.
- The switch lock lamp (💡) will turn off.

- The power switch is locked when the switch lock lamp (6) blinks for 5 seconds and the shaver does not operate even though the power switch is pressed.
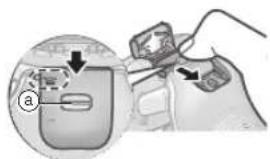
▶ Using the trimmer
- Slide the trimmer handle up to the "mm" position so that the trimmer stands upright.
- Press Ⓞ and use.
natural_image
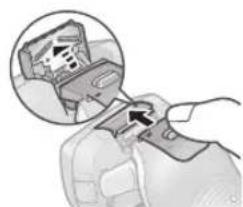
Close-up of a hand inserting a cable into a seatbelt, showing the cable being inserted (no text or symbols visible)Press and hold the top knob (a) and slide the trimmer handle down to lower the trimmer.
Tips for better usage
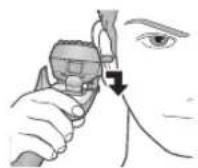
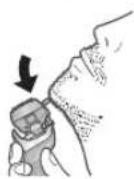
Apply the trimmer edge perpendicular to skin gently and move downward slowly.
Trimming sideburns Pre-shave of long beards
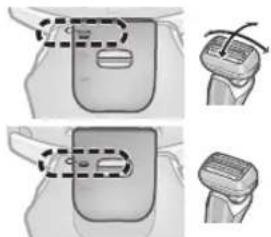
▶ Switching the shaver head
You can change the pivot action.
“
The shaver head is moved to prevent missed spots.
“ ”
You can lock the shaver head.
natural_image
Medical illustration showing a hand holding a device with dashed outlines, alongside two views of the device (no text or symbols present)Cleaning the shaver
We recommend cleaning the shaver after each use.
Cleaning with water
- Turn the shaver off and disconnect the AC adaptor.
1 Apply some hand soap and some water to the system outer foil [A②].

2 Press for more than 2 seconds to activate the sonic vibration cleaning mode.
- Splashing of foam is suppressed.
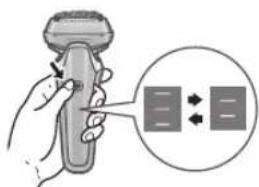
• The lamps blink alternately.
• After about 20 seconds, it will be automatically turned off, or you can turn it off by pressing the power switch.
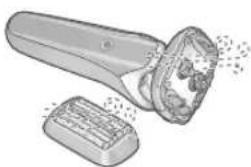
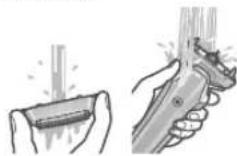
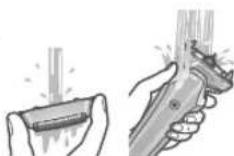
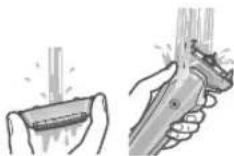
Remove the outer foil section [A⑨] and clean with running water.
• See page 18 for removing the outer foil section.
- Splashing is reduced by rinsing the shaver in sonic vibration cleaning mode.
• After rinsing with water, shake the shaver up and down for a few times to remove excess moisture and then wipe off any drops of water with a dry cloth.
![PANASONIC ESLS6A - Remove the outer foil section [A⑨] and clean with running water. - 1](/content/2026/03/557648/images/20c297492cb5dfdbae82c6afe4049b898c5599710ddb67ad4f54fc92128cdbdd.jpg)
4 Dry the outer foil section, the shaver, and the trimmer [A⑪] completely.
- Allow the shaver to dry in the shade, avoid direct sunlight.
![PANASONIC ESLS6A - Dry the outer foil section, the shaver, and the trimmer [A⑪] completely. - 1](/content/2026/03/557648/images/7f6797f509483c29a537c6ec2e09283595a4edc72e8c87735d1d7c727e051dca.jpg)
natural_image
Illustration of a handheld electric shaver with internal components and powder (no text or symbols)5 Lubricate the shaver. It will keep the movement of the blades smooth and maintain a comfort shave.
- Apply one drop of oil to each of the system outer foils.
- Raise the trimmer and apply a drop of oil.
- Switch the shaver on, and run it for approximately five seconds.
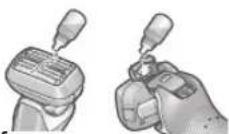
- Switch off the shaver, and wipe off any excess oil from the system outer foil with a soft cloth.
Notes
- Do not use any kitchen or bathroom detergents other than hand soap.
Doing so may cause malfunction. - Be careful not to hit the main body on the sink or any other object while draining the water. Failure to do so may cause malfunction.
- Do not wipe with thinners, benzine, alcohol etc.
Doing so may cause malfunction, cracking or discoloration of the parts.
Wipe with diluted soapy water.
Cleaning with the brush
Remove the outer foil section. (See page 18.)
Clean the system outer foil in the areas indicated by the circles every time you use the shaver. Otherwise, abnormal sound may be generated.
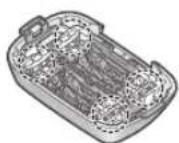
▶ Cleaning with the long brush
Clean the foil frame [A③], system outer foil [A②], the main body [A] and the trimmer [A⑪] using the long brush.
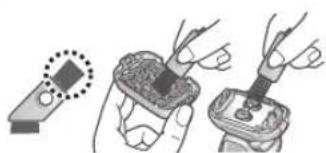
natural_image
Illustration of three hands using a tool to apply a component, with no visible text or symbols.Replacing the system outer foil
system outer foil once every 18 months
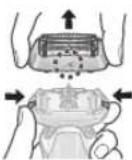
▶Removing the outer foil section
Press the foil frame release buttons [A⑤] and lift the outer foil section [A⑨] upwards.
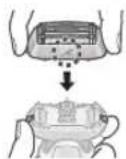
▶ Attaching the outer foil section
After turning the foil frame mark (A) to the front, securely attach the outer foil section [A⑨] to the shaver until it clicks.
▶Replacing the system outer foil
- Press the system outer foil release buttons [A⑩] and pull down the system outer foil [A②].
- Do not press the system outer foil release buttons with excessive force.
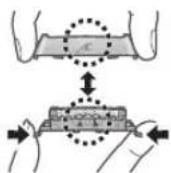
Doing so may bend the system outer foil, preventing complete attachment to the foil frame.
- Align the foil frame mark ( ) and the system outer foil mark (△) and securely attach together until it clicks.
Note
Do not throw away the foil frame.
FAQ
Question Answer
Does this product require inner blades?
Will the battery deteriorate if not used for an extended period of time?
Can I charge the shaver after every use?
Why should the adaptor be disconnected after charge?
What is the constituent of the dedicated oil?
Why does the appliance beep twice after switched off?
Outer foils and inner blades are integrated into the system outer foil.
The battery will deteriorate if not used for over 6 months, so make sure to perform a full charge at least once every 6 months.
The battery used is a lithium-ion, so charging after every use will have no effect on battery life.
Charging the battery for more than 1 hour will not affect battery performance, but disconnect the adaptor for safety and to save energy.
▶ Constituent of the oil is liquid paraffin.
The sound indicates that the battery capacity is running low. Please charge the appliance.
Troubleshooting
Perform the following actions. If the problems still cannot be solved, contact the store where you purchased the unit or a service centre authorized by Panasonic for repair.
Problem Action
The power switch does not turn ON.
Unlock the switch lock. (See page 15.)
Problem Action
The shaving sensor does not respond.
Depending on the beard thickness or the amount of beard trimmings in the
▶ shaver head, the shaving sensor may not react and the driving sound may not change. This is not abnormal.
The shaving sensor may not respond depending on the
▶ type and quantity of the shaving gel. This is not abnormal.
The shaving sensor may not respond when the remaining
▶ battery capacity is low. If this happens, recharge the shaver.
Apply oil. (See page 17.) The shaving sensor may not
▶ respond when there is not enough oil on the system outer foil.
| Problem Action | |
| The shaving sensor responds even though the shaver is not in contact with the skin. | Clean the beard trimmings from the shaver.Clean the system outer foil with the brush. (See page 17.)When the shaver is extremely dirty, remove the foil frame and wash with water.(See page 16.) |
| Replace the system outer foil.Expected life of system outer foil:Approximately 18 months |
| Problem Action | |
| Operating time is short even after a full charge. | Although the shaver can be used for about 2 weeks after a full charge (assuming dry-shave usages for 3 minutes per day), the usable number of days might be lower depending on how the shaver is used (for example, when used for wet shaving). |
| Apply oil. | |
| Clean the shaver. | |
| When the number of operations per charge starts to decrease, the battery is nearing the end of its life. | |
| Shaver does not operate even after charging. | Use the appliance in an ambient temperature approximately 5 °C or higher. |
| The battery has reached the end of its life. | |
| The shaver will not operate with the AC adaptor connected. Please use the shaver after it has been sufficiently charged and the AC adaptor disconnected. | |
| The driving sound changes while shaving. | The shaving sensor is operating. The sound changes depending on the beard thickness. |
| Makes a loud sound. | Apply oil.The blades will not move smoothly when there is no oil on the system outer foil, requiring more power.The shaver makes a high-pitched sound due to the linear motor drive. This does not indicate a problem.Confirm that the system outer foil is properly attached.Clean the system outer foil with the brush. (See page 17.)Wash the system outer foil with water. (See page 16.) |
| The odor is getting stronger. | Clean the shaver. |
| System outer foil gets hot. | Apply oil.Replace the system outer foil if it is damaged or deformed.(See page 18.) |
| Problem Action | |
| You do not get as close a shave as before. | Clean the shaver.Apply oil.Replace the system outer foil.Expected life of system outer foil:Approximately 18 months |
Service
Contact
Please visit Panasonic web site http://www.panasonic.com or contact an authorized service centre (you find its contact address in the pan european guarantee leaflet.) if you need information or if the shaver or the cord gets damaged.
Replacement parts
Replacement parts are available at your dealer or Service Centre.
| Replacement parts for ES-LS6A | System outer foil WES9600 |
| Lubrication oil WES003P | |
Battery life
The life of the battery is 3 years. The battery in this shaver is not intended to be replaced by consumers. Have the battery replaced by an authorized service centre.
For environmental protection and recycling of materials
This shaver contains a Lithium-ion battery. Please make sure that the battery is disposed of at an officially assigned location, if there is one in your country.
Disposal of Old Equipment and Batteries Only for European Union and countries with recycling systems
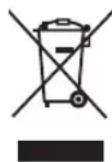
These symbols on the products, packaging, and/or accompanying documents mean that used electrical and electronic products and batteries must not be mixed with general household waste. For proper treatment, recovery and recycling of old products and batteries, please take them to applicable collection points in accordance with your national legislation.
By disposing of them correctly, you will help to save valuable resources and prevent any potential negative effects on human health and the environment.
For more information about collection and recycling, please contact your local authority. Penalties may be applicable for incorrect disposal of this waste, in accordance with national legislation.
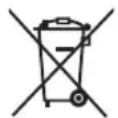
Note for the battery symbol (bottom symbol)
This symbol might be used in combination with a chemical symbol. In this case it complies with the requirement set by the Directive for the chemical involved.
Disposal of the built-in rechargeable battery
Remove the built-in rechargeable battery before disposing of the shaver.
The battery is to be disposed of safely.
Please make sure that the battery is disposed of at an officially designated location if there is one.
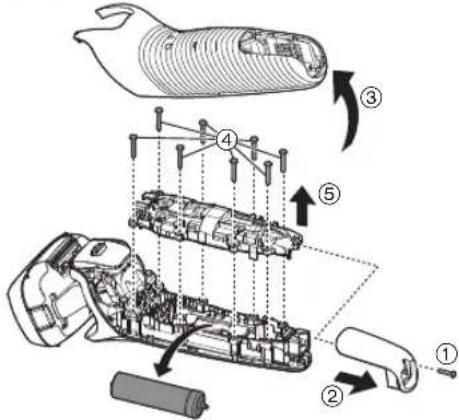
This figure must only be used when disposing of the shaver, and must not be used to repair it. If you dismantle the shaver yourself, it will no longer be waterproof, which may cause it to malfunction.
- Remove the shaver from the AC adaptor.
-
Press the power switch to turn on the power and then keep the power on until the battery is completely discharged.
-
Perform steps ① to ⑤ and lift the battery, and then remove it.
• Take care not to short circuit the positive and negative terminals of the removed battery, and insulate the terminals by applying tape to them.
Specifications
| Power source | See the name plate on the AC adaptor.(Automatic voltage conversion) |
| Motor voltage | 3.6 V--- |
| Charging time Approx. 1 hour | |
| Airborne Acoustical Noise | In shaving mode: 64 (dB (A) re 1 pW)In trimmer mode: 65 (dB (A) re 1 pW) |
This product is intended for household use only.
For more information about the energy efficiency of the product, please visit our website, www.panasonic.com, and enter the model number in the search box.
Panasonic
Betriebsanleitung
natural_image
Simple graphic with two vertical bars and a play button, no text or symbols presentnatural_image
Illustration of a hand holding a tool with a prohibition symbol (no text or labels)natural_image
Close-up of a hand inserting a device into a car seatbelt, showing the cable being inserted (no text or symbols visible)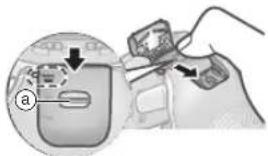
natural_image
Illustration of a hand holding a device with a magnified inset showing a component (no text or symbols visible)natural_image
Illustration of a hand holding a remote control device with a magnified inset showing two rectangular blocks (no text or symbols)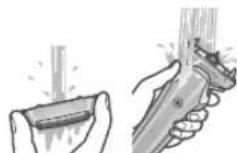
natural_image
Illustration of a handheld electric shaver with internal components and a separate base (no text or symbols)natural_image
Illustration of three hands holding test probes with a magnified inset showing a droplet (no text or symbols)Spezifikationen
▶ Prévention des accidents
Remarque
natural_image
Illustration of a hand holding a tool with a prohibition symbol (no text or labels)natural_image
Simple graphic with a three-pointed star and arrow pointing right, no text or symbols presentnatural_image
Close-up of a hand inserting a device into a car seatbelt, showing the cable being inserted (no text or symbols visible)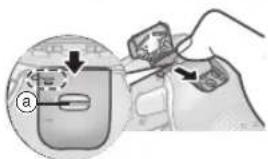
natural_image
Illustration of a hand holding a device with a magnified inset showing a device inside a container (no text or symbols visible)natural_image
Illustration of a medical device with two views showing internal components (no text or symbols)Nettoyage du rasoir
natural_image
Illustration of a handheld electric shaver with a textured lid and emitting particles (no text or symbols)natural_image
Illustration of three hands using a tool to apply a sample into a container (no text or symbols present)Spécifications
natural_image
Simple graphic with two vertical bars and a play button, no text or symbols presentnatural_image
Illustration of a hand holding a pen with a magnified inset showing a circular object, no text or symbols present.natural_image
Simple diagram with a three-pointed star and arrow inside a vertical rectangle, connected by a play button (no text or symbols)natural_image
Hand holding a device with a magnified inset showing a device inside (no text or symbols visible)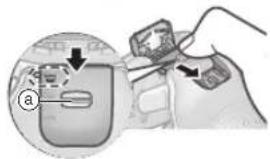
Pulizia del rasoio
natural_image
Illustration of a handbrush with an open lid and textured grip, showing internal components (no text or symbols)natural_image
Illustration showing three steps of a hand holding a small object, with no visible text or symbols.Specifiche
Opmerking
natural_image
Simple graphic with a light source icon and a play button, no text or symbols presentnatural_image
Simple diagram with two vertical bars and a play button, no text or symbols presentnatural_image
Close-up of a hand adjusting a car seatbelt with a magnified inset showing the device (no text or symbols visible)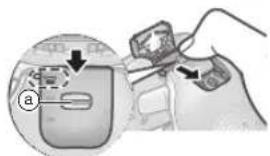
natural_image
Illustration of a hand holding a device with arrows indicating action or process (no text or symbols present)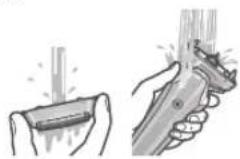
natural_image
Illustration of a handheld electric shaver with a button and textured tip (no text or symbols)natural_image
Illustration showing three steps of a hand holding a small object, with no visible text or symbols.Specifications
natural_image
Illustration of a hand holding a tool with a circular symbol and dashed line indicating a step, no text or symbols present.natural_image
Close-up of a hand adjusting a device's cable or connector, showing a magnified inset (no text or symbols visible)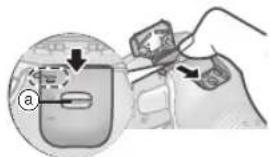
natural_image
Illustration of a handbrush and eraser with textured surfaces (no text or symbols)natural_image
Illustration showing three steps of a dental implant procedure: adding a square component, applying material to a base, and adjusting the base (no text or symbols present)Especificaciones
natural_image
Illustration of a hand holding a tool with a circular motion indicator and a prohibition symbol (no text or labels)natural_image
Illustration of a handheld electric shaver with exposed internal components and a separate base (no text or symbols)natural_image
Illustration showing three steps of a hand holding a small object, with no visible text or symbols.Specifikationer
Nota
natural_image
Illustration of a hand holding a tool with a prohibition symbol above (no text or labels)natural_image
Simple diagram with a light source icon and a play button, no text or symbols presentnatural_image
Hand inserting a device into a car seatbelt, showing the cable being inserted (no text or symbols visible)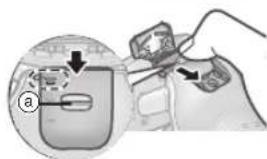
natural_image
Illustration of a handheld electric shaver with visible internal components and powder particles (no text or symbols)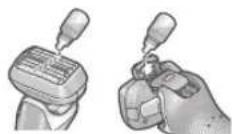
natural_image
Illustration showing three steps of a medical procedure: adding a square to a device, inserting into a box with liquid, and using a pipette (no text or symbols present)Especificações
Merk
Under lading Etter at
lyser.
natural_image
Illustration of a hand holding a tool with a prohibition symbol above (no text or labels)natural_image
Close-up of a hand inserting a cable into a device (no visible text or symbols)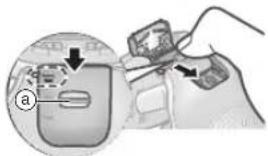
natural_image
Illustration of a hand holding a device with a magnified inset showing a device inside a device (no text or symbols visible)Tips for bedre bruk
Sett kanten av trimmeren vinkelrett og forsiktig på huden, og beveg den sakte nedover.
Rengjøre barbermaskinen
natural_image
Illustration of a handheld electric shaver with visible internal components and exhaust platters (no text or symbols)natural_image
Illustration showing three steps of a hand holding a small object, with no visible text or symbols.Bytte systemets ytre folie
systemets ytre folie én gang hver 18. måned
| Reservedeler for ES-LS6A | Systemets ytre folie WE | S9600 |
| Smøreolje WES003P | ||
Batteriets levetid
Spesifikasjoner
| Strømkilde | Se merkeplaten på vekselstrømsadapteren (automatisk spenningsomformer). |
| Motorspenning | 3,6 V--- |
| Ladetid Omtrent 1 time | |
| Luftbåren akustisk støy | Under barbering: 64 (dB (A) re 1 pW) Under trimming: 65 (dB (A) re 1 pW) |
Dette produktet er kun ment til husholdningsbruk.
Obs
natural_image
Illustration of a hand holding a pen with a prohibition symbol (no text or labels)natural_image
Close-up of a hand inserting a cable into a seatbelt, showing the connector (no text or symbols visible)natural_image
Illustration of a hand holding a small electronic device with a magnified inset showing internal components (no text or symbols)natural_image
Illustration of a handheld electric shaver with internal components and a separate base (no text or symbols)- Torka rakapparaten i skugga, undvik direkt solljus.
5 Smörj rakapparaten.
natural_image
Illustration of three hands using a tool to apply a component, showing step-by-step assembly (no text or symbols)Specifikationer
Huom
natural_image
Illustration of a hand holding a tool with a prohibition symbol (no text or labels)natural_image
Illustration of a handheld electric shaver with internal components and exhaust platters (no text or symbols)5 Voitele partakone.
natural_image
Illustration of three hands performing a manual tool manipulation (no text or symbols present)Teräverkon vaihto
Tekniset tiedot
natural_image
Illustration of a hand holding a handheld device with a prohibition symbol (no text or labels)natural_image
Simple diagram with two vertical bars and a play button, no text or symbols presentnatural_image
Close-up of a hand inserting a device into a car seatbelt, showing the cable being inserted (no text or symbols visible)natural_image
Illustration of a hand holding a device with a magnified inset showing a device inside a container (no text or symbols visible)natural_image
Diagram showing two views of a car seatbelt with dashed outlines indicating different seat configurations (no text or symbols present)Czyszczenie golarki
natural_image
Illustration of a hand brushing a toothbrush with teeth removed (no text or symbols)5 Nasmaruj golarkę.
natural_image
Illustration showing three steps of a robotic arm handling a small object, with no visible text or symbols.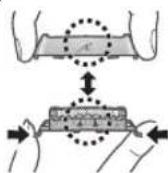
Dane techniczne
natural_image
Illustration of a hand holding a tool with a prohibition symbol (no text or labels)natural_image
Close-up of a hand inserting a cable into a seatbelt, showing the cable being inserted (no text or symbols visible)natural_image
Illustration of a handheld electronic device with exposed internal components and a separate base (no text or symbols)natural_image
Illustration of three hands performing a manual tool manipulation (no text or symbols present)Technické údaje
natural_image
Illustration of a hand holding a medical device with a prohibition symbol (no text or labels)natural_image
Illustration of a hand inserting a clip into a car seat, showing the cable being inserted (no text or symbols present)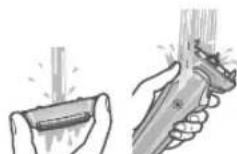
4 Čast's vonkajšou fóliou, holiaci strojček a zastrihávač [A⑪] nechajte dôkladne vyschnút'.
![PANASONIC ESLS6A - Čast's vonkajšou fóliou, holiaci strojček a zastrihávač [A⑪] nechajte dôkladne vyschnút'. - 1](/content/2026/03/557648/images/f2eb7dd875d8b42ac756babcf5622e2c4486b84908e7ecb2edc9956a39a68c0f.jpg)
natural_image
Illustration of a handheld electric shaver with internal components and powder particles (no text or symbols)natural_image
Illustration of three hands using a tool to apply a component, showing step-by-step steps (no text or symbols present)Technické údaje
Megjegyzés
natural_image
Illustration of a hand holding a pen with a hand pointing to a device, no text or symbols presentnatural_image
Simple gray vertical bar with three horizontal lines and a play button icon, no text or symbols present.natural_image
Close-up of a hand inserting a cable into a device (no text or symbols visible)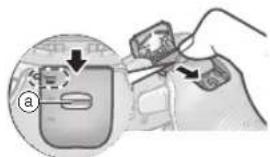
natural_image
Illustration of a hand holding a small object with arrows indicating movement or force (no text or symbols present)natural_image
Illustration of a handheld electronic device with a lid and internal components (no text or symbols)natural_image
Illustration showing three steps of a hand holding a small object, with no visible text or symbols.Müszaki adatok
natural_image
Illustration of a hand holding a tool with a prohibition symbol (no text or labels)natural_image
Simple diagram with a light source icon and a play button, no text or symbols presentnatural_image
Close-up of a hand inserting a device into a car seatbelt, showing the cable being inserted (no text or symbols visible)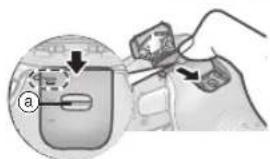
natural_image
Illustration of a handheld electric shaver with internal components and powder particles (no text or symbols)5 Lubrifiati aparatul de ras.
natural_image
Illustration of three hands performing a manual tool manipulation (no text or symbols present)Specificații
Not
natural_image
Illustration of a hand holding a tool with a prohibition symbol (no text or labels)2
Bittiğinde

iğmesine basın.
natural_image
Illustration of a person using a belt switch device to adjust a device (no text or symbols visible)natural_image
Diagram showing three views of a device with internal components and a close-up view of the device (no text or symbols present)natural_image
Illustration of a handheld device with a lid and spout, showing internal components (no text or symbols)natural_image
Illustration showing three steps of a hand holding a small object, with no visible text or symbols.Özellikler
© Panasonic Corporation 2022
⑤ EN, DE, FR, IT, NL, SP, DA, PT, NB, SV, FI, PL, CS, SK, HU, RO, TR
Printed in Japan
ES9700LS6A1E Y0222-0

- Panasonic
- Contents
- Safety precautions...... 8
- FAQ....18
- WARNING
- Safety precautions
- ▶ This product
- ▶ Preventing accidents
- CAUTION
- ▶ Protecting the skin
- ▶ Note the following precautions
- Handling of the removed battery when disposing
- ⚠️DANGER
- Important information
- Note the following precautions
- ▶ When using
- ▶ When storing
- ▶ When cleaning
- Parts identification
- A Main body
- B AC adaptor (RE7-87)
- Preparation
- Charging the shaver
- Note
- Quick charge
- Notes
- How to use
- Shaving beard
- Press and shave.
- Tips for better shaving
- Press when finished.
- Operation and display of the switch lock
- ▶ Locking the power switch
- ▶ Unlocking the power switch
- ▶ Using the trimmer
- Tips for better usage
- ▶ Switching the shaver head
- Cleaning the shaver
- Cleaning with water
- Remove the outer foil section [A⑨] and clean with running water.
- Dry the outer foil section, the shaver, and the trimmer [A⑪] completely.
- Lubricate the shaver. It will keep the movement of the blades smooth and maintain a comfort shave.
- Cleaning with the brush
- ▶ Cleaning with the long brush
- Replacing the system outer foil
- ▶Removing the outer foil section
- ▶ Attaching the outer foil section
- ▶Replacing the system outer foil
- FAQ
- Question Answer
- Troubleshooting
- Problem Action
- Service
- Contact
- Replacement parts
- Battery life
- For environmental protection and recycling of materials
- Disposal of Old Equipment and Batteries Only for European Union and countries with recycling systems
- Disposal of the built-in rechargeable battery
- Remove the built-in rechargeable battery before disposing of the shaver.
- Remarque
- Nettoyage du rasoir
- Pulizia del rasoio
- Opmerking
- Nota
- Merk
- Tips for bedre bruk
- Rengjøre barbermaskinen
- Bytte systemets ytre folie
- Batteriets levetid
- Obs
- Smörj rakapparaten.
- Huom
- Teräverkon vaihto
- Czyszczenie golarki
- Čast's vonkajšou fóliou, holiaci strojček a zastrihávač [A⑪] nechajte dôkladne vyschnút'.
- Megjegyzés
- 2
- Bittiğinde
- iğmesine basın.
Brand : PANASONIC
Model : ESLS6A
Category : Shaver