
Turret - Microphone MARANTZ - Free user manual and instructions
Find the device manual for free Turret MARANTZ in PDF.
| Brand | Marantz |
| Model | Turret |
| Product Type | All-in-one broadcasting system (streaming and podcasting) |
| Category | Microphone with integrated webcam and lighting |
| Webcam | HD with built-in H.264 video compression |
| Microphone | USB condenser, 48 kHz / 16-bit |
| Noise filter | Included, removable |
| Light ring | Daylight-balanced LED, with 3 temperature correction filters (diffuser, cool, warm) |
| Power supply | 12 V DC, 1 A power adapter (center positive plug) |
| USB connectivity | USB-C to computer (audio + video), 2 USB-A ports for USB drives |
| Headphone output | 3.5 mm stereo jack with built-in amplifier |
| Auxiliary output | 3.5 mm stereo jack (microphone signal only) |
| Main functions | Webcam with autofocus, microphone with mute and sensitivity adjustment (0 dB / -10 dB), adjustable lighting, mix control (Mic/PC), headphone volume |
| Included accessories | Turret, base, microphone, noise filter, 3 correction filters, USB-C to A cable, power adapter, user guide |
| System requirements | Computer with USB port, Windows or macOS operating system |
| Care and cleaning | Clean with a soft, dry cloth. Remove the plastic film from the filters before use. |
| Safety | Use only the provided adapter. Do not expose to water or humidity. |
| Spare parts and repairability | Correction filters and noise filter available. For support, visit marantzpro.com/support. |
| General information | Product registration and documentation at marantzpro.com |
Frequently Asked Questions - Turret MARANTZ
User questions about Turret MARANTZ
0 question about this device. Answer the ones you know or ask your own.
Ask a new question about this device
Download the instructions for your Microphone in PDF format for free! Find your manual Turret - MARANTZ and take your electronic device back in hand. On this page are published all the documents necessary for the use of your device. Turret by MARANTZ.
USER MANUAL Turret MARANTZ
User Guide (English)
Introduction
The Turret answers the need for a high-performance equipment package that includes everything needed for streaming and podcasting. This system has a full HD webcam with built-in H.264 video compression, a high-quality 48 kHz/16-bit USB condenser microphone with pop filter and an LED light ring, daylight-balanced, with both cool and warm filter accessories. The Marantz Turret is a unique, all-in-one broadcast system that gives any gamer, live Internet streamer or podcaster high-quality components with a multitude of configurations for creating a professional presentation. It's compact and simple, perfect on a desktop and portable enough to take on location.
To make the system capable of handling any streaming/podcast task without the need for additional equipment, Turret has a high-speed USB-C computer output for high speed and low latency, an internal USB hub and an onboard headphone amplifier so audio monitoring is a snap. Everything the demanding streaming/broadcasting enthusiast needs is right here, in one convenient, high-performance package.
Please see this guide's Setup chapter to learn how to integrate Turret with your audio system, and then refer to the Operation chapter to start using Turret.
Box Contents
Tower
Base
Microphone
Pop Filter
Replacement Shockmount Bands
(3) Lighting Filters (Diffuse, Cool Diffuse, Warm Diffuse)
USB Type-C-to-Type-A Cable
Power Adapter
User Guide
Safety & Warranty Manual
Support
For the latest information about this product (documentation, technical specifications, system requirements, compatibility information, etc.) and product registration, visit marantzpro.com.
For additional product support, visit marantzpro.com/support.
Setup
Connection
Items not listed under Introduction > Box Contents are sold separately.
- Use the included power adapter to connect the Power Input to a power outlet.
- Use the included USB cable to connect the USB Port labeled To PC to your computer.
- Optional: Connect USB flash drives to USB Ports 1 and/or 2. You can to use your computer to access these drives.
- Optional: Use a 1/8" (3.5 mm) stereo audio cable to connect this output to the input of an external mixer, speaker, etc.
- Optional: Attach the desired lighting filter to the LED Ring Light. Use the Brightness knob to adjust the brightness of the light ring around it.
Note: Remove the plastic film from the lighting filter before use.
- Connect 1/8" (3.5 mm) stereo headphones to the Headphone Output. Use the Headphone Volume knob to adjust the volume.
- Use the Mix knob to adjust the balance between the microphone signal (Mic) and the signal from your computer (PC) that you hear in the headphones.
- Open your video or audio recording software, and select Marantz Turret as your computer's default playback and recording devices.
- You're now ready to start recording.
Audio Setup
To set Turret as your default audio recording and playback device, follow the directions below based on your computer's operating system.
Windows:
- Use the included USB cable to connect the Turret to your computer.
- In the Taskbar, locate the Volume Control "speaker" icon. Right-click the speaker and select Playback Devices.
Alternatively, go to Start Menu > Control Panel (or Settings > Control Panel in Classic View) > Hardware and Sound > Sound. - In the Windows Sound control panel select the Playback tab and select Marantz Turret Audio as the default device.
- Click the Recording tab and select Marantz Turret Audio as the default device.
- Click Properties in the lower right-hand corner.
- In the new window, click the Advanced tab and select 2-channel, 24-bit, 48000 Hz (Studio Quality) as the default format.
Note: Although Turret's audio interface supports up to 24-bit audio, the microphone's output is 16-bit only. - Uncheck both boxes under Exclusive Mode.
- Click OK to close the Properties window.
- Click OK to close the Sound control panel.
macOS:
- Use the included USB cable to connect the Turret to your computer.
- Go to Applications > Utilities > Audio MIDI Setup.
- In the Audio Devices window, select Marantz Turret Audio in the left column.
- Right-click Marantz Turret Audio, and select Use this device for sound input.
- Right-click Marantz Turret Audio, and select Use this device for sound output.
- Quit Audio MIDI Setup.
Video Setup
To set Turret as a video capture device, follow the directions below:
- Use the included USB cable to connect the Turret to your computer.
- Press the Camera On/Off button to turn the camera on.
- Open your software. If you have no other video capture devices connected, Turret should automatically be selected in your software's video settings. Otherwise, select Turret in the list of video capture devices.
Features
Tower, Front Panel Tower, Rear Panel Microphone, Underside
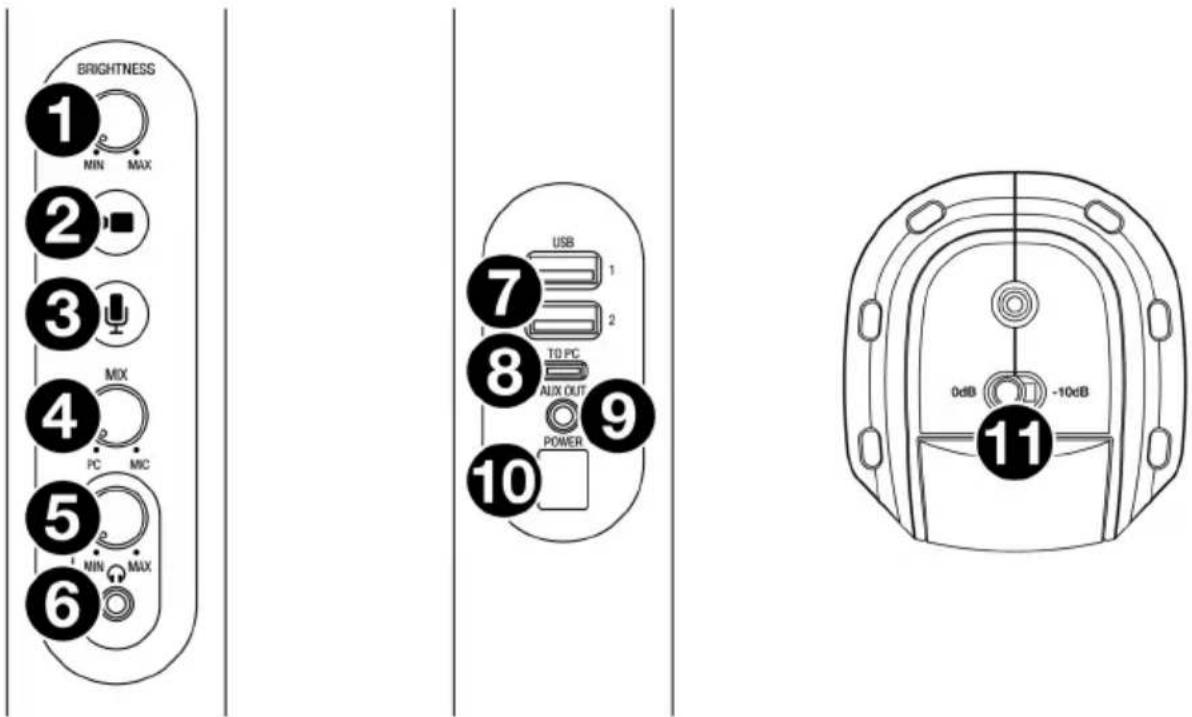
- Brightness: Turn this knob to adjust the brightness of the light ring around the camera.
- Camera On/Off: Press this button to turn the camera on or off.
- Microphone On/Off: Press this button to turn the microphone on or off.
- Mix: Turn this knob to adjust the balance of audio signals sent to the headphone output. Turning it counter-clockwise toward PC will increase the volume of the audio signal of your computer. Turning it clockwise toward Mic will increase the volume of the audio signal of the microphone.
- Headphone Volume: Turn this knob to adjust the volume of the headphone output.
- Headphone Output (1/8"/3.5 mm, stereo/TRS): Connect your headphones here. Use the headphone volume knob to adjust the volume.
- USB Ports 1 & 2 (USB Type A): Connect USB flash drives to these USB ports. When the USB port labeled To PC is connected to your computer, you can use it to access these USB drives.
- USB Port To PC (USB Type C): Use the included USB cable to connect this USB port to your computer. This connection allows Turret to send/receive audio and video data to/from your computer. It also allows any USB drives connected to USB Ports 1 and 2 on Turret to be accessible on your computer.
- Aux Out (1/8"/3.5 mm, stereo/TRS): Use an audio cable to connect this output to the input of an external mixer, speaker, etc. The Aux Out is for the microphone audio signal only.
- Power Input (12 VDC, 1 A, center-positive): Use the included power adapter to connect this input to a power outlet.
- Microphone Sensitivity: Use this switch to set the microphone sensitivity to 0 dB or -10 dB.
Operation
Camera
Before using the camera, make sure you have selected Turret as a video capture device in your computer and software. See Video Setup for more information.
To turn the camera on or off, press the Camera On/Off button. When the camera is on, the button and camera LEDs will be lit blue. When the camera is off, the button and camera LEDs will not be lit.
LED Ring Light
To turn the LED Ring Light on, turn the Brightness knob to the right from its left-most position until you hear a "click."
To adjust the Brightness of the LED Ring Light, turn the Brightness knob. Turn the knob to the right to increase the brightness, or turn it to the left to decrease the brightness.
To turn the LED Ring Light off, turn the Brightness knob all the way to the left until you hear a "click."
Filters
To attach a filter to the LED Ring Light, align the filter so the tab at the bottom of the filter is aligned with the notch at the bottom of the LED Ring Light, and then snap it into place.
Note: Remove the plastic film from the lighting filter before use.
To remove the filter, use the tab to pop it out from the LED Ring Light.
Auto Focus
To toggle Auto Focus off and on, press and hold the Camera On/Off button for 3 seconds. The button and camera LEDs will blink to indicate that the Auto Focus setting has been changed. By default, Auto Focus is set to on when Turret is connected to power.
Note: If you toggle Auto Focus on or off when the camera is off, the camera will turn on and stream video for a few seconds before it turns off again.
Microphone
Before using the microphone, make sure you have selected Turret as your audio recording device in your computer and software. See Audio Setup for more information.
Muting/Unmuting
To mute or unmute the microphone, press the Microphone On/Off button. When the microphone is on (unmuted), the button and microphone LEDs will be lit blue. When the mic is off (muted), the button LED will turn off, and the microphone LED will be lit red.
Mic Sensitivity
To adjust the sensitivity of the microphone, use the Microphone Sensitivity switch on the bottom of the microphone. Set this switch to 0 dB for normal operation. For situations where the sound input is sufficiently loud enough that it may overdrive some part of the audio signal chain, set this switch to -10 dB. This will reduce the overall microphone volume.
Pop Filter
A pop filter helps reduce the impact of "popping" sounds when speaking into the microphone and helps protect the microphone diaphragm from the build-up of breath condensation and saliva.
For these reasons, it is recommended to leave the pop filter in place, but if you would like to remove it, gently push the badge at the top of the screen until it pops out of the frame holding it in place. To reattach the screen, snap it back into place inside the frame.
Headphones (Monitoring)
Before using the headphones, make sure you have selected Turret as your audio playback device in your computer and software. See Audio Setup for more information.
Adjusting the Mix Knob
This knob is useful for dealing with "latency" when you are recording in your software. Latency is a delay in sound that may occur between the incoming sound (from the microphone) and outgoing sound (from your computer).
Latency is often the result of the "buffer size" setting, which is usually located in your software's Preferences, Options, or Device Setup menu. Higher buffer sizes generally result in higher latency. In some cases, lower buffer size settings can consume a lot of your computer's CPU and cause audio glitches. To prevent these audio glitches, you will need to use a higher buffer setting, and this may result in latency.
If you are experiencing latency when recording, adjust the knob towards the Mic position to increase the blend of unprocessed audio from your microphone directly to your Headphone Output. This will let you hear the incoming audio from the microphone without latency while still being able to hear the audio from your computer. When listening to the playback, adjust the knob all the way to the PC position.
If your computer is powerful enough, you may be able to set the buffer size setting in your software low enough such that you may never need to listen to the direct audio signal from the microphone. In this case, set the Mix knob all the way to the PC position to monitor only the audio output of your computer.
Adjusting the Volume Knob
To adjust the headphone output volume, turn the Headphone Volume knob. Turn the knob to the right to increase the volume, or turn the knob to the left to decrease the volume.
Troubleshooting
If you encounter a problem, try doing these things first:
• Make sure all cables and other connected devices are properly and securely connected.
• Make sure you are using Turret as described in this user guide.
• Make sure your other devices or media are working properly.
- If you believe Turret is not working properly, check the following table for your problem and solution.
| Problem: Solution: | |
| Power does not turn on. | Make sure Turret's power input is properly connected to a power outlet using the included power adapter. |
| Turret does not produce any sound, or the sound is distorted. | Make sure all cable and device connections are secure and correct.Make sure none of the cables are damaged.Make sure the settings on your loudspeaker, mixer, etc. are correct.Make sure you have selected Turret as an audio playback device in your computer or software. |
| Sound from the microphone is not heard. | Make sure the Microphone is turned on.Make sure you have set Turret as an audio recording device in your computer or software. |
| Video from the camera does not appear. | Make sure the Camera is turned on.Make sure you have set Turret as your video capture device in your computer software. |
Technical Specifications
| Camera | |
| Camera ON/OFF Button | ON – Blue LED; OFF – Black Screen (camera is still connected on USB) |
| Camera Angle | Manually adjustable +/- 15° vertical, 300° horizontal |
| Camera Height | With Extension: 17” (432.4 mm) Without Extension: 15.1” (383 mm) |
| Auto Focus | Multi-Step |
| Low Light Correction | Automatic |
| Subject Lighting | Multiple LED with color filters (White/Warm/Cool) with variable level control |
| Diagonal Field of View | >78° |
| Optical Resolution | 2 MP |
| Video | 1920 x 1080 @ 30 FPS |
| Compression | H.264 and M-JPEG compatible |
| USB | USB 2.0 – Class 2 Compliant Driver |
| Operating Systems | Windows XP, 7, 8, 10; macOS 10.6 or later; LINUX; Android |
| Microphone | |
| Mic Mute ON/OFF Button | ON – Blue LED; OFF – No LED, Mic is Muted |
| Microphone LED | ON – Blue LED; OFF – Red LED, Mic is Muted |
| Microphone Angle | Manually adjustable +/- 90° vertical; 180° horizontal (about arm) |
| Microphone Distance | 4” – 27” (100 – 685 mm) from stand on articulating arm |
| Pop Windscreen | Integrated removable/replaceable |
| Condenser Mic Capsule | 14 mm electret condenser |
| Polar Pattern | Cardioid |
| Sample Rate | 32 kHz / 44.1 kHz / 48 kHz @ 16-bit |
| Status LED | Red – Muted; Blue – On |
| Pad Switch | 0 dB / -10 dB |
| USB | USB 2.0 Class Compliant |
| Operating Systems | Windows 7, 8, 10; macOS 10.6 or later |
| Headphone | |
| Power Output | 130 mW max (Variable Volume Control 0-Max output) |
| Frequency Response | 20 Hz – 20 kHz |
| THD | 0.009% |
| Audio Out | 1/8" (3.5 mm), 2-Channel Stereo Output with variable mix (Mic and USB Inputs) |
| USB | |
| USB 1/2 | 2 x Type A USB 3.0, 0.75 A total available current between 2 ports for powering devices. |
| To PC 1 x USB-C connector / USB 3.0 connection | |
| USB Audio In | Class 2 compliant speaker device for audio to be monitored on headphone output, set by user in the computer. |
| General | |
| Dimensions With Arm fully in: 16.7” (424 mm) Width including base (max)With Arm fully out: 33.9” (860 mm) Width including base (max)Base Dimension: 6.85” (174 mm) Width x 8.04” Length (204.1 mm)Height with Extension: 19.6” (498.3 mm)Height without Extension: 17.7” (448.9 mm) | |
| Weight | 7.7 lbs3.5 kg |
| Power | AC-DC Power Supply 100 ~ 240 VAC compatible(12 VDC @ 1 Amp output) |
Specifications are subject to change without notice.
Trademarks & Licenses
Marantz is a trademark of D&M Holdings Inc., registered in the U.S. and other countries. Marantz Professional products are produced by inMusic Brands, Inc., Cumberland, RI 02864, USA.
Apple and macOS are trademarks or service marks of Apple Inc., registered in the U.S. and other countries.
Windows is a registered trademark of Microsoft Corporation in the United States and other countries.
All other product names, company names, trademarks, or trade names are those of their respective owners.
marantzpro.com


- User Guide (English)
- Introduction
- Box Contents
- Support
- Setup
- Connection
- Audio Setup
- Windows:
- macOS:
- Video Setup
- Features
- Operation
- Camera
- LED Ring Light
- Filters
- Auto Focus
- Microphone
- Muting/Unmuting
- Mic Sensitivity
- Pop Filter
- Headphones (Monitoring)
- Adjusting the Mix Knob
- Adjusting the Volume Knob
- Troubleshooting
- Trademarks & Licenses
- marantzpro.com
Brand : MARANTZ
Model : Turret
Category : Microphone