DZ121ND - Blu-ray player LG - Free user manual and instructions
Find the device manual for free DZ121ND LG in PDF.
User questions about DZ121ND LG
0 question about this device. Answer the ones you know or ask your own.
Ask a new question about this device
Download the instructions for your Blu-ray player in PDF format for free! Find your manual DZ121ND - LG and take your electronic device back in hand. On this page are published all the documents necessary for the use of your device. DZ121ND by LG.
USER MANUAL DZ121ND LG
Installation and Operating Guide
http://www.lg.ca
Model Number | ZDA-710 | DVD Player
zenith

natural_image
Abstract black lightning bolt graphic on white background (no text or symbols)
CAUTION RISK OF ELECTRIC SHOCK DO NOT OPEN

CAUTION: TO REDUCE THE RISK OF ELECTRIC SHOCK
DO NOT REMOVE COVER (OR BACK) NO USER-SERVICEABLE PARTS INSIDE REFER SERVICING TO QUALIFIED SERVICE PERSONNEL.

This lightning flash with arrowhead symbol within an equilateral triangle is intended to alert the user to the presence of uninsulated dangerous voltage within the product's enclosure that may be of sufficient magnitude to constitute a risk of electric shock to persons.

The exclamation point within an equilateral triangle is intended to alert the user to the presence of important operating and maintenance (servicing) instructions in the literature accompanying the product.
WARNING: TO PREVENT FIRE OR ELECTRIC SHOCK HAZARD, DO NOT EXPOSE THIS PRODUCT TO RAIN OR MOISTURE.
CAUTION: Do not block any ventilation openings. Install in accordance with the manufacturer's instructions.
Slots and openings in the cabinet are provided for ventilation and to ensure reliable operation of the product and to protect it from over heating.
The openings should be never be blocked by placing the product on a bed, sofa, rug or other similar surface. This product should not be placed in a built-in installation such as a bookcase or rack unless proper ventilation is provided or the manufacturer's instruction have been adhered to.
CAUTION: VISIBLE AND INVISIBLE LASER RADIATION WHEN OPEN AND INTERLOCKS DEFEATED.
CAUTION:
This product employs a Laser System.
To ensure proper use of this product, please read this owner's manual carefully and retain it for future reference. Should the unit require maintenance, contact an authorized service center.
Use of controls, adjustments or the performance of procedures other than those specified herein may result in hazardous radiation exposure.
To prevent direct exposure to laser beam, do not try to open the enclosure. Visible laser radiation when open. DO NOT STARE INTO BEAM.
CAUTION: The apparatus should not be exposed to water (dripping or splashing) and no objects filled with liquids, such as vases, should be placed on the apparatus.
FCC WARNING: This equipment may generate or use radio frequency energy. Changes or modifications to this equipment may cause harmful interference unless the modifications are expressly approved in the instruction manual. The user could lose the authority to operate this equipment if an unauthorized change or modification is made.
REGULATORY INFORMATION: FCC Part 15
This equipment has been tested and found to comply with the limits for a Class B digital device, pursuant to Part 15 of the FCC Rules. These limits are designed to provide reasonable protection against harmful interference when the product is operated in a residential installation. This product generates, uses, and can radiate radio frequency energy and, if not installed and used in accordance with the instruction manual, may cause harmful interference to radio communications. However, there is no guarantee that interference will not occur in a particular installation. If this product does cause harmful interference to radio or television reception, which can be determined by turning the product off and on, the user is encouraged to try to correct the interference by one or more of the following measures:
• Reorient or relocate the receiving antenna.
- Increase the separation between the product and receiver.
- Connect the product into an outlet on a circuit different from that to which the receiver is connected.
- Consult the dealer or an experienced radio/TV technician for help.
CAUTION concerning the Power Cord
Most devices are recommended be placed on a dedicated circuit;
That is, a single outlet circuit which powers only that electronic device and has no additional outlets or branch circuits. Check the specification page of this owner's manual to be certain.
Do not overload wall outlets. Overloaded wall outlets, loose or damaged wall outlets, extension cords, frayed power cords, or damaged or cracked wire insulation are dangerous. Any of these conditions could result in electric shock or fire. Periodically examine the cord of your appliance, and if its appearance indicates damage or deterioration, unplug it, discontinue use of the appliance, and have the cord replaced with an exact replacement part by an authorized servicer.
Protect the power cord from physical or mechanical abuse, such as being twisted, kinked, pinched, closed in a door, or walked upon. Pay particular attention to plugs, wall outlets, and the point where the cord exits the appliance.
To disconnect power from the mains, pull out the mains cord plug. When installing the product, ensure that the plug is easily accessible.
IMPORTANT SAFETY INSTRUCTIONS
CAUTION: PLEASE READ AND OBSERVE ALL WARNINGS AND INSTRUCTIONS IN THIS OWNER'S MANUAL. AND THOSE MARKED ON THE PRODUCT. RETAIN THIS BOOKLET FOR FUTURE REFERENCE.
This product has been designed and manufactured to assure personal safety. Improper use can result in electric shock or fire hazard. The safeguards incorporated in this product will protect you if you observe the following procedures for installation, use, and servicing.
This product does not contain any parts that can be repaired by the user.
DO NOT REMOVE THE CABINET COVER, OR YOU MAY BE EXPOSED TO DANGEROUS VOLTAGE. REFER SERVICING TO QUALIFIED SERVICE PERSONNEL ONLY.
-
Read these instructions. - All these safety and operating instructions should be read before the product is operated.
-
Keep these instructions. - The safety, operating and use instructions should be retained for future reference.
-
Heed all warnings. - All warnings on the product and in the operating instructions should be adhered to.
-
Follow all instructions. - All operating and use instructions should be followed.
-
Do not use this apparatus near water. – For example: near a bath tub, wash bowl, kitchen sink, laundry tub, in a wet basement; or near a swimming pool; and other areas located near water.
-
Clean only with dry cloth. – Unplug this product from the wall outlet before cleaning. Do not use liquid cleaners.
-
Do not block any ventilation openings. Install in accordance with the manufacturer's instructions. - Slots and openings in the cabinet are provided for ventilation and to ensure reliable operation of the product and to protect it from over-heating. The openings should never be blocked by placing the product on a bed, sofa, rug or other similar surface. This product should not be placed in a built-in installation such as a bookcase or rack unless proper ventilation is provided or the manufacturer's instructions have been adhered to.
-
Do not install near any heat sources such as radiators, heat registers, stoves, or other apparatus (including amplifiers) that produce heat.
-
Do not defeat the safety purpose of the polarized or grounding-type plug. A polarized plug has two blades with one wider than the other. A grounding type plug has two blades and a third grounding prong. The wide blade or the third prong are provided for your safety. If the provided plug does not fit into your outlet, consult an electrician for replacement of the obsolete outlet.
-
Protect the power cord from being walked on a pinched particularly at plugs, convenience receptacles, and the point where they exit from the product.
-
Only use attachments/accessories specified by the manufacturer.
natural_image
Abstract geometric shape resembling a circular frame with a triangular cutout, no text or symbols present-
Use only with the cart, stand, tripod, bracket, or table specified by the manufacturer, or sold with apparatus. When a cart is used, use caution when moving the cart/product combination to avoid injury from tip-over.
-
Unplug this product during lightning storms or when unused for long periods of time.
-
Refer all servicing to qualified service personnel. Servicing is required when the product has been damaged in any way, such as power-supply cord or plug is damaged, liquid has been spilled or objects have fallen into the product, the product has been exposed to rain or moisture, does not operate normally, or has been dropped.
Contents
Introduction .....5-8
About the ⏰ Symbol Display ....5
Symbol used in this Manual ....5
Notes on Discs 5
Handling Discs 5
Storing Discs 5
Cleaning Discs 5
Types of Playable Discs 6
Regional Code 6
Front Panel 7
Remote Control 8
Remote Control Operation 8
Remote Control Battery Installation .....8
Installation and Setup .....9-14
Setting up the Player 9
DVD Player Connections 9
Video and Audio Connections to Your TV ...9
Audio Connection to Optional Equipment ..10
Displaying Disc Information on-screen ....11
Initial Settings ....11
General Operation 11
LANGUAGE 12
- Menu Language 12
• Disc Audio / Subtitle / Menu .....12
DISPLAY 12
• TV Aspect 12
• Display Mode 12
• Progressive Scan 12
• TV Output Select 12
AUDIO 13
• Dolby Digital / DTS / MPEG .....13
• Sample Freq. (Frequency) .....13
• Dynamic Range Control (DRC) .....13
LOCK (Parental Control) 13
• Rating 13
- Password 13
• Area Code 14
OTHERS 14
• PBC 14
• Auto Play 14
• B.L.E. 14
Operation 15-19
General Features 15
Additional Features 16
Playing an Audio CD or MP3/WMA file ....17
Programmed Playback 17
Erasing a Track from Program List .....17
Viewing a JPEG file 18
Moving to another File 18
To rotate picture .....18
Still Picture 18
Zoom 18
Controlling other TVs with the remote control .19
Maintenance and Service 19
Reference .....20-21
Language Codes 20
Area Codes 20
Troubleshooting 21
Specifications 21
Introduction
To ensure proper use of this product, please read this owner's manual carefully and retain for future reference.
This manual provides information on the operation and maintenance of your DVD player. Should the unit require service, contact an authorized service location.
About the ∅ Symbol Display
“∅” may appear on your TV display during operation and indicates that the function explained in this owner's manual is not available on that specific DVD video disc.
Symbol Used in this Manual
Note:
Indicates special notes and operating features.
Tip:
Indicates tips and hints for making the task easier.
A section whose title has one of the following symbols is applicable only to the disc represented by the symbol.

All discs listed below

DVD and finalized DVD±R/RW

Video CDs

Audio CDs

MP3 files

WMA files
Notes on Discs
Handling Discs
Do not touch the playback side of the disc. Hold the disc by the edges so that fingerprints do not get on the surface. Never stick paper or tape on the disc.


Storing Discs
After playing, store the disc in its case. Do not expose the disc to direct sunlight or sources of heat and never leave it in a parked car exposed to direct sunlight.
Cleaning Discs
Fingerprints and dust on the disc can cause poor picture quality and sound distortion. Before playing, clean the disc with a clean cloth. Wipe the disc from the center out.

natural_image
Two hand diagrams showing a circle and a cross, no text or symbols presentDo not use strong solvents such as alcohol, benzine, thinner, commercially available cleaners, or anti-static spray intended for older vinyl records.
Types of Playable Discs
 | DVD(8 cm / 12 cm disc) |
 | Video CD (VCD/SVCD)(8 cm / 12 cm disc) |
 | Audio CD(8 cm / 12 cm disc) |
In addition, this unit plays DVD±R/RW and CD-R/RW, SVCD that contains audio titles, MP3, WMA, and/or JPEG files.
Notes:
- Depending on the conditions of the recording equipment or the CD-R/RW (or DVD±R/RW) disc itself, some CD-R/RW (or DVD±R/RW) discs cannot be played on the unit.
- Do not use irregularly shaped CDs (e.g., heart-shaped or octagonal) since they may result in malfunctions.
- This unit requires discs and recordings to meet certain technical standards in order to achieve optimal playback quality. Pre-recorded DVDs are automatically set to these standards. There are many different types of recordable disc formats (including CD-R containing MP3 or WMA files) and these require certain pre-existing conditions (see above) to ensure compatible playback.
Customers should note that permission is required in order to download MP3 / WMA files and music from the Internet. Our company has no right to grant such permission. Permission should always be sought from the copyright owner.
Regional Code
This unit has a regional code printed on the rear of the unit. This unit can play only DVD discs labelled same as the rear of the unit or "ALL".
Notes on Regional Codes
- Most DVD discs have a globe with one or more numbers in it clearly visible on the cover. This number must match your unit's regional code or the disc cannot play.
- If you try to play a DVD with a different regional code from your player, the message "Check Regional Code" appears on the TV screen.
Notes on Copyrights:
It is forbidden by law to copy, broadcast, show, broadcast via cable, play in public, or rent copyrighted material without permission. This product features the copy protection function developed by Macrovision. Copy protection signals are recorded on some discs. When recording and playing the pictures of these discs picture noise will appear. This product incorporates copyright protection technology that is protected by method claims of certain U.S. patents and other intellectual property rights owned by Macrovision Corporation and other rights owners. Use of this copyright protection technology must be authorized by Macrovision Corporation, and is intended for home and other limited viewing uses only unless otherwise authorized by Macrovision Corporation. Reverse engineering or disassembly is prohibited.
CONSUMERS SHOULD NOTE THAT NOT ALL HIGH DEFINITION TELEVISION SETS ARE FULLY COMPATIBLE WITH THIS PRODUCT AND MAY CAUSE ARTIFACTS TO BE DISPLAYED IN THE PICTURE. IN CASE OF 525 PROGRESSIVE SCAN PICTURE PROBLEMS, IT IS RECOMMENDED THAT THE USER SWITCH THE CONNECTION TO THE 'STANDARD DEFINITION' OUTPUT. IF THERE ARE QUESTIONS REGARDING OUR TV SET COMPATIBILITY WITH THIS MODEL 525p DVD PLAYER, PLEASE CONTACT OUR CUSTOMER SERVICE CENTER.
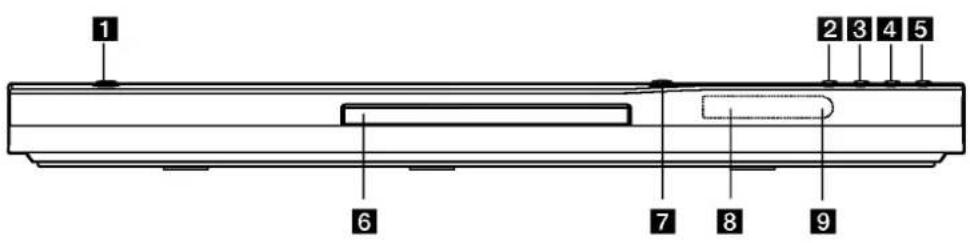
Front Panel
text_image
1 2 3 4 5 6 7 8 9
POWER
Switches the unit ON and OFF.

▶ (PLAY)
Starts playback.

■ (STOP)
Stops playback.

SKIP (◀◀)
Returns to beginning of current chapter or track or go to previous chapter or track.

SKIP (▶▶▶)
Go to next chapter or track.

Disc Tray
Insert a disc here.

▲ (OPEN / CLOSE)
Opens or closes the disc tray.

Display window
Shows the current status of the unit.

Remote Sensor
Point the remote control here.
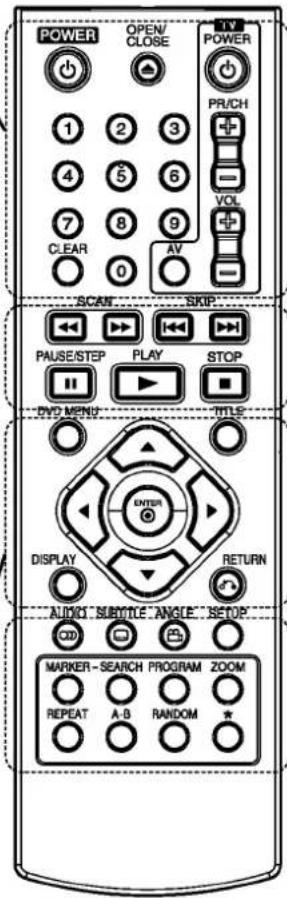
Remote Control
POWER Switches DVD Player ON and OFF
OPEN/CLOSE (▲)
Opens and closes the disc tray.
0-9 numerical buttons
Selects numbered options in a menu.
CLEAR
Removes a track number on the Program List or a mark on the Marker Search menu.
TV Control Buttons
POWER: Turns the TV on or off. AV: Selects the TV's source.
PR/CH +/-: Selects TV's channel. VOL +/-: Adjusts TV's volume.
DVD MENU
Accesses menu on a DVD disc.
TITLE
Displays the disc's Title menu, if available.
◀ / ▶ / ▲ / ▼ (left/right/up/down) Selects an option in the menu.
DISPLAY
Accesses On-Screen Display.
RETURN (○)
Removes the setup menu.
Displays the video CD with PBC.
text_image
POWER OPEN CLOSE TV POWER PR/CH 1 2 3 4 5 6 7 8 9 CLEAR AV SCAN SKIP PAUSE/STEP PLAY STOP DVD MENU TITLE ENTER DISPLAY RETURN AUDIO SUBOTLE ANGLE SETOP CD0 REPEAT A-B RANDOM * MARKER-SEARCH PROGRAM ZOOMSCAN (◄◄ / ►►)
Search backward or forward.
SKIP (I ◀◀ / ▶▶▶ I)
Go to next chapter or track. Returns to beginning of current chapter or track or go to previous chapter or track.
PAUSE / STEP (Ⅱ)
Pauses playback temporarily/press repeatedly for frame-by-frame playback.
(PLAY)
Starts playback.
STOP (■)
Stops playback.
AUDIO
Selects an audio language or an audio channel.
SUBTITLE
Selects a subtitle language.
ANGLE
Selects a DVD camera angle, if available.
SETUP
Accesses or removes the Setup menu.
MARKER
Marks any point during playback.
SEARCH
Displays MARKER SEARCH menu.
PROGRAM
Enter to program edit mode.
ZOOM
Enlarges DVD video image.
REPEAT
Repeat chapter, track, title, all.
A-B
Repeat sequence from point A to point B.
RANDOM
Plays tracks in random order.
Remote Control Operation
Point the remote control at the remote sensor and press the buttons.
Caution:
Do not mix old and new batteries and never mix different types of batteries such as standard, alkaline, etc.
Remote Control Battery installation
Detach the battery cover on the rear of the remote control, and insert two batteries (size AAA) with ⊕ and ⊖ aligned correctly.
Installation and Setup
Setting up the Player
The picture and sound of a nearby TV, VCR, or radio may be distorted during playback. If this occurs, position the player away from the TV, VCR, or radio, or turn off the unit after removing the disc.
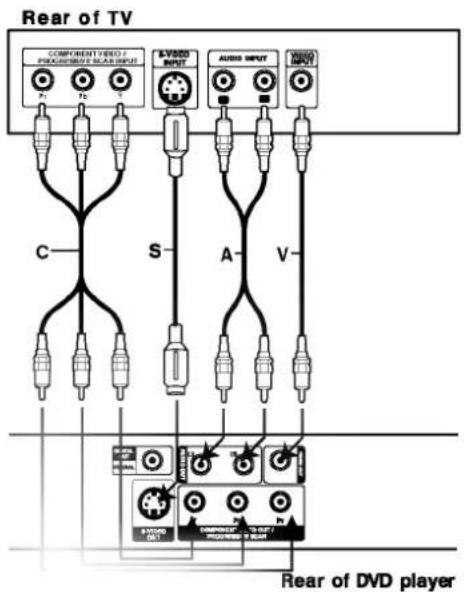
DVD Player Connections
Depending on your TV and other equipment there are various ways you can connect the player. Please refer to the manuals of your TV, stereo system or other devices as necessary for additional connection information.
text_image
Rear of TV COMPONENT VIDEO / PROGRAMMING SLAR INPUT P1 P2 P3 S A V AUDIO INPUT AUDIO INPUT C S A V Rear of DVD playerCaution:
You must set the TV Output Select option to use COMPONENT VIDEO OUT/PROGRESSIVE SCAN and S-Video jacks. (Refer to page 12.)
Video and Audio Connections to Your TV
Make sure the unit is connected directly to the TV and not to a VCR, otherwise the DVD image could be distorted by the copy protection system.
Video – Connect the VIDEO OUT jack on the unit to the video in jack on the TV using the video cable (V).
S-Video: Connect the S-VIDEO OUT jack on the DVD Player to the S-Video in jack on the TV using the S-Video cable (S).
Component Video – Connect the COMPONENT VIDEO OUT/PROGRESSIVE SCAN jacks on the DVD Player to the corresponding in jacks on the TV using an Y Pb Pr cable (C).
Progressive Scan
- If your television is a high-definition or "digital ready" television, you may take advantage of the DVD Player's progressive scan output for the highest video resolution possible.
- If your TV does not accept the Progressive Scan format, the picture will appear scrambled if you try Progressive Scan on the DVD Player.
Notes:
- Set the Progressive to "On" on the setup menu for progressive signal, see page 12.
- Set the progressive to "Off" by removing any disc from the unit and close the disc tray. Confirm that "no disc" is displayed on the display window. Then press STOP and hold it for five seconds before releasing it.
- Progressive scan does not work with the composite video connection (yellow VIDEO OUT jack).
Audio – Connect the left and right AUDIO OUT jacks of the unit to the audio left and right IN jacks on the TV (A) using the audio cables. Do not connect the unit's AUDIO OUT jack to the phone in jack (record deck) of your audio system.
Audio Connection to Optional Equipment
Connect the DVD player to your optional equipment for audio output.
Rear of DVD player
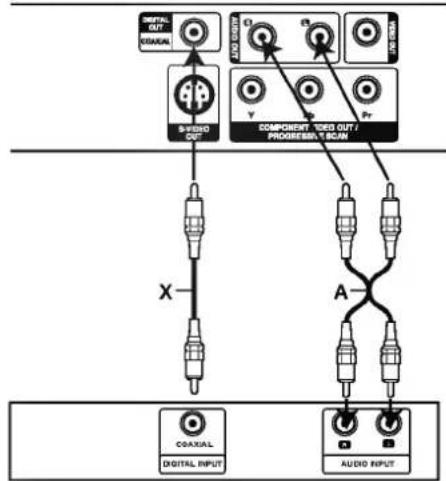
flowchart
graph TD
    A["COAXIAL"] -->|X| B["DIGITAL INPUT"]
    C["COMPONENT/development scan"] -->|A| D["AUDIO INPUT"]
    E["SPEED OUT"] --> F["OUTPUT"]
    G["AVG OUTPUT"] --> H["AVG"]
    I["ORANGE"] --> J["ORANGE"]
Amplifier (Receiver)
Manufactured under license from Dolby Laboratories. "Dolby", "Pro Logic", and the double-D symbol are trademarks of Dolby Laboratories.
DTS and DTS Digital Out are trademarks of Digital Theater Systems, Inc.
Amplifier equipped with 2-channel analog stereo or Dolby Pro Logic II / Pro Logic: Connect the left and right AUDIO OUT jacks on the DVD player to the audio left and right IN jacks on your amplifier, receiver, or stereo system, using the audio cables (A).
Amplifier equipped with 2-channel digital stereo (PCM) or audio / video receiver equipped with a multi-channel decoder (Dolby Digital™, MPEG 2, or DTS): Connect one of the DVD Player's DIGITAL AUDIO OUT jacks (COAXIAL X) to the corresponding in jack on your amplifier. Use an optional digital (COAXIAL X) audio cable.
Digital Multi-channel sound
A digital multi-channel connection provides the best sound quality. For this you need a multi-channel audio / video receiver that supports one or more of the audio formats supported by your DVD player such as MPEG 2, Dolby Digital and DTS. Check the receiver manual and the logos on the front of the receiver.
Notes:
- If the audio format of the digital output does not match the capabilities of your receiver, the receiver produces a strong, distorted sound or no sound at all.
- Six Channel Digital Surround Sound via a digital connection can only be obtained if your receiver is equipped with a Digital Multi-channel decoder.
Displaying Disc Information on-screen
You can display various information about the disc loaded on-screen.
-
Press DISPLAY to show various playback information. The items displayed differ depending on the disc type or playing status.
-
You can select an item by pressing ◀/▶ and change or select the setting by pressing ▲/▼.

- Title (Track) – Current title (or track) number/total number of titles (or tracks)
- Chapter – Current chapter number/total number of chapters
• Time – Elapsed playing time
Note:
If no button is pressed for a few seconds, the on-screen display disappears.
Initial Settings
By using the Setup menu, you can make various adjustments to items such as picture and sound. You can also set a language for the subtitles and the Setup menu, among other things. For details on each Setup menu item, see pages 12 to 14.
To display and exit the Menu :
Press SETUP to display the menu. A second press of SETUP will take you back to initial screen.
To go to the next level :
Press ▶ on the remote control.
To go back to the previous level :
Press ◀ on the remote control.
General Operation
- Press SETUP. The Setup menu appears.
natural_image
Dark gradient background with no visible text, symbols, or identifiable objects- Use ◀/▶ to select the desired option then press ▼ to move to the second level. The screen shows the current setting for the selected item, as well as alternate setting(s).
- Use ▲ / ▼ to select the second desired option then press ▶ to move to the third level.
- Use ▲ / ▼ to select the desired setting then press ENTER to confirm your selection. Some items require additional steps.
- Press SETUP, RETURN or PLAY to exit the Setup menu.
LANGUAGE
natural_image
Dark gradient background with no visible text, symbols, or identifiable objectsMenu Language
Select a language for the Setup menu and on-screen display.
Disc Audio / Subtitle / Menu
Select the language you prefer for the audio track (disc audio), subtitles, and the disc menu.
Original – Refers to the original language in which the disc was recorded.
Other – To select another language, press number buttons then ENTER to enter the corresponding 4-digit number according to the language code list on page 20. If you enter the wrong language code, press CLEAR.
DISPLAY
natural_image
Dark gradient background with no visible text, symbols, or identifiable objectsTV Aspect
4:3 – Select when a standard 4:3 TV is connected.
16:9 - Select when a 16:9 wide TV is connected.
Display Mode
Display Mode setting works only when the TV Aspect mode is set to "4:3".
Letterbox – Displays a wide picture with bands on the upper and lower portions of the screen.
Panscan – Automatically displays the wide picture on the entire screen and cuts off the portions that do not fit.
Progressive Scan
Progressive Scan Video provides the highest quality pictures with less flickering. If you are using the Component Video jacks for connection to a TV or monitor that is compatible with a progressive scan signal, set Progressive Scan to On. Press ENTER to confirm your selection. The confirm menu will appear.
Caution:
If your TV does not accept the Progressive Scan format, the picture will appear scrambled if you try Progressive Scan on the DVD Player.
If you set Progressive Scan to On in error, you must reset the unit.
1) Press ▶. Select "Off" using the ▲ / ▼ buttons. The Setup menu appears.
2) Press STOP and hold it for five seconds before releasing it. The video output will be restored to the standard setting and a picture will once again be visible on a conventional analog TV or monitor.
TV Output Select
Set the player's TV Output Select options according to the TV connection type.
YPbPr – When your TV is connected with the COMPONENT VIDEO OUT/PROGRESSIVE SCAN jacks on the DVD player.
S-Video – When your TV is connected with the S-Video jack.
AUDIO
Each DVD disc has a variety of audio output options. Set the player's AUDIO options according to the type of audio system you use.
natural_image
Dark image with minimal UI elements at bottom (no readable text or symbols)Dolby Digital / DTS / MPEG
Bitstream – Select "Bitstream" if you connect this unit's DIGITAL OUT jack to an amplifier or other equipment with a Dolby Digital, DTS or MPEG decoder.
PCM (for Dolby Digital / MPEG) – Select when connected to a two-channel digital stereo amplifier. DVDs encoded in Dolby Digital or MPEG will be automatically downmixed to two-channel PCM audio.
Off (for DTS): If you select "Off", the DTS signal is not output through the DIGITAL OUT jack.
Sample Freq. (Frequency)
If your receiver or amplifier is NOT capable of handling 96 kHz signals, select 48 kHz. When this choice is made, this unit automatically converts any 96 kHz signals to 48 kHz so your system can decode them.
If your receiver or amplifier is capable of handling 96 kHz signals, select 96 kHz. When this choice is made, this unit passes each type of signal through without any further processing.
Check the documentation for your amplifier to verify its capabilities.
Dynamic Range Control (DRC)
With the DVD format, you can hear a program's soundtrack in the most accurate and realistic presentation possible. However, you may wish to compress the dynamic range of the audio output (the difference between the loudest sounds and the quietest ones). This allows you to listen to a movie at a lower volume without losing clarity of sound. Set DRC to On for this effect.
LOCK (Parental Control)
natural_image
Grayscale abstract image with no discernible text, symbols, or structured contentRating
- Select Rating on the LOCK menu then press ▶.
- Select a rating from 1 to 8 using the ▲ / ▼ buttons and press ENTER. The password widow will appear.
Rating 1-8: Rating one (1) has the most restrictions and rating eight (8) is the least restrictive.
Unlock: If you select unlock, parental control is not active and the disc plays in full.
3. If you have not entered password yet:
When the "New Password" section is highlighted, enter a 4-digit password using the numbered buttons then press ENTER. Enter the 4-digit security password again to verify when the "Confirm Password" section is highlighted. The "OK" will be highlighted.
If you have entered password already:
Enter a 4-digit password you have entered using the numbered buttons. The "OK" will be highlighted
- Press ENTER to confirm your rating selection, then press SETUP to exit the menu.
Tips:
- If you make a mistake before pressing ENTER in each section, press CLEAR to enter again or repeatedly to delete password numbers one by one then correct it.
- If you enter the wrong password, you can not proceed to the next step.
Password
You can create or change password.
-
Select Password on the LOCK menu then press The "Change" is highlighted.
-
Press ENTER then the password window will appear.
3. To make a new password:
When the "New Password" section is highlighted, enter a 4-digit password using the numbered buttons then press ENTER. Enter the 4-digit password again to verify when the "Confirm Password" section is highlighted, then. The "OK" will be highlighted.
To change the password:
When the "Old Password" section is highlighted, enter the 4-digit password you have created then press ENTER. The "New Password" section will be highlighted. Enter a new 4-digit password using the numbered buttons then press ENTER. Enter the new 4-digit security password again to verify when the "Confirm Password" section is highlighted. The "OK" will be highlighted.
- Press SETUP to exit the menu.
If you forget your password
If you forget your security code you can clear it using the following steps:
- Remove any disc from the unit and close the disc tray. See that "nodISC" is displayed on the display window.
- Press SETUP and setup menu appears on the TV screen. Use the numbered buttons to enter the 6-digit number "210499". See that "P-CLr" is displayed on the display window.
- Enter a new password as described above.
Area Code
Enter the code of the area whose standards were used to rate the DVD video disc, based on the list in the reference chapter.
- Select "Area Code" on the LOCK menu then press ▶.
- Select the first character using ▲ / ▼ buttons.
- Shift the cursor using ▶ button and select the second character using ▲ / ▼ buttons then press ENTER, the password window will appear
- Press ENTER, the password window will appear.
- If you have not entered password yet:
When the "New Password" section is highlighted, enter a 4-digit password using the numbered buttons then press ENTER. Enter the 4-digit security password again to verify when the "Confirm Password" section is highlighted. The "OK" will be highlighted.
If you have entered password already:
Enter a 4-digit password you have entered using the numbered buttons. The "OK" will be highlighted. - Press ENTER to confirm your Area Code selection, then press SETUP to exit the menu.
OTHERS
natural_image
Blank image with no visible content, text, or symbolsPBC
Set Playback Control (PBC) to On or Off.
On: Video CDs with PBC are played according to the PBC.
Off: Video CDs with PBC are played the same way as Audio CDs.
Auto Play
You can set up the unit so a DVD disc automatically starts playing whenever the DVD is inserted. If Auto Play mode is set to On, this unit will search for title that has the longest playback time and then play back the title automatically.
Note:
The Auto Play function may not work for some DVDs.
B.L.E. (Black Level Expansion)
To select the black level of playback pictures. Set your preference and monitor's ability.
On: Expanded grey scale. (0 IRE cut off)
Off: Standard grey scale. (7.5 IRE cut off)
Operations
General features
| Buttons | Operations | Discs |
| ▲ (OPEN / CLOSE) | Opens or closes the disc tray. | ALL |
| II (PAUSE) | During playback, press II to pause playback. | ALL |
| Press II repeatedly to play Frame-by-Frame. | DVD VCD | |
| SKIP (I◄◄ / ►►I) | During playback, press SKIP (I◄◄ or ►►I) to go to the next chapter/track or to return to the beginning of the current chapter/track. | ALL |
| Press SKIP I◄◄ twice briefly to step back to the previous chapter/track. | ||
| SCAN (◄◄ / ►►) | During playback, press SCAN (◄◄ or ►►) repeatedly to select the required scan speed. DVD disc; 4 stepsVideo CD, MP3, WMA, Audio CD ; 3 steps | ALL |
| While the playback is paused, press SCAN ►► repeatedly to play in slow motion (4 steps, forward only). | DVD VCD | |
| REPEAT | During playback, press REPEAT repeatedly to select a desired repeat mode. DVD Video discs: Chapter/Title/OffVideo CD, Audio CD/MP3/WMA discs: Track/All/Off(or normal) | ALL |
| A-B | During playback, each press of A-B button to select point A and point B and repeats a sequence from point A (Starting point) to point B (End point). | DVD VCDACD |
| ZOOM | During playback or pause mode, press ZOOM to enlarge the video image (4 steps).You can move through the zoomed picture using ◀►▲▼ buttons. Press CLEAR to exit. | DVD VCD |
| RANDOM | During playback or in stop mode, press RANDOM for random playback. | ACD MP3 VCDWMA |
| TITLE | If the current DVD title has a menu, the title menu appears on the screen. Otherwise, the disc menu may appears. | DVD |
| DVD MENU | The disc menu appears on the screen. | DVD |
| (ANGLE) | During playback of DVD disc contains scenes recorded different camera angles, press ANGLE repeatedly to select a desired angle. | DVD |
| (SUBTITLE) | During playback, press SUBTITLE repeatedly to select a desired subtitle language. | DVD |
| (AUDIO) | During playback, press AUDIO repeatedly to hear a different audio language or audio track. | DVDVCD |
Notes on general features:
- On a Video CD with PBC, you must set PBC to Off on the setup menu to use the repeat function (See "PBC" on page 14).
- If you press SKIP (▶▶▶) once during Repeat Chapter (Track) playback, the repeat playback cancels.
- Zoom may not work on some DVDs.
- When you are playing a DVD disc contains scenes recorded different camera angles, the angle indicator will blink on the TV screen during scenes recorded at different angles as an indication that angle switching is possible.
Additional features
Time Search DVD VCD
To start playing at any chosen time on the disc:
- Press DISPLAY during playback.
- Press ◀ / ▶ to select the time clock icon and "-:-:-:-" appears.
- Input the required start time in hours, minutes, and seconds from left to right. If you enter the wrong numbers, press CLEAR to remove the numbers you entered. Then input the correct numbers.
- Press ENTER to confirm. Playback starts from the selected time.
Marker Search DVD VCD
To enter a Marker
You can start playback from up to nine memorized points. To enter a marker, press MARKER at the desired point on the disc. The Marker icon appears on the TV screen briefly. Repeat to enter up to nine markers.
To Recall or Clear a Marked Scene
- During disc playback, press SEARCH. The marker search menu appears on the screen.
- Within 10 seconds, press ◀ / ▶ to select a marker number that you want to recall or clear.
- Press ENTER and playback starts from the marked scene. Or, Press CLEAR and the marker number is erased from the list.
- You can play any marker by inputting its number on the marker search menu.
Last Scene Memory DVD ACD VCD
This player memorizes last scene from the last disc that is viewed. The last scene remains in memory even if you remove the disc from the player or switch off the player. If you load a disc that has the scene memorized, the scene is automatically recalled.
Note:
This player does not memorize the scene of a disc if you switch off the player before commencing to play the disc.
Screen Saver
The screen saver appears when you leave the DVD player in Stop mode for about five minutes. If the Screen Saver is displayed for five minutes, the DVD Player automatically turns itself off.
Playing an Audio CD or MP3/WMA file
This unit can play Audio CDs or MP3/WMA files recorded media.
Audio CD
Once you insert an audio CD a menu appears on the TV screen.
Press ▲ / ▼ to select a track then press PLAY or ENTER to playback starts.
MP3 / WMA
- Press ▲ / ▼ to select a folder, and press PLAY or ENTER to see the folder contents.
- Press ▲ / ▼ to select a track then press PLAY or ENTER. Playback starts.
Tips:
- If you are in a file list on the MUSIC menu and want to return to the Folder list, use the ▲ / ▼ to highlight 📄 and press PLAY or ENTER.
- Press DVD MENU to move to the next page. Press TITLE to move to the previous page.
- On a CD with MP3/WMA and JPEG you can switch MP3/WMA and JPEG. Press ▲ / ▼ to select a folder, and press ENTER to see the folder contents.
MP3 / WMA disc compatibility with this player is limited as follows:
- Sampling frequency: within 8 - 48 kHz (MP3), within 32 - 48kHz (WMA)
- Bit rate: within 8 - 320kbps (MP3), 32 - 192kbps (WMA)
- The player cannot read an MP3/WMA file that has a file extension other than ".mp3" / ".wma".
• CD-R physical format should be ISO 9660 - If you record MP3 / WMA files using software that cannot create a file system (eg. Direct-CD) it is impossible to playback MP3 / WMA files. We recommend that you use Easy-CD Creator, which creates an ISO 9660 file system.
- File names should have a maximum of 8 letters and must incorporate an .mp3 or .wma extension.
- They should not contain special letters such as / ? * : " < > | etc.
- The total number of files on the disc should be less than 648.
Programmed Playback
The program function enables you to store your favorite tracks from any disc in the player memory. A program can contain 30 tracks (Audio CD, MP3/WMA).
- Insert a disc. (Audio CD, MP3 or WMA.)
- Press ▲ / ▼ to select the desired file.
- Press PROGRAM during playback or in the stop mode. Repeat press PROGRAM to place additional tracks on the program list.
- Press DISPLAY. Program List menu appear. Press ▲ / ▼ to select the track you want to start playing.
Press DVD MENU to move to the next page.
Press TITLE to move to the previous page.
Audio CD Menu
MP3/WMA Menu
- Press PLAY or ENTER to start.
- To resume normal playback from programmed playback.
Press DISPLAY then select a track of list and then press PLAY or ENTER.
Erasing a Track from program list
-
Use ▲/▼ to select the track that you wish to erase from the program list.
-
Press CLEAR. Repeat to erase additional tracks on the list.
For details on each operation item, refer to relevant page.
Viewing a JPEG file
Using this DVD Player you can view discs with JPEG files.
- Insert a disc and close the tray. The PHOTO menu appears on the TV screen.
natural_image
Grayscale image with no discernible text, symbols, or identifiable objects- Press ▲ / ▼ to select a folder, and press ENTER or PLAY. A list of files in the folder appears. If you are in a file list and want to return to the previous Folder list, use the ▲ / ▼ buttons on the remote to highlight 📄 and press ENTER or PLAY.
- If you want to view a particular file, press ▲ / ▼ to highlight a file and press ENTER or PLAY. Viewing the file proceeding starts. While viewing a picture, you can press STOP to move to the previous menu (PHOTO menu).
Tips:
- Press DVD MENU to move to the next page. Press TITLE to move to the previous page.
- On a CD with MP3/WMA and JPEG you can switch MP3/WMA and JPEG. Press ▲ / ▼ to select a folder, and press ENTER to see the folder contents.
Moving to another File
Press SKIP (I◄◄ or ►►) once while viewing a picture to advance to the next or previous file.
To rotate picture
Press ◀ / ▶ during showing a picture to rotate the picture clockwise or counter clockwise.
Still Picture
- Press PAUSE/STEP during slide show. The player will now go into PAUSE mode.
- To return to the slide show, press PLAY, ENTER or press PAUSE/STEP again.
Zoom
Use zoom to enlarge the video image.
- Press ZOOM during playback to activate the Zoom function.
- Each press of the ZOOM button changes the screen in the sequence:
100% → 150% → 200% → 100%
3 Use the ◀▶▲▼ buttons to move through the zoomed picture. - To resume normal playback, press CLEAR or press ZOOM repeatedly to select the 100%.
JPEG disc compatibility with this player is limited as follows:
- Depending upon the size and number of JPEG files, it could take a long time for the DVD player to read the disc's contents. If you don't see an on-screen display after several minutes, some of the files may be too large — reduce the resolution of the JPEG files to less than 2M pixels as 2760 x 2048 pixels and burn another disc.
- The total number of files and folders on the disc should be less than 648.
- Ensure that all the selected files have the ".jpg" extensions when copying into the CD layout.
- If the files have ".jpe" or ".jpeg" extensions, please rename them as ".jpg" file.
- File names without ".jpg" extension will not be able to be read by this DVD player. Even though the files are shown as JPEG image files in Windows Explorer.
Controlling other TVs with the remote control
You can control the sound level, input source, and power switch of your LG TV with the supplied remote control.
You can control the sound level, input source, and power switch of non-LG TVs as well. If your TV is listed in the table below, set the appropriate manufacturer code.
- While holding down TV POWER button, press the number buttons to select the manufacturer code for your TV (see the table below).
- Release TV POWER button.
Code numbers of controllable TVs
If more than one code number is listed, try entering them one at a time until you find the one that works with your TV.
| Manufacturer | Code Number |
| LG / GoldStar | 1 (Default), 2 |
| Zenith | 1, 3, 4 |
| Samsung | 6, 7 |
| Sony | 8, 9 |
| Hitachi | 4 |
Notes:
- Depending on your TV, some or all buttons may not function on the TV, even after entering the correct manufacturer code.
- If you enter a new code number, the code number previously entered will be erased.
- When you replace the batteries of the remote, the code number you have set may be reset to the default setting. Set the appropriate code number again.
Maintenance and Service
Refer to the information in this chapter before contacting a service technician.
Handling the Unit
When shipping the unit
Please save the original shipping carton and packing materials. If you need to ship the unit, for maximum protection, re-pack the unit as it was originally packed at the factory.
Keeping the exterior surfaces clean
- Do not use volatile liquids such as insecticide spray near the unit.
- Do not leave rubber or plastic products in contact with the unit for a long period of time. since they leave marks on the surface.
Cleaning the unit
To clean the player, use a soft, dry cloth. If the surfaces are extremely dirty, use a soft cloth lightly moistened with a mild detergent solution.
Do not use strong solvents such as alcohol, benzine, or thinner, as these might damage the surface of the unit.
Maintaining the Unit
The unit is a high-tech, precision device. If the optical pick-up lens and disc drive parts are dirty or worn, the picture quality could be diminished.
Depending on the operating environment, regular inspection and maintenance are recommended after every 1,000 hours of use.
For details, please contact your nearest authorized service center.
Reference
Language Codes
Use this list to input your desired language for the following initial settings:
Disc Audio, Disc Subtitle, Disc Menu.
| Language | Code | Language | Code | Language | Code | Language | Code |
| Abkhazian | 6566 | Fiji | 7074 | Lingala | 7678 | Singhalese | 8373 |
| Afar | 6565 | Finnish | 7073 | Lithuanian | 7684 | Slovak | 8375 |
| Afrikaans | 6570 | French | 7082 | Macedonian | 7775 | Slovenian | 8376 |
| Albanian | 8381 | Frisian | 7089 | Malagasy | 7771 | Somali | 8379 |
| Ameharic | 6577 | Galician | 7176 | Malay | 7783 | Spanish | 6983 |
| Arabic | 6582 | Georgian | 7565 | Malayalam | 7776 | Sudanese | 8385 |
| Armenian | 7289 | German | 6869 | Maltese | 7784 | Swahili | 8387 |
| Assamese | 6583 | Greek | 6976 | Maori | 7773 | Swedish | 8386 |
| Aymara | 6588 | Greenlandic | 7576 | Marathi | 7782 | Tagalog | 8476 |
| Azerbaijani | 6590 | Guarani | 7178 | Moldavian | 7779 | Tajik | 8471 |
| Bashkir | 6665 | Gujarati | 7185 | Mongolian | 7778 | Tamil | 8465 |
| Basque | 6985 | Hausa | 7265 | Nauru | 7865 | Tatar | 8484 |
| Bengali; Bangla | 6678 | Hebrew | 7387 | Nepali | 7869 | Telugu | 8469 |
| Bhutani | 6890 | Hindi | 7273 | Norwegian | 7879 | Thai | 8472 |
| Bihari | 6672 | Hungarian | 7285 | Oriya | 7982 | Tibetan | 6679 |
| Breton | 6682 | Icelandic | 7383 | Panjabi | 8065 | Tigrinya | 8473 |
| Bulgarian | 6671 | Indonesian | 7378 | Pashto, Pushto | 8083 | Tonga | 8479 |
| Burmese | 7789 | Interlingua | 7365 | Persian | 7065 | Turkish | 8482 |
| Byelorussian | 6669 | Irish | 7165 | Polish | 8076 | Turkmen | 8475 |
| Cambodian | 7577 | Italian | 7384 | Portuguese | 8084 | Twi | 8487 |
| Catalan | 6765 | Japanese | 7465 | Quechua | 8185 | Ukrainian | 8575 |
| Chinese | 9072 | Javanese | 7487 | Rhaeto-Romance | 8277 | Urdu | 8582 |
| Corsican | 6779 | Kannada | 7578 | Rumanian | 8279 | Uzbek | 8590 |
| Croatian | 7282 | Kashmiri | 7583 | Russian | 8285 | Vietnamese | 8673 |
| Czech | 6783 | Kazakh | 7575 | Samoan | 8377 | Volapük | 8679 |
| Danish | 6865 | Kirghiz | 7589 | Sanskrit | 8365 | Welsh | 6789 |
| Dutch | 7876 | Korean | 7579 | Scots Gaelic | 7168 | Wolof | 8779 |
| English | 6978 | Kurdish | 7585 | Serbian | 8382 | Xhosa | 8872 |
| Esperanto | 6979 | Laothian | 7679 | Serbo-Croatian | 8372 | Yiddish | 7473 |
| Estonian | 6984 | Latin | 7665 | Shona | 8378 | Yoruba | 8979 |
| Faroese | 7079 | Latvian, Lettish | 7686 | Sindhi | 8368 | Zulu | 9085 |
Area Codes
Choose a Area code from this list.
| Area | Code | Area | Code | Area | Code | Area | Code |
| Afghanistan | AF | Ethiopia | ET | Malaysia | MY | Saudi Arabia | SA |
| Argentina | AR | Fiji | FJ | Maldives | MV | Senegal | SN |
| Australia | AU | Finland | FI | Mexico | MX | Singapore | SG |
| Austria | AT | France | FR | Monaco | MC | Slovak Republic | SK |
| Belgium | BE | Germany | DE | Mongolia | MN | Slovenia | SI |
| Bhutan | BT | Great Britain | GB | Morocco | MA | South Africa | ZA |
| Bolivia | BO | Greece | GR | Nepal | NP | South Korea | KR |
| Brazil | BR | Greenland | GL | Netherlands | NL | Spain | ES |
| Cambodia | KH | Herd and Mcdonald Islands | HM | Netherlands Antilles | AN | Sri Lanka | LK |
| Canada | CA | Hong Kong | HK | New Zealand | NZ | Sweden | SE |
| Chile | CL | Hungary | HU | Nigeria | NG | Switzerland | CH |
| China | CN | India | IN | Norway | NO | Taiwan | TW |
| Colombia | CO | Indonesia | ID | Oman | OM | Thailand | TH |
| Congo | CG | Israel | IL | Pakistan | PK | Turkey | TR |
| Costa Rica | CR | Italy | IT | Panama | PA | Uganda | UG |
| Croatia | HR | Jamaica | JM | Paraguay | PY | Ukraine | UA |
| Czech Republic | CZ | Japan | JP | Philippines | PH | United States | US |
| Denmark | DK | Kenya | KE | Poland | PL | Uruguay | UY |
| Ecuador | EC | Kuwait | KW | Portugal | PT | Uzbekistan | UZ |
| Egypt | EG | Libya | LY | Romania | RO | Vietnam | VN |
| El Salvador | SV | Luxembourg | LU | Russian Federation | RU | Zimbabwe | ZW |
Troubleshooting
| Symptom | Possible Cause | Correction |
| No power. | The power cord is disconnected. | Plug the power cord into the wall outlet securely. |
| The power is on, but the DVD player does not work. | No disc is inserted. | Insert a disc. (Check the disc indicator in the display window is lit.) |
| No picture. | The TV is not set to receive DVD signal output. | Select the appropriate video input mode on the TV. |
| The video cable is not connected securely. | Connect the video cable securely. | |
| No sound. | The equipment connected with the audio cable is not set to receive DVD signal output. | Select the correct input mode of the audio receiver so you can listen to the sound from the DVD player. |
| The power of the equipment connected with the audio cable is turned off. | Turn on the equipment connected with the audio cable. | |
| The AUDIO options are set to the wrong position. | Set the AUDIO option to the correct position, then turn on the DVD player again by pressing POWER. | |
| The DVD player does not start playback. | An unplayable disc is inserted. | Insert a playable disc. (Check the disc type and regional code.) |
| The rating level is set. | Change the rating level. | |
| The remote control does not work properly. | The remote control is not pointed at the remote sensor on the DVD player. | Point the remote control at the remote sensor of the DVD player. |
| The remote control is too far from the DVD player. | Operate the remote control closer to the DVD player. |
Specifications
General
Power requirements: AC 120V, 60 Hz
Power consumption: 8W
Dimensions (Approx.):
430 x 35 x 242 mm (17 x 1.4 x 9.5 inches)
(W x H x D) without foot
Weight (Approx.): 1.9 kg (4.2 lbs)
Operating temperature:
5 °C to 35 °C (41 °F to 95 °F)
Operating humidity: 5 % to 90 %
Outputs
VIDEO OUT:
1.0 (p-p), 75 Ω, sync negative, RCA jack x 1
S-VIDEO OUT:
(Y) 1.0 V (p-p), 75 Ω, negative sync, Mini DIN 4-pin x 1
(C) 0.3 V (p-p) 75 Ω
COMPONENT VIDEO OUT:
(Y) 1.0 V (p-p), 75 Ω, negative sync, RCA jack x 1
(Pb)/(Pr) 0.7 V (p-p), 75 Ω, RCA jack x 2
AUDIO OUT:
2.0 Vrms (1 KHz, 0 dB), 600 Ω, RCA jack (L, R) x 1
DIGITAL OUT (COAXIAL):
0.5 V (p-p), 75 Ω, RCA jack x 1
System
Laser:
Semiconductor laser, wavelength 650 nm
Signal system: NTSC
Frequency response:
DVD (PCM 96 kHz): 8 Hz to 44 kHz
DVD (PCM 48 kHz): 8 Hz to 22 kHz
CD: 8 Hz to 20 kHz
Signal-to-noise ratio:
More than 90 dB (ANALOG OUT connectors only)
Harmonic distortion: Less than 0.02%
Dynamic range:
More than 95 dB (DVD/CD)
Accessories:
Video cable (1), Audio cable (1), Remote control (1),
Batteries (2)
Note: Design and specifications are subject to change prior notice.
P/NO.:3834RD0090E
natural_image
Abstract black lightning bolt graphic on white background (no text or symbols)
AVIS
RISQUE DE CHOC
ELECTRIQUE
NE PAS OUVRIR

ATTENTION: POUR REDUIRE LE RISQUE DE CHOC ELECTRIQUE, N'ENLEVEZ PAS LE COUVERCLE (OU LA PARTIE ARRIERE). IL N'Y A PAS DE COMPOSANTS SUSCEPTIBLES D'ETRE REPARES PAR L'UTILISATEUR A L'INTERIEUR DE CETTE UNITE. CONFIEZ LE SERVICE TECHNIQUE A DU PERSONNEL QUALIFIE.

natural_image
Abstract circular shape with a geometric window and small dots, no text or symbols present.natural_image
Two hand-drawn diagrams showing a circle and a cross, no text or symbols present2 ▶ (PLAY) (LECTURE)
7 ▲ (OPEN / CLOSE) (OUVRIR / FERMER)
text_image
Screenshot of a video player interface with playback controls and selection optionsMenu
text_image
Screenshot of a video player interface with playback controls and playback buttons labeled 'Selection' and 'OK'Progressive Scan (balayage progressif)
natural_image
Dark image with a blurred horizontal band and three small icons at the bottom (no text or symbols)Dolby Digital / DTS / MPEG
natural_image
Grayscale image with no visible text, numbers, or symbols, showing a small icon at center (no readable text or symbols)Contrôle parental
text_image
Screenshot of a software interface with menu bar, navigation buttons, and a 'Selection' button at the bottom.PBC
natural_image
Grayscale gradient image with no visible text, symbols, or identifiable objectsDimensions (Approx.):
430 x 35 x 242 mm (17 x 1.4 x 9.5 pouces)
Poids (Approx.): 1.9 kg (4.2 lbs)