
DH18NS41 - Blu-ray player LG - Free user manual and instructions
Find the device manual for free DH18NS41 LG in PDF.



| Product Type | Internal DVD-ROM Drive |
| Interface | SATA |
| DVD-ROM Read Speed | 18x max |
| CD-ROM Read Speed | 48x max |
| Supported Disc Formats | DVD-ROM, DVD-R, DVD+R, DVD+R DL, DVD-R DL, DVD-RW, DVD+RW, DVD-RAM, CD-ROM, CD-R, CD-RW |
| Mounting | Internal, 5.25-inch bay |
| Power Supply | SATA power connector (15-pin) |
| Connector | SATA cable (7-pin) |
| Dimensions (approx.) | 170 x 145 x 42 mm |
| Weight (approx.) | 0.7 kg |
| Compatible Operating Systems | Windows XP, Windows Vista, Windows 7 |
| Minimum System Requirements | Pentium IV 2.4 GHz, 256 MB RAM, SATA-compatible motherboard |
| Loading Mechanism | Motorized Tray |
| Manual Ejection | Yes, via emergency eject hole |
| Regional Control | Region Playback Control Phase II, 5 changes maximum |
| Laser Safety | Class 1 Laser - Do not open the case (radiation hazard) |
| Maintenance | Clean with a soft cloth, do not use solvents |
| Supplied Accessories | Mounting screws (not confirmed) |
Frequently Asked Questions - DH18NS41 LG
User questions about DH18NS41 LG
0 question about this device. Answer the ones you know or ask your own.
Ask a new question about this device
Download the instructions for your Blu-ray player in PDF format for free! Find your manual DH18NS41 - LG and take your electronic device back in hand. On this page are published all the documents necessary for the use of your device. DH18NS41 by LG.
USER MANUAL DH18NS41 LG
To enjoy fully all the features and functions of your product, please read this owner's manual carefully and completely.
DH18NS41

3828HM1059M
www.lg.com
Internal Serial ATA Drive
PC Connection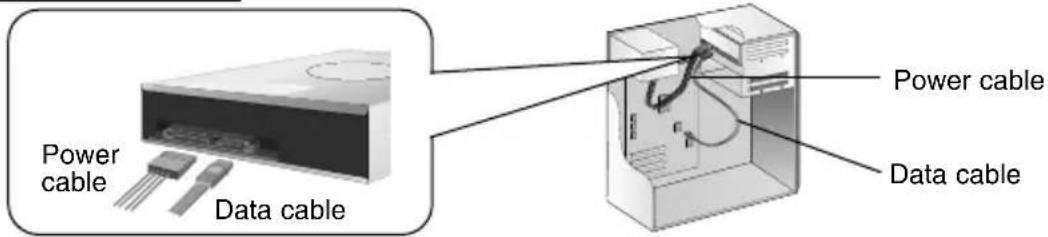
A | Location and Function of Controls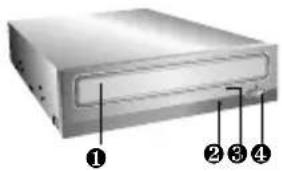
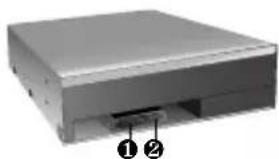
B | Connecting the SATA Power Cable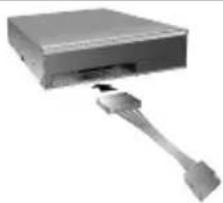
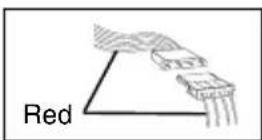
- Connect to the power connector of the PC.
C | Connecting the SATA Data Cable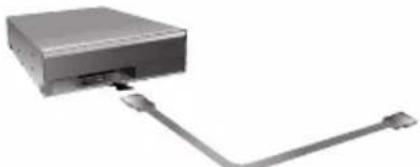
- Connect to the SATA connector on the PC's Motherboard.
English
Features
- Serial ATA interface • Data transfer rate (DVD-ROM max-18X-speed, CD-ROM max-48X-speed)
- Motorized tray loading system
- Designed for internal mounting • Emergency eject support
- Read compatible for DVD-R, DVD+R, DVD+R DL, DVD-R DL, DVD-RW, DVD+RW & DVD-RAM discs • Supports Region playback control Phase II
System Requirements*
• Pentium IV 2.4 GHz or higher - Motherboard that supports Serial ATA interface. • A minimum of 256 MB memory (higher recommended). - A suitable free standard 13.34 cm (5 1/4'') internal drive bay. - OS: Windows XP, Vista, Windows 7.
* Please note: Certain software (i.e. particularly those including Video playback) may require a considerably increased specification PC to give acceptable results. While this DVD-ROM drive can read DVD-video discs, decoding them to display on your pc's monitor requires separate MPEG decoding that is done by separate hardware (either an MPEG decoder card or MPEG decoding done by your video card), or separate software that you install to do MPEG decoding. These items are separate and are not included with this DVD-ROM drive.
Location and Function of Controls A
Front Panel
- Disc Tray
- Drive activity indicator
- Emergency Eject Hole
- Stop/Eject Button
Rear Panel
- SATA Power connector (15pin).
- SATA Data connector (7pin).
English
Installing the Drive
Before installing the drive, turn off the system power. Follow the steps below to install the DVD-ROM drive:
- Remove the cover from your computer system. Refer to the manual for the computer for details about removing the cover.
- Mounting the Drive
- Remove a 5 1/4-inch drive bay panel from the computer. Refer to the manual for the computer for details.
- Insert the drive unit into the bay. Do not apply excessive pressure to the cables inside the computer.
- Secure the drive with the screws. If there is not much space behind the drive, connect the SATA and other cables before securing the drive.
- PC Connection
The DVD-ROM drive connects to the motherboard of the host computer using a SATA interface cable.
- Connecting the SATA Power Cable Connect the power cable so the projection of the cable connector side comes to the left side. Be careful not to connect upside down.
- Connecting the SATA Data Cable Connect the data cable. Be careful not to connect upside down.
- When the installation of the drive unit is complete, replace the computer cover.
- Reconnect the computer power cord and turn on the computer.
Device Drivers
When using Windows XP, Vista or Windows 7 the installation of any software driver or special device is not required.
For Windows XP Users
■ In order to ensure normal drive operation, please check the following: - The drive is displayed in Windows XP : [Control Panel]-[System]-[Hardware]-[Device Manager]-[DVD/CD-ROM-Drive] - 32-bit is displayed in [Control Panel]-[System]-[Performance] ■ If the drive is not recognized by your computer, please check the following items. - If an indicator is displayed on the IDE controller in [Control Panel]-[System]-[Device Manager]-[Harddisk Controller], you will need to contact your PC's manufacturer or the motherboard's manufacturer and get the appropriate IDE controller driver. ■ Run ADD NEW HARDWARE in Control Panel to let the PC search again for the new device.
How to Use the Discs
When using CD-ROM discs, DVD-ROM discs, CD-R discs or CD-RW discs, don't attach any stickers or labels to the discs. Using discs with them attached not only causes read and write errors, but data on the disc may be lost due to damage to the disc itself.
The Discs in this unit operate at a very high speed! DO NOT use damaged, cracked or warped discs.
The drive's optical unit may be damaged if they break. DO NOT use non-standard discs.
Non-standard discs may not play or store data properly. Non-standard discs are any discs that are not the standard 12 cm CD type discs. This includes Sony Walkman™ discs, non-circular discs including promotional, business card discs, and other unusual discs.
Notes on CD-RW/DVD-RW discs
This product can read CD-RW/DVD-RW disc data. Note the following:
- A little longer time is needed to sense a CD-RW/DVD-RW disc when the operation starts, compared with standard CD-ROM/DVD-ROM discs.
- Since playback signal level of CD-RW/DVD-RW is lower than the replicated CD/DVD discs, reading speed of those discs is lower than that of the replicated discs to ensure data reading.
- Blank discs, discs that you failed to write data, or discs that session close processing has not been made, cannot be used.
- Operation may not start, or the data may not be read under the following conditions:
The quality of the recorded signal has deteriorated due to the dirt or scratches on the disc, or frequently rewritten discs. If the drive fails to read the disc, open the disc drawer, check the data side of the disc (side opposite the label side) for dust or scratches, and reinsert the disc and close the drawer to try to read the disc again.
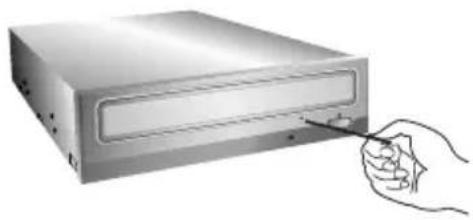
Emergency Eject
This drive has a feature that allows the CD to be ejected manually if necessary in an emergency, such as failure of the drive or a power outage.
NOTE: Don't use this feature except in an emergency.
1) Turn the power to OFF.
2) Poke a fine-tipped object (such as a straightened heavy duty paper clip) into the small hole above the eject button.
The front door will pop open and the disk tray will come partway out.
3) Pull the front door to open it all the way, then grip the disc tray between thumb and forefinger and gently pull it straight out.
NOTE: This feature is a last measure to be used only in an emergency. Using it excessively will cause malfunction. If you cannot get a good grip on the disc tray with your fingers, use a steel binder clip or spring clamp to pull it out.
Troubleshooting
Before Requesting Service
Before calling for service, check this list.
• The drive doesn't have power.
- Is the power supply cable from the host computer plugged in?
- Is the Power Connector to the drive securely attached?
• The system doesn't start.
- Are the power and SATA cables to the PC correctly connected?
- Is the total length of the SATA cable 20 inches or less? • Is each connector completely attached? Other connections may have been knocked loose while installing the drive.
- Cannot Read discs.
- Does the CD or DVD disc have dirt or scratches?
- Is the disc loaded in the drive with the read/write surface facing the right direction? (label up)
- Is the drive installed in the correct orientation?
- Was the drive or disc moved from a low temperature environment to a high temperature environment? (There is a possibility of condensation on the lens in the drive or on the surface of the disc.)
When you call for service, be prepared to give as much information as possible about your system, environment, and the specific problem. (What happened? When? How long? What was going on? Were there any error messages displayed? etc.)
Please Note: Since this product supports Region Playback Control Phase II, a certain MPEG decoder card or software without regional code setting may cause this drive not to read DVD-ROM discs. This DVD-ROM Drive enables you to change the regional code up to 5 times.
Important Precautions
Follow these precautions when handling the drive or discs.
Precautions
- Please take notice that the manufacturer of this equipment does not offer any warranty against data loss due to inappropriate installation or handling or direct or indirect damages.
- Please take notice that the manufacturer will bear no responsibility for direct or indirect damages caused by the use of this product or its malfunction.
- Please take notice that the manufacturer will bear no responsibility for damage to data caused by this product.
Installation
- Avoid placing the drive in a location subject to:
- high humidity
- high temperature
- excessive dust
- mechanical vibration
- direct sunlight
We recommend using the drive in a horizontal or vertical position. Do not install the drive at an angle.
Operation
- Don't move the drive suddenly from a cold place to a warm one or raise the room temperature suddenly. Condensation may occur, causing abnormal operation.
- Make sure to remove the disc before moving the drive. The disc may be damaged, causing data loss.
- Be careful to prevent foreign objects, such as liquids or metal, from entering the drive. In case a foreign object enters the drive, please consult the dealer where the drive was purchased.
- Don't interrupt the electric power while the drive is operating.
English
Specifications
| General Interface Description | ATA/ATAPI, INF-8090i v7 Revision 0.6, ATA/ATAPI -7 V1 Revision 4, MMC-5 Revision 4, Electrical, Connector; Serial ATA Gen 1i | ||
| Burst Data Transfer Rate | 1.5 Gb/s | ||
| Load/Eject | Tray type loading with Emergency eject | ||
| Buffer memory size | 198.75 kB | ||
| Applicable disc (read only) | DVD-ROM(Single layered and Dual layered disc), DVD-R 3.95GB & 4.7 GB, DVD-R Double, DVD+R,DVD+R Double, DVD-RW(Rev.1.0 & 1.1), DVD+RW, DVD-RAM, CD-ROM Mode1 and Mode2 data disc, CD-R,CD-RW,CD-ROM XA, CD-I, Photo-CD Multi-session, CD-Extra, CD TEXT, CD Audio disc, Mixed mode CD-ROM disc | ||
| Disc diameter | 12 cm/ 8 cm (8 cm disc can be used only with drive placed horizontally) | ||
| Performance | CD | Read CD-ROM/ R/ RW 48x/48x/40x max. | |
| DVD | Read DVD-ROM (Single Layer / Dual Layer) 18x /12x max. | ||
| Read DVD+R 16x max. | |||
| Read DVD+R Double Layer 8x max. | |||
| Read DVD+RW 12x max. | |||
| Read DVD-R 16x max. | |||
| Read DVD-R Double Layer 8x max. | |||
| Read DVD-RW 12x max. | |||
| Read DVD-RAM 5x max. | |||
| Access time (Random) | DVD-ROM 95 ms (Average) | ||
| CD-ROM 90 ms (Average) | |||
| Power | Voltage +5 V +/-5 % tolerance, less than 120 mVp-p ripple +12 V +/-10 % tolerance, less than 120 mVp-p ripple | ||
| Temperature | Operating Non-operating | 5 °C to 45 °C -30 °C to 60 °C | |
| Relative Humidity | Operating (No condensation) Non-operating (No condensation, Power Off, without disc) | 10 % to 80 % 10 % to 90 % | |
| Reliability | MTBF | 125,000 power on hours (POH) | |
NOTE: Specifications are subject to change without notice for improvement.
Caution!
The disc rotates at high speed in the drive unit.
Use of worn, damaged, or non-standard CD-ROM discs can only adversely affect the drive and cause the disc to shatter or crush while in use. Disc crush can only occur when you use a damaged CD-ROM disc in the drive. It is an extremely rare occurrence, but there are steps which can be taken to prevent it.
Always check your discs before inserting them into the drive.
- Take care not to use worn, cracked, damaged, warped or poor quality CD-ROMs, as this may cause damage to your drive.
- Check the clear plastic on the center of the disc; cracks here are the main cause of disc crush.
- Do not play CD-ROMs which are a non-standard (i.e., non-circular) shape, such as heart-shaped discs or discs in the shape of a business card.
How can you keep your discs from becoming damaged?
- When not in use, remove discs from the drive.
- Keep discs in the packaging supplied with them and out of direct sunlight and away from heat sources.
Excessive vibration or a sudden jolt to the drive during operation may cause a malfunction.
Avoid exposing the drive to sudden changes in temperature as it may cause condensation to collect inside the drive.
Please visit www.lgservice.com and install the automatic firmware download program, "LG ODD Online F/W update." This program will automatically check for new firmware releases and download them. It is also included on the software discs that accompany our drives.
Italian
In case of problems
NOTES on CD-RW/DVD-RW
Spanish
Portuguese
CAUTION: The laser used in the DVD-ROM drive can damage your eyes.
Do not attempt to open the cover.
To reduce the risk of electric shock, do not remove cover (or back).
No user-serviceable parts inside.
Refer servicing to qualified service personnel.
Use of controls or performance of procedures other than those specified here in may result in hazardous radiation exposure.
WARNING: To reduce the risk of fire or electric shock, do not expose this appliance to rain or moisture.
LG Electronics hereby declares that this/these product(s) is/are in compliance with the essential requirements and other relevant provisions of Directive 2004/108/EC, 2006/95/EC, and 2009/125/EC.
European representative: LG Electronics Service Europe B.V. Veluwezoom 15, 1327 AE Almere. The Netherlands (Tel: +31-(0)36-547-8888)
CLASS 1 LASER PRODUCT
CLASS 1 LASER PRODUCT
CLASS 1 LASER DEVICE
CLASS 1 LASER APPARATUS
CLASS 1 LASER PRODUCT
CLASS 1 LASER PRODUCT
CAUTION: CLASS 3B VISIBLE AND INVISIBLE LASER RADIATION WHEN OPEN. AVOID EXPOSURE TO THE BEAM.
WARNING: CLASS 3B VISIBLE AND INVISIBLE LASER RADIATION WHEN OPEN. AVOID EXPOSURE TO RADIATION.
WARNING: CLASS 3B VISIBLE AND INVISIBLE LASER RADIATION WHEN COVER IS OPEN. AVOID EXPOSURE TO THE BEAM.
WARNING: CLASS 3B VISIBLE AND INVISIBLE LASER RADIATION WHEN THIS PART IS OPEN. THE BEAM IS DANGEROUS.
WARNING! : COURSE 3B VISIBLE AND INVISIBLE WHEN OPEN YOU ARE EXPOSED TO LASER RADIATION. DO NOT LOOK INTO THE BEAM.
The appliance is not intended for use by young children or infirm persons without supervision.
Industry Canada requirement
This class B digital apparatus complies with Canadian ICES-003.
Note: This equipment has been tested and found to comply with the limits for a Class B digital device, pursuant to Part 15 of the FCC Rules.
These limits are designed to provide reasonable protection against harmful interference in a residential installation. This equipment generates, uses, and can radiate radio frequency energy and, if not installed and used in accordance with the instructions, may cause harmful interference to radio communications.
However, there is no guarantee that interference will not occur in a particular installation. If this equipment does cause harmful interference to radio or television reception, which can be determined by turning the equipment off and on, the user is encouraged to try to correct the interference by one or more of the following measures:
- Reorient or relocate the receiving antenna.
- Increase the separation between the equipment and receiver.
- Connect the equipment into an outlet on a circuit different from that to which the receiver is connected.
- Consult the dealer or an Authorized Service Center for help.
- FCC WARNING
Changes or modifications not expressly approved by the party responsible for compliance could void the user's authority to operate the equipment.
- This DVD-ROM Drive is for use only with UL listed personal computers that have installation instructions detailing user-installation of card cage accessory.
■ Microsoft® and Windows® are trademarks registered in the United States and other countries by the Microsoft Corporation. The company names and product names written in this manual are trademarks or registered trademarks of the respective companies.
©2011 Made by LG Electronics.
- INTERNAL SERIAL ATA DRIVE
- ENGLISH
- FEATURES
- SYSTEM REQUIREMENTS
- LOCATION AND FUNCTION OF CONTROLS A
- FRONT PANEL
- REAR PANEL
- INSTALLING THE DRIVE
- DEVICE DRIVERS
- FOR WINDOWS XP USERS
- HOW TO USE THE DISCS
- NOTES ON CD-RW/DVD-RW DISCS
- EMERGENCY EJECT
- TROUBLESHOOTING
- BEFORE REQUESTING SERVICE
- IMPORTANT PRECAUTIONS
- PRECAUTIONS
- INSTALLATION
- OPERATION
- CAUTION
- ITALIAN
- IN CASE OF PROBLEMS
- NOTES ON CD-RW/DVD-RW
- SPANISH
- PORTUGUESE
- INDUSTRY CANADA REQUIREMENT
Brand : LG
Model : DH18NS41
Category : Blu-ray player