COWM510 - Smoke detector ABUS - Free user manual and instructions
Find the device manual for free COWM510 ABUS in PDF.
User questions about COWM510 ABUS
0 question about this device. Answer the ones you know or ask your own.
Ask a new question about this device
Download the instructions for your Smoke detector in PDF format for free! Find your manual COWM510 - ABUS and take your electronic device back in hand. On this page are published all the documents necessary for the use of your device. COWM510 by ABUS.
USER MANUAL COWM510 ABUS

Security Tech Germany
Bedienungsanleitung
CO-Warnmelder
User manual
CO alarm
Please read this guide carefully before installation and use. Keep these instructions and provide all users with instruction on how to use it.
Page 23 - 40
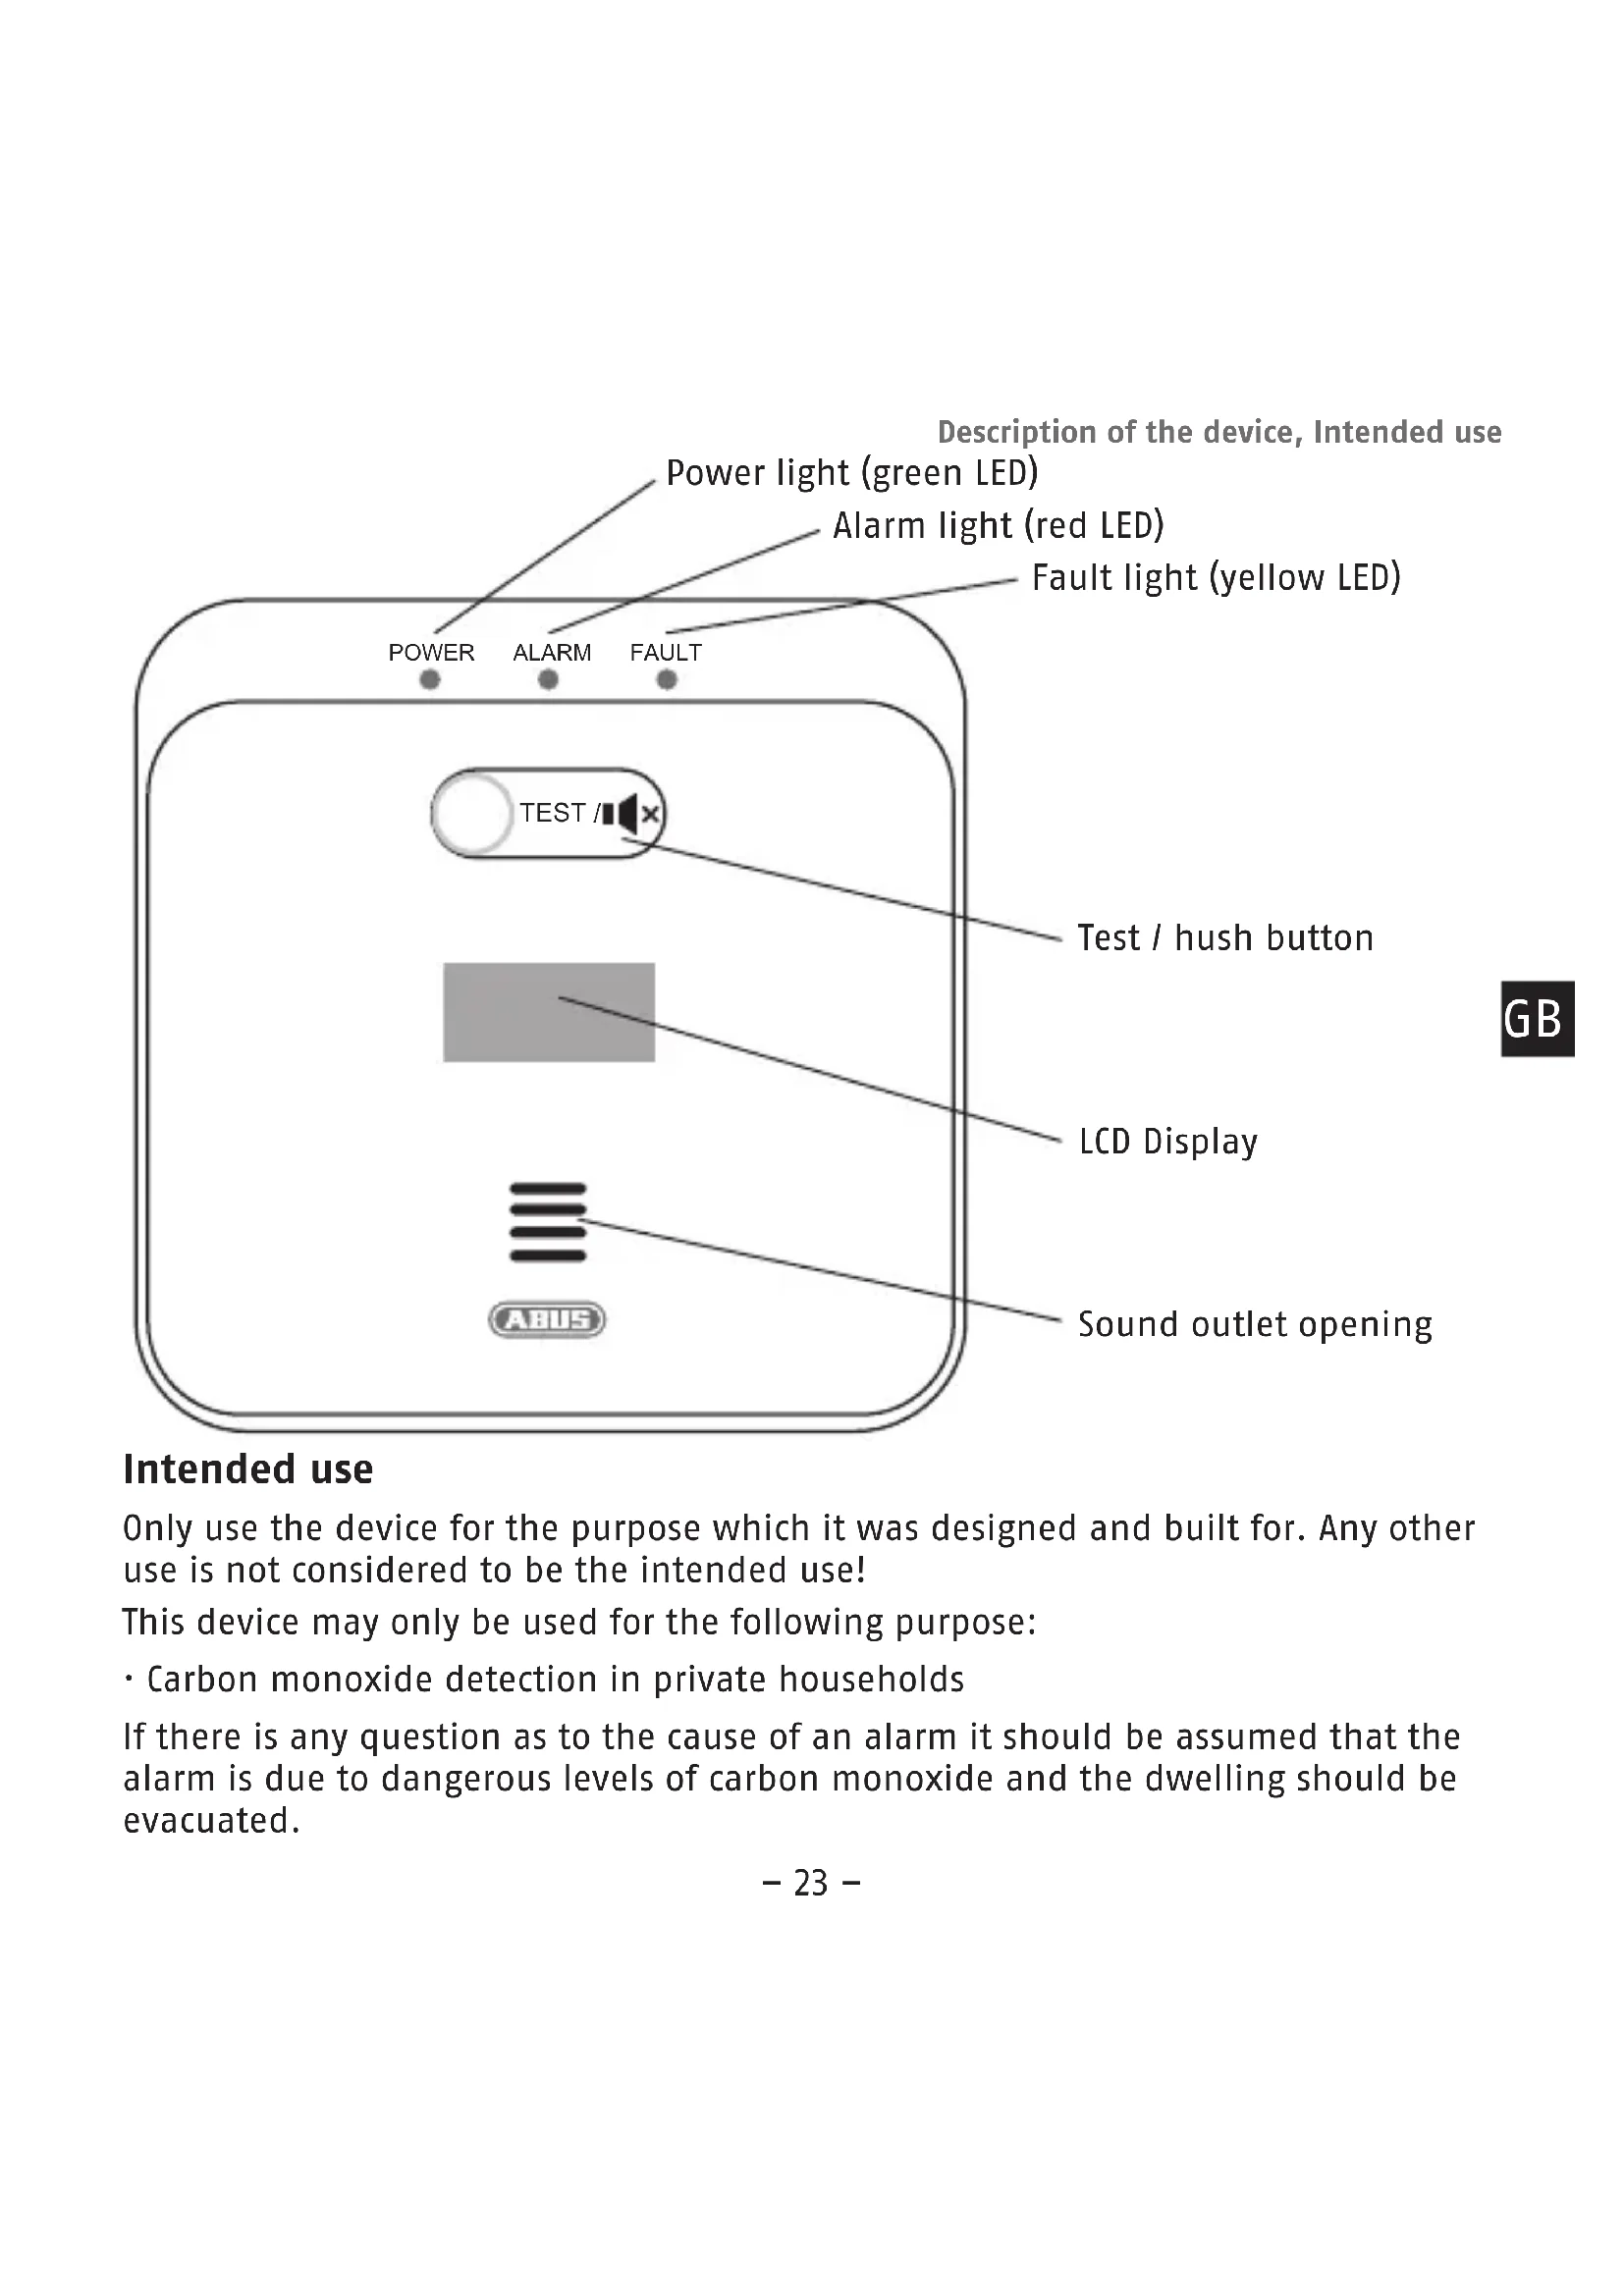
Only use the device for the purpose which it was designed and built for. Any other use is not considered to be the intended use!
This device may only be used for the following purpose:
- Carbon monoxide detection in private households
If there is any question as to the cause of an alarm it should be assumed that the alarm is due to dangerous levels of carbon monoxide and the dwelling should be evacuated.
Scope of delivery, Functions and technical features
Scope of delivery
- ABUS CO alarm COWM510 - 2x 1,5 V alkaline AA batteries
- This user guide - Mounting material screws, dowels
Functions and technical features
| Power supply DC 2x 1,5 V alkaline AA, Battery life approx. 5 years | |||
| Trigger sensitivity conforms to EN 50291-1:2018 | |||
| CO-concentration | no Alarm within | Alarm at the latest after | |
| 30 ppm* | 120 min | - - - | |
| 50 ppm* | 60 min | 90 min | |
| 100 ppm* | 10 min | 40 min | |
| 300 ppm* | - - - | 3 min | |
| Sensor type elektrochemical | |||
| Sensor lifespan max. 10 years | |||
| Operating temperature -10° to 40°C | |||
| Humidity 0 % to 95 % (non-condensing) | |||
| Sound pressure ≥ 85 dB (A)@3 m | |||
| Installation location Wall or desk-stand | |||
- ppm: parts per million
We reserve the right to make changes to these instructions without prior notice!
Safety information: Explanation of symbols
The following symbols are used in this manual and on the device:
| Symbol | Signal word | Meaning |
| Caution | Indicates a risk of injury or health hazards. | |
| Caution | Indicates a risk of injury or health hazards caused by electrical voltage. | |
| Important | Indicates possible damage to the device/accessories. | |
| Note | Indicates important information. |
General
Before using this device for the first time, please read the following instructions carefully and observe all warning information, even if you are familiar with the use of electronic devices.
Caution
All guarantee claims are invalid in the event of damage caused by noncompliance with these instructions. We cannot be held liable for resulting damage!
Caution
In the event of personal or material damage caused by improper operation or non-compliance with the safety information, we cannot be held liable. All guarantee claims are void in such cases!
Store these instructions in a safe place for later use. If you sell or pass on the device on to third parties, you must include these instructions with the device.
Safety information, Functions
Battery warning information
The device is supplied with two 1,5 V alkaline AA batteries. To guarantee a long service life and avoid fire and injury, please note the following:
- The batteries must not be directly exposed to heat or sunlight, and must not be stored in a place with a very high temperature.
-
The batteries must not be burned.
-
The batteries must not come into contact with water.
- The batteries must not be dismantled, pierced or otherwise damaged.
- The battery contacts must not be short-circuited.
- The batteries must be kept away from small children.
- The batteries cannot be recharged.
- Do not dispose of the batteries in domestic waste.
Packaging
- Keep packaging material and small parts away from children - danger of suffocation!
- Remove all packaging material before using the device.
Functioning of the device
To ensure that the device functions correctly, please note the following points:
- Do not cover the device!
- Do not paint over the device or cover it with wallpaper!
-
Do not, on any account, open or repair the device. Failure to observe obstruction will invalidate the warranty.
-
Do not use the device if it has been dropped or damaged in any other way.
-
If the device has been tampered with, there is a risk of electric shock or
malfunction.
- According to EN 50291, the COWM510 ABUS CO alarm is designed and approved exclusively for detecting CO (carbon monoxide) in private homes!
-
Application in industrial facilities, offices, boats, caravans or mobile homes is therefore not permitted!
-
The battery-operated ABUS C0 alarm COWM510 detects carbon monoxide (CO) in even low concentrations, then gives off an acoustic as well as optical signal.
- The purpose of the CO alarm is to protect persons against the acute effects of carbon monoxide. However, it cannot prevent the chronic affects of carbon monoxide exposure or offer persons with special risks complete safety.

- The CO alarm is not a substitute for smoke, fire or other alarms!
- It does not detect smoke, heat or other gases!
- In addition, the electrochemical sensor can only detect CO on time in a limited area (max. 60m^2 , depending on the environmental conditions).
GB
Formation & dangers from carbon monoxide Poisonous effect
- Carbon monoxide (CO) is a colourless, odourless, non-irritating gas which can quickly become a deadly threat.
- Carbon monoxide bonds to the pigment of the red blood cells, thereby preventing the transport of oxygen, which can lead to unconsciousness, death by suffocation.
High concentrations of CO can lead to death in just a few minutes!
Formation & dangers from carbon monoxide
Typical symptoms of poisoning
| Low Mild headaches, nausea, tiredness, CO concentration flu-like symptoms |
| Medium Bad headaches, racing heart, vomiting CO concentration |
| High Cramps, confusion, unconsciousness, CO concentration cardiac arrhythmia |
- Please note that the symptoms can occur earlier with children, pregnant women, senior citizens and persons with respiratory or heart diseases and even low CO levels could cause organ damage in unborn children!
Sources of carbon monoxide & preventative measures
- Carbon monoxide is created, among others, during incomplete combustion processes (e.g. defective floor heating or clogged smoke outlets).
-
Installing a CO alarm is not a substitute for the proper installation, use and maintenance of fuel-burning devices including related ventilation exhaust gas systems.
-
Have such devices/systems installed only by qualified persons. Acquire the devices/systems in perfect technical condition and have them regularly inspected!
- Make sure that ovens, chimneys and the like are kept clean at all times!
- Never operate barbecues, deck ovens, heating devices or other devices intended for use outside inside closed rooms.
Behaviour in case of alarm
When a carbon monoxide alarm sends out a signal, take the following measures in the specified order:
(1) Keep calm and open all doors and windows to increase the rate of ventilation. Stop using all combustion devices and make sure that they are switched off.
(2) Leave the building in particular when the C0 level is high or when the source cannot be instantly detected and alert occupants, if applicable.
(3) Call the fire service/rescue worker immediately from outside the building. Follow their instructions. Inform them that you assume carbon monoxide is being inhaled.
(4) Do not enter the area in question before the CO concentration has dropped to a non-critical value.
(5) Do not use the affected combustion device until the cause of CO emission has been removed by a professional.
(6) Check the functionality of the CO alarm after it has triggered (using Test button) and replace the batteries if necessary.
Selecting location
General
The design and spacial distribution of residential buildings as well as the number, type and location of carbon monoxide sources can vary greatly. However, there are general instructions concerning where the device should and should not be installed to keep the risk of false alarms as low as possible.
Which room? Installation for optimum safety
In every room that contains a combustion device.
In every room that is used as a sleeping area.
In every hallway per floor.
Selecting location
- In every room in which people spend long periods of time and from which they could not hear an alarm from another part of the building.
Minimum installation
If the number of alarms is limited or there are combustion devices in more than one room, the following criteria should be taken into account when installing the alarms:
- The alarms should be installed in rooms which contain a device without a smoke outlet or with an open smoke outlet.
- The alarms should be installed in rooms in which occupants spend the most amount of time.
Where in the room?
Carbon monoxide (CO) has almost the same density as air and therefore distributes itself uniformly in space. Consider the following points when positioning the CO alarm:
It is impossible to give exact instructions on the correct arrangement of an alarm which apply for all types of rooms and their use. The following points should be taken into account when choosing the optimal location for each corresponding situation.
Alarm located in the same room as a combustion device
When CO escapes from a combustion point, the heat initially rises. This is why you should install alarms as high as possible on a free wall in rooms with combustion devices, while considering the following points:
- The alarm should be assembled on a free wall, at least 200mm below the ceiling.
- Install the alarm at a height at which you can reach it without tools and at which you can see all alarm displays. (Between chest and head)
- The alarm should be at a horizontal distance of 1 to 3m from the possible source of carbon monoxide.
· If the room is divided, the alarm should be on the same side of the division as
the possible source of carbon monoxide.
- In rooms with slanted ceilings, the carbon monoxide alarms should be installed at the higher side of the room.
Alarms located in bedrooms and rooms far away from combustion devices
In rooms located far away from combustion devices, the carbon monoxide has already cooled to room temperature. Due to the fact that CO has nearly the same density as air, it distributes uniformly in the air.
Consider the following points:
- In bedrooms and in rooms which are located far away from combustion devices, the devices should be at the breathing level of the occupants (e.g. "desk level" at the bed-side table in bedrooms and "eye level" in living rooms).
- Make sure there is sufficient spacing to the ceiling as well as to corners and furnishings (min. 200 mm).
Where alarms should not be installed
- outside (use only possible in closed rooms);
where they can be blocked (e.g. by furniture); -
on ceilings (only suitable for wall installation);
-
next to a door or a window (reliable detection cannot be guaranteed);
- next to an air duct or similar ventilation opening;
in areas in which the temperature can fall below -10^ and rise over 40^ ; - in rooms that are exposed to large amounts of dust/dirt or grease.
Installation and start-up
Installation and start-up
The following two variants are possible for operating the CO alarm:
Wall installation
Take the following steps in the specified order to install the alarm on the wall:
- Use a water level to mark the drill
holes in the horizontal position (Spacing 80~mm
- Drill the holes with a suitable
marked locations. (0 5 mm) mm
power drill at the previously
sure not to damage any cables!
Keep CO alarm away from getting plaster dust when you drill the holes!
- Press the plastic dowels into the
drill holes and screw in the two
supplied screws until the screw
heads stick out approx. 5 mm.
Desk-stand
"At breathing level" in bedrooms and living rooms without combustion devices during operation.
- Use the two feet to place the alarm on the bottom side of the housing on a flat, dust-free base.
Installation and start-up
- Make sure that the alarm is standing securely and no objects prevent CO from entering the alarm.
Start-up
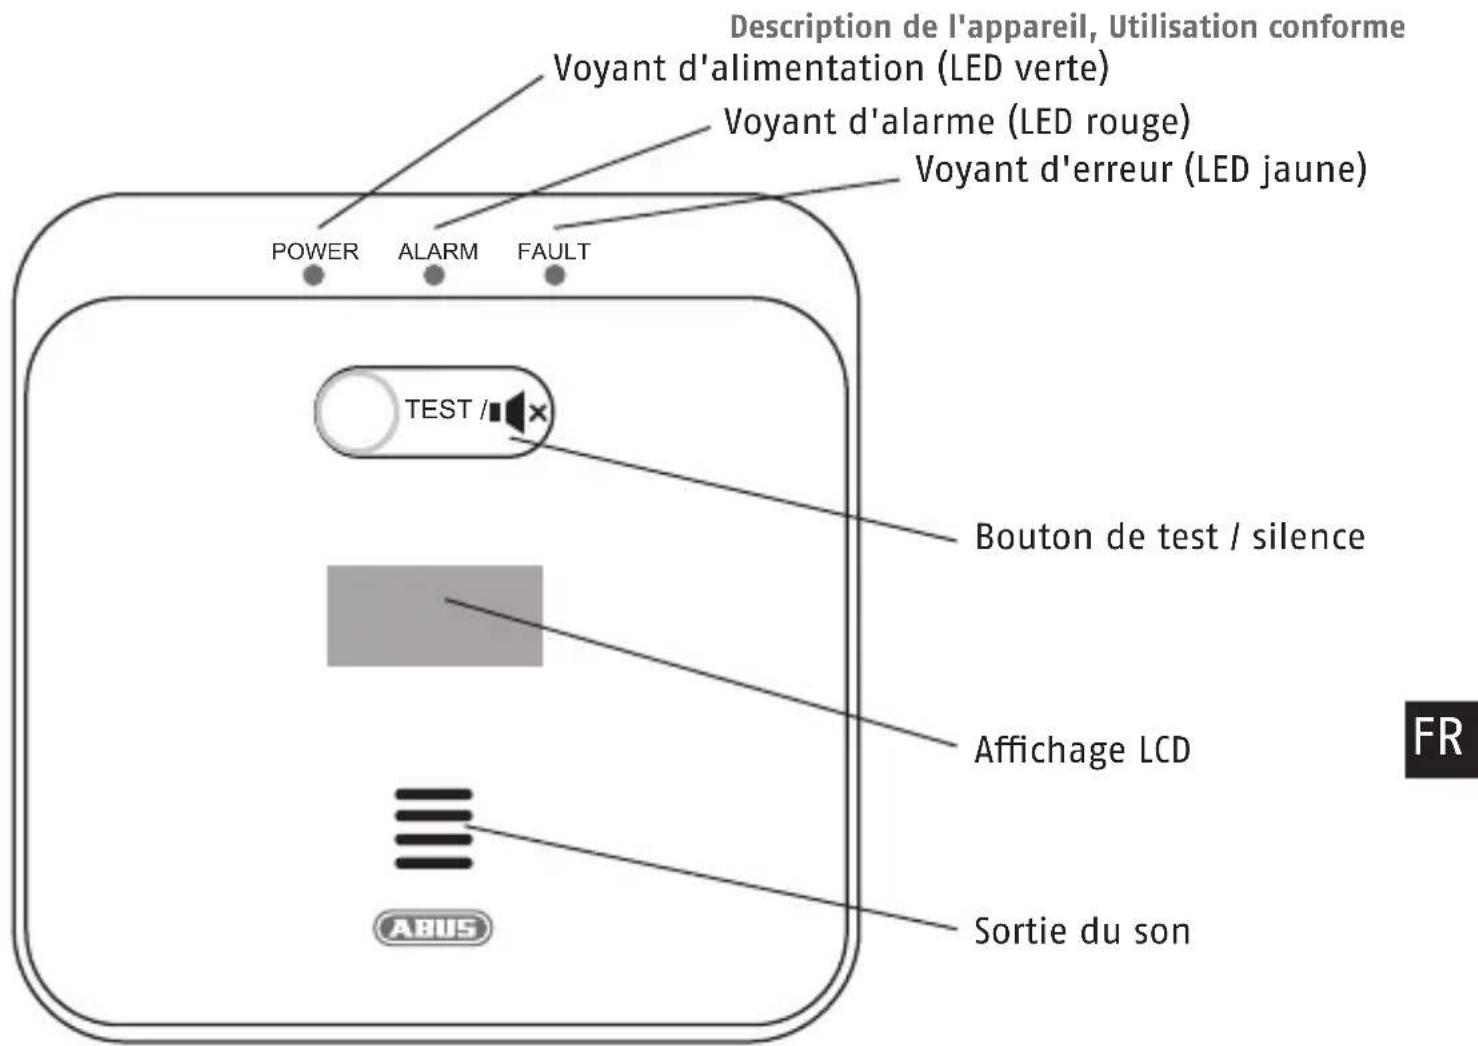
- Insert the supplied batteries into the battery compartment with the correct polarity. The warning tone sounds, the display shows the numbers from 000 to 999 and all three LEDs flash alternately. At the end of the warm-up phase, the LEDs and display go out.
- The green LED flashes every 30 seconds - the CO alarm is ready for operation.
- Then enter the current date (date of installation) on the rear label of the alarm with a water- and smudge-proof pen (see figure):

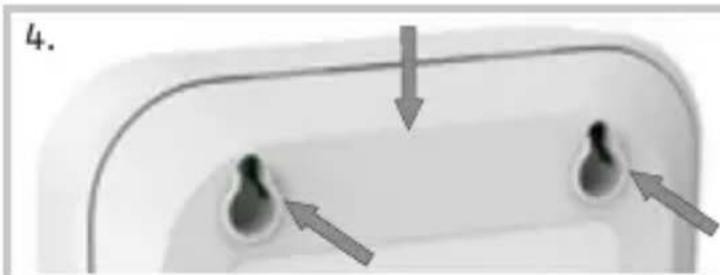
For wall installation: set the alarm on the screws with the rear side of the device facing downwards and lock it into place.
Testing the device electronics
Check the function of the C0 alarm by pressing the test button for 5 seconds. To protect your hearing, keep away from the device!
The alarm sounds four times and the red LED (alarm light) flashes four times.
This does not signalise that CO is present in the room; it is a confirmation that the alarm is functioning properly.
Test the alarm function after installation and after every battery change without fail (wait about 30 seconds after establishing the battery contact). A regular weekly test is also recommended.
Installation and start-up Displays and functions
| Condition Operation | tion LED Alarm LCD display | |||
| Power up and warm-up | Installing batteries | all three flash alternatively | one beep, after approx. 100 seconds | Counts 000-999 888* |
| Stand-by condition | green flashes approx. every 30 seconds | - | - | |
| Test condition Press test button | red flashes four times | four beeps | TES* | |
| Alarm condition | Increased CO concentration in the room | red flashes every 5 seconds | four beeps every 5 seconds | Display num- ber from 25 to 999* |
| Low battery - yellow flashes | every 30 seconds | one beep eve- ry 30 seconds | Lb | |
| Malfunction - yellow flashes | twice every 30 seconds | two beeps every 30 seconds | Err* | |
| End of unit life | - yellow flashes twice every 30 seconds | one long and one short beep every 30 seconds | End* | |
- If the CO concentration exceeds the maximum value, the display continues to show 999 ppm.
Installation and start-up
Displays and functions
| Condition Operation | LED Alarm LCD display | |||
| Hush condi-tion when alarm | Silence an unwanted alarm: Push and release the test/hush button, it will enter hush mode | red flashes every 5 seconds | -, Hush condi-tion duration: approx. 10 minutes | Display num-ber from 25 to 999* |
| Hush condi-tion when battery low | When the C0 alarm is alarming as low battery, push the test/hush button, it will enter hush mode | yellow flashes every 30 seconds | -, Hush condi-tion duration: approx. 12 hours | Lb |
- If the CO concentration exceeds the maximum value, the display continues to show 999 ppm.
Installation and start-up
Displays and functions
| Condition Operation | LED Alarm LCD display | ||
| Check latest CO peak value (memory function) | Press test/hush button for approx. 5 seconds | -- Display the | |
| latest CO peak value number detected (goes off after a while) | |||
| Delete the CO peak value recorded | Press test/hush button for approx. 10 seconds ** | -- Display num- | ber from peak value changes to 0 (0 flashes 3x) |
** The C0 peak value recorded is deleted after replace with a new battery.
Troubleshooting
Test: If the C0 alarm does not react after a functional test has been performed, first check that the batteries are inserted correctly (polarity).
If the detector does not react to a new function test even after this, please contact your dealer.
Weak batteries: If the CO alarm signals low battery performance, replace the batteries immediately, at the latest within 7 days. Only use 1,5 V brand alkaline AA batteries of the same type.
Malfunction: If the C0 alarm registers a sensor error, the complete alarm must be replaced - the sensor cannot be replaced!
The end of sensor lifespan: The lifespan of the electrochemical sensor is 10 years. If the end of the lifespan is reached, the complete alarm must be replaced immediately!
Care and maintenance
Cleaning
- Dusty detectors must be cleaned. You can clean dust from the air vents of the detector using a vacuum cleaner or compressed air.
-
If necessary, you can remove the dust with a brush.
-
You can clean the surface using a cloth slightly dampened in soapy water.
- Do not allow water to penetrate inside the device!
- Do not clean the device in a dishwasher!
- Do not use sharp, pointed, abrasive, caustic or corrosive cleaning materials or hard brushes!
- Do not use chemicals. The following substances can impair sensor function and trigger false alarms: Methane, propane, isobutane, isopropanol, ethylene glycol, benzene, toluene, ethyl acetate, hydrogen sulphide, sulphur dioxide, products with an alcohol base, dyes, thinners, solvents, adhesives, hairsprays and cleaning products.
Care and maintenance, Manufacture date
- Do not use flammable liquids for cleaning the alarm!
Maintenance
- The electrochemical sensor is subject to ageing. The sensor lifespan is thereby limited to 10 years.
- The sensor cannot be exchanged. For this reason, replace the entire 10 years after the date of its installation at the latest. (See label - rear side of the alarm).
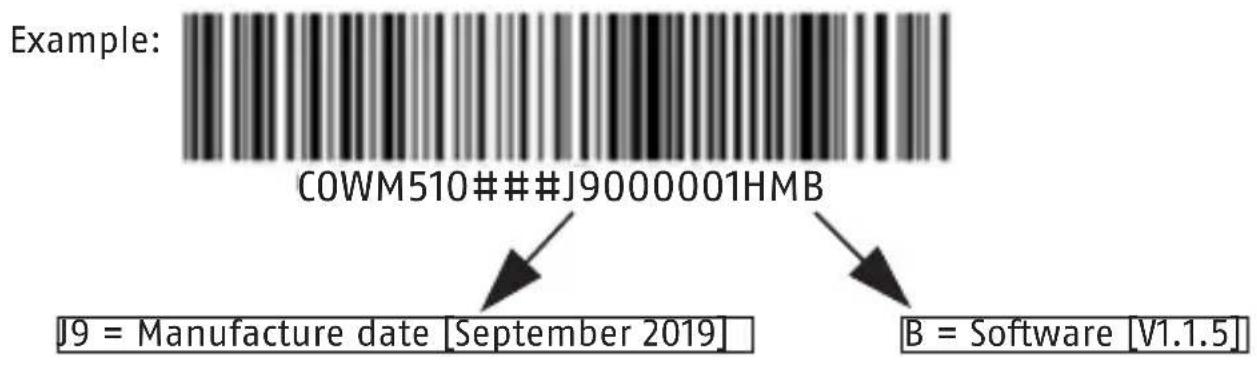
Manufacture date
There is a 21-digit bar code on the back of the alarm from which the date of manufacture and the software version of the alarm can be derived.
Positions 11, 12 and 21 of the bar code are relevant here:
| Position 11 - [Year of manufacture] | ||||
| 2019 2020 2021 | 2022 ... | |||
| J K L M ... | ||||
| Position 12 - [Month of manufacture] | |||||||||||
| Jan | Feb | Mar | Apr | May | Jun | Jul | Aug | Sep | Oct | Nov | Dec |
| 1 | 2 | 3 | 4 | 5 | 6 | 7 | 8 | 9 | A | B | C |
| Position 21 - [Software version] | |||
| B C | D | ... | |
| V1.1.5 | V1.1.6 | V1.1.7 | ... |
Battery replacement
- Open the battery compartment on the device side by pressing on the hatched area and pushing the cover in the direction of the arrow.
- Place the batteries into the compartment ensuring they are the right way round (the safety pin is pressed downwards) and close the battery compartment.
- Do not dispose of used batteries in domestic waste.
Warranty
- ABUS products are designed and manufactured with the greatest care and tested according to the applicable regulations.
- The warranty only covers defects caused by material or manufacturing errors at the time of sale. If there are demonstrable material or manufacturing errors, the CO alarm will be repaired or replaced at the guarantor's discretion.
- In such cases, the warranty ends when the original warranty period of 2 years expires. All further claims are expressly rejected.
- The warranty does not cover the batteries supplied.
- ABUS will not be held liable for defects and damage caused by external influences (e.g. transport, use of force, operating errors), inappropriate use, normal
Warranty, Disposal, Declaration of conformity
wear and tear or failure to observe the instructions in this manual.
- In the event of a warranty claim, the original receipt with the date of purchase and a short description of the problem must be supplied along with the CO alarm.
- If you discover a defect on your C0 alarm which existed at the time of purchase, contact your dealer directly within the first two years.
Disposal
Disposal as per directive WEEE 2012/19/EU and directive RoHS 2011/65/EU
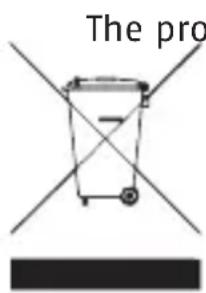
duct contains valuable raw materials. At the end of its service life, dispose of the product according to the applicable legal requirements. The product as well as any accessories must be collected and disposed of separately in the EU Devices displaying this symbol may not be disposed of with domestic waste. Please contact your dealer or dispose of the products at the local collection point for electronic waste.
Declaration of conformity
ABUS August Bremicker Söhne KG, Altenhofer Weg 25, 58300 Wetter hereby declares that the device with part designation COWM510 is in compliance with the essential requirements and other relevant provisions of Directive 2014/30/EU. For further information on the CE declaration or to view the CE declaration, please contact ABUS August Bremicker Söhne KG, Customer Service, Altenhofer Weg 25, 58300 Wetter, Germany.
Subject to technical alterations.
No liability for mistakes and printing errors.
© ABUS|D58292Wetter(Germany)
www.abus.com