
A300068 - Kitchen scales BARTSCHER - Free user manual and instructions
Find the device manual for free A300068 BARTSCHER in PDF.
| Product type | Digital electronic kitchen scale |
| Brand | Bartscher |
| Model | A300068 |
| Maximum capacity | 60 kg |
| Graduation | 20 g |
| Power supply | 230 V ~ 50 Hz, 1.8 W (mains adapter) or 4 AAA batteries |
| Dimensions (W x D x H) | 320 x 300 x 42 mm |
| Platform dimensions | 320 x 300 mm |
| Net weight | 4.7 kg |
| Included accessories | 1 mains adapter |
| Measurement units | kg / lb |
| Display | Digital display with stability indicator and STOP function |
| Main functions | Simple weighing, tare, STOP function (weight hold 120 s), piece counting, free or standard 2-point calibration, RS 232 data transfer |
| Intended use | Weighing items up to 60 kg, without calibration requirement |
| Cleaning | Soft damp cloth, mild detergent; do not immerse |
| Safety | Use only original adapter; avoid water and moisture; do not use if damaged |
| Platform material | Stainless steel (by deduction, not explicitly specified but typical) |
| Operating temperature | Not specified; indoor use only |
Frequently Asked Questions - A300068 BARTSCHER
User questions about A300068 BARTSCHER
0 question about this device. Answer the ones you know or ask your own.
Ask a new question about this device
Download the instructions for your Kitchen scales in PDF format for free! Find your manual A300068 - BARTSCHER and take your electronic device back in hand. On this page are published all the documents necessary for the use of your device. A300068 by BARTSCHER.
USER MANUAL A300068 BARTSCHER
natural_image
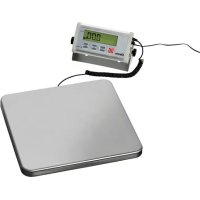
Digital digital balance scale with a digital timer and attached power cord, placed on a square base (no visible text or symbols)A300.068 / A300.151
Bedienungsanleitung
Electronic digital scale
from page 17 to 32
GB/UK
Mode d'emploi
① Fernanzeige
Keep this instruction manual ready to hand at the product!
1. General information.... 18
1.1 Information about the instruction manual 18
1.2 Key to symbols.... 18
1.3 Liability and Warrantees.... 19
1.4 Copyright protection 19
1.5 Declaration of conformity.... 19
2.Safety 20
2.1 General information.... 20
2.2 Safety instructions for use of the device 20
2.3 Intended use 21
3. Transport, packaging and storage.... 22
3.1 Delivery check.... 22
3.2 Packaging 22
3.3 Storage....22
4. Technical data 23
4.1 Technical specification 23
4.2 Overview of parts 23
5. Installation and operation.... 23
5.1 Safety instructions.... 24
5.2 Installation and connection.... 24
5.3 Operation 25
6. Cleaning and maintenance.... 26
6.1 Safety advice.... 30
6.2 Cleaning 30
6.3 Safety instructions for maintenance 30
7. Possible Malfunctions ...... 31
8. Waste disposal 32
Bartscher GmbH
1.1 Information about the instruction manual
This instruction manual contains information about the installation, operation and maintenance of the device and should be consulted as an important source of information and reference guide.
Awareness of the safety instructions and instructions for use in this manual will ensure the safe and correct use of the device.
In addition to the information given here, you should comply with any local Health and safety Controls and generally applicable safety regulations.
The instruction manual forms part of the product and should be kept near the device and easily accessible for anyone carrying out the installation, servicing, maintenance or cleaning.
1.2 Key to symbols
In this manual, symbols are used to highlight important safety instructions and any advice relating to the device. The instructions should be followed very carefully to avoid any risk of accident, personal injury or material damage.

WARNING!
This symbol highlights hazards, which could lead to injury.
Please follow the instructions very carefully and proceed with particular attention in these cases.
WARNING! Electrical hazard!
This symbol draws attention to potential electrical hazards. If you do not follow the safety instructions, you may risk injury or death.

CAUTION!
This symbol highlights instructions, which should be followed to avoid any risk of damage, malfunctioning and/or breakdown of the device.

NOTE!
This symbol highlights tips and information, which have to be followed for an efficient and trouble-free operation of the device.
1.3 Liability and Warrantees
All the information and instructions in this manual take into account standard safety regulations, current levels of technical engineering as well as the expertise and experience we have developed over the years.
The instruction manual was translated with all due care and attention. However, we do not accept liability for any translation errors. The German version of this instruction manual is definitive.
If the delivery consists of a special model, the actual scope of delivery may differ from the descriptions and illustrations in this manual. This is also the case for special orders or when the device has been modified in line with new technology. If you have any questions, you should contact the manufacturer.
NOTE!
Read the instruction manual carefully before using the device. The manufacturer does not accept liability for any damage or malfunction resulting from not following the instructions for use.
The instruction manual should be kept near the device, easily accessible for anyone wishing to work with or using it. We reserve the right to make technical changes for purposes of developing and improving the useful properties.
1.4 Copyright protection
The instruction manual including any texts, drawings, images or other illustrations is copyright. No part of this publication may be reproduced, transmitted or used in any form or by any means without permission in writing from the manufacturer. Any person who commits any unauthorized act in relation to this publication shall be liable to claims for damages. All rights reserved.

NOTE!
The contents, texts, drawings, pictures and any other illustrations are copyright and subject to other protection rights. Any person unlawfully using this publication is liable to criminal prosecution.
1.5 Declaration of conformity
The device complies with the current standards and directives of the EU.
We certify this in the EC declaration of conformity.
If required we will be glad to send you the according declaration of conformity.
2.Safety
This section provides an overview of all important safety aspects.
In addition every chapter provides precise safety advice for the prevention of dangers which are highlighted by the use of the above mentioned symbols.
Furthermore, attention should be paid to all pictograms, markers and labels on the device, which must be kept in a permanent state of legibility.
By following all the important safety advice you gain an optimal protection against all hazards as well as the assurance of a safe and trouble-free operation.
2.1 General information
This device is designed in accordance with the presently applicable technological standards. However, the device can pose a danger if handled improperly and inappropriately.
Knowing the contents of the instruction manual as well as avoiding mistakes and thus operating this device safely and in a fault-free manner is very essential to protect yourselves from the hazards.
To prevent hazards and to ensure optimum efficiency, no modifications or alterations to the device that are not explicitly approved by the manufacturer may be undertaken.
This device may only be operated in technically proper and safe condition.
2.2 Safety instructions for use of the device
The specifications regarding the industrial safety are based on the Regulations of the European Union applicable at the time of manufacturing the device.
If the device is used commercially, the user is obliged to ensure that the said industrial safety measures concur with the state of the rules and regulations applicable at the time in question for the entire period of use of the device and to comply with the new specifications.
Outside the European Union, the industrial safety laws applicable at the place of installation of the device and the regional territorial provisions must be complied with.
Besides the industrial safety instructions in the instruction manual, the general safety and accident prevention regulations as well as environment protection regulations applicable for area of application of the device must be followed and complied with.

CAUTION!
The device is not intended for use by individuals (including children) with physical or mental disabilities, insufficient experience, and/or insufficient knowledge unless such persons are under the care of a person responsible for their safety or have received instructions regarding appropriate use of the device.
○ Children should be observed to ensure that they are not playing with the device.
o Preserve this manual safely. When passing on/selling the device to a third party, the manuals must be handed over along with the device.
- Every person using the device must act in accordance to the manuals and under consideration of the safety advice.
- The device is to be used indoors only.
2.3 Intended use
Safe operation is only guaranteed when using the device for its intended purpose.
Any technical interventions, as well as assembly and maintenance are to be made by a qualified customer service only.
Electronic digital scale is only intended for weighing objects of a weight up to 60 (150) kg.

CAUTION!
Any use going beyond the intended purpose and/or any different use of the device is forbidden and is not considered as conventional.
Any claims against the manufacturer or his authorized representative as a consequence of experiencing damages resulting from unconventional use are impossible.
The operator is liable for all damages resulting from inappropriate use.
3. Transport, packaging and storage
3.1 Delivery check
Please check the delivery upon completeness and transport damage immediately after receipt. In case of visible damage do not accept or accept the delivery with reservation only.
Note the extent of damage on the carrier's bill of delivery. Trigger off the complaint. Hidden damages should be reclaimed immediately after notice, as claims for damages can only be asserted within the effective period for complaints.
3.2 Packaging
Please do not throw away the covering carton of your device as it might be useful for storage purposes, when moving or, in case of damages, when the device must be sent back to a repair center. The outer and inner packing material should be removed completely from the device before installation.
NOTE!
If you liked to dispose the packing, consider the regulations applicable in your country. Supply re-usable packing materials to the recycling.
Please inspect the device upon completeness. In case any part is missing please contact our customer service center immediately.
3.3 Storage
Keep the package closed until installation and under consideration of the outside indicated positioning- and storage markings.
Packages should be stored under consideration of the following:
- Do not store outdoors.
- Keep it dry and dust-free.
- Do not expose it to aggressive media.
- Do not expose it to direct sunlight.
- Avoid mechanical shocks and vibration.
- In case of longer storage (> 3 months) make sure you check the state of the packaging and the parts regularly. If required refresh or renew.
4. Technical data
4.1 Technical specification
| Name | Electronic Digital Scale | |
| Item no.: | A300.068 A300.151 | |
| Weighing range: | up to 60 kg | up to 150 kg |
| Scaling: 20 g 50 g | ||
| Connection value: 230 V 50 Hz 1.8 W | ||
| Dimensions: B 320 x T 300 x H 42 mm | ||
| Weighing surface dimensions: B 320 x T 300 mm | ||
| Weight: 4.7 kg | ||
| Accessories: 1 mains adapter | ||
| Other: Not legal-for-trade | ||
We reserve the right to make technical changes!
4.2 Overview of parts
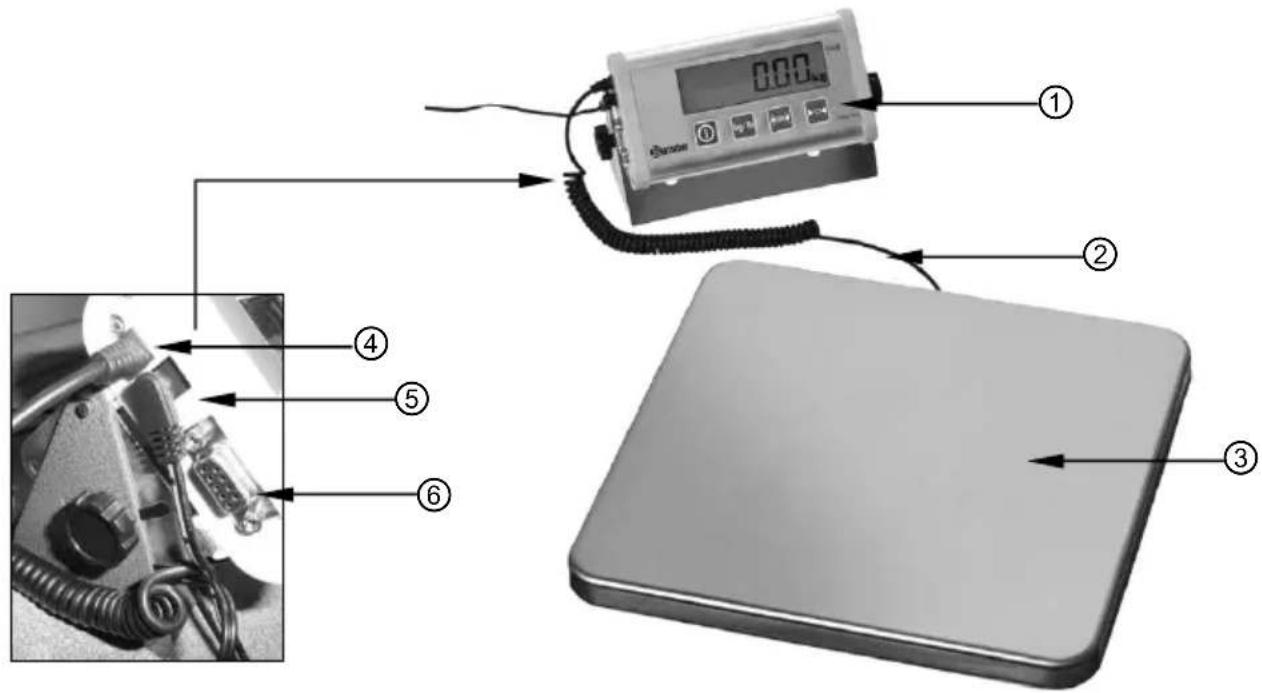
① Remote display
④ Twisted cable connector
② Twisted cable
⑤ Power supply connector
③ Weighing surface
⑥ PC connector (RS 232)
5. Installation and operation
5.1 Safety instructions
WARNING! Hazard via electrical current!
The device can cause injuries due to improper installation!
Before installation the local power grid specification should be compared with that of the device (see type label).
Connect the device only in case of compliance! Take note of the security advice!
- Before connecting the mains adapter the local power grid specification should be compared with that of the device (see type label) (230 V / 50 Hz).

WARNING!
Improper installation can lead to severe damages of the device and personal injuries.
- Use only the leak-proof batteries (4 alkaline batteries AAA). All batteries should be replaced at the same time, otherwise the improper operation or disturbances may occur.
- Do not use the device in case it does not function properly, has been damaged or dropped.
- Do not use any accessory or spare parts that have not been recommended by the manufacturer. These can be dangerous for the user or lead to damages of the device or personal injury, and further, the warranty expires.
5.2 Installation and connection
- Unpack the device and dispose of all packaging material.
- Place the electronic digital scale on a level and safe surface.
- Avoid exposing the scale to direct sunlight. It may lead to discoloration or malfunctions.
- Keep the scale away from water and other liquids, as it is not waterproof. Contact with liquids may result in electric shock, injury and damage to the device when the scale is used in a wet environment.
5.3 Operation
Operating Panel
flowchart
graph LR
    A["①"] --> B["Process Box"]
    B --> C["②"]
    D["Bartscher"] --> E["③"]
    D --> F["④"]
    D --> G["⑤"]
    D --> H["⑥"]
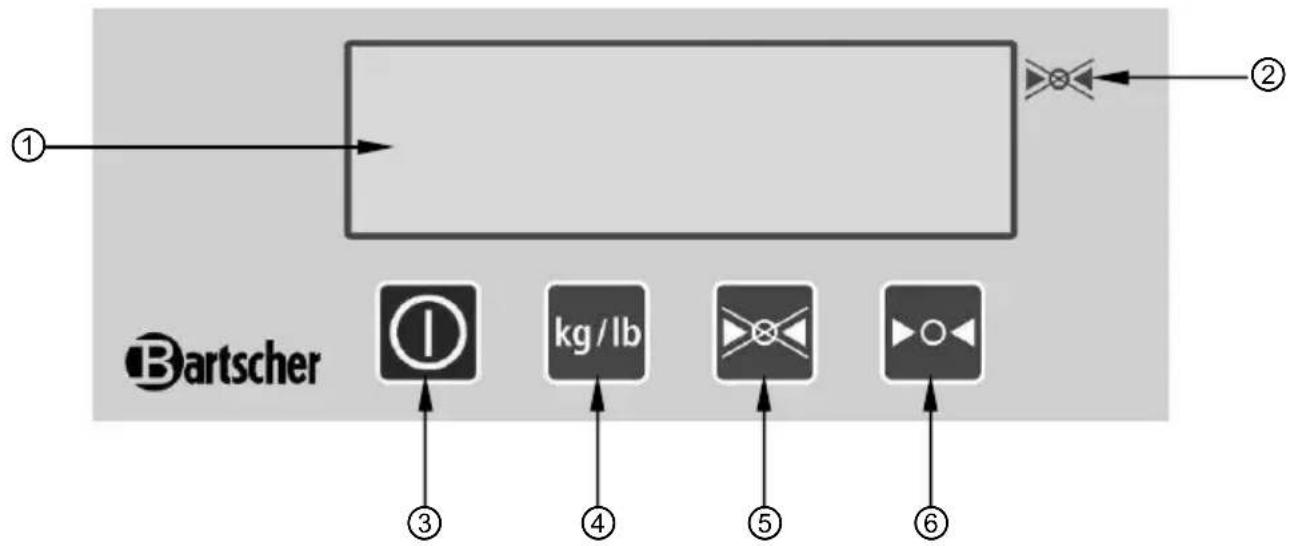
Indicators and keys
| Name Function | ||
| 1 | Digital display | Displaying the selected functions or weighed value. |
| 2 | “STOP” indicator | Indicates that “STOP” function is active. |
| 3 | ON/OFF key | Power on/off |
| 4 | “WEIGHT UNIT” key Unit change kg/lb | |
| 5 | “STOP” key | After pressing that key the weighed value is maintained on the digital display for 120 seconds after removing the weighed object. |
| 6 | “ZERO” key for tare | Sets the display to zero or deducts the weight of the container. |
Power on/off
- When the device is to be supplied from the adapter, connect the adapter to the device by putting the plug in appropriate socket on the left side of the remote display, then put the network plug in the single wall socket with earthing.

ATTENTION!
Only use the original adapter for the scale. Other adapters may lead to permanent electric damage.
- The device may also be supplied from the batteries. Open the battery compartment on the right side of the display and install 4 alkaline batteries AAA, paying attention to polarity. Close the battery compartment.
- When there are no objects on the weighing surface, press ON/OFF ①. The digital display shows all symbols for a few seconds, then the maximum load and scaling.
- When the display shows "0", weighing of objects may begin.
• To turn off the scale press ON/OFF ① again. - When the digital scale is not used, remove the network plug from the wall socket. In case of longer inactivity remove the batteries from the device.
Weighing
- Press ON/OFF to turn the scale on.
When the device is turned on, all values appear on the display for a few seconds and then the display shows "0". Weighing may begin.
- Selecting the weighing unit using the button kg/lb
Press kg/lb to select "kg" or "lb". The weighing unit appears after selection next to the displayed weight. When the indication stops blinking (which means that the data are stable), the weighed value may be read.
- Weighing without a container:
Check whether “0” is displayed. If not, press ▶o◀ to display “0”. Place the objects to be weighed on the weighing surface. Once the value is stable, the stability indicator “▶” appears on the display.
- Weighing with a container:
Place the empty container on the weighing surface. Wait until the stability indicator “▶” appears and press ▶o◀. Place the objects to be weighed in the container. Once the value is stable, the stability indicator “▶” appears on the display.
Calibration methods
Arbitrary single-point calibration
a) Turn on the device, press and hold kg/lb the display shows “----”.
b) Press kg/lb to switch to the calibration mode. The digital display shows "CAL".
c) Press to make sure that the calibration mode is active.
d) The digital display shows "Load" and "0.0kg" alternately.
e) Make sure that there are no objects on the weighing surface. Press to confirm the scale calibration for “0.0kg”. During the calibration for “0.0kg” the symbol “0.0kg” flashes on the display. Assure peace and stability of the weighing surface, as well as lack of influence of other factors which might disturb weighing. When the load is maintained in a stable way for longer than 2 seconds, the scale automatically finishes calibration for “0.0kg” and switches to the next calibration step. Otherwise the symbol “0.0kg” still flashes on the display until the load is stabilized.
f) Assuming that the next calibration step is "xx.xkg", the digital display shows "Load" and "xx.xkg" alternately, which means that the load of "xx.xkg" should be placed on the weighing surface. When that load needs to be modified, press or to enter the modification menu. Then press to modify the flashing position. Press to increase the flashing position by "plus 1" and press to make sure that the modification has been made.
g) Make sure that the load on the weighing surface is “xx.xkg” and press to confirm the calibration of “xx.xkg”. During the calibration for “xx.xkg” the symbol “xx.xkg” flashes on the display. Assure peace and stability of the weighing surface, as well as lack of influence of other factors which might disturb weighing. When the load is maintained in a stable way for longer than 2 seconds, the scale automatically finishes calibration for “xx.xkg” and saves the calibration parameters in the memory. Otherwise the symbol “xx.xkg” still flashes on the display until the load is stabilized.
Standard double-point calibration
a) Turn on the device, press and hold kg/lb the display shows “----”.
b) Press or to switch to the calibration mode. The digital display shows "Line".
c) Press to make sure that the calibration mode is active.
d) When the scale calibration begins, the digital display shows "Load" and "0.0kg" alternately.
e) Make sure that there are no objects on the weighing surface. Press to confirm the scale calibration for “0.0kg”. During the calibration for “0.0kg” the symbol “0.0kg” flashes on the display. Assure peace and stability of the weighing surface, as well as lack of influence of other factors which might disturb weighing. When the load is maintained in a stable way for longer than 2 seconds, the scale automatically finishes calibration for “0.0kg” and switches to the next calibration step. Otherwise the symbol “0.0kg” still flashes on the display until the load is stabilized.
f) The next calibration is displayed automatically, referring to half of the maximum load (30 or 75 kg). Place the indicated load on the weighing surface, wait until the load stabilization (flashing stops) and press ▶o confirm.
g) The scale switches automatically to the calibration of the maximum load (60 or 150 kg). Place the indicated load on the weighing surface, wait until the load stabilization (flashing stops) and press to confirm.
h) Now it is possible to return to the weighing mode.
STOP function

After pressing ▶ key the weighed value is maintained on the digital display for 120 seconds after removing the weighed object from the weighing surface. That function allows for easy load readout.
- Place the weighed object on the weighing surface.
- Wait until the displayed value stabilizes.
-
Press ▶. Wait for the acoustic signal. The digital display shows “▶” indicating “STOP”.
-
Remove the weighed object from the weighing surface. The weighed value is shown on the digital display for 120 seconds.
-
Exiting/deactivation of STOP function.
The object is weighed and the STOP function is activated. In order to deactivate/exit the STOP function press ✗ again to turn off “▶” symbol meaning STOP and return to the weighed value.
Sending data / printing function
- If the electronic digital scale is to be integrated with the computer system, the RS 232 connector allows for data transfer from the weighing operation.
- Press and hold for 2 seconds, the acoustic signal is emitted and data from the weighing operation are sent from the CPU to the connected computer or printer.
Counting mode (number of pieces)
- That function of the digital scale allows for determination of number of pieces in one sample. The number of pieces is determined upon the basis of known weight of a single piece.
- Remove all objects from the weighing surface and press ▶o◀ to set the device to “0”.
- press kg/lb until the device switches to "pcs" mode and the display shows "ADD10".
- By pressing it is possible to set the number of pieces (20, 50, 5).
- Place the number of pieces corresponding to the setting (5, 10, 20, 50) on the weighing surface.
Caution: the weight of each piece must be higher from the minimum allowable partial weight, otherwise the display shows symbol "no".
The pieces weight must be identical.
- Press in order to calculate the unitary weight and save it in the memory.
- Remove the weighed objects from the weighing surface. The digital scale is now set for calculating the objects of the same unitary weight.
- Place the objects to be counted on the weighing surface. The digital display shows number of pieces of a given object.
- In order to count another number of a given objects press kg/lb . If the counting operation is to be terminated, press kg/lb stop the counting mode and the scale saves the last value used for counting.
6. Cleaning and maintenance
6.1 Safety advice
Before beginning with repair or cleaning works make sure that the adapter has been disconnected from the device and from the power socket (pull the power plug!).
- Do not use any acid agents and make sure no water ingresses the device.
To protect yourself from electric shock, never immerse the device, its cables and the plug in water or other liquids.
! CAUTION!
The device is not suited for direct washing via water jets. Therefore, you must not use any kind of pressure water jet for cleaning the device!
6.2 Cleaning
- The device should be cleaned regularly.
- The remote display should be cleaned with use of moist, soft cloth and mild cleaning agent.
- When required, remove the weighing surface from the device for washing. Use soft cloth only and make sure you never use any kind of abrasive agents or pads, which could scratch the surface.
○ After the cleaning procedure you should use a soft and dry cloth to wipe dry and polish the surface.
6.3 Safety instructions for maintenance
○ Check the mains adapter and the mains lead from time to time to ensure they are not damaged in any way. Never use the device if the lead or adapter is damaged. If the mains adapter or the lead are damaged they must be replaced by a qualified electrician.
- In case of damage or malfunction, please contact your stockist or our customer service centre. Pay attention to the troubleshooting tips in pt. 7.
○ Only a qualified technician and using original spare parts and accessories should carry out repairs and maintenance of the device. Do not attempt to repair the device yourself.
7. Possible Malfunctions
| Problem Cause Solution | ||
| The digital display doen not show any symbols | Incorrectly connected supply plug.Discharged batteries. | Connect the supply plug correctly.Replace the batteries. |
| Signallization of low AC voltage. | Low batteries voltage. | Replace the batteries. |
| Weighing operation data readout error. | The “0” value has not been set before weighing.The digital scale is not calibrated. | Remove all objects from the weighing surface, press ▶o◀ and begin the weighing operation.Calibrate the scale. |
| Incorrect calibration | The calibration load is not precise. | Use the precise calibration load. |
Displayed error codes
| Error code | Meaning Solution | |
| no | The calibration load inconsistent with the display indication has been used during the calibration.The number of pieces inconsistent with the display indication has been used during the calibration. | Use the load corresponding to the displayed value.Use the number of pieces corresponding to the displayed value. |
| AC | Too low batteries voltage. | Replace the batteries or use the mains adapter. |
| Err-0 | Calibration data loss.Damaged digital scale or remote display. | Recalibrate.Contact the service company. |
| Err-1 | The load excesses the maximum value.Calibration data loss.Damaged digital scale or remote display. | Remove the objects from the weighing surface.Recalibrate.Contact the service company. |
8. Waste disposal
Discarding old devices
At the end of its service life the discarded device has to be disposed in accordance with the national regulations. It is advisable to contact a company which is specialized in waste disposal, or just contact the local disposal service in your community.
! CAUTION
You are obliged to dispose of the batteries (rechargeable batteries) found in your device, the device and the mains adapter unit. Remove the battery (rechargeable battery) from the device and dispose of it at the local battery collection point of your municipality. Disconnect the mains adapter from the power-supply and deliver the device and the mains adapter unit to your local disposal point for waste devices. Disposal via private household's waste is prohibited.
NOTE!
For the disposal of the device please consider and act according to the national and local rules and regulations.
Bartscher GmbH
① Display a distanza
④ Spina del cavo a spirale
② Cavo a spirale
① Panel de control remoto
4. Specifications 87
① Losse display
① Дистанционен дисплей
④ Конектор на спиралния кабел
② Спирален кабел
- Bedienungsanleitung
- Electronic digital scale
- Mode d'emploi
- Keep this instruction manual ready to hand at the product!
- General information.... 18
- 2.Safety 20
- Transport, packaging and storage.... 22
- Technical data 23
- Installation and operation.... 23
- Cleaning and maintenance.... 26
- Possible Malfunctions ...... 31
- Waste disposal 32
- Information about the instruction manual
- Key to symbols
- WARNING!
- WARNING! Electrical hazard!
- CAUTION!
- NOTE!
- Liability and Warrantees
- Copyright protection
- Declaration of conformity
- 2.Safety
- General information
- Safety instructions for use of the device
- Intended use
- Transport, packaging and storage
- Delivery check
- Packaging
- Storage
- Technical data
- Technical specification
- Overview of parts
- Installation and operation
- Safety instructions
- Installation and connection
- Operation
- Operating Panel
- Power on/off
- ATTENTION!
- Weighing
- - Weighing with a container:
- Calibration methods
- Arbitrary single-point calibration
- Standard double-point calibration
- STOP function
- Sending data / printing function
- Counting mode (number of pieces)
- Cleaning and maintenance
- Safety advice
- ! CAUTION!
- Cleaning
- Safety instructions for maintenance
- Possible Malfunctions
- Displayed error codes
- Waste disposal
- Discarding old devices
- ! CAUTION
- Specifications 87
Brand : BARTSCHER
Model : A300068
Category : Kitchen scales