
Pacemaker X3 - Treadmills Klarfit - Free user manual and instructions
Find the device manual for free Pacemaker X3 Klarfit in PDF.

| Product type | Folding treadmill |
| Brand | Klarfit |
| Model | Pacemaker X3 |
| Open dimensions (L x W x H) | 149 x 64 x 130 cm |
| Folded dimensions (L x W x H) | 64 x 60 x 137 cm |
| Running surface (L x W) | 109.5 x 39.5 cm |
| Device weight | 28 kg |
| Maximum user weight | 120 kg |
| Power supply | 220 V ~ 50 Hz |
| Power consumption | 1100 W |
| Speed range | 0.8 - 10 km/h |
| Adjustable incline | 3 positions: flat, 3.5%, 7% |
| Training programs | 12 automatic programs (P01-P12) |
| Display | LCD display (time, distance, speed, heart rate, calories) |
| Heart rate sensors | Hand grip sensors |
| Safety | Safety cord with magnet, emergency stop |
| Speed quick selections | 3 km/h, 5 km/h, 7 km/h |
| Power cord length | 185 cm |
| Lubrication | Every 50 hours of use |
| Maintenance | Clean with soft cloth and mild detergent |
| Spare parts | Safety pin, screws, plastic covers, Allen keys |
| Item numbers | 10026385, 10026386, 10026387 |
| Usage | Household only |
Frequently Asked Questions - Pacemaker X3 Klarfit
User questions about Pacemaker X3 Klarfit
0 question about this device. Answer the ones you know or ask your own.
Ask a new question about this device
Download the instructions for your Treadmills in PDF format for free! Find your manual Pacemaker X3 - Klarfit and take your electronic device back in hand. On this page are published all the documents necessary for the use of your device. Pacemaker X3 by Klarfit.
USER MANUAL Pacemaker X3 Klarfit
TECHNISCHE DATEN
natural_image
Collection of mechanical tools including wrench, screwdriver, and bolt (no text or symbols visible)ZUSAMMENBAU
natural_image
Black and white illustration of a mechanical device with a curved handle and lever (no text or symbols visible)
natural_image
Close-up of a hand using a tool to apply white material, with a red arrow pointing to a small object (no text or symbols visible)
natural_image
Close-up of a mechanical component with a metallic bracket and cylindrical shaft (no visible text or symbols)natural_image
Close-up of a hand securing a black curved pipe with metal fittings (no text or symbols visible)
natural_image
Close-up of a hand holding a handheld device with buttons and a small object (no visible text or symbols)
natural_image
Close-up of a hand holding a small mechanical device (no visible text or symbols)STEIGUNG EINSTELLEN
natural_image
Two treadmills shown side by side, one increasing and one decreasing, with no visible text or symbols.
natural_image
Close-up of a hand operating a control panel with a digital display and buttons (no visible text or symbols)Das Band starten:
natural_image
Line drawing of a person using a treadmill to lift a roller, no text or symbols presentnatural_image
Symbol of a trash bin crossed with a diagonal line, no text or numbers presentBerlin Brands Group UK Ltd
PO Box 1145
Oxford, OX1 9UW
United Kingdom
Dear customer,
Congratulations on the purchase of your device. Please read the following instructions carefully and follow them to prevent potential damage. We accept no liability for damage caused by disregarding the instructions or improper use. Please scan the QR code to access the latest operating instructions and for further information about the product.

TECHNICAL DATA
| Article number | 10026385, 10026386, 10026387 |
| Power supply 220 V ~ 50 Hz | |
| Power consumption 1100 W | |
| Cable length: 185 cm | |
| Weight 28 kg | |
| Dimensions open (LxWxH) 149 x 64 x 130 cm | |
| Dimensions folded (LxWxH) 64 x 60 x 137 cm | |
| Dimensions treadmill (LxW) 109.5 x 39.5 cm | |
| Maximum load: 120 kg | |
| Package contents | Device, operating instructions |

WARNING
This stationary training device is not suitable for high accuracy purposes. The heart rate monitoring system may be faulty. Excessive exercise can lead to dangerous injury or death. Should your performance decrease unusually, stop training immediately.
SAFETY INSTRUCTIONS
Read the operating instructions carefully before using the appliance and keep them for future use. Product features may differ slightly from those shown in the illustrations. Changes can be made by the manufacturer without notification.
- Keep the operating instructions in a safe place so that you can access them at any time.
- Do not assemble the device until you have read the operating instructions completely. The safety and efficiency of the device can only be guaranteed if the device has been correctly assembled and is properly maintained and used. It is your own responsibility to ensure that all users of the device are informed of warnings and precautions.
- The device must be placed on a stable and straight surface to be used safely. Protect the floor with a mat. Do not use the device in humid environments, such as pools, etc. The safety distance around the device must be at least 0.6 metres.
- Before using the exercise programmes, it is essential that you consult a doctor to determine whether you have any physical or health problems that could pose a risk to your health and safety by using the machine or prevent you from using the machine properly. Your doctor's advice is vital if you are taking medication that affects your pulse, blood pressure or cholesterol levels.
- Pay attention to your body's signals. Exercising incorrectly or excessively can be detrimental to your health. Stop exercising if any of the following symptoms occur: pain, tightness in the chest, irregular heartbeat, extreme shortness of breath, dizziness or nausea. If you experience any of these conditions, you must consult a doctor before continuing your training.
- Do not exercise directly after meals.
- The device may only be assembled by adults. Keep children and pets away from the device.
• The device may only be used in domestic areas. - The device is not suitable for therapeutic use. It can only be used for the exercises shown in the instructions.
- Wear adequate exercise clothing and exercise shoes when using the machine. Avoid loose clothing as it may get caught in the device or clothing that may restrict your movement.
-
Keep your back straight during exercise.
-
Before each use of the unit, always check that the handles, saddle, nuts and bolts have been properly tightened.
- Observe the maximum position for adjustable parts of the device and never go beyond the "Stop" mark as this would pose a risk.
- Only use the device as shown. If you notice any defective parts during assembly or inspection, or if you hear strange noises coming from the device during use, stop use immediately. Do not use the machine again until the problem has been corrected.
• Take care when lifting or moving the unit so that you do not injure your back. Always use back-friendly lifting techniques and seek help from another person if necessary. - All moving parts of the device (e.g. pedals, handles, saddle... etc.) must be serviced weekly. Check these before each use. If something is broken or loose, repair or fix the relevant part immediately. Do not continue using the device until you have restored it to a good initial condition.
- Keep the power cord away from heat sources.
- Do not insert any objects into the machine openings.
- Switch off and unplug the device before moving or cleaning the device. To clean, rub the surfaces with a mild detergent and a damp cloth. Do not use solvents under any circumstances.
- Do not use the device in places that are not temperature-controlled, such as garages, verandas, bathrooms, carports or outdoors.
- Only use the device as described in the operating instructions.
- Incorrect repair and structural modifications (e.g. removal or replacement of original parts) may put the user of the device at risk.
- The flywheel becomes very hot during use.
- Activate the key lock when you are not using the machine.
- Children from the age of 8, mentally and physically impaired persons may only use the device if they have been familiarised in detail with the functions and safety precautions by a supervisor responsible for them beforehand.
• Make sure that children do not play with the device. - Before use, check the voltage indicated on the nameplate. Ensure that you only connect the device to sockets with the appropriate voltage.
Note: Maximum user weight: 120 kg.
DEVICE OVERVIEW

INDIVIDUAL PARTS AND SMALL PARTS
Open the packaging and remove the contents. The package contains the following parts:
- 1 x main unit
• 1 x handrail/control panel - 1 x locking pin
- 2 x plastic cover
- 2 x Allen key
- 1 x safety cord
• 1 x M6 mounting screw - 4 x M8 mounting screw
- 1 x wrench

natural_image
Collection of mechanical tools and components including wrench, screwdriver, and bolted joint (no text or labels visible)ASSEMBLY
Place the unit on its edge. Stand behind the unit, hold it firmly and use your left hand to pull the locking pin out of the left side of the base section. This holds the unit together when folded. Use both hands to open the unit.
Tighten the fixing screw on the front left side to secure the treadmill.
Guide the control panel to the corresponding hole and fix it with an M6 screw.

natural_image
Black and white illustration of a mechanical device with a curved handle and lever (no text or symbols visible)
natural_image
Close-up of a hand holding a white object with a red arrow pointing downward (no text or symbols visible)
natural_image
Close-up of a mechanical component with a metallic bracket and cylindrical shaft (no visible text or symbols)Now attach the handrails to the frame and fasten them with the Allen key. Make the connection of the contacts on the right frame bar. Then put on the plastic cover.

natural_image
Close-up of a hand securing a black curved pipe with metal fittings (no text or symbols visible)
natural_image
Close-up of a hand holding a handheld device with buttons and a small object (no visible text or symbols)
natural_image
Close-up of a hand holding a small mechanical device (no visible text or symbols)SET SLOPE
Loosen the fixing screw. Set the pen to the desired position (There are 3 available Level, 3.5% and 7% gradient). Reattach the mounting screw.

FOLD TREADMILL
Switch off the device completely and pull the plug out of the socket. Loosen the fixing screw. Lift the base section, pull out the locking pin and use it to secure the base section to the frame. Keep the fixing screw in a safe place.

natural_image
Two treadmills shown side by side, one increasing and the other decreasing, with no visible text or symbols.
Emergency stop: Attach the magnet to the surface and the clip to your clothing
Activating the device:
Insert the plug into the socket and set the switch on the front right-hand side to position "1". As soon as the unit has been activated, a short tone sounds to indicate that the unit is in standby mode.
Place the safety cord on the magnetic surface. (If this safeguard has not been fitted, the display shows "-- -".)

natural_image
Close-up of a hand operating a control panel with a digital display and buttons (no visible text or symbols)Start the tape:
Press the start button. The display counts down and a triple beep sounds. The belt starts at the lowest speed (0.8 km/h). The preset programme is 60 minutes.
Change the speed
There are several ways to change the speeds:
- Increase or decrease the speed with the (+) / (-) buttons on the control panel.
- Change directly to 3 km/h, 5 km/h or 7 km/h with the quick selection buttons.
Change the programme before switching to manual mode
- Press the mode button once. The display shows 30 minutes.
- Select the desired programme time.
- Then press the start button. The display counts down and a triple beep sounds. The belt starts at the lowest speed (0.8 km/h).
- Select the desired speed.
- The display counts down the time entered.
Change the distance before switching to manual mode
- Press the mode button twice (the display shows 1 km).
- Increase or decrease the distance with the arrow keys on the control panel.
- Then press the start button. The display counts down and a triple beep sounds. The belt starts at the lowest speed (0.8 km/h).
- Select the desired speed. The display counts down the distance entered.
Using the 12 automatic programmes (P01-P12)
- Select the programme key until your desired programme is displayed. The preset time of 30 minutes is displayed.
- Increase or decrease the time with the arrow keys on the control panel (5-60 minutes).
- Then press the start button. The automatic programme starts after a 3-second countdown.
PROGRAMMES
- Twelve different programmes can be used (P01-P12) or you can set the speed and time yourself.
- Press the programme button and select one of the 12 programmes. Each programme has a preset duration of 30 minutes and is divided into 20 sections of 1.5 minutes each.
- If you want to change the time, you can do this with the arrow keys on the control panel. The time that can be set is between 5-60 minutes. When you use programmes, the display counts down from the set time.
| Speed in km/h per section | ||||||||||||||||||
| P1 | 23 | 345 | 345 | 534 | 544 | 423 | 353 | |||||||||||
| P2 | 24 | 456 | 466 | 645 | 644 | 422 | 542 | |||||||||||
| P3 | 24 | 466 | 477 | 747 | 744 | 424 | 532 | |||||||||||
| P4 | 25 | 567 | 757 | 788 | 595 | 566 | 443 | |||||||||||
| P5 | 24 | 456 | 775 | 678 | 854 | 465 | 542 | |||||||||||
| P6 | 24 | 345 | 487 | 578 | 364 | 425 | 432 | |||||||||||
| P7 | 23 | 334 | 534 | 534 | 533 | 366 | 533 | |||||||||||
| P8 | 23 | 367 | 746 | 744 | 467 | 444 | 232 | |||||||||||
| P9 | 24 | 477 | 478 | 489 | 944 | 456 | 332 | |||||||||||
| P10 | 24 | 567 | 546 | 886 | 654 | 424 | 433 | |||||||||||
| P11 | 24 | 595 | 955 | 599 | 555 | 998 | 763 | |||||||||||
| P12 | 25 | 810 | 7710 | 107 | 710 | 106 | 677 | 554 | 3 | |||||||||
CLEANING AND CARE
Note: Switch off the device and remove the plug from the socket before cleaning or maintenance.
Cleaning
- The unit can be cleaned with a soft cloth and mild detergent.
- Do not use abrasive or aggressive solvents.
• Take care not to expose the computer display to excessive moisture as this could damage it and pose a hazard. - Make sure that the unit (especially the computer display) is not exposed to direct sunlight as this could damage the screen.
Storage
- Store the treadmill in a clean and dry indoor environment.
- Never leave or use the unit outdoors.
- Make sure the main power switch is turned off and the power cord is unplugged from the wall socket.
ADJUST THE TREAD
The treadmill has already been adjusted at the factory, yet all users tend to be right- or left-footed. If the tread slips to the side, it must be adjusted. There are 2 adjustment screws at the rear of the unit. Tighten the screw half a turn on the side where the tape has slipped and loosen it equally on the other side. Carefully run the tread through to make sure it is absolutely centred. Repeat the process if the tread is still not properly centred.
- Turning clockwise moves the tread to the right. Turning anti-clockwise moves the tread to the left.
- Turning clockwise moves the tread to the left. Turning anti-clockwise moves the tread to the right.
Note: The treadmill should not be pulled too tightly as this could damage the tread.
LUBRICATION
Lubrication under the treadmill provides superior performance and extends the life of the unit. Apply some lubricant after the first 25 hours of operation (or after 2-3 months) and repeat the process every 50 hours of operation (or after 5-8 months).
Applying lubricant

natural_image
Line drawing of a treadmill with a hand adjusting the frame (no text or symbols)Lift one side of the treadmill. Put some lubricant under the centre of the treadmill on the top of the running deck. Switch on the machine and let it run at low speed for 3 - 5 minutes so that the lubricant is evenly distributed.
Note: Never apply too much lubricant. If excess lubricant runs out, wipe it off immediately.
Checking the treadmill for correct lubrication
Lift one side of the treadmill and touch the top of the running deck. If the surface is smooth, no further lubrication is required. When the surface is dry, apply some lubricant.
DISPOSAL CONSIDERATIONS

natural_image
Symbol of a trash bin crossed with a diagonal line, no text or numbers presentIf there is a legal regulation in your country regarding the disposal of electrical and electronic equipment, this symbol on the product or on the packaging indicates that this product must not be disposed of with household waste. Instead, it must be taken to a collection point for the recycling of electrical and electronic equipment. By disposing of this product in accordance with the regulations, you protect the environment and the health of those around you from negative consequences. For information on recycling and disposal of this product, contact your local government or household waste disposal service.
This product contains batteries. If there is a legal regulation in your country regarding the disposal of batteries, the batteries must not be disposed of in household waste. Consult your local regulations for the disposal of batteries. By disposing of this product in accordance with the regulations, you protect the environment and the health of those around you from negative consequences.
MANUFACTURER & IMPORTER (UK)
Manufacturer:
Chal-Tec GmbH, Wallstrasse 16, 10179 Berlin, Germany.
Importer for Great Britain:
Berlin Brands Group UK Ltd
PO Box 1145
Oxford, OX1 9UW
United Kingdom
Cher client, chère cliente,
FICHE TECHNIQUE
natural_image
Collection of mechanical tools including wrench, hammer, screwdriver, and bolt (no text or symbols visible)natural_image
Black and white illustration of a mechanical device with a curved handle and lever (no text or symbols visible)
natural_image
Close-up of a hand holding a white object with a red arrow pointing downward (no text or symbols visible)
natural_image
Close-up of a mechanical component with a metallic bracket and cylindrical shaft (no visible text or symbols)natural_image
Close-up of a hand connecting a black curved pipe with metal fittings (no text or symbols visible)
natural_image
Close-up of a hand holding a handheld device with buttons and a small object (no visible text or symbols)
natural_image
Close-up of a hand holding a black mechanical device (no visible text or symbols)RÉGLAGE DE LA PENTE
natural_image
Two outdoor treadmills shown side by side, one increasing and the other decreasing (no text or symbols visible)ORDINATEUR D'ENTRAÎNEMENT

natural_image
Close-up of a hand operating a control panel with a digital display and buttons (no visible text or symbols)natural_image
Line drawing of a treadmill with a hand adjusting the frame (no text or symbols)natural_image
Symbol of a trash bin crossed with a diagonal line, no text or numbers presentBerlin Brands Group UK Ltd
PO Box 1145
Oxford, OX1 9UW
United Kingdom
Gentile cliente,
DATI TECNICI
natural_image
Collection of mechanical tools including wrench, hammer, screwdriver, and bolt (no text or symbols visible)MONTAGGIO
natural_image
Black and white illustration of a mechanical device with a handle and lever (no text or symbols visible)
natural_image
Close-up of a hand holding a white object with a red arrow pointing downward (no text or symbols visible)
natural_image
Close-up of a mechanical component with a metallic bracket and cylindrical shaft (no visible text or symbols)natural_image
Close-up of a hand securing a black curved pipe with metal fittings (no text or symbols visible)
natural_image
Close-up of a hand holding a handheld device with buttons and a small object (no visible text or symbols)
natural_image
Close-up of a hand holding a small mechanical device (no visible text or symbols)IMPOSTARE LA PENDENZA
natural_image
Two treadmills shown side by side, one increasing and one decreasing, with no visible text or symbols.
natural_image
Close-up of a hand operating a control panel with a digital display and buttons (no visible text or symbols)Avviare il nastro:
natural_image
Line drawing of a treadmill with a hand adjusting the frame (no text or symbols)natural_image
Symbol of a trash bin crossed with a diagonal line, no text or numbers presentPRODUTTORE E IMPORTATORE (UK)
Produttore:
Chal-Tec GmbH, Wallstraße 16, 10179 Berlino, Germania.
Berlin Brands Group UK Ltd
PO Box 1145
Oxford, OX1 9UW
United Kingdom
Estimado cliente:
DATOS TÉCNICOS
natural_image
Collection of mechanical tools including wrench, screwdriver, and bolt (no text or symbols visible)MONTAJE
natural_image
Black and white illustration of a mechanical device with a curved handle and lever (no text or symbols visible)
natural_image
Close-up of a hand using a tool to apply white material, with a red arrow pointing downward (no text or symbols visible)
natural_image
Close-up of a mechanical component with a metallic bracket and cylindrical shaft (no visible text or symbols)natural_image
Two treadmills shown side by side, one increasing and one decreasing, with no visible text or symbols.natural_image
Close-up of a hand operating a control panel with a digital display and buttons (no visible text or symbols)Activar la cinta:
natural_image
Line drawing of a treadmill with a hand adjusting the frame (no text or symbols)natural_image
Symbol of a trash bin crossed with a diagonal line, no text or labels presentBerlin Brands Group UK Ltd
PO Box 1145
Oxford, OX1 9UW
Reino Unido

bar
| Category | Value | |---|---| | Category 1 | 100 | | Category 2 | 100 | | Category 3 | 100 | | Category 4 | 100 | | Category 5 | 100 | | Category 6 | 100 | | Category 7 | 100 | | Category 8 | 100 | | Category 9 | 100 | | Category 10 | 100 | | Category 11 | 100 | | Category 12 | 100 | | Category 13 | 100 | | Category 14 | 100 | | Category 15 | 100 | | Category 16 | 100 | | Category 17 | 100 | | Category 18 | 100 | | Category 19 | 100 | | Category 20 | 100 | | Category 21 | 100 | | Category 22 | 100 | | Category 23 | 100 | | Category 24 | 100 | | Category 25 | 100 | | Category 26 | 100 | | Category 27 | 100 | | Category 28 | 100 | | Category 29 | 100 | | Category 30 | 100 | | Category 31 | 100 | | Category 32 | 100 | | Category 33 | 100 | | Category 34 | 100 | | Category 35 | 100 | | Category 36 | 100 | | Category 37 | 100 | | Category 38 | 100 | | Category 39 | 100 | | Category 40 | 100 | | Category 41 | 100 | | Category 42 | 100 | | Category 43 | 100 | | Category 44 | 100 | | Category 45 | 100 | | Category 46 | 100 | | Category 47 | 100 | | Category 48 | 100 | | Category 49 | 100 | | Category 50 | 100 | | Category 51 | 100 | | Category 52 | 100 | | Category 53 | 100 | | Category 54 | 100 | | Category 55 | 100 | | Category 56 | 100 | | Category 57 | 100 | | Category 58 | 100 | | Category 59 | 100 | | Category 60 | 100 | | Category 61 | 100 | | Category 62 | 100 | | Category 63 | 100 | | Category 64 | 100 | | Category 65 | 100 | | Category 66 | 100 | | Category 67 | 100 | | Category 68 | 100 | | Category 69 | 100 | | Category 70 | 100 | | Category 71 | 100 | | Category 72 | 100 | | Category 73 | 100 | | Category 74 | 100 | | Category 75 | 100 | | Category 76 | 100 | | Category 77 | 100 | | Category 78 | 100 | | Category 79 | 100 | | Category 80 | 100 | | Category 81 | 100 | | Category 82 | 100 | | Category 83 | 100 | | Category 84 | 100 | | Category 85 | 100 | | Category 86 | 100 | | Category 87 | 100 | | Category 88 | 100 | | Category 89 | 100 | | Category 90 | 100 | | Category 91 | 100 | | Category 92 | 100 | | Category 93 | 100 | | Category 94 | 100 | | Category 95 | 100 | | Category 96 | 100 | | Category 97 | 100 | | Category 98 | 100 | | Category 99 | 100 | | Total (Total) |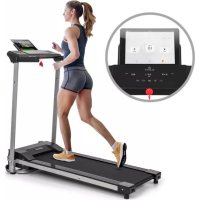

- ZUSAMMENBAU
- STEIGUNG EINSTELLEN
- Das Band starten:
- Dear customer,
- WARNING
- SAFETY INSTRUCTIONS
- DEVICE OVERVIEW
- INDIVIDUAL PARTS AND SMALL PARTS
- ASSEMBLY
- SET SLOPE
- FOLD TREADMILL
- Activating the device:
- Start the tape:
- Change the speed
- Change the programme before switching to manual mode
- Change the distance before switching to manual mode
- Using the 12 automatic programmes (P01-P12)
- PROGRAMMES
- CLEANING AND CARE
- Cleaning
- Storage
- ADJUST THE TREAD
- LUBRICATION
- Applying lubricant
- Checking the treadmill for correct lubrication
- DISPOSAL CONSIDERATIONS
- MANUFACTURER & IMPORTER (UK)
- Manufacturer:
- Importer for Great Britain:
- Cher client, chère cliente,
- RÉGLAGE DE LA PENTE
- ORDINATEUR D'ENTRAÎNEMENT
- Gentile cliente,
- MONTAGGIO
- IMPOSTARE LA PENDENZA
- Avviare il nastro:
- PRODUTTORE E IMPORTATORE (UK)
- Produttore:
- Estimado cliente:
- MONTAJE
- Activar la cinta:
Brand : Klarfit
Model : Pacemaker X3
Category : Treadmills