Cycloony Mini BIke - Indoor bike trainer Klarfit - Free user manual and instructions
Find the device manual for free Cycloony Mini BIke Klarfit in PDF.
| Product Type | Pedal Trainer (Indoor Bike) |
| Brand | Klarfit |
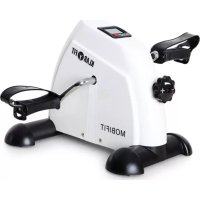
| Model | Cycloony Mini Bike |
| Power Supply | 220-240 V ~ 50/60 Hz |
| Power | 70 W |
| Weight | 5.5 kg |
| Max User Weight | 120 kg |
| Speed Levels | 12 |
| Display | Speed, time, distance, calories (scan mode) |
| Reverse Function | Yes, via REVERSE button |
| Adjustable Duration | 1 to 15 minutes |
| Usage | Home use, seated or lying |
| Assembly | Front/rear stabilizers and pedals to attach |
| Maintenance | Cleaning with damp cloth, periodic lubrication |
| Safety | Stop via POWER button, red switch |
| Standards | CE (EMC 2014/30/EU, LVD 2014/35/EU, RoHS 2011/65/EU), EN957 |
| Item Numbers | 10026399, 10026400 |
Frequently Asked Questions - Cycloony Mini BIke Klarfit
User questions about Cycloony Mini BIke Klarfit
0 question about this device. Answer the ones you know or ask your own.
Ask a new question about this device
Download the instructions for your Indoor bike trainer in PDF format for free! Find your manual Cycloony Mini BIke - Klarfit and take your electronic device back in hand. On this page are published all the documents necessary for the use of your device. Cycloony Mini BIke by Klarfit.
USER MANUAL Cycloony Mini BIke Klarfit
Congratulations on purchasing this equipment. Please read this manual carefully and take care of the following hints to avoid damages. Any failure caused by ignoring the items and cautions mentioned in the instruction manual is not covered by our warranty and any liability. Scan the QR code to get access to the latest user manual and other information about the product.

CONTENT
Safety Instructions 14
Overview and Assembly 15
Control Panel and Operation 17
Training and Exercises 19
Care and Maintenance 21
Hints on Disposal 22
TECHNICAL DATA
| Item number | 10026399, 10026400 |
| Power Supply | 220-240 V ~ 50/60 Hz |
| Power | 70 W |
| Weight | 5.5 kg |
| Max. User weight | 120 kg |
DECLARATION OF CONFORMITY
Producer:
Chal-Tec GmbH, Wallstraße 16, 10179 Berlin, Germany.

This product is conform to the following European Directives:
2014/30/EU (EMC)
2014/35/EU (LVD)
2011/65/EU (RoHS)
SAFETY INSTRUCTIONS
- Please read these operating instructions carefully before setting up and using the device. Safe and effective use of the unit can only be achieved if it is properly assembled, maintained and used. Make sure that all persons who use this device are informed of the warnings and safety instructions.
- Before starting training with this equipment, consult a physician and be screened for any physical or health restrictions that may prevent safe and efficient use of this equipment. If you are taking any medication that affects your blood pressure, heart rate, or cholesterol level, it is imperative that you consult a physician before exercising.
- Pay attention to your body's signals. Improper or excessive exercise can be harmful to your health. Stop training immediately if you notice the following symptoms: Chest pain / tightness, irregular heartbeat, extreme shortness of breath, signs of lightheadedness, dizziness or nausea. If you experience any of these symptoms, consult a doctor before continuing.
- This device is not intended for use by persons (including children) with limited physical, sensory or mental abilities, or for lack of experience and/or knowledge, unless they are supervised or instructed by a person responsible for their safety on how to use this device. Children should be supervised to ensure that they do not play with the device.
- Place the appliance on a dry and level surface.
- Make sure all screws and fasteners are properly tightened before each workout.
- The safety of the equipment can only be guaranteed if the equipment is regularly maintained and checked for any damage or wear and tear.
- Only use the unit as intended. If you discover any defective components during assembly or inspection, or if you notice any unusual noises on the machine during training, stop training immediately. Do not use the device again until the problem has been identified and solved.
- Wear appropriate clothing when using the machine. Do not wear loose clothing that could become entangled with the machine and restrict your freedom of movement.
- The device has been tested and certified according to EN957 and is approved for domestic use.
- The device is not suitable for therapeutic use.
OVERVIEW AND ASSEMBLY
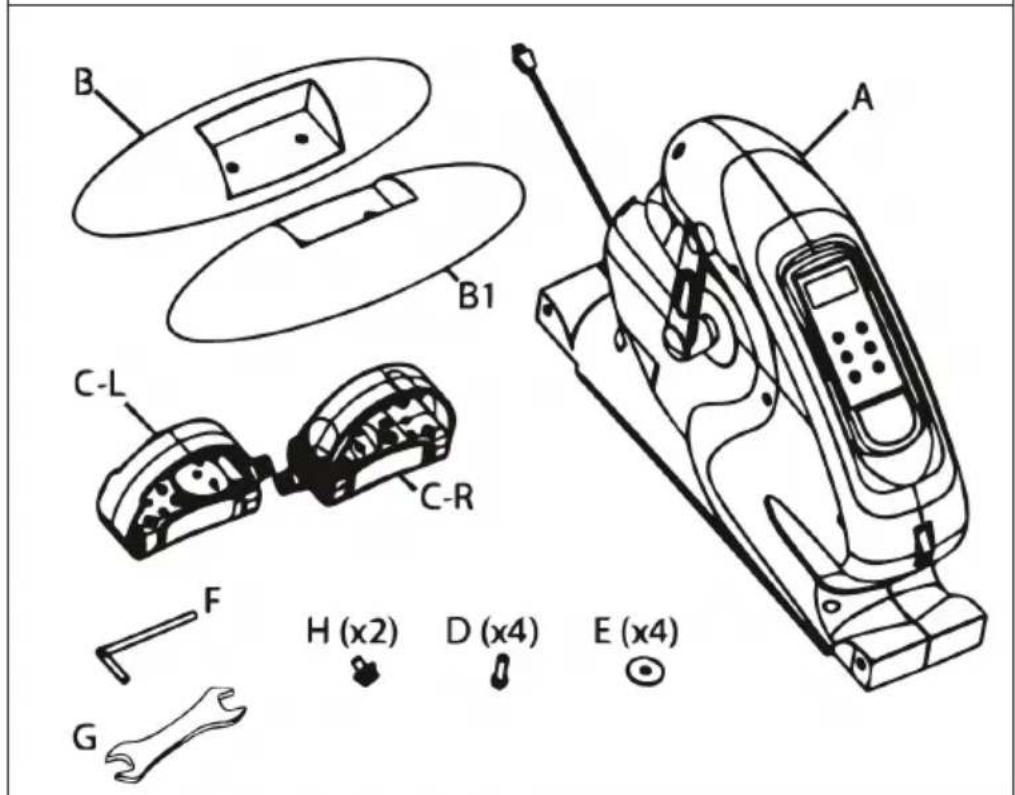
Overview
1
2
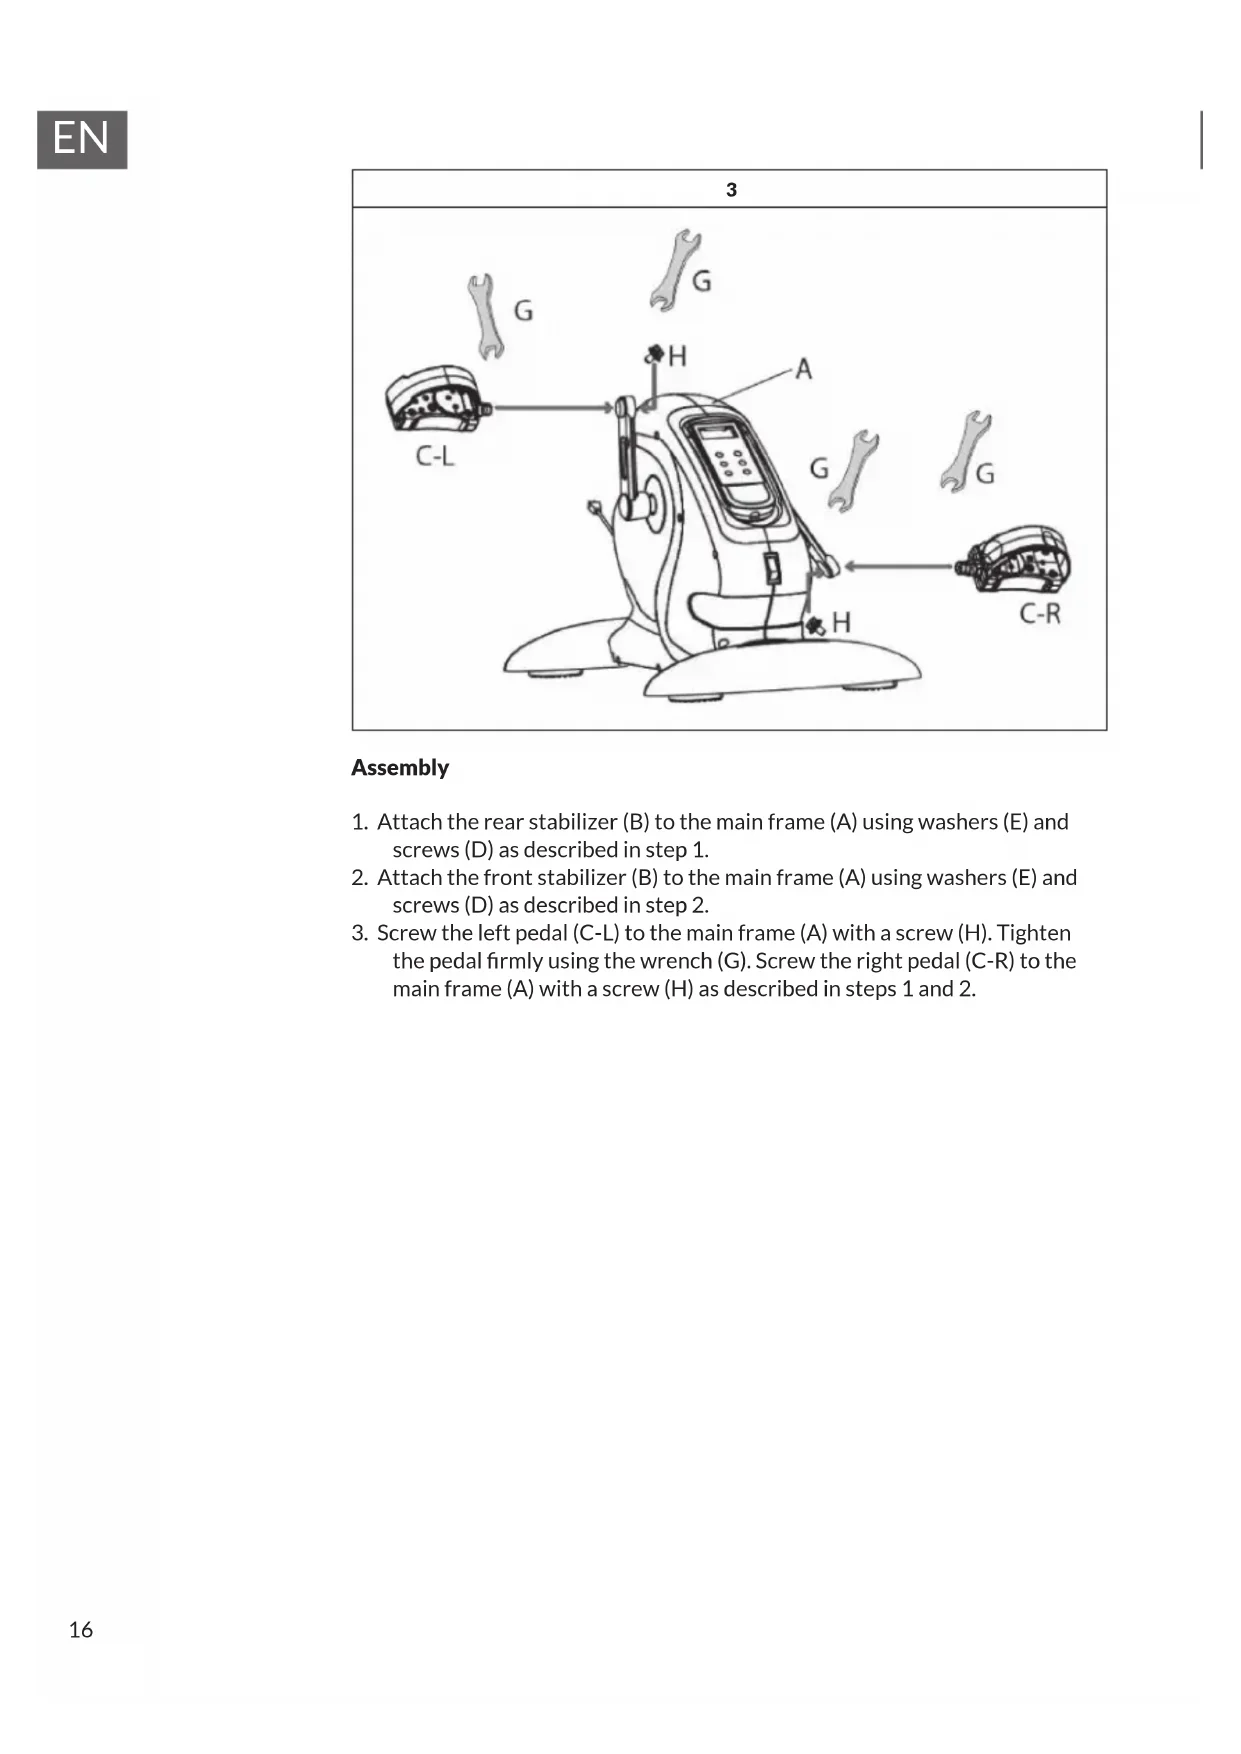
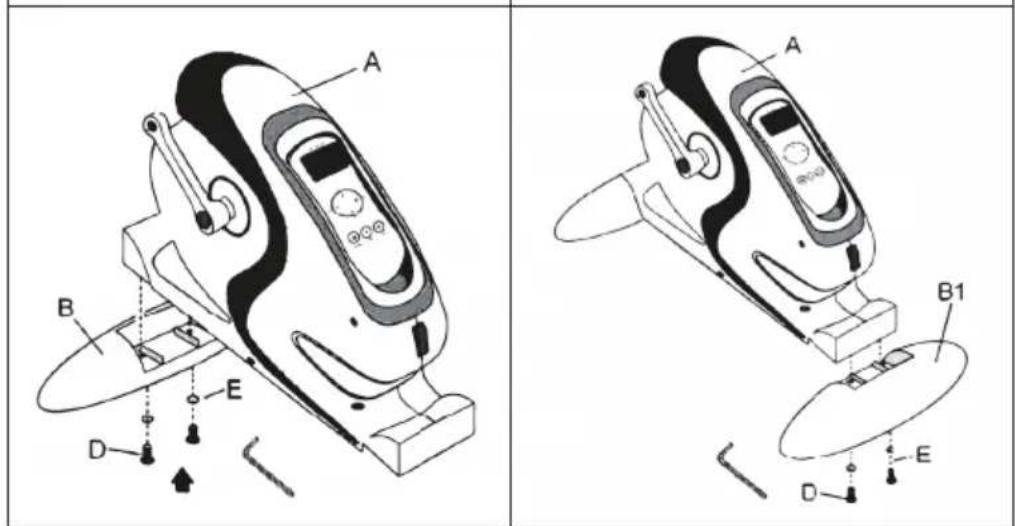
Assembly
- Attach the rear stabilizer (B) to the main frame (A) using washers (E) and screws (D) as described in step 1.
- Attach the front stabilizer (B) to the main frame (A) using washers (E) and screws (D) as described in step 2.
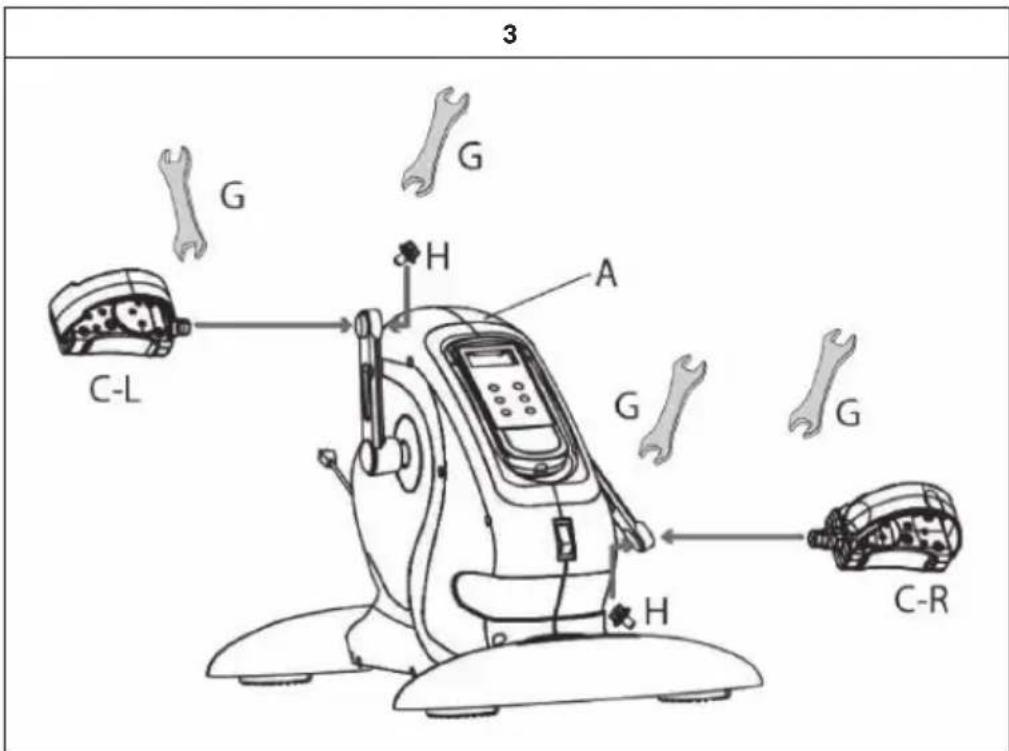
- Screw the left pedal (C-L) to the main frame (A) with a screw (H). Tighten the pedal firmly using the wrench (G). Screw the right pedal (C-R) to the main frame (A) with a screw (H) as described in steps 1 and 2.
Control Panel and Key Functions
| Scan Start / Stop Time Decrease Speed | Speed Time Distance Calories Mode Mode Change of direction Increase Speed |
| Power Start and Stop. | |
| Time Selection key Time (1-15 min). | |
| Mode Selection key for displaying the values for speed, time, distance and calories. | |
| Reverse Button to change the direction of pedal movement. | |
| Speed-Speed. Speed reduction button (12 speeds). | |
| Speed+ Speed increase button (12 speeds). | |
Operation
| Power Press | press the POWER button to start at speed 1 and a preset time of 10 minutes. The display alternates between speed, time, distance and calories. |
| Time Press | the TIME button to set the workout time from 1 to 15 minutes. For quick adjustment, press and hold the button until the desired time is displayed. The machine will stop automatically when the selected time has elapsed. |
| Mode Press | the MODE button repeatedly to display data for speed, time, distance and calories burned. If you want to display the values alternately, press the MODE button several times until the red lamp under SCAN lights up. |
| Reverse Press | press the REVERSE button to change the direction of pedal rotation. |
| Speed- Press | press the SPEED- button to decrease the speed. Press and hold the button until the desired speed is displayed. |
| Speed+ Press | press the SPEED+ button to increase the speed. Press and hold the button until the desired speed is displayed. |
Note: To turn off the unit, press the POWER button. When the training session is finished, move the red switch located under the remote control bracket to position 0.
TRAINING AND EXERCISES
- If you are still untrained, we recommend short training sessions between 3 and 6 minutes at a low speed. Exercise twice a day. The preset duration is 5 minutes.
- Increase the duration of each session piece by piece until you reach 15 minutes twice daily.
- If you feel comfortable exercising, increase the speed level.
Exercise 1: Sitting
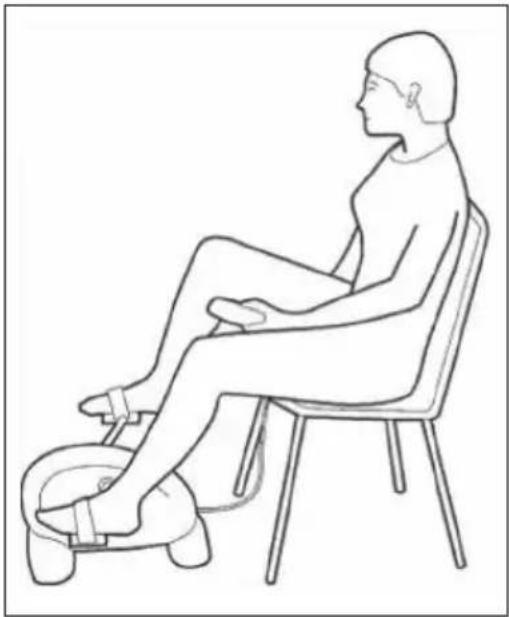
- Use a stable chair.
- Be sure to place the pedal trainer at a comfortable distance from the chair (to avoid having to stretch your legs too far).
- Make sure that the lower part of your back (lumbar region) remains supported while using the pedal trainer. We recommend that you place a small pillow in the lumbar area.
- Sit down and place your feet on the pedals.
- Remove the remote control from the holder and press the power button. The pedals will begin to rotate.
- To stop the pedals, press the power button again.
Exercise 2: Lying down
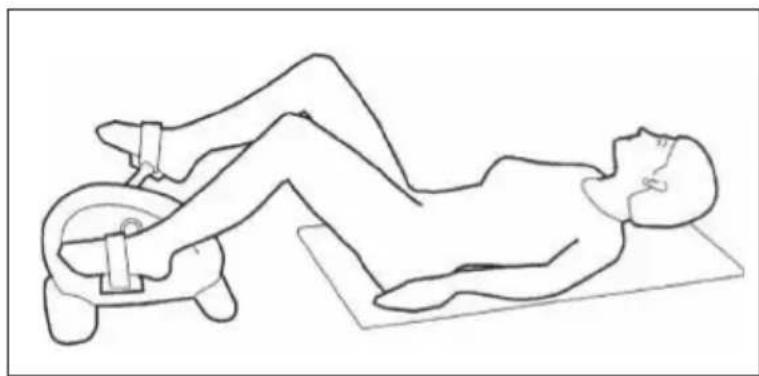
- When lying down, make sure that the lower part of your back (lumbar region) is lying down while using the pedal trainer. We recommend that you place a small cushion under your lumbar region and head.
- Lie down with both feet in the pedals (it is recommended to use the pedal loops).
- Place your arms on the right and left side of your body.
- Remove the remote control from the holder and press the POWER button. The pedals will begin to rotate.
- To stop the pedals, press the POWER button again.
- Stay in this position for a moment after finishing the workout and then slowly stand up.
Note: When using the machine on the bed, make sure it is stable. Place it on a board or stable surface and not directly on the mattress or bed linen.
Exercise 3: Sitting
- Make sure to place the pedal trainer on a stable surface and at a comfortable distance from the chair (to avoid having to stretch your arms too far).
- Place the pedal trainer, for example, on a fixed table and sit on a stable chair. Adjust the pedal trainer to the height of your chest so that the magnetic holder for the remote control points in your direction.
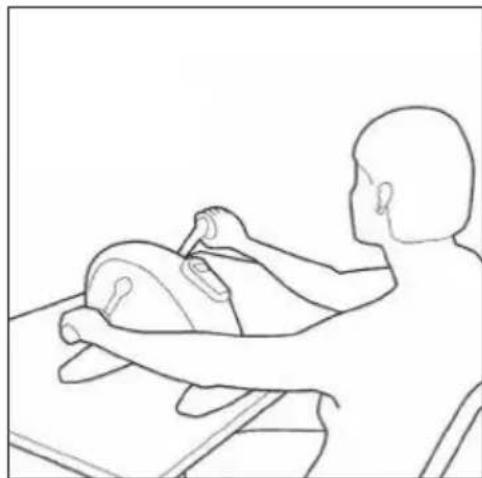
- Remove the remote control from the cradle and press the power button. The pedals will begin to rotate.
- Sit in this position for a moment after finishing the workout, then slowly stand up.
CARE AND MAINTENANCE
Note: As with all training machines with mechanical, moving components, screws may loosen due to frequent use. We therefore recommend that you check them regularly and, if necessary, retighten them with a suitable key. Clean your training device regularly with a damp cloth to clean the surfaces from sweat and dust.
- When you don't use the exercise bike for a long time, please take out the console battery to avoid running out of battery.
- Often clean the exercise bike with clean cloth to keep the clean appearance.
- The safety level of the equipment only can be maintained if it is regularly examined for damage and or /wear and tear.(e.g. handle bar, pedals and seat ...etc.). It is vital that any faulty parts are replaced and the it is not used until completed repaired.
- Regularly check that the elements fastened with nuts and bolts are correctly tightened.
- Remember regularly to grease moving parts.
- Special attention to the component, most of them are susceptible to wear like brake system, foot pad etc.
- As sweat is very corrosive, do not allow it to come into contact with the enameled or chromed parts of the equipment, particularly the computer. Immediately wipe the equipment after using. The enameled parts can be cleaned using a damp sponge. All aggressive or corrosive products must be avoided.
- Storing the equipment in a clean and dry environment away from children.
According to the European waste regulation 2012/19/EU this symbol on the product or on its packaging indicates that this product may not be treated as household waste. Instead it should be taken to the appropriate collection point for the recycling of electrical and electronic equipment. By ensuring this product is disposed of correctly, you will help prevent potential negative consequences for the environment and human health, which could otherwise be caused by inappropriate waste handling of this product. For more detailed information about recycling of this product, please contact your local council or your household waste disposal service.
Your product contains batteries covered by the European Directive. 2006/66/EC, which cannot be disposed of with normal household waste. Please check local rules on separate collection of batteries. The correct disposal of batteries helps prevent potentially negative consequences on the environment and human health.
Chere cliente, cher client,
Chal-Tec GmbH, Wallstraße 16, 10179 Berlin, Germany.