Vacu Pro 2 - Vacuum packaging machines Espressions - Free user manual and instructions
Find the device manual for free Vacu Pro 2 Espressions in PDF.

User questions about Vacu Pro 2 Espressions
0 question about this device. Answer the ones you know or ask your own.
Ask a new question about this device
Download the instructions for your Vacuum packaging machines in PDF format for free! Find your manual Vacu Pro 2 - Espressions and take your electronic device back in hand. On this page are published all the documents necessary for the use of your device. Vacu Pro 2 by Espressions.
USER MANUAL Vacu Pro 2 Espressions
natural_image
Exterior view of a modern stainless steel espressioner device (no visible text or symbols on the device body)GEBRUIKERSHANDLEIDING
MANUEL D'INSTRUCTIONS
INSTRUCTION MANUAL
BEDIENUNGSANLEITUNG

Verwijdering
In conformity to Directive 2012/19/CE, the symbol reported on the device indicates that the device to dispose must be considered as waste, and must therefore be subject to separate waste collection. Therefore, the user will have to confer (or have conferred) said waste to the separate waste collection centres predisposed by local administration, or deliver it to the reseller when purchasing a new equivalent type of device. Separate waste collection and subsequent treatment, recovery and disposal operations favour the manufacturing of devices with recycled materials and limit negative effects on the environment and on health, caused by eventual improper waste management. The unlawful disposal of the product by the user could result in administrative fines as provided by the laws transposing Directive 2012/19/EC of the European member state in which the product is disposed of.
Verschrottung

natural_image
Line drawing of hands holding a device with arrows indicating movement or change (no text or symbols)fig. D

natural_image
Line drawing of hands operating a mechanical roller or printer device (no text or symbols present)fig. E
natural_image
Line drawing of hands operating a printer with a paper roll, showing a downward arrow indicating compression (no text or symbols present)fig. F
natural_image
Line drawing of hands operating a printer with paper and scroll (no text or symbols)fig. G
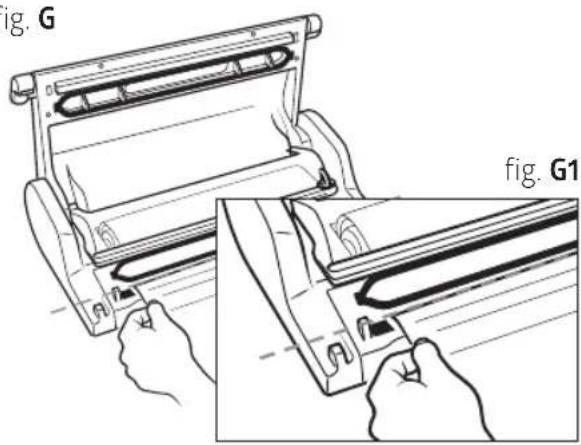
fig. Q1
natural_image
Line drawing of a medical or laboratory procedure showing a tube inserted into a device with a loop and a small component (no text or symbols)fig. Q2

8.2 Vacumeren in Espressions MAGIC VAC® bewaarbussen
natural_image
Line drawing of two medical devices with handles, one open and one closed, labeled Fig. R1 (no text or symbols on the devices themselves)fig. R2
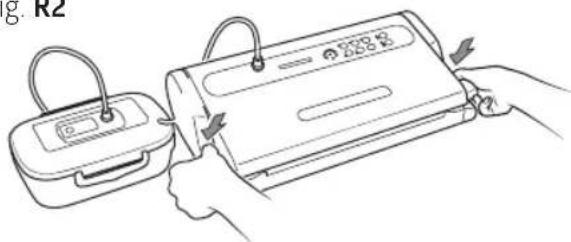
fig. R3

fig. T2
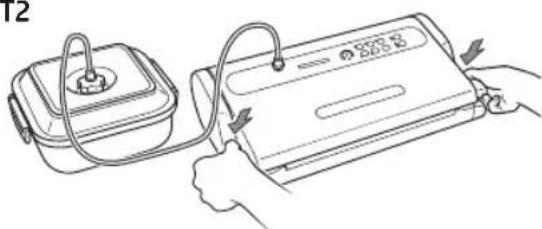
fig. T1
natural_image
Line drawing of two electronic devices with cables and connectors (no text or symbols)fig. T3
natural_image
Line drawing of a hand using a mechanical device to press or install a sheet of paper (no text or symbols present)natural_image
Line drawing of a hand holding a metal tray over a wire basket (no text or symbols)fig. U3

natural_image
Line drawing of a hand operating a rolled-up printer (no text or symbols present)Accessoire compartiment
natural_image
Technical line drawing of a mechanical housing or enclosure component (no text or symbols)fig. V2

natural_image
Line drawing of hands holding a rectangular device with a downward arrow indicating a change or adjustment (no text or symbols present)fig. V3
De machine opbergen
natural_image
Line drawing of a portable electric stove with power cord and plug (no text or symbols)fig. W2

natural_image
Line drawing of a hand holding a device with a control panel and indicator lights (no text or symbols)fig. W4
natural_image
Technical line drawing of a portable electronic device (no text or symbols)Problemen oplossen
1. Dispositif breveté 'Lock & Unlock systeem'
2D Touche Auto Vacuum & Seal
natural_image
Line drawing of hands operating a mechanical device with rollers (no text or symbols)
natural_image
Line drawing of hands operating a printer with paper roll, showing mechanical components and a downward arrow (no text or symbols)
natural_image
Line drawing of a hand using a paper roll presser to press or spread materials (no text or symbols present)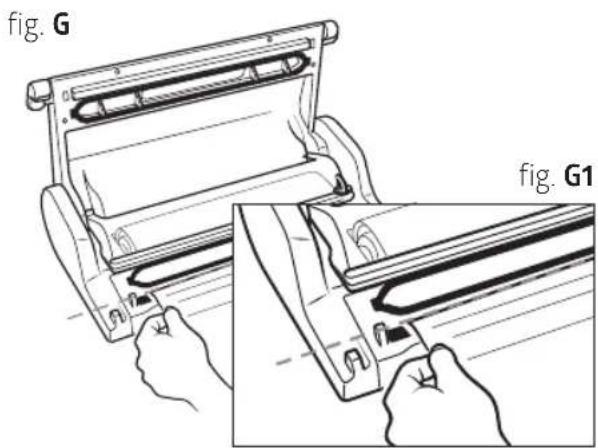
flowchart
graph TD
    A["OPEN"] --> B["VACUUM"]
    B --> C["CLOSED"]
    C --> A
fig. Q1
natural_image
Line drawing of a medical or laboratory device with tubing and a central component (no text or symbols)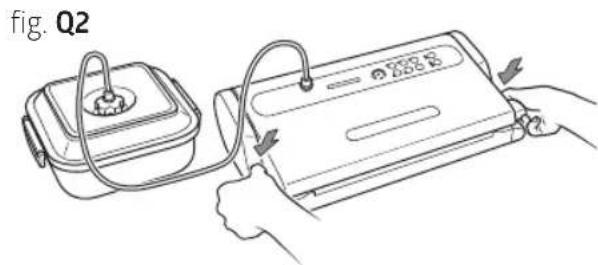
8.2 Emballage en Contenants Espressions MAGIC VAC® Family
natural_image
Line drawing of two medical devices with handles, one open and one closed, labeled 'fig. R1' (no text or symbols on the devices themselves)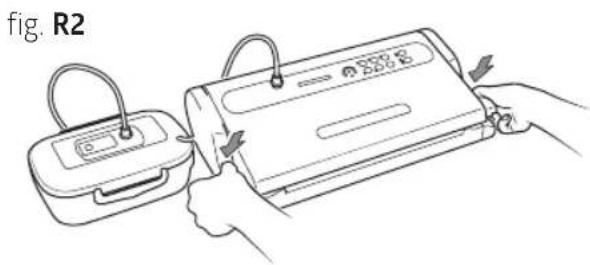
natural_image
Line drawing of two electronic devices with cables and connectors (no text or symbols)fig. T3

Nettoyage
natural_image
Line drawing of a printer or scanner with a hand inserting a slot into it (no text or symbols)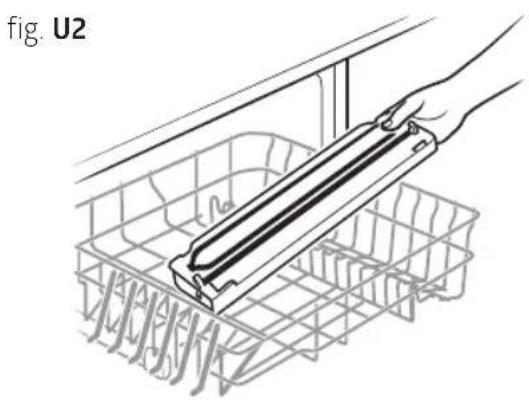
natural_image
Diagram of a hand holding a rectangular device inside a wire basket, no text or symbols present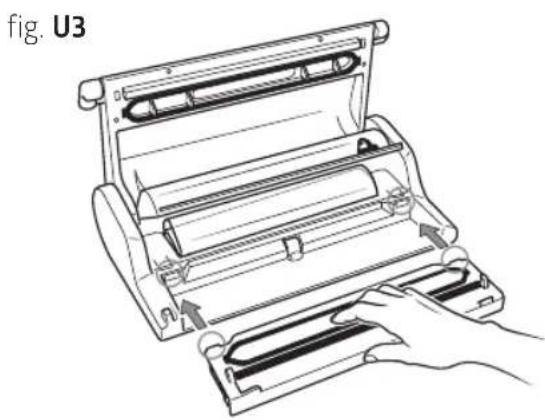
natural_image
Line drawing of a mechanical device with a hand operating it, showing internal components and motion arrows (no text or symbols)Compartiment accessoires
natural_image
Technical line drawing of a rectangular mechanical component with mounting flanges and a central slot (no text or symbols)fig. V2
natural_image
Line drawing of hands assembling a mechanical component with a downward arrow indicating assembly (no text or symbols)fig. V3

Rangement de la machine
natural_image
Line drawing of a portable electric stove with a power outlet and cord (no text or symbols)fig. W2
natural_image
Line drawing of a hand holding a device with a control panel, no text or symbols presentfig. W4
natural_image
Line drawing of a portable electronic device with a handle and control panel (no text or symbols)Espressions safety precautions 58
Machine arts of your Vacu Pro 2 60
Description of controls and functions 62
How to use your Vacu Pro 2 63
Cleaning 71
Accessory compartment 72
Storaging the machine 72
Troubleshooting 73
Technical features 74
The advantages of vacuuming 75
About vacuum packing 77
How to preserve food in Espressions MAGIC VAC® bags 78
How to preserve food in Espressions MAGIC VAC ^® containers —— 79
Points to remember 80
Notes 81
Terms of guarantee 82
Congratulations
Congratulations, and thank you for choosing a high quality kitchen appliance from Espressions! If it is well maintained, you will enjoy it for many years. Before using the appliance for the first time, read the instruction manual carefully and follow all the safety precautions provided below. People who have not familiarised themselves with the instruction manual for this appliance may not use it. Keep the packaging for later use, but dispose of all the plastic packaging material, as it can be dangerous for children who play with it.
For further information about our products or product range, please visit our website:
www.espressions.eu

Packaging disposal

Product box Cardboard insert

Product packaging bag MAGIC Cutter packaging bag

Polystyrene insert for cover
Espressions safety precautions
Espressions Vacu Pro 2 safety precautions
The manufacturer makes every effort to ensure that all of their products are of the highest quality and safety, however, as with any electric appliance, fundamental safety regulations must be observed in order to avoid hazards to people, animal and/or things.
- This appliance can be used by children aged from 8 years and above and persons with reduced physical, sensory or mental capabilities or lack of experience and knowledge if they have been given supervision or instruction concerning use of the appliance in a safe way and understand the hazards involved. Children shall not play with the appliance. Cleaning and user maintenance shall not be made by children without supervision.
- Carefully read the instructions before using your Espressions Vacu Pro 2 and keep it handy for future reference.
- The appliance is not designed for continuous operation. Do not carry out more than one complete cycle every 2 minutes. The operating cycle is 50 seconds approx and after then there's the break until 2 minutes. In extreme ambient conditions, an intensive use of the appliance may trigger the automatic thermal protection devices. In such a case allow the appliance to cool down sufficiently to enable resetting of the protection devices.
- Do not use the device near or on hot surfaces.
- The appliance cover is not protected against liquid penetration.
- Do not draw liquids into the vacuum chamber. Should this happen, immediately dry the vacuum chamber.
- Do not submerge the appliance in water and do not use it if the cable or plug is wet; if this should happen during use, immediately unplug it wearing dry rubber gloves. Do not remove or touch the appliance that is submerged in water before unplugging it. Do not use it after having removed it from the water (send it immediately to an authorized repair centre or our authorized dealer).
- Do not touch the sealing bar during use or at the end of the cycle in order to prevent possible burns.
- Do not use knives or other sharp utensils to remove any residue from the sealing bar; always wait for it to cool off before cleaning it with a sponge dampened with gentle detergent.
- Never use power adapters other than those reported on the device (see information label).
• Always unplug after use. - Do not open or tamper with the device. Repairs must only be performed by authorized personnel. Unauthorized repairs will void the warranty.
- The Manufacturer, Retailer and Importer shall be deemed responsible for the safety, reliability and performance only if: a) the device is used in compliance with the use instructions; b) the electrical system in the area where the device is used is in compliance with current laws.
- The use of Espressions MAGIC VAC® original bags is highly recommended. If other types of vacuum bags are used to carry out multiple vacuum packaging operations, the plain side of the film should be laid face down onto the sealing bar.
- No lids or use containers that have cracks or is damaged!
This text is for users in countries except European countries:
- This appliance is not intended for use by persons (including children) with reduced physical, sensory or mental capabilities, or lack of experience and knowledge, unless they have been given supervision or instruction concerning use of the appliance by a person responsible for their safety.
- Children should be supervised to ensure that they do not play with the appliance.
Only use original Espressions MAGIC VAC® bags and accessories.
Machine parts of your Vacu Pro 2


natural_image
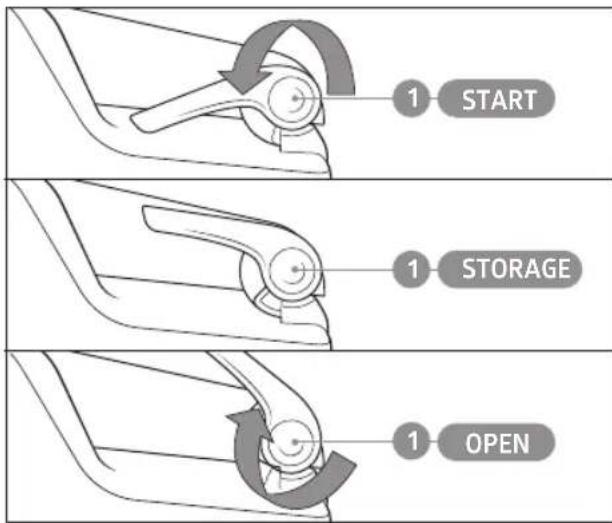
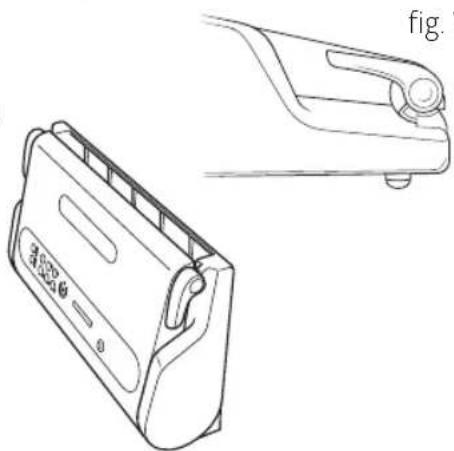
Technical line drawing of a mechanical device with two views and directional arrows indicating movement (no text or symbols)1. Patented 'Lock & Unlock System'
To lock and unlock the bag insertion area, allowing for the packing cycle to be executed in automatic mode and freeing the operator for other activities. The Lock & Unlock System is controlled by two Handles (1), which rotate in three predefined positions to open (OPEN) - close (STORAGE) and activate the machine (START).
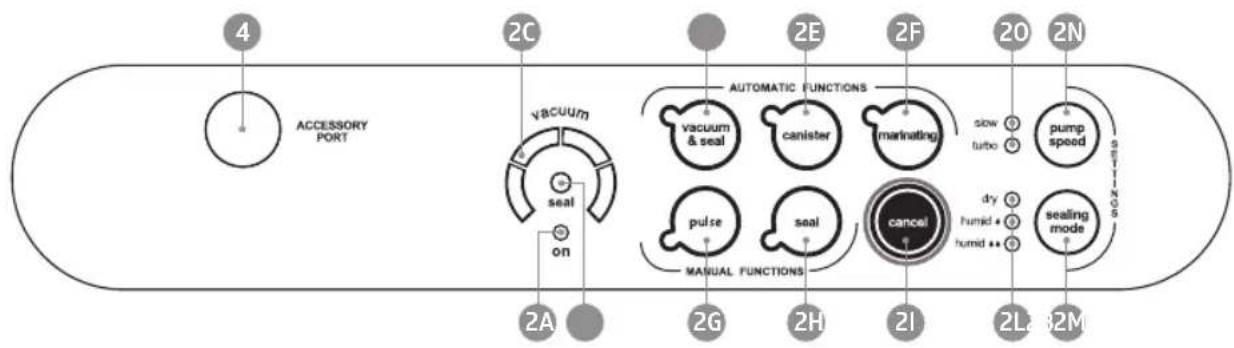
2Controlpanel
To set the various functions of the machine (see paragraph: DESCRIPTION OFCONTROLS AND FUNCTIONS).
3LitWindow
Patented solution that allows the user to see the correct positioning of the bagin the vacuum Chamber.
4 Air intake for the Tube (ACCESSORY PORT)
To insert the Tube to perform vacuum packing in all canisters and with all Espressions MAGIC VAC® accessories.
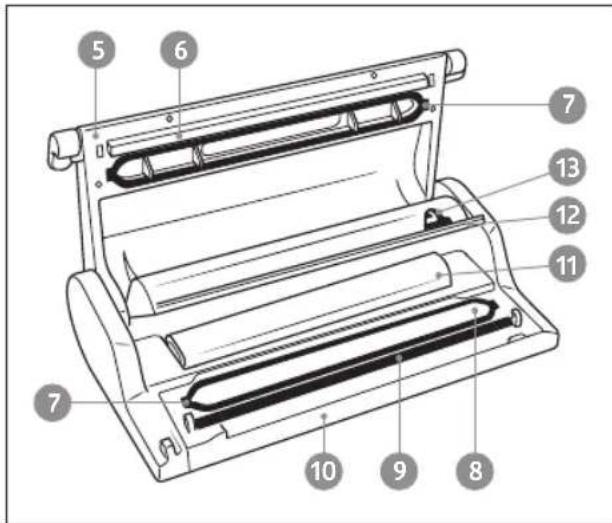
5Cover
Open in the upper fixed position, it allows for bags to be positioned before proceeding with packing.
6Sealingbar
Heating element which seals the bag.
7Airtightgasket
Guarantees the vacuum in the chamber allowing for air to be evacuated from the bags Espressions MAGIC VAC®.
8Vacuumchamber
Is the location for positioning the bag and evacuating the air.
9 Sealing gasket
Presses the bag on the Sealing Bar.
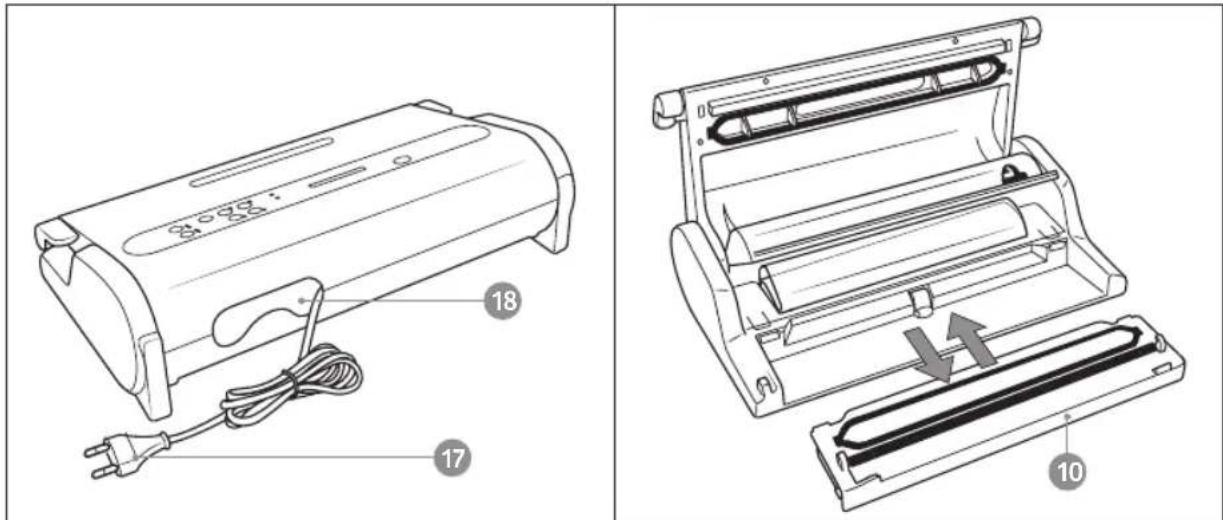
10 Removable Tray
Patented solution that allows the Vacuum Chamber to be washed in the dishwasher for maximum hygiene.
11 Roll-Holder Compartment
12 Roll-Holder Compartment Cover
It protects the roll from possible soiling during the packing phases.
13 Bag Cutter
Can be used in both directions.
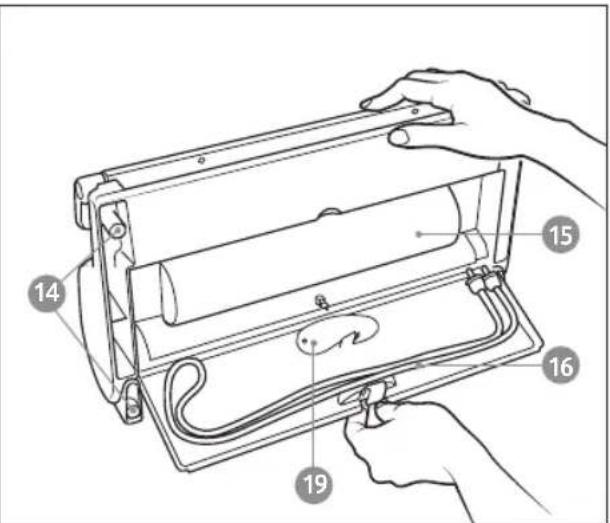
14 Anti-skid Feet
Prevent the machine from sliding during use.
15 Accessory Compartment
Compartment for storing the Magic Cutter (19) (where applicable) and the Canister Connection Tube, located on the lower part of the machine.
16 Canister Tube
This connects the machine to all of the Espressions Vacu Pro 2 accessories.
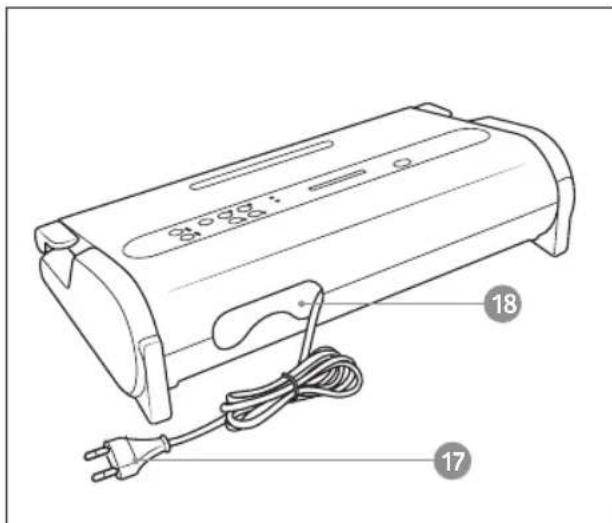
17 Power Cable
To connect the machine to power.
18 Cable Compartment
Compartment for storing the Power Cable, located on the back of the machine.
Description of controls and functions
flowchart
graph LR
    A["4"] --> B["ACCESSORY PORT"]
    B --> C["vacuum"]
    C --> D["seal"]
    D --> E["on"]
    E --> F["2A"]
    C --> G["2G"]
    G --> H["2H"]
    H --> I["2I"]
    I --> J["2L"]
    J --> K["32M"]
    C --> L["2E"]
    L --> M["2F"]
    M --> N["sow turbo"]
    N --> O["pump speed"]
    O --> P["sealing mode"]
    P --> Q["cancel"]
    Q --> R["dry humid"]
    R --> S["2H"]
    S --> T["2I"]
    T --> U["2L"]
    U --> V["32M"]
    style A fill:#f9f,stroke:#333
    style V fill:#f9f,stroke:#333
    style C fill:#ccf,stroke:#333
    style D fill:#ccf,stroke:#333
    style E fill:#ccf,stroke:#333
    style F fill:#cfc,stroke:#333
    style G fill:#cfc,stroke:#333
    style H fill:#cfc,stroke:#333
    style I fill:#cfc,stroke:#333
    style J fill:#cfc,stroke:#333
    style K fill:#cfc,stroke:#333
    style L fill:#cfc,stroke:#333
    style M fill:#cfc,stroke:#333
    style N fill:#cfc,stroke:#333
    style O fill:#cfc,stroke:#333
    style P fill:#cfc,stroke:#333
    style Q fill:#cfc,stroke:#333
    style R fill:#cfc,stroke:#333
    style S fill:#cfc,stroke:#333
    style T fill:#cfc,stroke:#333
    style U fill:#cfc,stroke:#333
2A ON LED
GREEN, it is activated when the Handles (1) are in the START position.
2B SEAL LED
Flashing RED when Sealing.
2C Progress Display
Indicates the air extraction phases during the packing cycle.
2D Auto Vacuum & Seal Button
Start button for the automatic bag packing cycle, including final sealing.
2E Canister Button
Start button for the automatic cycle for canisters and Espressions MAGIC VAC® accessories.
2F Marinating Button
Start button for the special 'Rapid Marinating' cycle to be used only with the square 2.5 litre Espressions MAGIC VAC® Executive Canisters.
2G Pulse button
Button to start the manual cycle; the machine continues extracting air until the button is released.
2H Seal Button
Start button for manual Sealing.
21 CANCEL Button
Stops the machine at any time.
2L Sealing Mode
RED LEDs indicate the sealing mode selected: 'Dry', 'Humid' of 'Humid'.
2M Sealing Mode Button
Selects from the 3 sealing modes.
2N Pump Speed Button
Selects from the 2 Pump Speeds.
20 Pump Speed
BLUE LEDs indicate the Pump speed selected.
4 ACCESSORY PORT
Air intake
How to use your Vacu Pro 2
WARNING: When not using the machine, keep the Handles (1) in the STORAGE position. Do not close completely in order to avoid damaging the Airtight Gasket (7).
Before each use, carefully clean your machine and accessories that come in contact with food (canisters, lids, jars, etc....) following the instructions provided in paragraph 'CLEANING INSTRUCTIONS'.
1. Positioning the machine
Position the machine in a dry place on a horizontal surface, being careful to leave the work zone around the machine itself free of obstacles and wide enough to allow for placing the bags of food to be packaged. Connect the power cable to an electrical outlet corresponding with its voltage (see the information label).
2. Connecting the machine
Insert the Power Cable Plug (17) in the outlet. Check for correct connection by rotating the Handles (1) in the START position; on the display of the Mod. EP6400, the GREEN ON LED (2a), the BLUE LED (20) for the 'turbo' pump speed and the RED LED (2L) for the 'Humid' sealing mode will light up.
3. Adjustments
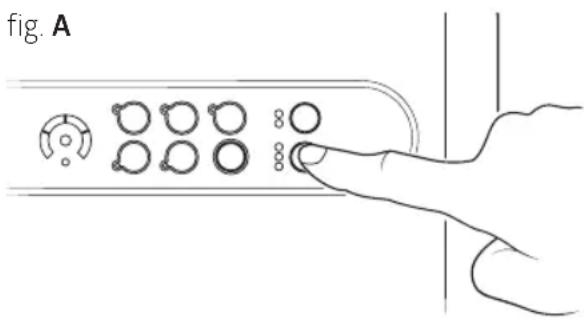
3.1 Setting the sealing mode
The Espressions Vacu Pro 2 is equipped with an intelligent sealing function that auto-adjusts the sealing according to the temperature of the Sealing Bar which increases little by little with consecutive packing cycles. Therefore, the final bag sealing result can be influenced by the type of food to be packed or the temperature of the room. Thus, to optimise the final result you can choose form 3 sealing modes:
- 'Dry' for dry foods like cookies, rice and coffee..
• 'Humid for cheeses, dry meats and salami. - 'Humid' for red meats, which have liquids or blood, and fish. When the machine is turned on, the sealing option is always set to 'Humid'
To set the sealing mode, before starting the packing cycle, press the 'sealing mode' button (2M) to select the mode desired (fig. A).
ATTENTION: The sealing mode selected remains memorized until the Handles (1) are rotated to the OPEN position. The selection must be done at every packing cycle.
3.2 Set the pump suction speed
The Espressions Vacu Pro 2 is equipped with a pump suction speed regulator to make the packing operation easier. When the machine is activated by rotating the Handles (1) to the START position, the speed is automatically set to 'turbo' or the highest that can be used in normal packing operations. However, when packing fragile foods in Espressions MAGIC VAC® bags, it is best to select the 'slow' function which reduces the pump speed, thus allowing control over the performance of the operation by manual activating the sealing process with the 'seal' button (2h) at the proper time. If the 'slow' speed is selected and the 'canister' or 'marinating' functions are then activated, the speed will automatically set itself to 'turbo'.
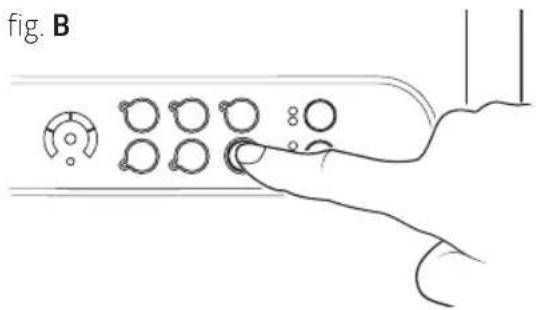
3.3 Cancel Button - (21)
To stop the machine at any time, press the 'cancel' button (21) as shown in figure B. All the LEDs will flash for several seconds. When they go off, the machine can be reactivated for any function.
4 Recommendations for bag use
Espressions MAGIC VAC® bags are available in various sizes. Check the ideal bag size for the food that you intend to store. Make sure the length of the bag to be used is at least 8 cm greater than the food to be stored and add another 2 cm for each time the bag is to be reused.
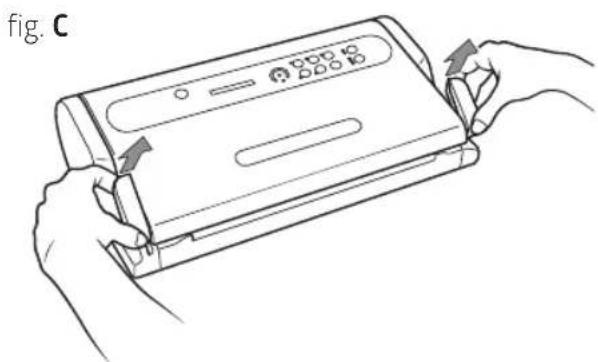
5 Making bags from Espressions MAGIC VAC® rolls
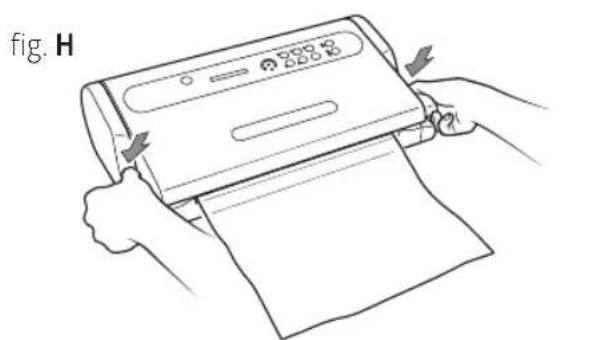
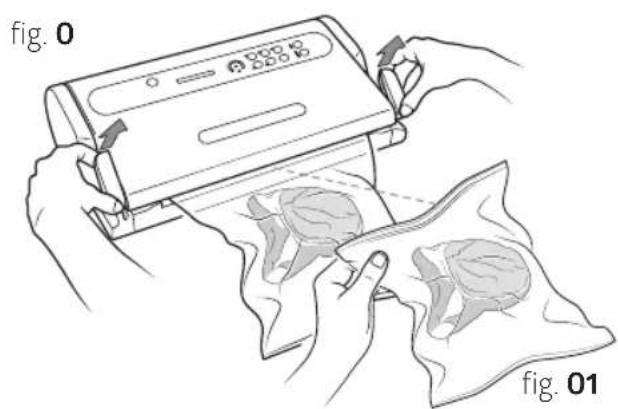
a) Open the machine by rotating the Handles (1) to the OPEN position (fig. C and D).
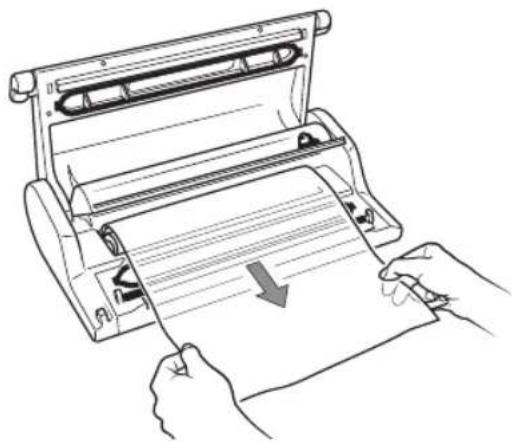
b) Unroll the correct length from the roll (fig. E).
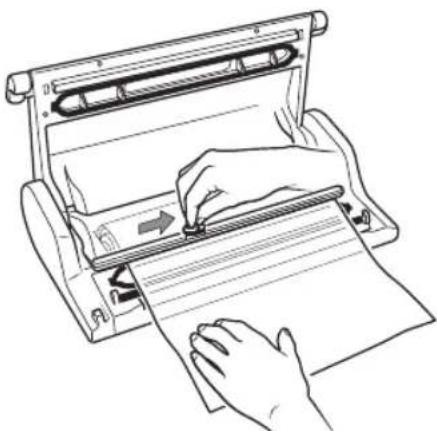
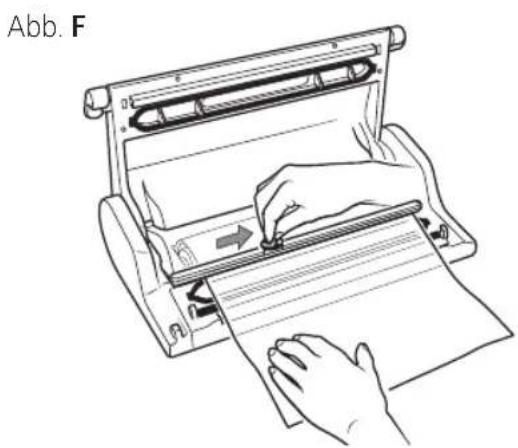
c) Close the Cover of the Roll Compartment (12) and cut the piece using the Bag Cutter (13), as shown in (fig. F), by running it from one side to the other.
Now you can seal one open side of the piece by following these steps:
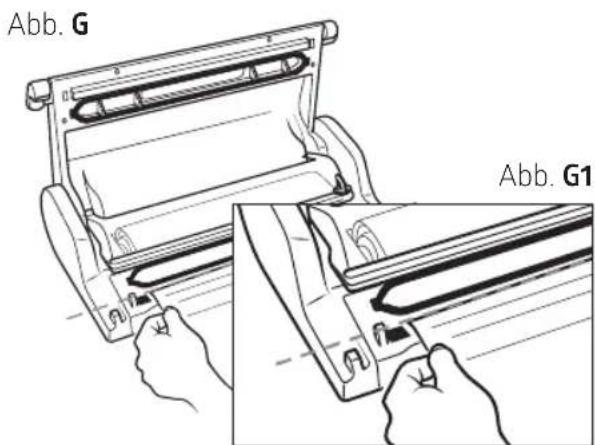
d) set one of the two open ends of the bag on the Sealing Bar (6) (fig. G and G1).
natural_image
Line drawing of hands holding a device with arrows indicating movement or change (no text or symbols)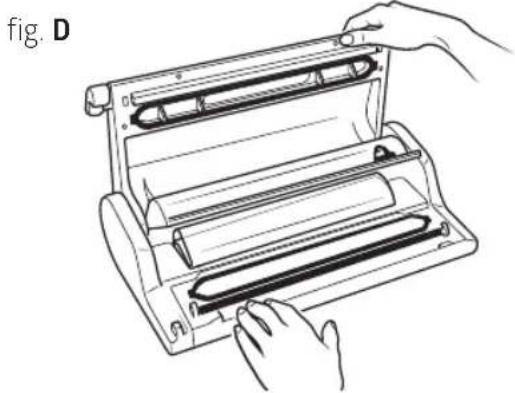
natural_image
Line drawing of hands operating a mechanical device with rollers (no text or symbols)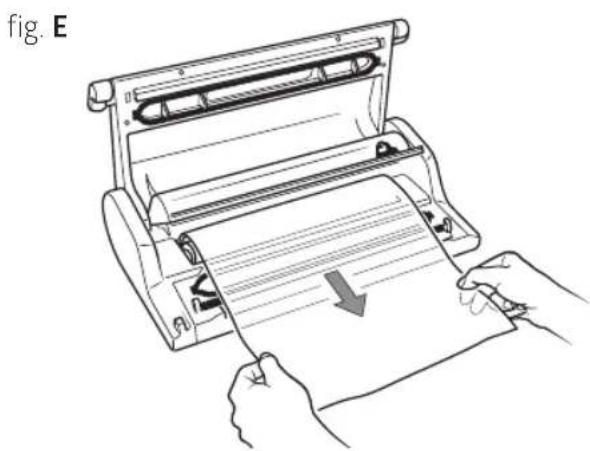
natural_image
Line drawing of hands operating a printer with a paper roll, showing motion and page number (no text or symbols)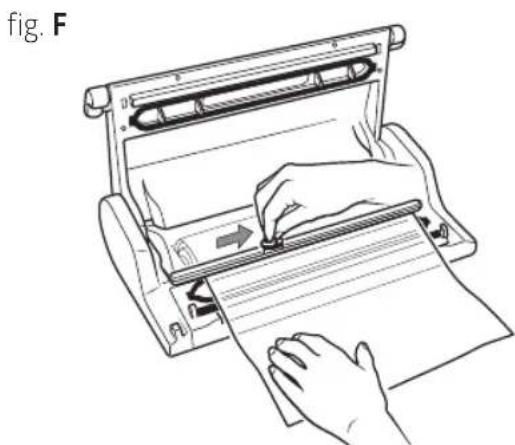
natural_image
Line drawing of a hand using a paper roll presser to press or write on paper (no text or symbols present)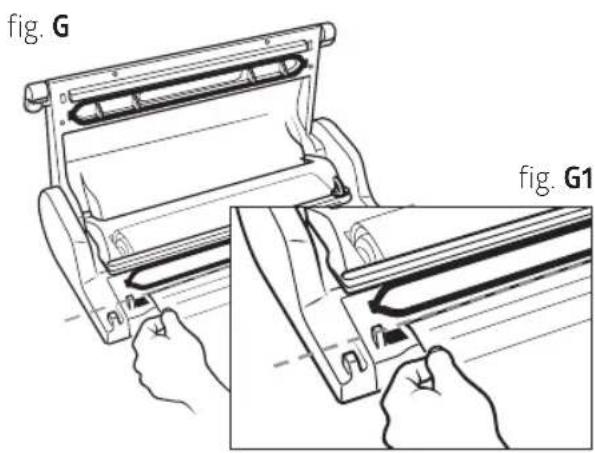
ATTENTION: Do not let the bag protrude into the Vacuum Chamber (8) or on the Airtight Gasket (7), but set the end on the external part of the Airtight Gasket (7) as indicated in figure G1.
e) Close the machine by rotating the Handles (1) to the START position.
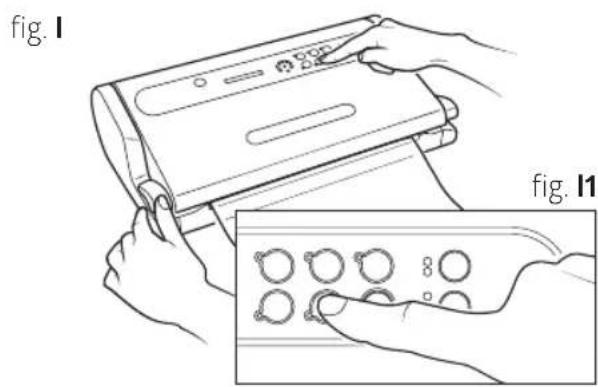
f) Seal one open side of the piece by pressing the 'seal' button (2H) (fig I and I1).
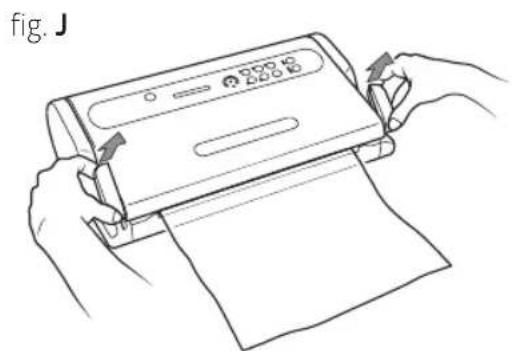
g) Unlock the Cover (5) by rotating one of the two Handles (1) (fig.J) and remove the bag.
h) Check the seal obtained, which should look like a regular horizontal line, smooth and without wrinkles (fig. K).
a) Insert the food in the MAGIC VAC® Bag (see point 4), and eliminate any liquids or food residues from the inside of the end of the bag that must be sealed.
TIP: When vacuuming moist food, fold approx. 5 cm of the open side of the foil inside out and only then place the food in the bag. Fold back so that the foil is dry and clean where it needs to be sealed.
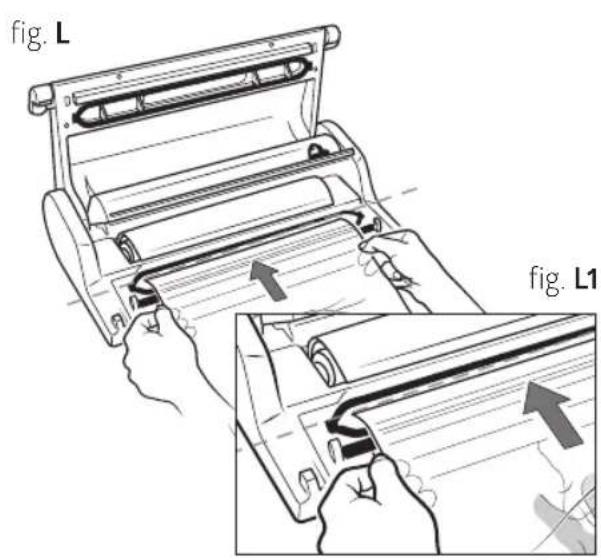
b) Lay the bag with its contents in front of the machine, placing the open end inside the Vacuum Chamber (8) (fig. L and L1).
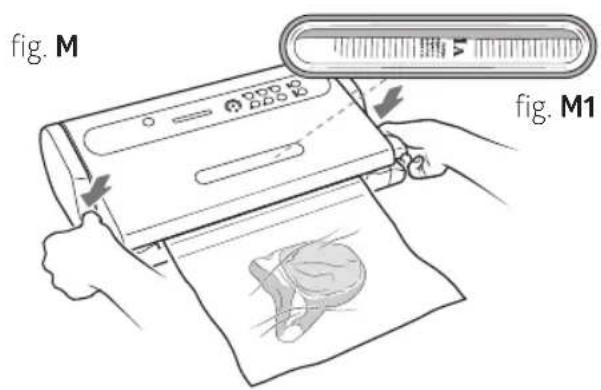
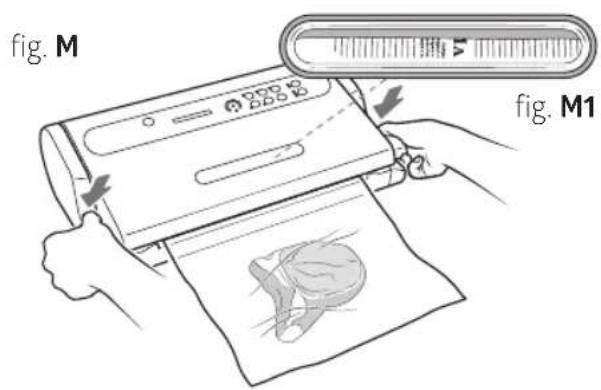
c) Close the machine by rotating the Handles (1) to the START position (fig. M) and, looking through the Lit WINDOW (3), make sure the open end of the bag is inside the vacuum chamber (8) (fig. M1).
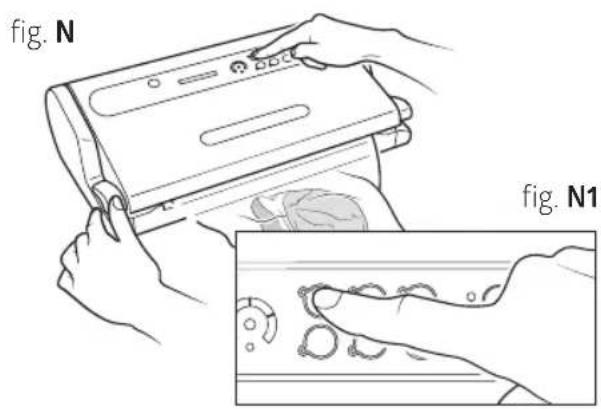
d) Start the automatic cycle by pressing the 'vacuum & seal' button (2D) (fig. N and N1). If you want to seal the bag before the automatic completion of the cycle, press the 'seal' button.
e) Wait for the LED seal light (2B) in the centre of the Progress Display (2C) to stop flashing.
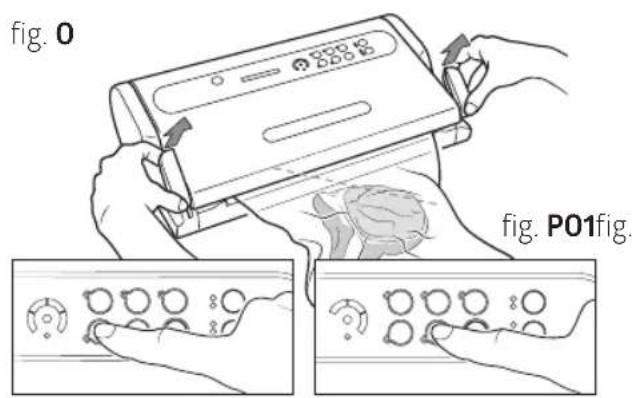
f) Unlock the Cover (5) by rotating one of the two Handles (1) (fig. O) and remove the bag.
g) Check the seal obtained which should look like a regular horizontal line, smooth and without wrinkles (fig. O1).
PLEASE NOTE: Interrupting the automatic vacuum cycle and premature sealing does not fully extract oxygen from the food and will cause it to spoil and dry out sooner.


7. Manual cycle for vacuum packing in bags
Follow these steps to avoid crushing delicate foods:
a) Insert the food in the MAGIC VAC® Bag (see point 4), and eliminate any liquids or food residues from the inside of the end of the bag that must be sealed.
TIP: When vacuuming moist food, fold approx. 5 cm of the open side of the foil inside out and only then place the food in the bag. Fold back so that the foil is dry and clean where it needs to be sealed.
b) Lay the bag with its contents in front of the machine, placing the open end inside the Vacuum Chamber (8) (fig. L and L1).
c) Close the machine by rotating the Handles (1) to the START position (fig. M) and, looking through the Lit WINDOW (3), make sure the open end of the bag is inside the vacuum chamber (8) (fig. M1).
d) Select the 'slow' speed using the 'pump speed' button (2N) as in the previous point 3.2.
e) Press and hold the 'Pulse' button (2G) (fig. P) to start the manual vacuum cycle, release the button to interrupt it. Repeat this operation until you reach the desired vacuum, then activate sealing by pressing the 'Seal' button (2H) (fig. P1) to seal the bag.
f) Wait for the LED seal light (2B) in the centre of the Progress Display (2C) to stop flashing.
g) Unlock the Cover (5) by rotating one of the two Handles (1) (fig. O) and remove the bag.
h) Check the seal obtained which should look like a regular horizontal line, smooth and without wrinkles (fig. O1).
PLEASE NOTE: Interrupting the automatic vacuum cycle and premature sealing does not fully extract oxygen from the food and will cause it to spoil and dry out sooner.
8. Automatic cycle in MAGIC VAC® canisters
Use this cycle to vacuum the Espressions MAGIC VAC® vacuum boxes, boxes closed with MAGIC VAC® lids, bottles with the MAGIC VAC® bottle stopper or glass preserving jars equipped with lid and ring using the MAGIC VAC® lid attachment.
CAUTION: Only use original Espressions MAGIC VAC® vacuum boxes as they can withstand the vacuum force obtained with the Espressions Vacu Pro 2. Other boxes and accessories may implode and cause injury.
8.1 Packing in Espressions MAGIC VAC® Executive Canisters
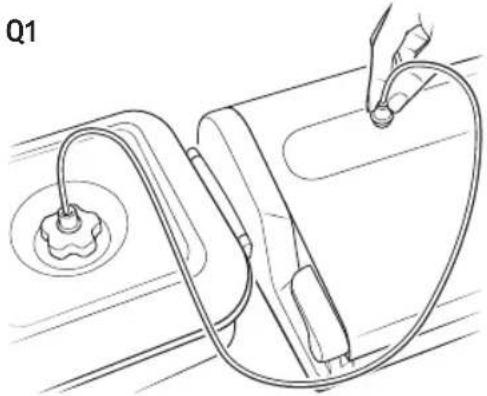
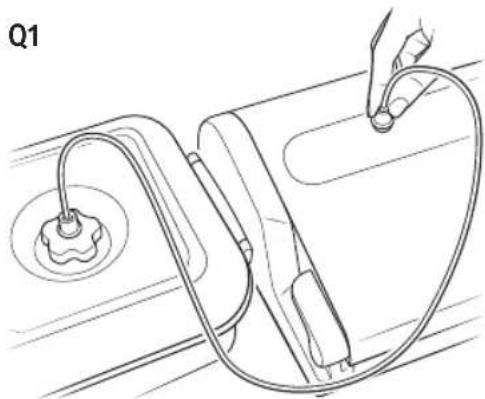
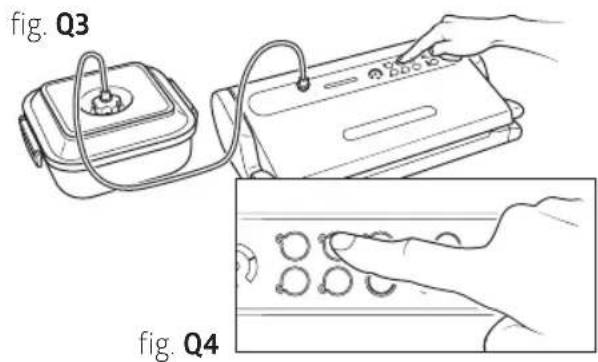
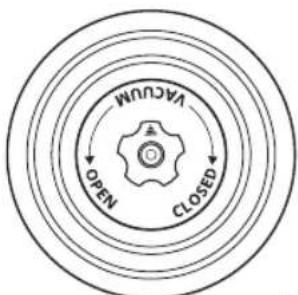
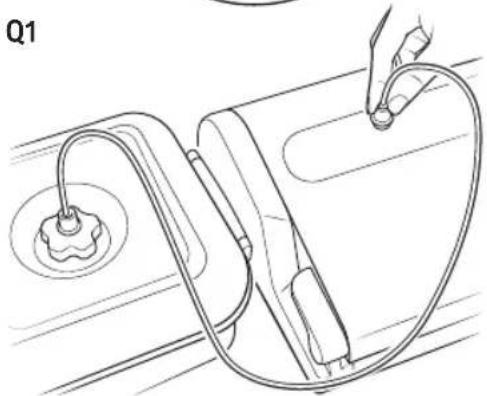
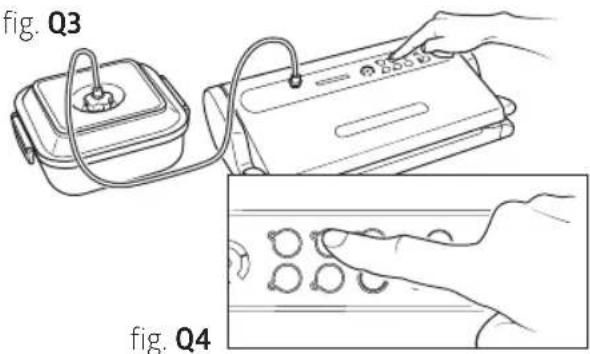
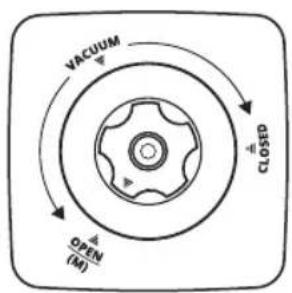
a) Refill the Canister leaving a space of at least 3 cm from the upper rim of the canister and place the lid on the canister. Turn the Knob on the lid to the 'VACUUM' position (fig. Q).
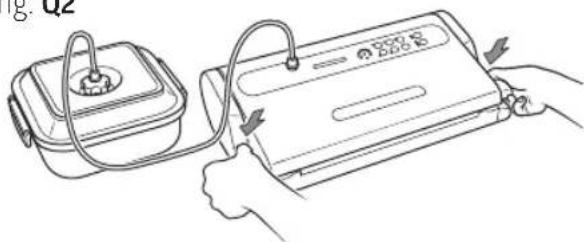
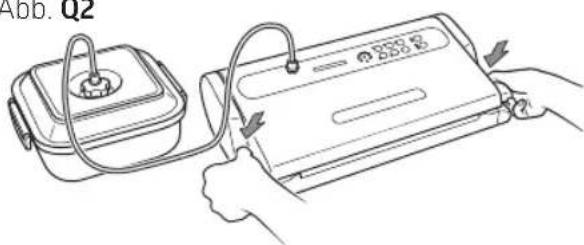
b) Using the Canister Tube (16), connect the knob on the lid of the Canister to the air intake ACCESSORY PORT (4) on the machine (fig. Q1).
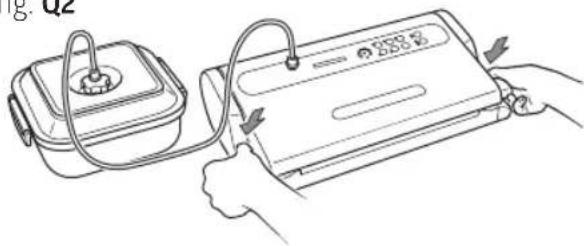
c) Close the machine by rotating the Handles (1) to the START position (fig. Q2).
PLEASE NOTE: At the beginning of the vacuum phase you may need to press down on the lids of some types of canisters using your hand in order to hermetically seal them and make the cycle start easier.
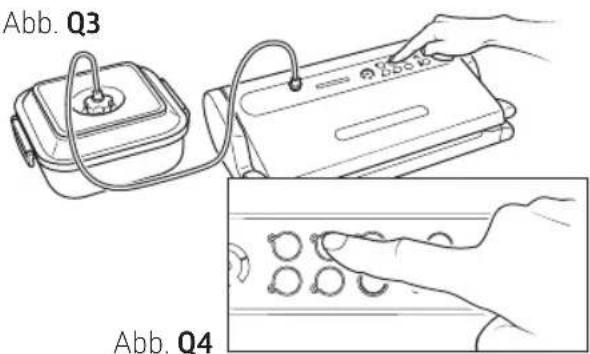
d) the 'canister' button (2E) (fig. Q3 and Q4); the machine will perform the vacuum cycle automatically and will shut off when the operation is complete. In any event, the pump turns itself off automatically after about 5 minutes.
e) Detach the Canister Tube (16) from both the Canister Knob as well as the ACCESSORY PORT (4) on the machine.
f) Turn the Canister Lid knob to the 'CLOSED' position.
To open the canisters, turn the Lid Knob to the 'OPEN' position; you should hear the air whistle as it re-enters the canister. This sound is your guarantee that the contents were vacuum-packed.
fig. Q
flowchart
graph TD
    A["OPEN"] --> B["CLOSED"]
    B --> C["VACUUM"]
    C --> D["Outer Ring"]
    style A fill:#f9f,stroke:#333
    style B fill:#ccf,stroke:#333
    style C fill:#cfc,stroke:#333
    style D fill:#fcc,stroke:#333
fig. Q1
natural_image
Line drawing of a medical or laboratory procedure showing a device with tubing and a circular component, labeled Q1 (no text or symbols on the diagram itself)fig. Q2
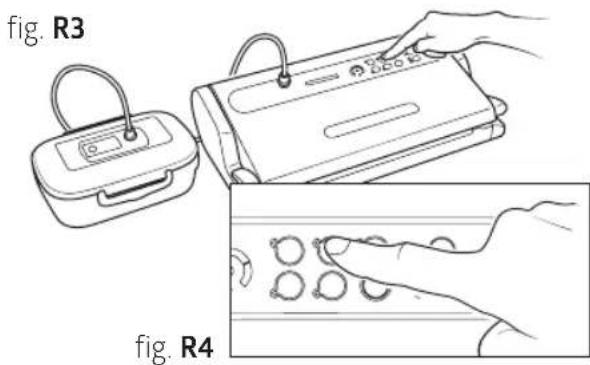
8.2 Packing in Espressions MAGIC VAC® Family canisters
Multi-use canisters, ideal for storing products that are used frequently like dry and fragile foods; powdered foods; fruits and vegetables, fresh as well as blended or pureed; due to their transparency and design, they are attractive on kitchen shelves and guarantee excellent visibility of their contents.
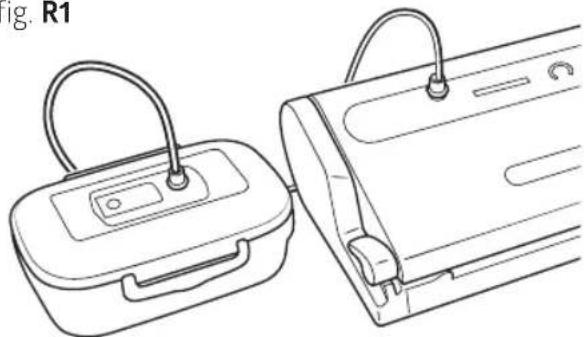
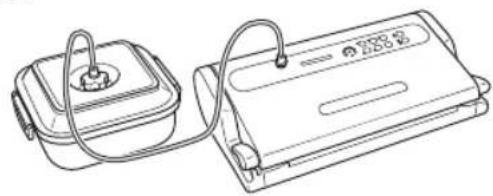
a) Fill the Canister leaving a space of at least 3 cm from the upper rim of the canister and place the lid on the canister.
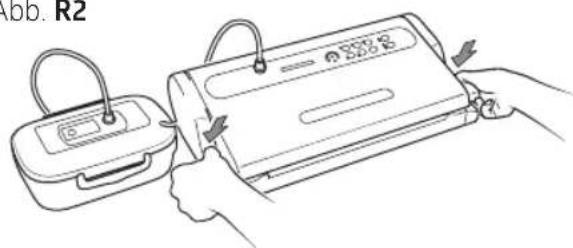
b) Using the Connection Tube (16), connect the canister lid to the air intake ACCESSORY PORT (4) on the machine (fig. R1).
c) Close the machine by rotating the Handles (1) to the START position (fig. R2).
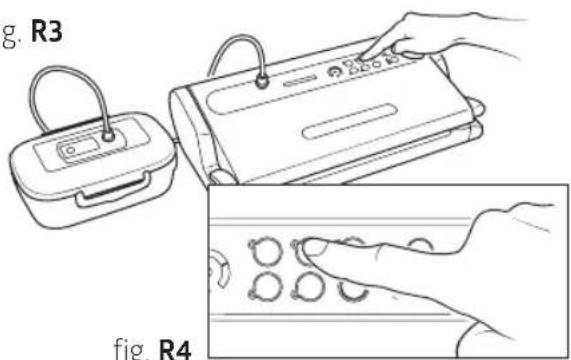
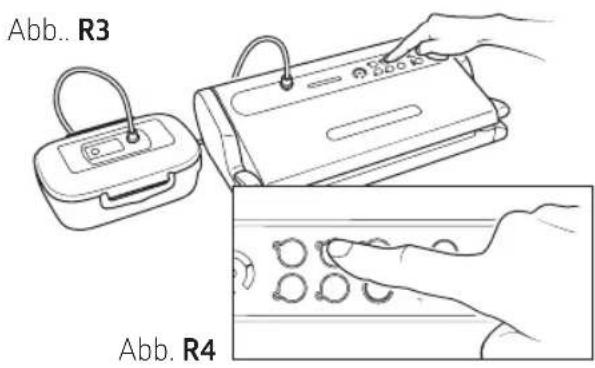
d) Press the canister button (2E) (fig R3 and R4), the machine will perform the vacuum in the canister and will shut itself off once the operation is complete.
e) Detach the Connection Tube (16) from the canister lid.
f) To open the canisters, press the centre button and open the valve based on the model used (see canister instructions).
fig. R1
natural_image
Line drawing of two medical devices with handles and connectors, no text or symbols presentfig. R2

fig. R3
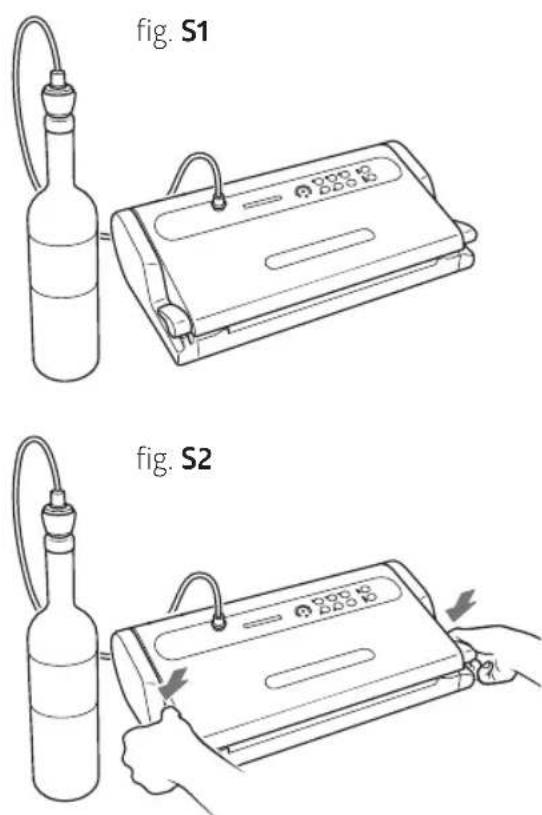
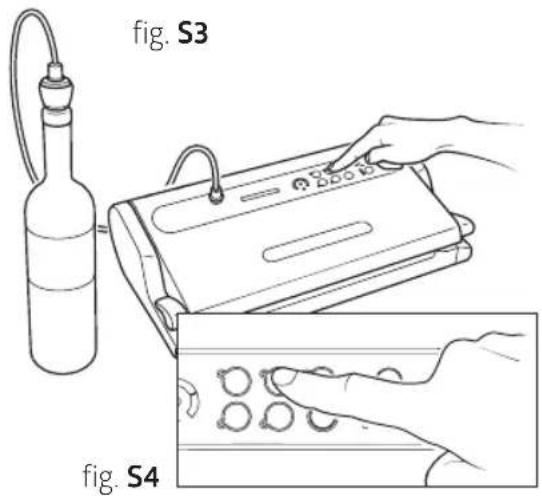
8.3 Packing with Espressions MAGIC VAC® bottle capper
With the bottle capper, glass wine or oil bottles can be quickly vacuumed, so that the quality and taste are preserved for longer.
Proceed as follows:
a) Firmly push the cap in the bottle.
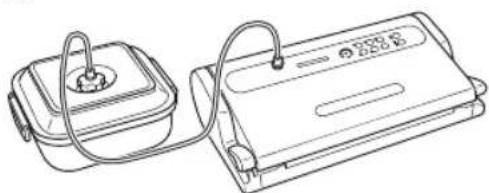
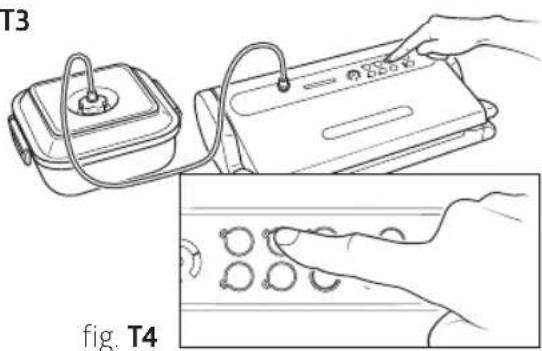
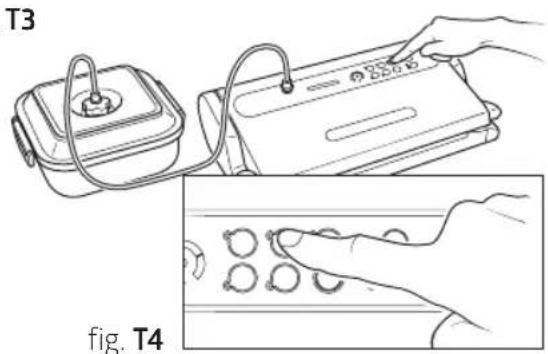
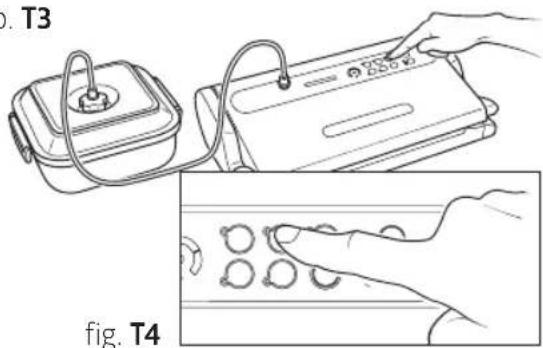
b) Using the Connection Tube (16), connect the ACCESSORY PORT (4) on the machine with the bottle capper (T) (fig. T1).
c) Close the machine by rotating the Handles (1) to the START position (fig. T2).
d) Press the 'canister' button (2E) (fig. T3 and T4); the machine will perform the vacuum cycle automatically and will shut off when the operation is complete.
e) Detach the tube from both the bottle capper, as well as from the ACCESSORY PORT on themachine.
To open the bottle, simply pull the cap off the bottle.
9. Rapid Marinating
Marinating is the best method for flavouring a meat or game dish and tenderizing it. Food is marinated in just a few minutes when it is vacuum-packed because the vacuum-packing process opens the pores in the food allowing for greater and faster absorption of the marinade. Using the exclusive 'rapid marinating' function, the machine maintains the vacuum for several minutes and then releases it, allowing the food to 'rest' for 30 seconds. This process is repeated several times. The pulsating vacuum and rest action allows for a much faster marinating time. When the rapid marinating cycle is complete, the device will beep to signal that the marinating is finished. The entire cycle lasts about 14 minutes.
Proceed as follows:
a) To marinate meat, fowl and fish, poke the surface of the food and place it in the square Espressions MAGIC VAC® Executive 2,5 litre canister, cover it with the marinade chosen, leaving an air space of about 3 cm from the upper rim of the canister, and place the cover on the canister.
b) Attach the Side Handles on the lid itself and then turn the knob to the 'OPEN' - (M)' position (fig. T).
PLEASE NOTE: It is very important that the knob on the container is left in the 'OPEN - (M)' position for the entire marinating cycle.
PLEASE NOTE: Ensure that the seal on the lid and the rim of the canister are clean and dry.
fig. T
c) Using the Connection Tube (16), connect the ACCESSORY PORT (4) on the machine with the Canister Lid Knob (fig. T1).
d) Close the machine by rotating the Handles (1) to the START position (fig. T2).
e) Press the 'marinating' button (2F) (fig. T3 and T4); the corresponding BLUE LED light will turn on and remain steady during the vacuum phase and flashing during the rest phase. The machine will turn itself off automatically after the third vacuum phase. The entire cycle lasts about 14 minutes.
f) A beep indicates that the cycle has ended.
g) Detach the tube from the canister first and then from the machine air intake.
PLEASE NOTE: At the end of the cycle, if you wish to vacuum-pack your marinated food, turn the knob on the canister to the 'CLOSED' position.
h) Then, to end the cycle, press the 'cancel' button (21) or turn the Handles (1) to the OPEN position.
You can stop the machine at any time by pressing the 'cancel' button (2I) or turning the Handles (1) to the OPEN position; if you wish to repeat the marinating operation you must detach the tube from the canister ad wait for it to refill completely with air. Then, re-attach the tube to the knob (in the OPEN - M position) on the container, then restart the rapid marinating cycle by pressing the 'marinating' button (2F).
fig. T1
natural_image
Line drawing of two electronic devices with cables and connectors (no text or symbols)fig. T2
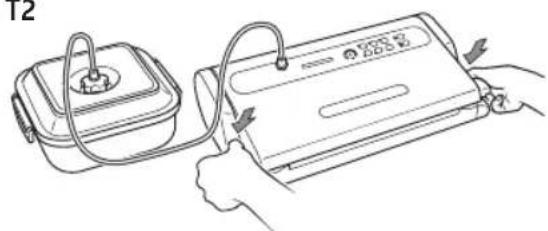
fig. T3
Cleaning
ATTENTION: Always unplug the cable from power before cleaning.
- Clean hands thoroughly before proceeding with cleaning the machine and accessories.
- Both before and after use, clean the accessible surfaces of the machine with a sponge and neutral detergent or denatured alcohol or white vinegar diluted with water.
ATTENTION: Do not use aggressive detergents or solvents or products based on aromatic substances!
In the event of accidental penetration of liquids inside the structure, do not plug the unit into power, do not use it and contact the nearest authorized service centre or your authorized dealer.
IMPORTANT: Avoid the use of pointed metal items (such as scissors, knives, awls or scrapers) to remove residues as they can ruin the surface.
- To clean MAGIC VAC® accessories (canisters, lids, jars, etc.), refer to the instructions included with the accessories themselves.
fig. U1
natural_image
Line drawing of a printer or scanner with a hand operating it, showing internal components and a downward arrow indicating motion (no text or symbols present)Washing the Removable Tray
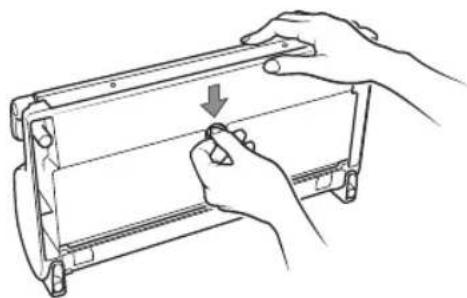
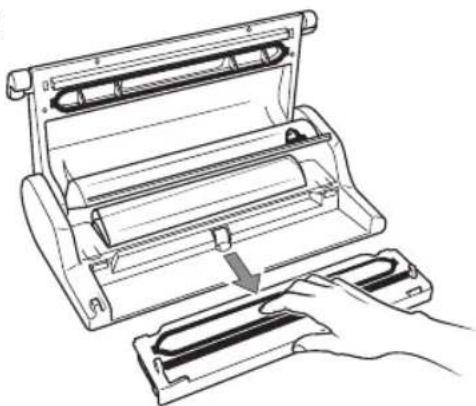
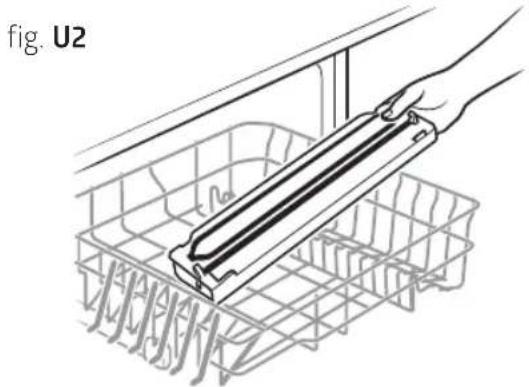
The machine is equipped with a liquid-collecting Removable Tray (10) that is completely removable and washable, only wash in the upper dish-washer rack (fig. U2). Clean it like any other kitchen object and allow it to dry completely; then, reinsert the Removable Tray (10) in its location at the bottom of the machine.
To remove the Removable Tray, proceed as follows: Open the machine, take hold of the Removable Tray and pull it toward yourself (Fig. U1). To reposition the Removable Tray (10) in the machine, insert it into its seat pushing the two teeth located on the sides of the Removable Tray in all the way until they catch (Fig. U3).
natural_image
Diagram of a hand holding a rectangular object over a wire basket, labeled 'fig. U2' (no text or symbols on the diagram itself)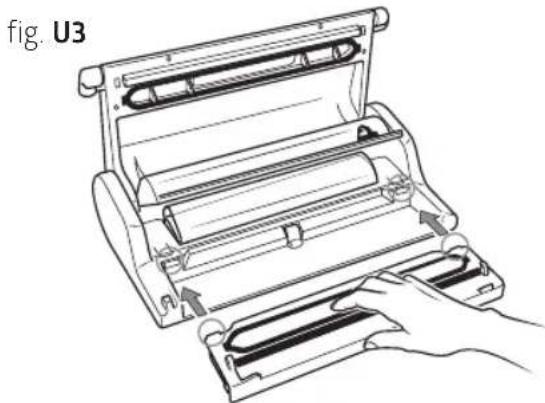
natural_image
Line drawing of a mechanical roller presser with hands operating it (no text or symbols)Accessory compartment
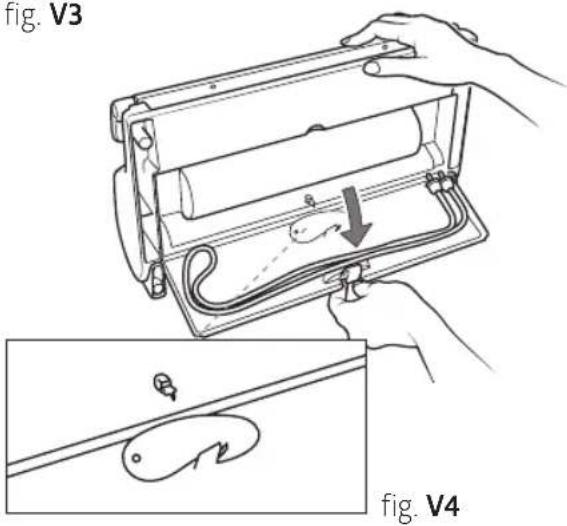
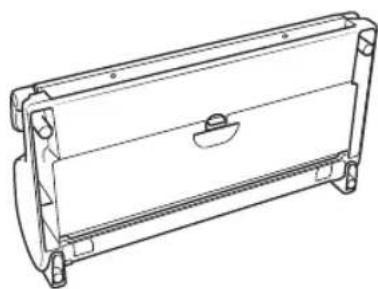
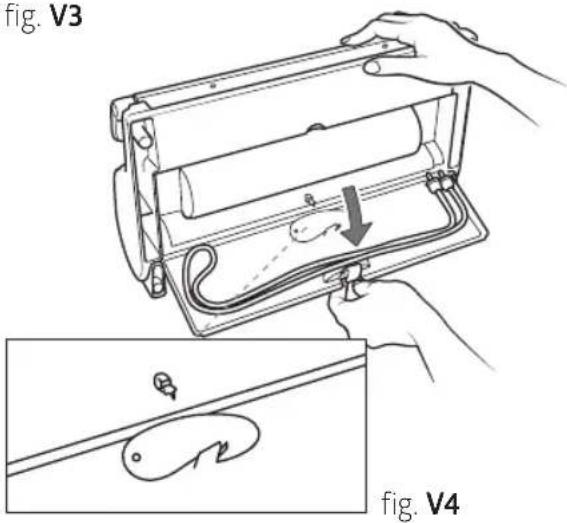
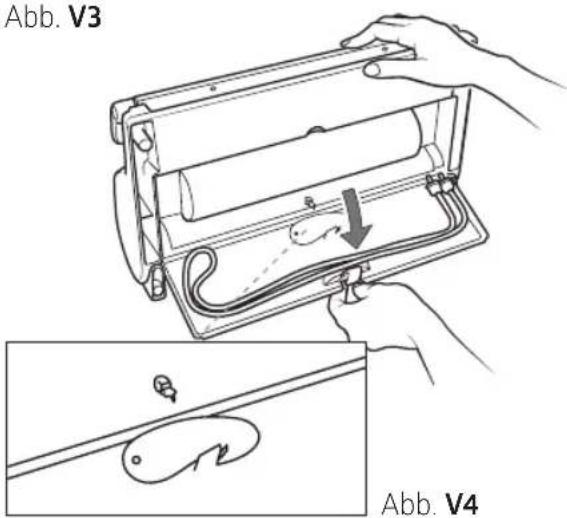
In the upper part of the machine there is a convenient Accessory Compartment (15) where you can keep the Canister Tube (16) (fig. V3) and the Bag Cutter, manual MAGIC Cutter (where applicable) (fig. V4).
fig. V1
natural_image
Technical line drawing of a rectangular mechanical component with mounting flanges and a central slot (no text or symbols)fig. V2
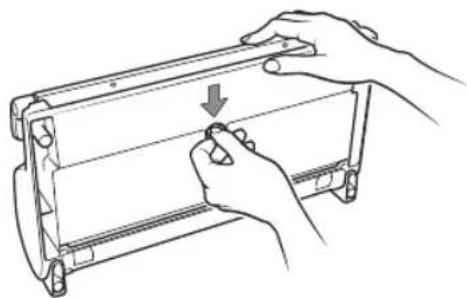
natural_image
Line drawing of hands holding a mechanical component with a downward arrow indicating rotation (no text or symbols)fig. V3
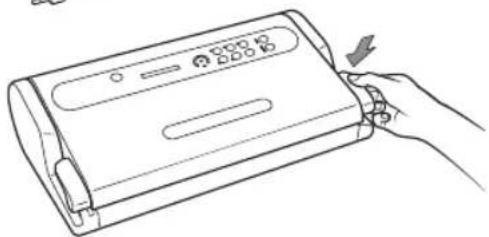
Storaging the machine
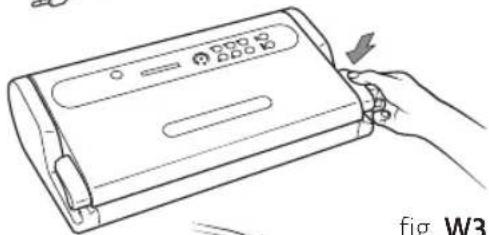
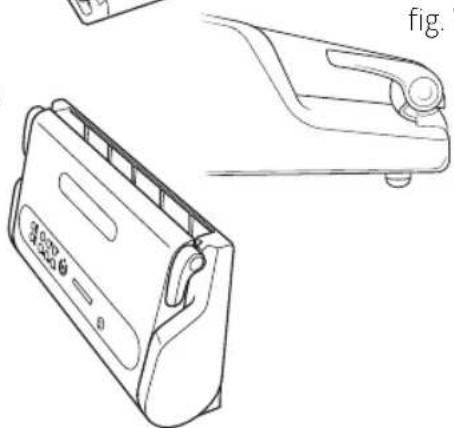
When you are not using the machine, you can place it in a vertical position to reduce space. Proceed as follows:
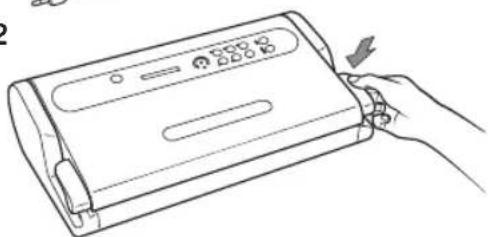
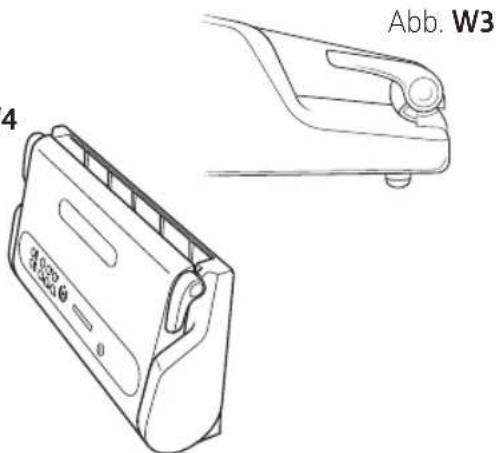
a) Insert the Power Cable (17) in the Cable Compartment (18) on the back of the machine (fig. W1).
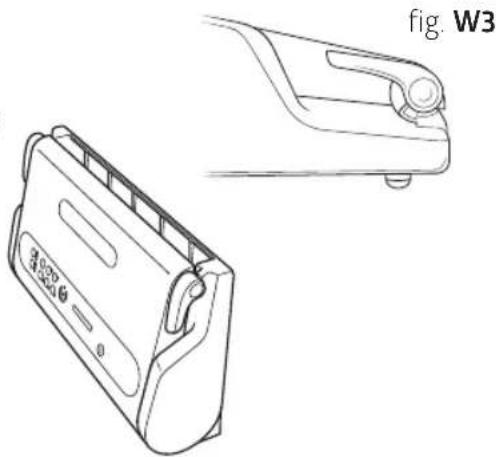
b) Close the machine by rotating the Handles (1) to the STORAGE position (fig. W2 and W3).
ATTENTION: Do not turn the Handles (1) to the START position because complete closure of the machine when it is inactive for a long period of time could damage the Airtight Seal (7) causing a leak in the Vacuum Chamber (8) and subsequent failure of the machine to work properly.
c) Place the machine in a vertical position far from heat sources (fig. W4).
fig. W1

natural_image
Line drawing of a portable electric stove with power cord and plug (no text or symbols)fig. W2
natural_image
Line drawing of a hand holding a rectangular device with a control panel and indicator lights (no text or symbols)fig. W4
natural_image
Technical line drawing of a portable electronic device with a side view showing its front and top views (no text or symbols)Troubleshooting
| Espressions VACU PRO 2 does not work | Make sure the power cable on the MAGIC VAC® is fully inserted in the machine and in the electrical outlet. Check the electrical outlet by trying another device in the same outlet.Make sure the power cable and/or plug is not defective. If so, do not use the machine. |
| Espressions VACU PRO 2 does not perform the first seal on the piece of cut roll | Check that the piece of cut roll is correctly positioned as described in the paragraph: '5 - Making bags from MAGIC VAC® rolls'. Check the position and integrity of the Sealing Gasket |
| Espressions VACU PRO 2 does not completely vacuumpack the bags | In order to correctly seal the bags, the open end must be entirely inside the Vacuum Chamber (8). Check the correct position through the Lit WINDOW (3).Make sure the Sealing Bar(6), the Airtight Gasket (7) and Sealing Gasket (9) are not dirty.The MAGIC VAC® bag may be punctured. To check, seal the bag with air inside, place it under water and squeeze. If you see bubbles, there is a leak. Reseal or use another bag. |
| Espressions VACU PRO 2 does not seal the bag or roll completely | When you can't completely seal the bag, press the 'sealing mode' button (2M) and increase the sealing time.If the Sealing Bar (6) overheats and melts the bag, lift the Cover (5) and allow the Sealing Bar (6) to cool for a few minutes.Check the position and integrity of the Sealing Gasket (9)If liquids escape during the vacuum-packing phase, remember that they must first be refrigerated.TIP: Soup, marinades and other liquid items that you want to vacuum in a foil bag, you can first freeze in a container and then remove and freeze frozen in a bag. |
| The Espressions MAGIC VAC® bag doesn't maintain its vacuum after sealing | Leaks along the seal can be caused by wrinkles, crumbs, grease or liquids. Open the bag, clean the upper part of the inside of the bag and remove any residue from the Sealing Bar (6) before resealing.Make sure the bag is not punctured and thus did not maintain the vacuum. Protect any pointed edges of the contents in the bag using paper napkins. |
| Espressions VACU PRO 2 does not seal containers. | Using the Canister Tube (16), connect the canister lid (or the Lid Attachment if necessary) and the ACCESSORY PORT (4) on the machine.Leave adequate space (at least 3 cm) between the contents and the top of the jar or canister.Make sure that the rim of the jar or canister and universal lid are not damaged in the sealing zone. Clean the rim and the lid with a damp cloth and reseal.Make sure the gasket on the canister lid or universal lid is placed in the correct position and not damaged. |
| Espressions MAGIC VAC® canisters or Espressions MAGIC VAC® lids do not maintain the seal | Make sure the knob on the canister lid is set to 'VACUUM' before vacuum-packing and that it is set to 'CLOSED' after it is complete.Check that the O-Ring under the knob on the canister lid or universal lid is correctly positioned.Makes sure that the rim of the jar or canister and universal lid are not damaged in the sealing zone. Clean the rim and the lid with a damp cloth and reseal.Make sure the gasket on the canister lid or universal lid is placed in the correct position and not damaged.Make sure the connection tube is correctly connected to both the canister knob as well as the ACCESSORY PORT (4) on the machine. |
| The marinating cycle does not start correctly | Make sure the knob on the lid of the square Espressions MAGIC VAC® Canister is set to 'OPEN - (M)' and that the Handles (1) are attached.Check that the O-Ring under the knob on the canister lid or universal lid is correctly positioned.Makes sure that the rim of the jar or canister and universal lid are not damaged in the sealing zone. Clean the rim and the lid with a damp cloth and reseal.Make sure the connection tube is correctly connected to both the canister knob as well as the ACCESSORY PORT (4) on the machine.Make sure the gasket on the canister lid or universal lid is placed in the correct position and not damaged.Lightly press the canister lid down when the first vacuum phase starts until the lights on the Progress Display (2C) are regularly lit. |
Technical features
| Product code: | EP6400 |
| Model: P0608ED | |
| Structure: • ABS + chrome-plated inserts | • Lighted WINDOW• Dishwasher safe Removable Tray• Roll-Holder Compartment with Cover and integrated Bag Cutter• Accessory Storage Compartment• Vertical Storing |
| Machine dimensions: 44 (W) x 23.5 (D) x 11 (H) cm | |
| Machine weight: Approx. 4.0 Kg | |
| Voltage/Power: 230V- 50Hz | |
| Input: 130 W | |
| Stand by: 0 W | |
| Sealing: Auto-adapting and Adjustable on 3 levels | |
| Sealing bar: Width 315 mm (Professional aluminium type) | |
| Protection: Self-resetting thermal safety | |
| Pump type: Double pump with self-lubricating pistons | |
| Pump speed: | Adjustable on 2 levels |
| Nominal pump capacity: | 18 l/min |
| Max vacuum: | -0,82 bar / 61 cm/Hg / -11,9 PSI |
| Vacuum chamber venting: | Automatic upon opening |
| Compliant with directives: | CE |
Electromagnetic compatibility: The Espressions MAGIC VAC® has been engineered to meet current electromagnetic compatibility requirements. However if you suspect that the appliance is interfering with the operation of your TV, radio or other electrical unit, try relocating the appliance until the interference ceases. Alternatively try plugging the appliance into a different power socket.
The advantages of vacuuming
Vacuum packing will revolutionise the way in which you buy and keep food. By keeping food under vacuum (i.e. without air), the shelf-life of foods is greatly extended, whether it is kept in the larder, fridge or freezer. Air can make food rancid and stale, it can cause it to ferment, dry out, and it may even cuse freezer burns. Vacuum packing keeps your food fresher and more flavourful for longer.
Now you can pack fresh food bought from the market, or food picked from your vegetable garden, in handy portions for future use, even in large quantities. Food bought already vacuum-packed, like cheese and meat, will retain its flavour and freshness once opened, without problems of moisture and mould, if it is vacuum-packed after use in Espressions Vacu Pro 2 bags and containers. Meat, fish and vegetables can be frozen without the risk of frost burns and will keep their freshness and quality. Foodstuffs like coffee, rice, flour and nuts will last much longer if they are vacuum packed. Fresh or perishable foods must in any case be frozen or kept in the fridge.
IMPORTANT: The original quality of the food must be of the very highest order, in terms of freshness and environmental hygiene, when you decide to vacuum pack it. There are in fact no preservation methods which will transform a poor product into a good one.
Always keep your Espressions MAGIC VAC® bags and containers handy and you will quickly appreciate the many advantages and ease of use that Espressions Vacu Pro 2 offers when it comes to preserving the quality of food. Consult the 'Food preservation times with Espressions Vacu Pro 2' chart to see how vacuum packing can extend the life of any food without in any way altering or impairing its taste, smell, appearance, hygiene and nutritional value.
Food preservation times with Espressions Vacu Pro 2
| Preservation times at atmospheric pressure | Preservation times with Espressions Vacu Pro 2 | |
| Refrigerated foods (5°± 2°C) | ||
| Red meat 3-4 days 8-9 days | ||
| White meat 2-3 days 6-9 days | ||
| Whole fish 1-3 days 4-5 days | ||
| Game 2-3 days 5-7 days | ||
| Cooked pork products 7-15 days 25-40 days | ||
| Sliced pork meats 4-6 days 20-25 days | ||
| Soft cheese 5-7 days 14-20 days | ||
| Hard and semi-hard cheese 15-20 days | 25-60 days | |
| Vegetables | 1-3 days | 7-10 days |
| Fruit | 5-7 days 14-20 days | |
| Cooked and refrigerated foods (5°± 2°C) | ||
| Purees and vegetable soups | 2-3 days | 8-10 days |
| Pasta and risotto | 2-3 days 6-8 days | |
| Boiled and roast meats | 3-5 days | 10-15 days |
| Desserts with fillings (cream and fruit) | 2-3 days 6-8 days | |
| Frying oil | 10-15 days | 25-40 days |
| Frozen foods (-18° ± 2°C) | ||
| Meat 4-6 months 15-20 months | ||
| Fish 3-4 months 10-12 months | ||
| Vegetables 8-10 months 18-24 months | ||
| Food at ambient tempera (25° ± 2°C) | ||
| Bread 1-2 days 6-8 days | ||
| Packed biscuits 4-6 months 12 months | ||
| Pasta 5-6 months 12 months | ||
| Rice 5-6 months 12 months | ||
| Flour 4-5 months 12 months | ||
| Dry fruit 3-4 months 12 months | ||
| Ground coffee 2-3 months 12 months | ||
| Powder tea 5-6 months 12 months | ||
| Freeze-dried products | 1-2 months | 12 months |
| Powdered milk | 1-2 months | 12 months |
Approximate values which in any case depend on pack integrity and on original food quality characteristics. These values also refer to packaging obtained with Espressions MAGIC VAC® bags/rolls, containers and accessories combination. The times shown on the chart cannot be guaranteed with use of bags/rolls, containers and accessories of other brands. The manufacturer therefore disclaims liability.
IMPORTANT: Keep perishable foods in the freezer or fridge. Vacuum packing extends the life of food, but does not turn it into a 'preserve', i.e. a stable product at ambient temperature.
About vacuum packing
The deterioration of food is caused by chemical reactions that occur in food which is exposed to the air, temperature, moisture, the action of enzymes, the growth of micro-organisms or contamination by insects. Vacuum packing reduces the absolute pressure of the air inside the package or container, by removing the oxygen and eliminating volatile compounds. The oxygen in the air causes food to deteriorate, firstly through a process of oxidation, causing the loss of nutritional values, flavour and all the food's qualities. Air also promotes the growth of most micro-organisms and causes the frost burns which occur on frozen food. Vacuum packing extends the shelf life of many fresh foods, by reducing oxidation and preventing the proliferation of microbes (bacteria and mould). However, many fresh foods contain sufficient moisture to encourage the growth of micro-organisms that can grow with or without air. To prevent the deterioration of such foods, they must be preserved at low temperatures.
Micro-organisms like mould, yeast and bacteria are present everywhere, but they can cause problems only in certain conditions. For example, mould will not grow in environments with a low oxygen content, or in the absence of moisture or humidity. To grow, yeast requires moisture, sugar and a moderate temperature, but it can grow in the presence or absence of air. Refrigeration slows the growth of yeast and freezing blocks it completely. Bacteria can multiply with or without air, depending on their type. Clostridium Botulinum is a very dangerous type of bacteria which can develop in environments which do not contain acids, are without oxygen and are exposed to temperatures in excess of 4°C for long periods of time. Foodstuffs vulnerable to attack by Clostridium Botulinum are those with low acidity (like red meat, poultry, fish, seafood, olives in brine, eggs, mushrooms and vegetables) and medium acidity foods like virtually all vegetables and many fruits (ripe tomatoes, onions, red pepper, figs and cucumbers). To prevent contamination by this bacterium, it is essential to observe the basic rules of hygiene and, to prevent its harmful proliferation in preserved foods, they must be refrigerated for short periods and/or frozen for long-life preservation. However, such foods must be eaten immediately after heating.
IMPORTANT: You must consume immediately any food which has been heated while still sealed in Espressions MAGIC VAC® bags. Leaving the food to cool slowly at room temperature in the sealed vacuum bag may cause several harmful micro-organisms to multiply, in just a few hours, to values that are healththreatening.
Several enzymes found in foods cause increasingly noticeable changes in colour, structure and flavour; such changes depend on the preservation time, temperature and, above all, the presence of air. To halt the action of enzymes, vegetables must be blanched briefly using steam or a microwave oven. Food which contains a high percentage of acidity, like most fruits, do not require blanching. The absence of air created by the vacuum will in any case slow down or prevent the action of these enzymes. Insect larvae are frequently found in many low water content or dried foods which have not been vacuum packed or frozen, and they can develop during preservation and thus contaminate the food. Some products like flour and grain might contain larvae, but using vacuum packing will stop them developing into insects.
How to preserve food in Espressions MAGIC VAC® bags
Vacuum packing for the freezer
First of all, use the freshest possible food. The Espressions Vacu Pro 2 system will allow you to retain all the freshness of the food only if it is properly preserved. Some foods have a soft consistency which could be damaged by vacuum packing the product when fresh. To prepare delicate foods like meat, fish, berries, bread, etc., it is advisable to pre-freeze them first. In the first twenty-four hours there is no risk of freezer burns, so you can vacuum pack the products frozen the previous day in Espressions MAGIC VAC® bags, and then keep them in the freezer for long periods so as to preserve all the nutritional values and flavour of the product you have packed. When vacuum packing soups, stews or other liquid food, pre-freeze it in a pan or high-strength dish. When the food becomes solid, vacuum pack it, add a label and replace in your freezer. To vacuum pack vegetables, peel them and then blanche them briefly in boiling water or a microwave oven until they are warm but still firm. Then vacuum pack them in convenient portions. If the food is not pre-frozen, leave an extra 5 cm in the length of the bag to allow for expansion due to freezing. With regard to meat and fish, it is advisable to place the food on a paper towel and vacuum pack it with the towel in the bag. This will absorb any moisture in the food. To preserve food like focaccia, crêpes and small hamburgers, stack them on top of each other, placing greaseproof paper or film between each piece. This will make it easier to remove some of the food, repackage the rest and replace it immediately in the freezer.
Vacuum packing for the fridge
For busy households, food can be prepared in advance, then vacuum packed and kept in the fridge for use at different times, ready to be heated as and when necessary.
Vacuum packing for the larder
Even foods that can keep at room temperature (like, for example, coffee, flour, pasta, sugar, etc.) can benefit from vacuum packing. If these products are to remain unused for several days, such as when you go away on holiday, it is advisable to protect all foods by vacuum packing. They will keep better and moisture, mould and insects will not attack and ruin them.
Defrosting Espressions MAGIC VAC® bags
To defrost vacuum packed food such as meat, fish, fruit, vegetables or other delicate foodstuffs, place it on the lowest shelf in the fridge to defrost slowly; bread and focaccia should be left at room temperature, while soups or other liquid foods should be immersed in hot water still in the vacuum bags until they reach the right temperature. When you leave food at room temperature or heat it in a bain-marie, make sure you cut one corner of the bag to let the steam escape. When the food has been defrosted, it must be consumed immediately. Do not re-freeze it.
Repackaging pre-packed food
Many foodstuffs, like cheese and meat, are sold pre-packed in factory-prepared vacuum bags. To retain the flavour and freshness of these foods, repackage them in Espressions MAGIC VAC® bags after the factory package has been opened.
Pre-packed foods must always be consumed by the use-by date shown on the original package. They must also be handled with the greatest care and hygiene when repackaging.
Useful tips
- For food with tapered ends or sharp edges, like bones and spaghetti, pad the edges with paper towels to prevent perforating the bag.
- Fragile and delicate foodstuffs like strawberries, crackers or biscuits should be preserved in Espressions MAGIC VAC® containers.
- There are many non-food products which can be vacuum packed, such as camping equipment including matches, first aid kits and clean, dry clothes. You can even preserve the emergency triangle in the car. Silverware and collections can also be vacuum packed to protect the items against oxidation, etc.
How to preserve food in Espressions MAGIC VAC ^® containers
WARNING: Do not use plastic or glass containers that are not suitable since they could implode under the vacuum pressure of Espressions Vacu Pro 2 and cause injury.
Freezing in containers
To freeze food in plastic containers use only Espressions MAGIC VAC ^® containers or, in the case of glass receptacles, used tempered glass suitable for freezer temperatures.
Vacuum packing food in containers
Vacuum packing in containers is ideal for products that you use frequently. Dried foodstuffs like pasta, rice, flour, sugar, crisps, savouries or biscuits, and pet food, will maintain all their shape and freshness. Salad foods and vegetables can be cleaned for the whole week and kept in an Espressions MAGIC VAC® container. They will remain firm and fresh. To absorb excess moisture, fold a paper towel and place it on the bottom of the container.
WARNING: Liquids must be cooled before vacuum packing. Hot liquids will expand and leak from the container during depressurising.
Food in powder or granule form can be covered with a paper towel before vacuum packing. This will prevent the powder or granules from getting into the vacuum paths or being deposited in the Vacuum Cap seal. Oil used once for frying can be filtered, cooled, vacuum sealed in an Espressions MAGIC VAC ^® container and kept in the fridge. This will enable you to use the oil again at least once, since it has been preserved in an airless and cold environment, thereby retaining its characteristics. Larder items like flour, rice and cake mixes stay fresh for longer if they are vacuum packed. Nuts and condiments retain their flavourand will not become rancid.
Tips for preserving food in jars
To preserve food in jars, use lids which have been checked and are free from defects. To create and maintain a good vacuum, the seals of the lids must be in perfect condition. To keep the lids in good condition, immerse them in boiling water for three minutes and then rub the dry seal with a drop of oil. This will restore the necessary elasticity to the seals of the lids.
Points to remember
In order to optimise the preservation of foods and ensure perfect hygiene, a number of important rules must be followed:
- Make sure you wash your hands thoroughly and clean all the implements and surfaces you will be using to cut and vacuum pack the food.
- If possible, wear gloves when handling the food.
- Once perishable food has been packed, place it in the fridge or freeze it immediately, maintaining a constant fridge or freezer temperature. Do not leave the food for a long time at room temperature.
- Place the containers of vacuum packed food carefully in the fridge or freezer so that the food will cool rapidly to a low temperature.
- After opening tinned food or food that has been factory vacuum packed, it can be vacuum packed again. Follow the instructions to cool the food after opening and put it away as soon as it has been vacuum packed.
- Pre-packed foods must in any case be consumed by the use-by date shown on the original package.
- Once you have warmed up or defrosted perishable food, it must be eaten. Do not eat perishable food if it has been left at room temperature for many hours. This is especially important if the food has been prepared with a dense sauce, in a vacuum pack or in other low-oxygen content environments.
-
Do not defrost food in boiling water or using other heat sources, unless the food in question is liquid (soups, juices, etc.).
• Vacuum packing extends the life of dried food. Food which has a high fat content becomes rancid due to oxygen and heat. Vacuum packing extends the life of food like nuts, coconuts, or cereal products. Store in a cool, dark place.
• Vacuum packing will not extend the life of fruit and vegetables such as bananas, apples, potatoes and several vegetables, unless it has been peeled prior to vacuum packing. -
Soft foods and food with a delicate structure (like fish, berries, etc.) must be pre-frozen for one night before they can be vacuum packed and placed in the freezer.
- Vegetables like broccoli, cauliflower and cabbage give off gas when they are vacuum packed fresh for storage in the freezer. To prepare these foods for vacuum packing, heat and freeze them.
- To ensure correct and safe vacuum packing, use only original Espressions MAGIC VAC® bags, containers and accessories.
All rights reserved. Partial or total reproduction prohibited.
Given the constant technological progress being made in this sector, the manufacturer reserves the right to make technical and functional changes to the product without prior notice.
Notes
Terms of guarantee
This ESPRESSIONS kitchen appliance has been made to a very high degree of excellence in quality and design. However, should there be, within the guarantee period, any defects found in the materials or in the operation, and if we feel it is appropriate, we will replace the defective parts or effect repairs in accordance with the terms of guarantee stated below. This 2-year guarantee applies to parts as well as the costs of labour only in the case of domestic use. Postage costs are not included.
These terms of guarantee are provided in addition to, and will not be prejudicial to, your legal rights. This guarantee does not cover postage or transport costs incurred in the return of the appliance. This guarantee only applies to products that have been purchased and remain within the Benelux countries. The guarantee does not apply to any plugs, electric leads or fuses, and also does not apply to any defects resulting from:
- Normal wear and tear of the appliance or parts in respect of use.
- Failure to follow the instructions for use in respect of use or maintenance.
- Connecting the product to a power source not suitable to the purpose.
- Damage caused by incorrect use or misuse of the product.
- Any modifications made to the product by anyone else other than the service personnel authorised by Espressions.
- The dismantling of or any other interference with the product.
- Theft or attempted theft of the product.
- Breakages or defects resulting from transport.
Before you return this product under the terms of this guarantee, please make sure:
- that you have followed the instructions for this product properly.
- that the power supply to the equipment is working and that you have plugged in the appliance.
• that the defect is not a result of a faulty fuse.
If you wish to make a claim under the terms of this guarantee, then please:
- Return the product by post or transport services to the dealer from whom the product was purchased or directly to Espressions.
- Ensure that the product is clean and carefully and suitably packed for transportation, preferably in its original packing.
- Enclose information in respect of your contact details (name, address telephone number) and where and when the product was purchased, together with a copy of the receipt.
- Describe the exact nature of the defect.
This guarantee does not cover any other claims whatsoever, including and without any exception, any liability for additional, indirect or resulting damage. It also does not cover any costs for modifications or repairs carried out by third parties without the express permission of Espressions. If any part of or the whole appliance is replaced, the guarantee period will not be extended. The original date of purchase shall still apply as the commencement of the guarantee period.
For more information you can contact your dealer or:
Espressions B.V. Eindhoven www.espressions.eu
Bedienungsanleitung
Inhaltsverzeichnis
2D Taste Auto Vacuum & Seal
natural_image
Line drawing of hands operating a mechanical device with rollers (no text or symbols)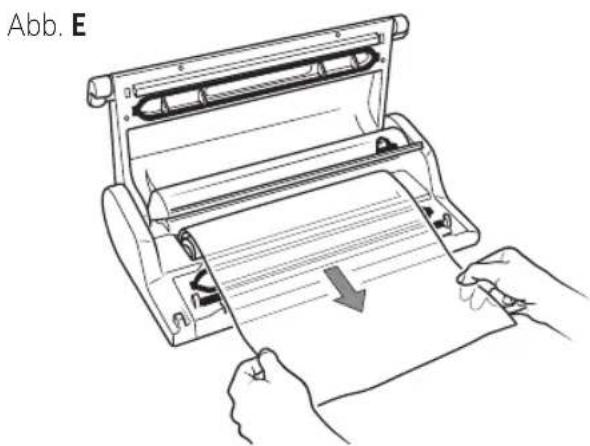
flowchart
graph TD
    A["OPEN"] --> B["VACUUM"]
    B --> C["CLOSED"]
    C --> A
Abb. Q1

natural_image
Line drawing of a medical or laboratory procedure showing a tube inserted into a container with a bulb and a hand holding a tool (no text or symbols)Abb. Q2
8.2 Verpackung in Espressions MAGIC VAC® Family Behältern
natural_image
Line drawing of two medical devices with handles, one open and one closed, labeled Abb. R1 (no text or symbols on the devices themselves)Abb. R2
natural_image
Line drawing of two electronic devices with cables and a connector (no text or symbols)Abb. T2

Abb. T3
natural_image
Line drawing of a printer or scanner with a hand inserting a slot into it (no text or symbols present)natural_image
Line drawing of a hand holding a plastic tray inside a wire basket (no text or symbols)Abb. U3

natural_image
Line drawing of a hand operating a rolled-up printer (no text or symbols present)natural_image
Technical line drawing of a rectangular mechanical component with mounting flanges and a central slot (no text or symbols)Abb. V2

natural_image
Line drawing of hands holding a mechanical component with a downward arrow indicating a change (no text or symbols present)Abb. V3
natural_image
Line drawing of a portable electric stove with a power cord and plug (no text or symbols)Abb. W2
natural_image
Line drawing of a hand holding a device with a button and arrow indicator (no text or symbols)Abb. W4
natural_image
Technical line drawing of a portable electronic device (no text or symbols)Schadensuche
Contact us or visit our website.
Espressions
Park Forum 1110
NL-5657 HK Eindhoven
Mail: info@espressions.eu
Website: www.espressions.eu
Manufactured by Flaem Nuova S.p.A. - Italy

espressions is a registered trademark
Due to minor changes in design or otherwise, the product may differ from the illustrations in this publication. © 2021 Espressions B.V.